News
How to retrofit a Highline Camera in VW / Skoda MQB cars in India

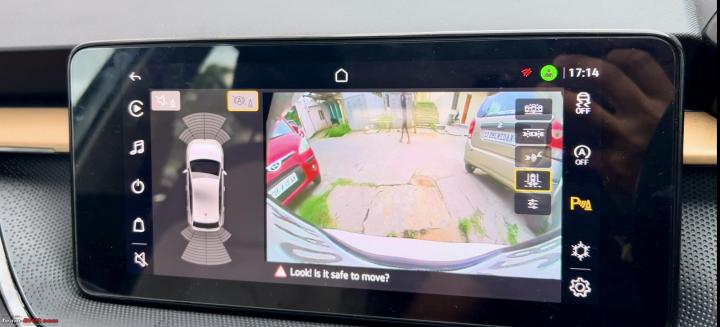

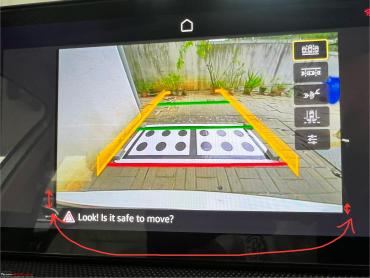

In addition to having a better image sensor and output, this camera offers multiple views and dynamic guidelines. It can be turned on on-demand and even its video output can be adjusted.
BHPian audioholic recently shared this with other enthusiasts:
The Highline Camera Retrofit:
I had started this experiment close to a year ago. But I had failed multiple times due to poor homework on my end. Finally, this was successful after a lot of tries and some wasted cameras. The MQB A0IN cars in India come with a basic rear-view camera. In technical terms, it's called RVC Low or KA1. This camera is powered via 12V and grounded via the reverse light, so it turns on when the reverse gear is engaged with the reverse light. The resolution of the screen is poor and the guidelines are static. So basically it's a dumb camera which just turns on when reverse gear is engaged and does its job. It's also offered in international variants as a cheaper option.
What is a highline camera?
The Highline camera (RVC High or KA2) is available in many cars here and abroad in VW, Skoda cars also Audi with some changes to the interface. This is an integrated control unit in addition to the camera itself. Hence in addition to having a better image sensor and output, this camera offers multiple views, dynamic guidelines, can be turned on on-demand and even its video output can be adjusted. The low light performance of the KA2 is much superior. Also as a bonus, this camera offers live guidance for parallel parking, which is spot on in guiding you to a perfect parallel park. I will explain this in detail later.
Comparison of the cameras:
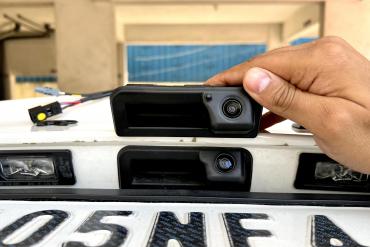
The cameras look identical and also fit in the same housing.

The real difference is in the back, in the camera hardware. The RVC Low on the right side has a thin body and extends outwards into the moulded cables. The RVC high has a larger body to include the extra functionality.

The video signal connector is the grey one which is common between the two. But the other connector is different.
- RVC Low: +12V(Fused) and GND(reverse) which is used to power the camera
- RVC High: +12V(Fused) and GND(Permanent) and in addition to that we have CAN Low and CAN High connections which go as a part of the Convenience CAN network(refer to my earlier explanation).

This upgrade is quite common abroad, either from a non-camera variant to RVC High or RVC low to high. Another motivation was the cheap cameras available abroad as well as from China. The following posts will explain the installation process in detail.
Procuring the right camera:
It took three different cameras to arrive at the right replacement camera.
Due to intensive part sharing between VW, Skoda, Audi cars, these cameras are a mad permutation and combination between different plastic housings, hardware and its software parameterisation. My first purchase from Aliexpress was an Audi camera which had the same shape as that of my car. I believed that the Audi camera could be easily recoded to match the Skoda and ended up purchasing it. It was only 30$ including shipping so I took the plunge
Little did I know that the crazy ride started from there. I tested the camera, its output would turn on but it was not so good in terms of clarity, the adaptive guidelines wouldn't work and the camera had problems shutting down and restarting. This was how the output looked like.
The camera would not accept any coding change and the static guidelines were not even matching the width of the car nor its orientation. After scratching my head about this issue, I arrived at the wrong conclusion - That the Chinese camera was faulty and due to its nature, would not accept coding and any adaptations. Then I ordered an original Audi part from a scrapped car via Ebay. This was again inexpensive and worth a try. Giving a blow to my assumption, this camera had the same behaviour of the Chinese camera with respect to the output as well as not taking in any coding changes.
That's when I got to know about a concept called Parameterization. While the camera hardware and software remain the same between VW, Audi and Skoda for a given part, what differs is a layer called Parameterization which is one level below coding and adaptations. This commands the actual behaviour of the component and its boundaries of customisation via coding. You can code the camera to adapt to a manual/AT car but not change the version from Audi to Skoda etc. This needs to be flashed via ODIS engineering or a tool called VCP which is similar to VCDS. I even procured the VCP dongle and tried flashing parameters to these two cameras, and I somehow never succeeded in it and then got busy with my personal life.
During my free time I intensively read about the right way to upgrade the camera and learnt there are the following requisites:
- A camera that's correctly parameterized to your car or at least manufacturer/body type/installation of park
- If a brand new camera is used, it needs calibration to be performed else won't work
- If a pre-existing camera is used, its calibration might not be matched against your car and it will result in a poor output
Procuring ODIS was another thing I did, considering the long-term benefits it has over VCDS even though the latter is far more user-friendly.
The final camera(s):
Along with the PDC system I ordered from China, the seller had stock of the exact camera I needed and I managed to get it at a rather similar price of 50$ which I decided would be the last bet, or I would live with an Optical parking system and the RVC Low. This attempt turned fruitful. Here is a link to one similar camera (there are plenty of listings and can't point out a single one).
The final installation:
The plastic trim covering the boot lid from inside needs to be removed by unscrewing two screws and the panel can be removed as its metal clips will unlock one by one.
The stock camera just needs to be yanked out of its place using trim removal wedges. More than one is needed to complete the job successfully.
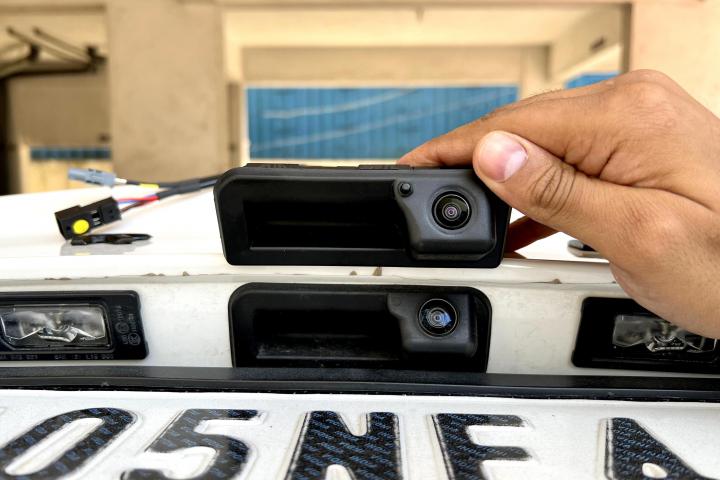
Stock camera and new camera side by side:


After removing the stock camera, three connectors needs to be disconnected - 1. The power connector of the stock camera. 2. Signal connector which is grey in colour. 3. Boot lid unlock switch

Tapping of convenience CAN bus from the infotainment pin whose process I have explained earlier.

The CAN bus wire needs to be routed along the A Pillar, running board, rear seat and then the boot. The camera only needs power apart from the CAN connections and no other signal. Sorry I do not have pictures of this since I work single handedly and was not sure if this would even work.
Apart from CAN, we need to power up the camera. Since the stock camera has its own fuse and wiring, we just need to route the +12V wire from the stock connector to the new connector like this:
1. Depin the power wire(red/green color) from the stock connector

2. The stock power wire will go to the place in the new camera connector (where the white wire has been depinned from).

After these connections are made and coding changes are done(explained later), this is the first result:

The new camera won't work without calibration, and some sellers push calibration values for random cars and send the camera, but it's highly recommended to recalibrate the camera. In the next post, I will explain the coding changes and calibration process in detail.
Continue reading audioholic's installation for BHPian comments, insights and more information.
Find Car News
Just News


_4.jpg)
.jpg)
About Us