News
DIY: Installing an auto-dimming IRVM in my Scorpio-N Z8
The stock IRVM uses a unique mount which is not compatible with any aftermarket mount.
BHPian soumobakshi recently shared this with other enthusiasts.
DIY Installation of Auto-Dimming IRVM in the Mahindra Scorpio N Z8 D AT 4Xplor
After the rendezvous with the Duster and then the All New Thar, it was time for Scorpio N. And now after about an Year and 20k Kms later, 2 things that bugged me was the GPS Signal Loitering issue when connected over Android Auto and someone like me, who spends a lot of time driving at night, the absence of an auto-dimming inside rearview mirror (IRVM)was a sore point on a well kitted car. I was able to fix the GPS issue while browsing through some Android Forums and then this was the next big thing which i had to fix
The Auto IRVM as a feature, automatically reduces glare from the headlights of vehicles behind you, it can significantly enhance night time driving comfort. Luckily, installing an auto-dimming IRVM turned out to be lengthy but a feasible DIY project with adequate support from Ankit from durvient.
A big shout out to him for the constant support which was required due to an unique type of mount used by Mahindra, making it not compatible with any standard mounts available in the after market.
And a clarification too, I am in no way involved commercially with Ankit or Durvient
Tools and Materials Needed
- Ensure it is compatible with your vehicle.
- Mounting Bracket/Adapter: Specific to the Scorpio N. This was the single impediment in a Standard swap job, otherwise.
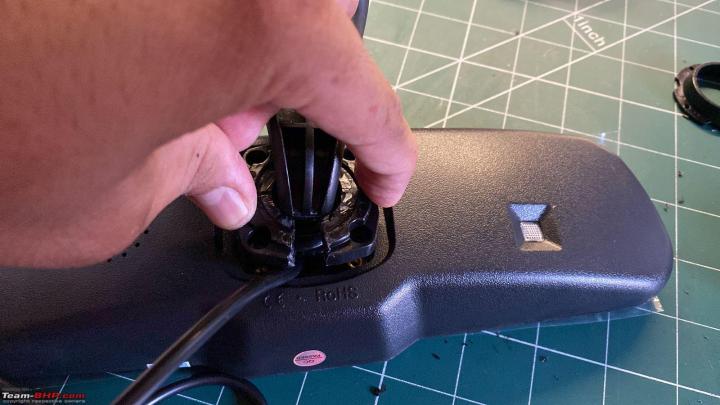
Images of the Std IRVM and the internal components..


- Wiring Harness: For connecting the mirror to power. Didn't have to do much here as Ankit had ensured extra cable length was already provided with the mirror.
- Trim Removal Tools: For removing interior panels.
- Fuse Tap Connectors: For connecting wires securely. Fuse Tester, Heat Shrink: For securing wire connections.
- Start with Clean Hands unless you want to soil the light color interiors
Step-by-Step Installation Guide:
- It was a Saturday post Breakfast project, so I moved my car within the basement parking lot to an empty parking bay which received adequate light and was well ventilated.
- Removed the Existing Mirror Using a trim removal tool and removed the cover to access the existing mirror. Gently detach the mirror from the windshield.
- Install the New Auto-Dimming Mirror by Attaching the custom mounting bracket which was the Original Scorpio N IRVM’s fabricated on the Auto IRVM by Ankit in a very skillful manner.I had to ensure that it was fixed to the Windshield on the base plate was securely fastened


- Wiring the Mirror by Routing the wiring harness from the mirror to the fuse box located under the steering in Scorpio N. The harness includes a power wire (red), a ground wire (black).Identifying Power Source using a Fuse Tester was easy and I quickly located a Fuse which is Powered on Ignition Only. Used a Fuse Tap and connected the Red Wire to it and heat Shrink the joint for a stable and secure power to the Auto Dimming IRVM. Attached the (Black)ground wire to a metal part of the car’s body for a solid ground connection.
- Secured all wiring to prevent them from hanging loosely. Reconnected the Fuse and time to test the mirror. Turned the ignition ON and Bingo!, the mirror powers on. Exposed the sensor to bright light to check if it dims and clears up when the light is removed.
- Reassembled Interior Panels Connections and time for a road test.
Post Installation Testing video
I am certain that many Scorpio N users would be contemplating to add an auto-dimming IRVM and I hope this guide may help them to install the mirror, enhancing nighttime driving comfort and safety. If at any point you feel uncertain, don’t hesitate to seek professional assistance to ensure everything is installed correctly and safely.
Enjoy the glare-free drive
Read BHPian comments for more insights and information.
Find Car News
Just News


_5.jpg)


About Us


Buy & Sell
USED CARS