News
Living with a 2008 LC Prado V6: Upgrades & restoration processes
I have clocked ~ 10K kms in the last 1.5 Years which includes a few road trips
BHPian raj_1787 recently shared this with other enthusiasts.
As promised, I am back with an update on my journey with the Silver Rhino so far. The last post covered my experience of finding, evaluating, transferring, and restoring the Rhino. After all of this was completed, I was finally able to enjoy the Rhino from ~ Feb 2023. In this post, I will try to walk you through my journey of living with the Rhino, various projects that I executed on the Rhino, and the learnings that came associated with all of this.
This is going to be another long one and hopefully with tons of learning!
Sunroof Servicing: I noticed minor rusting on the frame of the sunroof glass. Upon investigating further, I found that the frame is indeed rusting and is in initial stages. The sunroof of Prado 120 has a design limitation and is prone to honeycomb-style rusting. The areas most prone to rusting are where the rubber, frame and glass are all glued together. I checked with Madhuban Toyota and researched on web, and found that all 3 parts (glass, frame and rubber) are sold as 1 SKU (~ INR 60K) and child parts are not serviceable. The design is such that it is prone to rusting upon ageing. There are numerous stories posted by Prado 120 and GX 470 owners worldwide on this topic. I discussed with Jatin at Wagenwerkz and he picked up the job. The rusted portions were cleaned by sanding, and the holes in the frame were repaired with filler. This wasn’t easy as the rubber cannot be separated from the frame and the entire job had to be performed very carefully, such that the rubber seal is not damaged. After cleaning and repairing the affected areas were painted with anti rust black paint. Thought the finish was compromised because of the anti-rust paint used, but it gave a few more years of life to the sunroof. The channels were serviced, and drains were cleaned. Spend ~ 4K
Brake Rotor, Pads and Check-up Service (Mid-Year): During the initial assessment it was reported that the front brake pads were non-OEM and the brake rotors were also just 25mm which is the recommended thickness for replacement as per schedule. I planned this with Madhuban Toyota and ordered for the Front – Brake pads and Rotors. Along with the brake rotor and pads replacement, also got the spark plugs replaced, (fuel system) throttle body cleaning done as a part of the check-up service. The engine was a lot more silent and smooth post plug replacement and fuel system cleaning.
The front wheels developed a brake squeal in a couple of days after replacement and the rotors had developed minor scratches. The rotors were resurfaced by Madhuban Toyota and the issue did not reoccur since then. Spend ~ INR 50K
Rear Suspension Air Balloon: The rear left suspension balloon started losing air and I observed this for a few days before taking the car at Madhuban Toyota. While there wasn’t any issue while driving, I am sure this was putting extra pressure on the air compressor. I checked service history and the balloon on RHS was replaced by the previous owner in 2021. There was no history of balloon replacement prior to that in the lifecycle. As days progressed, the leakage started worsening. On 15th Aug 2023, I took a solo road trip to Nanded through Samrudhi Mahamarg, and upon reaching Nanded when I parked the car, within 30 minutes, the balloon lost air. The very next day, I asked Madhuban Toyota to order for the replacement balloon. It was replaced within a week as the part arrived quickly. No issues thus far. Spend ~ INR 30K
Wheel Hub Caps: When I acquired the car, one of the wheel cap was missing, which I ordered for ~INR 3.5K at Madhuban Toyota itself. The other wheel hub caps also had some broken clips and were bound to fall off some day. I lost two of them during the trip to Nanded. Replacement hub caps were available on Amazon US/Ubuy for ~ 30$. I placed order on Ubuy, however the landed cost including shipping and duty was ~ INR 8K for a set of 4. Still cheaper than INR 3.5K a pc from Toyota.
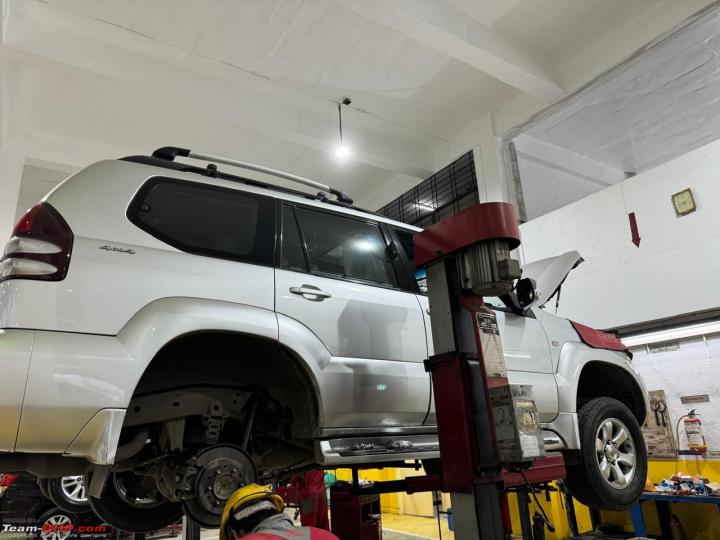
Suspension Overhaul and 160 K Service (Annual): This was the most interesting project and took quite a bit of research and time. The whole episode started when I had given the car at Madhuban for Rear LHS suspension balloon replacement. From the history I had while acquiring the car, there were some remarks of weak suspension components (mostly rear suspension components). Hence, I requested Madhuban folks to do a compressive suspension assessment and provide me with the report. While the assessment carried out was more on visual basis, as some of the parts like Struts, ball joints can be assessed properly only upon dismantling the suspension. The report indicated that the struts are weak, bushes are worn out and the steering rack reported a leakage. There was a history of front struts replacement in 2017, and front UCA and LCA bushing replacement.
I decided to go for a complete suspension overhaul, as it would mean a more confident and comfortable highways cruises. I started my research by making a list of all the parts needed for the overhaul. The approx. cost if I had to go for all OEM Toyota parts was upwards of ~ 7 lakhs. Just to give an idea – Steering rack assembly ~ 1.5 Lakhs, all 4 struts ~ 2 Lakhs, front LCA ~ 50 K each, front UCA ~ 35 K each and so on.
I decided to dig deeper and connected with a few wonderful individuals for guidance and support. I connected with Viraat_13 (an enthusiast and a teambhp member) on his insta page – Viraat’s Automotive Garage, who also runs a garage in Delhi. Viraat was super helpful in guiding and arranging some parts for me. He was also kind enough and offered to send over his team to Mumbai to carry out the overhaul. I also connected with Mr. Virender from Automarc (Okhla, Delhi) to also seek guidance on the projects. These folks have immense experience on LC’s and were able to share their experience and recommendations on using the most suitable OEM/OEM supplier parts. These discussions really inspired me and instilled confidence in me to proceed with this project.
During my research I also came across a lot of examples (mostly in Australia and US), where suspension had been upgraded with non-OEM specs parts, and these were mostly performance oriented for better off-roading capabilities. I concluded that sourcing these performance parts will be challenging, expensive and finding someone with experience to carry out this upgrade and maintaining it will be a big task. I did meet Mineel at Mkraft who does Ironman, but for Ironman I had to convert air balloons to spring-based suspension in the rear. I wasn’t ready to let go of the comfort the ballons add to the ride and was keen to stick to OEM specs.
The consensus was that suspension overhaul can be done using OEM supplier parts as most of these parts are available from brands who are suppliers to Toyota. The only challenge would be to source these parts and source them accurately. Struts – KYB (OEM Supplier), Bushings and strut mountings – RBI (OEM supplier), there was an option of CTR also, but the feedback on web was not so great on CTR. Ball joints, linkage rods – the clear winner was 555. The steering rack assembly parts like rack end and tie and were also available in 555 at a much lower cost, but then Steering rack assembly had to be repaired with a steering gasket kit sold by Toyota only. Furthermore, I pushed Madhuban Toyota folks to repair the rack with the OEM kit, so they agreed to do so only on the condition that I put in the rack end and tie ends from them.
After almost three months of research, discussions and part sourcing, I finally gave in the car to Madhuban Toyota (with non OEM parts as well that were sourced by me through various channels) to carry out the overhaul. Here is the final list of parts that went into the Rhino after months of research to ensure that the right parts are being sourced. Thanks to Viraat, Virender ji, boodmo.com, amayama.com, partsouq.com and toyota-general.epc-data.com and size.name/en/catalog who were of enormous help during this research.
The who exercise took ~ 5 days as the whole suspension had to be dismantled, parts were sent for bush and ball joint replacement at hydraulic press, Steering Rack was sent for repair, all this managed by Madhuban Toyota. Thankfully, all the parts that were ordered were an absolute fit with zero deviation from OEM fitment. Huge shout out to Madhuban Toyota team – Ravi Parmar (not at Madhuban now but helped a lot), Swapnil, Aakash, Jafer Bhai and Pahadi Bhai (the technician who worked only the Rhino for 5 straight days, he has an experience of working on LC’s in middle east and hence I was super confident on execution)
As a part of the annual service, I also got ATF fluid/ATF strainer, differential oil, Coolant replaced.
Total spend including, parts (plus duty on parts sourced form partsouq), labour, annual service ~ 2.9 L. Out of this spend, suspension overhaul was ~ 2.3 L and rest was spent on the annual service, change of fluids, filters etc.
I had a road trip planned a week after the work was completed, hence I decided to drive the car a bit around the city, sent the car again to Madhuban for suspension retorquing. Once the car was back, I was off for my planned road trip to Nanded and Tadoba via Samruddhi Mahamarg. Oh boy, what a drive it was, planted and steady, even on the poor surface of the concrete expressway, my family was quite comfortable.
I am sure many of you would be aware of this, but I still want to share this learning that I had during this whole project – handling courier and customs during import. By default, in such cases, courier companies like Fed-ex, DHL will calculate the duty @~70% of the invoice value submitted by the shipper. Now in the fine print, if you read carefully, if you are importing these parts for personal use, and you can prove that you are an individual who has made the payment for these goods through your own account/card the applicable duty is @~40%. It added 3-4 days of delay as DHL was not very efficient, but I was able to save almost 30% duty on INR 85K (parts shipped by Partsouq.com). DHL did try to pull a fast one by adding demurrage for the period of delay, but I knew how to bring them on track, and they refunded the demurrage.
Audio Upgrade: This was another long project, which involved a lot of research, tons of learnings. The most important learning that doing an audio setup for an SUV especially a 7 seater is not easy. I had few basic expectations from this set up – 1) it should have a good sound stage for the driver and the front passenger, 2) occasionally the car is driven with all seats occupied, hence the audio experience for last row passengers should not be compromised when played at low volume, 3) and lastly when required the set up should be able to deliver the needed punch to make some noise.
I met various installers during the process and one key learning is that if you are procuring the products from the installer, then he will be biased towards his own interests/commissions/sales targets/inventory. Further, I also learnt that car audio set up is a bespoke set up and it is very hard to audition the products beforehand, especially in Mumbai.
One more important thing I learnt is that when it comes to car audio, there is nothing like a minor upgrade, either you upgrade properly, or you don’t do it at all. Anything in between will leave you demanding for more.
In my previous post I had already shared my experience with Motosounds (Ravi), Mulund and hence I avoided him this time.
I met Ramie from Sound Factors pro to discuss the setup, one major challenge was his availability – the guys is eternally busy, does high-end car audio and high-end home audio setups as well and really know his stuff. I met him twice and he had a contradicting PoV both times I met him on the approach and the products to be used. Few reasons I did not proceed with him was:
- No Consistency in the proposed approach both times I met him
- If your budget is ~ 1L, this guy may not be able to give you a value-for-money set-up, you really need to have deep pockets to be able to get best of this guy
- The setups he proposed had DSP as a must, and hence it limited the number of channels, and by this meant I will not be able to give the experience to last-row passengers if I do not go with a high-end DSP with 10+ channels.
Next, I spoke to Motorouge Dipesh and Manish, the guys sounded reasonable and had good reviews on the web. After much deliberation, I decided to execute step 1 –> 4 channel morel MPD 4.100 – 100 RMS per channel, and JBL GTO Stadium 930 (6X9) in the boot in a box. An amplifier was used to power the GTO’s in the boot and Helix L 62C in front doors. Nakamichi speaker wires and Scoche wiring kit for the amp was used. The idea of installing GTO’s in the boot was to bring the fullness in the sound as I was avoiding a subwoofer and to give the experience to last-row passengers as well. During installation I checked the GTO’s and the manufacturing date was of 2017 and the pair that was pulled out for installation had a manufacturing defect which I noticed. This was quickly replaced as they claimed they had enough inventory. I was worried about installing a 7-year-old inventory, but I was reassured by Manish that if there is any issue they are there to support.
The installation experience itself was below average – the installer, a contract worker and not a permanent, was inexperienced and damaged the dashboard trims while opening the trims. The line and length of the dashboard trims was damaged and after putting things back the OEM fit and finish was lost. The guy was in a tearing hurry as he had to do another installation, that he had booked with someone else. He claimed that Toyota had an issue with the dashboard trims and the OEM fit and finish cannot be achieved once opened. Manish was helpless and expressed his helplessness about the installer attitude.
Coming to the upgrade experience, while the GTO’s in the boot were booming well, the overall balance was still disturbed and I could not get a good sound stage in the front. Even the clarity was missing.
With this experience, I quickly started working on the evaluation of stage 2. I discussed with Manish and he proposed that we should change the HU as the poor source (Blaupunkt costa messa 900) is the culprit. He proposed Pioneer 5290 and I was ok with the suggestion as based on multiple reviews on this forum, it was by far a good choice. Another issue to be addressed was weak front staging and Manish proposed to install a better set of components in the front. I was in no mood of a cocktail and hence stuck to JBL’s. The components from the same series were JBL GTO Stadium 600C, however, they were not in stock and the new series was available – JBL Stadium 62CF. The advantage with this was the possibility of adding a plug-and-play mid-range for a much better front staging if it was needed in future.
I researched a bit and also took a quote from Winkel.com (another distributor in Mumbai). I got a better quote from Winkel and I told Manish upfront about it, Manish bettered his quote immediately and I went ahead with stage 2. I was clear that I needed a better installation experience, and Manish was in agreement. Manish proposed that I get the installation done from Fixwell. I was hesitant, hence I took feedback on Fixwell from Ramie. I was all green and an appointment with Surinder at Fixwell was set up. Manish sent the products over to Fixwell in Marol directly and the installation was completed in about half a day seamlessly. The line and length of the dashboard was also restored. Surinder and his boys did an amazingly neat job with this installation.
This looked like a major upgrade from what I had earlier, not to mention the Apple carplay that came in the pioneer unit as an added benefit. It took me a few days to get used to the new HU and fine-tuning. Front staging was still lacking, probably the rear JBL GTO Stadium 930 was overpowering the rest of the components of the set-up.
While I was quite happy with the install, there was an itch to move to stage 3, and then started the search for procuring the mid-range (JBL Stadium 32S was the only compatible plug-and-play upgrade, and I was ok with this. The question was the installation position as there were two options. Upon some digging I found that some GX470 came with a factory front 3way set up and it had the midrange in the door (sample image attached). I wasn’t too impressed with the OEM position of the tweeter or the proposed midrange, as the OEM positions would give me a compromised front sound stage. I decided to proceed with installation on A-pillar for midrange and tweeters after a lot of deliberations. Procured the pods for midrange and JBL Stadium 32s from Manish (Motorogue) and proceeded with installation at Fixwell. This time Pravin picked up the installation, and he spent a good 3-4 hours the result was an extremely satisfying installation. The front soundstage improved drastically.
The next few days, while I was enjoying the setup, a strange low-frequency rattle developed in one of the JBL GTO Stadium 930’s in the boot and was quite prominent at lower volumes. I contacted Manish and he asked me to drop the speaker at his shop at Lamington Road. Dipesh inspected the speaker and confirmed the rattle at lower frequencies. While Manish was trying to push back by saying that this is nominal and can be ignored. I was in no mood to compromise after spending so much of effort and money. Manish agreed to have the speaker sent at JBL service center. I wasn’t aware that I was in for an ordeal with this Moto`rogue’ duo.
After about 15 days of follow up, Manish told me that JBL is saying that the speaker has gone bad and cant be repaired and they will have to replace it. However they do not have a replacement set available right now. Every time I followed up a new excuse was cooked and handed over to me very sweetly by Manish. After a few weeks I was quite sure that since this is a discontinued model there is no point in waiting for the replacement. I asked Manish for the ticket number of the case logged with the service center so that I could directly deal with the service center and I was told that there is no ticket as they deal with the distributor and distributor deals with the service centre. I gave up and gave an offer to Manish to give me JBL Stadium 62CF in replacement of the GTO Stadium 930’s. He tested my patience for another two weeks. Finally agreed to give me the JBL Stadium 62CF’s at Rs 18K while the earlier pair was sold to me at Rs 16.5K. I told him that this is not a fair practice, but I had lost my patience by this time and paid him the difference to get the JBL Stadium 62CF’s delivered.
This was the start of stage 4 and probably the final one. I decided to put a sub in the boot and put the Helix L 62C in the boot and use JBL stadium 62CF in the rear doors for a better sound consistency in the front and middle row. Now I had to power 7 channels – 2 in front door, 2 in rear door, 2 in boot and 1 for sub so I needed 1 more amp that could run two components and 1 sub in bridge mode.
I evaluated a few amplifiers and zeroed on the Pioneer 8704 for the following reasons:
- It offered enough power
- Has a subwoofer bass control knob
- And was compact in size for an underseat installation.
Took quotes from Manish, Winker and Fixwell for the amplifier. Fixwell and Winkel offered comparable prices, so I asked Surinder at Fixwell to order for the amp. The amp arrived and installation was decided to be carried out the following Sunday. Surinder asked Pravin to dedicatedly work on Prado and the install was completed by around evening.
The final set-up was an absolute bliss and I drove away a happy man:
Here is the summary of all stages of the installation.
- Stage 0: Blaupunkt Costa Messa 900 HU, Helix L 62C in front doors, stock speakers in rear doors
- Stage 1: Morel MPD 4.100 powering JBL GTO Stadium 930 in the boot and Helix L 62C in front door. HU and stock speakers in rear door remain unchanged Done at Motorogue, cost ~ 40K
- Stage 2: Replaced Blaupunkt HU replaced with Pioneer 5290 and Helix L 62C components in front door replaced with JBL Stadium 62CF. (Helix L 62C goes in store for now) Done at Fixwell, Cost ~ 37K
- Stage 3: Added JBL Stadium 32S midrange added on the front pillars with metal pods. Done at Fixwell, Cost ~ 18K
- Stage 4 and Final: Added Pioneer 8704 amp, Kenwood KFC-W3009 Sub in boot and replaced rear door stock speakers with JBL Stadium 62CF. Removed JBL GTO Stadium 930 (gone bad) in the boot with Helix L 62C Done at Fixwell, Cost ~ 34K
- End State set up: Morel MPD 4.100 powering the front 3-way components (JBL Stadium 62CF + JBL Stadium 32S) and JBL Stadium 62CF on the rear doors. Pioneer 8704 powering Kenwood KFC-W3009 (had this sub with me in my Nissan Sunny for last 12 years, but wasn’t functional any more as the amplifier in sunny had stopped working, hence decided to reuse in Prado) sub in bridge mode and Helix L 62C in the boot.
Amp wiring – Scoche
Speaker Wiring – Motorouge used Nakamichi, Fixwell used Blaupunkt. Damping used (partial damping) – Vibrofilter, Silicon speaker baffles were also used for the door speaker along with egg crate foam behind the baffles
Roof LED bar install and Roof Carrier mounts replacement:
I always wanted a roof-mounted LED bar, and decided to go for it as I already had a 32 inch Lightbar which was procured from Aliexpress in 2017 and it is bright as hell.
I ordered a KC wiring hider for taking the wire from engine bay till the roof alongside the A pillar. I also ordered the mounting brackets to mount the bar on the roof rail. These were ordered on Amazon US and they were brought to India soon by someone travelling back.
The mounts looked great and I was also tempted to get these mounts for my roof rack as well, as the existing ones were cheap and had started rusting. I got these fabricated out of stainless steel by giving one of the mounts as a sample to a fabricator. He made an exact replica of the mounts and were very similar in weight, strength and thickness of the sheet.
I painted them Matt black over a weekend and subsequently mounted the bar and replaced all the mounts of the roof rack. I am now at peace that I don’t have to bother about rusted bolts as the mounting hardware is of a very high quality.
Had planned to get the wiring done by Jatin (Wagenwerkz)
Cost ~ 10k (not considering the cost of the LED bar as I had it spare)
Mounts ordered on Amazon
KC wire hider
Mounts fabricated for roof rack (Random Fabricator in Kurla)
wireless remote for Led bar
Interior Cleaning and Glass Polishing:
A thorough interior cleaning was long pending, especially with multiple projects and workshop visits, the interior was taking a toll. I decided to send the Rhino to Maxshine, Thane. Discussed the requirement with Mangesh and booked the appointment. Along with interior cleaning, I also asked them to polish all the 4 door glasses and the rear quarter glasses as it had minor swirl marks which were giving an ageing look to the car. While the interior cleaning was done (not the usual Maxshine stuff, it was a lower-than-average outcome), the window panes were not polished properly, and infact were damaged further. It could be due to a bad buffer pad, incorrect compound or poor workmanship, but the glasses became cloudy. I was told by Pritish that the cloudiness would settle in a few days. I waited for a few days, but it was the same and I decided to speak with Mangesh. Mangesh accepted that there could be an issue, but he claimed that glass polish is not successful. I disagreed with him as I had an experience with 3M and as per my experience glass polishing does remove minor swirls and scratches, it may not remove deep scratches but it will never make the glass cloudy unless done incorrectly.
I told Mangesh, that I will take the car to 3M and will get the glass polished again, Mangesh refunded the money, but was still not willing to accept that he could have done a substandard job.
I booked an appointment with 3M Mulund, and explained the issue to them. They tested on one glass. While the results were not 100%, but still the glass was better than before. The job was performed by 3M Mulund, and the glasses were looking much better than before. Since the weather had already become hot in Mumbai, it was decided that we will perform one more round of polishing in monsoon, as cooler weather is favourable for good results in glass polishing.
Cost – 2.5K paid at Maxshine (excluding the refund of glass polish)
4.5k paid at 3M Mulund
Battery replacement: The battery, though just about 3 years old gave up when the car was left unattended for about two weeks. Upon inspection it was found that the battery was also throwing out the acid. I decided to get the battery replaced immediately, as a precaution the battery tray was sanded properly and anti rust paint was applied on the tray as the acid from battery had damaged the pain on the tray, and the tray could have easily corroded in a few months.
Done at Wagenwerkz by Jatin.
Summary:
I have clocked ~ 10K kms in the last 1.5 Years which includes a few road trips - Mahabaleshwar (2 trips), Nasik (1 trip), Tadoba (1 trip) and Nanded (2 trips).
The car has grown on me in the last 1.5 years and I understand the machine much better. I can't say more, but Rhino is an absolute pleasure to drive.
To date, my TCO on my Rhino is estimated to be ~ 21L (everything included). While there is a part of me which says that is it worth to keep investing in such an old car, when I drive the car, I get my answers immediately.
I do keep looking out for tips to keep the Rhino young and in pristine condition and next on the line for preventive/proactive maintenance are the following:
- Inspection of Universal Joints
- Fuel Tank cleaning, replace filter in fuel tank
- Replacement of hoses as per maintenance schedule


Check out BHPian comments for more insights and information.
Find Car News
Just News


_5.jpg)


About Us

Buy & Sell
USED CARS