News
Installed a 3D printed spark plug tray on my Alfa Romeo Spider

I also picked up some new front shocks for the Spider from my friendly Alfa parts supplier Goos.
BHPian Jeroen recently shared this with other enthusiasts.
Well, I knew it would happen at some point, but I have done it!
The first 3D printed part fitted to one of my classic cars. In this case a spark plug tray/top on the Alfa Spider.
On the Spider the spark plug leads are secured on top of the cylinder head/valve cover. Somehow this cover got lost over the last 18 months of doing multiple jobs on the engine.

You can't source it new anymore and also second hand impossible to get hold of.
By chance I got a suggestion from somebody on AlfaBB (https://www.alfabb.com/threads/calib...5#post-8910435) He noticed that some photographs I shared it was missing and directed me to another AlfaBB member who had made 3D CAD design.


So I downloaded these files. The tray was still attached to the valve cover. So I send the CAD file of the top to a 3D print shop. The next day and Euro 13 later I received two 3D printed tops! I ordered only one, but they made me two for some reason. Euro 13 to put is some perspective is the price of two coffees at Starbucks here!

Fits perfectly!!
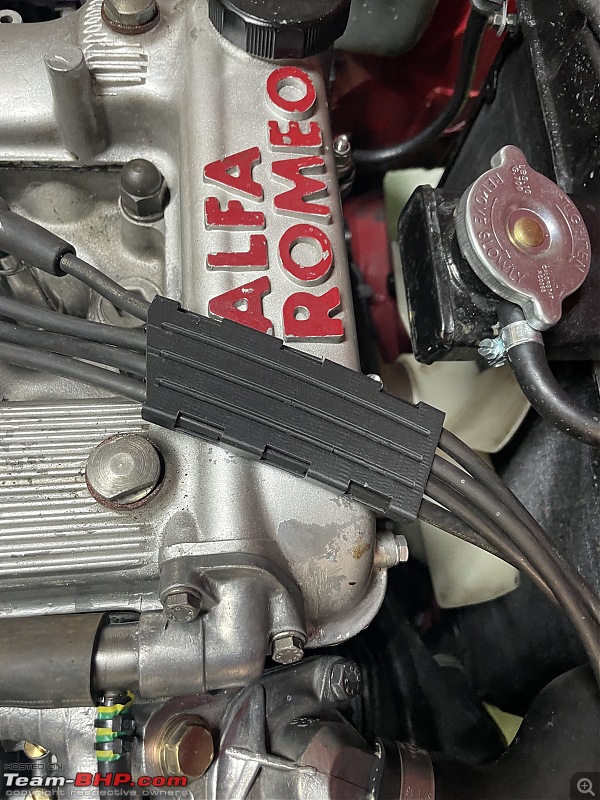
I am very pleased with it. I have owned a 3D printer myself many years ago. It was not a huge success at the time. It was easy enough to get the shapes and dimensions correctly. But in those days the final product would be quite brittle and would quickly snap.
This part feels a little flexible, so I don't think it will break easily. The one thing I might/should have checked perhaps was the heat resistance of the material used. I just did not think of it. But it gets 90oC easily on top of that valve cover. So we will see how this lasts!
I also picked up some new front shocks for the Spider from my friendly Alfa parts supplier Goos. (Actually, I picked them up by boat!! different story different thread)
You can read earlier on in this thread on how I replaced the rear ones and that made a huge difference. I also adjusted the front ones at the time. (They were Koni Adjustable shocks).
Marc suggested I should replace the front ones with the same Bilstein Gas shocks.
Replacing front shocks on a Spider is one of the easiest jobs you can do!

Of course, you need a jack, and axle stand and the respective wheels need to come off.

Original Koni as fitted for the last 20 years and some 120000km!

Take off the nuts at the top and the bottom and pull them out. That's all.
As is customary comparing the old and the new one. I paid special attention to the top mount, based on our earlier (unfortunate) experiences with replacing the shocks on Peter's Lancia. These were identical, new rubber mounts and nuts were supplied with the new shock.

One shock fitted!
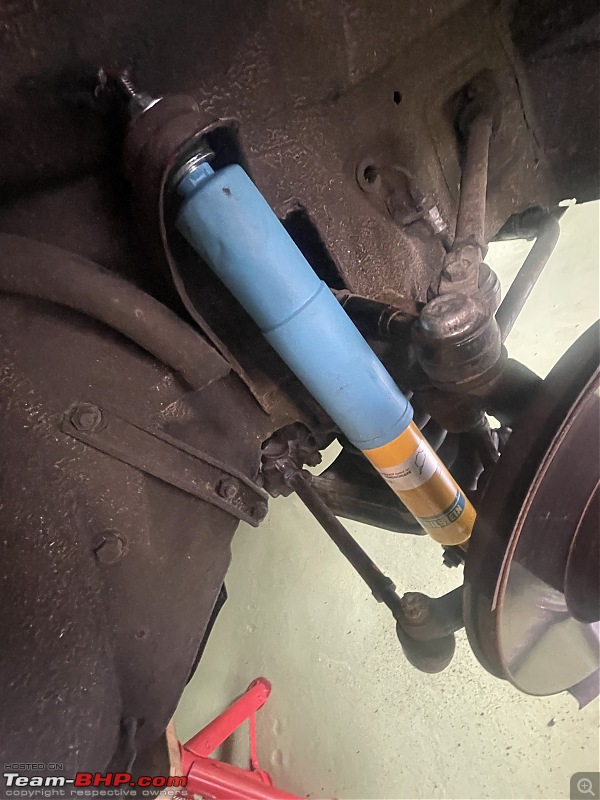
Replace on the other side and make sure to torque all wheel lug nuts correctly!

I have done a test drive with them. Again, makes a difference in the feel and handling. Also, the ride height is slightly better. These shocks are (gas) preloaded. So they actually do push the car up a bit compared to non-gas shocks. On a very low-slung car, fitted a sump guard of 1 or 2 centimetres extra clearance makes a huge difference when encountering speed bumps and so on.
I am very pleased with how the Spider feels and drives. Still need to check the oil consumption. I have done about 700 km. Fuel consumption with the carbs compared to the injection is up by about 20%. But I was expecting that.
In just over a week Peter and I will be taking our Spiders to the South of Germany for our annual Spider trip. The first stop is Technik Museum in Sinnsheim.
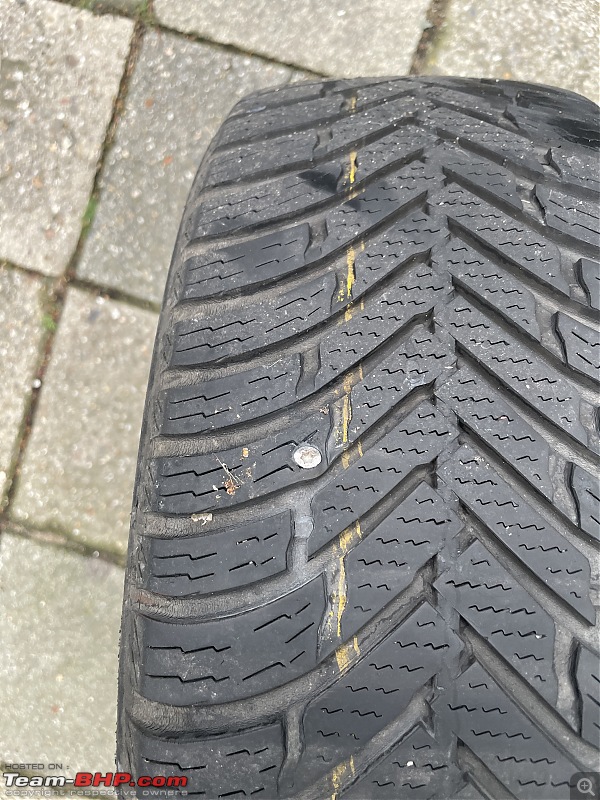
Mrs. D's little Fiesta suffered a flat! I wanted to move it around our yard and as soon as I started it, I got a TPMS alarm. I checked and I could see the right rear tire being a little low on air.
Mrs D was supposed to go over to our daughter and look after our two granddaughters for the day. So I quickly jacked up the Fiesta, shoved an axle stand underneath, and took the wheel off.

Look at this, no mistake, that will leak!!
Threw the wheel in the back of my Jeep and drove over to our local tyre fitter (Euromaster Gorinchem). I know these guys, I have bought multiple tyres from them over the years. I rocked up at exactly 08.00 AM. By 08.15 I was on my way back home with a fixed tire.
By 08.30 the Fiesta was back on the road!
Of course, always use a torque wrench for the wheel nuts. (Funnily enough, the Fiesta has the highest lug nut torque in our fleet! 130Nm

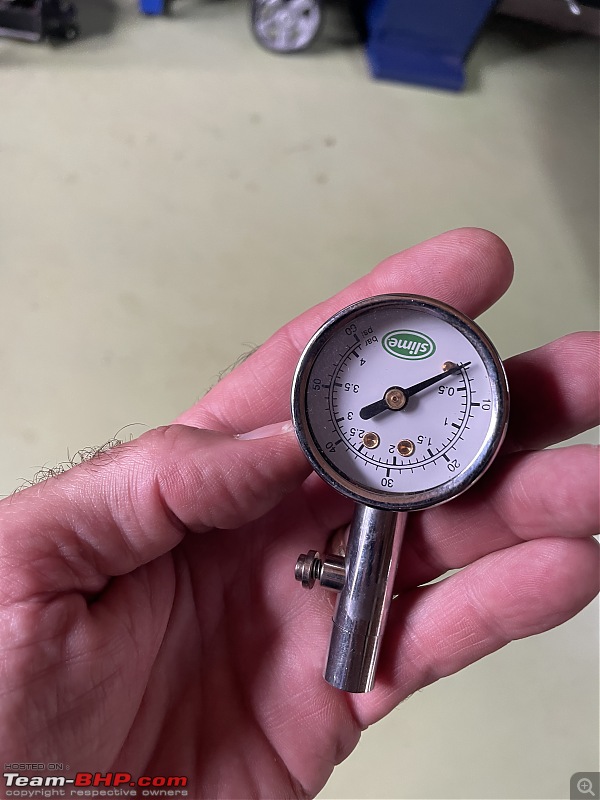
Checked all four tyres for correct pressure

Whenever I use my compressor with its fancy Haxet tyre inflator manometer I always take one reading with this small handheld manometer. These tyre inflators are notorious for wandering off their original calibration over time. So I check them regularly against a different instrument. As long as they indicate similar values we are good to go!
Check out BHPian comments for more insights and information.
Find Car News
Just News


.jpg)


About Us
Buy & Sell
USED CARS