News
DIY overhaul of an abused Yamaha R15 v2: rebuilding a Japanese engine
This was when I got a crazy idea. Since the bike was scrap anyway, I suggested that we give it one last shot and open it up ourselves and see what the damage was.
BHPian that_sedate_guy recently shared this with other enthusiasts.
Guys & gals, this is a crazy, massive undertaking I’ve started with zero prior hands-on experience. I’ll take you through a complete rebuild of a trashed 2016 model R15 V2 motorcycle. The writeup will be long, really long and will be done in multiple parts at the least. I hope you all enjoy going through this as much as I'm enjoying doing it and writing about it!
A little backstory: I used to work in Titan Precision Engineering, Hosur where I was a team lead of an assembly division. In my team was a boy who went from awkward subordinate to good colleague to a good friend. Let’s call him Mr. P. Now, Mr. P is a passionate individual but just a tiny bit naïve about the ways of the world. I used to teach him a lot about both machines and general topics until I left. He also left for a different job soon after but always stayed in touch.
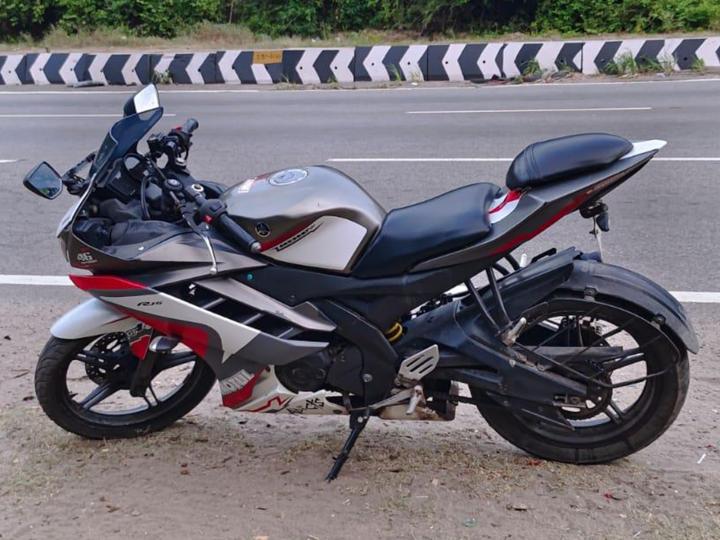
One fine day, I got a call from him. “Sir!” he exclaimed. “I’ve bought myself a motorcycle, sir!” he gushed out elated and sent me two images.


I was happy for him for the entirety of two seconds before my critical mind kicked in.
Me: Oh, wow. Fancy bike indeed. How much did you get it for? How many kms has it done and what model?
He: It’s a 2016 model, has run 71500 kms and I got it for 30K.
Me: Wait what? Did you say 71500 or was it 7150?
He: 71500, sir.
Me: Um, did you check everything? Is the engine sounding good? Are the tyres well to do? Is the battery good?
He: The bike looked good and I bought it. Have I done something dumb?
Me: Uh, it’s okay. Tell me what known issues are there.
He: The engine makes weird noises. I don’t really know much else. And oh, forks are leaking, hehe.
Me: Oh goodness me. Alright take it to a good mechanic. 8 years and 70K+ kms means you’re due for a lot of replacements. Engine oil, coolant, chain and sprocket set, front forks, tyres front and rear, Clutch inspection and such. And we also need to look at the noise from the Engine.
He: What on earth and how do you know all this? Alright, never mind. So the thing is, I don’t have a good mechanic here where I live. I’ll bring it to you and let’s see.
And since the bike had been staying idle for a few days, he had to actually transport it because the bike wouldn’t start no matter what. He brought it to my house and first things first, I checked the battery and sure enough it was more dead than the hair on my bald head. I jumped it with my Bullet’s battery and the thing started up all nice and lovely until the dreaded gearbox grinding sounds came. I moved it around for a bit and sure enough, the clutch and crankcase had serious issues.
We called a known mechanic and the words he said scalded poor Mr. P to no extent.
“Sir, this bike is a waste of time. Please scrap it and buy something else,” he said and walked off. We didn’t lose hope yet and called up the authorized centre. If anything, those guys would always replace parts happily and slap a hefty bill. The guy from the centre looked at it, heard the noises and said, “Sir working on this is a waste. I’d suggest you throw this away and buy some other bike.”
Mr. P was nearly on the verge of tears. One can understand the pain a boy from a not so well-off family would feel, buying his dream bike and hearing it is not worth repairing even!
This was when I got a crazy idea. Since the bike was scrap anyway, I suggested that we give it one last shot and open it up ourselves and see what the damage was. At the very least, we could use this as a learning opportunity. Our very first engine build experience on a Japanese liquid-cooled engine; people who know me always call me crazy for the right reasons indeed.
The engine was running fine which meant it hadn’t seized up, yet. Mr. P agreed and we set to work. I went straight to the manual library site and downloaded the workshop service manual and started off with the engine mounting bolts after taking off the fuel tank, the coolant hoses and the throttle body.

Six hours later, all the fairings, the exhaust system, the coolant system and the engine were off the bike and the first slap we got was from the oil drain plug. The thing just folded over like it was made of dough. The hexagonal profile became a perfect circle in the first try and now there was no way to drain the oil without making a huge mess. Well, it wouldn’t be a trashed motorcycle if everything worked, so we decided to soldier on with the crank covers instead.
The crankcase covers were removed and the oil was drained out when we saw something no motorbike owner or mechanic wants to see; the forbidden milkshake. The damned coolant had mixed with the oil and the entire engine was full of slimy brown-white sludge! The oil was burnt as well to top off our misery. This meant each and every screw, nut and washer had to be taken apart and cleaned before being put back in and then the whole engine had to be flushed because otherwise, the engine would just be a perpetual oil spoiler.


We called it a day and went to sleep wondering what else was in store for us.
The next day, we set about opening the engine itself. First things first, the clutch came off. The plates were a bit worn off so we decided to replace the entire set. The outer housing and the dog housing were good to go however so it was just the plate sets that needed replacement. Sat down and cleaned all the muck out of the parts.


Moving on to the crankcase, we found out that the engine had previously been opened by someone incompetent because some of the crankcase screws were missing! I opened up the cylinder head and found the camshaft timing pulley in the wrong alignment! No wonder the engine sounded like cars Jeremy Clarkson typically bought during top gear specials.
“Gah!” I exclaimed and pulled apart the cylinder head. The bore was in perfect condition which gave more relief to both of us than we would like to admit. The piston almost looked as if it had been dropped in a bucket of tar though. Again, I brushed off the carbon deposits on the piston with a toothbrush and some diesel before wiping it clean with soft cloth and packing it up neatly as I did not want the piston grooves to get dented or scored while lying around. Mr. P went home after this and I sat down to work more on getting everything apart.


Then came the coolant pump off the cylinder head. This is when things went from bad to worse. I knew something was wrong somewhere in the circulation system leading to the coolant-oil mix. Opening the pump gave all the answers.

Removing the seal revealed a lot of residual coolant where there was supposed to be none. I took apart the two sides of the pump and inspected the shaft and bearings and sure enough, the coolant bearing was full of slimy gunk. On the other side of the bearing was something which was meant to be a seal but was now more of a kitchen strainer due to all the holes and tears it had. It was royally gone!


There was no point in wasting time with the pump. Further, the housing looked lightly damaged from tools being used forcefully on it previously so I decided to replace the entire pump and move on.
Next in line was the cylinder head in itself. The same gunk and burnt oil problem was here as well. I removed the rocker arms and subsequently, the camshaft. Save for some rough machining edges and burr on the surface, the camshaft was in really good condition. It was probably replaced, I couldn’t know.
I’ve had experience working in a machining and machine part assembly factory in my first company where we often assembled precision components like motion guide rails, bearings etc. That experience taught me to always check the bearings twice before deeming them good. I did not have expensive measuring gauges of any sort with me so I did the next best thing I could. I rotated the camshaft bearing and listened to and felt the bearing races for any signs of debris grinding or brinelling effects. In a nutshell, brinelling is what happens when the balls of a ball bearing dig into the outer or inner races of the bearings leading to noise, vibration and eventually, bearing failure.
Sure enough, the camshaft bearing was not in good shape so decided to have that replaced.

With the camshaft out, I had to take out the valves held in place by strong springs. What I needed was a valve compressor tool and what I had was a 10-inch vise which I made myself; more on that later. With the right attachment, it could work without shooting the springs off like bullets. I took a stainless steel pipe and made a valve compression end tool, used it with the vise and got the valves off. The valve seals were in good condition but there was no point in keeping them because the valves were completely destroyed.


I was fairly sure that this was NOT supposed to be in the cylinder head along with the rocker arms!

This meant I was in for a complete valve replacement as well. Sigh! Called it a day and stowed away everything in my storage box to have a look at it after I return from a hometown visit.
To be continued. Thanks for sitting through this torture until now!
Check out BHPian comments for more insights and information.
Find Car News
Just News


About Us


Buy & Sell
USED CARS