News
DIY Fog Lamp Installation for Himalayan 450: Aim to improve visibility
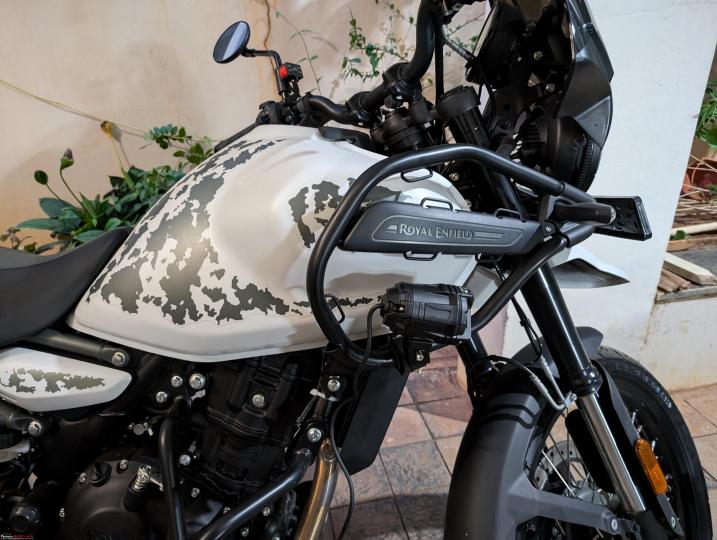
The light connectors are plug and play and can be easily unscrewed. Remove a couple of nuts and install back when needed. Of course will need some alignment each time.
BHPian vj_v3 recently shared this with other enthusiasts.
Given the pathetic throw of the stock headlamp on the Him 450, I decided to get a pair of cheap Fog lamps for the bike so that I can improve the lighting and ride safer.
I actually hate these aux lights and white led bulb installations that the whole of India is misusing and blinding oncoming traffic but it is clear that the Himalayan needs some more eyes or I might get killed.
Requirements
- low cost - so that I don't have to be worried about expensive lights getting stolen when i leave the bike in random parking.
- Decent performance while hopefully not blinding oncoming traffic. Separate low and high beam preferred.
- Plug and play, so that I can install it in 5 mins when I am going on a long ride.
- 0 tampering of Stock wiring.
Did some basic research and found HJF LIU Mercedes/Y projector lamps suits my requirements above. It has a model that comes with full wiring harness included in the box and costs under Rs. 4000 including the wiring harness.
These lights meet all my requirements above but most importantly ticks my requirement 2 above because it is a projector light and like most projectors has decent cutoff at the top of the light beam, so I can angle it such that it only lights up the road and does not blind the oncoming traffic.
Note: This is just a basic model from HJG and there are a bunch of other models (123, 124 etc etc) with more impressive lighting and better features. I must admit that I just looked at a few models online and decided this works for me.
I did not like CREE models because while they have a large beam spread and light up the whole road, they can easily blind oncoming traffic.
For the installation, I removed the tank of the Him450 and did the whole installation myself since i know what i was doing and did not want to lay my trust on any amateur installer who would do it in a hurry. In fact, I did it slowly across a couple of days while the bike is sitting idle in my parking. The tank is just held by 3 hex bolts under the seat. You need to remove 2 drain pipes, 1 fuel tube and 1 fuel pump connector on the left and 1 fuel level sensor connection on the right and slide the tank backwards away from the handle. Removing the connections can be tricky the first time but an additional pair of hands will be useful.
For the ignition signal, I know that a lot of installers just poke the wire into a random fuse or connector they find lying. The Himalayan has an open connector under the seat that can be used but also has a spare accessory connector under the tank to plug and play their own stock fog lamps when they launch it, I guess. (Discussed here (Royal Enfield Himalayan 450 Review)).
I went to a random accessory shop and requested the guy there for help and found a compatible male connector that fits into the stock accessory connector.
I forgot to click proper pictures (with the idea of posting) during or after installation but these are enough to get a good idea I guess. Also, happy to answer any questions if something is not clear.
The light connectors are plug and play and can be easily unscrewed. Remove a couple of nuts and install back when needed. Of course will need some alignment each time.
Just need to figure out a nice way to waterproof the hanging connector from the harness when not in use. Using regular insulation tape for now.


Check out BHPian comments for more insights and information.
Find Car News
Just News

.jpg)


.jpeg)

About Us

Buy & Sell
USED CARS