News
Installing & hardwiring a dual-channel dashcam on my Mahindra XUV700


While some people recommend just taking the wire across the A-pillar where the plastic pillar housing meets the head-liner and then continuing down into the fuse box, I think that's a really dumb thing to do if your car has side airbags.
BHPian OrthodocX recently shared this with other enthusiasts:
DO-IT-YOURSELF:
Dual-channel dashcam installation on the XUV700 hardwired with 24-hour parking surveillance and concealed wiring.
Hi everyone. Amit here. I have recently assumed ownership of an XUV 700 AX7L P AT.
One of the first things I wanted to do was to install a good dashcam in it. I'm not used to such a big car, and wanted documentary evidence if I ever got into trouble. The AX7L comes with a built-in 360-degree camera which can record video onto an optional SD card. But it is limited to 32GB, difficult to access and the videos are distorted due to the extremely wide angle optics. While I have it enabled on my car, this is only a plan-B-type solution. My first choice was still a high-quality, dedicated dashcam.
Before delivery, I approached the dealership to install a dashcam along with the other accessories I had selected. I was bluntly told that since Mahindra did not sell dashcams, they could not officially install it for me. I could either do it on my own or outsource it to a third-party accessory shop.
I caught myself thinking – “How hard can it be? Watch a few videos, talk to a few people, learn some new skills, and just do it yourself!". "I've been tinkering with stuff since I was a child." "Isn't it wonderful to have some trepidation, uncertainty and excitement in life?" "What was the point of being a member of the planet's most intelligent species if I was not going to use my brain and opposable thumbs?" These, and many such delusionary thoughts ran through my mind at odd hours of the night, as I summoned the courage to start poking around the innards of my brand new ride.
At some point bravado won over reason, optimism triumphed over caution, and I made the commitment to do it myself.
Enough with the prologue, let’s get down to the nitty gritty.
1. The Mission Statement:
- COMPREHENSIVE. Both front and back video recording.
- CLEAR. Sharp day-time and noise-free night-time footage, with the ability to read number plates and other fine details.
- CLEAN. No visible wires. This was non-negotiable. I hate clutter and dangling wires and will climb a mountain to solve this problem if I have to.
- SMART. The dashcam should have 24-hour parking surveillance function. I wanted the option to record even when the car was off, in a service centre or with a valet, etc.
- SAFE. No messing with existing electronics, cutting wires, or stuff that would void warranty, and compromise safety in any way.
2. The Decision-Making Process:
a. Based on my research, I concluded that some of the best dashcams used a Sony IMX675 (Starvis 2) sensor. After a careful review of dashcams using this sensor, I chose the 70Mai A510. I had also contemplated the A810, but decided it was unnecessarily expensive and an overkill to record 4K videos for dashcam footage. I also wanted to avoid the added thermal and storage burden that came with 4K. People who had first-hand experience with the A510 spoke very highly of it, and the price was reasonable as well.

b. To eliminate glare and reflections from the dashboard, I would also need a CPL filter to apply over the front camera lens. It is irritating to have these constant reflections in the video like perpetual watermarks! A compatible filter was available on Amazon and was promptly ordered.

c. Since I wanted the option of using 24-hour parking surveillance and time-lapse recording, the dashcam needed to have access to the car battery even with the car turned off. Wiring it directly to the battery was out of the question, because it would drain the battery dead in a few days. I learned that for parking surveillance, we need a separate accessory called the hardwiring kit. It is made by 70mai but sold separately. One end inserts into the camera, and the other end has three wires, yellow (ACC), Red (VCC) and Black (GND). In the middle is a small box containing the tech that controls the parking surveillance mode and prevents deep discharge of the car's battery. There are two versions of this – a micro-USB and a Type-C model. Choose the correct one to avoid having to deal with dongles and adapters later. The A510 uses a Type-C USB connector.

d. Have I mentioned that I hate dangling or visible wires? Well, I HATE them with a vengeance. So, the wires would have to be concealed in the pillars and the headliner, as close to 100% as possible. From dashcam installation videos, I noticed that most people successfully routed the rear camera cable upto the boot and then just gave up trying to conceal it any further, letting the wire go across the boot hinge and onto the rear windshield. I cannot live with that. Did I mention that I hate exposed wires? I guess I did, but I just want to be crystal clear about how vehemently I detest clutter. This meant that I would have to figure out how to conceal that last bit of rear wire as well. Ahhh, the holes we dig for ourselves...
e. The final and most crucial step would be figuring out the fuse-box. There is very limited information available online on the XUV700 fuse-box. Nearly every tutorial seems to recommend using an existing fuse and piggy-backing the dashcam wiring on one of them. They recommend to use the "less critical" fuses that will likely only damage minor functions of the vehicle in case of a malfunction. No prizes for guessing that I had a MAJOR problem with this approach. This car is infamous for having way more tech than it can handle and is often maligned for its unreliable electronics. Did I want to add more masala to this piri-piri eye-wash? No sir. I did not want to touch the existing fuses if I could avoid it. Let sleeping dragons sleep.
Funnily enough, in the owner's manual, Mahindra has very helpfully marked many fuse slots with the word "spare" but somehow none of the installation guides recommend using one of these. Logic dictates that if it's a spare, it's not connected to any essential system, and is just an empty power source begging to be used! I have a kink for logical things, so I was willing to pursue this further. Unfortunately, Mahindra does not mark these spare fuse slots with BATT or ACC - to differentiate between which ones were permanently powered vs those that were only powered with the car turned on respectively. I would have to figure this out myself.

A basic Multimeter from Amazon, 25 odd minutes of "how to use a multimeter" on Google, and some testing on random household electronics (that didn't cost Rs 30 lakhs) convinced me that I had enough basic knowledge to take on the challenge.

Armed with this optimism (or delusion), I prepared myself to dive into the fuse-box, ready to start stabbing it with the multimeter probes until I had identified two spare fuses that I liked, one for BATT/VCC and the other for ACC.
Time to buckle up, Dorothy!
The Installation Process:
1. Installing the front dashcam:
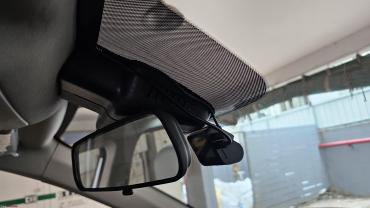
I wanted to install mine right behind the IRVM - where it didn't intrude into my vision while I was driving. Unfortunately, this is exactly where the dealership had stuck the FasTag! - dead center on the windshield, right below the ADAS camera module.

In my opinion, this is the best location for the front dashcam. It is out of sight of the driver (behind the IRVM) and perfectly centered on the car, so that the video captured is symmetrical from one edge of the hood to the other. Second best position would be to install the dashcam below the existing FasTag. But that would encroach into my peripheral vision and would be an eyesore on an otherwise beautiful, large windshield. Third choice would be to place it on either side of the FasTag. This would cause the camera footage to be off center. You can choose which kind of irritation you can live with and decide for yourself.
Naturally, I went with the most painful option of ripping out the existing FasTag in order to place the camera in my preferred location. Perfection exacts a toll (*wink *pun).
For those thinking I'm a lunatic, fret not - I had already procured a replacement FasTag that I ordered on the day after vehicle delivery (Yes, I did put a lot of planning into this).
I spent the next 10 mins furiously cleaning the glue residue from the old FasTag with IPA, a blade and some microfiber cloth. Once the glass was squeaky clean, I placed the provided electrostatic sticker as instructed in the dashcam manual and stuck the camera onto it. So far, so good.
2. Routing the front dashcam wire to the fuse-box:
After the front camera was installed on the windshield, I plugged in the USB C cable provided with the parking surveillance kit into the camera and then routed it along the ADAS camera module up into the head-liner, tucking it in using the provided trim tool.

This wire then travelled to the right side under the head-liner's forward edge till it reached the A-pillar. Then the wire was tucked behind the A-pillar and traveled down to the fuse-box. There's a catch here, so please read the next part carefully.
3. Don't strangle the airbag:
This is where my installation deviates from most tutorials I have seen online. While some people recommend just taking the wire across the A-pillar where the plastic pillar housing meets the head-liner and then continue down into the fuse-box, I think that's a really dumb thing to do if your car has side airbags.

Doing this essentially stretches your wire across an explosive device (the airbag is a pyrotechnic marvel - basically a gas bomb) and I don't want anything running across it if it ever decides to deploy during an accident. My solution? Partially detach the A-pillar so you can see the airbag, and route the camera cable BEHIND it rather than in front of it.


It involves a little extra labour and some degree of contortionism, but hey! maybe it won't kill you in a crash, so I'm guessing it's got to be worth it! The same process would be repeated for the rear dashcam wire a little later.
4. Routing the rear camera wire to the boot:
This is really easy - just do what you did with the front camera cable, but once you're across the A-pillar (behind the airbag) instead of going down the pillar, continue horizontally in a straight line beneath the rubber weather strips and tuck the wire into the head-liner (NOT under the weather strips where it is squished by the door every time it closes, but UNDER the headliner - by pushing it in a little deeper with the trim tool. Go across the B and C pillar in a similar fashion. No worries about curtain airbags here because the wire is running parallel to them and will be pushed away/downwards during airbag deployment – but it won't get in the way. This will bring the wire all the way into the trunk/boot of the car upto top center of the rear frame.

Here, you have to make a choice. You can choose to just hop the wire across the gap (hinge) and plug it into the rear camera unit. This will leave some wire exposed and you will see it every time you open/close the boot, and also in the rear view mirror. You cannot avoid this as it is necessary to leave the wire sufficiently slack to allow for boot excursion while opening, and the wire will bunch up during boot closure.
The second option is to channel it under the rear headliner, around the end of the airbag (leave enough slack to prevent tangling with the curtain airbag), and out through the metal frame of the rear of the car. This requires the use of a cable shuttle. I did not have one, so I just crafted a makeshift one using zip-ties. From here, the wire can go into the accordion-like connecting tube that goes from the body of the car into the boot door frame, completely concealed from view and out through the center of the door. Like all things worth doing, this one requires a little extra work.


Concealing that last stretch of wire necessitates the removal of the boot door top trim. It is easy enough once you know what to do. There are two black panels held together with sturdy clips (one on each side) which conceal two screws holding the boot door top trim in place. These panels can be grabbed and pulled away safely - the pins don't break easily. Each removed panel exposes one screw on either side which needs to be removed. The boot door trim can then be pried away and placed in the boot.


This exposes the door frame and the cable can now be brought to its final destination through the door frame, to the rear camera location.
5. Installing the rear camera:
This is fairly straightforward. Choose an install location, clean with IPA, place the electrostatic sticker on the glass and remove all bubbles. Then peel the adhesive backing paper from the camera mount and stick it onto the electrostatic film. Ideally, you should install it dead center on the rear windshield, and low enough that the lens is behind the rear wiper coverage area (thanks to @batterylow for the suggestion). This will ensure that you get clear visibility in light rain or when the glass is dirty and you use the wiper to clean/wash it.
Some people might want to install it on the boot fascia instead of the glass (in order to use sun shades) but the adhesion will be questionable and the more gap there is between the camera and glass, the worse the image quality is likely to be (coz science and optics and stuff). But that's a personal choice, so you do you. Just make sure the camera lens is between two of the defogger heating lines, to avoid getting that line in the video recording. My location of choice was dead center but high-mounted as I could not stand a blob blocking my rear view.

Finally, connect the short camera cable to the main rear cable that you have so painstakingly routed to the back and secure the coupling with some electrical tape. Then bunch up the excess wire and secure it in a cubby-hole in the door frame. This is to prevent it from rattling around later and giving yourself two footballs in the boot instead of one!
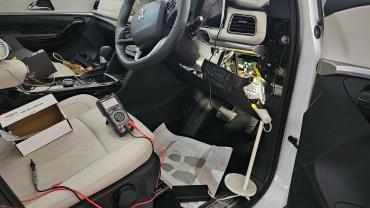
6. Fuse-box installation:
This was the only harrowing part of the entire project, because I was going to be mucking around inside the high ampere bay of a 2-day old car I had never worked on in my life. However, if you want to avoid any stress and don't want to go through the entire process of testing every fuse with a multimeter, you can choose to just use the fuses that I ended up selecting - it's up to you, not everyone enjoys pain.
The first step is to get access to the fuse box. This involves removing a panel located in the side on the driver’s side. It's a pull-away panel and very sturdy - you are unlikely to break it (but who am I to underestimate you?). Still, just be a little careful, okay? Peeling away the rubber beading running over the panel helps in its removal. Once you yank the panel away, it will reveal two screws holding the fuse-box cover in place. There are two more screws on the bottom of the panel that need to be removed (at least on the AX7L) before the panel can be partially pulled away to expose the fuse-box. Mind you, this panel has switches connected by wires leading into the ECU so don't pull away too hard. All the work involved can be completed without disconnecting these wires. Detailed instructions on how to access the fuse-box as well as the fuse diagram are very helpfully provided by Mahindra in your owner’s manual (Yes sir, I read all 400+ pages).


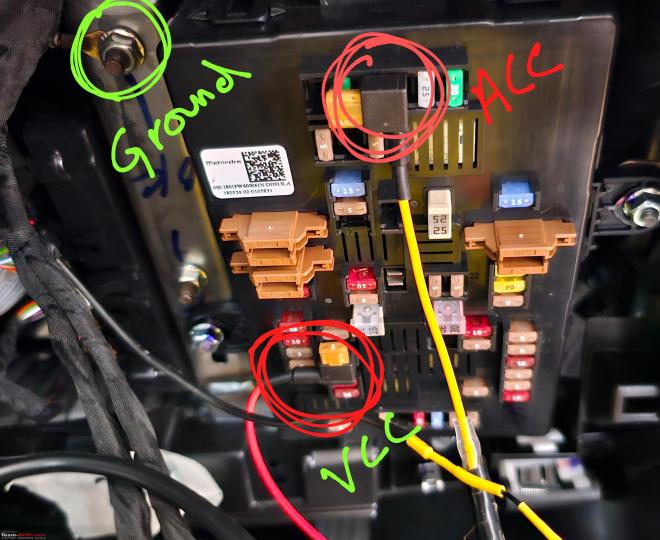
Next, I pulled out my shiny new multimeter, set it to DC Voltage mode and selected 20V (next higher setting than what voltage you're looking for) as I was looking for 12V DC. Since I have already explained I did not want to touch existing fuses, I only went after the spare slots. There are multiple spare fuses on the board: F1, F4, F8, F12, F13, F32, F45 and F52 rated for different amperes.
For dashcam purposes, 5 amps is sufficient (and that's the fuse that comes with the hard-wiring kit), so we can use any of the 15A or 20A rated slots, leaving the higher rated slots for future projects (*wink, *wink). Make sure the car ignition is off at this point. Touch the black probe to any nearby bare-metal point on the car chassis (ground) and the red probe to the metal contact in the fuse slot that you want to test. Each slot has two recessed metal contacts inside. These are the points that the fuse comes in contact with once it is inserted.
One of the points is connected to a power source and the other is an air-gapped contact terminal intended to hold the other end of the fuse, and is usually connected to the target device. Once the fuse is inserted, current flows from the source contact across the fuse into the other terminal and eventually to the connected device (dashcam in this case). If the flowing current exceeds the fuse rating, it melts (blows) the fuse to break the circuit and disconnects the device, preventing damage. This current flow is uni-directional, so you have to test both contact points in the slot to figure out the direction of the current flow.
One of the contacts should read 12V and the other should read 0V. Upon inserting the fuse, both will read 12V as they are now connected with a fuse and the current is free to flow across. You have to ensure that the hardwiring kit is installed such that the prong at the end of the fuse cable (away from the wire) is touching the source pin. If you reverse it and insert it, the current will bypass the fuse and flow directly into the wire and its connected device, thereby affording no protection to the car or the accessory. This is dangerous - you will practically be forcing a direct connection between the car battery and the dashcam without any safety, so understand this properly before proceeding. I hope this also explains the basic principles of a fuse.
On slots that are connected directly to the battery (VCC), the multimeter will show ~ 12V reading on the source terminal even when the car ignition is turned off. This is your VCC slot. This will be used for low power actions like parking surveillance. Write it down, and also note which is the source pin, to determine the direction of the flow of current. Some spare slots will show 0V on both contact points when tested with the multimeter. These are not VCC slots and may either be ACC slots or just a dummy slot.
Once you have identified the VCC fuses, focus your attention on the spare slots which were showing 0V at both contacts when the car was turned off. Now turn on the ignition and re-test these slots. You will see that suddenly one of the contacts on these starts reading ~12V and the other reads 0V. Note the fuse number and direction of the current flow. On turning off the engine, power will drop back to 0V on both the contacts in a few seconds. This is an ACC slot. This will be used to power the dashcam during the running of the car. Congratulations! you have now identified your ACC and VCC fuse slots.
I have used F4 for ACC and F32 for VCC.

Select the appropriate pair of red and yellow cables. Three sets of different designs are provided – each fits a different car manufacturer’s fuse slot, and Mahindra uses the narrowest design among the three. Each comes with a 5 Amp fuse pre-installed.

Connect these cables to the hardwire kit’s corresponding wires (same color) by crimping them in the provided connector. Now insert these fuse-equipped cable connectors in the ACC and VCC slots, while ensuring the correct orientation.
There is one more wire in the hardwiring kit - the black one labelled GND (ground). This simply has to be connected to the bare metal chassis of the vehicle. Choose any bare-metal bolt nearby and pinch the black wire under it. I soldered the black wire to a spade/fork terminal before doing that as that is the proper way to do it, but you can choose to just use the stripped wire without a terminal to make a loop and secure it under the bolt.

With this done, the electrical connections are complete.
Make sure the micro-SD card is installed in the camera. Now insert the USB-C cable into the front dashcam and turn on the ignition to power it using the ACC source. The camera will initialize and you can go through the set-up process and start continuous recording. Go into settings and then try setting up parking surveillance. If you have done your connections properly, the dashcam will let you set up this function. You can choose between recording on collision detection or continuous time-lapse recording - the latter is more battery-intensive. If not, it will say that the parking surveillance cable not detected, and you'll have to re-trace your steps and see where you went wrong. After this is done, turn off the engine and in a few minutes the dashcam will go into parking surveillance mode (70Mai models actually announce this in a tinny, Chinese-accented voice).
Review the footage recorded on both cameras on your phone - NOT on the tiny dashcam screen, and tweak the alignment, mirroring and rotation to your liking.
Clean up the car and put everything back together:
Replace the rear door panel with screws and snap back the two side panels, re-seat all the rubber seals and weather strips, snap the A-pillar closed, and finally re-assemble the fuse-box after tying up the excess wires and tucking them away behind the fuse panel. Basically, undo all the mayhem you’ve caused so far.


And that’s it, you’re done!
Grab a beverage of your choice and marvel at the genius that you are, having overcome what appeared to be an insurmountable hurdle just days ago, all on your own. You go, Tiger!!
Until next time, Ciao.
The Hardware I purchased for this project:
- 70mai A510 Dual-Channel DashCam - Rs 13,999
- 70mai Type-C Hardwire Cable Kit with 24 hour Parking Monitoring with fuse adapters - Rs 1,999
- Sandisk 256GB High endurance Micro SD Card (128GB would have been enough, but YOLO) - Rs 2,200
- Nextdigitron CPL filter for 70Mai A510 front dashcam (Thanks to @batterylow for the link) - Rs 999
- Themisto TH-M98 Digital Multimeter - Rs 798
Other miscellaneous tools that I used (I have most of these lying around at home):
- Philips head screwdriver
- Trim tool for tucking wires into door trims and head-liner (I just used the one that came with the dashcam)
- Headlight/torch/portable light source. Difficult to see clearly into the fuse-box without external light unless you are working in broad daylight.
- USB powered fan - for creature comfort (I live in Chennai). Trust me - you don't want to be doing this while sweating (Trust me, you'll be sweating if you're doing this for the first time :P). You'll likely short out something or at the very least muck up the white interiors while struggling with the upholstery and the fuse-box/wiring. Also, I wouldn't recommend Dorothy'ing around in the fuse-box with the AC and engine running either, until you have it figured out.
- Gloves (disposable nitrile or plastic, not the rubber type) - used while handling upholstery to prevent smudges, sweat and oil marks on the oh-so-white interiors.
- Electrical tape
- Wire stripper/pliers for cutting, stripping and crimping.
- Zip ties (used for cable shuttling for boot door wire concealment)
- Isopropyl Alcohol (IPA) - used for cleaning glass before applying the electrostatic stickers provided with the dashcams. You DO NOT want to stick the camera adhesive directly onto windshield - it has major attachment issues, and does not believe in giving second chances. IPA can help remove stubborn glue residue like that left behind by a FasTag. It’s a wonderful general-purpose solvent.
- My trust old tool-box with its eclectic collection of random tools.
P.S. Up until this project, I hadn't even seen a dashcam in real life. Thankfully, the internet is a treasure-trove of content, created by DIY enthusiasts and technically adept samaritans who can teach you almost anything. I learnt a lot of hows and whats from these resources. There is also a lot of content by people who have no idea what they are doing, or how terribly wrong they are - but are not shy to showcase it publicly. These people were equally helpful in teaching me what NOT to do.
I also got to know some very helpful TeamBHP members and XUV700 owners who guided and encouraged me on this project. Some of the honorable mentions are @careind (Indhar), @batterylow (Rahul), Bala, @rudra_shiv (Arun) and many kind folks in the XUV700 Tamil Nadu community.
I hope this experience can be of some help to those looking for information on the topic.
Post credit bonus
The sharpest amongst you must be wondering what I did with the FasTag? Well, I am currently trialing its placement in the upper left corner (co-driver side). So far, it has worked well across toll plazas. I am waiting to confirm that it works at malls and airports as well before I permanently stick it there.

Check out BHPian comments for more insights and information.
Find Car News
Just News


About Us


Buy & Sell
USED CARS