News
Pics: Detailed my 18 year old Maruti Zen at home
With proper precautions, anyone can refer and detail their car themselves at home, without any fancy equipment.
BHPian Adiiityaaa recently shared this with other enthusiasts.
Introduction
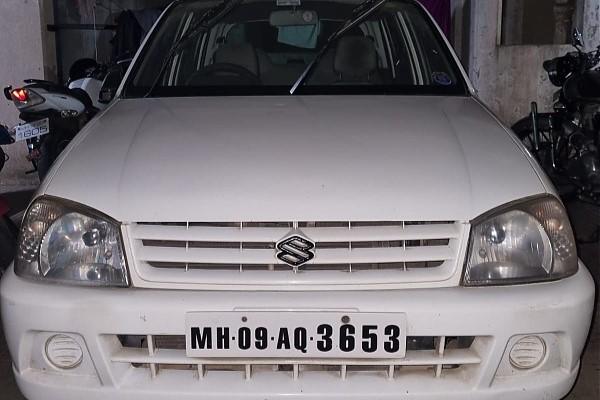
Our Maruti Suzuki Zen will be completing 18 years with us soon, marking a really long run to emotionally connect it with us. It has served us really well in its lifetime and as far as I remember, has never left us stranded anywhere, has not thrown any tantrums, does not give big maintenance bills and is still good to drive as it was on the day purchased. However, with the days passing by, the color has started to fade. It still looks better than many new cars on the road, but has lost some of its glory. Hence, I have decided to detail it myself; both interior and exterior, all in my parking! [Moreover, a good friend of mine was restoring his '07 Honda Accord, which started the initial phase of getting things done by yourself bug] Before doing anything, I removed both the front and rear logo, colored them black and then installed later on, just to enhance the aesthetic appeal.

Blacked-out rear logo
Under the hood
As mentioned earlier, the car has never faced a breakdown in the last 18 years. Hence, the bonnet was never opened frequently except for changing air filter and topping up washer fluid, thereby accumulating grime and dust as we never thought of cleaning it. The underside of bonnet has turned black-ish, most probably due to heat and carbon deposits [correct me if I am wrong].
Underside of Bonnet: Started the detailing process by cleaning the underside of the bonnet. It did not require much correction, hence, first washed it with normal water and let it dry. Then, applied Turtle Wax 1-step polishing compound evenly in small quantities. Buffed it off using some manpower and a microfiber towel. Immediate differences were visible, which motivate you to further proceed with your aim. Pardon me for dark images, but the motivation kicked in at 7 in the evening.
Engine Bay: Getting this cleaned was on my mind since a long time. The 18 years so far has lead to accumulation of grime, oil stains and so much dust in the Engine bay. I was always skeptical if I could wash the engine bay with water; what would happen if water went into Alternator, or a short circuit occurs, or something gets damaged? I'm sure many of us would've had this thought at least once. It is true that your car might get damaged, but with proper precautions, like:
- Not using Pressure Washer
- Covering every important component before dealing with water
- Making sure every spark plug is properly connected and all caps are properly sealed
- Completely drying the car before starting
You can clean your engine bay. Started off by covering the alternator with a plastic bag and disconnecting the battery. Continued further by spraying the Engine Degreaser finely over the engine bay and letting it rest for sometime. I used toothbrush and a metal wire brush to remove the grime. Finally, washed it with water using a hose and dried it off using a Garden Blower. To increase the aesthetic appeal, buffed up the sides using Turtle Wax 1-step polishing compound. I could, however, not achieve so great results in this step. There was not a major difference visible, hence, I plan to get it cleaned at a Car wash. It was at this point I felt that why detailing exists as a profession and not everyone can get it done properly.

Managed to get underside of bonnet back to original shade
Interior
Dashboard: A good looking dashboard ensures a good mood throughout the journey. The dashboard always stays in good shape, as I have a habit of wiping it with a damp cloth whenever I sit in the car. Cleaned it with a microfiber cloth and applied Waxpol Vinyl & Leather Polish using the applicator provided the package itself. It brings a glossy finish to the panel, and is visually appealing especially the dashboard is sun-kissed when cruising on a highway. Repeated the same process on the door pads as well as instrument cluster and AC controls to complete the look.
Floorboard: I occasionally clean the mats when I am at my native place, Kolhapur. So, floorboard area also remains clean throughout the year. Removed the mats and washed it with soap, brush and water. While they were drying, I used a Garden Blower to remove every solid particle from the carpet. When I removed the mats, I was greeted with sand from our Kunkeshwar Trip (Maruti Zen road-trip | Exploring the Kunkeshwar temple village), which was cleaned in this step. Wiped the carpet with a damp cloth before putting the mats back in.
Headliner: While this may not be an important part and is often ignored while cleaning as no one notices it much in non-sunroof cars, cleaning it can make your cabin feel fresher. I decided not to invest much in this step. I bought Ezee Liquid Detergent and mixed it with water. Using a sponge applicator, I cleaned the headliner and then wiped the residue with a microfiber cloth. Make sure you only use the foam and not water from the Ezee mixture; otherwise, your headliner might get damaged.
Seats: I used a Garden Blower to remove small impurities and then I cleaned the seats in the same way as I cleaned the headliner. Zen did not get leather seats during its production, hence, you cannot use any modern cleaner as such.
Glovebox and Boot: This area is often ignored, too. Started by first removing everything, and then used a Garden Blower to clean the area. Moreover, I washed the rubber mat from the boot and polished the glovebox using Waxpol
Vinyl & Leather Polish. Afterwards, neatly arranged everything back. Last step to finish with interior was to add a Car air freshener.

The Polish is extremely efficient and worth it
Exterior
Body:
Step 1: A quick wash using a 3M Car Shampoo was enough to make the car look so much better than earlier. The reason was- our society's watchman. Not that he did anything special, but instead, he used to not do anything! First of all, he used the same cloth for every car. Moreover, he did not care to change his water. Other than that, he left water as it is on the car, which left stains when dried. Now I understand, why many people, including some of us on the forum as well, prefer to clean the car themselves. Anyways, I dried the car using Microfiber towel after the wash.
Step 2: After ensuring everything was dry, I applied Waxpol Rubbing Compound Green in small patches around the body. I first started with the bonnet: applied the compound, sprayed some water on it and then buffed it with a microfiber towel. After spending a lot of manpower, I was finally smiling when the old, dull bonnet was as clear as new one. A Polishing Machine would have really sped things up, but I wanted to make this DIY as pocket friendly as it could become. Also, make sure that you first test it on a small part of your car, because sometimes, the results cannot be in your favor. The excitement in me forgot to test it on a small part first but anyways it did not disappoint me.

Please zoom-in to see yellow-ish shade in before to pure color in after[/center][/i]
Step 3: While the two above steps were enough to make the car clean as per my requirements, the third step is to Polish the Car. I used the Turtle Wax 1-step polishing compound for the third step. The procedure to use it is the same as that of the second step. One of my friends uses Sheeba Multipurpose Liquid Polish in this step, which does make your car shine, but is temporary.
Step 4: The step 4 is aimed towards protection. This is an important step which ensures that your hard work stays for a longer duration. This involves either applying Ceramic Coating, Waxing or getting PPF for your car. I, however, omitted this step. I plan to get our car ceramic coated in future, after which, I will update about it in the thread.
Headlight: Washing the headlights with shampoo would not be enough. They were oxidized and hazed up. Replacing it was not an option and getting them done from outside was not worth it. In the mean time, I came across a thread started by @Ashtoncastelino on headlight restoration. Followed it step by step, which yielded me good results.

There was a slight improvement in Headlight throw as well
Windows: I cleaned the windows while washing the car. This was enough. But then, I found a Waxpol Glass Cleaner in my inventory. Sprayed it and then cleaned it with a microfiber towel. It did make the windows clearer, but I guess I could have omitted this step. I also topped up the Wiper washer fluid with Waxpol Windshield Cleaner Concentrate.
Tire's: I was going to use an Iron Remover. However, the accessories shop was out of stock. So, decided to use Soapy Water solution. I carefully sprayed each tire and mag wheel with Soapy water and used some brushes and a sponge to ensure that every area is covered. Washed it with water afterwards. Make sure to be quick in this step, as I advise not to keep this solution on wheels for long. Results receive rating of 3.5/5 from me. An iron remover is capable of removing all the stains of brake dust of all these years, and hence will give an even better finish.
Behind the License Plate: Impurities often get stuck in this area while washing your car. If this area isn't washed properly, which I have noticed on many car wash centers, it can even leave permanent stains on the body. Hence, I decided to clean this area as well. Just after removing the License plate, I was greeted with so much dirt that I was forced to wash this area again. Then after drying, buffed this area using Waxpol Rubbing Compound Green. For some stains which didn't came off, I sanded them off with 3M Wetordry Sheets - P2000. 2000 Grit is extremely smooth and will not damage your paint. However, make sure to use it smoothly, without applying much pressure.

Notice how bad this thing looks underneath!
I have replaced all the T10 bulbs in my car, and I'll soon write a post about it here.
Grill and Bumpers: Just as License Plate, there were some stains on the Grill as well Bumper, especially on the surface of the vents. These were tough ones which did not go off with rubbing compound, and were messing with the clean looks of the car. Moreover, the logos had popped out, maybe due to the age of the adhesive used. This allowed me to clean the stains from beneath them as well. I sanded them off with 3M Wetordry Sheets - P2000.

Conclusion
Products Used:
- Turtle Wax 1-step polishing compound
- Microfiber towel
- Toothbrush
- Metal wire brush
- Garden blower
- Engine Degreaser: Diesel
- Waxpol Vinyl & Leather Polish
- Ezee Liquid Detergent
- 3M Car Shampoo
- Waxpol Rubbing Compound Green
- Waxpol Glass Cleaner
- Waxpol Windshield Cleaner Concentrate
- Soapy Water: 1 Part of Dish wash liquid + 4 Parts of water + Baking soda
- 3M Wetordry Sheets - P2000
Please note that these are the exact products that I have used in the DIY, but I purchased them offline from my trusted accessories shop.

Some of them could not make it here as they were either borrowed or were empty
Time Required:
- Under the Hood: 01 hour 43 minutes
- Interior: 02 hours 19 minutes
- Exterior: 03 hours 32 minutes [took some help from a friend]
What Next:
The DIY turned out as I expected. However, the car has started showing its age- although I achieved good results, they are temporary. The paint has chips here and there, especially on the bonnet, the brakes have some rusting on them, the scratches on the bumper, etc. all these things make me consider getting the car repainted. I plan on getting ceramic coating done on my car, myself, in the parking! But considering the current condition and look of the car, I think it will be an overkill. If I somehow make my mind to do it, I will be using Avalon King Armor Shield IX.
With this, I conclude my post on detailing our Maruti Zen. With proper precautions, anyone can refer and detail their car themselves at home, without any fancy equipment. Thank you for your engagement, and I hope you found it informative and enjoyed reading. Cheers!

Read BHPian comments for more insights and information.
Find Car News
Just News


About Us


Buy & Sell
USED CARS