News
Triumph Scrambler 400X: 1st service update & 5 accessories I bought
The high mudguard makes it bike look like a proper scrambler now. Might have to wait and see how it fares in Bangalore monsoons.
BHPian aston_martyr recently shared this with other enthusiasts.
Update: More accessories, summer rides and some luggage modifications
Since the last update the running has been a bit low. However I have added a few more accessories since.
- Luggage rack
- Bullet indicators
- Mud splash kit
- High mudguard
The installation was split on two different occasions due to availability.
Feb 5th – I had randomly called in on a Monday morning to check on accessories availability and was told that the luggage rack and the bullet indicators were available. Did not have any prior appointments, the service center personnel asked me to drop by 2PM to get them fitted. It took a couple of hours to actually get to my bike as it was delivery time for those who had dropped their vehicles for service in the morning and I was informed of the delay beforehand.
1) Luggage rack was something that I added in preparation for longer rides later this year. Feels sturdy and no issues so far.

2) Bullet indicators are something that looked very good and suited the vehicle much better that the stock one’s which had already gone through a warranty replacement due to fogging up issues.
Evidently this job was assigned to a rookie in the service center, and it went wrong as everyone expected.
I took a test ride after the installation and found the below.
- The front indicator wiring/relay was swapped I assume, so when I pressed left the right indicator would light up and vice versa. The rear indicators had no such problem.
- The headlight alignment was way off, both low and high beams were pointing to the sky.
A senior technician came in immediately and fixed the relay issue and aligned the headlight throw as well. Took about 20 mins more but job was completed.
Note to others: Make sure to check the indicators light up the right way and also the headlight alignment once this job is done.
The indicators do really amp up the classic looks of the motorcycle now.

After this the bike was at a standstill for 2 weeks at home. I came back worried about any battery draining issues. The engine immobilizer indicator light was not blinking anymore. I assumed the worst.
However when I turned the key in and switched on the bike it came alive immediately. No harm done I suppose. But one thing to note is that the immobilizer blinking light is not observed if the vehicle is not used for awhile. Need to take note of this next time. Not sure if its just battery optimization or something else. If anyone has any thoughts on this feel free to comment.
Called up the service center on Thursday March 7th in the morning, checked on accessories availability. I was interested in the lower engine guard. But was told that the mud splash kit and the high mudguard was available. Requested an appointment, since the next day March 8th was a holiday the service center is closed so I was asked to come by on March 9th.
Saturday morning I left early and reached the service center by 9:30 and to my surprise I was not the first to arrive. I always make it a point to take the first slot for the day and arrive 5 mins ahead. I ventured in only to find a sweet looking street triple and 2016 manufactured bike run just for about 8k kms. Had a good chat with the owner while the staff were getting their stations ready.This time since I had taken the appointment ahead of time, the installation was done on priority and the whole job took about 30 mins.
The high mudguard makes it bike look like a proper scrambler now. Might have to wait and see how it fares in bangalore monsoons.
The mud splash kit comes in a pair, front and rear. The rear splash kit was installed and the one for the front is specific for the stock mudguard so it was not installed. Carried the old parts and the spare splash guard for the front home with me.
Total cost

Not many rides due to work commitments. But here are a couple.
Ride 5 : DD hills , Madugiri, and back.
Did a short ride to DD hills early Feb. Nothing much to write about here, roads were great.
Started early morning at 6 AM, onwards to DD hills. After the climb I took the back roads to Koratagere and then onwards to Madugiri (did not do the trek). Join back to the NH via Sira and back to Bangalore.
It was a short ride and had a good chance to open the throttle from Sira till I reached bangalore.
Some pictures as is customary from DD hills.

After this ride i had the chance to purchase some more gear. I am slowly adding to the collection. Procured the Viaterra Fly magnetic tank bag, Camelbak hydration pack and grip puppies.
Viaterra fly magnetic tank bag
- I bought this for a specific reason that it can be used as a magnetic tank bag without the hassle of the straps and if I did not like it I could just mount it as a tailbag.
- I tried to use it as a tankbag, but somehow it felt cramped. This was on a short city ride, and the rear magnetic flaps kinda foul with the thigh pads on the tank. Gotta adjust it everytime you take it on and off. But the bag itself is good and the magnets have no issues holding onto the tank whatsoever.
- On the next ride out to VVS I tried to use it as a tailbag, viaterra provides straps for tail mounting with the purchase at no extra cost. It was alright, although I felt it could be better. Then I came across their fly universal tank bag which had buckle straps, which looks very convenient to get on and off the bike. Checked with them and explained the situation. The person understood what i needed and provided the spare straps with buckles that are meant for the fly universal and it was a good decision. Now mounting and unmounting the bag off the bike and roaming around is easier than before. The additional set of straps cost me 459 rupees.
Overall I would say it’s a good multipurpose bag which can be used as a tailbag, can be converted to a backpack while moving away from the motorcycle and if I feel too lazy I could just put it on my tank and call it a day.
Camelbak hydration pack
I got the stoaway hydration bag, because it comes in an insulated bag of its own and an insulated sleeve. Originally according to them this was intended to keep the water warm when hiking in colder places however it works the opposite way as well. This keeps water cool even after riding for about 4 hours in mid day heat. I do not use a backpack for the hydration pack so this goes in the tailbag which I find convenient to use and no extra weight on my back.
Grip puppies
This was a no brainer, got the regular ones from Big Bad Bikes bangalore. Had to slice off about ¾ of an inch to fit perfectly. Installed it myself and it was money well spent.

After this had to make some time to test out the additions made to the vehicle.
Ride 6: Short ride to Vani Vilasapura Dam
Came across this place from a rider group the week prior. The ride itself is 340 kms+ to and fro, there were two places of interest as pointed out by fellow riders. One the dam itself which is perennial so there would be some water which coming from bangalore city would be a sight to behold with all the water scarcity going on.
Secondly there is a trail that goes up to a temple on a hillock alongside the windmills at a distance of about 8kms is what I have seen on the maps. This was more enticing and I planned to test the scrambler out on the trail this time. However as luck would have things always don’t go to plan.
Started from home at 5:30 AM filled up some fuel and was at the Goraguntepalya by 5:45 AM. Took the NH4 all the way to Hiriyur. Nothing to complain about the NH here apart from 3 diversions for ongoing roadworks which were very short. Took a diversion at the marikanive gate and onwards to the destination which was about 20kms away.
Arrived at the destination at about 8:30 AM. Went straight to the starting point of the trail, but was stopped there and was told by a guard there that they do not allow vehicles. Did not get a proper reason as well. Dejected I went towards the dam entrance which was at the top. Spent a few mins there, as it was early morning I had the place to myself and the view was a sight for sore eyes to say the least. Water everywhere. Had a quick snack and moved towards the backwaters point which is a good 7 kms away as there is no direct path to it. Spent some time there and spoke to some locals going about their morning business, washing clothes etc… Apart from the trail ride denial, it was a calm morning. I packed up to leave before the Sun marks his territory as the temperatures have been soaring off late in the south.Started the return journey, no changes to the route. Stopped at Paakshala, had some brunch and reached home in 2 hours with a couple of hydration stops and a fuel stop.
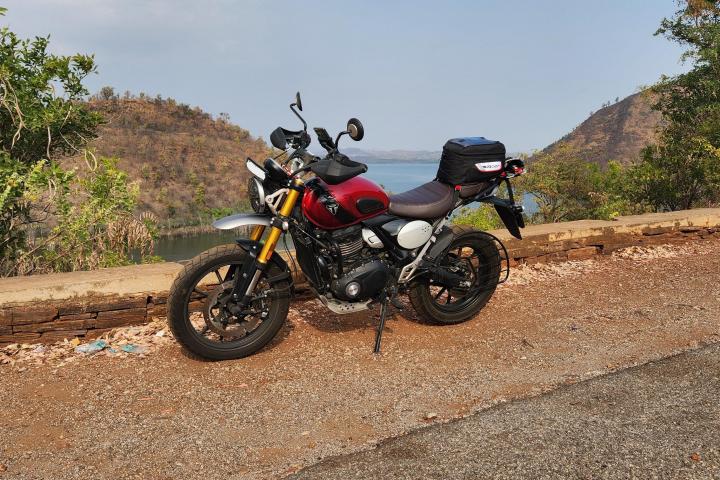
The tailbag conversion was a success, mounting and unmounting was a breeze thanks to the buckle straps. Grip puppies were a great addition, i feel no stress in my palms nor do the vibes above 6k rpm pose that much of an issue. Had to get used to the thicker handgrip now, might take a few more days for this.
ODO: 3578 km
The view from the top after parking.

Shot of the motorcycle along with the tail mounted Viaterra, note the buckle straps comes as two attachments and can be removed as well in case one wants to convert it to a magnetic tankbag. Very convenient.

Read BHPian comments for more insights and information.
Find Car News
Just News


About Us