| |||||||

| Search Forums |
| Advanced Search |
| Go to Page... |
 |
| Search this Thread |  169,277 views |
 19th May 2023, 01:06
| #76 |
| BHPian Join Date: Aug 2021 Location: Manipal
Posts: 258
Thanked: 2,109 Times
| Re: Azure Grey 2006 Maruti-Suzuki Swift VXi | Ownership Review Changing Coolant to Long Life Pink CoolantIt was time for the coolant change as it was 2 years since I got the car and Service Manual states coolant to be changed every 2 Years or 20,000kms. DBHPian Vigsom was running Toyota LLC Pink Coolant on his Grand Vitara since more than a decade and DBHPian Leoshashi was running the same on his GG (800). The LLC Pink Coolant is to be changed every 5 years which is twice more than the regular green coolant given by Maruti. Took the plunge and ordered 5 Litres of Golden Cruiser Pink Coolant ( Premix ) from Boodmo around ₹210 per litre. Swift has a requirement of 4.75 Litres of Coolant. Watched lot of YouTube Videos on coolant change and also got in touch with Vigsom and Leoshashi, both were of immense help. I understood that the entire Cooling System needs to be flushed THOROUGHLY and only then new coolant should be poured in. Since I'm doing the coolant change I thought it would be wise to get all the hoses changed as preventive measure and moreover they dont cost a bomb. Sourced all the parts from Boodmo. One tip which Vigsom and Shashi suggested is to change the Radiator cap as well, one might think its a simple cap but it plays an important part in the cooling system and many seem to skimp on this little fella. The thermostat valve casing was smothered with RTV by MASS, I felt its better to change the casing as it just costs ₹54. The hose will sit flush and tight with the new casing. So I got the Following parts from Boodmo.
 Funny part is my radiator doesnt come with the drain plug for the radiator and the only way to drain the coolant is to remove the radiator outlet pipe. Ran to my Petrol Pump and got 5 litres of Distilled water to completely flush the cooling system. Started of by loosening the clamps and unplugging the radiator outlet pipe while the engine was cool.    Removed the thermostat valve and poured regular tap water into the radiator after it was completely drained from the green coolant.   Radiator was SPIC and SPAN. Got the engine running for about 5 mins and drained it again to check for the colour of the drained water, It was still green. Did this cycle for about 5-6 times till the water drained was almost clear. Just to be double sure I installed the thermostat valve and drained all the water and this time filled with the 5 Litre Distilled Water. Drove the car for about a week with distilled water which was about 500kms. I had my eye close on the temperature gauge on the drives and it stood steady at the Half mark! After a week, having done good number of kms I decided to drain the distilled water and see the colour of it. The car was taken on a Sunday to my friends Service station where ramp was accessible to easily drain coolant and change hoses. The coolant still had a bit of green tinge on it.    Again, removed the thermostat valve and flushed the system 3 more times till clear water came out.  The thermostat valve was in horrible state, the rubber had cracked and hardened it needed replacement. Removed all the Distilled Water from the block using the compressed air in my friend's service station. Installed all the hoses, new thermostat valve, thermostat casing and new radiator cap, then poured the Pink LLC Coolant.  Spic and Span Coolant Passage in Block  New Heater inlet pipe  New Heater outlet pipe  Old vs New Thermostat Valve casing  New Radiator Inlet Pipe vs Old  New Radiator Outlet Hose vs Old Hose  Radiator Cap  New Thermostat vs Old one  New Thermostat vs Old one 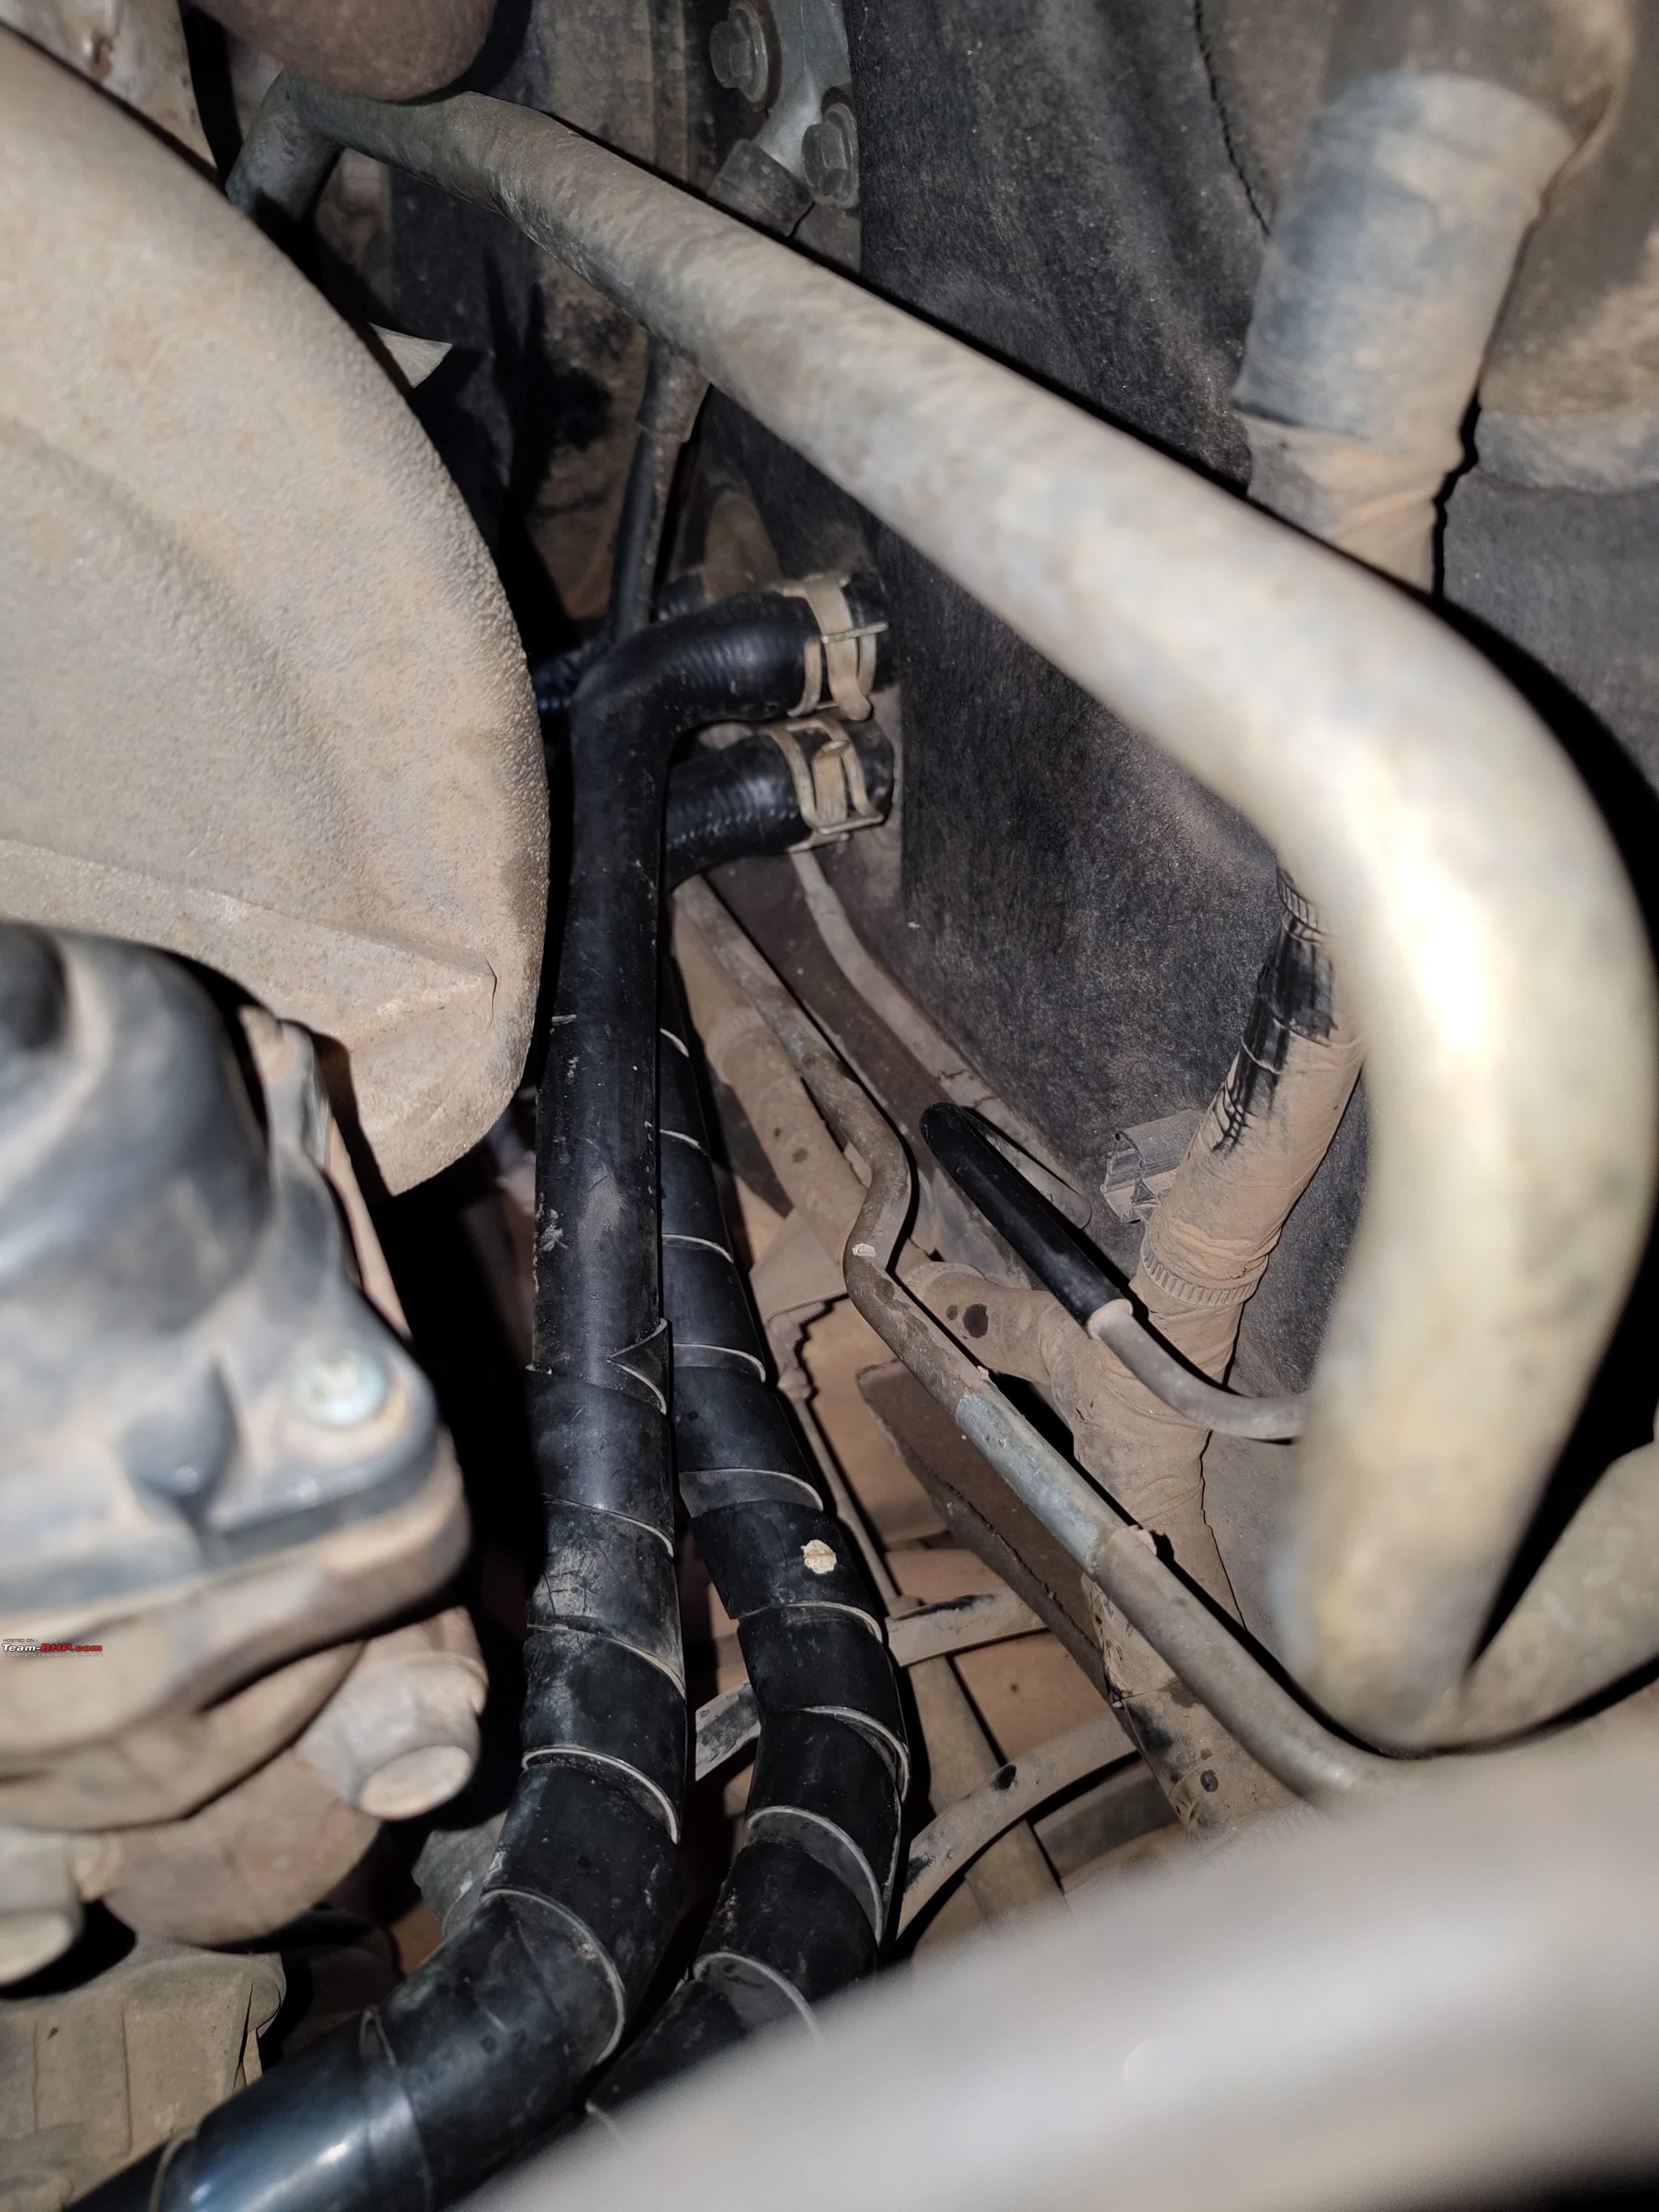 New heater pipes in place   In goes the new Pink LLC Coolant  Made sure the cooling system had no air present in it by pressing on the hoses and warming up the engine till the thermostat valve opened up. The coolant reservoir was also topped up with the new Pink Coolant. Left the car to idle for about 30 mins to observe for any leaks or abnormalities, none found, and I drove the car home. The next day morning I found the coolant reservoir was a had bit on the lower side as expected, topped it up again.  Odometer reading on the day of Coolant change Unfortunately, now this product is available on Boodmo only in a Concentrate form and not Premix.  Just for the kicks, I experimented with the old thermostat valve to see how it operates. I have run the Swift more than 10,000kms since this Coolant change and It seems to be doing it duties effectively without any Issues. Regards Ashton Castelino Last edited by Ashtoncastelino : 19th May 2023 at 01:18. |

|  (20)
Thanks (20)
Thanks
 |
| The following 20 BHPians Thank Ashtoncastelino for this useful post: | BeemerBug_06, chinmaypillay, dailydriver, digitalnirvana, eccentric, keroo1099, lapis_lazuli, Leoshashi, paragsachania, pjbiju, Roy.S, sukiwa, Tanveer02, Taronish_E, vaasu, Varun_HexaGuy, Vignesh Vee, vigsom, vishy76, VivekCherian |
| |
|
24th May 2023, 14:35
| #77 |
| BHPian Join Date: Feb 2012 Location: Noida - NCR
Posts: 783
Thanked: 2,909 Times
| Re: Azure Grey 2006 Maruti-Suzuki Swift VXi | Ownership Review Is there a specific metallurgical or chemical reason cars come pre-filled with green and not long life coolant? Anything to do with the block material and corrosion inhibition that green coolant offers but not any other? Are ordinary coolants upward compatible with OAT/HOAT coolants? Can anyone tell if all new cars come with life time "coolant" ? |
|
| ()
Thanks
|
|
24th May 2023, 16:10
| #78 | |
| Distinguished - BHPian  Join Date: Feb 2006 Location: NSEW
Posts: 3,830
Thanked: 26,691 Times
| Re: Azure Grey 2006 Maruti-Suzuki Swift VXi | Ownership Review Quote:
 ). Although I may not be hitting the Bull's eye, here are my replies: ). Although I may not be hitting the Bull's eye, here are my replies:1. Green is the Inorganic Acid Technology type, while the others (purple, yellow, orange, and Toyota's famous pink) are all Organic Acid or Hybrid OAT long life coolants. The latter are non silicate, non borate, non phosphate types. 2. No. The long life coolants in fact keep the water path cleaner and free from deposits. I haven't known of any Toyota that has had any issues on the water path when the coolant has been changed at 1,60,000km (first drain) and every 80,000km thereafter. 3. The two types of coolant (IAT with HOAT/OAT) should not be mixed. However, if a HOAT system is flushed thoroughly with DM water, it can be filled with IAT 50:50 mix too. 4. From what I've seen, all new cars save a few Marutis come with HOAT coolant. Here is some good reference material to understand coolants. Last edited by vigsom : 24th May 2023 at 16:18. | |
|
| (3)
Thanks
|

| The following 3 BHPians Thank vigsom for this useful post: | Ashtoncastelino, BeemerBug_06, digitalnirvana |
|
26th May 2023, 21:16
| #79 |
| BHPian Join Date: Aug 2021 Location: Manipal
Posts: 258
Thanked: 2,109 Times
| Re: Azure Grey 2006 Maruti-Suzuki Swift VXi | Ownership Review Unexpected Misfiring Immediately 2 days after the coolant change I noticed suddenly the car was misfiring HEAVILY, it sounded like a Classic 350 I kid you not, I had to solve this ASAP as the car is a daily runner and no way was I going to let dad drive a car which is misfiring. Got in touch with DBHPIAN Vigsom to diagnose the issue the same day. It was late at night but still he chose to stay on the line till the end. I started to check if the Ignition coils were firing correctly, Swift uses just 2 Ignition coils for 4 cylinders. They were all good. Next up was checking the High-Tension cables, I did not doubt them since they were replaced in 2021 January. I thought of checking the Plugs as well and one by one started removing the plugs. They had done just about 17,000kms.      Out of the 4 Spark plugs, one was completely black with carbon and a piece of carbon was stuck between the electrode. I did not have new plugs with me since it was well past 12 midnight, Vigsom suggested we just clean the plugs, adjust the gap and install them back for now and see if the misfire had stopped. Cleaned the plugs using wire brush and adjusted the gap uniformly across the plugs. Assembled everything back and started the car with fingers crossed, Well past 1am Vigsom and me were curious and I cranked the car and it started with ZERO misfires ! I shrieked in happiness.  Now, I wanted to know what the reason for this sudden carbon deposition of one spark plug was, Vigsom asked me if I was running any additive or any Higher Octane Petrol, I acknowledged that I was running on XP95 for about 4000-5000km. He said that could be the cause to dislodge the deposit and got stuck between the electrode. I decided to get the Ignition coils and the spark plugs changed when I service the car. Next day when dad started the car, he found it not misfiring one bit, little did he know I was up half the night diagnosing the issue whilst Vigsom on call.  I cannot thank Vigsom enough for helping me through this unexpected issue. You truly have made your Chacha proud. 85000km DIY Service Car had clocked a cool 10,000km in a span of 9 months, which was decent running. Again opted for the Mobil 1 5W40 Fully Synthetic Oil from Amazon. Got all the required parts through boodmo.
Using few strong wooden planks and few bricks I managed to just raise the front of the car and choke the rear wheels to gain access to the oil drain nut and oil filter. I have ordered a set of jackstands and won't be using this setup.   Unbolted the drain bolt and let it drain for a cool 1 hour with the oil filter removed.  Installed the drain nut washer and tightened the drain nut back to spec using a torque wrench.  Primed the new filter with oil and installed it in place Whilst I was under the car, I thought its good to clean the rubber parts and spray silicone spray on them to prolong their life. The drive shaft boots, Steering rack boot, stabiliser bar bush, Link rods, engine mounts, and control arm bushes were sprayed with Wurth Silicone spray.  Lowered the car and poured in the new oil Next up was the Ignition Coil and Spark plug replacement, Got 4 Denso K20PR-U Spark Plugs from Boodmo.    before cleaning the tappet cover  After cleaning the tappet cover.   Comparison The left side Link rod had its boot torn and was having a bit of play, ordered new Link rod from Boodmo and installed it along with new nuts.  Old vs new Link rod Cleaning the cowl panel Started cleaning the Cowl panel thoroughly, using a brush and made sure the drain passage was also clean and free from debris. No signs of rusting was seen. Lubricated the wiper links using Maruti Hinge Relief.  The dirty cowl top  After a good cleanup  Stuffing Grease onto the front strut top Taking Leoshashis advice, I decided to stuff grease onto the strut tops since water ingress into it can cause the strut bearing to go bad and become noisy. Applied grease generously and fit the cap back on to it.  Replacing the open wheel nuts to Closed ones Since I had put alloys, the Lug nuts were the same old open ended ones which come with V and L variants. Got 16 of the closed Lug nuts and installed them to complete the looks.   Closed Nut vs Open nut  Replacing the Exhaust rubber mounts The existing rubber mounts started cracking and the exhaust was shaking a bit too much, decided to get these replaced as well.  New mounts Odometer reading   Signing off with a photo after a good weekend and TLC for the Swift. Regards Ashton Castelino |
|
| (24)
Thanks
|
| The following 24 BHPians Thank Ashtoncastelino for this useful post: | anantpoddar, BeemerBug_06, dailydriver, digitalnirvana, JD_404, keroo1099, Klub Class, lapis_lazuli, Leoshashi, lxskllr, paragsachania, Prathiiik, Roy.S, starter, sudeepg, sukiwa, Taronish_E, tharian, TurboLag200, vaasu, Varun_HexaGuy, Vignesh Vee, vigsom, vishy76 |
|
29th May 2023, 16:54
| #80 | |
| BHPian | A good crisp update  Glad that you have undertaken all the work yourself. I am sure it was a fun and rewarding experience. I too enjoyed the time I serviced the Zen. It was surprisingly easy! Good to see a special mention going once again to the only and only Vigsom. What can I say about the man ! He is an absolute storehouse of knowledge and experience. He was of great help and supported with helping diagnose a few issues in my Corolla too. A great guy indeed! Such helpful and generous people are hard to meet. Quote:
Last edited by Aditya : 30th May 2023 at 05:20. Reason: Back to back posts merged | |
|
| (2)
Thanks
|
| The following 2 BHPians Thank BeemerBug_06 for this useful post: | Ashtoncastelino, digitalnirvana |
|
30th May 2023, 07:27
| #81 | |||
| BHPian Join Date: Aug 2021 Location: Manipal
Posts: 258
Thanked: 2,109 Times
| Re: Azure Grey 2006 Maruti-Suzuki Swift VXi | Ownership Review Quote:
Quote:
 if not older. if not older.Quote:
Regards Ashton Castelino Last edited by Ashtoncastelino : 30th May 2023 at 07:35. | |||
|
| (2)
Thanks
|
| The following 2 BHPians Thank Ashtoncastelino for this useful post: | digitalnirvana, Jabberwocky |
|
9th June 2023, 16:47
| #82 |
| BHPian Join Date: Aug 2008 Location: bangalore
Posts: 592
Thanked: 1,634 Times
| Re: Azure Grey 2006 Maruti-Suzuki Swift VXi | Ownership Review Sorry I'm hijacking your thread Ashton but my Swift decided to throw a fit this afternoon and overheat when my better half took it out. Luckily she was near a Maruti Authorised Center that spent 2 good hours trouble shooting but couldn't find a leak! Next thought was the fan or thermostat going kaput, but the damn fan worked with the AC on and off which has left me completely bewildered. My wife has been packed off home with new coolant and advice to bring it back if it starts misbehaving again (fingers and toes crossed). I have to give a big shout out to Smart Cars, Kaggadasapura who didn't charge a dime for the time and effort spent on the car. Will have to swing by tomorrow and thank them. |

| (1)
Thanks
|
| The following BHPian Thanks keroo1099 for this useful post: | Ashtoncastelino |
|
11th June 2023, 12:00
| #83 | |
| BHPian Join Date: Aug 2021 Location: Manipal
Posts: 258
Thanked: 2,109 Times
| Re: Azure Grey 2006 Maruti-Suzuki Swift VXi | Ownership Review Quote:
If you're willing , you can switch your Swift to LLC Coolant  Regards Ashton Castelino Last edited by Ashtoncastelino : 11th June 2023 at 12:02. | |
|
| (1)
Thanks
|
| The following BHPian Thanks Ashtoncastelino for this useful post: | keroo1099 |
|
12th June 2023, 06:33
| #84 | |
| BHPian Join Date: Aug 2008 Location: bangalore
Posts: 592
Thanked: 1,634 Times
| Re: Azure Grey 2006 Maruti-Suzuki Swift VXi | Ownership Review Quote:
No point in switching coolant when the existing coolant is new and the car does less than 500km/month. | |
|
| (1)
Thanks
|
| The following BHPian Thanks keroo1099 for this useful post: | Ashtoncastelino |
|
15th June 2023, 00:20
| #85 |
| BHPian Join Date: Aug 2021 Location: Manipal
Posts: 258
Thanked: 2,109 Times
| Re: Azure Grey 2006 Maruti-Suzuki Swift VXi | Ownership Review Audio Upgrade !BHPian Vedirah had sent me his mint Infinity Reference Components which he used just for a month and were in warranty as well. I had no idea about how the Audio wiring, so the homework began, I wanted it to be done in one shot and while I’m at it, make sure all the stuff inside the door panel is all right, If not repair/replace immediately. After many inputs from BHPian Chiranjit, Vedirah and SudeepG, I was finally done with the homework.  Started procuring the items required * 6.5Inch ABS Speaker Spacers sourced from my local audio shops * terminals Sourced from Robu.in and hnhcart.com * Speaker wires * Foam Tape * Screws * 3M VHB Tape * IPA    Started by removing the door pads carefully and inspected the door panel and removed the speakers. It required quite a bit of cleaning as lot of dust had accumulated.     The old speaker spacers were MDF Spacers from 2006 which were TOASTED ! those spacers were also the cause of small rust spots. The darn screws also were so badly rusted that I had to tear of the spacers and unscrew them with pliers from the back YEEEESH ! sanded down those rusted areas till bare metal, wiped it down with IPA and then after drying, spray painted those spots with black paint. Thoroughly washed the inside carefully and mounted the spacers, crimped the new terminals and installed the speaker whilst sandwiching the foam tape between the speaker and the spacer. While I was at this, I also inspected the window winder mechanism , cleaned it from debris and greased it. Making sure the Door panel drain holes are clear from any debris is very important as well, if not it can lead to rusting from the inside and its not a situation you want yourself to be in.    The old door stopper was also replaced as it had worn out  Installed the tweeters on the sail trim and mounted the crossover with VHB tape under the sail trim behind the doorpad. My younger cousin brother was more than happy to assist me with the install. I took my own sweet time as it was a weekend. Started the installation around 6PM and was done by midnight !   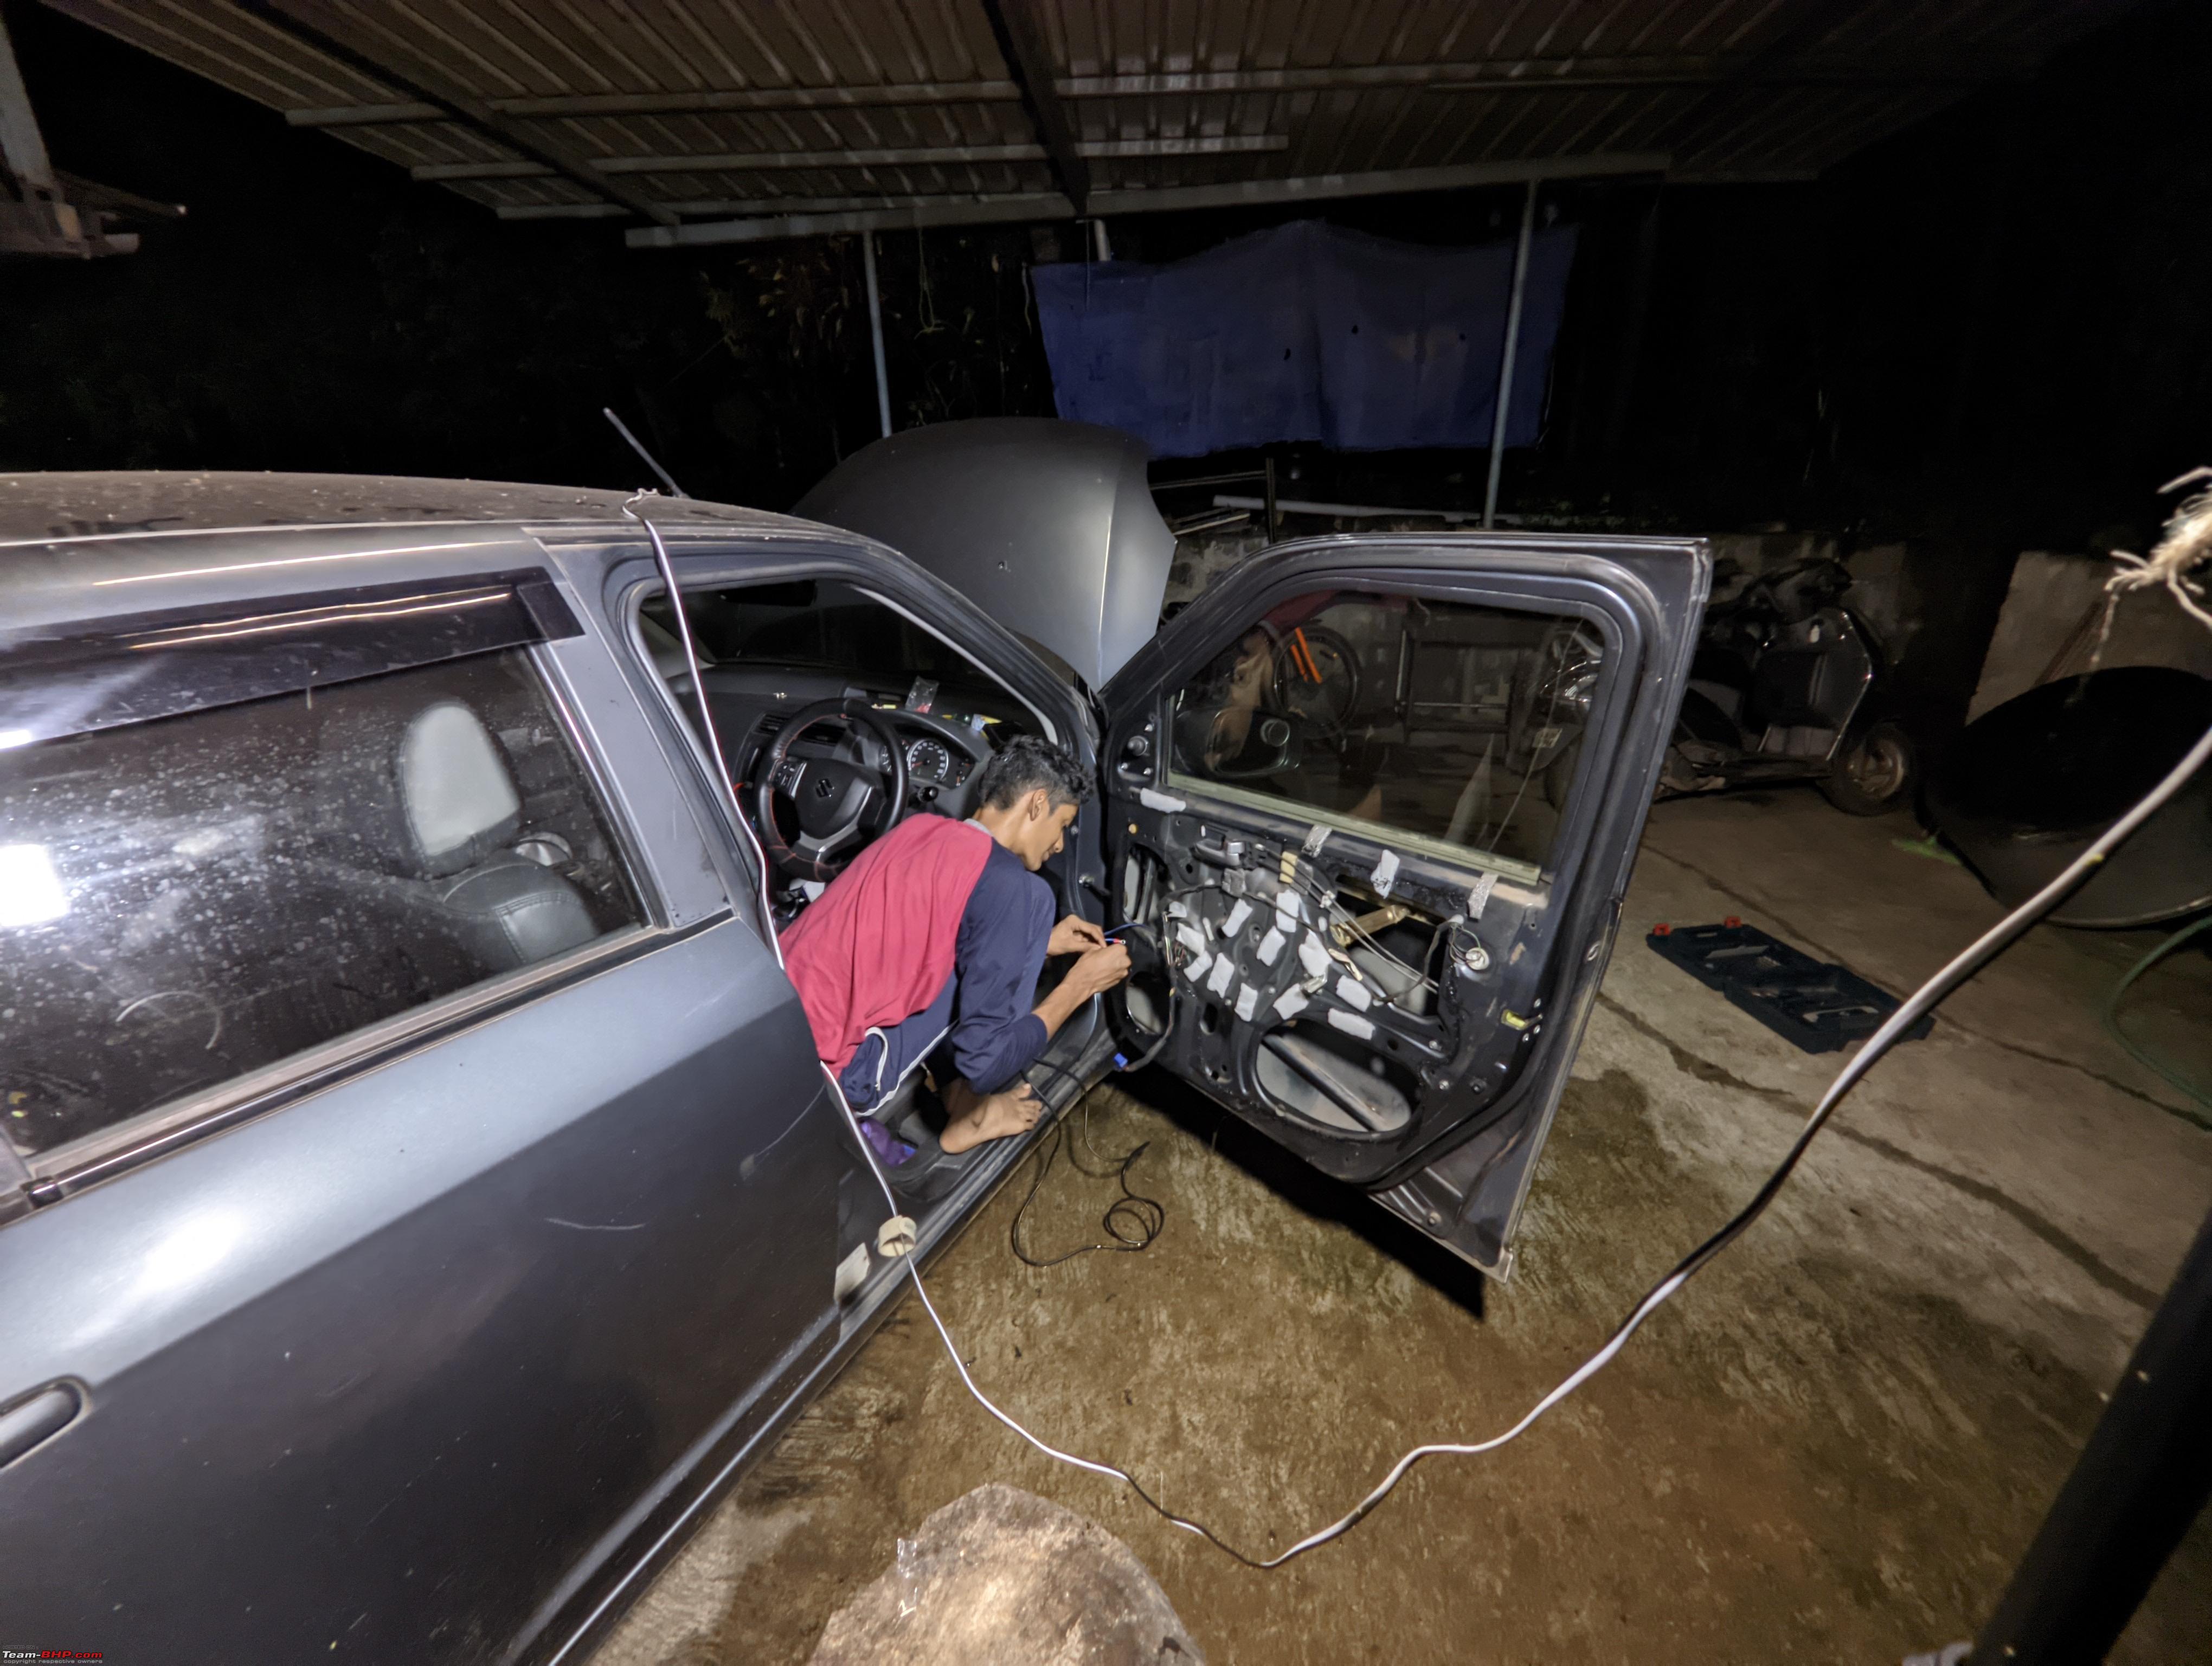    The change in the Sound quality was DAY&NIGHT difference over the old speakers. Dad was also very impressed with the sound quality.These infinity components have the perfect Highs, mids and have a good tight bass. I’m sure the Sound quality will further improve if the car is damped. Project for another day ! AC Condenser CleaningThe ac condenser was never cleaned In its lifetime, decided to give this a go. Ordered TetraClean Alkaline AC Coil Cleaner for this job. Removed the front bumper and got to work, It’s a very strong solution so dilution is recommended. Sprayed it after dilution with water onto the condenser and a LOT of gunk foamed up and came out. The condenser was thoroughly washed after this and it looked like a new unit.   Deep Clean of the interiors I take up this job when I have excess time on my hands and my elder cousin sister also assists me with this. Started by dismantling the seats to thoroughly clean them as well. I used normal detergent and water for cleaning. The carpet was vacuumed well and the flooring was also checked and cleaned where required. some photos of the work        Had some extra time to do the wheels as well Final Photos of the Swift after all the work   Regards Ashton Castelino Last edited by Ashtoncastelino : 15th June 2023 at 00:34. |
|
| (60)
Thanks
|
| The following 60 BHPians Thank Ashtoncastelino for this useful post: | 5hadow, abaliga, abhi9044, acestormtrooper, anantpoddar, arjab, Avikbrio, batterylow, brownkaiser, chaksjr, cogWheel, CrossLife, dailydriver, Desmosedici, digitalnirvana, dkaile, eccentric, GreenerPlanet, Harjot37, Highh5, JoshuaM, KA19Rao, keroo1099, KK_HakunaMatata, klgiridhar, Klub Class, Leoshashi, lxskllr, meples, mugen_pinaki27, NewUser123, Nitish B Shetty, paragsachania, pheru8b, RaceCyborg, ramnaresh_2000, Roy.S, Rshreyansh, RunSam, Sahilrai166, saikishor, sai_ace, sandeep1732, satrikon_454, self_driven, Sen, starter, Strider24, Taha Mir, Tanveer02, Taronish_E, Tpsdhiraj, TSI47, TurboKat, vaasu, Vignesh Vee, vigsom, vivek2652, Wanderers, ysjoy |
|
15th June 2023, 01:04
| #86 |
| BHPian Join Date: May 2023 Location: Salem,TN
Posts: 32
Thanked: 52 Times
| Re: Azure Grey 2006 Maruti-Suzuki Swift VXi | Ownership Review Hey, Congrats on getting such a great car and happy to see you are taking such great care of it. The first gen swift is quite a gem and never fails to put a smile on the driver's face. We have a '10 VXi too, but it's a K12. Wishing you loads of happy miles with your grey beauty. Cheers Last edited by Dr.Procastinate : 15th June 2023 at 01:05. |
|
| (1)
Thanks
|
| The following BHPian Thanks Dr.Procastinate for this useful post: | Ashtoncastelino |
| |
|
17th June 2023, 23:46
| #87 |
| Senior - BHPian | Re: Azure Grey 2006 Maruti-Suzuki Swift VXi | Ownership Review I am seeing gaps in the spacer and the fit of the speaker/spacer/body panel. The back of the speaker should be sealed off as much as possible from the front or your bass may suffer due to the front and back sound waves cancelling each other out. Please have a second look at the woofer mounting the next time you're there |
|
| (5)
Thanks
|
| The following 5 BHPians Thank greenhorn for this useful post: | Ashtoncastelino, digitalnirvana, GreenerPlanet, RaceCyborg, Sen |
|
17th June 2023, 23:59
| #88 | |
| BHPian Join Date: Aug 2021 Location: Manipal
Posts: 258
Thanked: 2,109 Times
| Re: Azure Grey 2006 Maruti-Suzuki Swift VXi | Ownership Review Quote:
| |
|
| (3)
Thanks
|
| The following 3 BHPians Thank Ashtoncastelino for this useful post: | digitalnirvana, greenhorn, RaceCyborg |
|
18th June 2023, 07:27
| #89 |
| BHPian Join Date: May 2016 Location: Dindigul
Posts: 91
Thanked: 116 Times
| Re: Azure Grey 2006 Maruti-Suzuki Swift VXi | Ownership Review Hi. It was great DIY. Congrats on maintaining the car well. I have a Ritz 2011 with K12 engine and would definitely like to slowly get into DIY maintenance. Regarding the interior cleaning done, please explain what are the steps carried out including the seats removal process. Will be useful to do mine also. |
|
| (1)
Thanks
|
| The following BHPian Thanks VishJ for this useful post: | Ashtoncastelino |
|
6th July 2023, 17:44
| #90 |
| BHPian Join Date: Aug 2021 Location: Manipal
Posts: 258
Thanked: 2,109 Times
| Re: Azure Grey 2006 Maruti-Suzuki Swift VXi | Ownership Review Steering Rack Repair !Two of my Biggest fear with the First generation Swift/ Dzire is the failure of the steering rack and AC compressor. The steering rack costs a whopping 35000 and the AC Compressor 58000. In my swift the AC compressor was taken care of, but the steering rack had developed a knocking sound when turning the wheel left and right. Friend and fellow BHPian Chiranjits Swift also had developed this issue and it was a nightmare for him. Chiranjit's Swift Steering rack noise The Rack noise my Swift was making Now apparently, the thing that goes bad in the steering rack and develops a knocking sound is the little plastic bush which is on the left side of the steering rack. I wanted to repair mine, browsed through the parts manual and checked for all the child parts available, The bush was not available separately from Maruti so aftermarket was the only choice. Got the following parts for the steering rack repair Steering rack bush Plunger Spring Plunger Adjusting Plug Check Nut New boots ( 48572M63J00 and 48571M63J00) Boot clamps (48575-63J00 and 48576M63J00) Stabilizer Bar Bushes  I discussed with my mechanic and decided on a day to do the overhaul.      Once we dismantled the entire sub-frame and removed it from the car, I found the left control arm ball joint busted and a inner tie rod had developed play. I gave clear instructions on not to open the torque sensor which is mounted on the steering rack.  The torque sensor and the EPS Motor Opening this torque sensor will lead to issues such as poor return of the steering from one side. Whilst my mechanic started dismantling the steering rack, I went to my local parts shop to get the inner tie rod, they had Talbros in stock so I gladly picked it up. MGP Control arm was sourced but was of the Ritz, it is a direct fit into the First generation Swift. Inspected all the suspension parts for wear and tear, stabiliser bar bush was on its way out so replaced that as well. All steering rack parts were washed and cleaned thoroughly using diesel and the rubber parts were cleaned and sprayed with Wurth Silicone Spray generously.  Rack Vendor is Showa 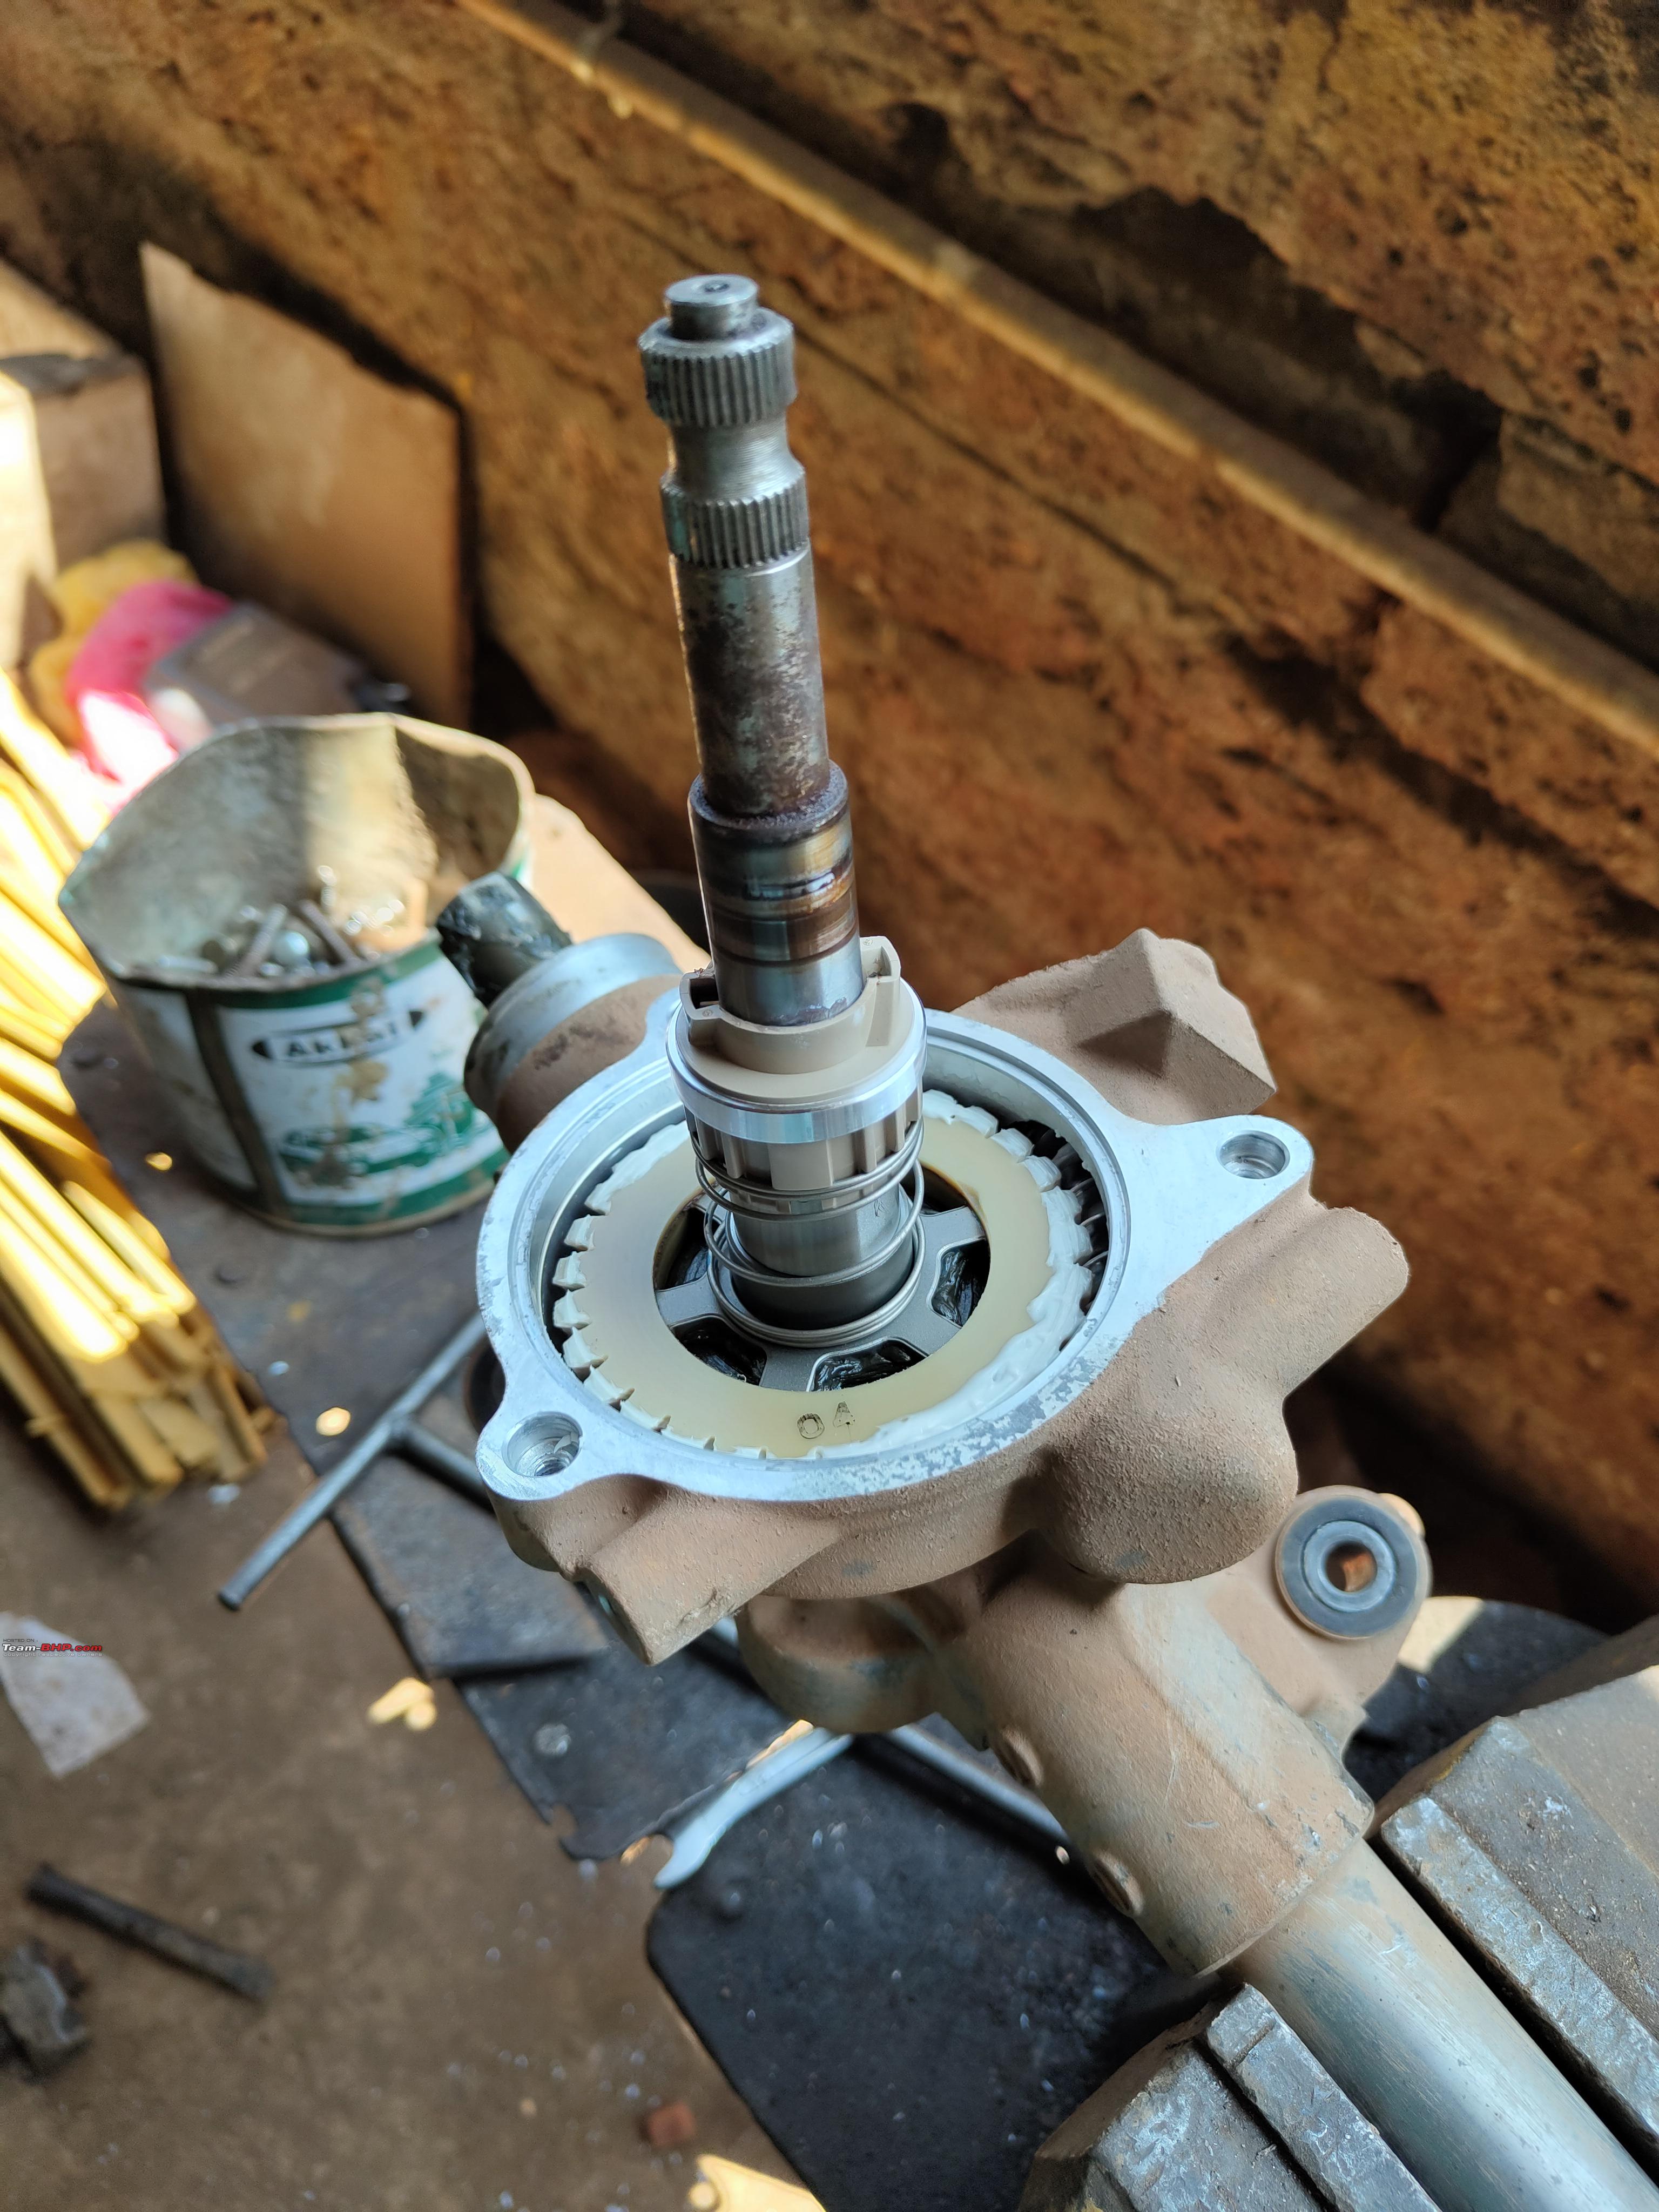     Steering rack pressure washed  Old bush  New bush The new bush and Damper kit was put in place, and adjusted till there was no play in the rack. Applied grease to the rack such that it will never run dry. Torqued all the bolts back to spec and mounted the rack onto the Sub-frame assembly. Installed the sub-frame assembly onto the car and made sure the steering wheel was at center position. After rack repair ! Me and Vishu took a good test drive and found the noise to be completely gone. Generally after the rack is worked upon, there is a tendancy of the steering getting heavy but lucky for me, the steering weight was the same if not lighter Touchwood! Regards Ashton Castelino |
|
| (12)
Thanks
|
| The following 12 BHPians Thank Ashtoncastelino for this useful post: | --gKrish--, arjab, audioholic, dailydriver, digitalnirvana, eccentric, Gannu_1, keroo1099, paragsachania, Taronish_E, vaasu, vigsom |
|