Okay,
It has been a long time since i was supposed to put this thread up, but better late than never!
A bit of background
Formula SAE is basically an engineering competition, where each of the ~150 engineering schools that take part build a racecar within the rather comprehensive set of
rules set down by the competition.
Teams are judged on four events - skidpad, acceleration, endurance, and autocross, as well as on other factors like cost report, design and presentation.
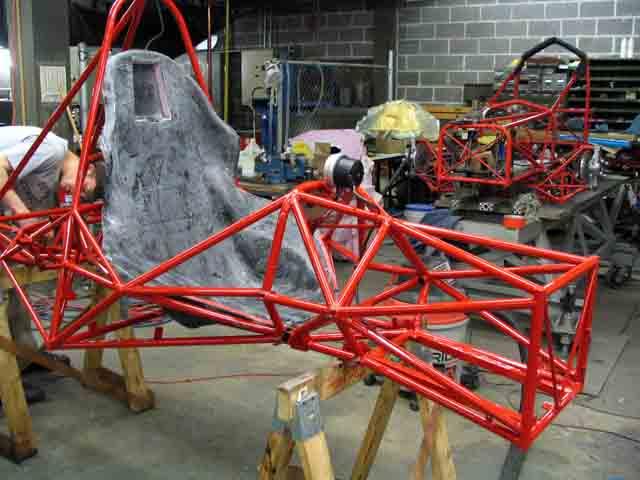
One of the things i was part of with the Brown University FSAE team was fabricating a seat for the car.
A friend and i were given the CAD drawings of the frame that was already designed and told to integrate a seat however we wanted.

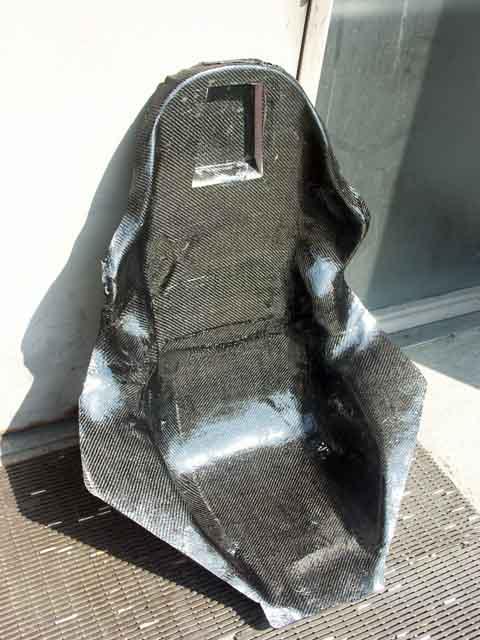
The seat was to be made from carbon fiber, for its clear advantages in terms of strength and weight. As you can see from the picture above, we decided to take a non-conventional approach and extend the "wings" of the seat all the way to the tubing. Originally we planned to bond the seat directly onto the chassis. However, the seat needed to be removable for inspecting the engine, so then we played with the idea of a two part seat.
In the end, we fixed upon a single piece seat which would be removable (not bonded to the chassis, but bolted).

Even though this massive winged seat would me marginally heavier than a typical "go-kart" like seat, it would have a much larger weight saving overall, due to the fact that it eliminates two things -
1. The floorpan
2. The firewall (Rules say that no part of the driver should be in direct line of sight with any part of the fuel, lubrication or cooling systems.)
So as you can see in the image above, the final seat was constructed in CAD. We then proceeded to cut the computer model into 2" sections and printed out the cross section of the seat at those 2" intervals.
We then cut 2" sheets of polystyrene foam along those profiles, and then glued them all together to form one big rough seat.
Then was the "fun" part of sanding it down. Keeping a close eye on symmetry. (Luckily i was out of town during this part of the mould making

)

Then, there were several options as to how we could proceed to make the seat itself.
1.
Lots of work but best quality - Currently we have a female mould. We would then proceed to make a male mould (aka a "plug") out of fiberglass and then layup the CF over the plug. The advantage of this was that it would provide a much nicer front surface of the seat (the part that everyone would get to see). It would also allow us to re-enforce the seat with ribbing or foamcore while it is still on the plug. As well as roll over/fold over the outer edges of the carbon fibre which would give the seat more strength. Oh, and also the positive mould would allow this setup to be vacuum bagged which would be a huge advantage.
Keep in mind that when making a mould, the quality of the mould surface is a very important factor in the final quality of your moulded peice. Huge amount of surface detail are picked up off the mould. The less time you spend on the mould, the more time you will end up spending on fixing your peice.
2.
The quicker way - The second option was to simply do the wet layup in the female mould itself. The disadvantage of this would be that all the epoxy would collect at the lowest point in the mould, and since we would be working in concave shapes, it would be more difficult to manage the material, and folding over the edges would not really be possible. However the advantage was that it would save us a huge amount of time and effort.
We decided to go with option 2, the simple way since we were really running out of time.

We prepped the female mould by coating it with a couple of layers of white gesso (which is basically like acrylic paint if im not mistaken?), then sanding it down. This gave us a nice finish on the inside of the mould.
Another issue was preventing the carbon fibre from sticking to the mould. We originally planned to use PVA mould release, but we were running out of time and we didnt have the stuff, nor did we have the time to pre-test it. So we made do with what we had, which was old-school mylar tape (the brown shiny packaging tape) and a bit of wax mould release (which i dont really think helped).
The pic above shows us at the halfway point in terms of covering the mould with tape.

Yikes.
Thats all carbon fibre.
We were a little scared based on the fact that we were planning to use about 75% of the carbon fibre in the shop, and neither of us had ever done a CF layup before, or even a fibreglass one for that matter!
(The carbon fibre had been "gifted" to Brown by a sponsor, so luckily no-one had any idea as to the value of it...made our job a little less stressful!)
Rhode Island has a lot of yacht makers, especially around Newport, and most of them use CF nowadays for making masts etc. Given the width of the spools they require its not too strange to find huge amounts of left over/unusable CF in their workshops
So a bit about Carbon Fibre layups, from my limited knowledge.
It seems when i asked about this earlier, the most common question was "dont you need a huge oven??", so let me clarify...
T
here are a few ways to layup CF:
1. Wet layup - the dry CF-cloth is placed on the mould and then the two-part epoxy is poured on and spread (and then preferably vacuum bagged)
2. Induction - The dry cloth is placed in the mould, and then placed in a vacuum bag, and then the resin is sucked in by the vacuum.
3. Pre-preg - This is the fastest, lightest, least wasteful way. (Used by car manufacturers like
Koenigsegg for example) The carbon cloth itself comes pre-impregnated with a thin layer of resin. This cloth usually needs to be kept at a rather low temperature to keep it from hardening/bonding, and then when it is layed up and heated it hardens and bonds with the other layers of CF.
So needless to say we went with the wet-layup.
We wanted to use a vacuum bag (basically a big plastic bag that goes over the mould and the vacuum causes it to deflate and press the CF firmly against the mould), but given the fact that we were using a female mould, a vacuum bag would be impossible, or very tricky.
The more air squeezed out of the resin and fibres, the stronger the CF will be when set
So on we go, precut the CF peices to size, did a dry run, mixed the 2-part epoxy in sufficient quantities, angled the mould so we wouldnt get too much expoy collecting in the low points and wet layup away!
Our poor substitute for vacuum bagging was "sand bagging", ie we put plastic bags filled with sand on top of the CF to keep it in place on the mould and have some pressure on it.

Above is the product of 3 layers of CF in one wet layup session (given 24hours to cure).
We had no idea how strong 3 layers was going to be, considering CF is regarded as this amazing material.
However, what we came to learn was that a huge amount of the strength of the CF comes from the structure/form in which it is moulded. A 4-layered flat piece will snap and break in half as easily as a 3-layered curved piece (shaped kinda like a shin-guard or such).
The seat was relatively strong, but nowhere near confidence inspiring. Especially since the seat was all that there would be between the driver's butt and the ground going by at 80km/h. So we decided we would put on another 3 layers and sandwich some foam in between the layers to give it some more structure, and therefore strength.

Notice how the back side of the seat has a pretty nice surface (since it was in contact with the mould). Its not visible in a picture this size, but you could also see the outline of every individual piece of tape that was used on the mould, just to give you an idea of mould detail being transferred.
So the red stripes of tape indicate where we wanted strips of the foam core.

I used a heat gun to bend the foam into the required shapes, and then just stuck them on temporarily with some hot melt glue.
Then proceeded to wet layup the next 3 layers of carbon fibre, put a sheet of non-stick plastic over it and dumped some sand bags on for the pressure and let it cure for 24hours.

There we go. (340sq.ft. of CF..hmmm)
Placed the seat in the chassis that had just come back from powdercoating, marked the areas that needed to be trimmed (since we had made the wings a little larger than necessary), and then cut them off with a pneumatic rotary cutter.
The front of the seat had been sanded down to get rid of a few bumps and ridges.

To get from the rough sanded look to this shiny finish, all it took was one tiny drop of epoxy that was rubbed on the surface (filling all the tiny scratches caused by the sanding) and hence giving it that shiny surface.

Another area of much confusion was how we should mount the seat onto the car.
Eventually we ended up drilling holes through the front part of the bottom of the seat and bolting onto tabs on the frame. Two narrow tubes were welded onto the frame under the butt area of the seat for additional support, and square aluminum plates with a tapped cylinder welded onto the back of them were bonded onto the seat behind the drivers shoulders and bolted onto the frame. You can see them just below the headrest in the pic below.

And this is me driving the car >
(boy did it pay off!)

cya
R


 28th December 2005, 15:38


 (12)
Thanks
(12)
Thanks
 excellent work rehaan, it gives a lot of insight into making of carbon fibre products. grt team work too i think. in fact i m looking for manufacturer of carbon fibre products in India. this write up of yours will surely help me to explain the details of other carbon fibre products i m looking for.


 . It had 4times the torsional rigidity of the last years chassis, and was triangulated beyond belief, which in turn became a pain to cut and notch the tubes for and weld them, with upto 8tubes intersecting at places. This years chassis will be simpler!!
