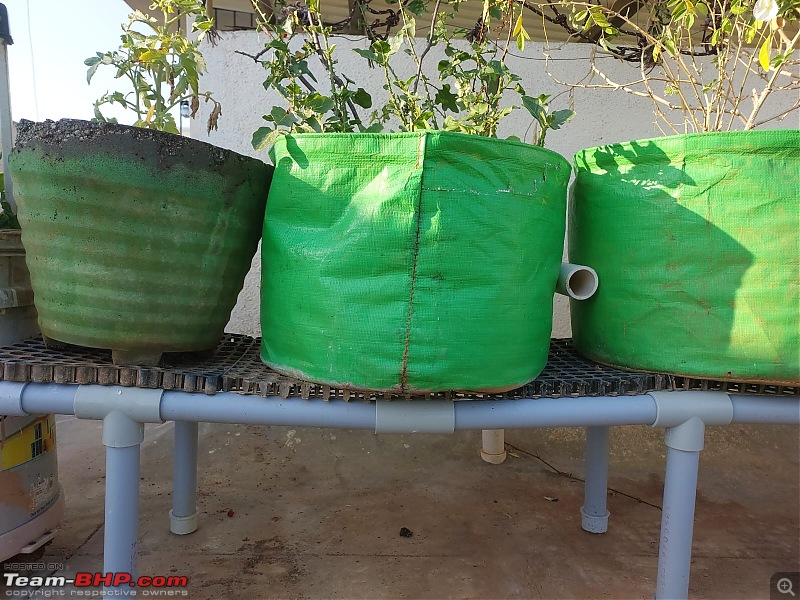
I recently built a few plant stands for my mother's rooftop garden.
This a build guide (with minimal pictures, sorry

) for anyone who might want to make one of these.

These stands can hold around 5 mid sized pots.

They require drain cells to be placed on top of them to fill the gap.
Why use stands at all?
1. It gives an aesthetic appeal to the garden.
2. It makes cleaning leaves and other debris that tend to fall.
3. The main reason I built one - It prevents stagnation of the excess water that occurs when watering.
Why build/ Why not buy?
1. Satisfaction of a DIY build.
2. The prices of such stands are exorbitant.
3. I had too much time on my hands.
Bill of Materials:
1. 1' grey PVC pipe - 4.2 metres - Rs. 300
2. 1' T coupler - 10 pieces - Rs. 200
3. 1' L bend - 4 pieces - Rs. 60
4. 1' endcaps - 6 pieces - Rs. 60
4. PVC glue solution 50ml - Rs. 40
Why PVC?/ Why not ABS/Metal?
1. PVC pipes are ubiquitous. You can find them at any hardware store near you.
2. Price. This entire build costs less than Rs.700. In comparison, 1 metre of ABS pipe costs Rs. 130.
3. Easy to DIY. All you need is a hacksaw blade and you're done. In comparison, metal builds will require speciality saws and welding equipment.
4. Weight. Let's say you want to relocate the stands. Lifting a PVC stand is anyday easier than a Metal one.
5. Rust. Water and metal don't mix very well unless coated, and plants need water.
6. ABS is supposed to hold weight better and also be resistant to sunlight. However, my PVC stands seem to hold the weight well and we have all seen grey PVC pipes running down buildings. If civil engineers can trust it to not fail, I can too.
7. The most important reason for me. My mom wanted ABS but forgot to convey it to me. It was only after I built it that she told me this. And it was after she told me that I researched on the benefits of PVC and hence the above 6 points.
A short note on PVC -
There are 3 types of PVC
1. Electrical conduits which are thin and are solely for running wires through walls. They have no weight bearing capacity. These are found in electrical stores. This is the cheapest PVC.
2. Cold water PVC or grey PVC which is what we require for this build. They are designed to carry cold water.
3. Hot water PVC or uPVC, these are designed to carry hot water such as from heaters. the only difference between uPVC and regular PVC is the ability to handle heat without melting. This is the costliest PVC.
It goes without saying that each of these have their own fittings.
The Build
The build is based off this YouTube video.
I've modified a few lengths to my liking which I think are better fitting. If you are into gardening and understand tamil, do go through the channel, he has a lot of good videos.
When buying the pipe request the shopkeeper to cut the pipes to required lengths. This means all you have to do is a dry fit followed by gluing the parts together once you get home. Most hardware stores willingly cut it. However, please note that the number of cuts will be high, so ask this when it's not crowded. If the shopkeeper refuses or you feel you need more of a DIY experience, get the pipes cut to manageable lengths that are in multiples of the required sizes. Then use a Hacksaw blade and do the remaining cuts.
Cutting lengths for the pipe :
8 * 10' long
6* 9' long
4* 2' long
4* 7' long
Dry fit
Keep the 6 9' pieces aside. These are the legs and they will be attached last.
Start with a L bend.
To this on one end attach a 2' pipe.
To the other end attach a 7' pipe. To the other end of the 7' pipe, attach another L bend.
Attach a 2' pipe to the other end of the L.
Attach one arm of the T to the other end of the 2' pipe on both sides.
With this done you must have something that looks like this.
Now attach one 10' pipe to the other arm of the T. Make sure that the leg of the T faces the ground.
Now take another T and attach one arm to the other end of the 10' pipe with the leg of the T facing inward.
Repeat both steps for the other side.
Attach a 7' pipe between the legs of the 2 Ts.
With this done, you must have something like this.
To the other arm of the T attach another 10' pipe.
Attach one arm of the T with the leg facing downwards.
Attach a 10' pipe with the arm of the T.
Attach a T with the leg facing inwards.
Attach a 10' pipe with arm of T.
Attach a T with leg facing downwards.
Repeat entire process on other side.
Add the 2 7' pipes between the legs of the T which are facing inward.
Attach the L bend with 2' piece to the other arm of the T.
Take the 6 legs which are 9' in length and attach end caps to one side. Attach the other side to the Ts with down facing legs.

This should be your completed stand.
If the stand isn't level, try adjusting the depth of the pipe inside the leg of the T and the end cap. You should be able to level it to your liking. Remember
NOT to glue the legs or the endcaps.
Gluing
Attaching 2 PVCs together is more of bonding than gluing.(a layer of plastic melts and cures with the other rather than glue holding it together.)
Before beginning the process, choose a smooth and level surface. This will help you measure length and width of the stand and help keep everything square.
So please make sure before you glue the surfaces that it is exactly what needs to be glued.
Also, when dry fitting there will be friction of parts which will be absent when gluing since the liquid minimises friction. Keep this in mind as excessive changes in length can make the stand weak.
To glue, glue both the inside of the fitting and the outside of the pipe.
Be swift in gluing as the glue tends to dry out quickly.
If you've made a mistake when gluing and realise it immediately, pull out the 2 parts and clean it before reapplying. However, if some time has passed, try pulling it out/ heating. If this doesn't work, you will have to discard the piece and redo it.
DO NOT GLUE THE LEGS OF THE STAND OR THE END CAPS. These are used for levelling the stand.
Voila..!! Your stand is ready. Make sure to use drain cells before you place your pots or grow bags.
Modifications for extra weight bearing capacity
Suppose your stand looks weak and you'd like to add an extra leg or 2 for weight bearing. In this case, you will need a 1/2 inch screw, 2 end caps and some pipe for the leg (This length will be less than 9' please measure before cutting.)
Take one end cap and screw in the screw from the centre of the inside of the end cap.
Now turn the stand upside down such that the legs face up and at the spot where you want a leg, drill a small hole (Or burn one with a skewer (make sure size of skewer less than diameter of screw.)) and screw in the screw.
Now measure the length of the leg required (Usually around 8 1/2 to 8 3/4 inch. It depends on the levelling of the stand.
Do not glue any of this. Now your stand should be able to bear some extra weight.
Detailed pictures would have helped, but unfortunately I forgot

. Apologies for the inconvenience.
I do hope this was useful.
Regards,
alphamike_1612
 (42)
Thanks

 (1)
Thanks
 (2)
Thanks
 (2)
Thanks
 (1)
Thanks


 ) for anyone who might want to make one of these.


 . Apologies for the inconvenience.

