I had just finished de-rusting & rust-proofing the fuel tank on my 1996 Yezdi Roadking (RK). Thought I'd share my experience with you all.
The RK has not been in use from 2001 to 2007, that is 6-years of rusting in peace here in Visakhapatnam's highly corrosive coastal weather - that too under a cover (big mistake). By the time I got to the bike, the cover had almost dis-integrated, the seat foam is powdered and everything else is just rust galore. You get the picture.
Took me a couple of months to get the bike back on road. Engine was seized, so the whole thing was soaked in kerosene overnight to free it up. Got a new seat, a new paint job, some new parts, new stickering, got the chrome parts re-chromed etc. After spending a sizeable amount the Roadking roared back to life. But my joy was short-lived. The fuel-line was getting clogged with fine rust from the fuel-tank, and it was getting very annoying.
The fuel-tank was cleaned with acid twice in the last two years - I didn't want to do it again for fear of perforating the tank. And it was cleaned with kerosene and nuts/bolts/pebbles another three or four times. Everytime this is done, the bike is rust free for a couple of months and then slowly I can see the rust accumulating in the fuel filter and eventually it clogs up. After dealing with this three times in the past six-months, I was fed-up and wanted a permanent fix to the rust cancer that is eating away my RK's fuel tank.
So I researched the internet for a few weeks, took advice & suggestions from fellow TeamBHP-ians and the Yahoo Yezdi Group Members and prepared my action plan. I had to rule out a couple of options cause I wanted to retain the paint job on the fuel tank (but it got messed up anyway, as you will find out). I decided upon a three step approach:
1. Clean all loose rust inside the tank with another round of kersone with nuts-n-nolts approach.
2. Completely de-rust the tank using Electrolysis so that the good metal is untouched & paint is protected.
3. Finish up the job using the RR-10 Fuel Tank Sealant marketed by Escorts Yamaha.
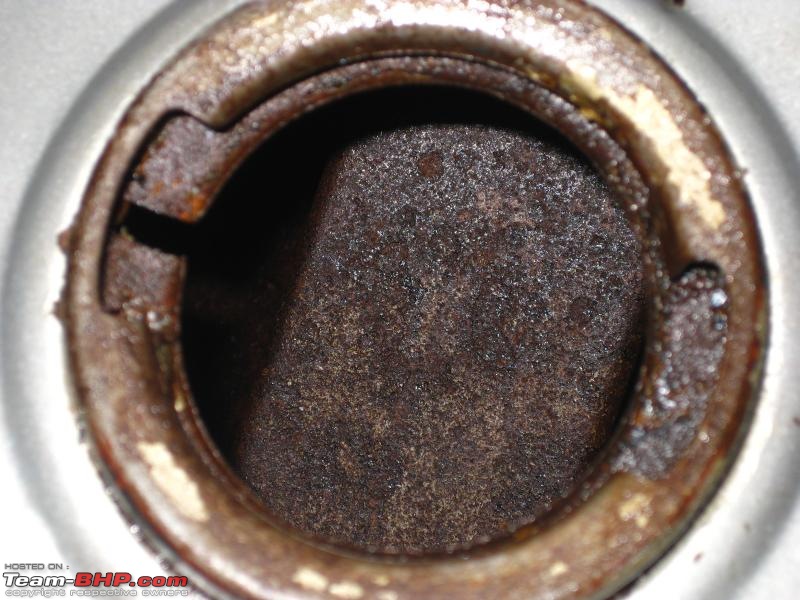
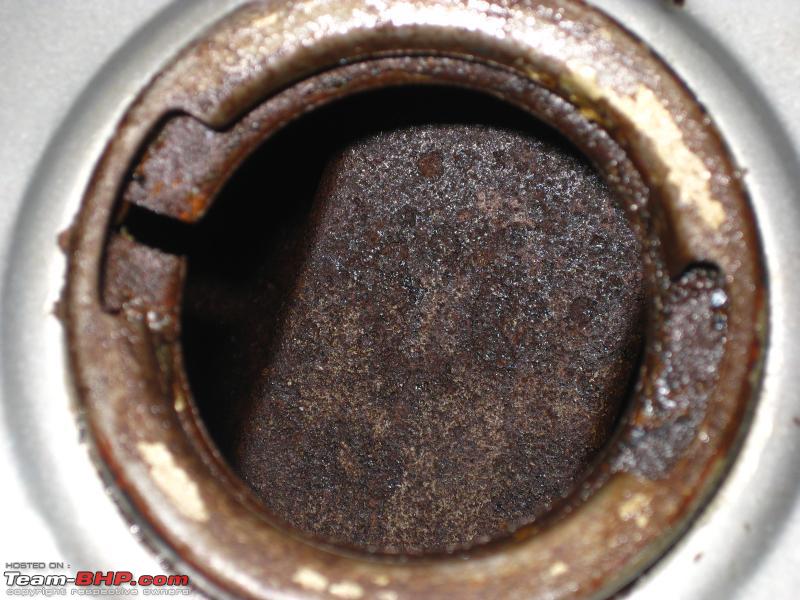
First step was simple enough. Removed the tank and emptied all of the petrol-rust sludge in it. Filtered out the petrol and did another round of cleaning with it. Then dumped two liters if Kerosene in the tank with a handful of nuts and bolts and subjected the tank to violent shaking for about 10 mins to get to all the loose rust. Did it one more time to make sure. The picture below shows how the tanked looked after this process.
Next I washed the tank with warm water and detergent (I used Surf) to get rid of all the kerosene and petrol residue. Did this three times till I was satisfied that the tank was clean. Then rinsed it twice with regular water from a high-pressure hose.
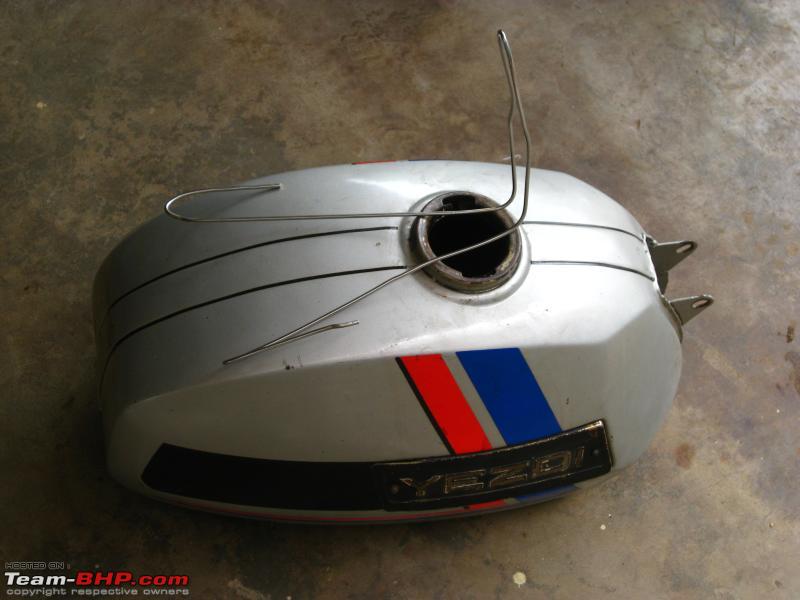
Next was to prepare the electrolyte solution for the electrolysis process. The RK tank capacity is 14 liters. So I took a 20 liter bucket of water (almost full) and mixed washing soda (sodium carbonate, also sold as laundry soda) in it at about 1-tsp per liter. This is an approx measure - no need to be accurate. more washing soda doesn't hurt the process. Then filled the fuel tank upto the brim with this electrolyte (remember to plug the petrol outlet with a suitable bolt or cork or something). Make sure there are no leaks. The solution is non-toxic and safe to handle at home.
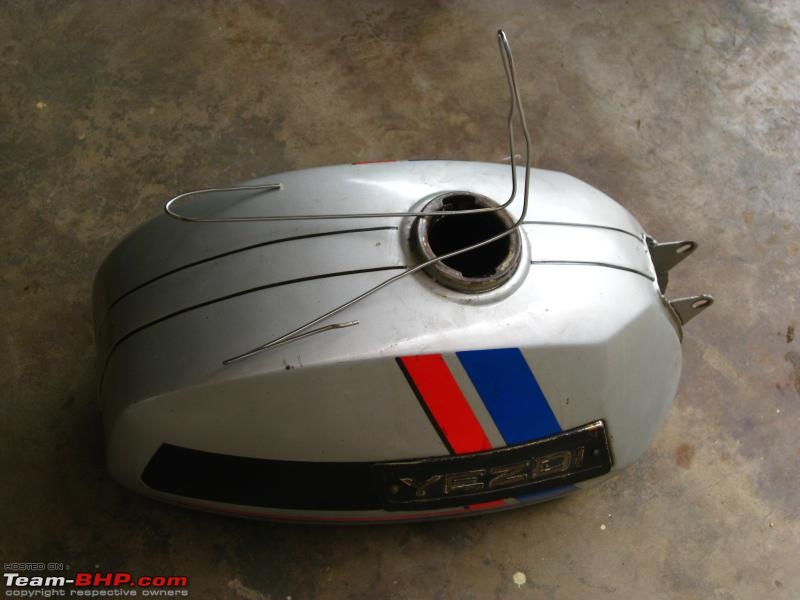
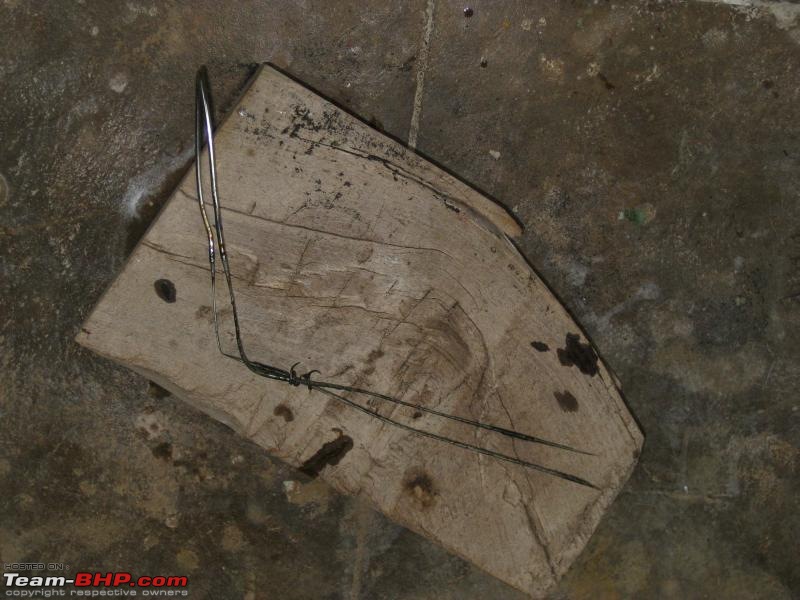
For the anode I used a regular wire-hanger. It was straightened out and then bent into a shape that is suitable for insertion into the tank, but it should not touch the tank anywhere. See the pic to get an idea. I used a thermocol piece supported by two wooden blocks to hold the anode in position.
For the power supply I initially planned to a 12v battery charger I had, but found out that it was a "smart charger" meaning it won't power on unless it actually detects a battery. And also its max output was 3A, while all my reading suggested that a higher amperage is desired, though not essential. So I then switched to a 450W computer power supply I had lying around. It can provide upto 25A on its 12V line. Again, the PSU would not power-on if it is not connected to a PC-motherboard, but a quick google search gave me the information necessary to by-pass that and activate the power supply.
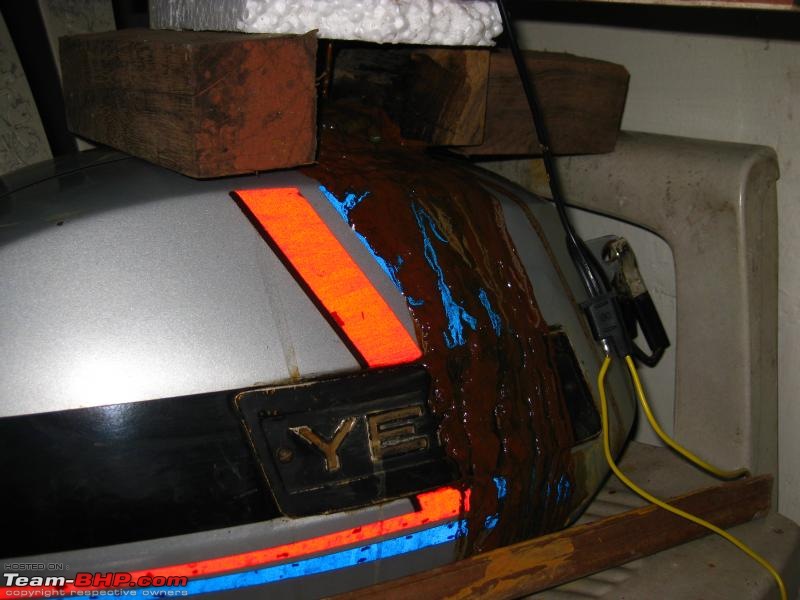
I used a couple of large alligator clips on half-meter cables to connect the PSU to the tank & wire-hanger. The fuel-tank must be negative (-) and the wire-hanger must be connected to positive (+). Get this wrong, and you will end up runing the tank.

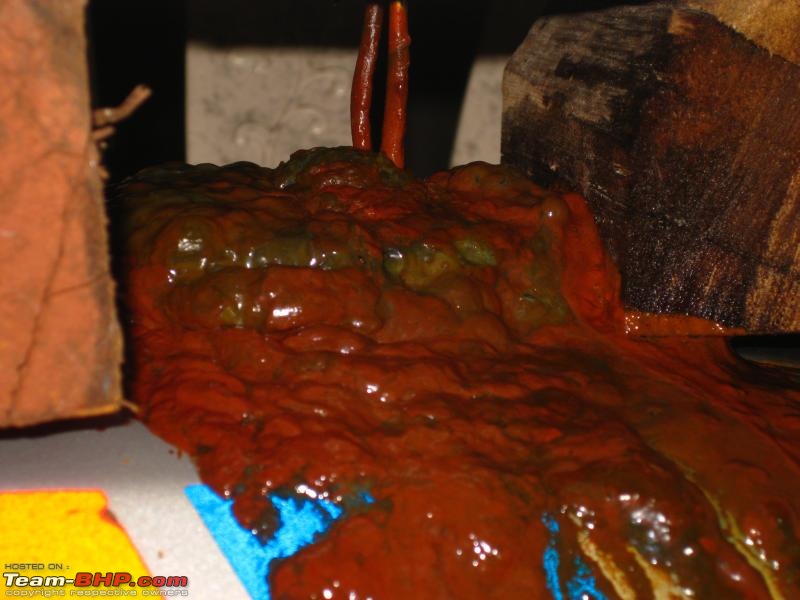
Turned the unit on in the morning at 9 AM. Almost immediately I saw bubbles surfacing and within minutes a greenish-brown sludge was forming on the tank. It is essential to keep the tank opening well ventilated - hydrogen gas is produced during this process and is highly explosive, so no open flames nearby. As the process continued, the sludge started bubbling over onto the paint. At this point I should have taken care and protected the paint with a plastic covering or something, but I was so sure that it won't harm the paint that I did do anything. And by the evening, the paint was stained at a couple of places and even peeled at one place.
Every couple of hours I scooped out the disgusting sludge and topped off with regular water. And twice during the day, I removed the wire hanger and cleaned it of deposits. The wire hanger was getting eaten away quite fast. By 5PM the wire-hanger was more than half dis-integrated.
I decided to see the situation inside the tank. So I dumped the elctrolyte and rinsed it with water. The metal inside the tank was bare, no sign of rust anywhere. It was amazing (unfortunately I was too excited at this point and forgot to take a picture). I originally planned leave the elctrolysis on overnight, but decided it was no not necessary anymore.
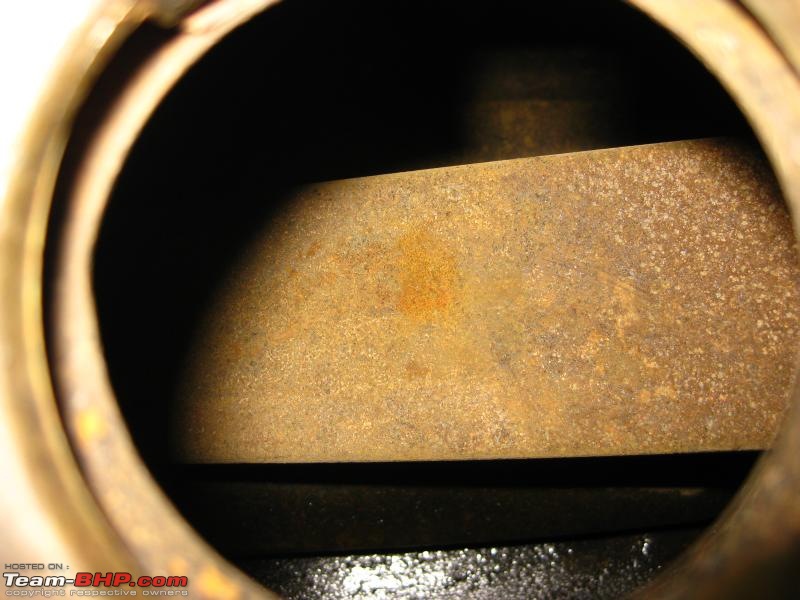
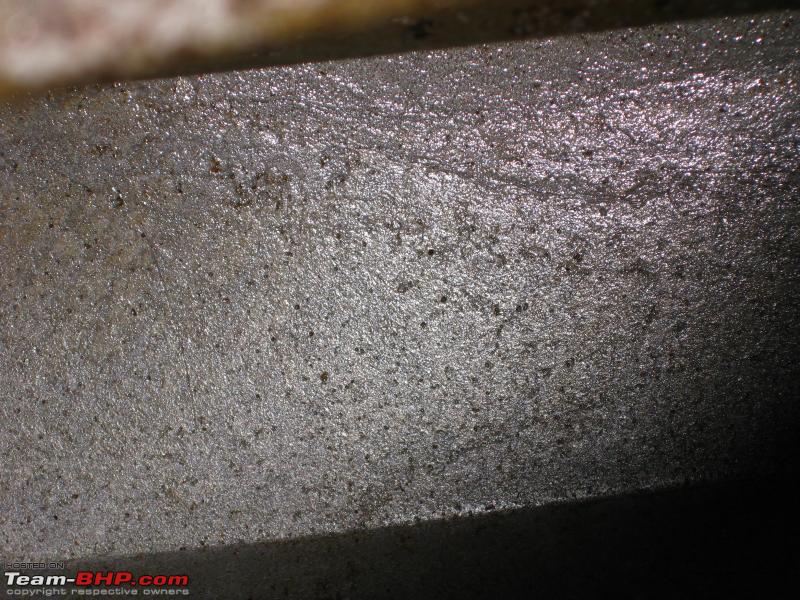
I rinsed the tank thoroughly with a high-pressure hose and then dried it with a vaccum clean set on blow. I remembered to take a picture at this point, but by now the water cleaning and air-drying caused some flash-rust inside the tank. You can see it in the pic below.
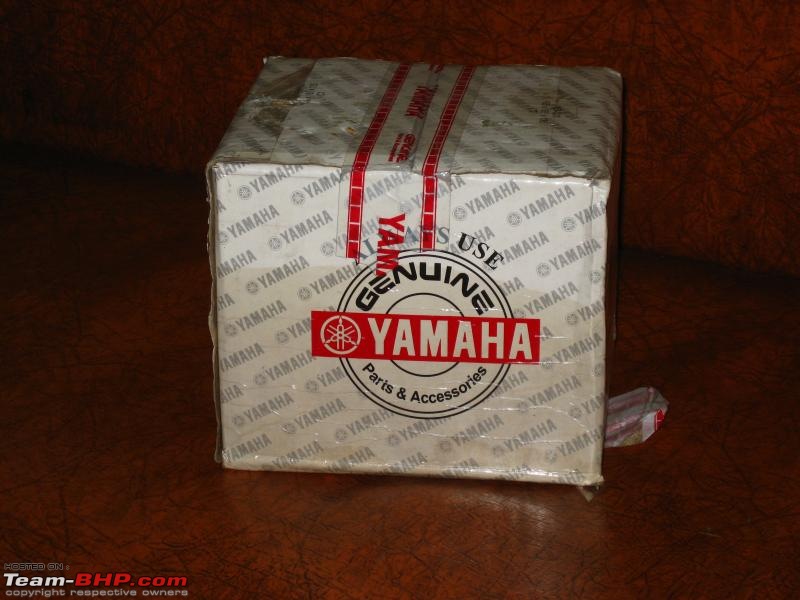
Next opened the box of RR-10 rust cleaning kit. It is marketed by Escorts Yamaha and you should find it or be able to order it at any Yamaha service center. The description on the bill says "Tank Cleaning Kit" and the Part No. is 1L166080000. Mine was old stock (mfd 2007) and the price was Rs 132 only. The box has the Yamaha logo on it. Within it there was another box with four bottles - one solvent degreaser, one rust remover and two bottles of sealant. This is similar to the "Kreem" fuel tank coating system from USA.
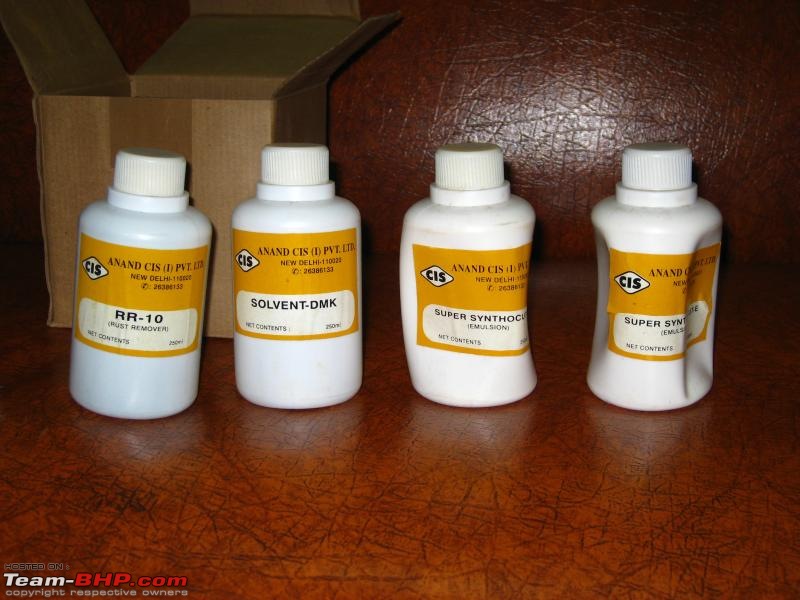
First bottle - the solvent is a colorless fluid. I didn't think it was necessary to use in my tank as it was already pretty clean, but I went ahead with it anyway for sake of completion (didn't want to regret missing this one step after all the efforts). Poured the bottle in, shook and rotated the tank for about three minutes, let it settle for the next couple of minutes and then shook it well for another three minutes before draining it all off. Point to note here is that all these liquids can be re-used. I didn't know that at the time and wasted them... grrrrr

Second bottle - the rust remover is dark brownish in color with a pungent smell. Just one look at it is enough to make sure you don't want any of it on your skin. The instructions didn't give any caution, so I was doing this with bare hands and have a couple of blisters & chemical burns to show for it. Always use gloves & eye-protection when handling these chemicals, they are quite powerful. The process is the same, dump the contents into the tank, shake the hell out of it and drain it when you are sure that you got to all the inner surfaces. I am guessing this also etched the surface for the sealant to bond in the next step.
Thrid & Fourth bottles - the sealant is creamish in color. You want to make sure that you get all of the inner surface coated with this, and then give ample time for it to dry & bond. I used the first bottle for 10 mins, then drained it back into the bottle (I got half back). Did the same with the 2nd bottle and got a bit more than half back. Let the tank settle for 10 mins and poured both bottle into the tank and did another 10-min long exercise of shaking, rotating and dancing with the tank. By this time I was pretty tired. I drained the contents and put the tank on the terrace for drying. I let it dry all day next day. By the evening the inside was smooth with withish speckles


I am pretty pleased with the results and am confident that the rust monster is gone for good from my tank. The petrol in my fuel filter bottle is now clear, earlier it used to be reddish-orange (when running) or muddy red (when clogged).
My only disappointment is that the paint got damaged. I used regular bore water for mixing the electrolyte and our area has a very high solid content in the bore water. These additional salts may have caused some unexpected reactions leading to paint damage. I think the stains will come-off with rubbing compound. The area where paint has peeled still has paint under it. I am thinking of sanding it lightly and then rubbing over it. Hopefully this will make the tank presentable. I may get the whole bike painted again sometime next year.
Well, thats my story. Hope it is of help to someone.
Cheers
Teja


 30th November 2009, 13:28

 (4)
Thanks
(4)
Thanks


 thnx mate, to yamaha as well for the product.


