Team-BHP > Motorbikes
Register New Topics New Posts Top Thanked Team-BHP FAQ


Reply
  Search this Thread
9,973 views
Old 13th June 2023, 02:06   #1
BHPian
 
NTab's Avatar
 
Join Date: Mar 2022
Location: Patna
Posts: 128
Thanked: 304 Times
DIY : Fixing a Motorcycle Puncture

Fixing the Rear Tyre Puncture on Himalayan.

The nightmare that every Himalayan owners fear, a flat rear.

We all have dreaded about it. From using pocket friendly slimes, to expensive tubeless conversion kits, most of the Himmy owners have tried whatever they can afford or believe to work. But, there is a common factor, we all run away from fixing the damn puncture the traditional way.
My story starts with the same fear. No matter where I travel to, how beautiful the vistas are, there is this perpetual fear of ‘what if the bike gets punctured?’ Some people suggested to use anti-puncture sealant, others swear by its ineffectiveness and how it affects the handling. Few good folks guided me to tubeless conversion path, but that comes with some prerequisite, aluminium rims, and money matters. No solution in sight.

Luckily I only had to curse the tube tyres twice. The first time it was around 500kms odo reading in the city. Had to drive the bike around 500mts and the puncture was repaired. After that went to at least 4 long tours and the blessing was intact. I returned from Kushma ride few days back. My wife was the pillion this time. While the whole trip went smoothly, even though the road conditions from Mugling to Pokhara were horrendous, my rear tyre finally succumbed to this tiny thorn and drew its last breath just as we reached home. This was the second time, and hopefully the last also.

This really got me thinking about the possibility of having something like this in a remote location, especially when I am solo or with a pillion. I read about it, and the only solution that came up is to learn how to fix a puncture. So I finally decided to take the plunge, and try to fix the puncture by myself. Given that I was in the comfort of my home, even if something goes wrong, I can always ring a mechanic to rectify it. I was also just tired of living in this continuous fear of getting puncture. I love ADVs and most of them have tube tyres, how long I am gonna keep running away from this and look for expensive solutions.

For members who are novice like me, I tried to document my experience as truthfully as possible so that they can learn from my mistakes (yes, I did make some), be better prepared.


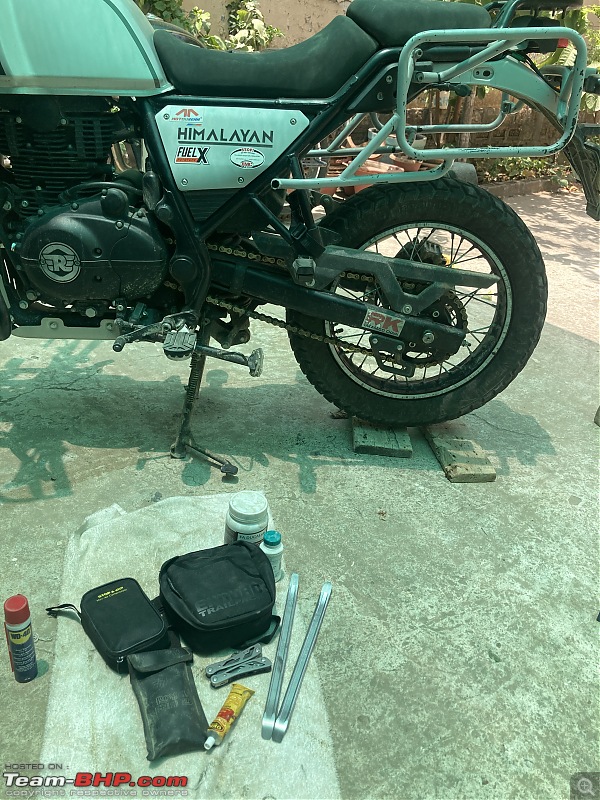
1. The Tools :- 24mm spanner, Screw Driver(to hold the axle rod), Air inflator, 3 Tyre Levers(I had 2, and realised 3 would have made life easier), Valve remover, Puncture repair kit, 1 big sheet to keep everything at place and clean.

2. The Process :- Start with taking out the rear wheel. It’s a fairly easy process. Just keep something beneath your tyres, and it will be easier to take out the axle rod. Hang the chains on the swing arms.
Attachment 2463266

Remove the sprocket from the tyre, and place them on the sheet. It’s also a good time to check for any free play on them. Now place the tyre with disc side up. Remember to keep the disc side always up otherwise you may end up damaging them.
DIY : Fixing a Motorcycle Puncture-f49fcfaab8d749f1997effe96372dd95.jpeg

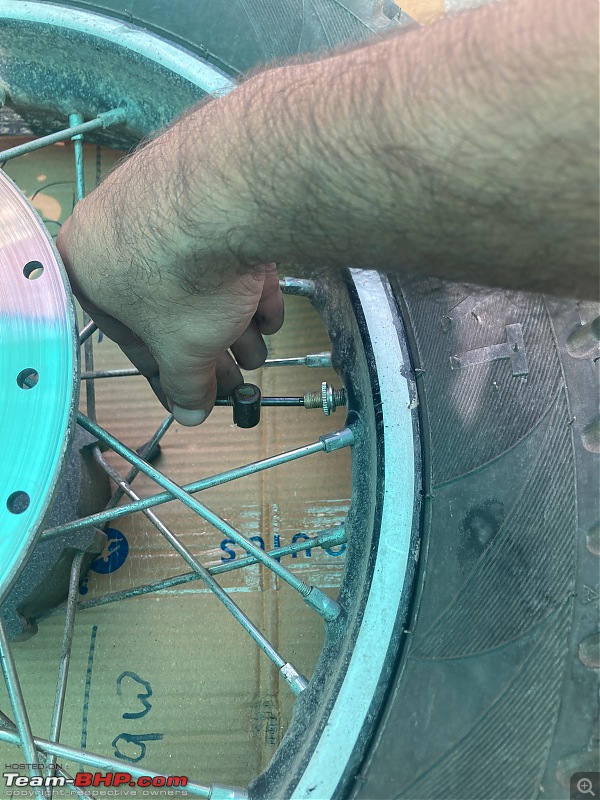
Use the valve remover tool to take out the valve, and also remove the locking nut. Check the Valve for any damage, and keep it somewhere clean and safe. Now, I missed one step here, and it created a little bit of trouble for me later on. After removing the lock nut, push the nozzle inside, otherwise after breaking the bead, it will be difficult to get it done.
DIY : Fixing a Motorcycle Puncture-fe67b553237743759604f948b7ae5c82.jpeg
DIY : Fixing a Motorcycle Puncture-c4edd18918f34354aa5f68d0af4f39f5.jpeg

The first major step. Breaking the bead. Use your knees to break it. I didn’t face any problem doing it. It’s a fairly easy process, just be sure to use good pressure. Alternatively, I have seen people using side stand of other heavy bikes to break the bead, so you can try that also.
DIY : Fixing a Motorcycle Puncture-1bc493ed92ad425ea6946af874d6fbe8.jpeg

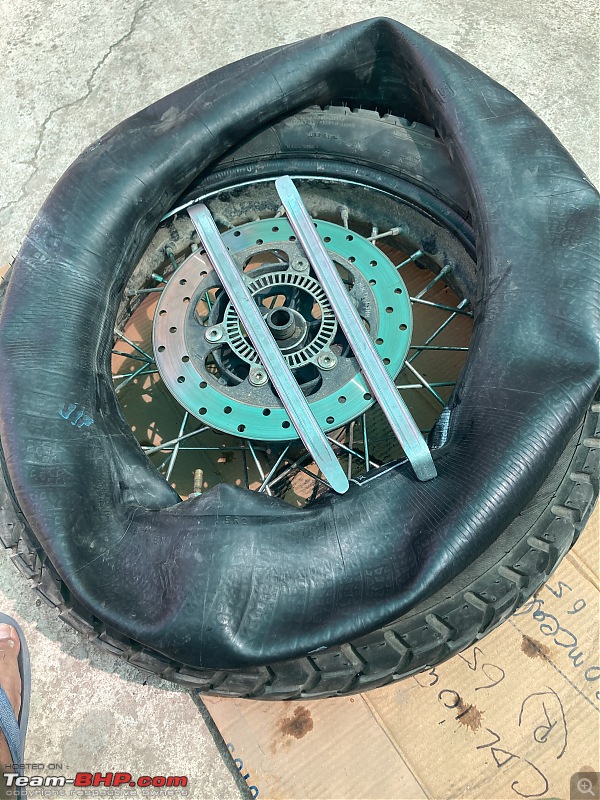
Use the levers to remove one side of the tyre from the rim. Start from the opposite side of the nozzle. Make sure not to put levers way too inside the rims as they can damage the tube lining in the middle of rim. During this process 3 levers really comes in handy. You can jam the levers in your disc pad keep on moving forward.
DIY : Fixing a Motorcycle Puncture-84abcc94d5924355b326a0148de076eb.jpeg

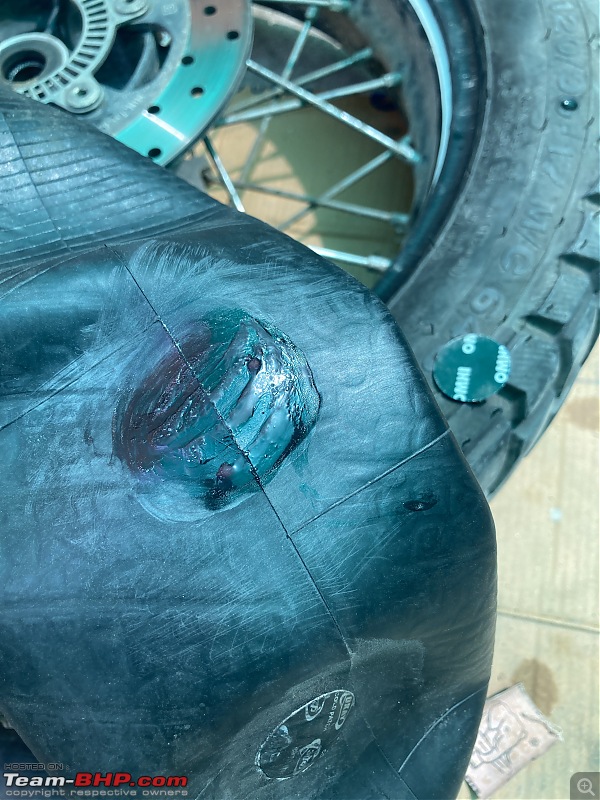
Take out the tube. First visually inspect for puncture, and also check around the nozzle. Retighten the valve and fill up air. Check for puncture(s), and mark them. Deflate the tube, use sand paper to rub around the puncture to make the surface a little coarse, easier for glue to work. Apply a generous coat of glue, let it dry for a minute, and then put the puncture patch over the hole. Use the lever/spanner to put a little pressure over the patch by gently pressing over it. Keep it aside for few minutes.
DIY : Fixing a Motorcycle Puncture-de639287e89746a0a494f6106da26b54.jpeg
DIY : Fixing a Motorcycle Puncture-11174892ed404118bbc20e0f6337574e.jpeg
DIY : Fixing a Motorcycle Puncture-d11e21443d244673963885a11c29fbd1.jpeg
DIY : Fixing a Motorcycle Puncture-c14c957aa5804bb38314b40cd96cb10b.jpeg

Now check the tyre for nail or any sharp object. It’s time to put the tube back in tyre. You can recheck the tube again by inflating it. Better safe than sorry. Insert the nozzle first and use the locking nut to keep it from sliding inside. Insert the tube in the tyre carefully. One trick I have seen somewhere is to sprinkle some baby powder over the tube. It helps with prevention of folds on the tube while inserting.
DIY : Fixing a Motorcycle Puncture-659242e7d4524d87a036430f5b01166a.jpeg
DIY : Fixing a Motorcycle Puncture-5851a7847d1d48bb88e78a55c757cc5d.jpeg


The toughest part for me starts now. Putting the tyre back into the rim. I think there is no trick to it. It’s just that you have to do it somehow. Remember not to insert levers way too inside in the rims, as it can damage the tube and lining. Again 3 levers could have made it a little easier.
DIY : Fixing a Motorcycle Puncture-5db0796503ac4e759349d9333623f985.jpeg

Inflate the tyre, and refit it onto the bike. Keep something beneath the tyre as it will be easier to insert the axle rod. You can also check for chain slack right now, and adjust accordingly.
DIY : Fixing a Motorcycle Puncture-9935024bd86d49ee92f41d20b80c509c.jpeg


Now that I have done it myself with the basic tools, my fear has absolutely gone. It’s a liberating feeling hard to explain. It’s a little time taking and physically exhaustive process, but punctures don’t happen every other day. Hardly twice or thrice during a tyre’s life, and that too can be avoided by keeping the optimum pressure.

I hope this guide proves to be helpful, and a little motivational for every TBHPian to finally embrace the tube tyres, and travel in peace.


Looking forward to experience and tips from other fellow members.
NTab is offline   (40) Thanks
Old 13th June 2023, 04:44   #2
Team-BHP Support
 
Join Date: Feb 2004
Location: Mumbai
Posts: 20,018
Thanked: 86,411 Times
re: DIY : Fixing a Motorcycle Puncture

Thread moved out from the Assembly Line. Thanks for sharing!
Aditya is offline   (2) Thanks
Old 13th June 2023, 09:42   #3
Senior - BHPian
 
sandeepmohan's Avatar
 
Join Date: Feb 2010
Location: Wellington
Posts: 3,283
Thanked: 6,045 Times
Re: DIY : Fixing a Motorcycle Puncture

Much appreciate sharing this DIY.

A point I'd like to add is not to have someone accidently apply the rear brakes. Once the piston pops out, its hard to push it back in.

It may not always be possible to unmount the wheel when you're out on the road. Also, not all of us carry those large levers to unmount the tire from the rim.

As an alternative, if you are faced with a flat that can be rectified or repaired with a puncture patch, I'd try and unseat the tire and get the tube out with the wheel still mounted on the swing arm. You'll have to inflate partially (probably 20%) and listen for an air leak. The challenge with this process is getting the tube out so you'll still need tire levers (maybe shorter ones).
sandeepmohan is offline   (7) Thanks
Old 13th June 2023, 10:31   #4
BHPian
 
NTab's Avatar
 
Join Date: Mar 2022
Location: Patna
Posts: 128
Thanked: 304 Times
Re: DIY : Fixing a Motorcycle Puncture

Quote:
Originally Posted by sandeepmohan View Post
Much appreciate sharing this DIY.

A point I'd like to add is not to have someone accidently apply the rear brakes. Once the piston pops out, its hard to push it back in.
Thank you for the appreciation.
It’s a great point that you have mentioned. I have highlighted it also. Rear disk brake at times are extremely irritating and problematic in refitting of tyre, and that’s one of the reason a lot of puncture guys don’t want to work on such bikes.

Quote:
It may not always be possible to unmount the wheel when you're out on the road. Also, not all of us carry those large levers to unmount the tire from the rim.
With all the luggage mounted, it may get difficult to unmount the rear wheel. Also, the weather and terrain plays a crucial role in doing things yourself.
Regarding those tyre levers. I don’t think carrying them requires any extra space. I have kept mine in the side chain of my saddle bag. Previously it was laid flat inside my Viaterra Claw. All they need is 12 inches of flat space in your cargo space. There are smaller ones also, but I suppose it will not be easy generating enough leverage with them.

Quote:
As an alternative, if you are faced with a flat that can be rectified or repaired with a puncture patch, I'd try and unseat the tire and get the tube out with the wheel still mounted on the swing arm. You'll have to inflate partially (probably 20%) and listen for an air leak. The challenge with this process is getting the tube out so you'll still need tire levers (maybe shorter ones).
This is something which seems to be much easier method but I haven’t seen anyone doing it properly. Also, given the limitations, unseating the tyre is the real task.

There is also one point I forgot to add to the original post. Even if you don’t wish to patch the puncture yourself, it’s a good idea to at least learn how to mount and unmount the rear wheel. In case of emergency you can take out the wheel and go directly to the repair guy rather than going to and fro. Also if you happen to find someone who doesn’t want to work because of disk brakes, you can unmount yourself, get the tyre patched and mount it back.
NTab is offline   (5) Thanks
Old 13th June 2023, 22:40   #5
Newbie
 
Join Date: Feb 2023
Location: Kochi
Posts: 23
Thanked: 76 Times
Re: DIY : Fixing a Motorcycle Puncture

Quote:
Originally Posted by NTab View Post
It’s a great point that you have mentioned. I have highlighted it also. Rear disk brake at times are extremely irritating and problematic in refitting of tyre, and that’s one of the reason a lot of puncture guys don’t want to work on such bikes.
As a person who had owned Himalayan and removed the back wheel countless times, the trick is to put the chain first and fit the caliper in the wheel before sliding the whole wheel to the frame. The order is very important, otherwise you will waste your time fighting the chain and caliper.

Quote:
A point I'd like to add is not to have someone accidently apply the rear brakes. Once the piston pops out, its hard to push it back in.
I would advise inserting a spanner into the gap between the brake pads after you have removed it from the wheel, you can use the spanner that comes with the bike, the thickness of the disk and the spanner is almost the same.
aslampr07 is offline   (4) Thanks
Old 14th June 2023, 16:37   #6
BHPian
 
windiesel's Avatar
 
Join Date: Aug 2009
Location: All CAPS
Posts: 507
Thanked: 298 Times
Re: DIY : Fixing a Motorcycle Puncture

Quote:
Originally Posted by NTab View Post
but punctures don’t happen every other day. Hardly twice or thrice during a tyre’s life, and that too can be avoided by keeping the optimum pressure.
That's twice/thrice too many! I had a puncture on my rear tyre of Meteor at a place 25 km ahesad of Chakrata in the middle of nowhere. Thank heavens, the tyres are tubeless on my bike and we had a small pump and a repair kit handy and the leak could be plugged with not too much drama. Had I been running tubetype tyes, a puncture repair guy had to summoned from 25 km away the next day! Being 50+ riders, both me and my buddy, there was no way we could have taken off the tyre and all the action that you did!
windiesel is offline   (2) Thanks
Old 14th June 2023, 17:41   #7
BHPian
 
NTab's Avatar
 
Join Date: Mar 2022
Location: Patna
Posts: 128
Thanked: 304 Times
Re: DIY : Fixing a Motorcycle Puncture

Quote:
Originally Posted by windiesel View Post
That's twice/thrice too many! I had a puncture on my rear tyre of Meteor at a place 25 km ahesad of Chakrata in the middle of nowhere. Thank heavens, the tyres are tubeless on my bike and we had a small pump and a repair kit handy and the leak could be plugged with not too much drama. Had I been running tubetype tyes, a puncture repair guy had to summoned from 25 km away the next day! Being 50+ riders, both me and my buddy, there was no way we could have taken off the tyre and all the action that you did!
Even a single puncture can be a torture if one is stuck at the wrong place. Tubeless(/conversion)is obviously the optimal way, but it’s way too costly, especially for bikes with steel rims. Even if one doesn’t know how to fix a puncture, at least learning how to mount/unmount the tyres is a necessary skill for tourers.
NTab is offline   (4) Thanks
Old 15th June 2023, 09:10   #8
Senior - BHPian
 
Join Date: Dec 2006
Location: pune
Posts: 2,397
Thanked: 2,735 Times
Re: DIY : Fixing a Motorcycle Puncture

Quote:
Originally Posted by NTab View Post
I tried to document my experience as truthfully as possible.
Perfectly done, thanks for sharing. Reminded me of Bhaiyyaji's thread on tubeless tyres.

Quote:
Breaking the bead. Use your knees to break it.
One can even stand on tyre sidewall.

Quote:
Make sure not to put levers way too inside the rims as they can damage the tube lining in the middle of rim.
I have done this on bicycle tubes a lot, forcing me to change tube rather than fixing the puncture.

Quote:
One trick I have seen somewhere is to sprinkle some baby powder over the tube. It helps with prevention of folds on the tube while inserting.
Other trick would be to fill little air in tube to avoid folds on tube.

Quote:
There is also one point I forgot to add to the original post. Even if you don’t wish to patch the puncture yourself, it’s a good idea to at least learn how to mount and unmount the rear wheel. In case of emergency you can take out the wheel and go directly to the repair guy rather than going to and fro. Also if you happen to find someone who doesn’t want to work because of disk brakes, you can unmount yourself, get the tyre patched and mount it back.
Agree fully. I have seen even tyre dealers charging extra for wheel removal in spite of disc brakes becoming a norm on our two-wheelers.
sukiwa is offline   (3) Thanks
Old 15th June 2023, 14:12   #9
HTC
BHPian
 
Join Date: Mar 2020
Location: Bengaluru
Posts: 398
Thanked: 1,376 Times
Re: DIY : Fixing a Motorcycle Puncture

We happened to encounter 2 punctures on himalayan bikes during our ladakh trip last year.

Luckily my instincts kicked in when we entered Manali and I saw RE spares shop. Bought the levers and extra tube. First puncture happened around 8pm at Upshi. We were returning to Leh from Hanle. Since there was no puncture shop open at that time, removed the rear wheel and took it to Karu which was 6 KMs from there. After getting the puncture done, came back to bike and found someone who know to fix rear wheel. He asked for spacer which was missing. Then we realized that we had dropped it somewhere on the way to Karu. Again went to Karu and found the spaces was lying on the ground in front of puncture shop. Good thing is we observed how he put the tyre back. Since its disk brake, after fitting back the tyre, need to pump the brake lever few times to build the lost pressure in brake lines.

Next day evening, on our journey to Leh, another Himalayan in our group picked a puncture at Pang. It was raining aswell. But somehow we managed to use the tools and replace punctured tube with new one.

Right sized spanner, pump, levers and spare tubes are must when going on long rides. I feel better pay a puncture guy some money to learn removing tyres and applying punctures.
HTC is online now   (5) Thanks
Old 15th June 2023, 19:39   #10
BHPian
 
NTab's Avatar
 
Join Date: Mar 2022
Location: Patna
Posts: 128
Thanked: 304 Times
Re: DIY : Fixing a Motorcycle Puncture

Quote:
Originally Posted by sukiwa View Post

One can even stand on tyre sidewall.
I tried standing on the sidewalls, but as the wheel hub was protruding outside of the rims, it was very wobbly and unstable. Went down on my knees eventually.
Another trick is use side stand of another motorcycle. It’s the easiest way if you are accompanied by another bike.


Quote:
Other trick would be to fill little air in tube to avoid folds on tube.
Another great trick. Highlighted it as well.


Quote:
Originally Posted by HTC View Post
We happened to encounter 2 punctures on himalayan bikes during our ladakh trip last year.

Right sized spanner, pump, levers and spare tubes are must when going on long rides. I feel better pay a puncture guy some money to learn removing tyres and applying punctures.
Tubes are must for Himalayan owners. The stock size is impossible to find if you are stuck somewhere. At times people don’t realise the puncture and keep on driving which completely damages the tube. Happened with my riding partner on our way back from Guwahati. As soon as he noticed the tyre is flat, he stopped, and even then the tube was completely gone. Luckily we had spare tubes, and that saved us from a lot of hassle.
NTab is offline   (3) Thanks
Old 15th June 2023, 21:19   #11
BHPian
 
adrian's Avatar
 
Join Date: Sep 2009
Location: Trivandrum
Posts: 942
Thanked: 1,273 Times
Re: DIY : Fixing a Motorcycle Puncture

Quote:
Originally Posted by NTab View Post
Fixing the Rear Tyre Puncture on Himalayan.


Remember not to insert levers way too inside in the rims, as it can damage the tube and lining.[/b]
Congratulations on your DIY. Regarding the tyre lever pinching the tube : This can be preventing by slightly inflating the tube before trying to pry the tyre beads over the rim.

Quote:
Originally Posted by sandeepmohan View Post
Much appreciate sharing this DIY.

A point I'd like to add is not to have someone accidently apply the rear brakes. Once the piston pops out, its hard to push it back in.
This can be prevented by wedging something between the brake pads, every time the wheel is removed.

I got a simple useful plastic wedge (usually thrown away by mechanics) along with my Royal Enfield Disk brake conversion kit (Bybre), which fits perfectly between the brake pads when the wheel is removed. Not aware if this can be purchased anywhere.

DIY : Fixing a Motorcycle Puncture-whatsapp-image-20230615-9.07.47-pm.jpeg

DIY : Fixing a Motorcycle Puncture-whatsapp-image-20230615-9.06.43-pm.jpeg

DIY : Fixing a Motorcycle Puncture-whatsapp-image-20230615-9.06.40-pm.jpeg

regards adrian
adrian is offline   (6) Thanks
Old 19th June 2023, 09:34   #12
Newbie
 
Join Date: Feb 2022
Location: Mysore
Posts: 10
Thanked: 14 Times
Re: DIY : Fixing a Motorcycle Puncture

I had the same thought process of learning atleast how to remove the wheel on my Interceptor. Royal Enfield has a DIY Playlist on YouTube that helps. Although I got the thing done pretty well, taking care to block the disc brake pads as mentioned, my rear brake stopped working post the fix. Tried pumping and checking for pressure and eventually had to call an RE mechanic who diagnosed it as the abs sensor gone faulty, although I'm not sure what I did to cause that.
BlitzAl is offline   (2) Thanks
Old 19th June 2023, 22:51   #13
BHPian
 
NTab's Avatar
 
Join Date: Mar 2022
Location: Patna
Posts: 128
Thanked: 304 Times
Re: DIY : Fixing a Motorcycle Puncture

Quote:
Originally Posted by BlitzAl View Post
I had the same thought process of learning atleast how to remove the wheel on my Interceptor. Royal Enfield has a DIY Playlist on YouTube that helps. Although I got the thing done pretty well, taking care to block the disc brake pads as mentioned, my rear brake stopped working post the fix. Tried pumping and checking for pressure and eventually had to call an RE mechanic who diagnosed it as the abs sensor gone faulty, although I'm not sure what I did to cause that.

ABS sensor going kaput due to tyre removing and refitting is kind of new, never heard about it. Good that you mentioned it, at least there is this one possible cause if breaks don’t work even after pumping.
NTab is offline   (2) Thanks
Old 20th June 2023, 10:31   #14
BHPian
 
adrian's Avatar
 
Join Date: Sep 2009
Location: Trivandrum
Posts: 942
Thanked: 1,273 Times
Re: DIY : Fixing a Motorcycle Puncture

Quote:
Originally Posted by BlitzAl View Post
RE mechanic who diagnosed it as the abs sensor gone faulty, although I'm not sure what I did to cause that.
Quote:
Originally Posted by NTab View Post
ABS sensor going kaput due to tyre removing and refitting is kind of new, never heard about it.
The following video refers to a problem of ABS malfunctioning and this can happen during tyre removal, if one is not careful.

adrian is offline   (3) Thanks
Reply

Most Viewed


Copyright ©2000 - 2025, Team-BHP.com
Proudly powered by E2E Networks