| |||||||

| Search Forums |
| Advanced Search |
| Go to Page... |
 |
| Search this Thread |  119,881 views |
 23rd April 2023, 12:39
| #1 |
| Senior - BHPian | 2023 Royal Enfield Classic 350 | Chrome Red | The Comprehensive Review Is it the LAST of the Timeless Classic? 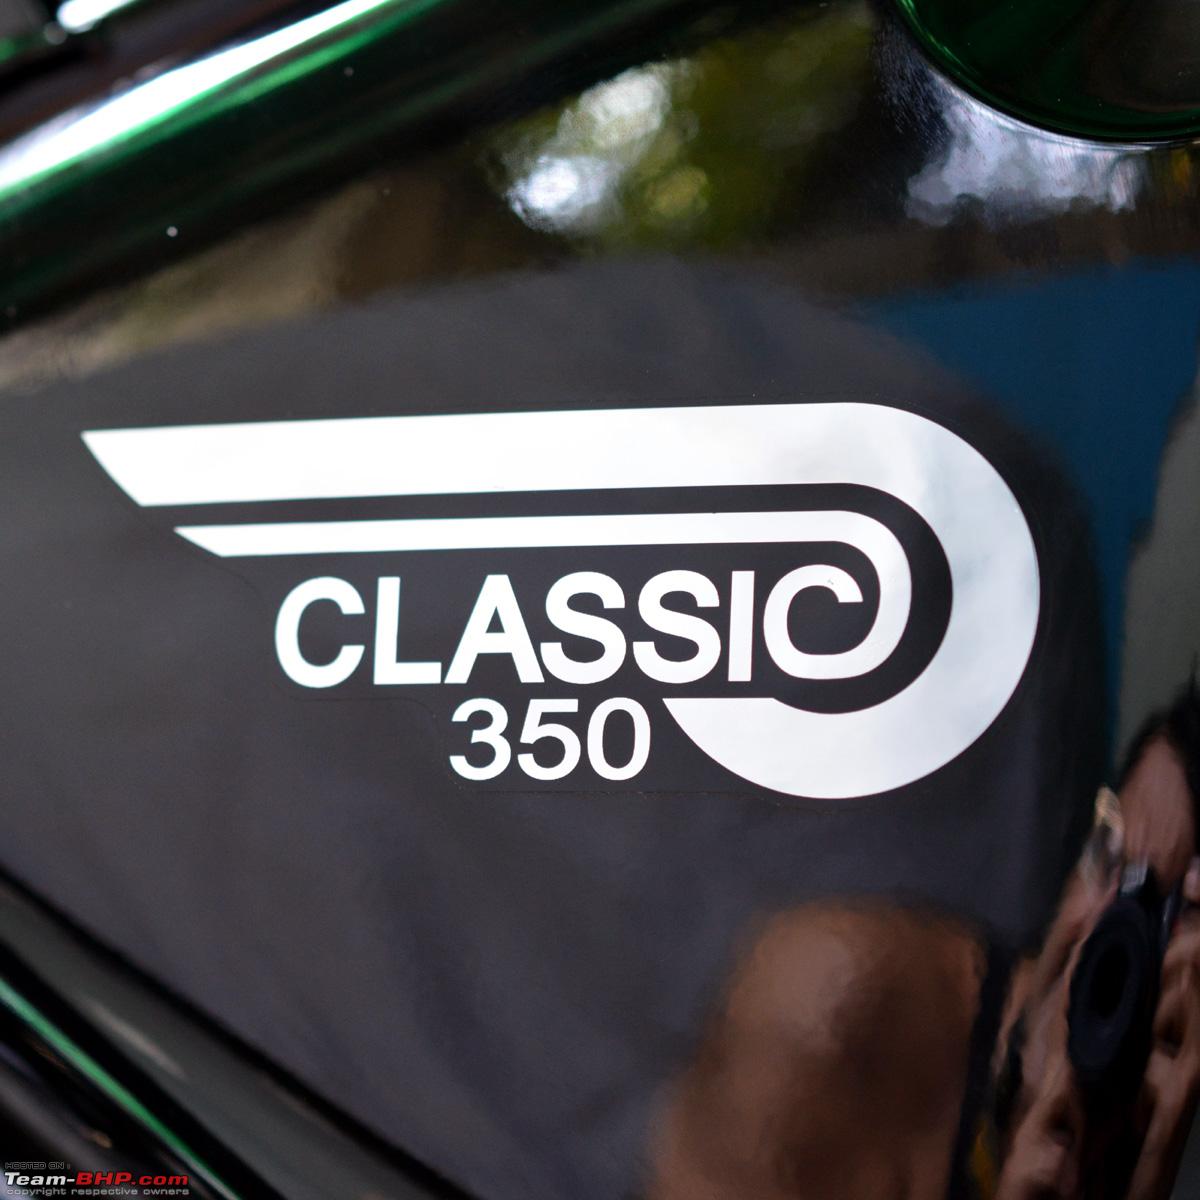 Someone said somewhere that this is THE BEST motorcycle in the world?? 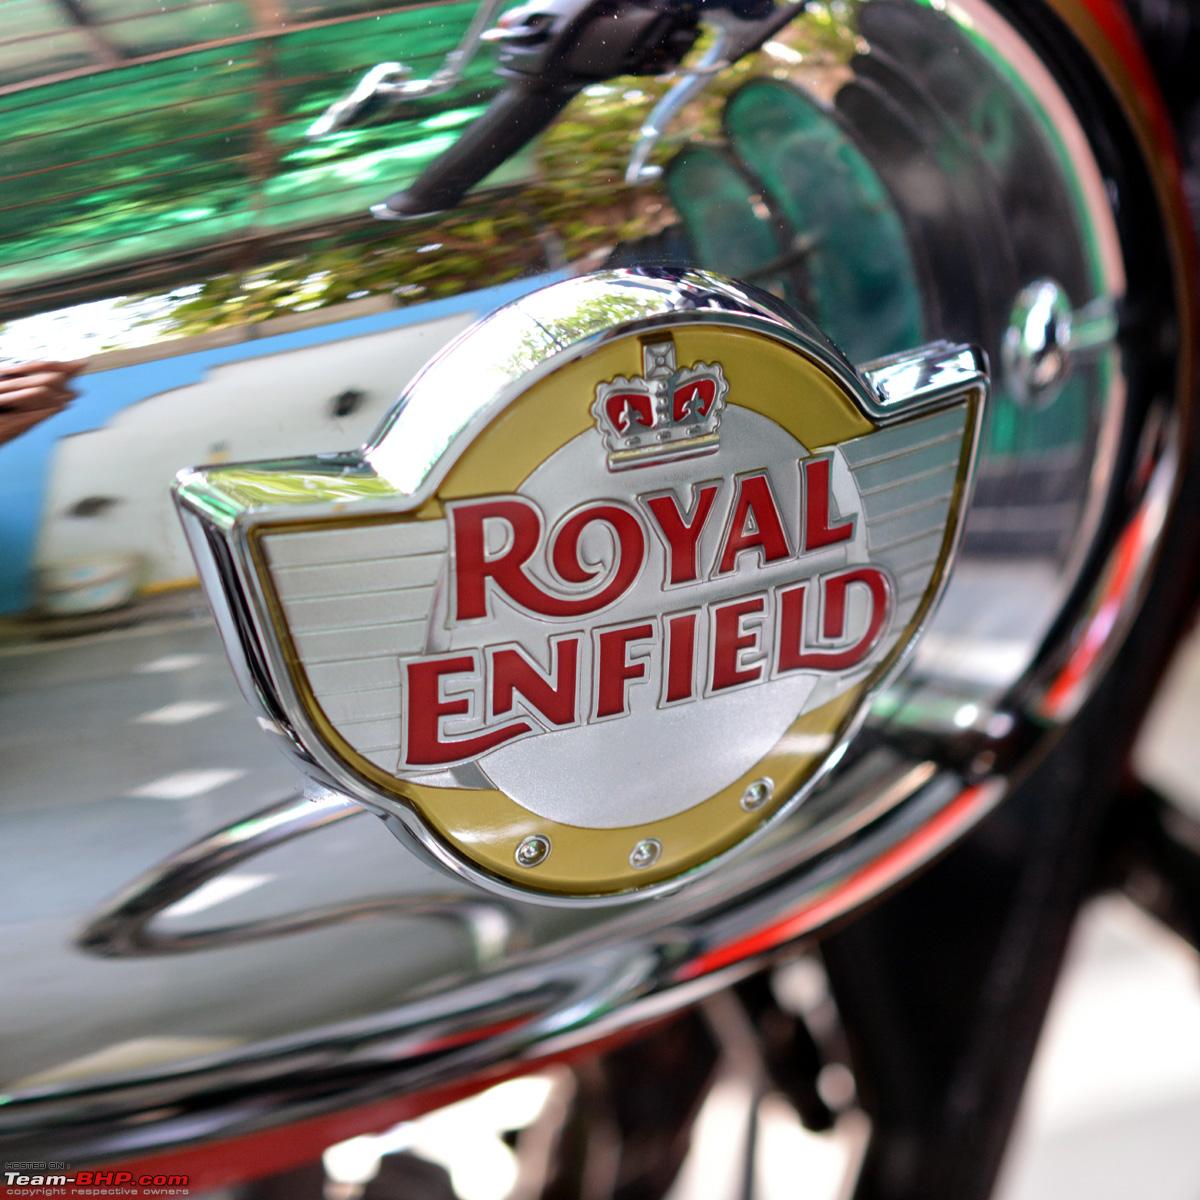 That THIS is all the motorcycle you will ever need?? Huh!!!  (I should call it a DAZZLER rather than a motorcycle...lolz)  When I watched and read some reviews, which state the above facts, about this motorcycle, I really scratched my head!! I (DISCLAIMER - arguably) own the "BEST" motorcycle in the world i.e. the BMW R1250 GS Adventure (BMW R1250GS Adventure Pro MY2020 - Style HP - The Comprehensive Review). I also own one of the (if not THE) "BEST" Classic CRUISER motorcycle in the world i.e. the HARLEY DAVIDSON Heritage Softail Classic (Harley-Davidson Heritage Softail Classic FLSTC: The Comprehensive Review) (which has CLASSIC written even in it's name). Then why would someone like me be inclined towards such tall claims about our familiar, Made in India, grassroots bike like the "BULT" (as they call it in Punjab... Lolz). Long story short, I owned the first Bullet 500 of Northern India in the early 90's when it was relaunched. Sold it in less than 2 years due to lack of finesse or quality and it's failure to startup in the winters even after literally breaking my leg on it's kick starter. But it always had a charm, a connect in my mind. The other day I was riding my local transport - my 2004 Karizma, which had done just 12k kms in 19 years and was literally still maintained by me as good as new. And I was stopped by the cops who informed me that the RC of my Karizma had expired 4 years back... lolz, and that I could not longer get the RC extended as I stayed in the NCR and it had become a END OF LIFE vehicle in their books and could be impounded... unbelievable. This policy of the NCT really does not make any sense for low mileage, well maintained and non polluting vehicles like mine, but then when did we ever consider many of our policies to be running on logical lines. They could easily get a full fitness test conducted, with full emissions checkup and let the vehicle ply on the roads like abroad. But then... So they stopped short of seizing my vehicle and told me to junk it up ASAP and get a new vehicle. So, survival without a 'small' 2 wheeler in a congested city like Meerut is just not possible. So the seeds to get a new 2 wheeler were sown! And what better choice than to return back to the "Timeless Classic" that was still plying on our roads in it's modern 'avatar'. I was a sucker for the extremely good looks of the Classic 350 so it was really a no-brainer to go for it compared to the Meteor or other bikes in the RE stable. I had also owned the Himalayan in 2016 from the RE stable, as some of you would remember, which I used primarily to do my bucket list solo 20 days sojourn of Leh Ladakh and subsequently sold it off. Budget was not a constraint but the 'Super Meteor 650' was too big for my needs in the city and I also did not find it as comfortable as the 350. It's short test ride had my lower back straining over. Next decision was the colour. I had only 2 in mind, the top of the line Chrome Red or the Halcyon Green which nearly matched my old Bullet 500 (Green) in looks. RE was charging nearly 22k premium for the Chrome parts but after discussing with my dealer friend I went for the Chrome because RE does really spend some extra dow on the hard chrome process. The build quality and fit and finish has come a long... read REALLY long, long way from the Bullet that I remember from 30 years back. And this new J series ENGINE, is just a GEM. More on it later. So it was booked on the 22nd of March'2023 through the Make it Yours (MIY) app at my friend's dealership in Meerut. I customised the bike as I needed it in Alloy Wheels for peace of mind. Some may argue that the "Classic" quotient of the bike decreases without the spoked rims, and I do agree to an extent, but then practicality is also important. And it does look quite good in those machined alloy wheels from the factory with tubeless tyres. It was built in the factory the very same day i.e. the 22nd of March and it was delivered to me on the 6th of April 2023, still very much factory fresh. So the cost breakup comes as follows - It was Rs. 2,30,135/- ex-showroom (with company fitted alloy wheels and tubeless tyres). For context the ex-showroom price of the bike with spoked wheels and tubed tyres is Rs. 2,21,297/-, so the company fitted alloys and tubeless tyres costed me Rs. 8,838/- extra. Their MRP at the dealership is Rs. 14,000/- but they do come with a 10% discount, so lets say 12,600/-, but then conversion to Tubeless tyres would have been another issue, but then you do get to keep the original spoked wheels too. So overall, I feel it was a good deal. And in comparison the Halcyon Green costs 1,98,971/- ex-showroom. So the Chrome version is charging a premium of Rs. 22,326/-. Still worth it in my books. RTO was 24014, Comprehensive Insurance with zero dep and return to invoice was 13155 with 1 year full and further 4 years 3rd party, total 5 years insurance. I installed original genuine accessories from the dealership worth 11,150/- on which I got 1,115/- discount which included - Silver Airfly Evo Engine Guard in SS 4250/-, Silver Aluminum Sump Guard 3100/-, Passenger Backrest with fittings 2700/- and a Bike Cover for 1100/- (which was later give to me complementary). So total on-road cost with accessories and little discount was 2,76,019/-. Add to it the original Tripper Navigation I added a little while back for Rs. 5500/- (after discount for 3 components, details later. Factory fitted Tripper is now available in all variants of the Classic 350 from April'23 manufacturing onward for Rs. 5000/-; Sadly it was out of stock when I configured my bike online) and the On ride price of the bike goes upto Rs. 2,81,019/- More to follow... Last edited by dkaile : 24th April 2023 at 15:36. |

|  (35)
Thanks (35)
Thanks
|
| The following 35 BHPians Thank dkaile for this useful post: | aargee, adrian, ajay0612, anivy, bblost, berserk, CentreOfGravity, chinmaypillay, Cyborg, dailydriver, deerhunter, Gordon, GTO, irajput, keroo1099, lovetorque, mh09ad5578, navin_v8, pachchu77, Peri_patetic99, Ranjith812, Redline6800, RedPhobos, rj22, Roy.S, samabhi, shancz, Shreyas Aterkar, shyamg28, SmartCat, Vaishak, Viju, Voodooblaster, Wageabond, Waspune |
| |
|
23rd April 2023, 13:17
| #2 |
| Senior - BHPian | re: 2023 Royal Enfield Classic 350 | Chrome Red | The Comprehensive Review The Delivery The bike was delivered on the 06th of April but there were some hiccups along the way... I was there when the bike reached the dealership from their local stockyard  Unloading  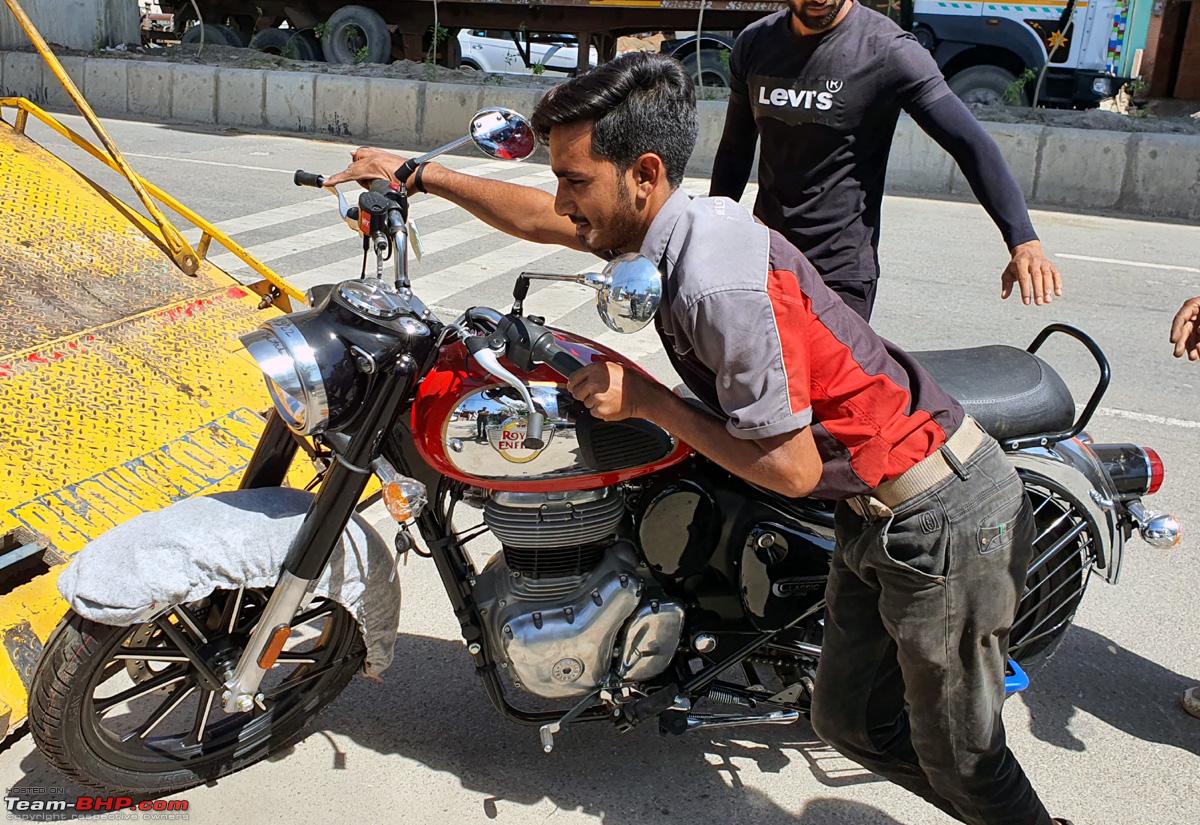 Manufacturing date reads as 22-Mar-23 on the VIN sticker 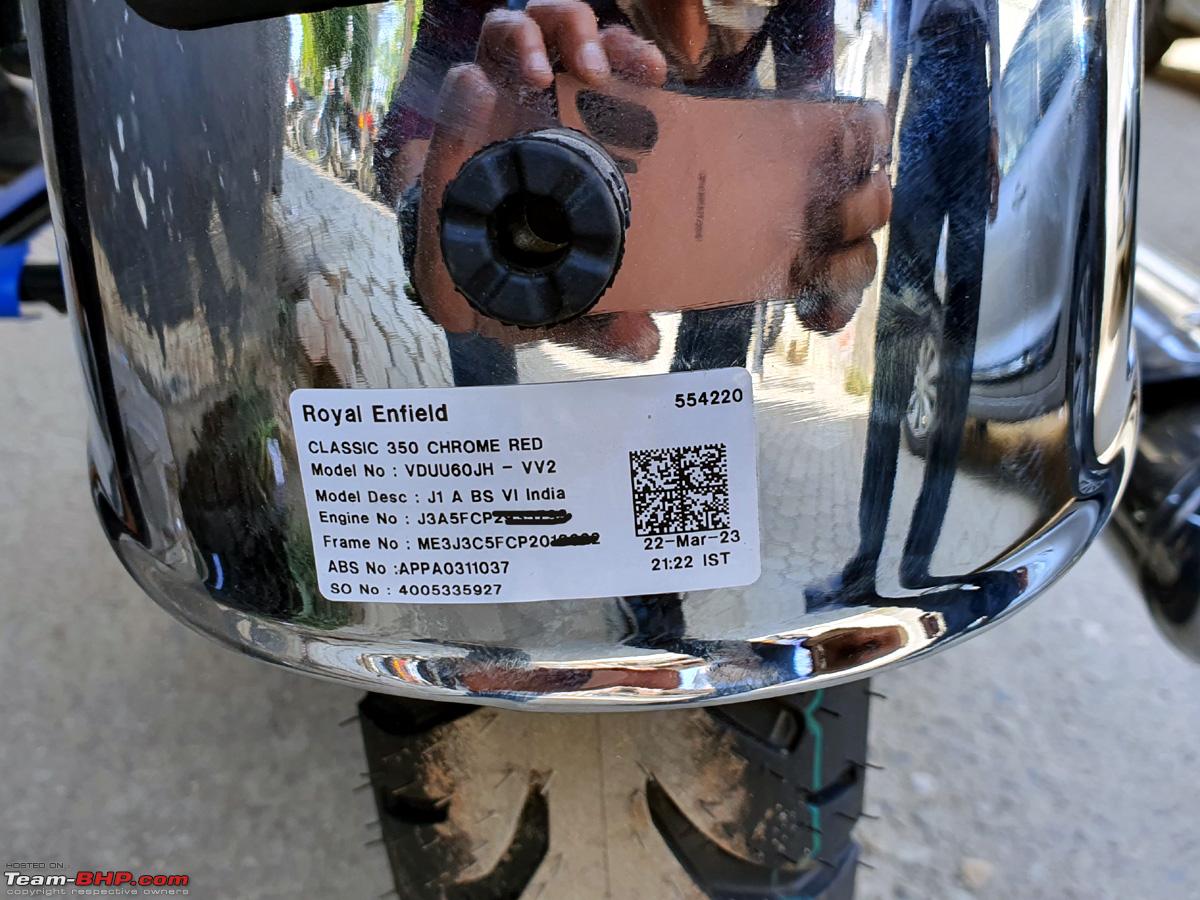 But there were 2 transportation damages to the bike. The 1st being a scratch on the front chrome fender - 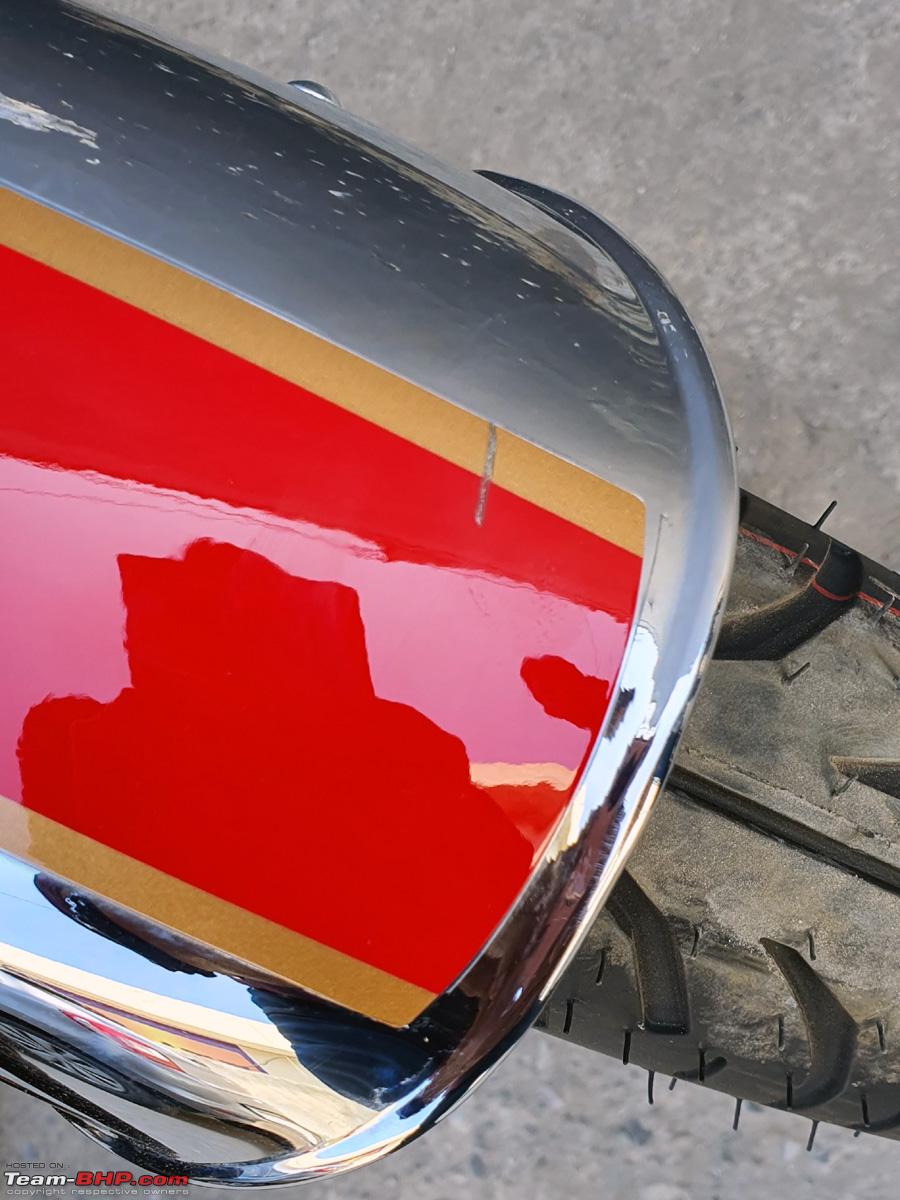 And the 2nd being a slight tear, which was hardly noticeable, to the pillion seat -  I got both these parts replaced from a brand new stock bike which was standing in their godown, thanks to the pro-activeness of my dealer friend. He will get these parts replaced from the RE factory and subsequently replace them on his own bike, so the new owner too gets a fresh bike with undamaged parts. The Engine # and Chassis # (VIN) were checked and found to be manufactured in March 2023. The 9th digit in the VIN is the month of manufacture which in my case was 'C' which corresponds to 'March', and the 10th digit is the year of manufacture which in my case was 'P' which corresponds to '2023' 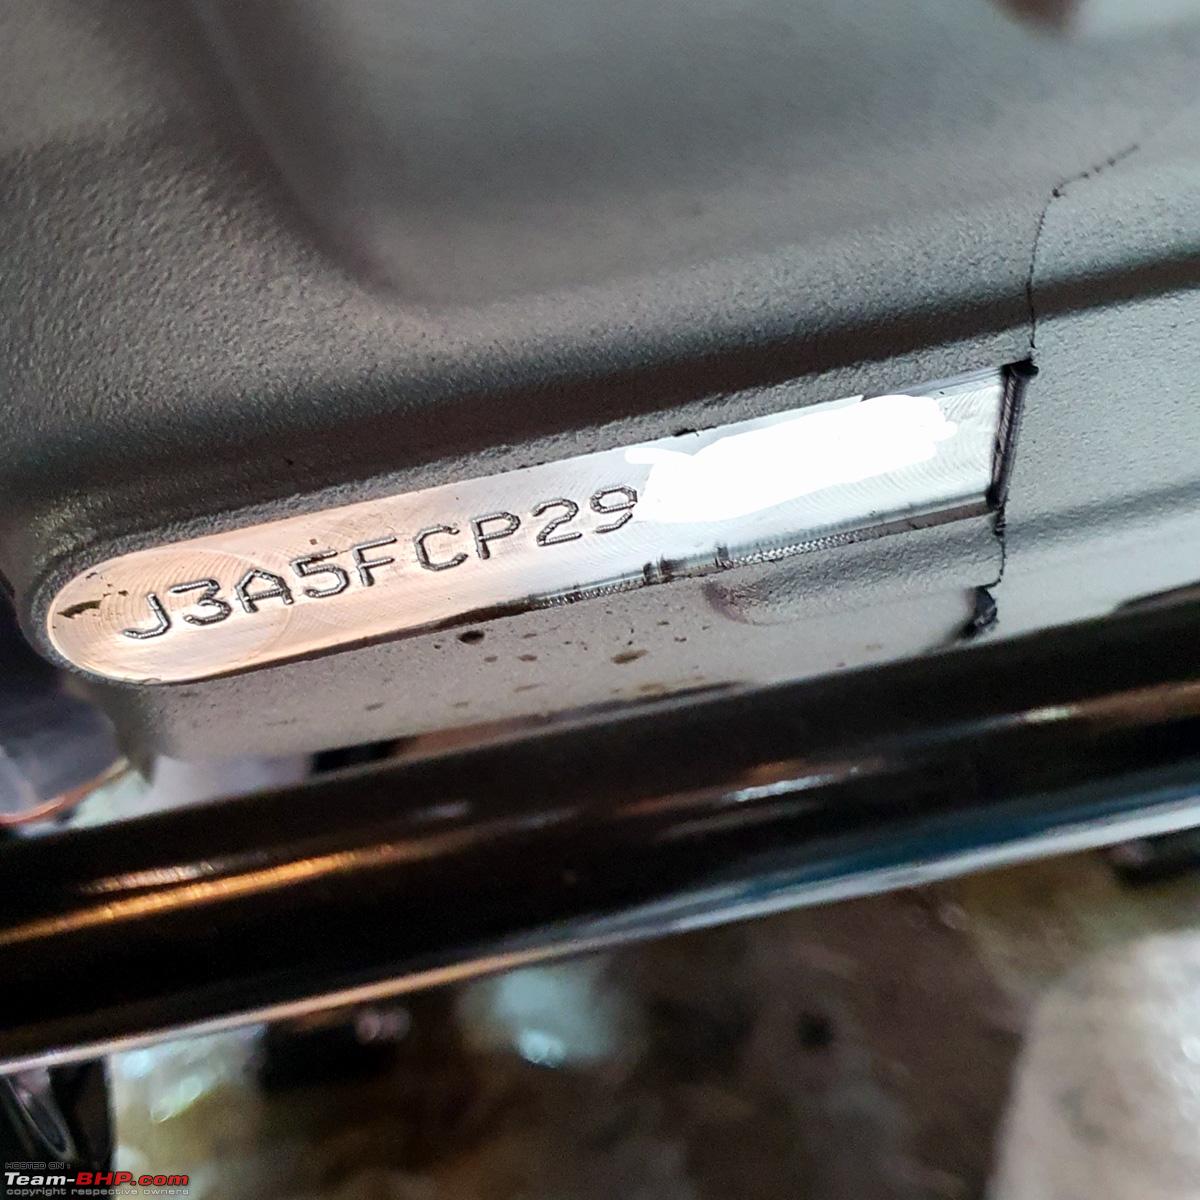 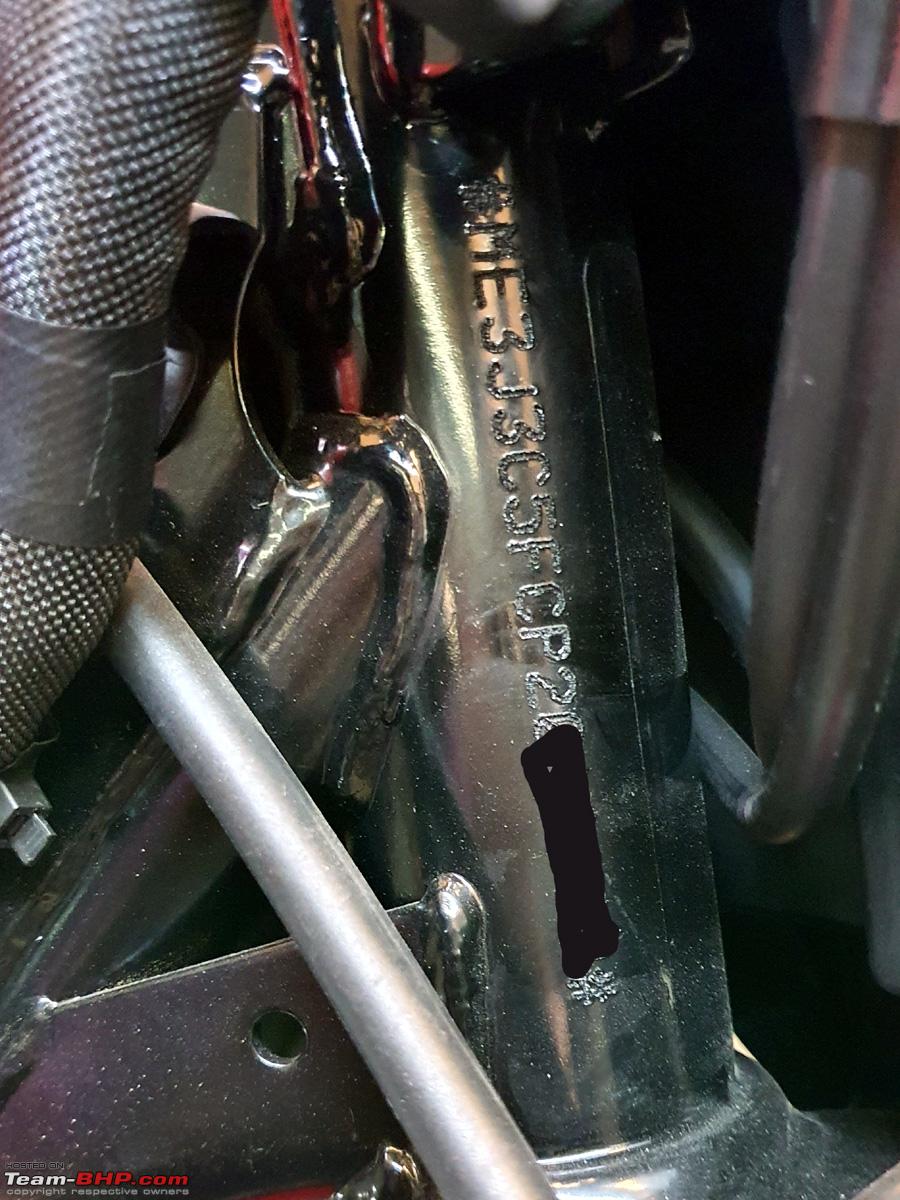 The bike needed a thorough PDI and washup and everything else was found to be order 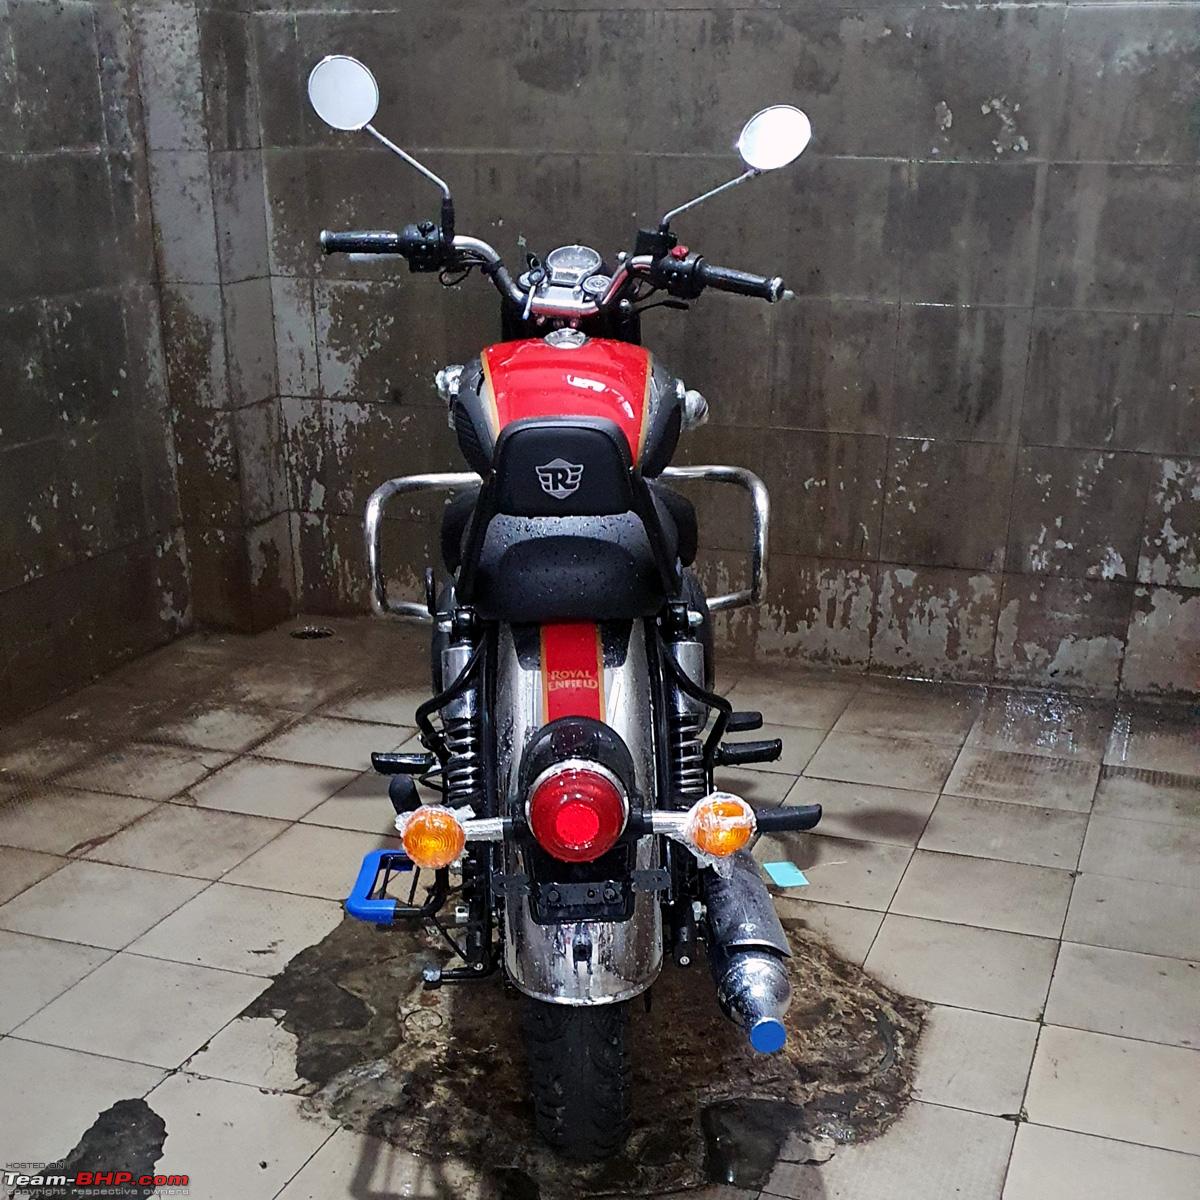 The final invoice 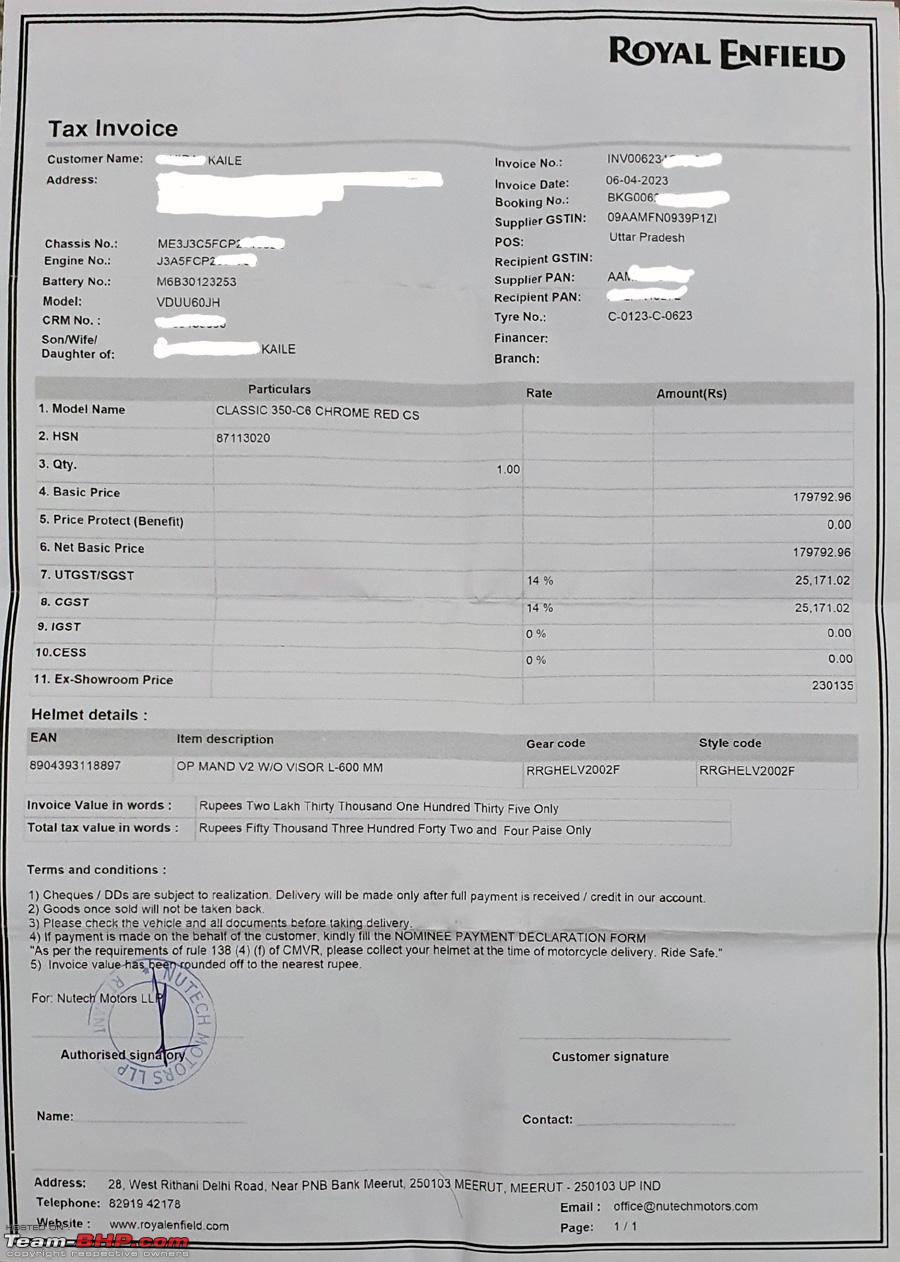 The Bike, ready for delivery 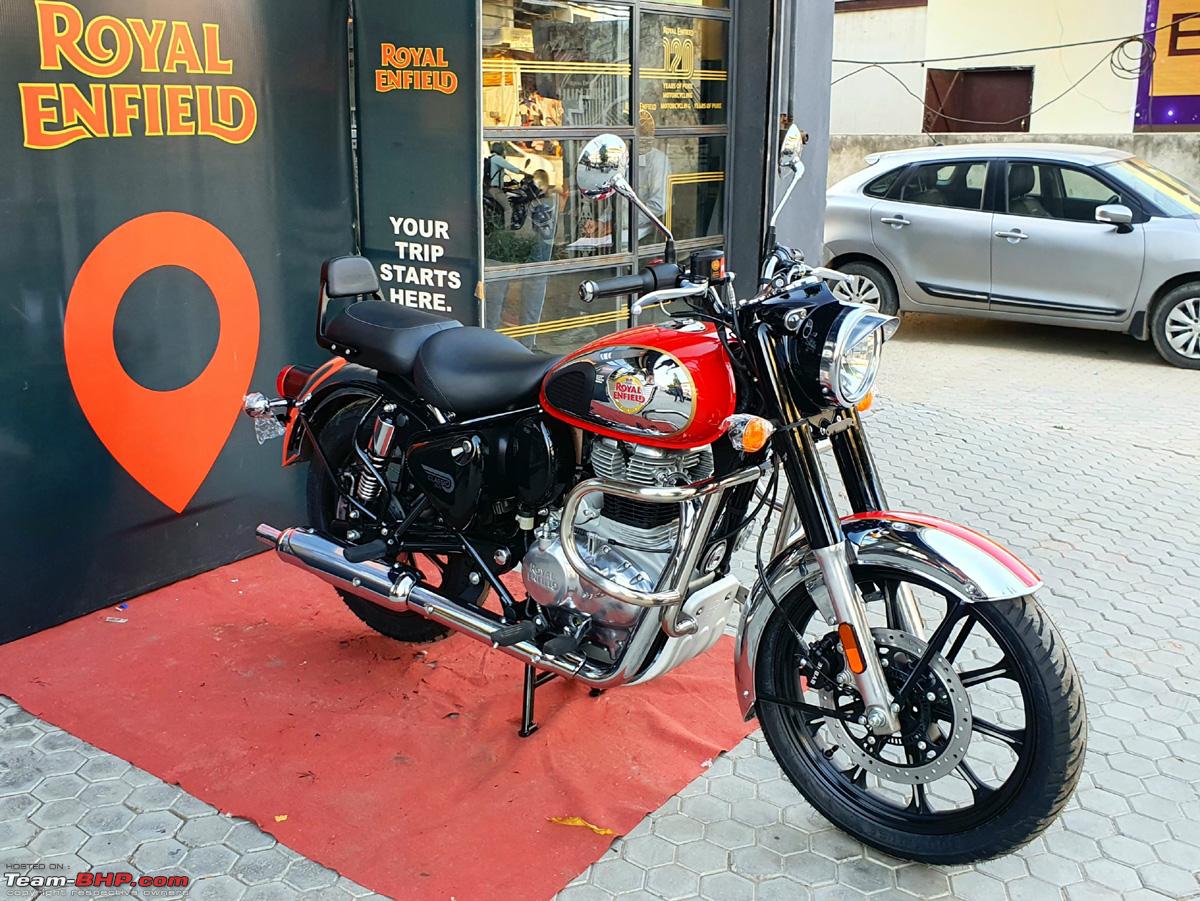 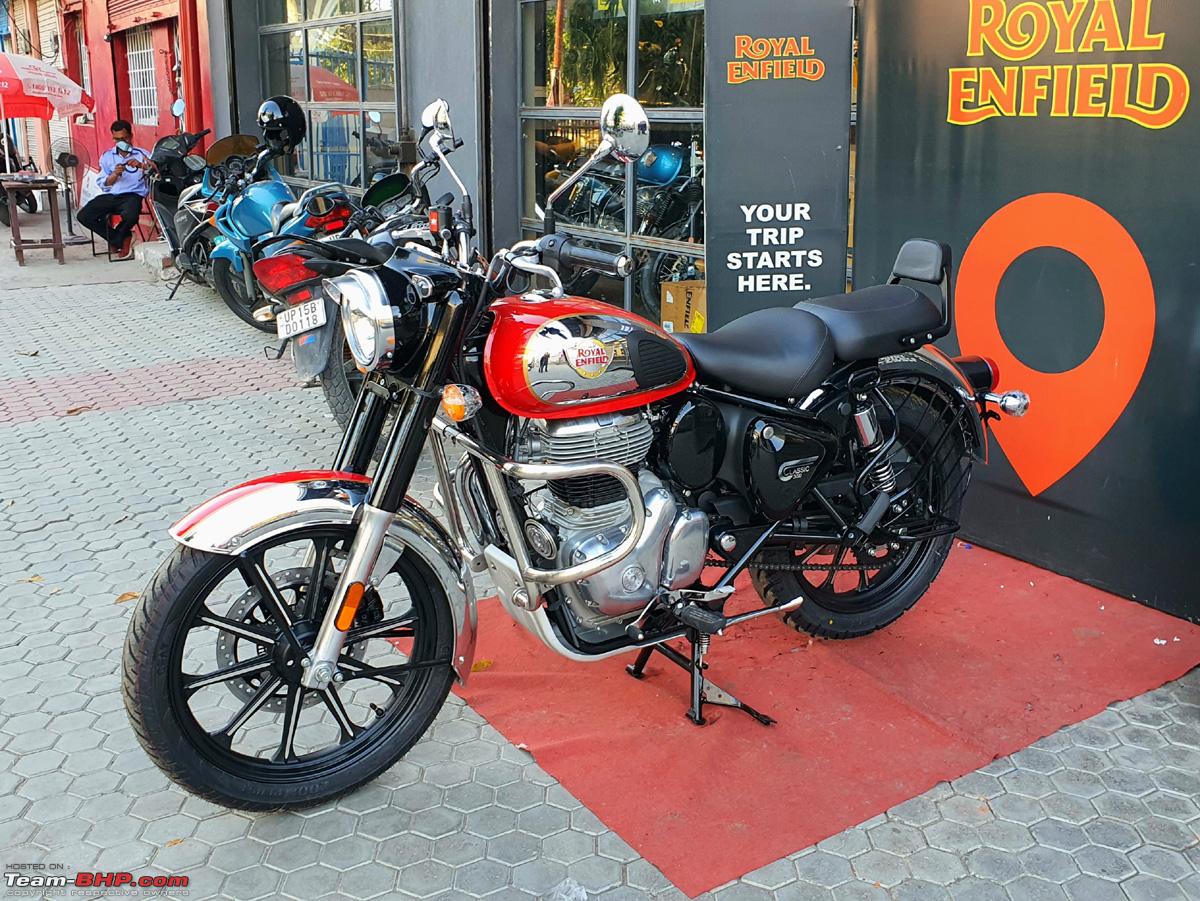 More to follow... |
|
| (37)
Thanks
|
| The following 37 BHPians Thank dkaile for this useful post: | aargee, achayan, adrian, ajay0612, aman9393, anivy, Axe77, berserk, Cyborg, dailydriver, deerhunter, Dosa, Gordon, GTO, irajput, ITZ_Zeta, keroo1099, lovetorque, mh09ad5578, pachchu77, Peri_patetic99, PM - B, RedPhobos, Ritkon, rj22, Roy.S, samabhi, sanjoyraju, shancz, Shreyas Aterkar, shyamg28, Skyline_GT, SmartCat, Vaishak, Viju, Voodooblaster, Waspune |
|
23rd April 2023, 14:46
| #3 |
| Senior - BHPian | re: 2023 Royal Enfield Classic 350 | Chrome Red | The Comprehensive Review The Bike Oh! The Classic Teardrop Fuel Tank... This 13L teardrop shaped fuel tank is really a 'piece of art' about which ode's can be written. This chrome one, especially, has impeccable fit and finish and it's paint and chrome quality is 100% comparable to the best around in the world - 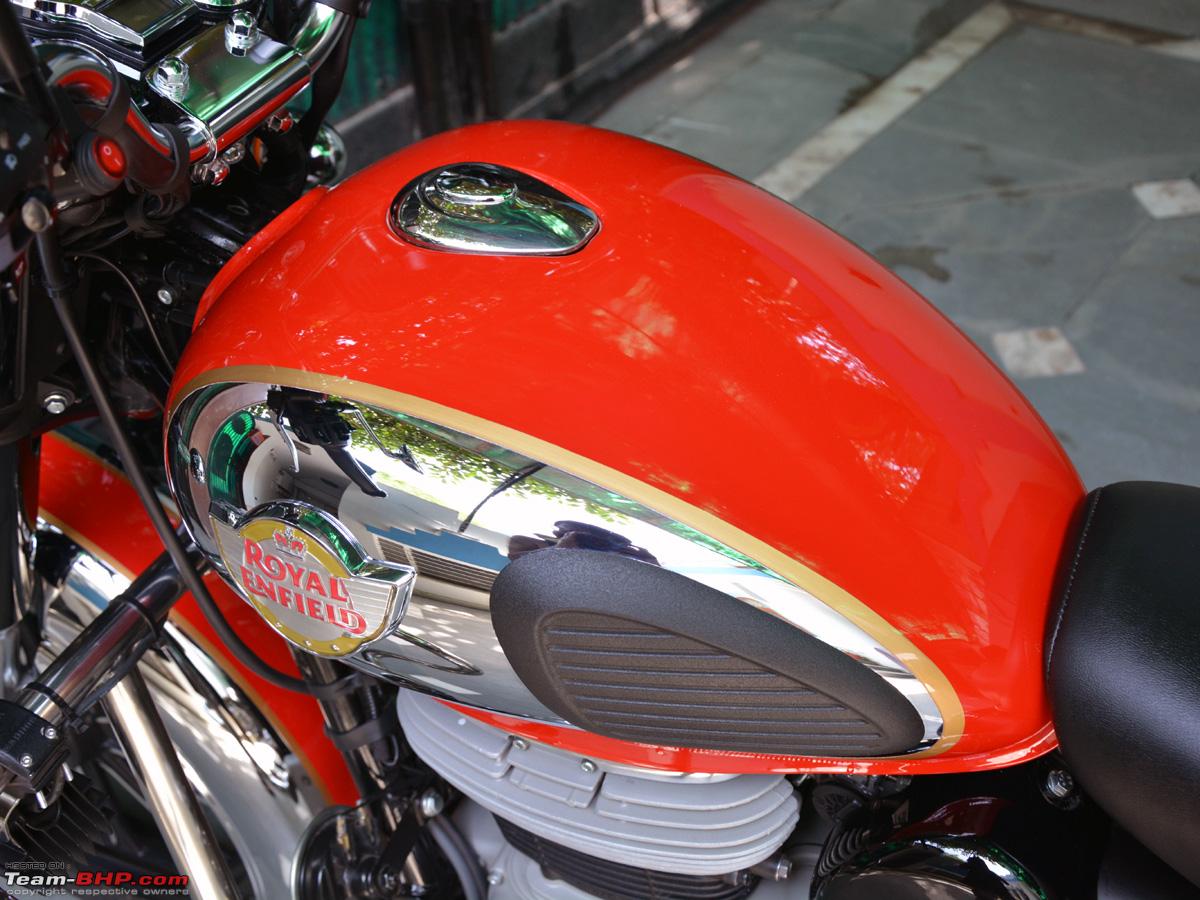 And that 3D embossed Royal Enfield logo (first seen on the Interceptor 650) is truly world class and was one of the primary reason I tilted towards the Chrome variant as the same was not available on the Halcyon Green.  And those (still) Hand Painted Golden Lines on the tank are a true 'Classic' touch and the Chrome variant is the only one in the Classic range that comes with these. The only other bike in the RE stable that still furnishes these hand painted golden lines on the fuel tank is the base 'standard' variant of the Bullet which comes only with a kick start. A closer look at the 'impeccable' Paint/Chrome finish on the tank - 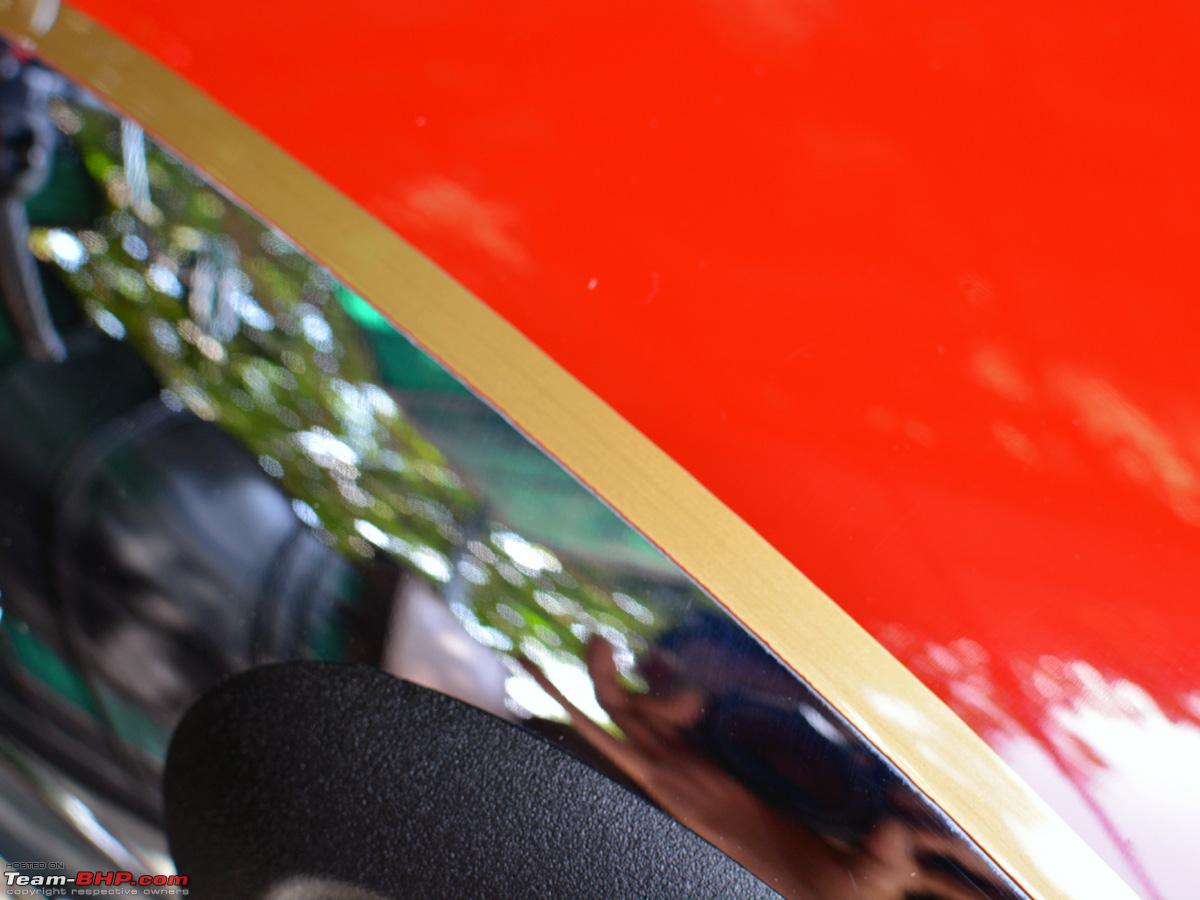 A closer look at the Thigh Pad on the tank which also has a high quality rubber finish and luxurious hug and feel to it -  A look at the paint and chrome quality on the front fender -  And that 'lockable' Fuel Lid is another piece of art, finished in solid chrome - 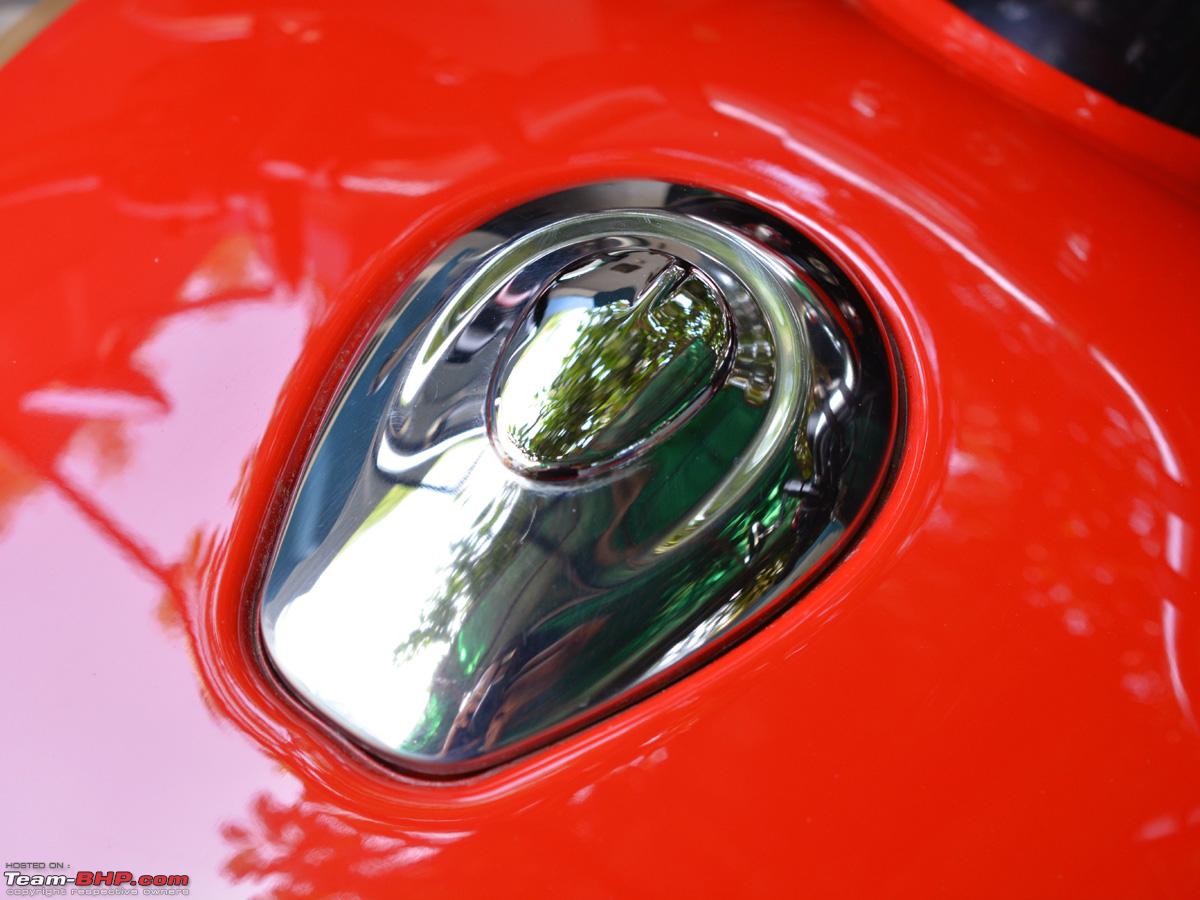 With the Sliding Key Slot - 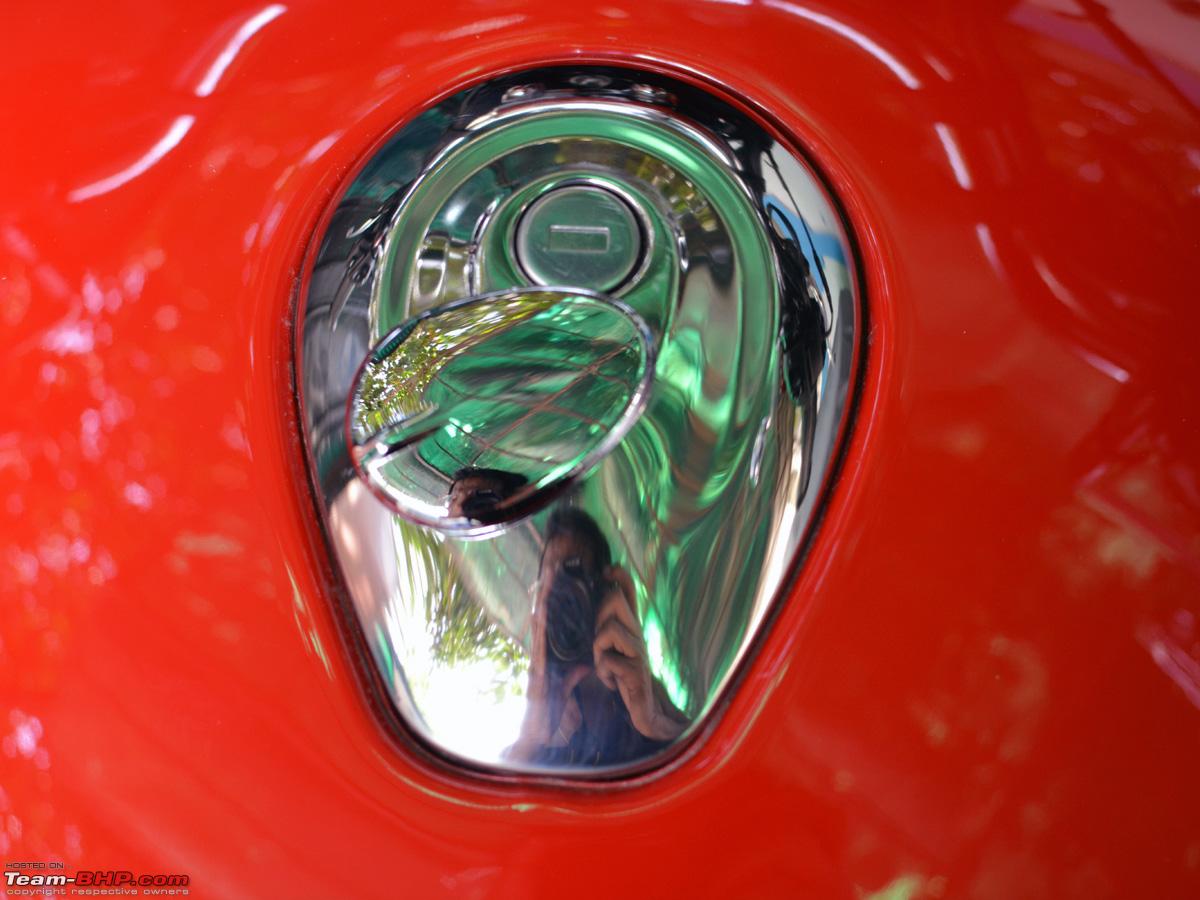 The 'attached' Fuel Lid opened. Notice the drain plug hole -  The Right Hand Side Mirror and Handlebar Controls - 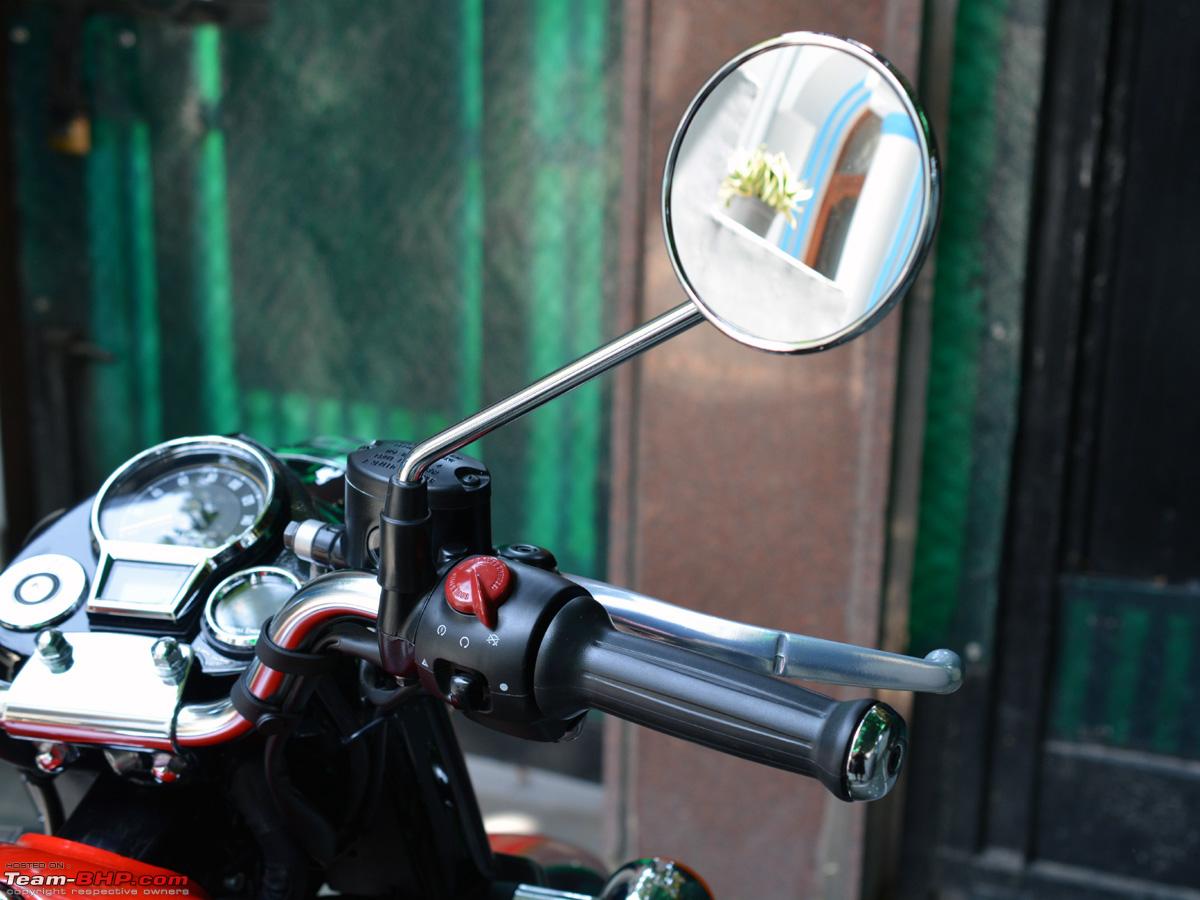 A close up of the Right Hand side controls which includes a classic 'Rotary' Engine Kill switch and Starter Button finished in Red along with a very modern (now available) Hazard Lights switch below. A 'modern' touch to the Retro bike -  The Left Hand Side Mirror and Handlebar Controls - 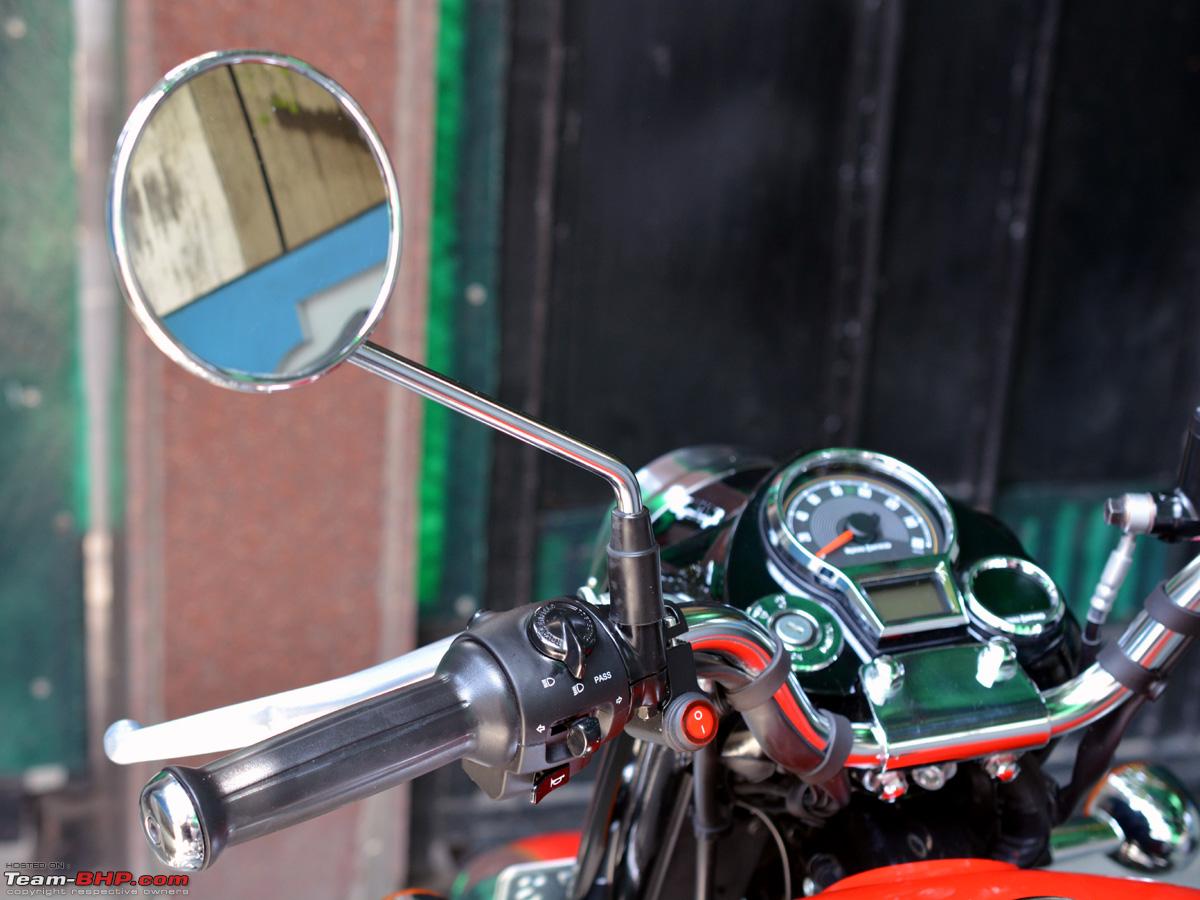 A closer look at Left Hand side controls which include a retro 'Rotary' Always On Headlight Switch with High Beam and Pass Switch included. A standard 'push to cancel' indicator toggle switch and a 'traditionally' placed Horn switch below (unlike the Honda's 350's). The after-market Red illuminated handlebar switch visible to the right is for the after-market Fog Lights (more on that later) - 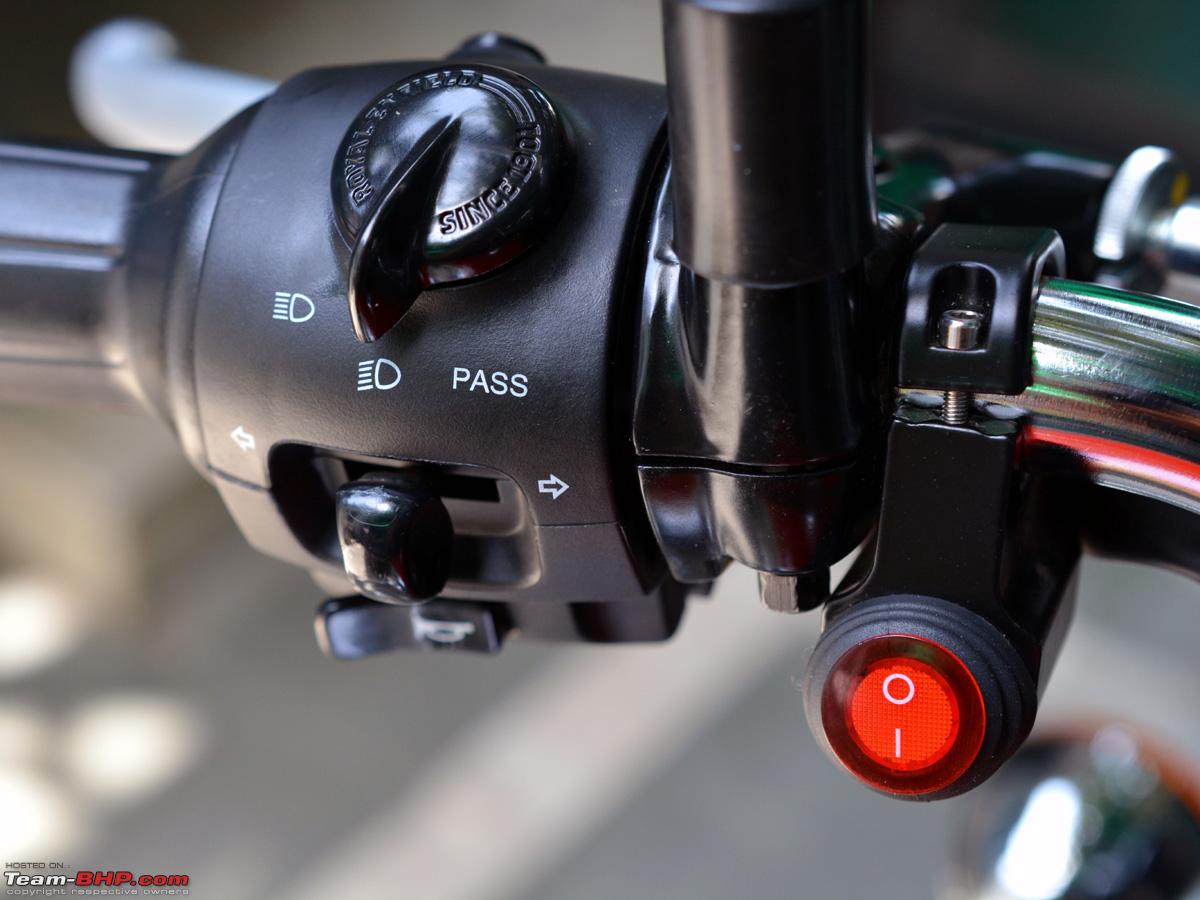 On the back is an 'i' Button where the traditional Pass Switch used to be placed, to control/toggle between various instrument cluster display menus - 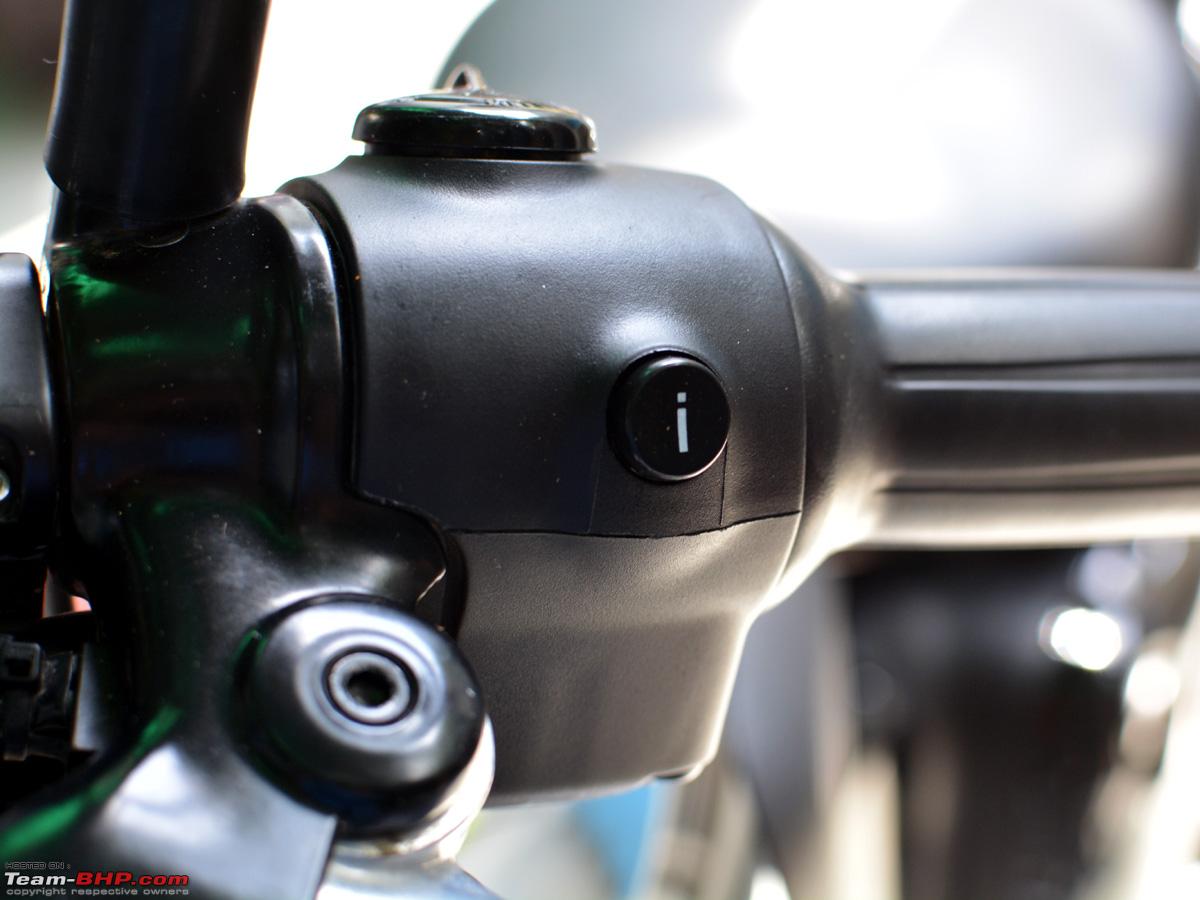 And sandwiched in between is a 'modern' USB 2.0 port (5V 2A) for charging your mobile devices -  A view of the Cockpit and the Handlebar from the Rider's perspective -  Going further back with a view of the Tank 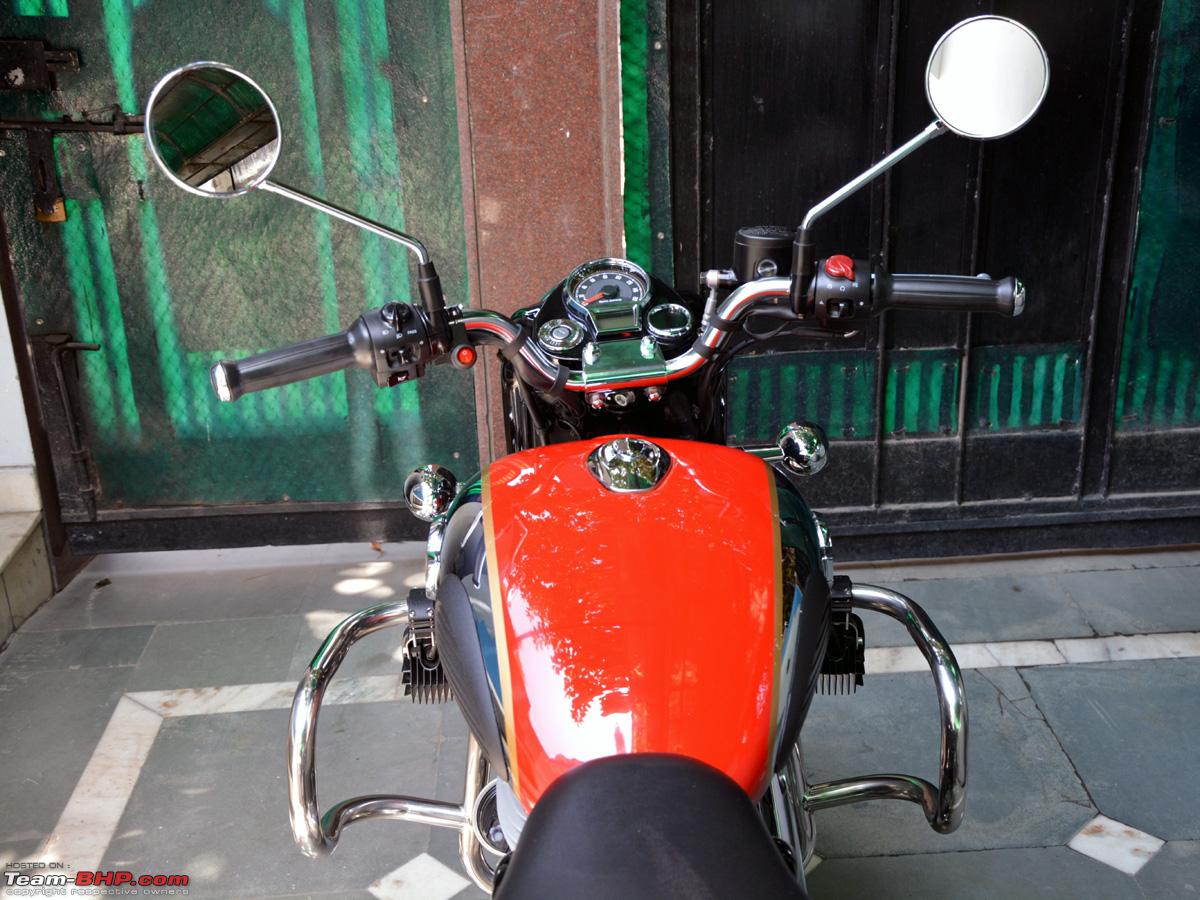 And further still with a view of the bike from astern - 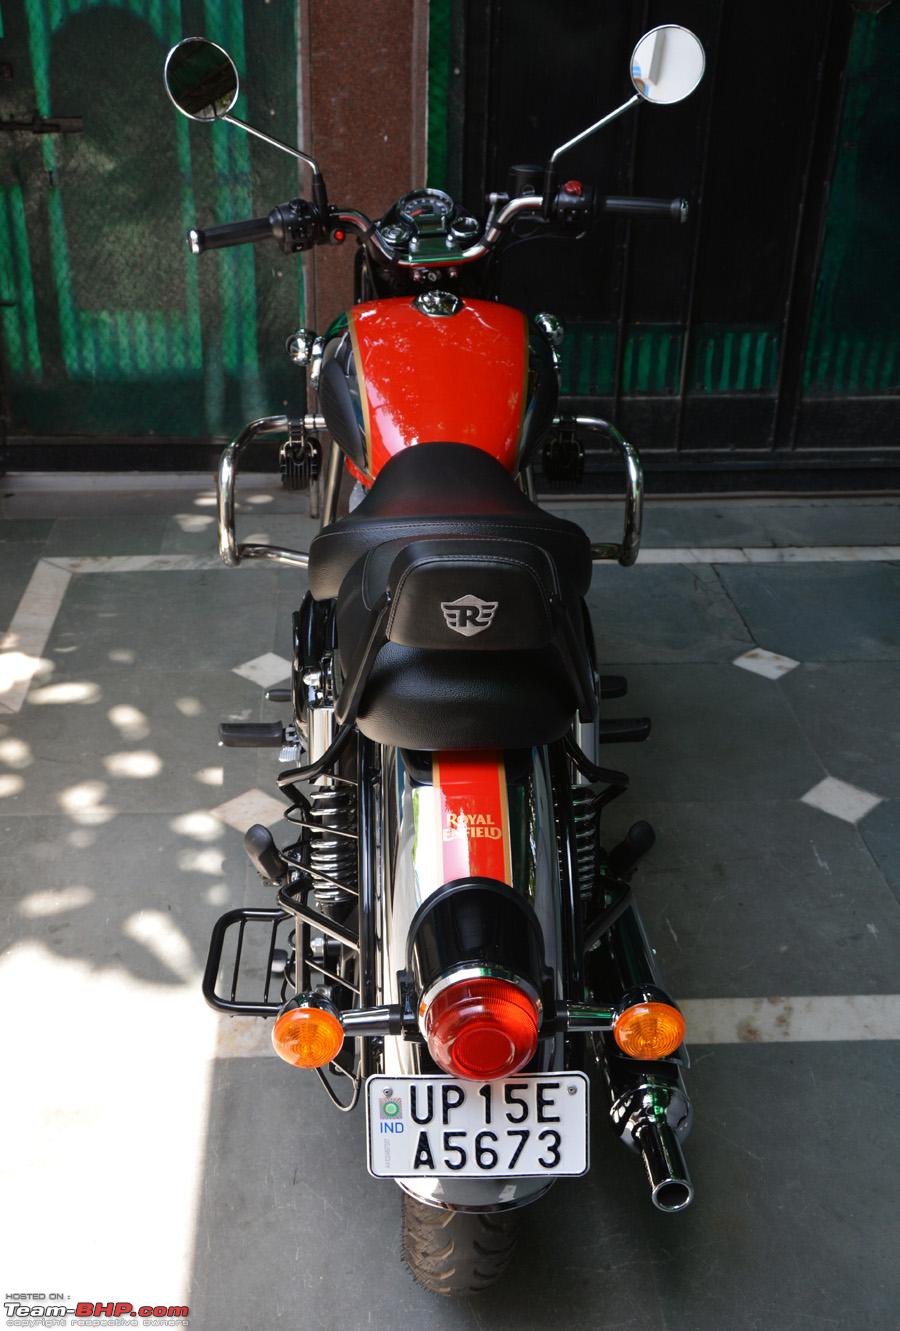 A close up view of the 'plastic' turn indicator. Though the majority of the bike is finished in quality metal parts, there are some 'plastic' bits like these. But they are finished in high quality to give them that neo-retro look - 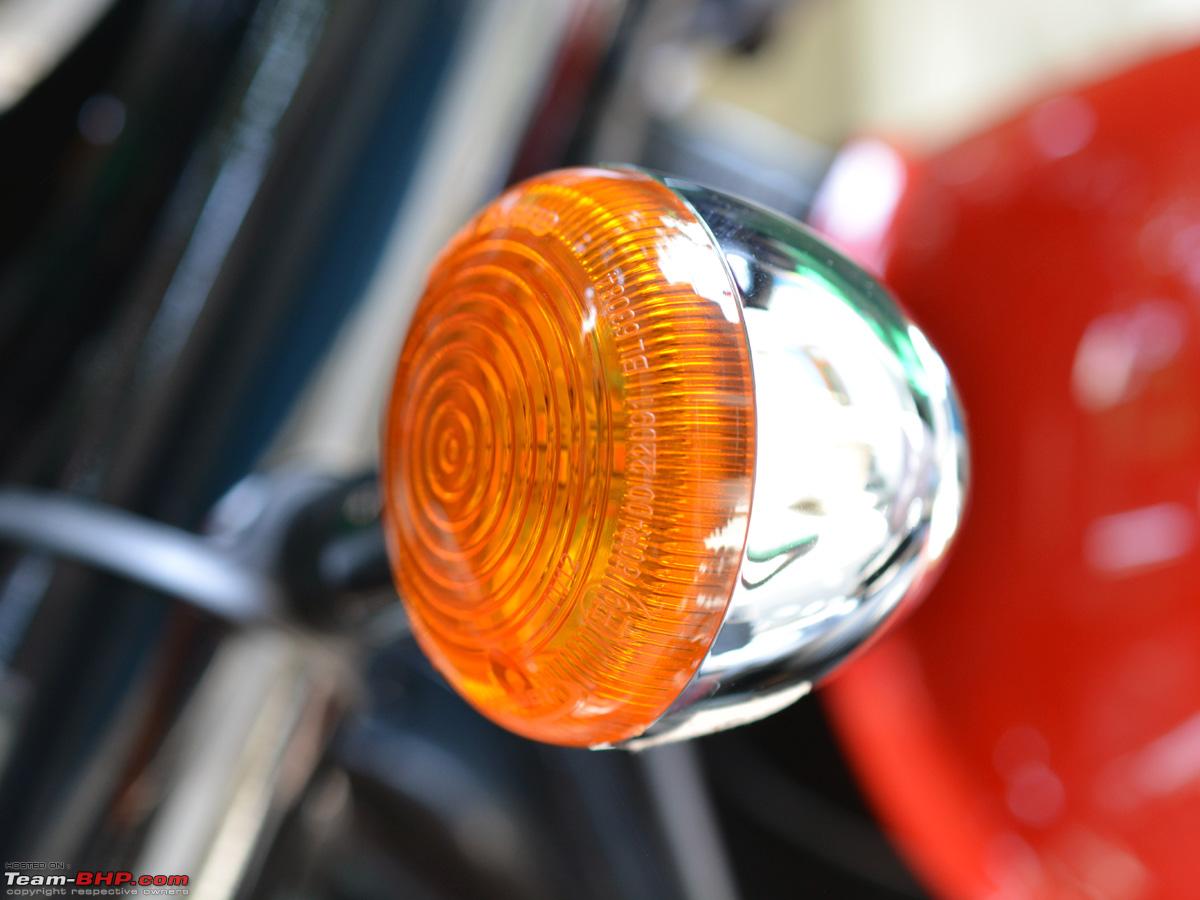 And that "Classic" Round Headlight Unit, but now with 'Clear' lens, for that modern touch, with the solid 'chrome' bezel with visor. Also visible are a pair of the 'traditional' Position Lamps also known as the "Trafficator" lamps - 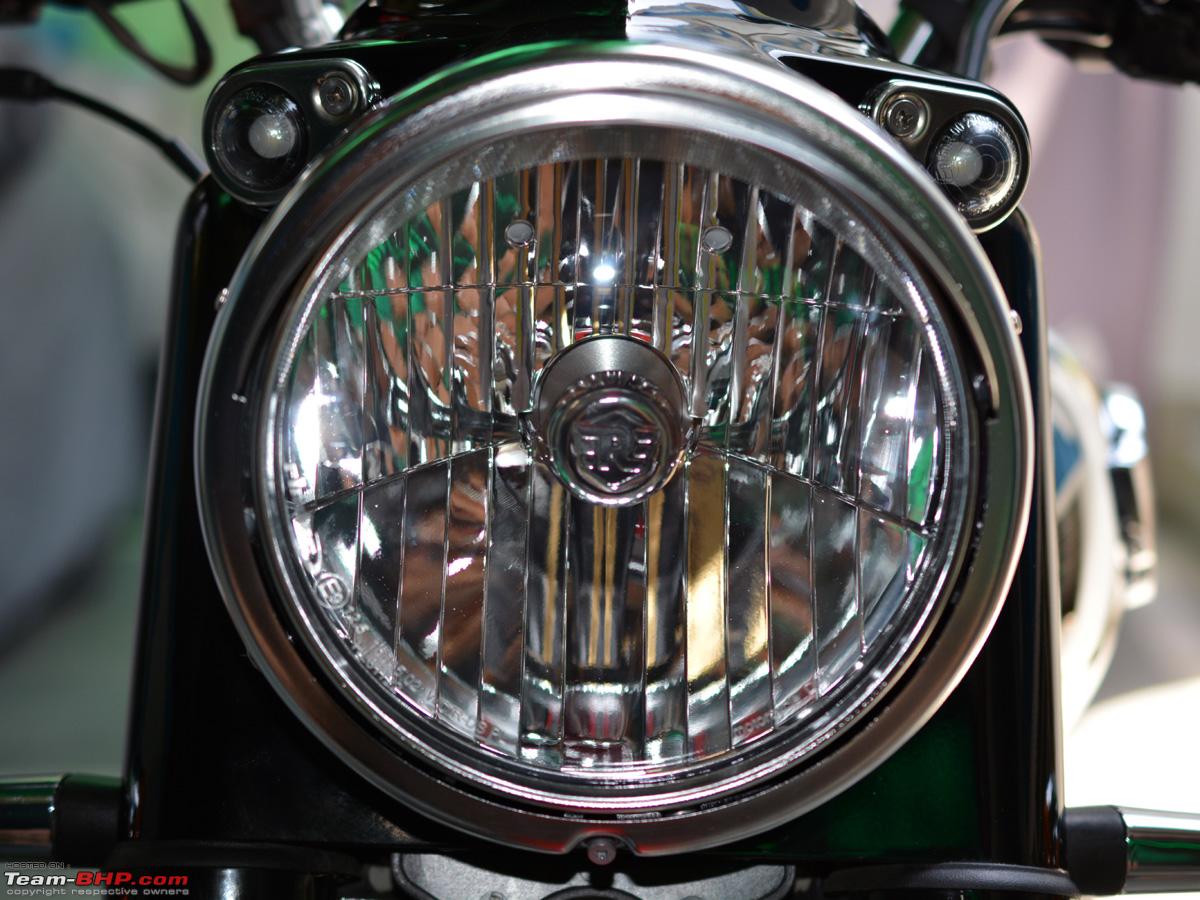 A close up of the 'Trafficator' Lamp. These bulbs can easily be replaced by opening the single Philips screw that is visible upfront - 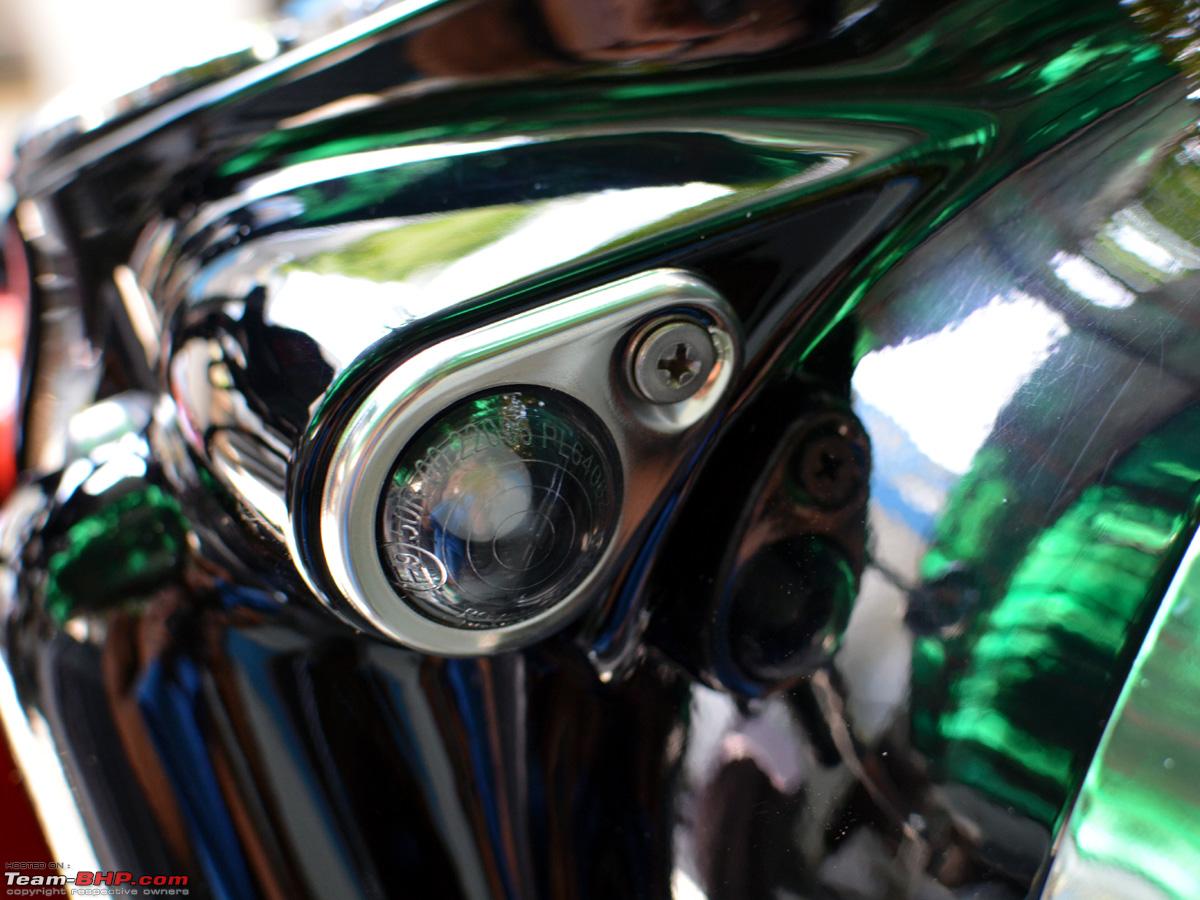 The "THRONE". The pair of separate seats come in 3 variants. The 'standard' variant that comes stock, as visible here, is soft and comfortable for city rides. There is also a Thicker and Harder "Touring" Variant set available and also a Thinner "Low" Seat for the vertically challenged - 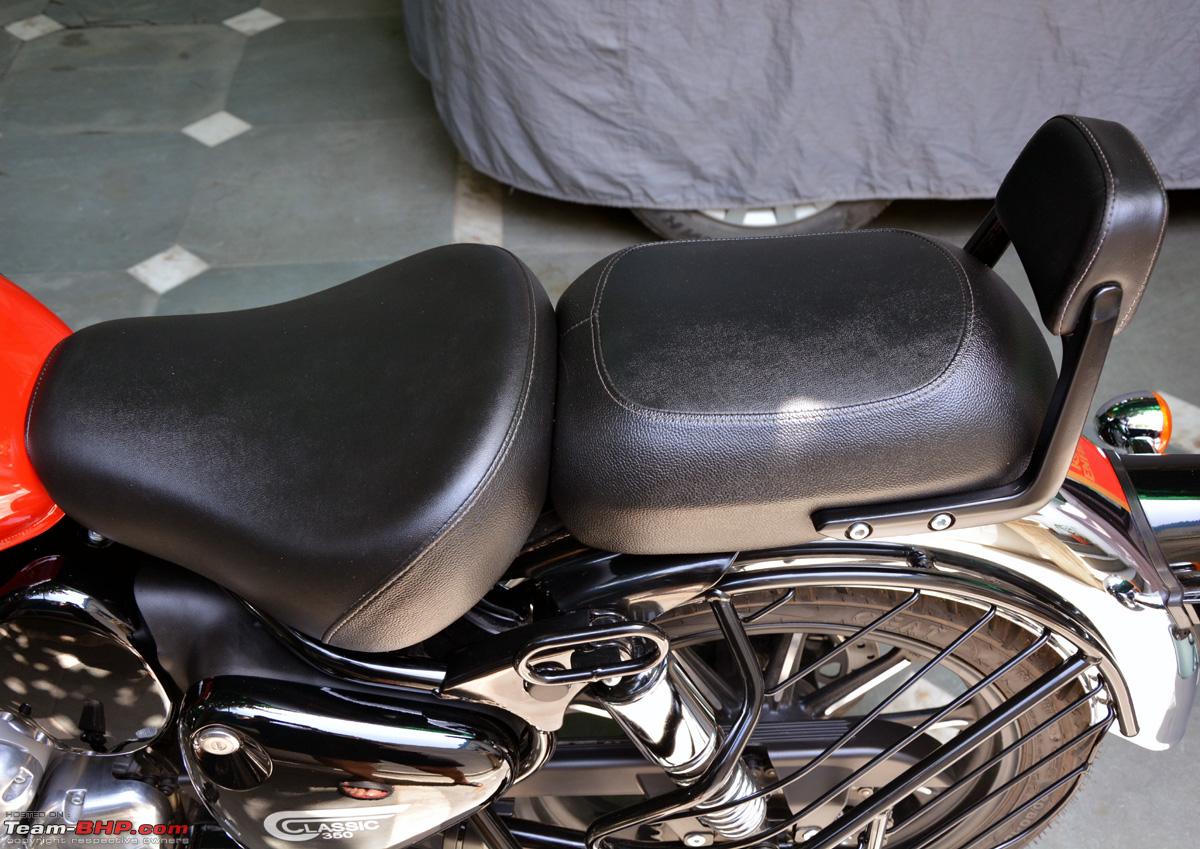 Another view of the pair of the very 'comfortable' standard Seats - 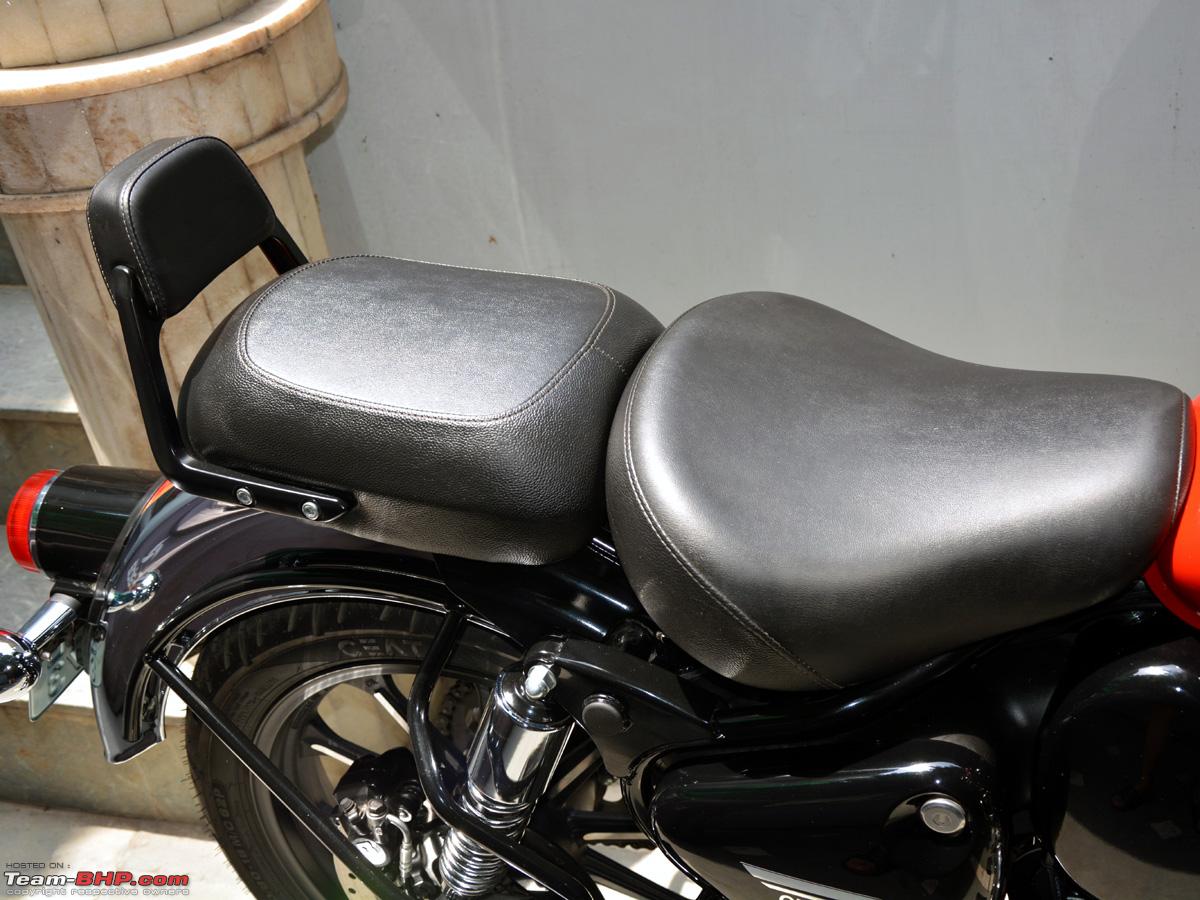 And the 'accessory' Pillion Backrest. I opted for this in place of the standard round-tube pillion grab handle as that gets uncomfortable and digs into the back of the pillion -  View from the back of the Backrest highlighting the beautifully 'embroidered" RE Logo in silver which complements the chrome bike - 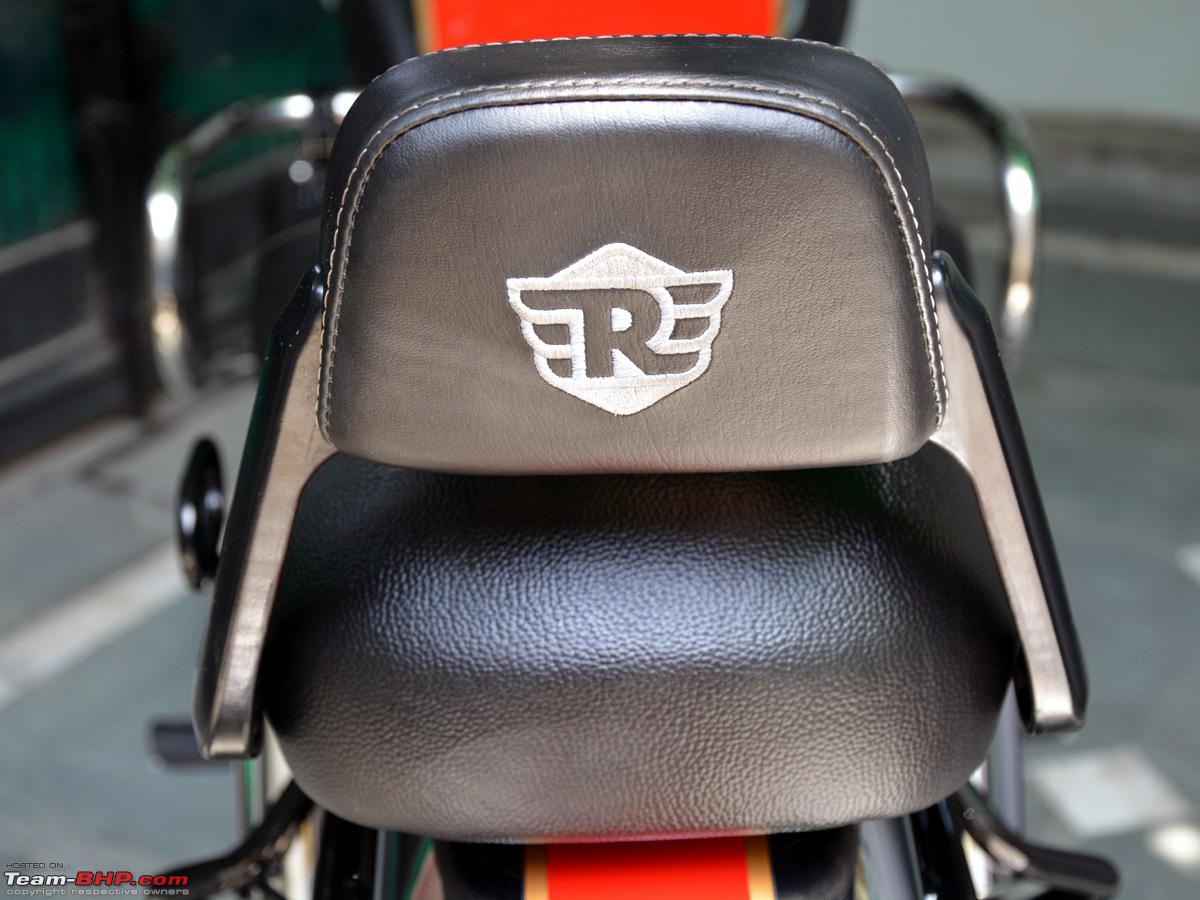 A view of the backrest from the side highlighting the recline angle and space - 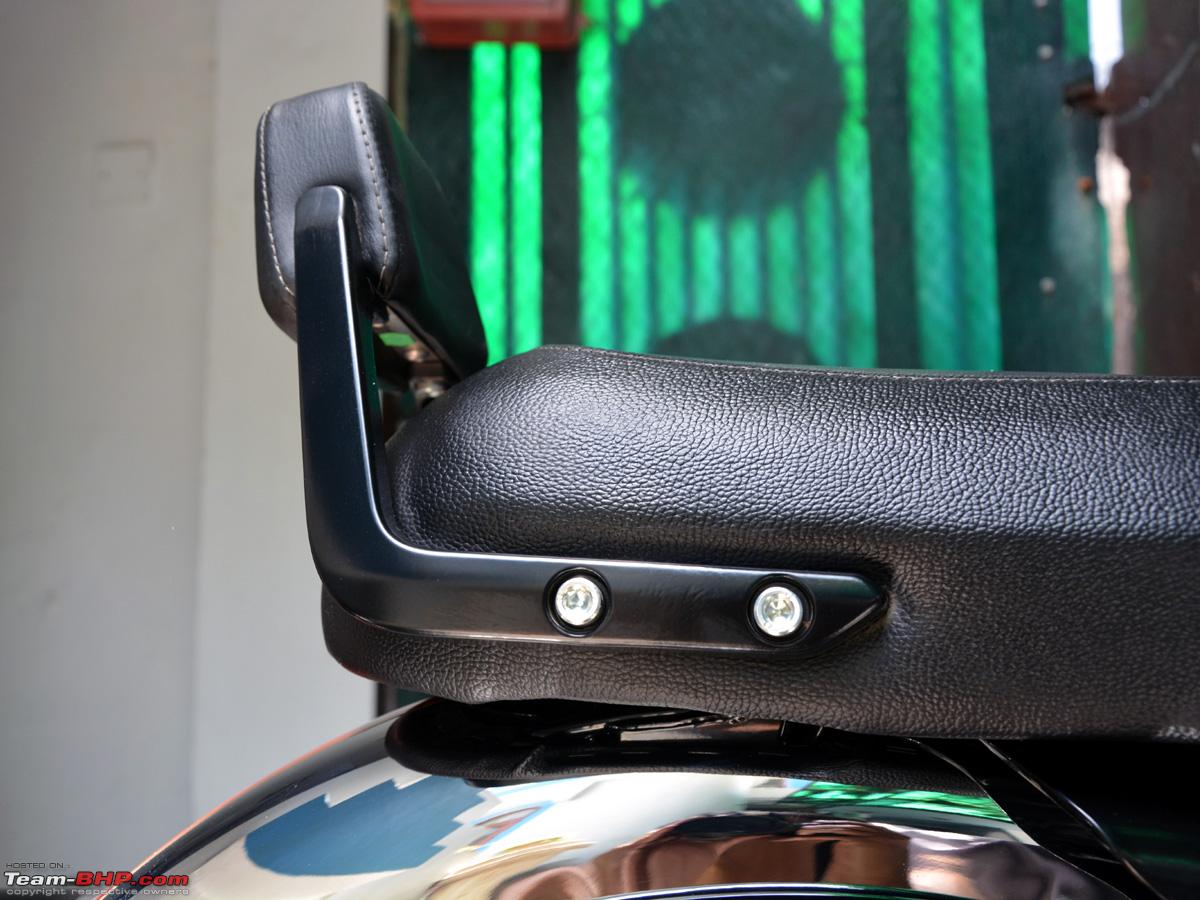 A view of the under seat bolts to remove the seat structure. You can give it a single-seater 'bobber' look in minutes - 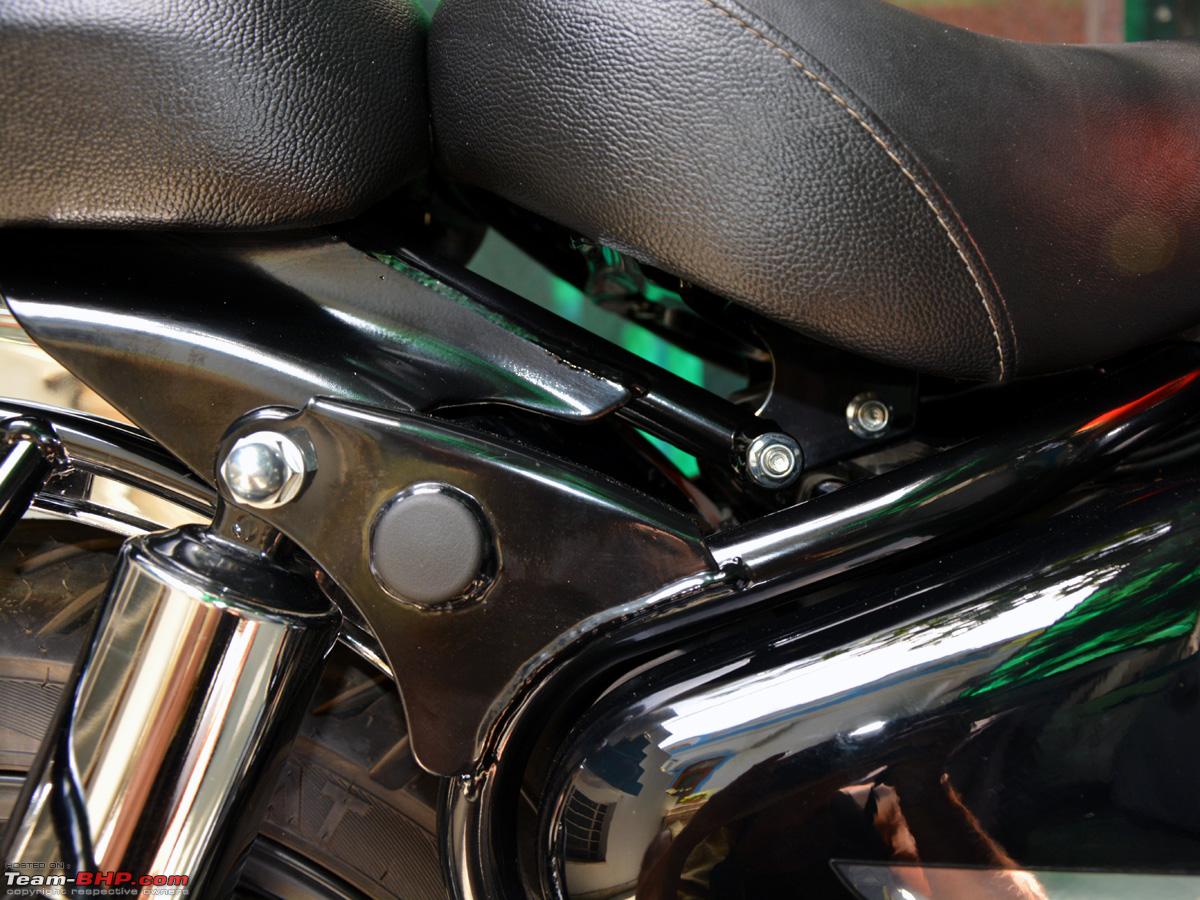 More to follow - Last edited by dkaile : 24th April 2023 at 15:45. |
|
| (37)
Thanks
|
| The following 37 BHPians Thank dkaile for this useful post: | aargee, achayan, adrian, ajay0612, anivy, berserk, brownkaiser, chinmaypillay, Cyborg, dailydriver, deerhunter, Dosa, Geo_Ipe, Gordon, GTO, irajput, ITZ_Zeta, keroo1099, lovetorque, mh09ad5578, NitNac, pachchu77, Peri_patetic99, PM - B, RedPhobos, rendezvous3850, Ritkon, rj22, Roy.S, samabhi, shancz, shyamg28, Skyline_GT, SmartCat, Vaishak, Viju, Voodooblaster |
|
23rd April 2023, 16:03
| #4 |
| Senior - BHPian | re: 2023 Royal Enfield Classic 350 | Chrome Red | The Comprehensive Review The Instrument Cluster The instrument cluster in this variant that I got, displays speeds only in KMPH and not in both MPH and KMPH as seen earlier. I was slightly miffed about this but on seeing the 'white' backlit display at night, the pureness of the display grew on me. Also there have been numerous speedometer issues reported vastly on forums and videos worldwide, where the speedometer display needle used to get stuck and did not return to zero. It was zero'd down to heavy 'electrical grease' being used by RE on the contact points. However this change in instrument cluster design may have also been an outcome to sort out that issue. 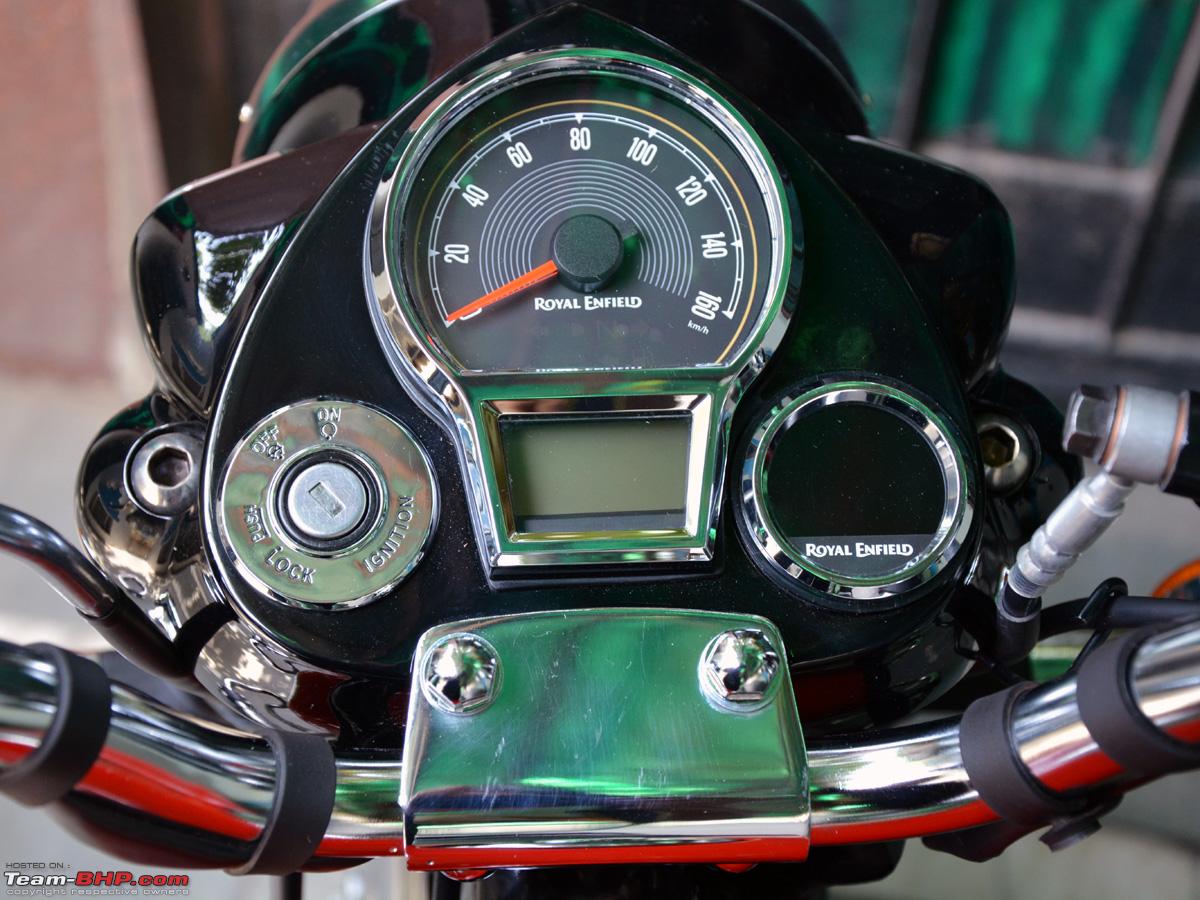 A view from the front of the "Classic" nacelle, which is RE trademark for the Bullet Classic... Notice the high gloss paint and finish - 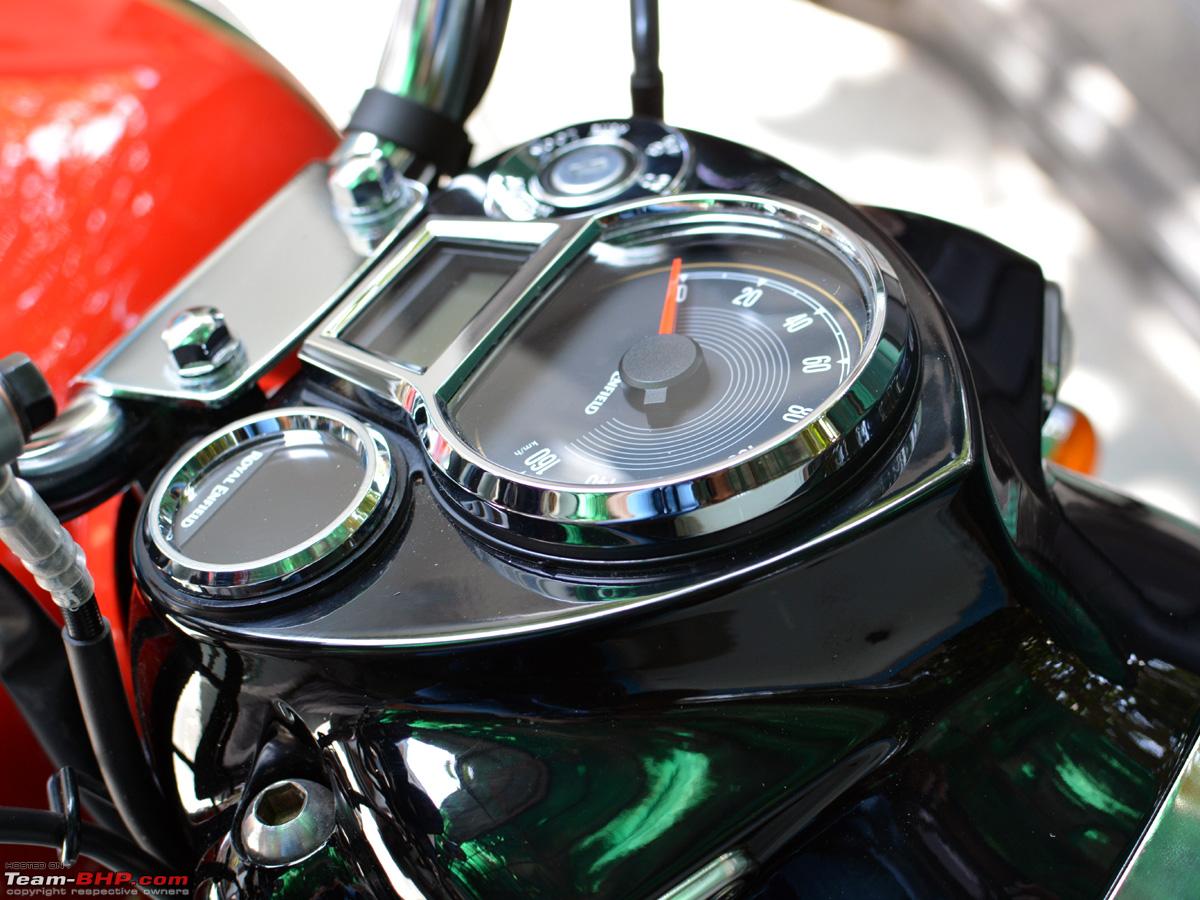 The instrument cluster switched on. The needle does a complete sweep like 'modern' bikes. The 'Tripper' Navigation unit visible here is NOT standard fitment (more on that later) - 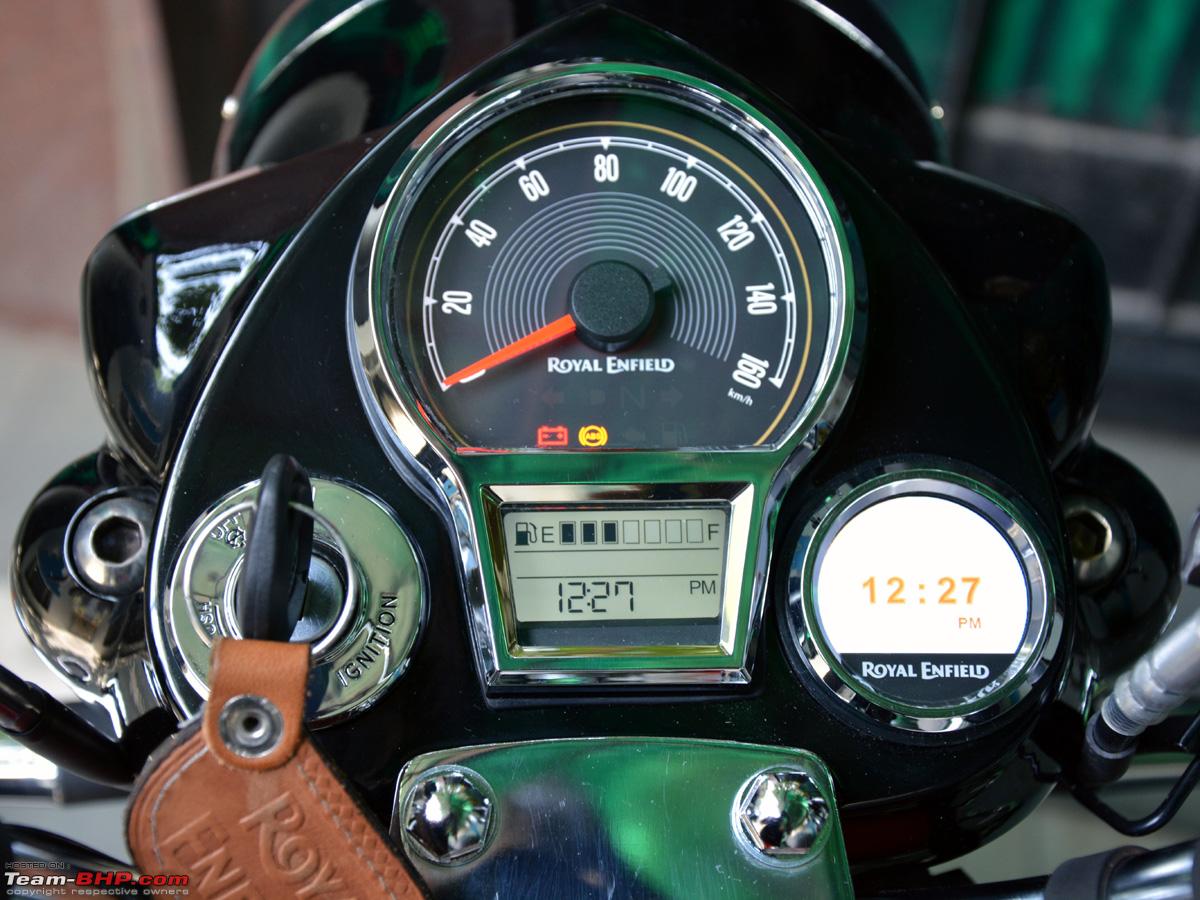 A closer look at the TRIPPER Navigation screen. Notice that it is now straightened unlike the installation photos that you will see later in this thread - 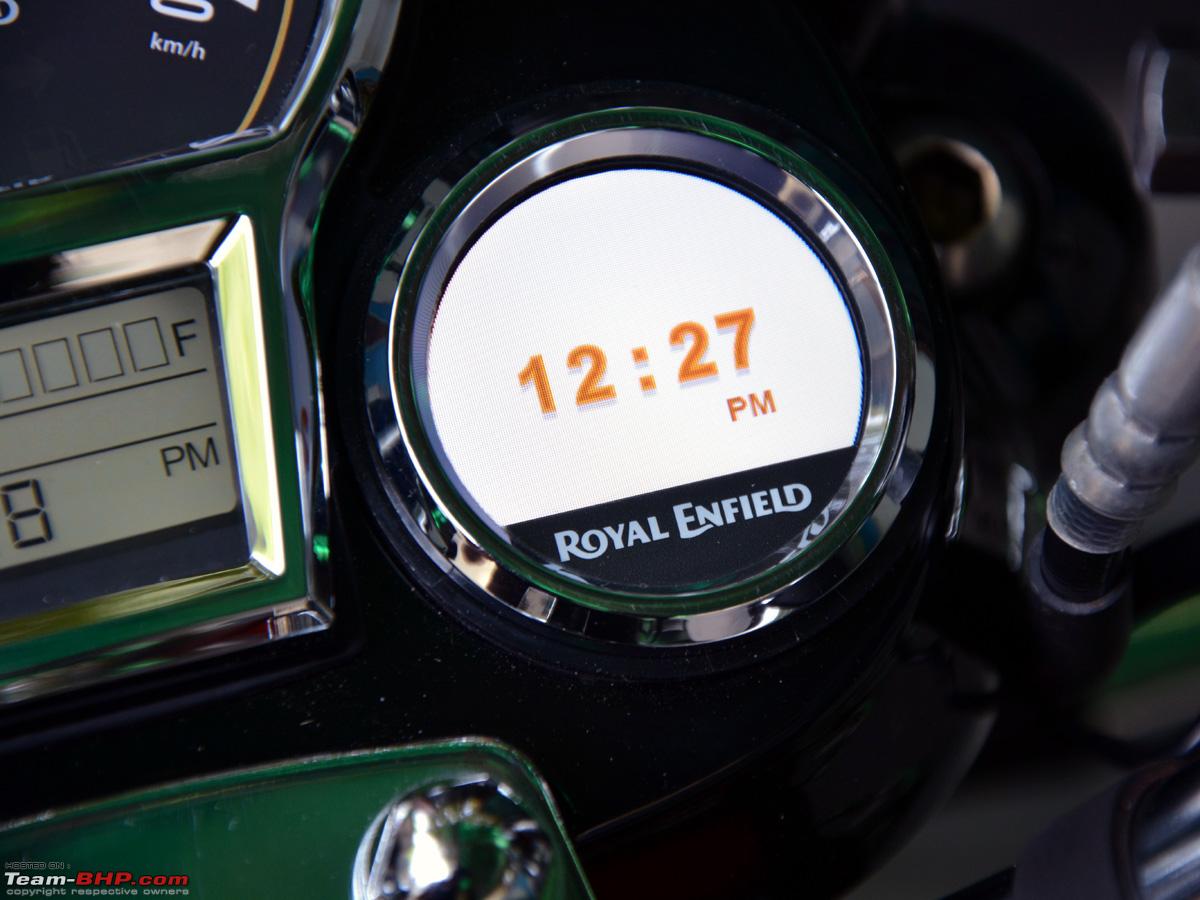 A closer look at the Ignition Switch - 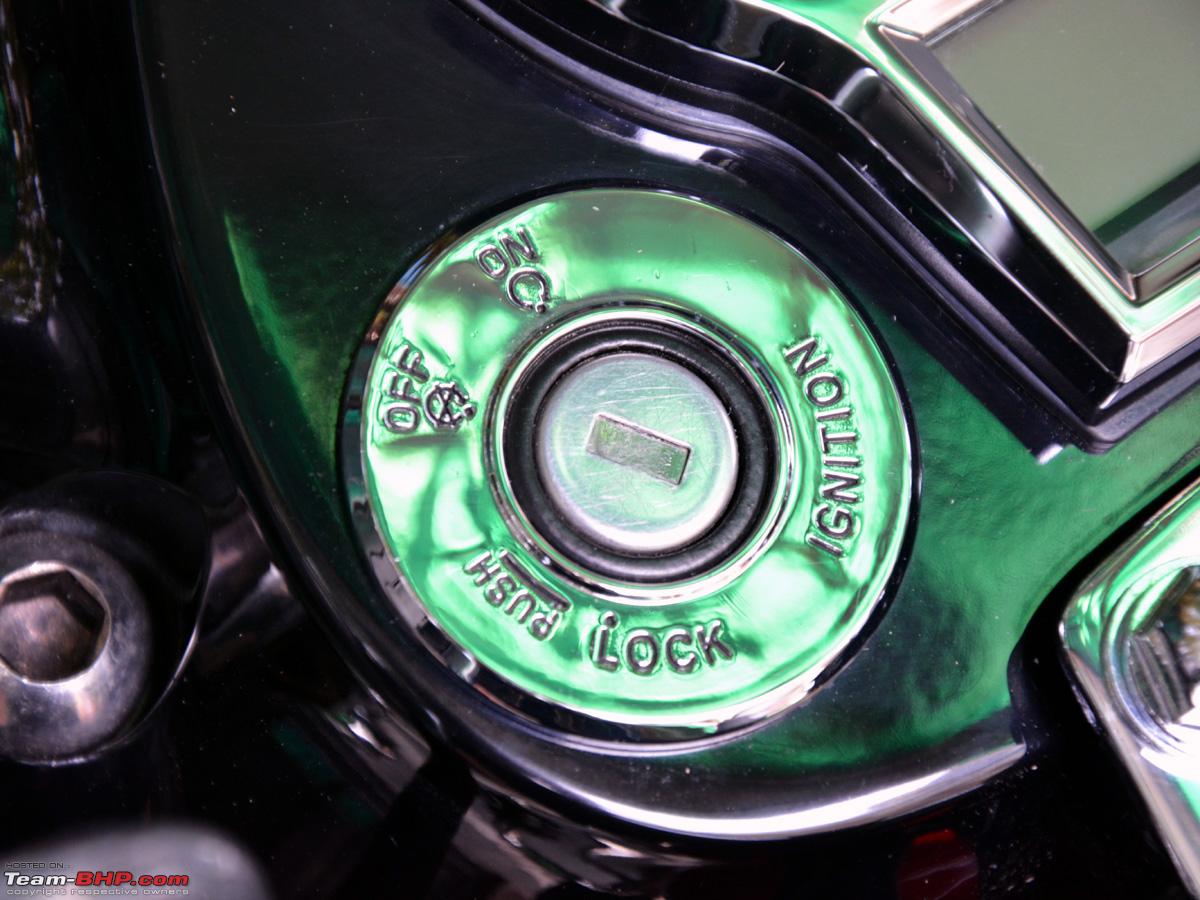 Chrome Bar Ends on the handlebars - 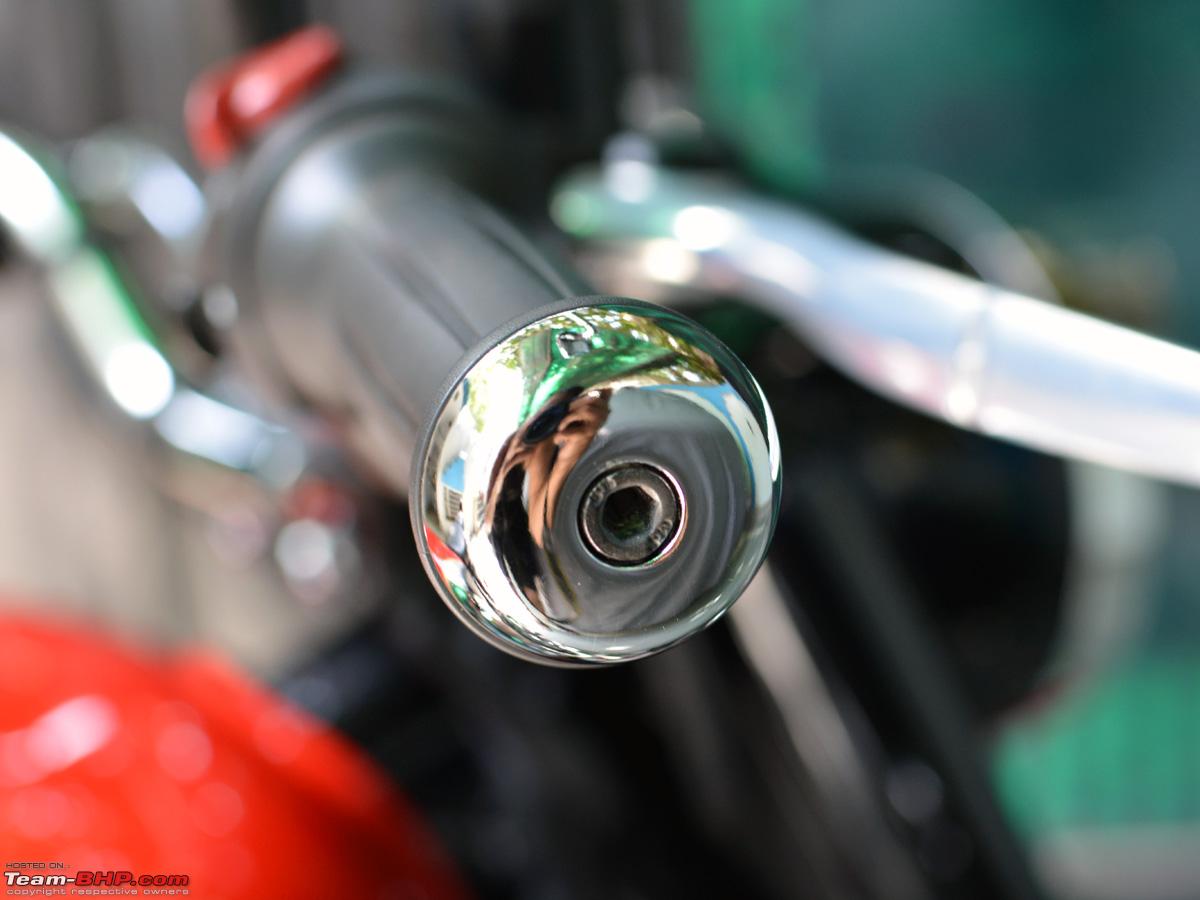 Fiem (all metal) Chrome Mirrors. Have a decent view of the back even at high speeds (as tested on my recent 100km ride) -  Front Brake Fluid Reservoir uses DOT 4 brake fluid -  Proudly displays quality and MIY stickers for the customised bike on it's back - 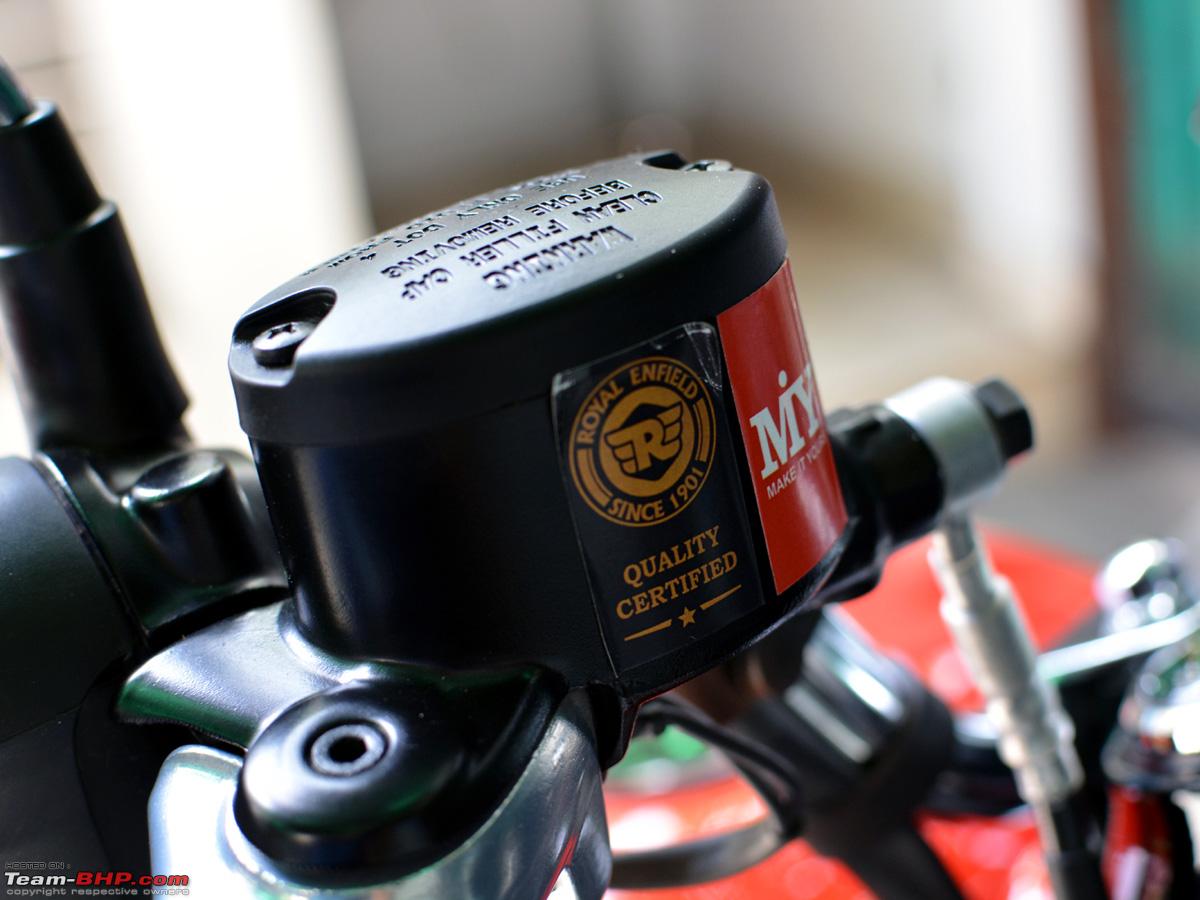 Coming back to the Rear Fender with the beautiful Royal Enfield logo in gold -  And further down to the Rear Tail Light Cluster which is all halogen (21/5W) - 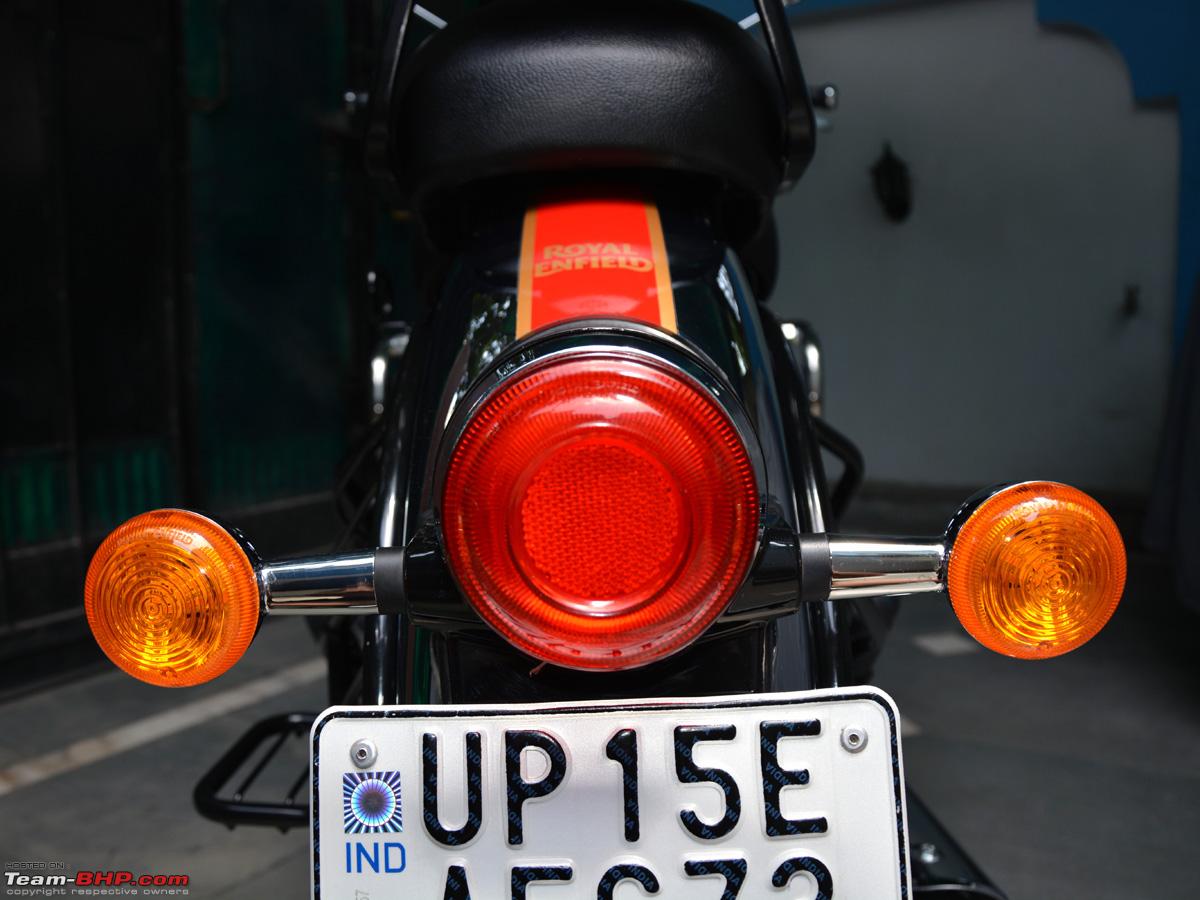 The HEART of the matter - A view of the 350cc, 20HP, 27Nm Engine from the left side. This new J-series engine is butter smooth sans the old vibes, which is a good thing as far as I am concerned. The vibrations are hardly felt in the hand grips and the rear view mirrors, leading to an overall comfortable long ride experience. 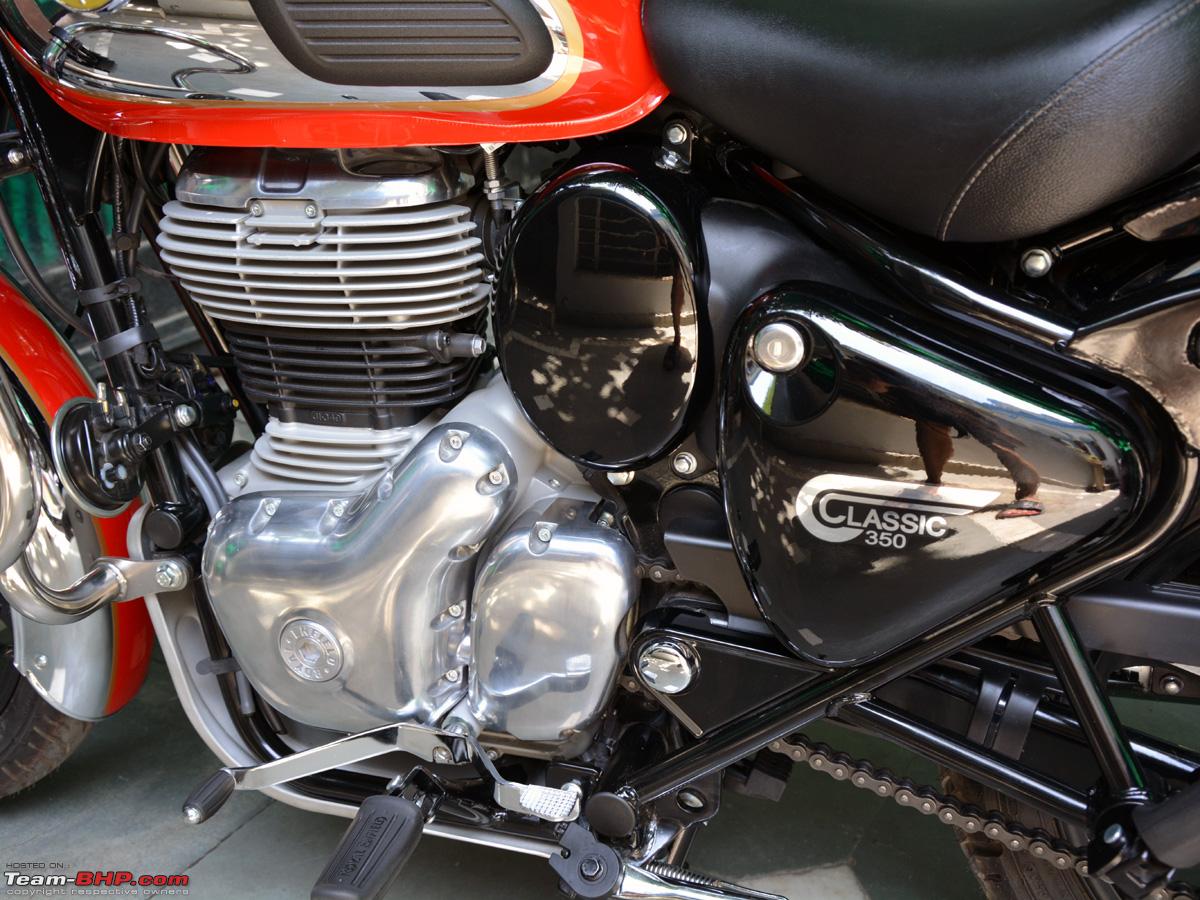 The Engine from the right side. The picture speaks for itself for the quality of aluminum casings and body parts finishing - 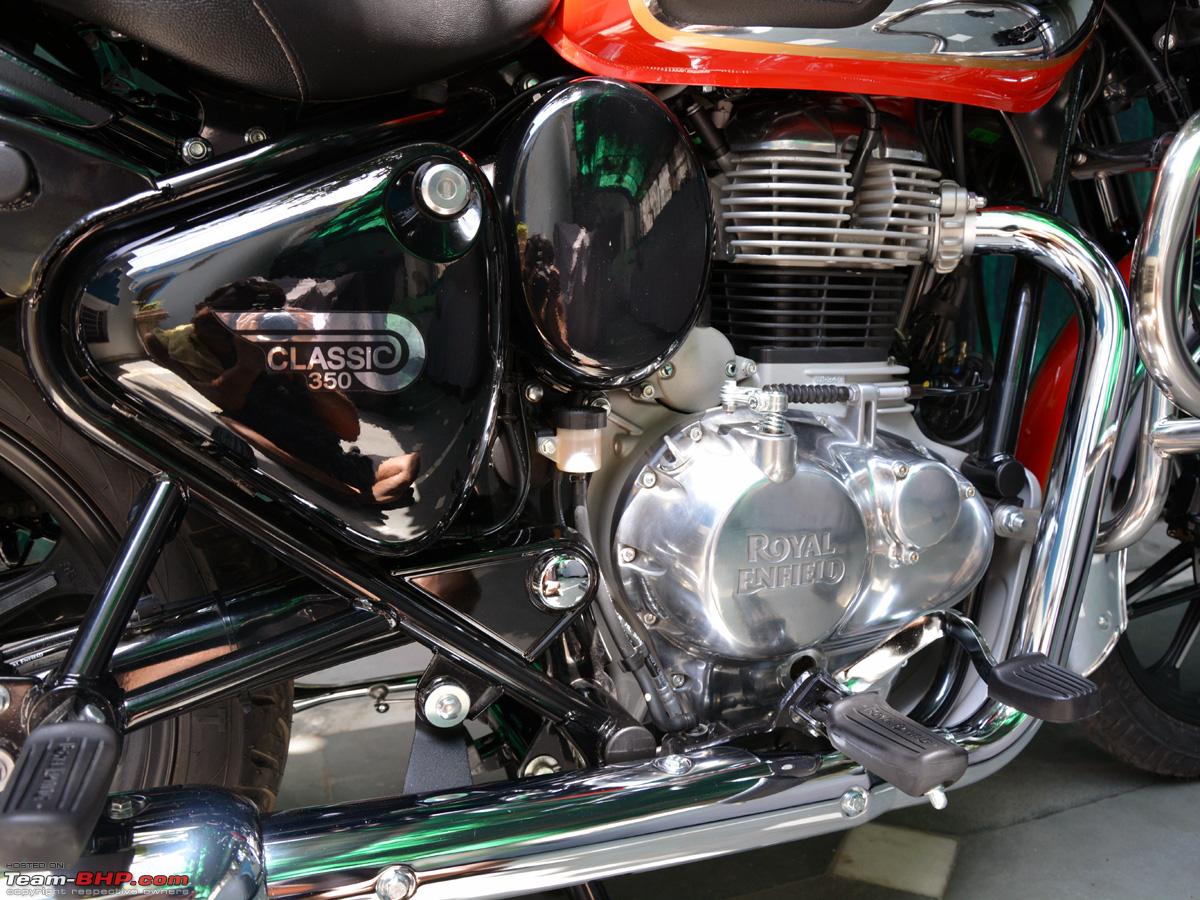 A closer look at this GEM - 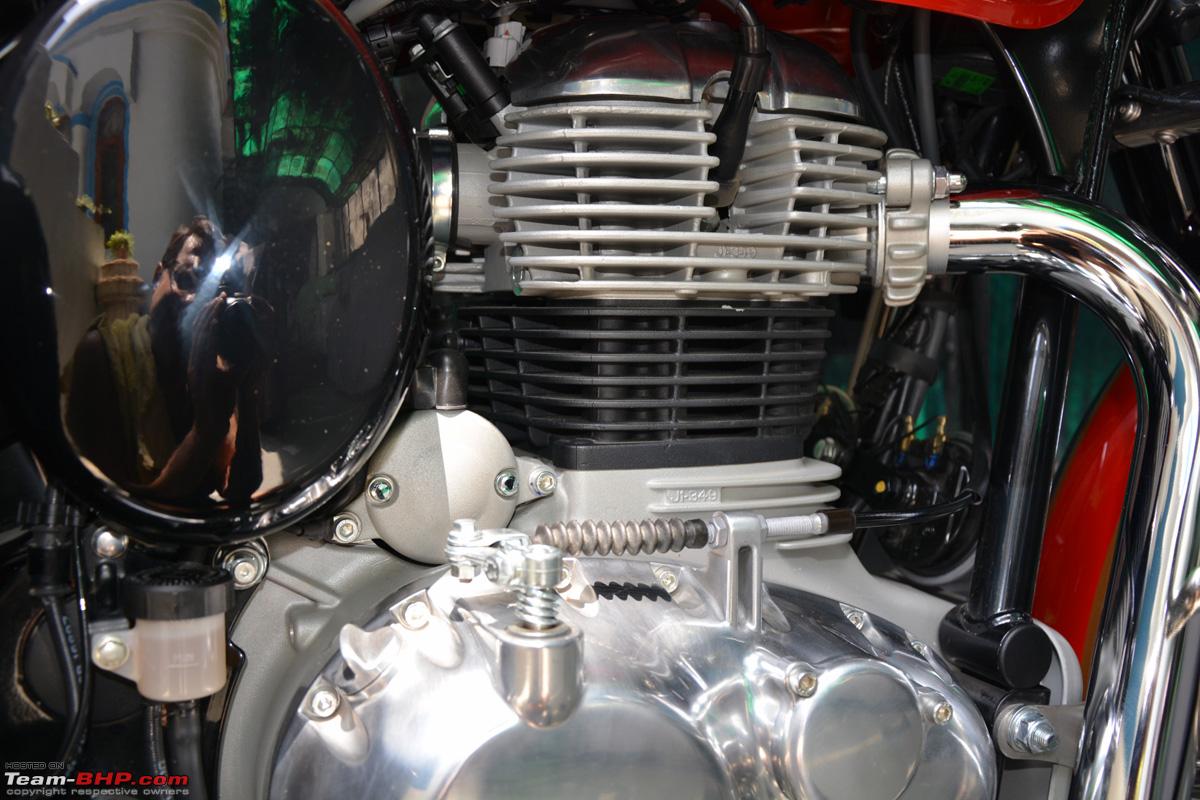 Royal Enfield embossing on the engine casing on the right, besides the oil filter -  Another view - 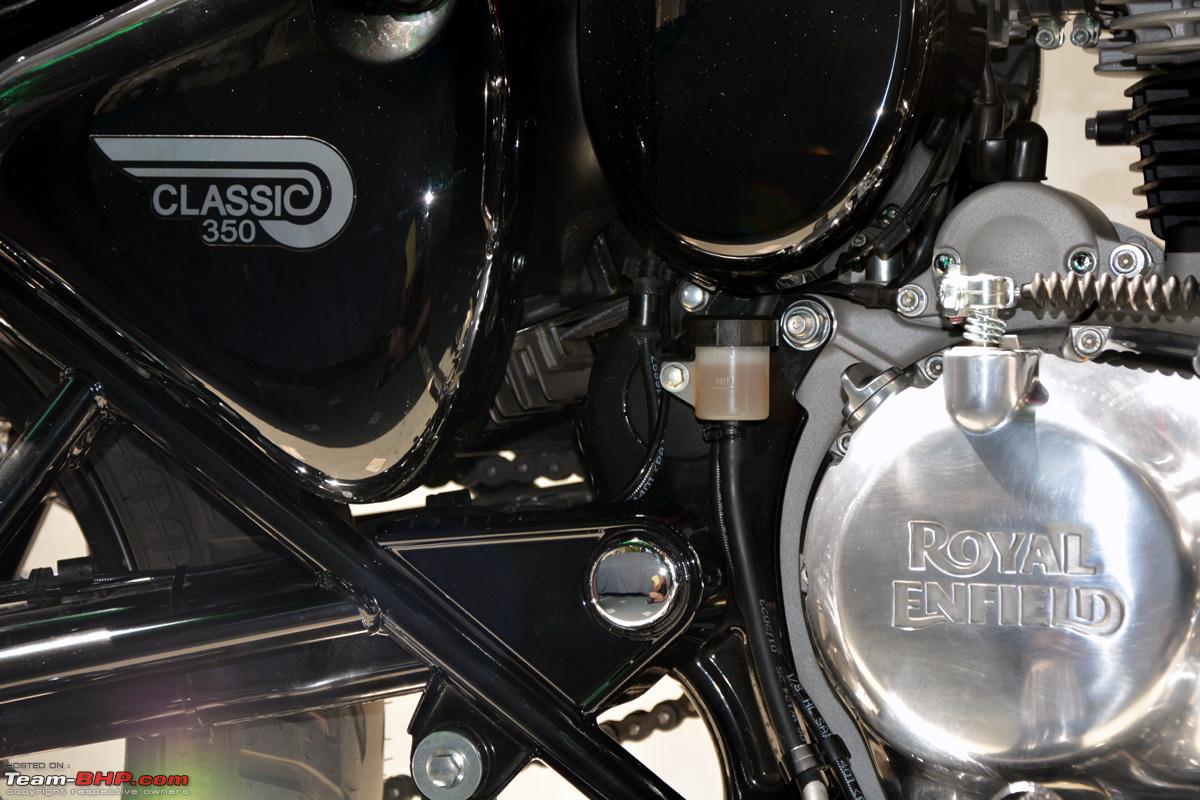 Oil Level window on the lower right side - 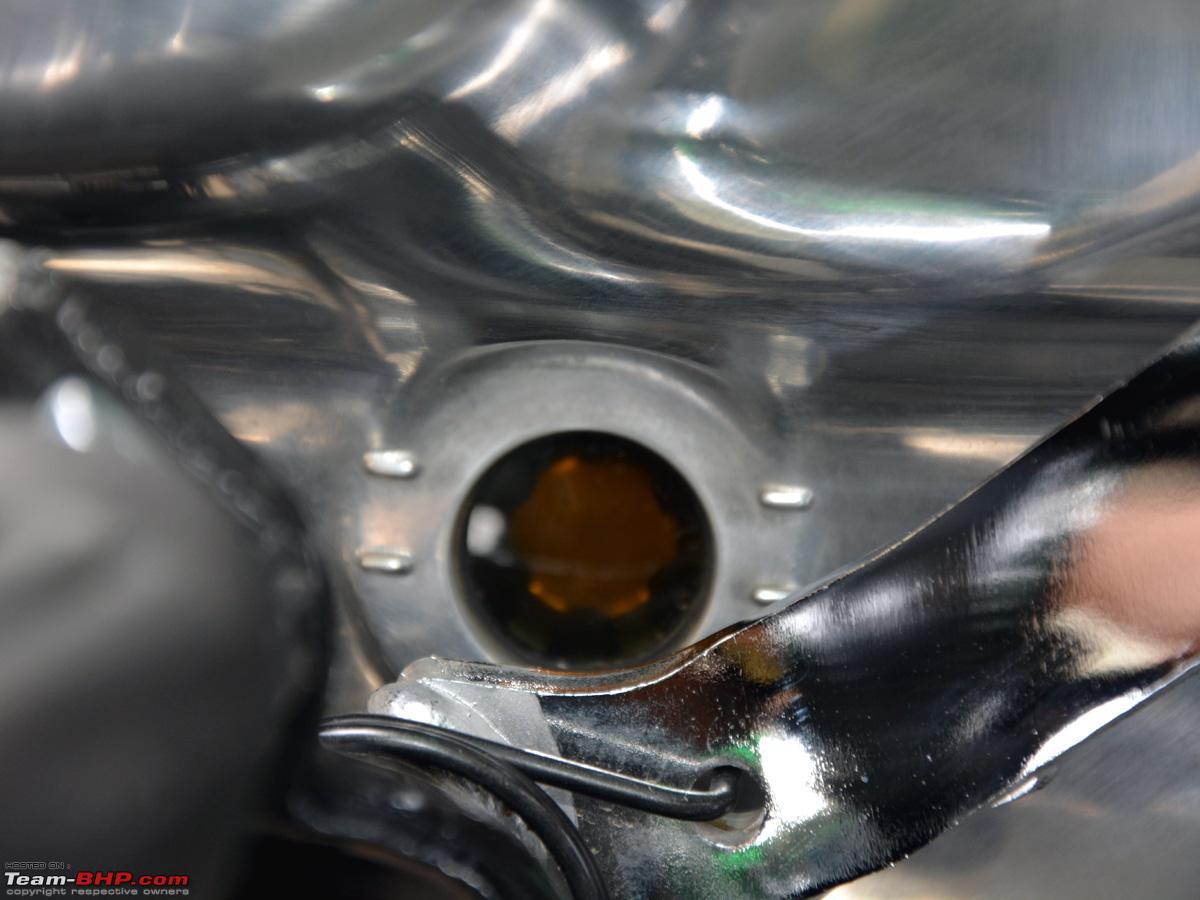 The Rear Brake Fluid Reservoir tucked in between -  A look at Oil Filler Cap besides it -  Again made of solid aluminum alloy - 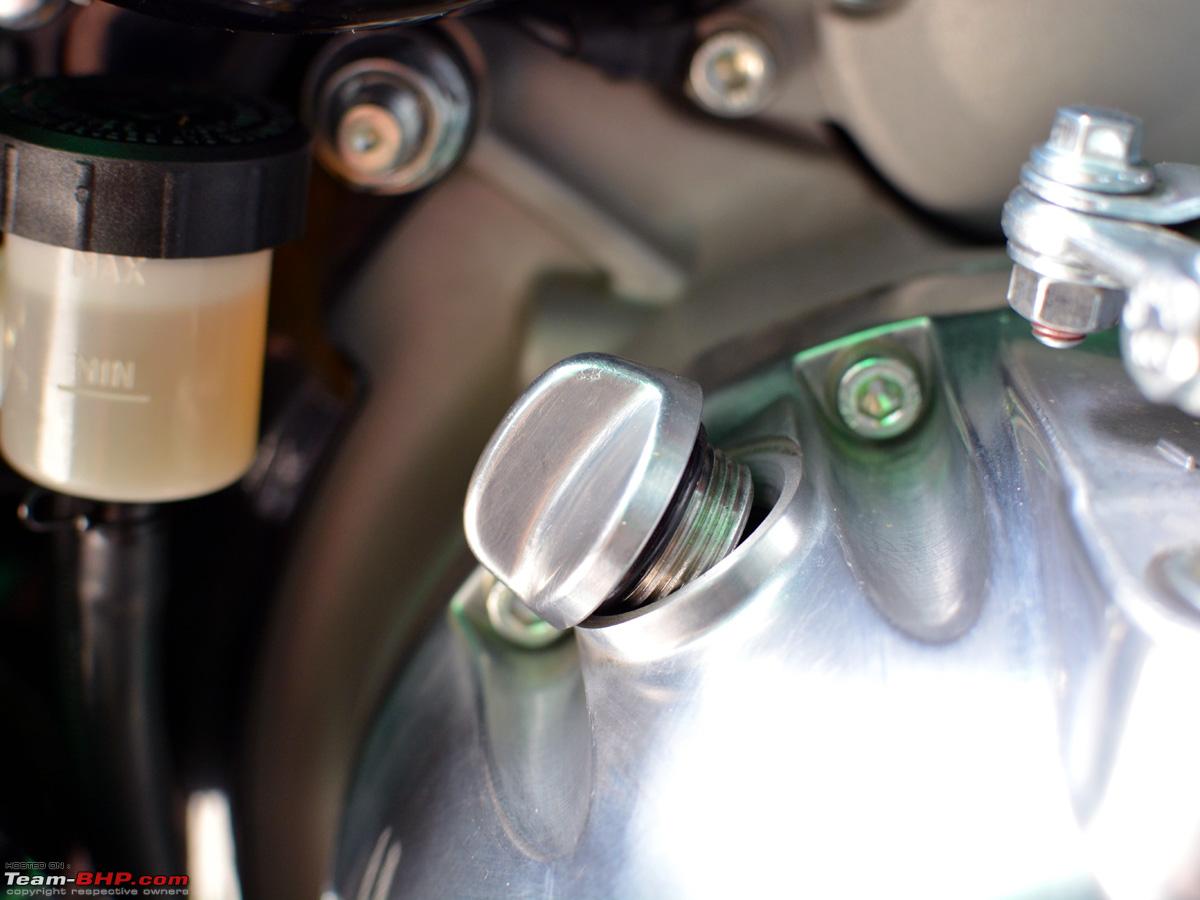 The Exhaust Header. Better finished than many bikes from bigger stables - 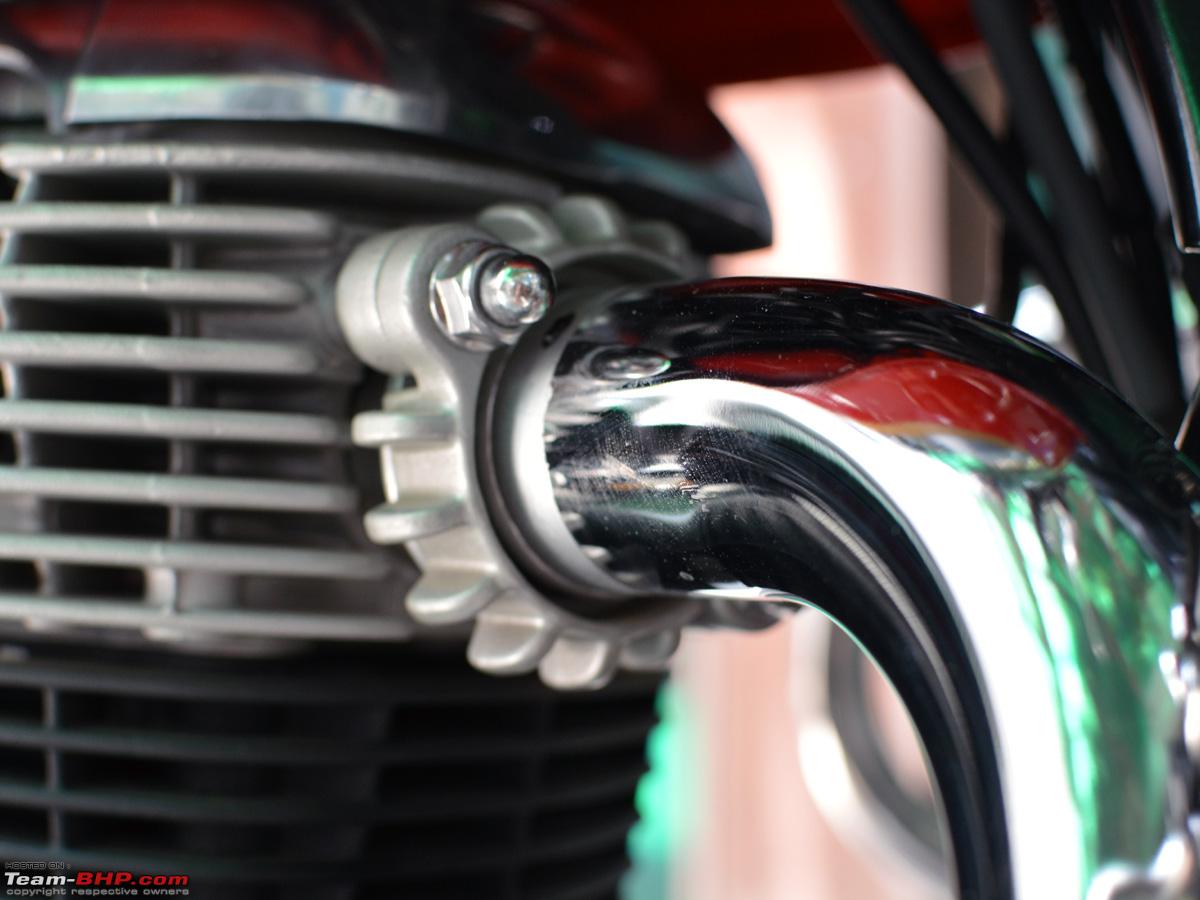 The single spark plug (YR7MES/Bosch - 0.7-0.8mm) - 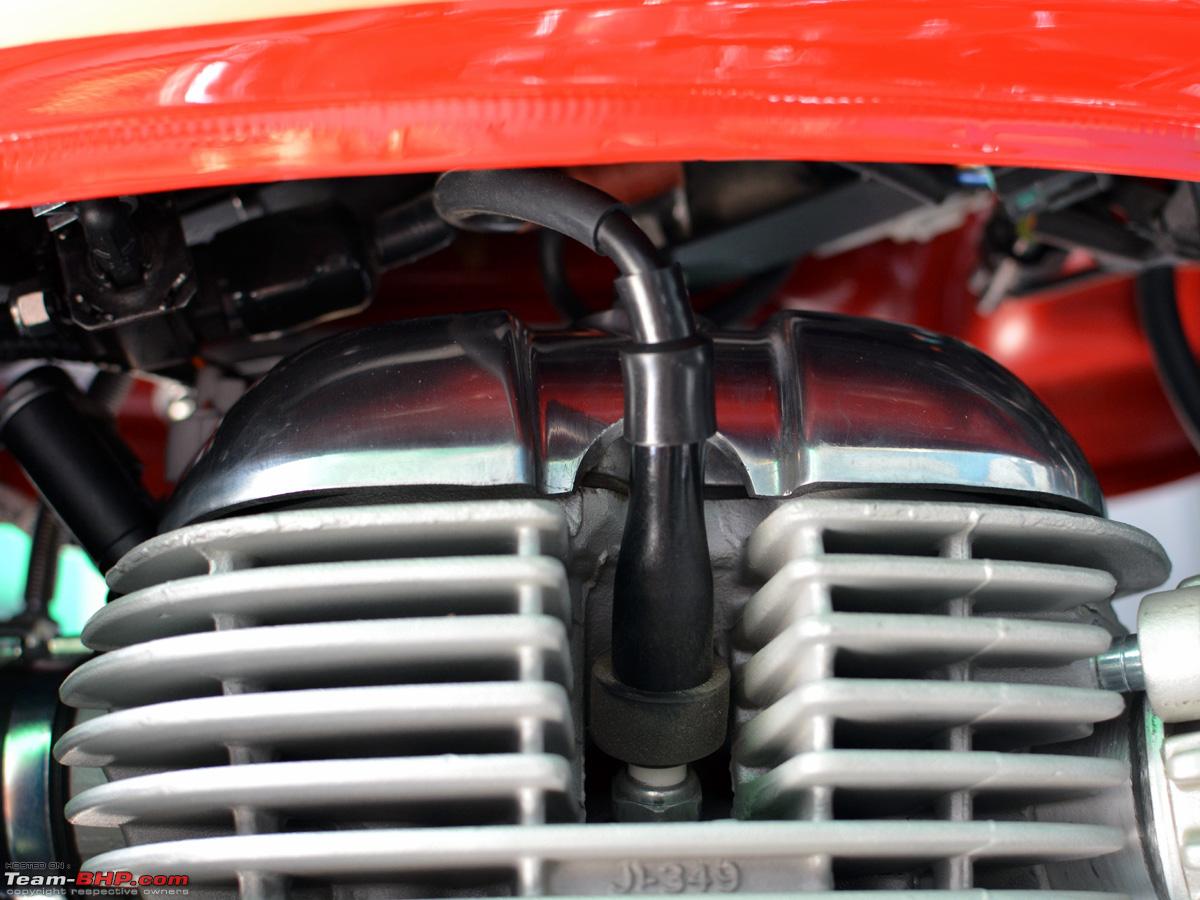 The Clutch Cable Adjuster -  The Electric Start Motor - 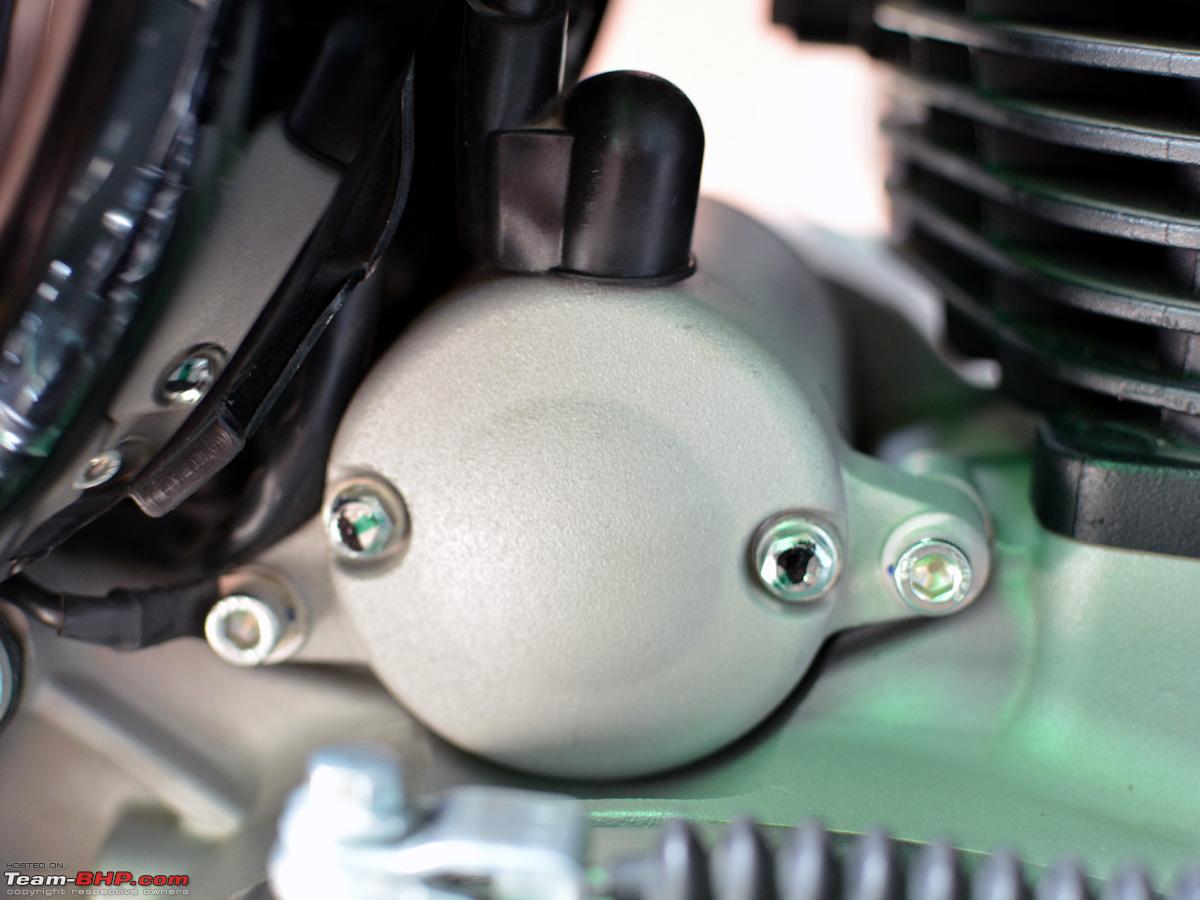 Another piece of Art - The Classic Exhaust Tail Pipe with it's legendary shape -  The fit and finish has improved tremendously from my times. Each exhaust is properly numbered and all welds and joints are seamless - 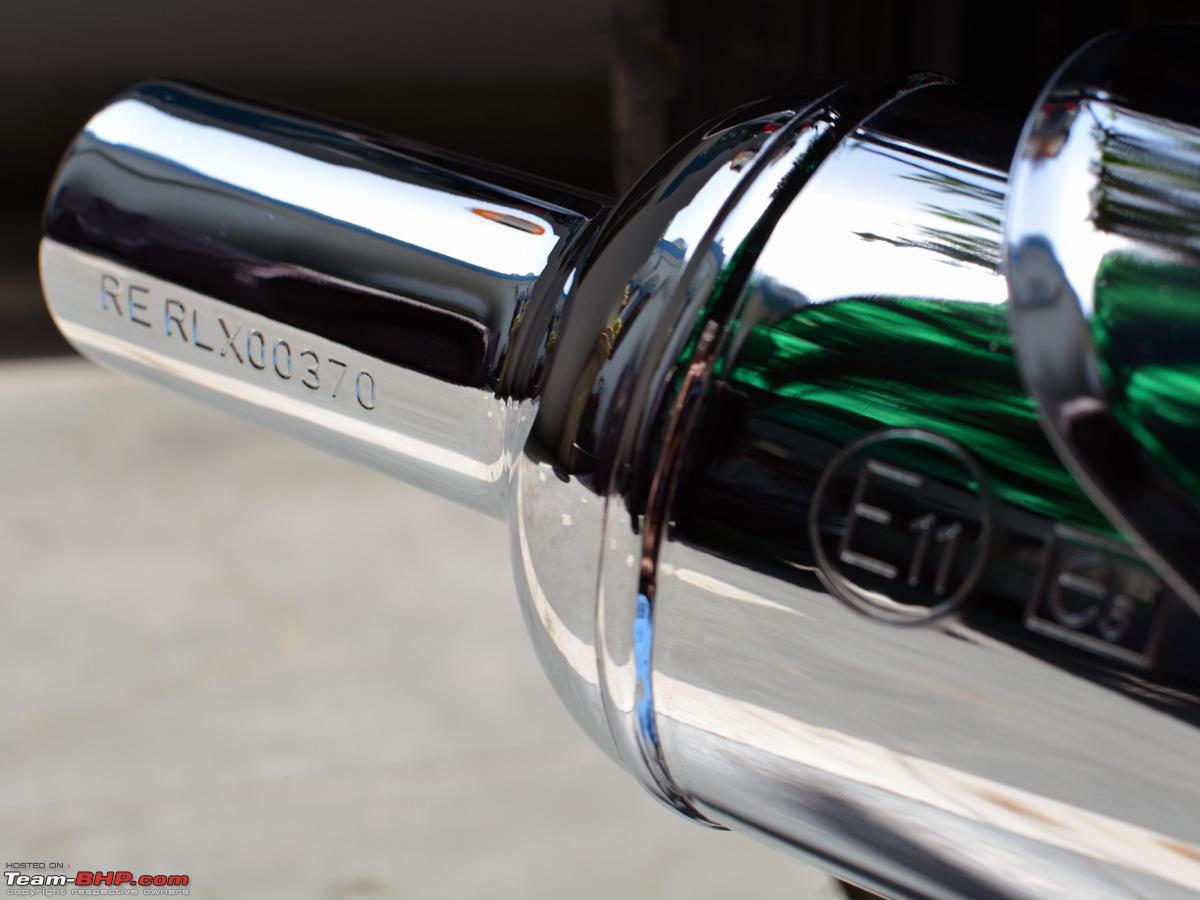 Royal Enfield embossing on the crank case adjuster on the left - 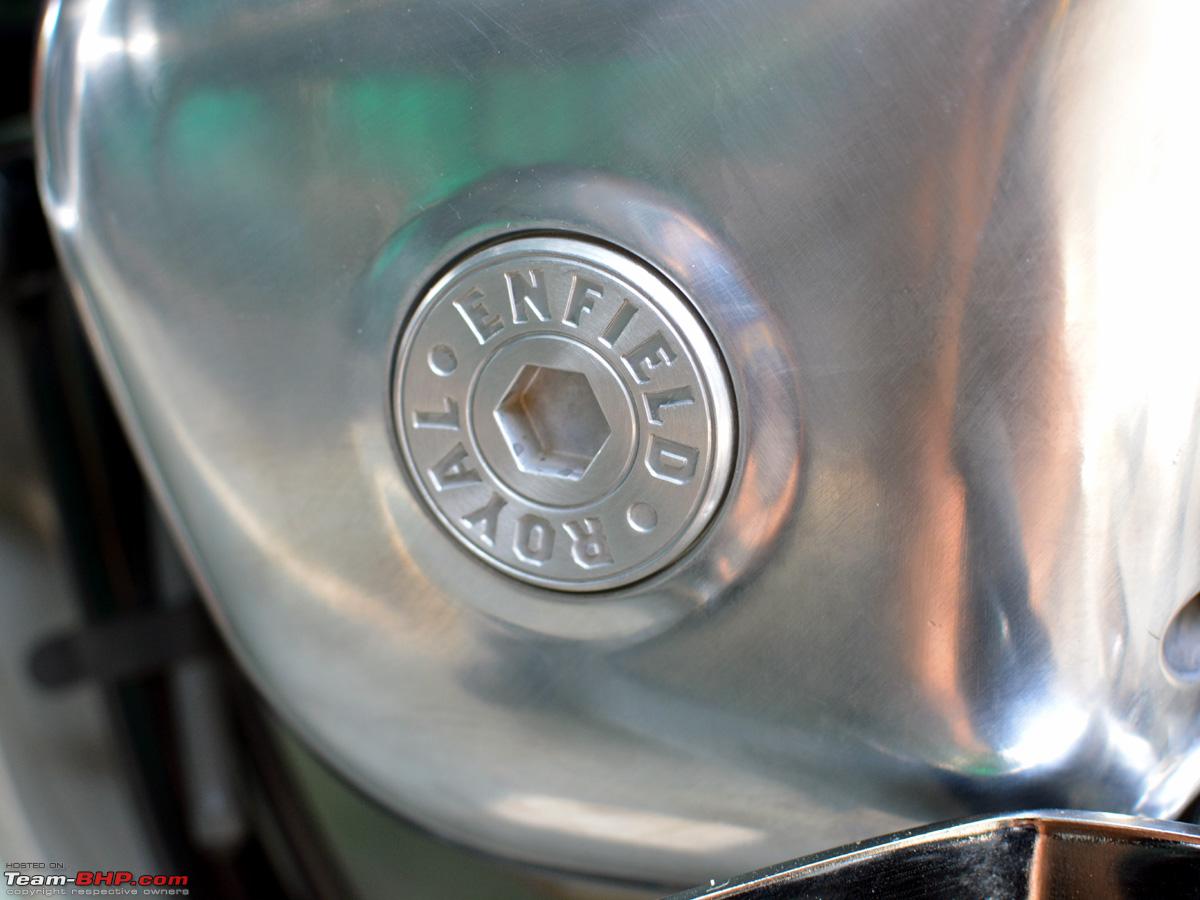 More to come... Last edited by dkaile : 24th April 2023 at 15:49. |
|
| (39)
Thanks
|
| The following 39 BHPians Thank dkaile for this useful post: | aargee, achayan, adrian, ajay0612, anivy, berserk, chinmaypillay, Cyborg, dailydriver, deerhunter, Dosa, Geo_Ipe, GTO, irajput, ITZ_Zeta, JoshuaM, keroo1099, lovetorque, mh09ad5578, NitNac, pachchu77, Peri_patetic99, RedPhobos, rendezvous3850, Roy.S, samabhi, SandyX, shancz, Shreyas Aterkar, shyamg28, Skyline_GT, SmartCat, Tgo, Vaishak, vattyboy, Viju, Voodooblaster, Wageabond, xVpuredrive |
|
23rd April 2023, 19:36
| #5 |
| Senior - BHPian | re: 2023 Royal Enfield Classic 350 | Chrome Red | The Comprehensive Review The Tyres The Front 19" Alloy Wheel with Tubeless Tyre 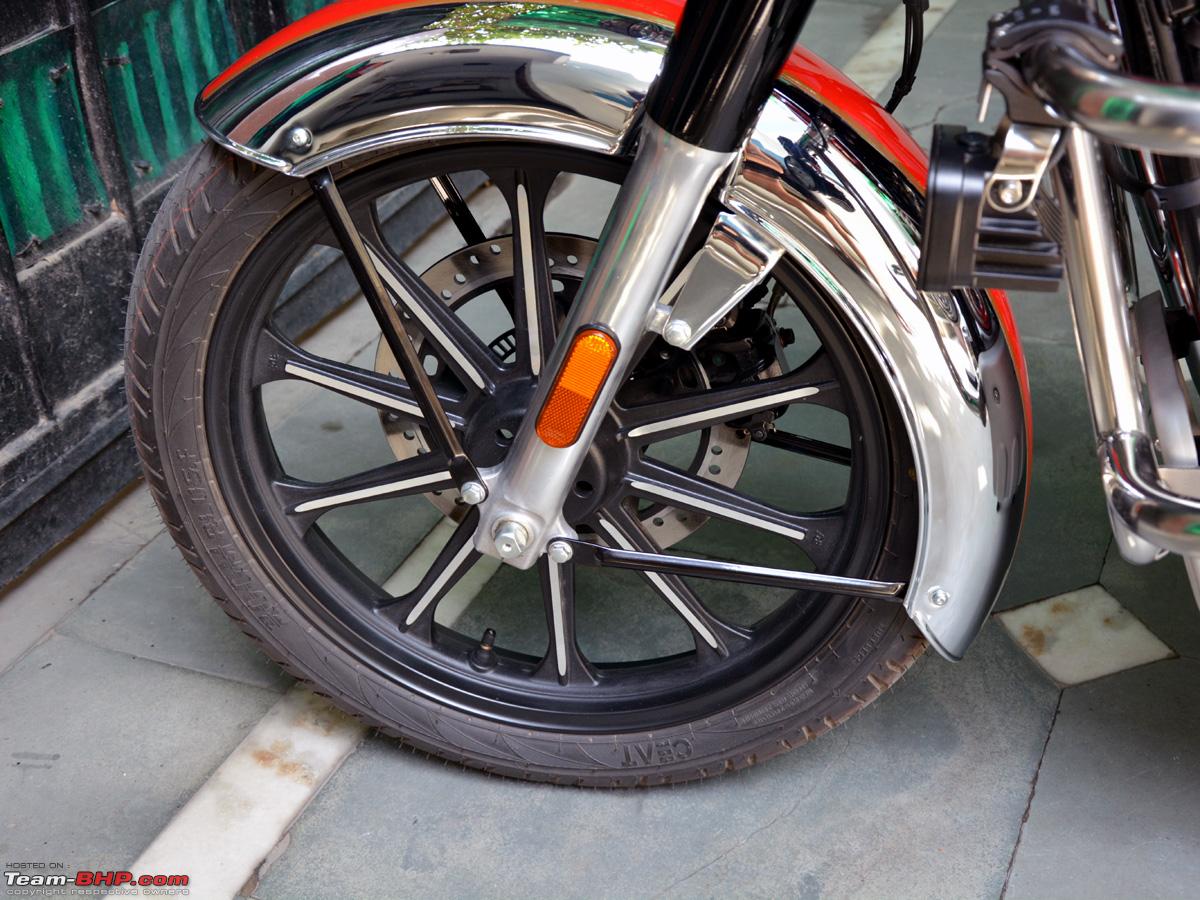 The Rear 18" Alloy Wheel with Tubeless Tyre 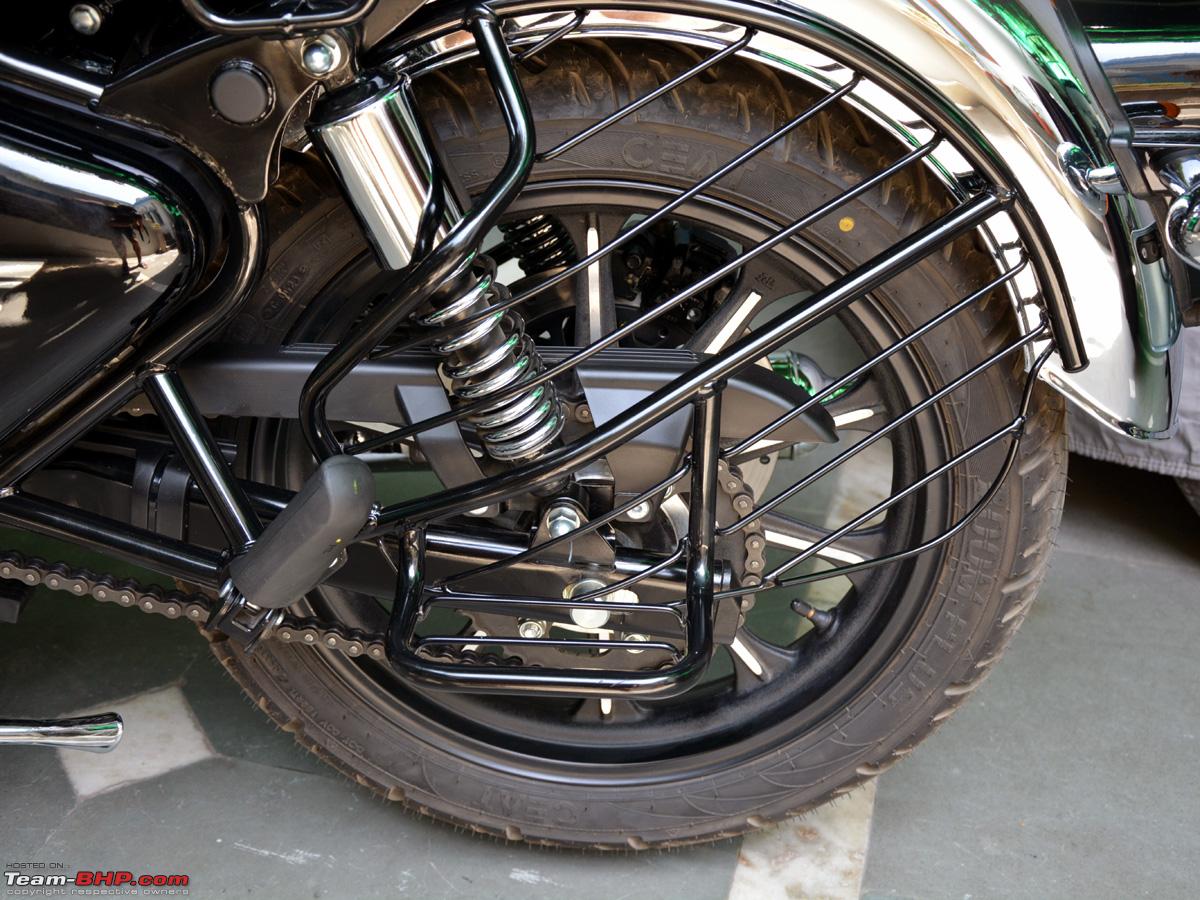 A closer look at the Tubeless Tyre Valve  The Front Brake Discs by BYBRE (short for By-Brembo) which are 300mm with twin piston floating caliper  Same BYBRE Rear Discs which are 270mm with single piston floating caliper. The Brake feel and bite is more than adequate and the dual channel ABS is standard and not very intrusive. 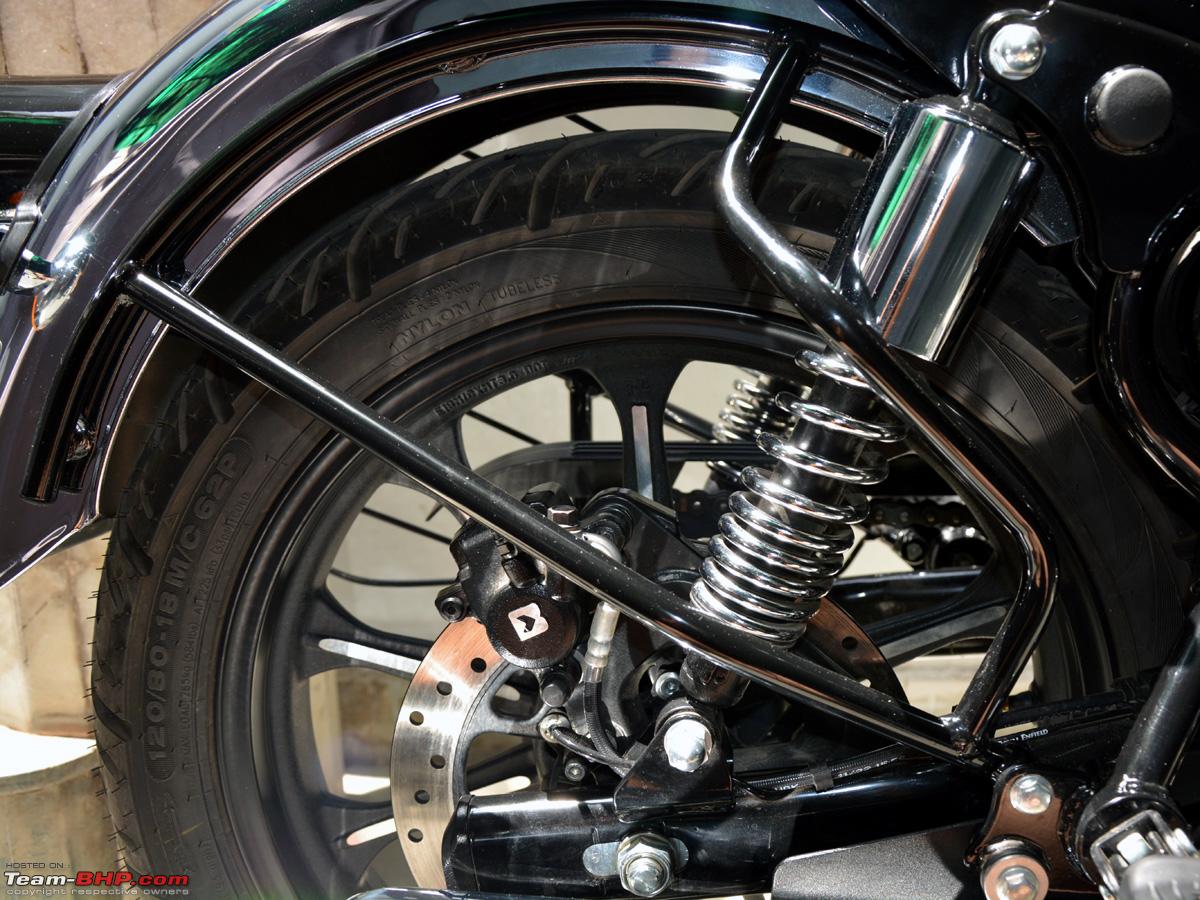 Another look of the rear tyre with the well designed (and essential for the city) Saree Guard where my wife can sit easily on short rides with proper space to keep her feet sideways. A small but vastly overlooked design essential for a city bike in Indian conditions where ladies mostly sit pillion wearing a Salwar suit or a Saree. 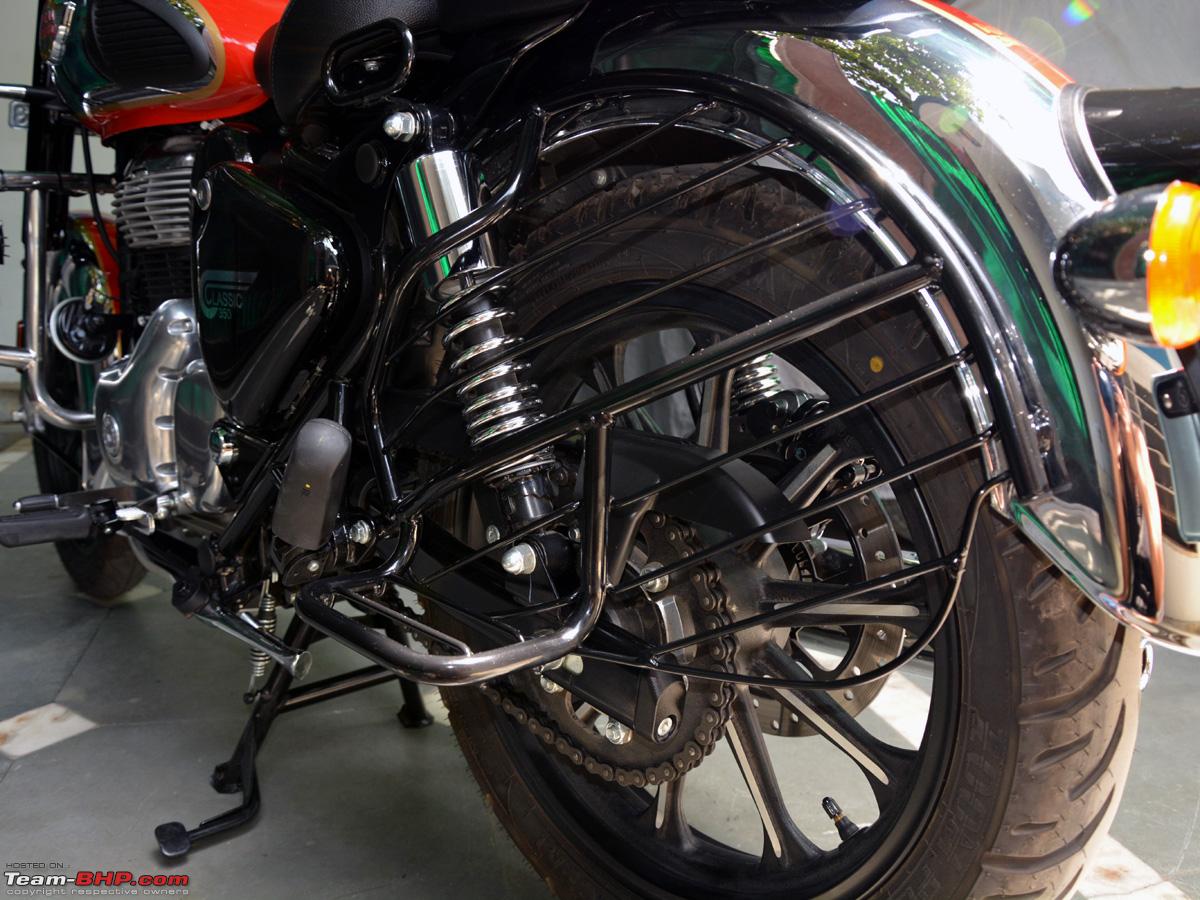 The Tyres are by CEAT - 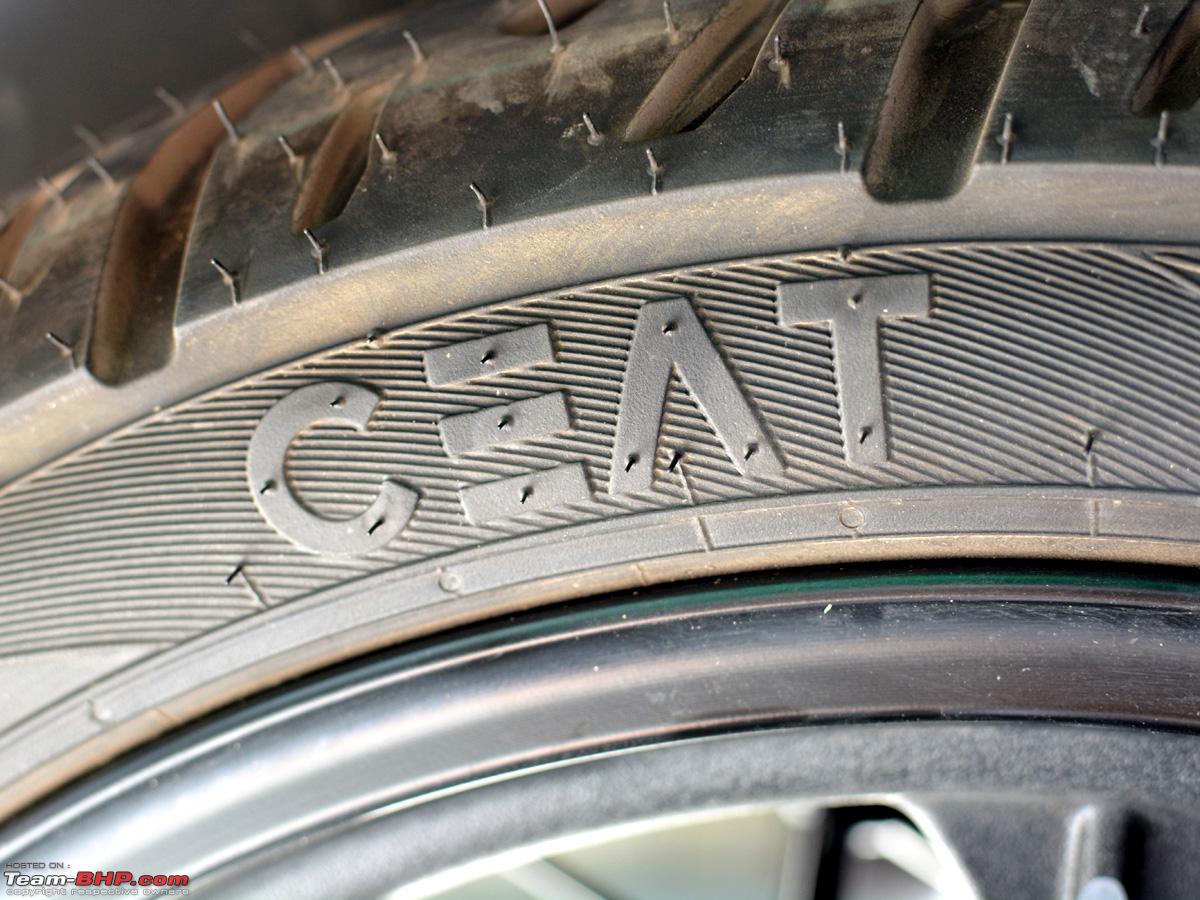 ZOOM Plus as they are called. Notice the Tubeless marking on the Alloy Rims! 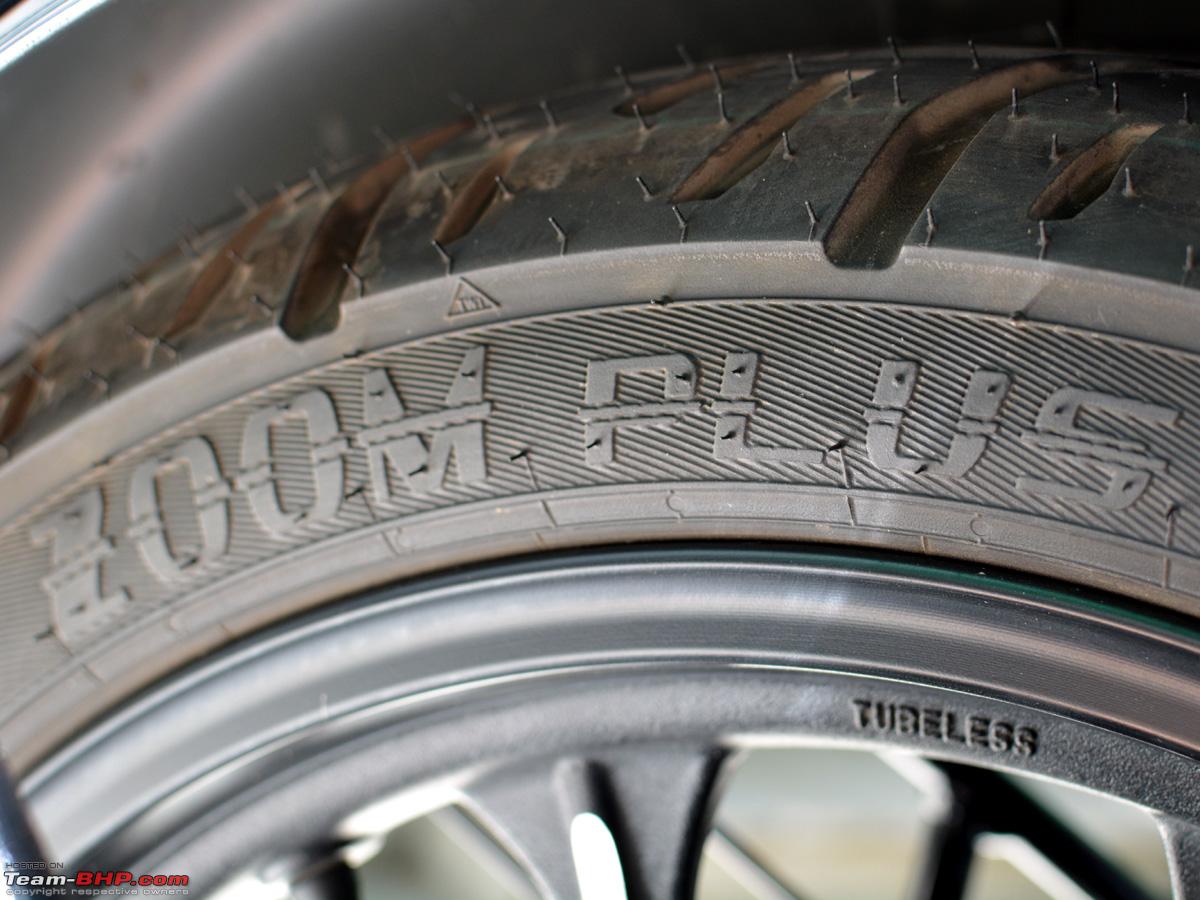 Tubeless marking on the tyres too - 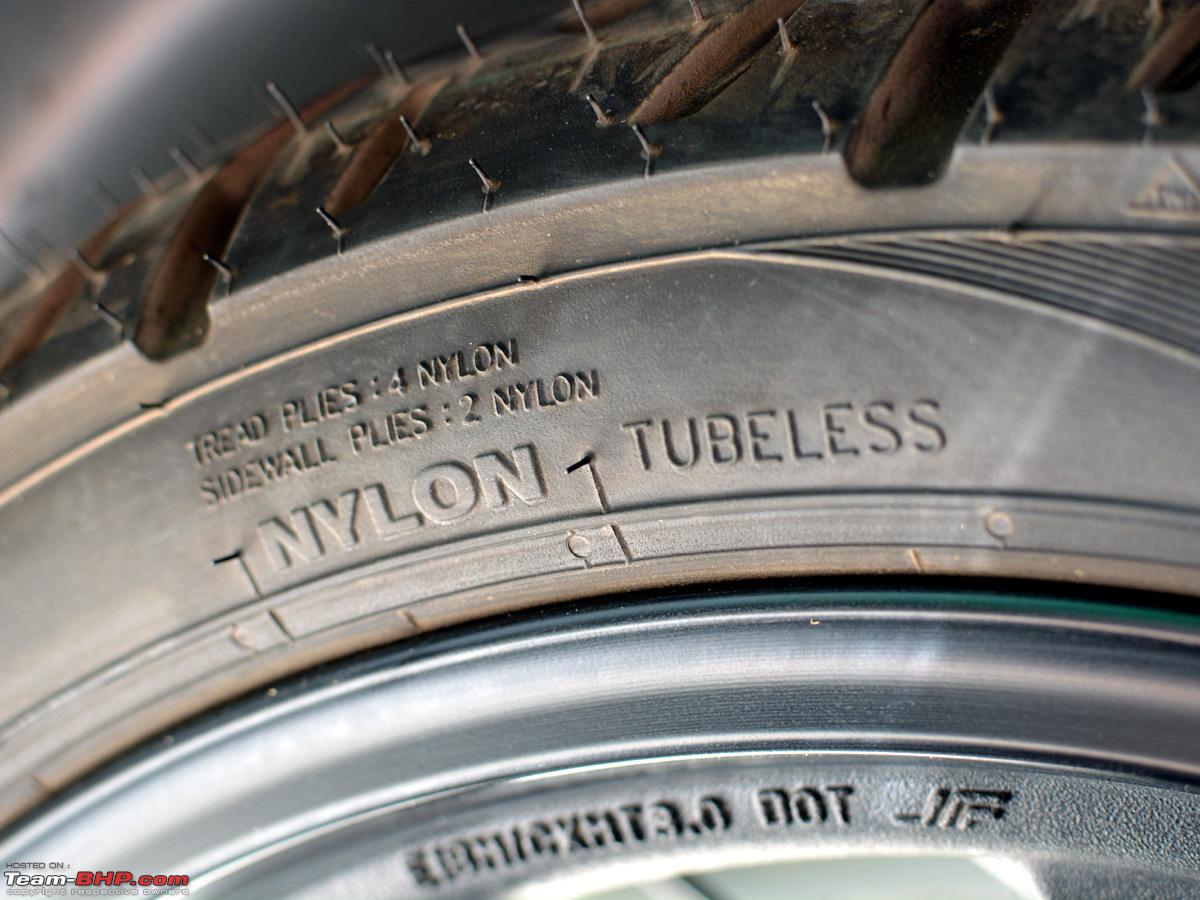 120/80 - 18 section profile for the REAR (36 psi with pillion and 32 psi for solo riding) -  Rated for 150 kmph  100/90 - 19 section profile for the FRONT (32 psi) - 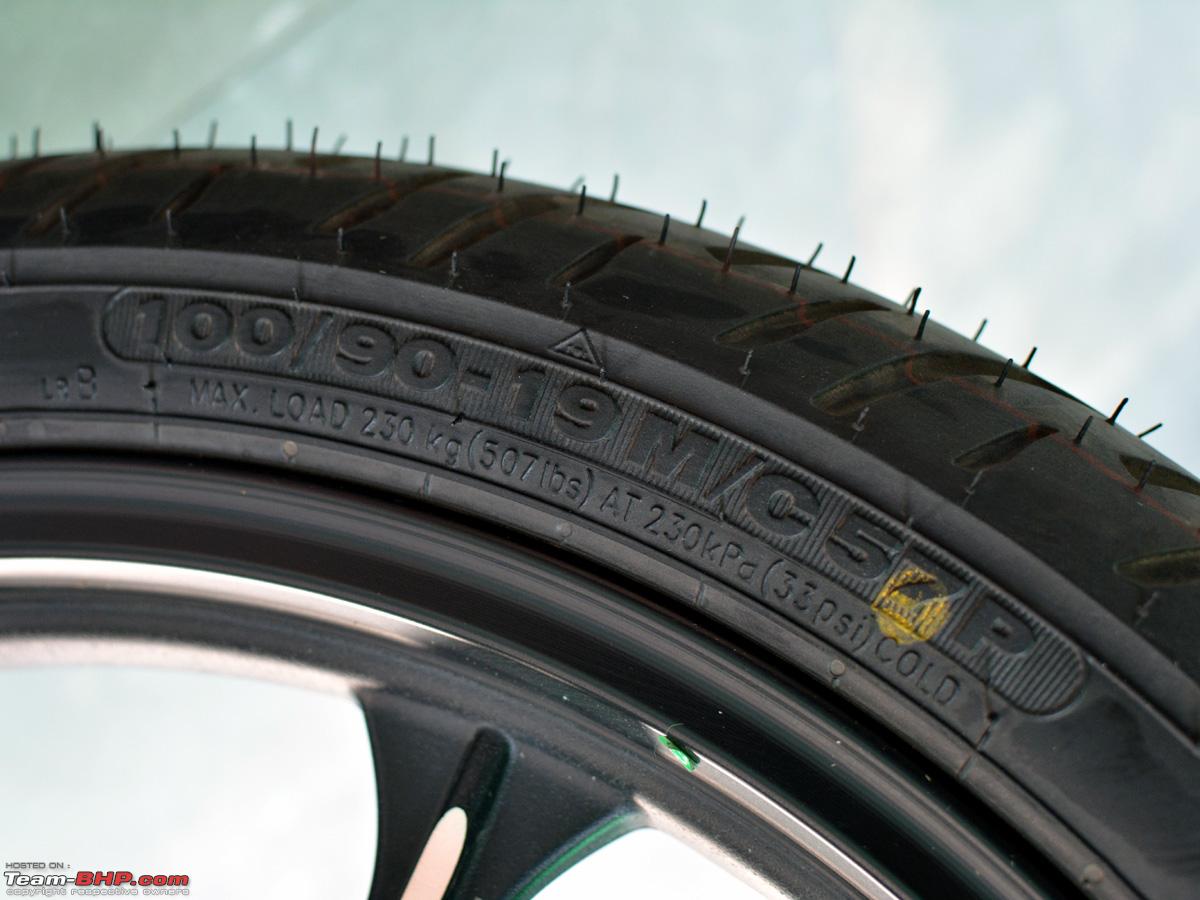 The Rear Tyre AXLE Nut with the chain adjustment readings -  Even insignificant parts are aesthetically finished in chrome - 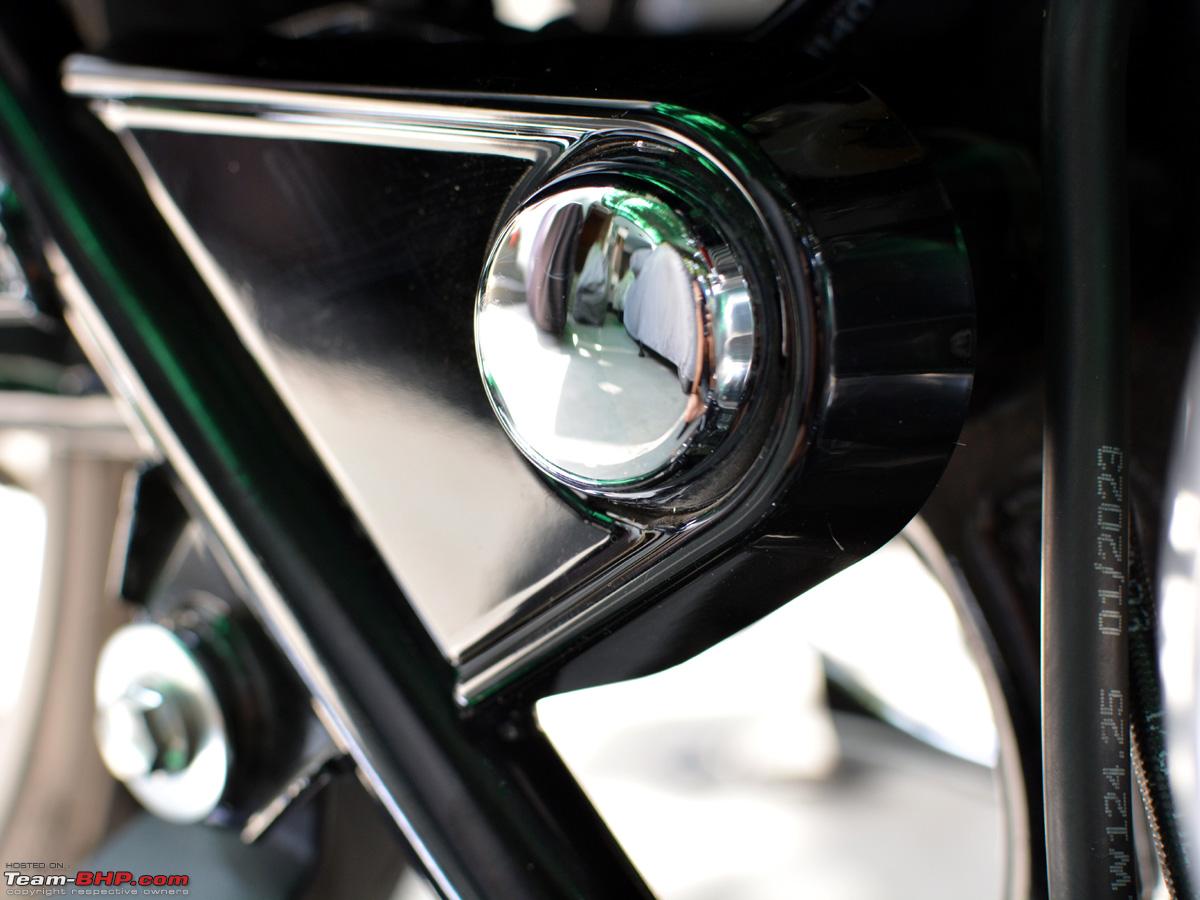 The Rear Suspension Preload 6 step Adjuster with 90mm of travel - 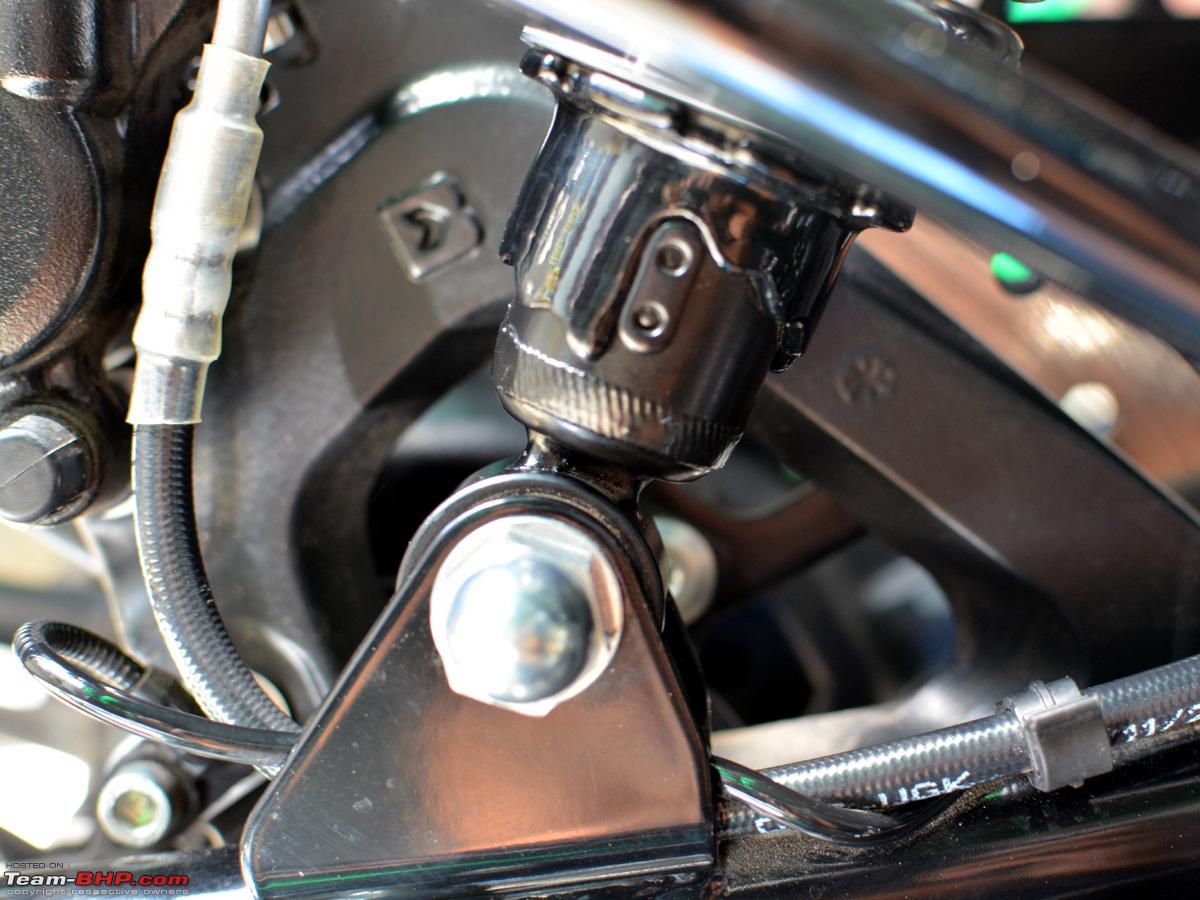 The Stock Single Horn on the left. Notice the 'L' marking in it's center signifying Low Tone. It's a 2.5A unit.  The 2nd Dual Horn was added by me immediately. Notice the 'H' marking in it's center signifying High Tone. It too is 2.5A unit and is the original Uno Minda K95 horn that used to be previously supplied as stock with the bike but has since been reduced to a single horn due to regulations. The senior mechanic at RE explained to me that fitting the 2nd horn in this bike does NOT require a relay as the stock wiring and horn switch has been designed for the original dual horn setup and there is a 10A horn fuse in the fuse box stock from the factory. So fitting the 2nd horn was done in minutes.  The accessory all aluminium Sump Guard does protect the engine casing from getting dirty, even in every day riding. It can be easily be removed by 4 bolts for oil removal at the time of servicing. The lower 2 Hex Nuts were replaced by me by 10mm SS bolts as there have been cases where they have got scrapped by speed breakers and are then impossible to open by a hex key. So 10mm nuts is the way to go lower down - 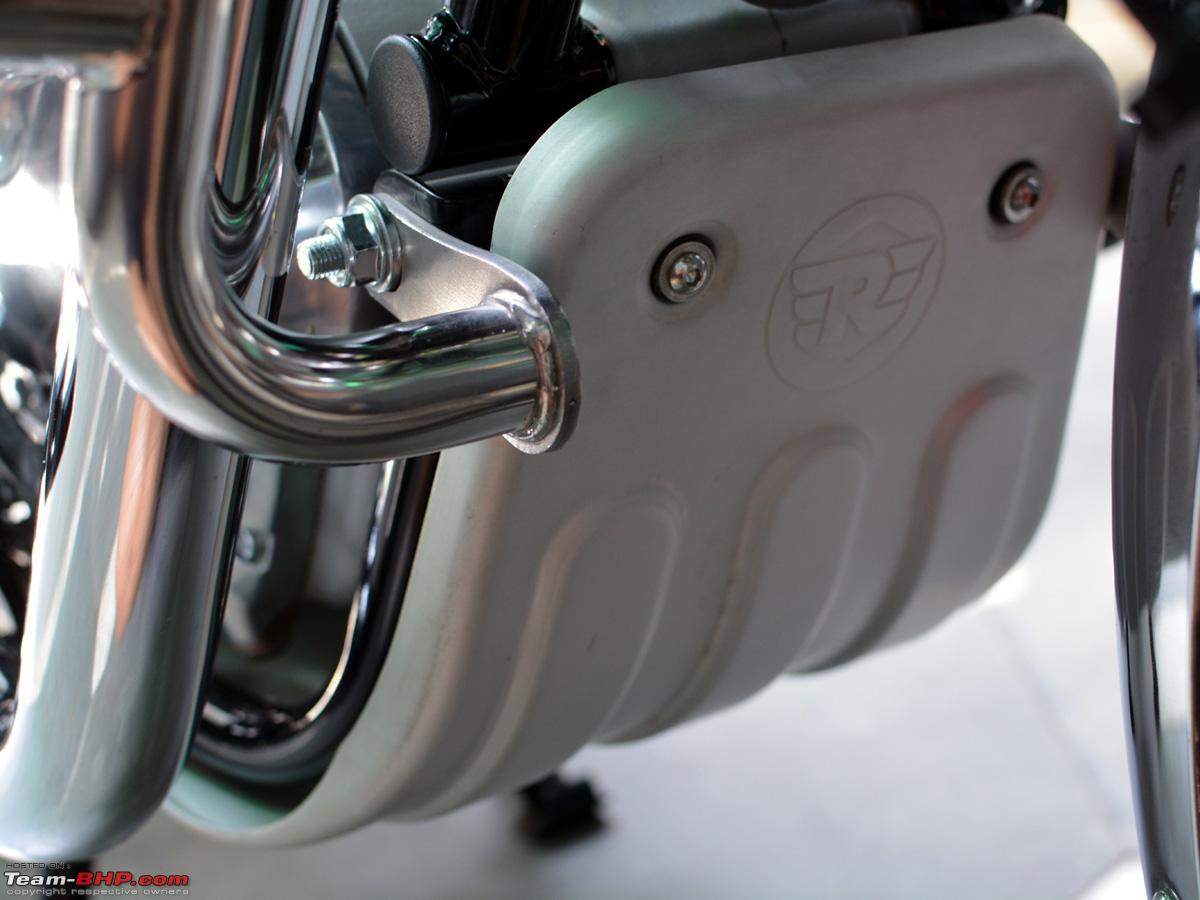 The HJG LED Fog Lights added by me almost immediately. The mounts used were by Maddog, Bangalore and the wiring harness and handlebar switch was original HJG. Details of fitment in later posts - 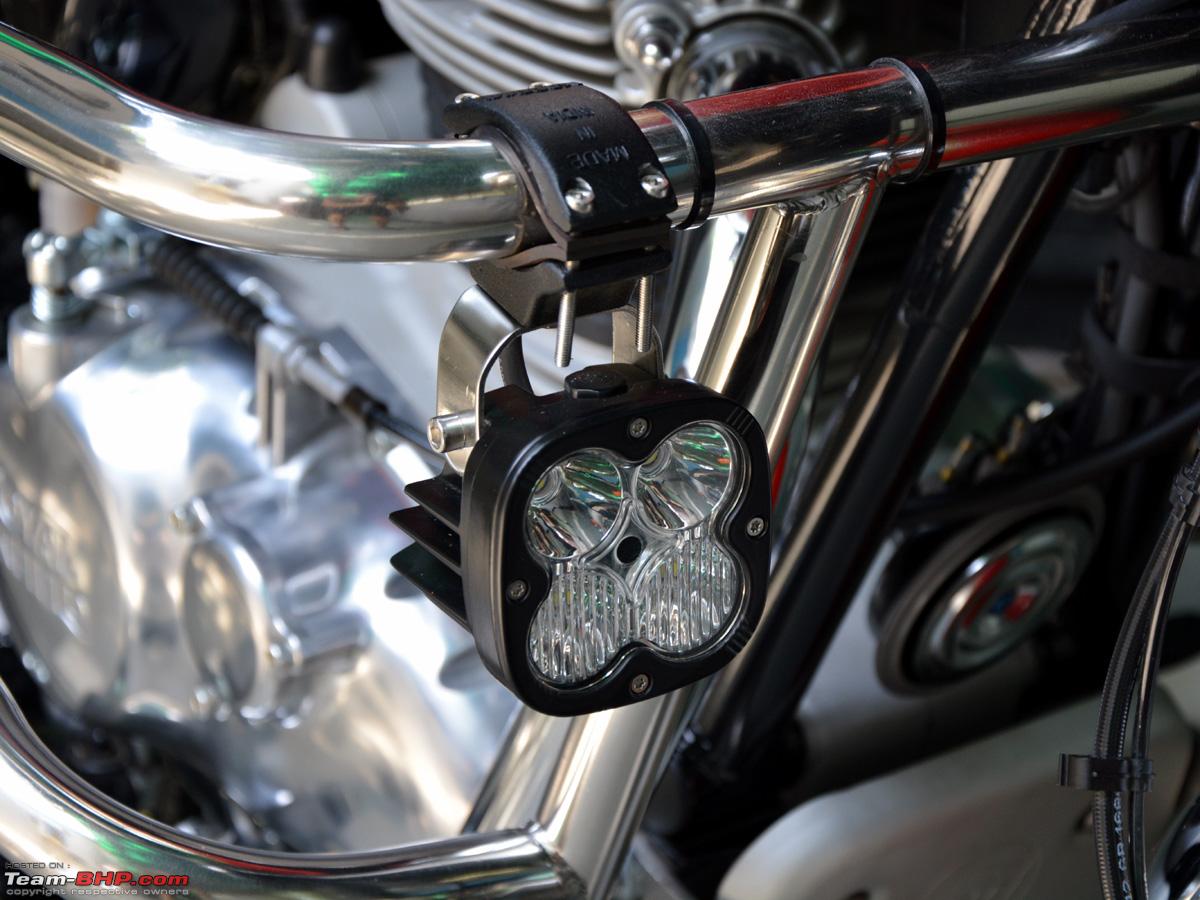 A closer look at the beam pattern of these HJG Fog Lights. Notice the lower 2 portions are Spread Beam pattern and upper 2 portions are Spot Beam pattern. I had to rotate the cover lens to achieve this - 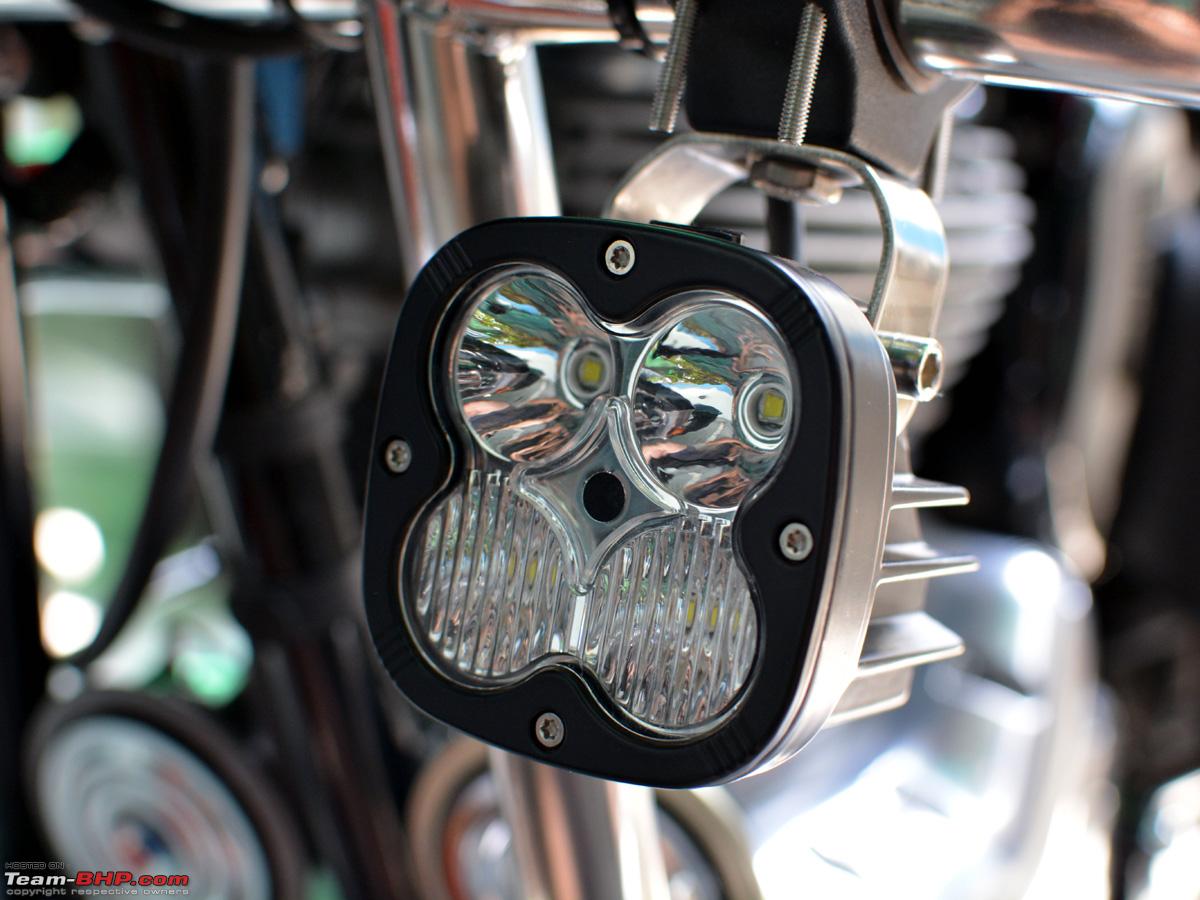 A look at the finishing of the back heat sink in these HJG's. Very good quality which I am also using on my BMW R1250 GSA for almost a year now. 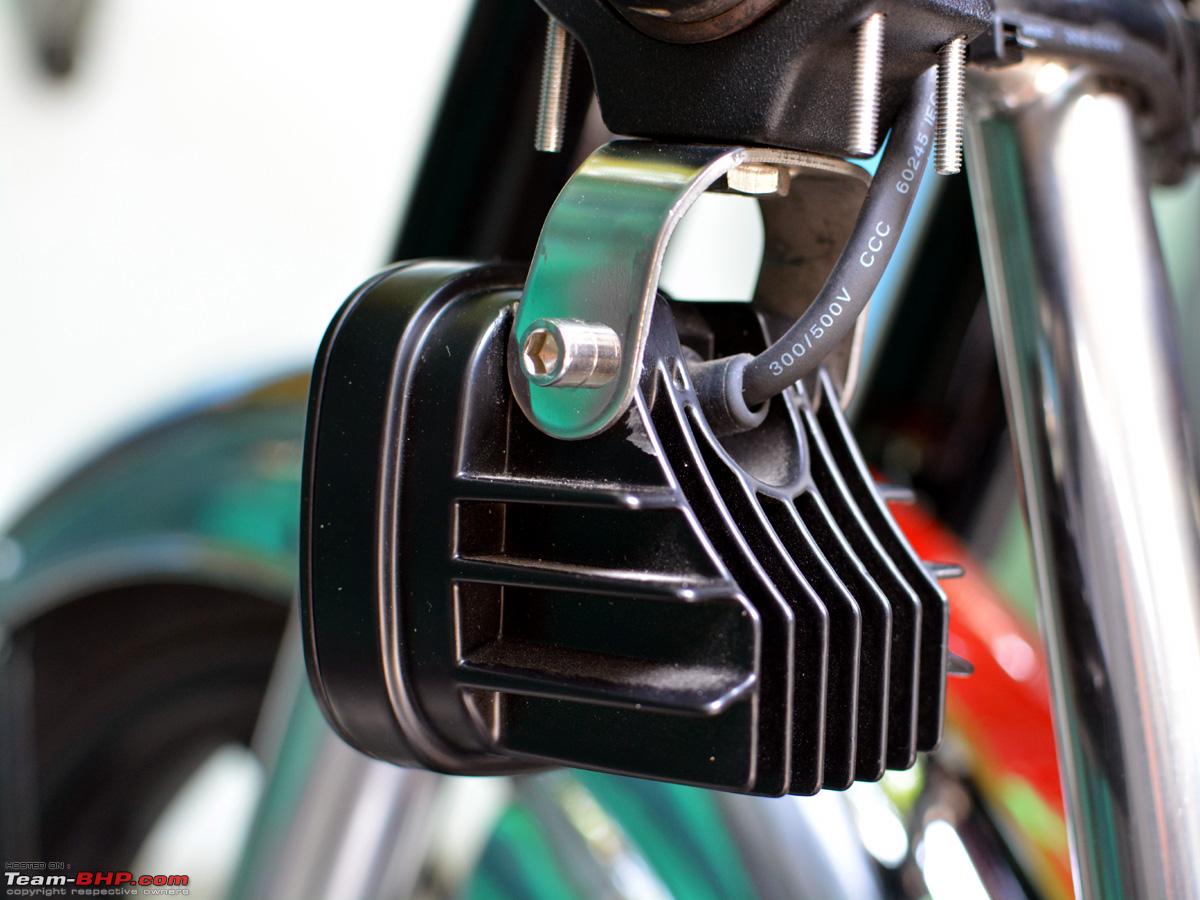 Lockable Right Side Box encasing the Exide 8Ah VRLA Battery and the Electricals. Notice the OBD2 port with the Red Plastic Cover on the right side. Yes, the BULT is now scannable by a OBD2 scanner in the last couple of years now and the RE workshop even has a dedicated scanner for this purpose -  The Fuse Box opened up - 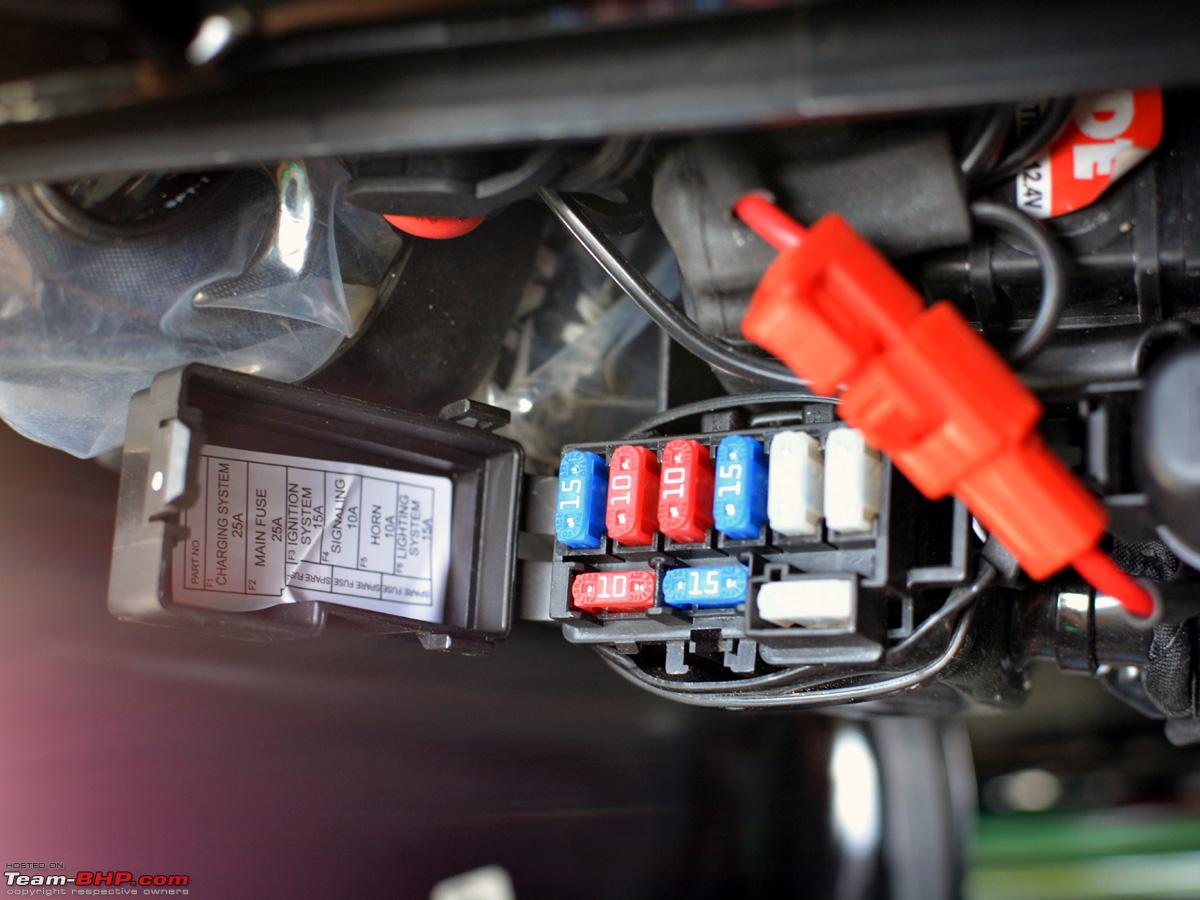 And the Main Fuse besides the Fuse Box - 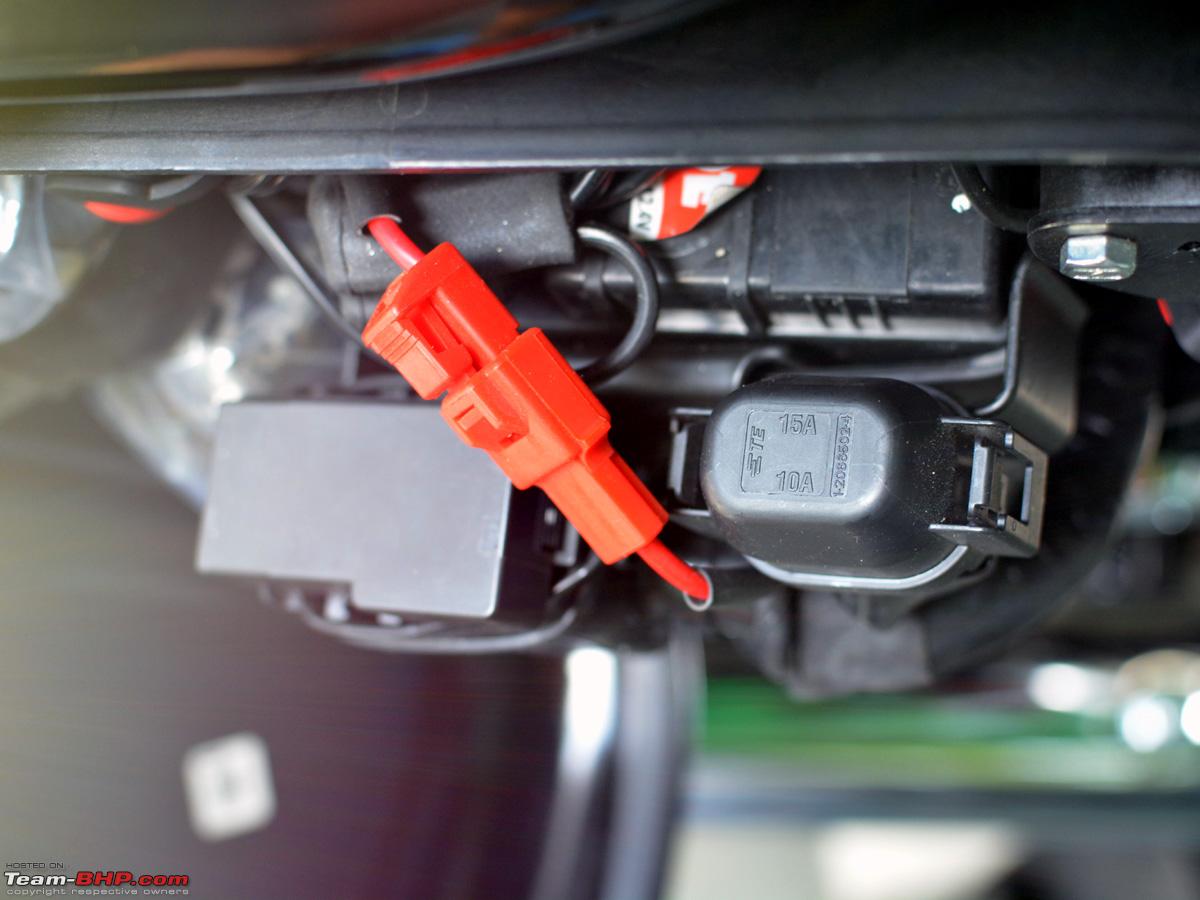 Lockable Left Side Box houses the Air Filter component with a removable plastic tray on top of it to keep the User's Manual and First Aid Kit - 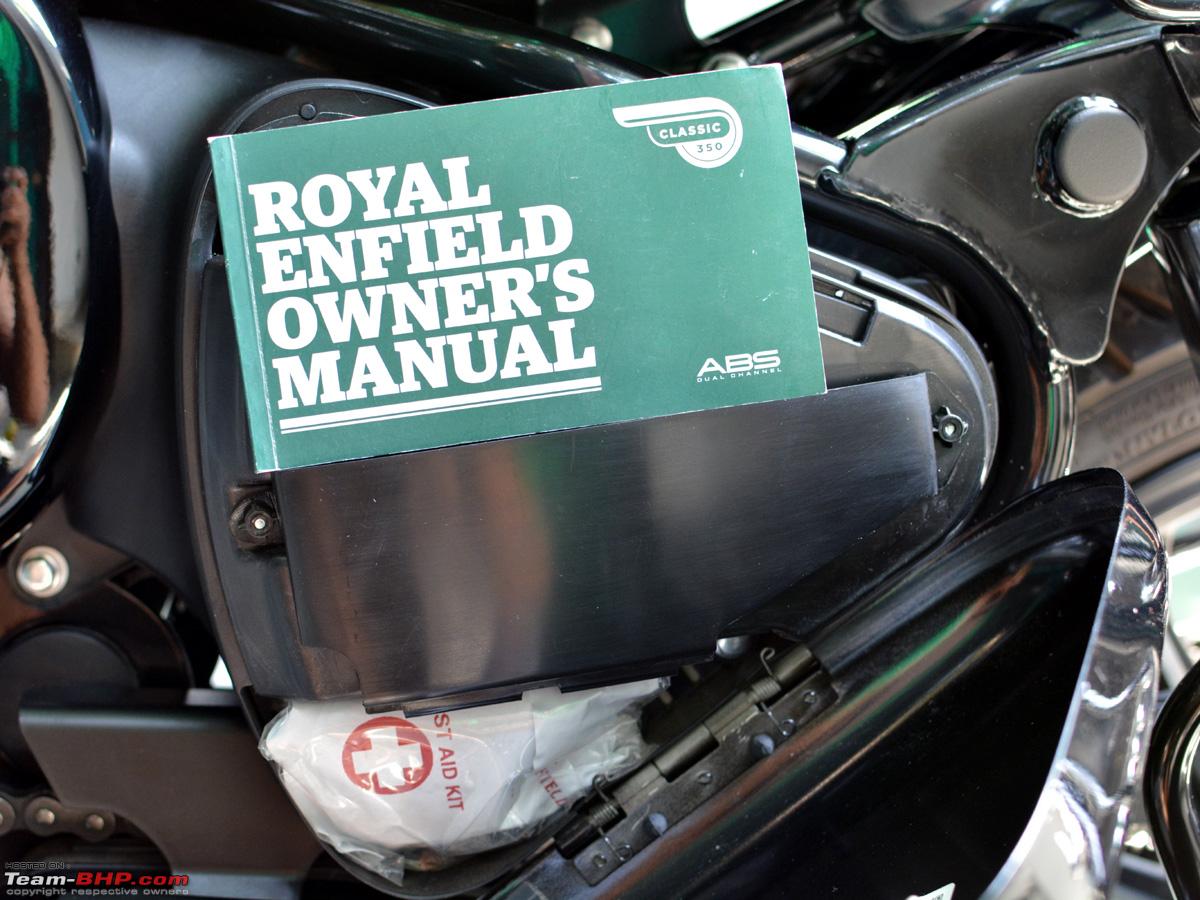 You can also easily store your Bike's documents in that tray along with the User's Manual -  More to come... Last edited by dkaile : 24th April 2023 at 15:54. |
|
| (31)
Thanks
|
| The following 31 BHPians Thank dkaile for this useful post: | aargee, achayan, adrian, ajay0612, anivy, berserk, Cyborg, Dosa, Geo_Ipe, Gordon, GTO, irajput, JoshuaM, keroo1099, lovetorque, mh09ad5578, NitNac, pachchu77, Peri_patetic99, PM - B, RedPhobos, samabhi, sanjoyraju, shancz, Shreyas Aterkar, shyamg28, SmartCat, Vaishak, Viju, Wageabond, xVpuredrive |
|
23rd April 2023, 21:33
| #6 |
| Senior - BHPian | re: 2023 Royal Enfield Classic 350 | Chrome Red | The Comprehensive Review The Foot Controls Right Side Rider Foot Pedal and Rear Brake Lever. Nicely finished in some good quality rubber with Royal Enfield branding -  A closer look  Right Side Pillion Foot Pedal  Left Side Rider Foot Pedal and the Heel and Toe Gear Shifter. Earlier I was sceptical about this arrangement and inquired from the dealership to just get the only Toe Shifter that comes in the RE's sold abroad as they were more nicely finished in alloy. But finally settled to make peace with these and they turned out to be more comfortable -  View of the Heel and Toe shifter from the side. Everything is so nicely finished - 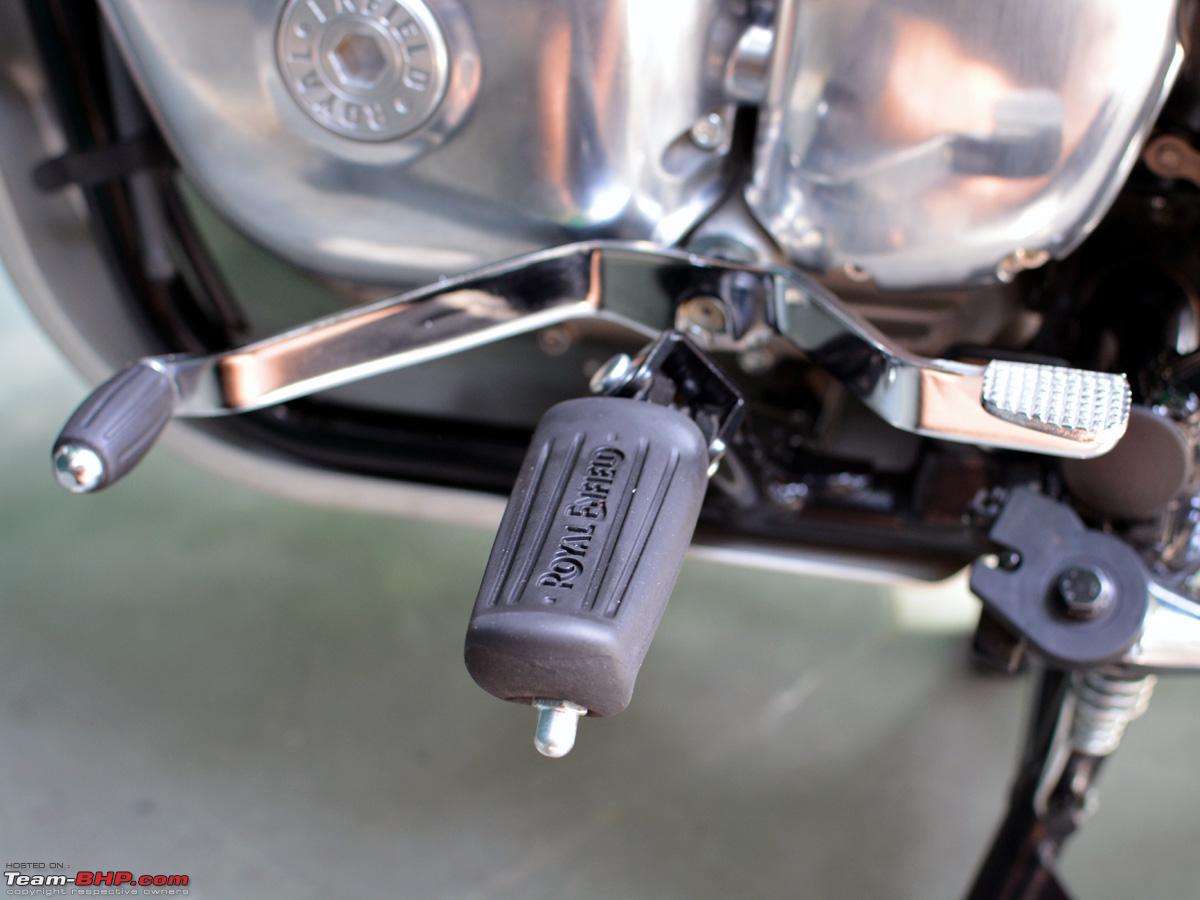 A close-up of the Toe Shifter. Nice soft rubber padding to save your shoes - 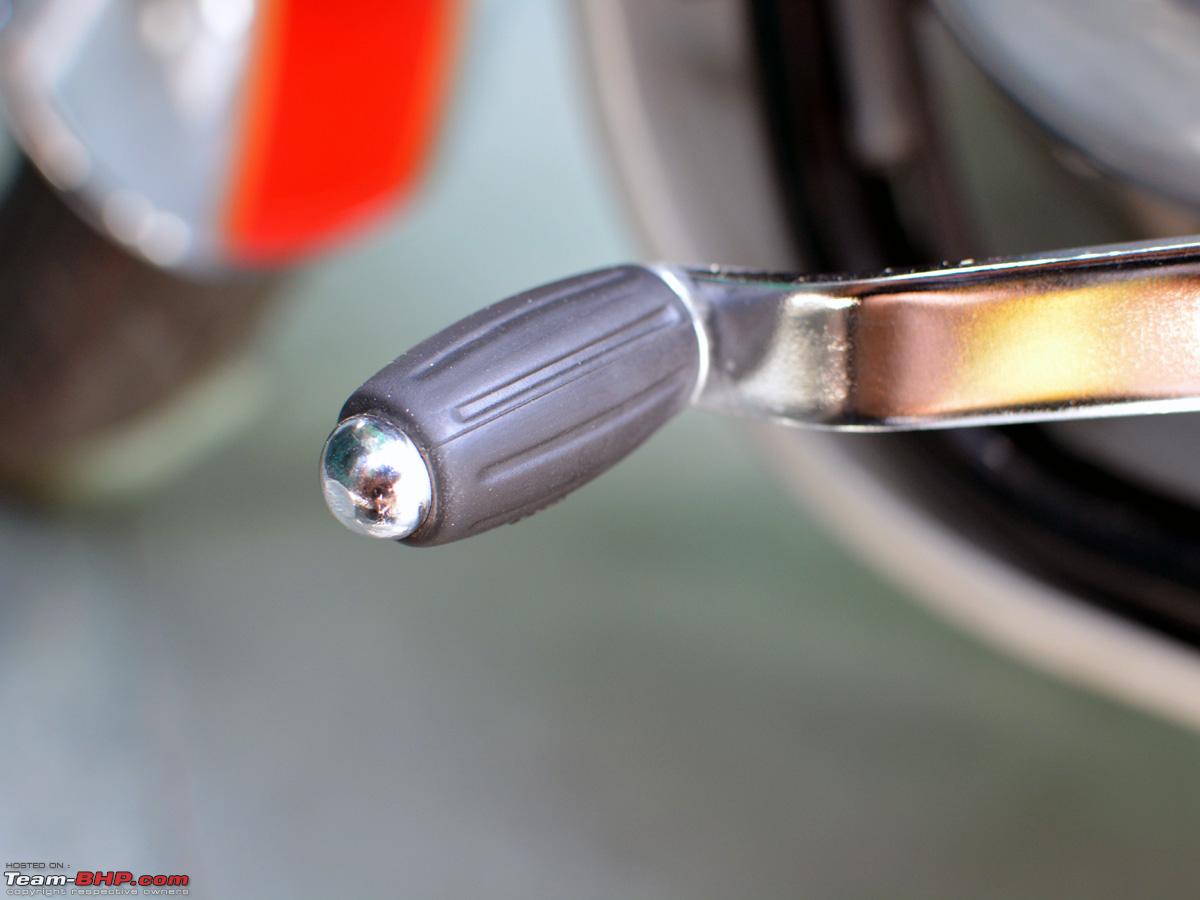 Knurled finish on the Heel Shifter for proper grip - 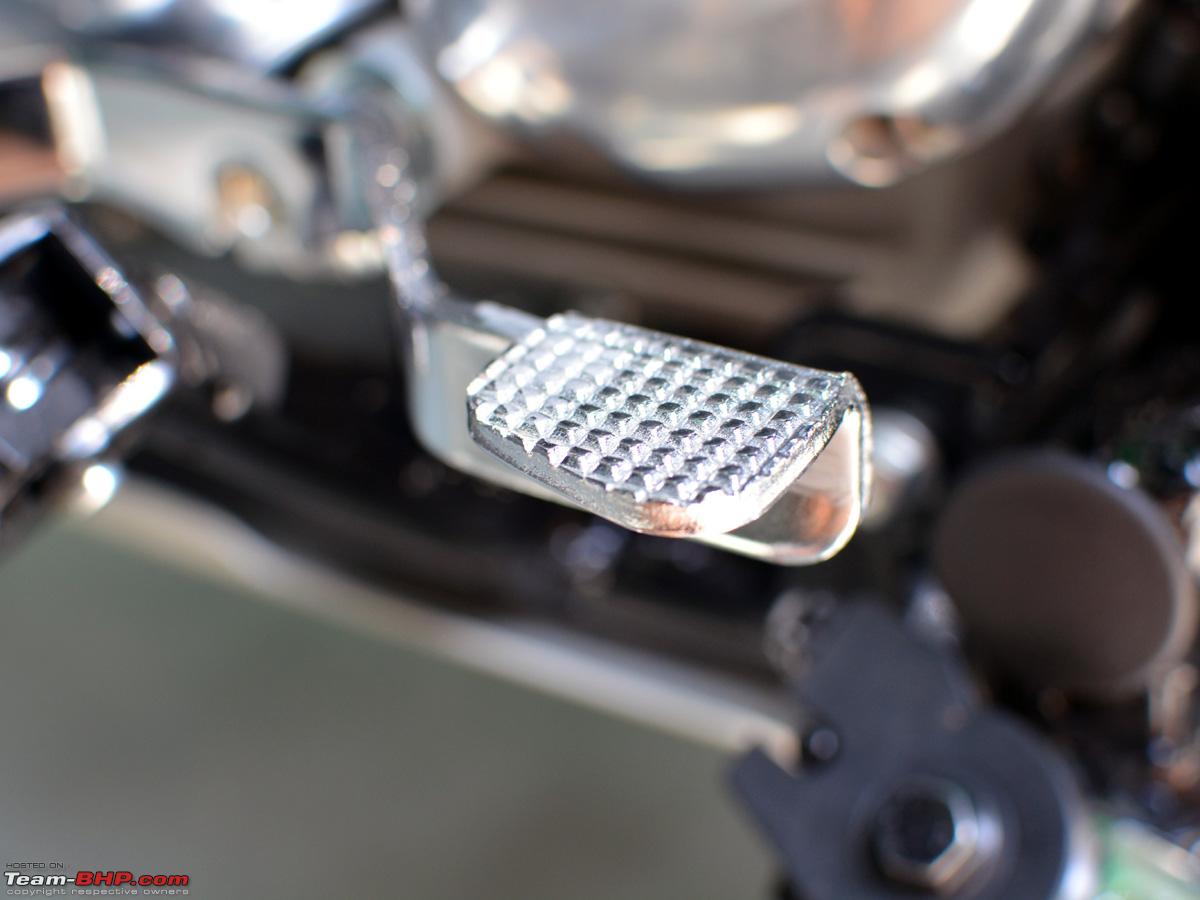 Cornering friendly and spring loaded foldable rider pedals so you don't break or bend them during extreme cornering. Nice touch - 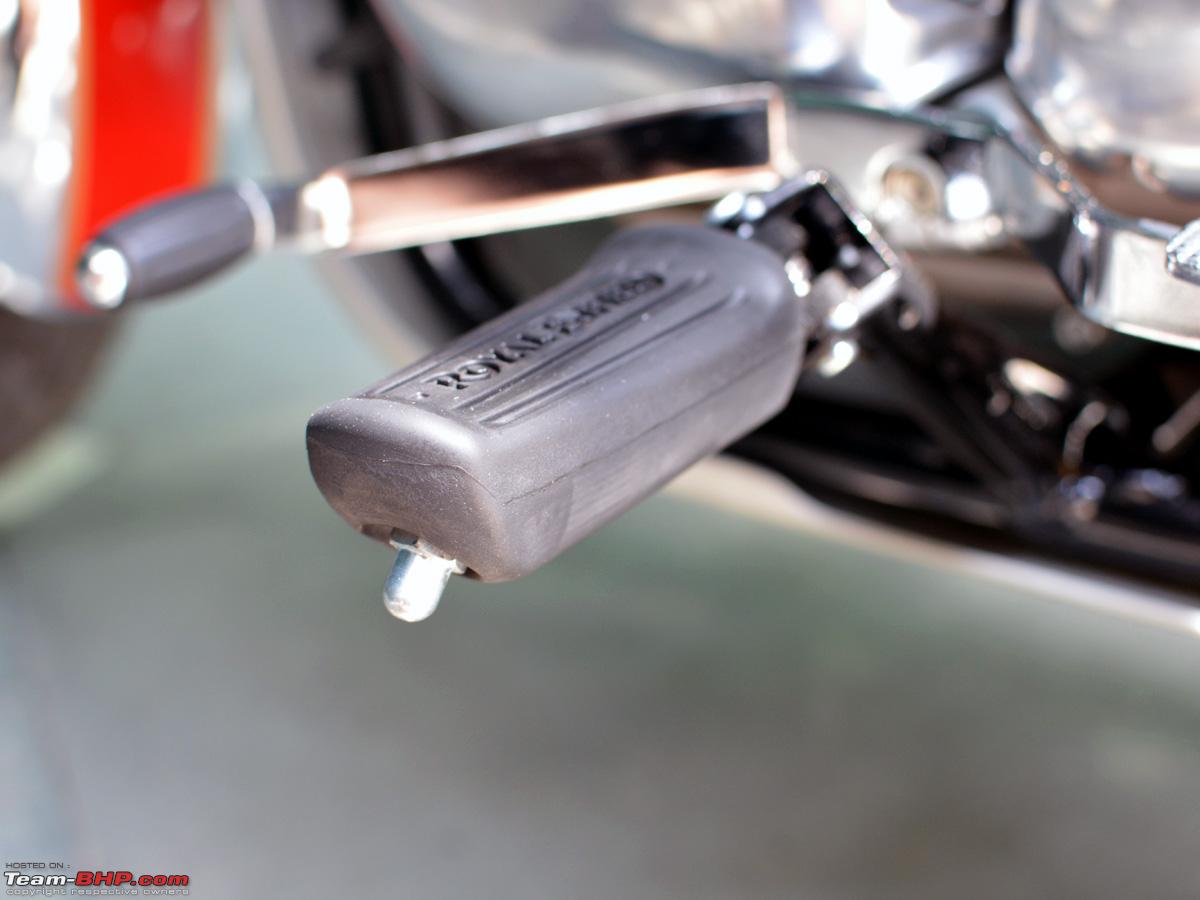 A view of the left side Pillion Foot Pedal and Foot Rest built into the Saree Guard - 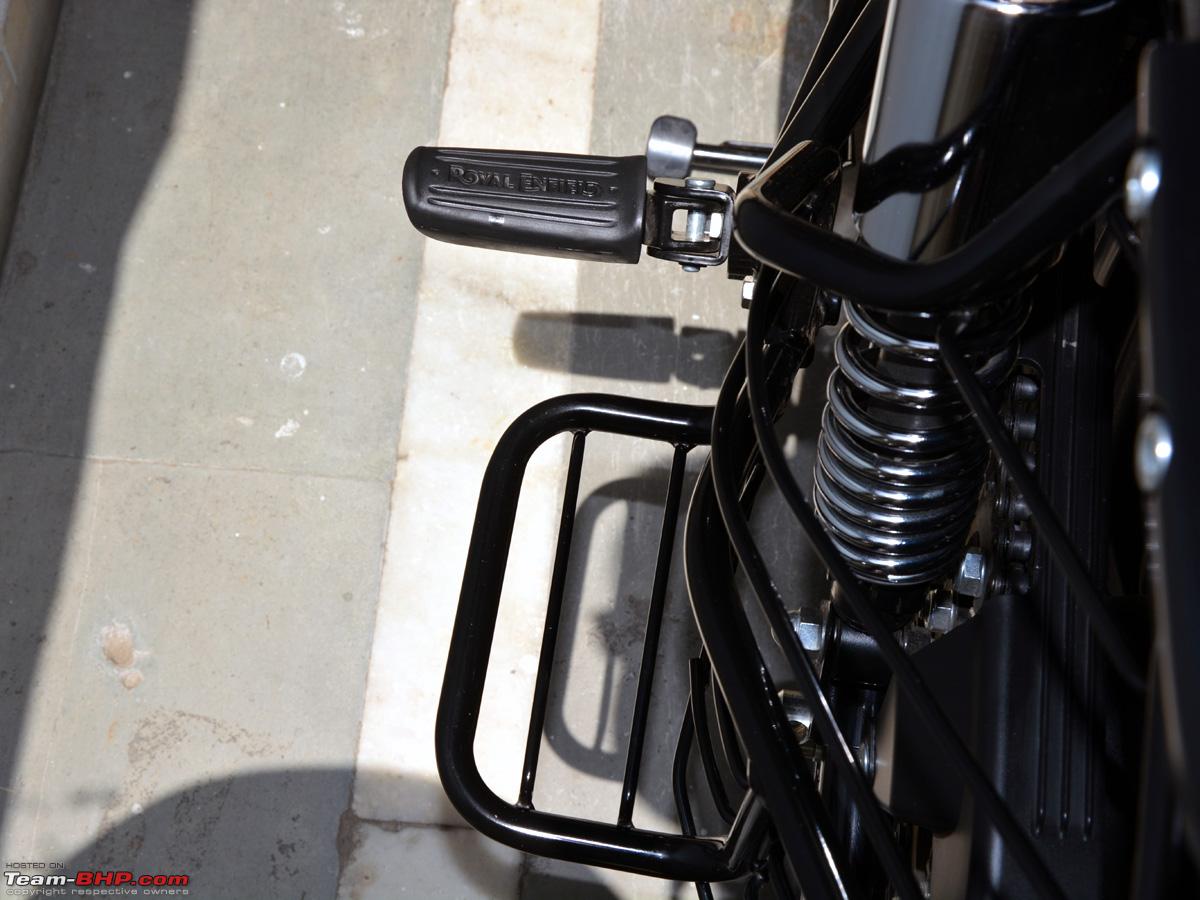 Single Grab Handle only on the left side. Some versions of the Classic 350 did come with these grab handles on both sides earlier. This left side one is essential to put the bike onto the center stand -  The Center and the Side Stand opened up. Notice the full chrome and solid built finish on the Side Stand. Nice touch again - 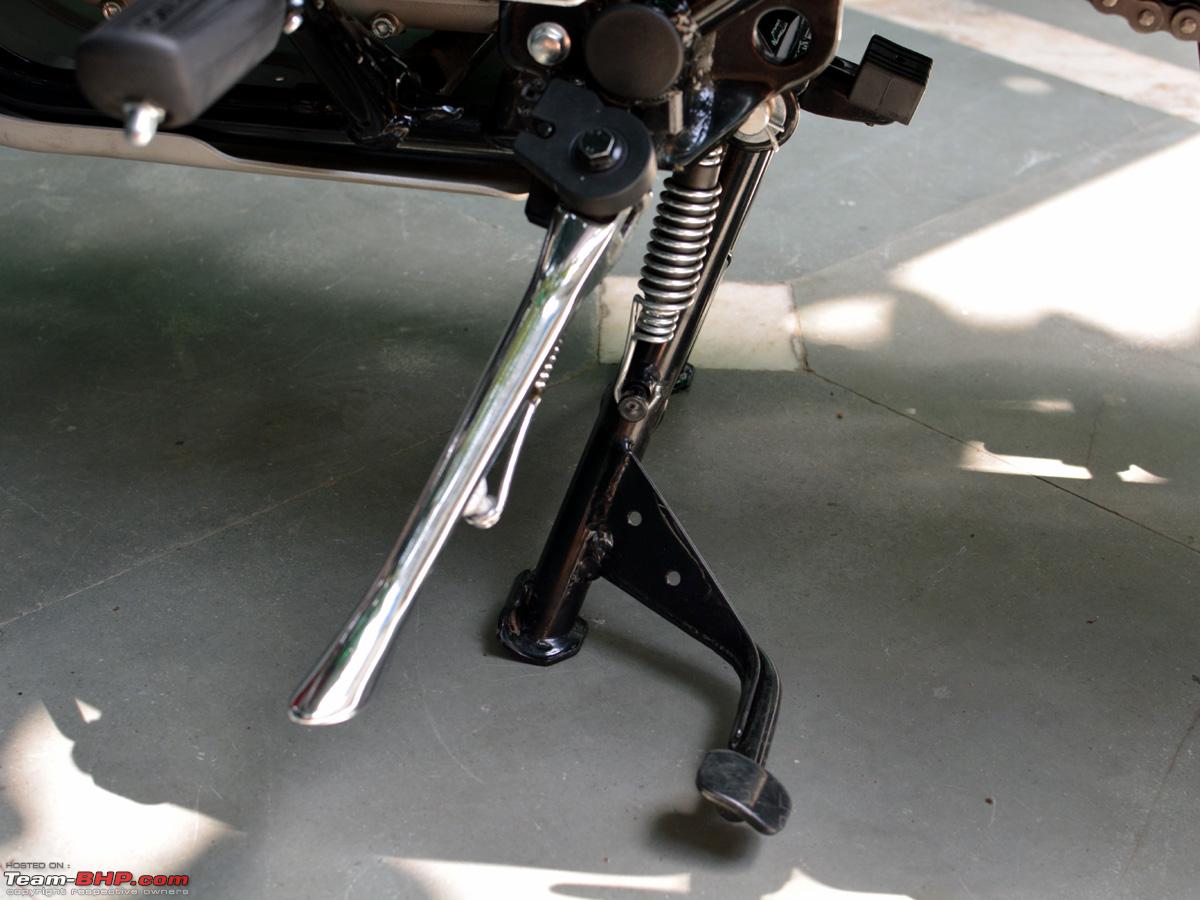 Close up of the Side Stand Down Switch which shuts the bike down in gear if the side stand is not up - 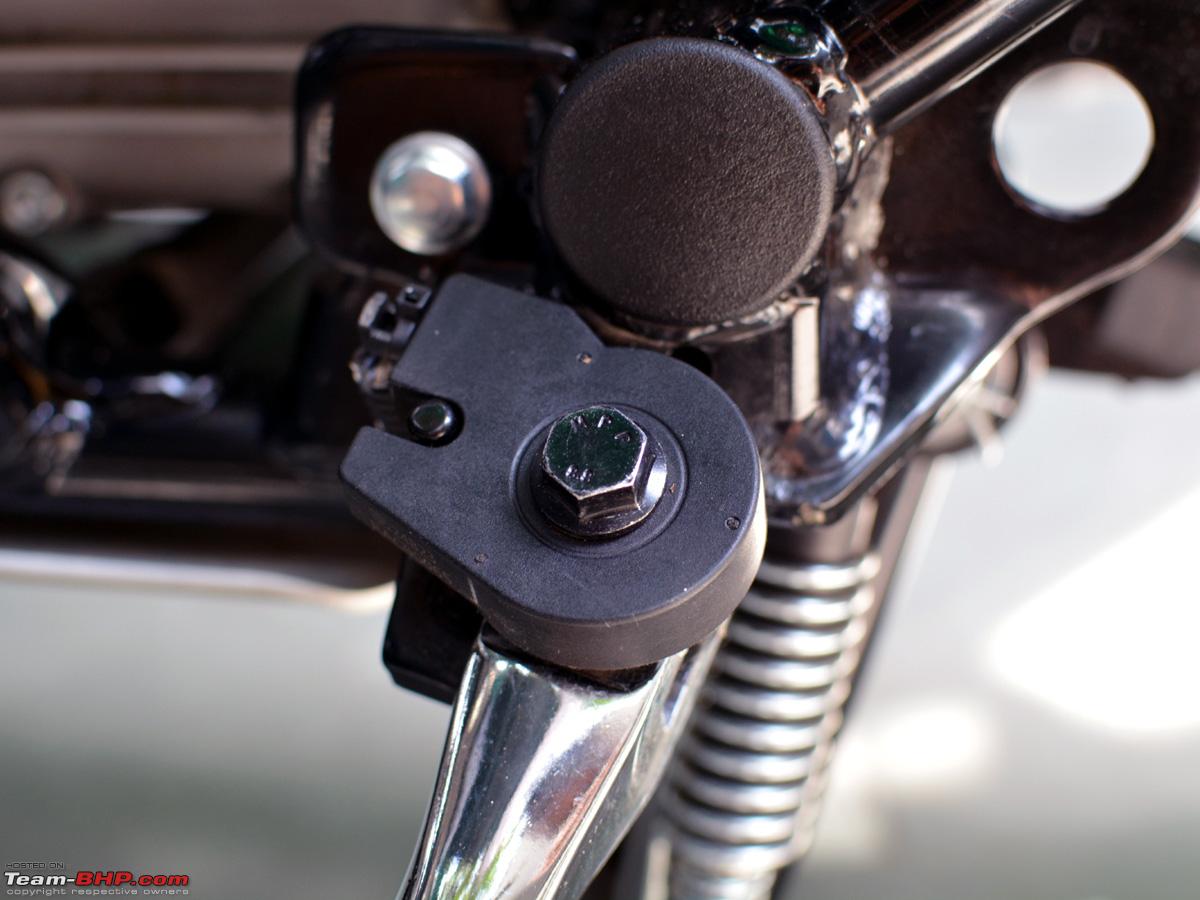 Rubber Pad for the Center Stand to rest without causing any scratches or vibrations while on the move - 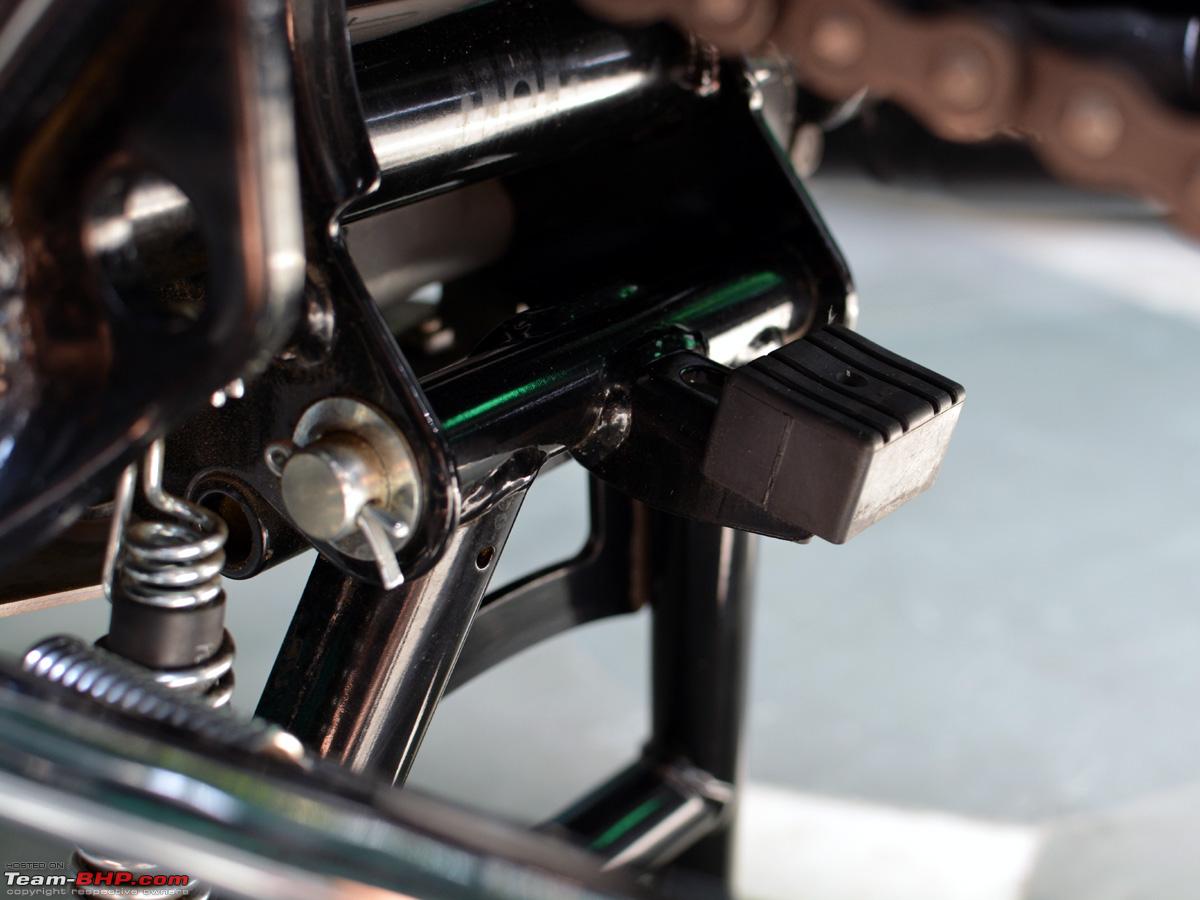 Finishing of the Front Suspension with Reflectors on both sides. The front suspension is a non adjustable 41mm telescopic unit with 130mm of travel. 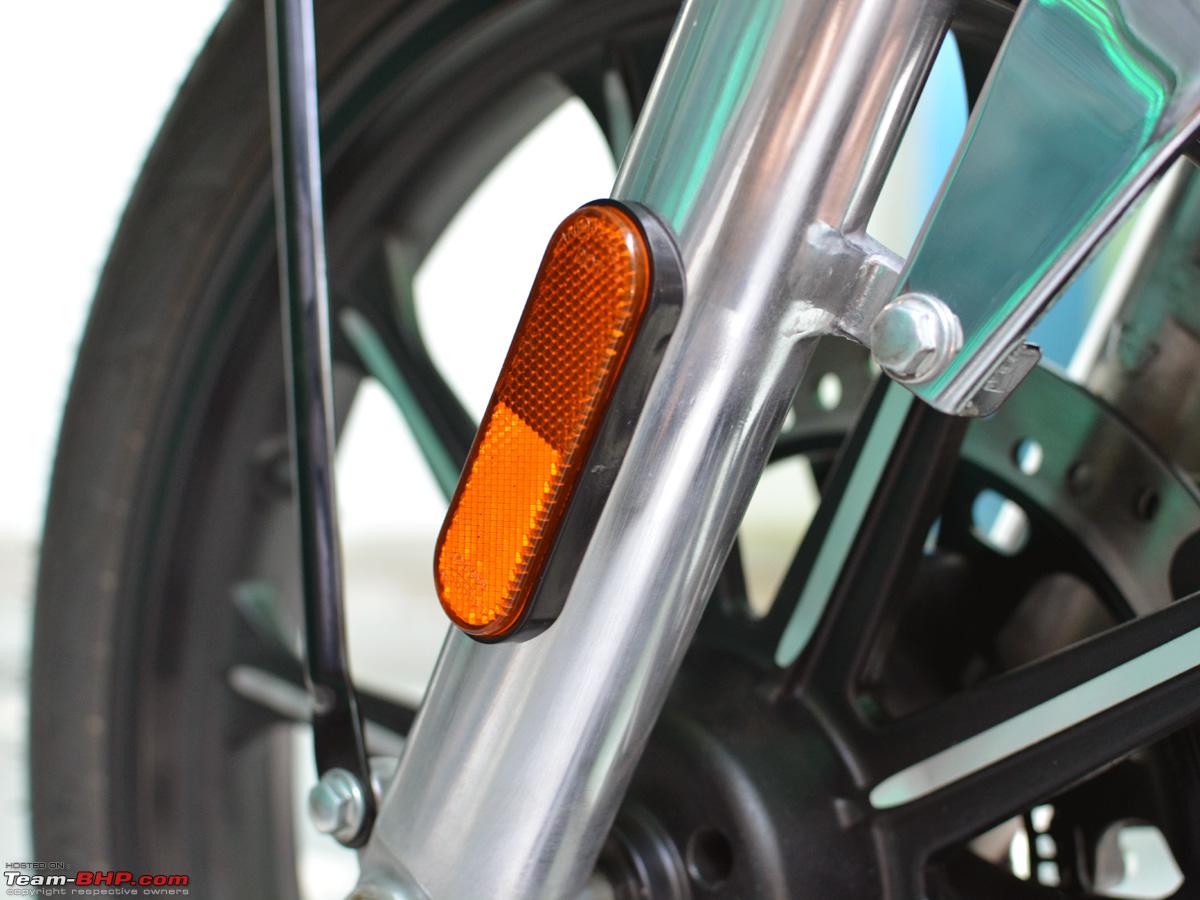 -------------------------------------------- Other Minor but Significant things - RE branding even on the accessories. Here it is visible on the Engine Guard and this piece is so designed as to break on collision so that the Rider Foot does not get stuck on a bent engine guard -  And then even on the heat shield inside the headlight -  A pair of 'modern cut' Keys are standard -  The Left Side Oval Black Casing in front of the Left Side Box (Air Filter Cover) is empty inside and just for show and can accommodate any extra relays or fuel map hardware that you may like to put in your bike. On the other hand the Right Side Oval Box houses the electrical relays for various components. Both these black oval covers on either sides can be opened by a single 10mm nut. 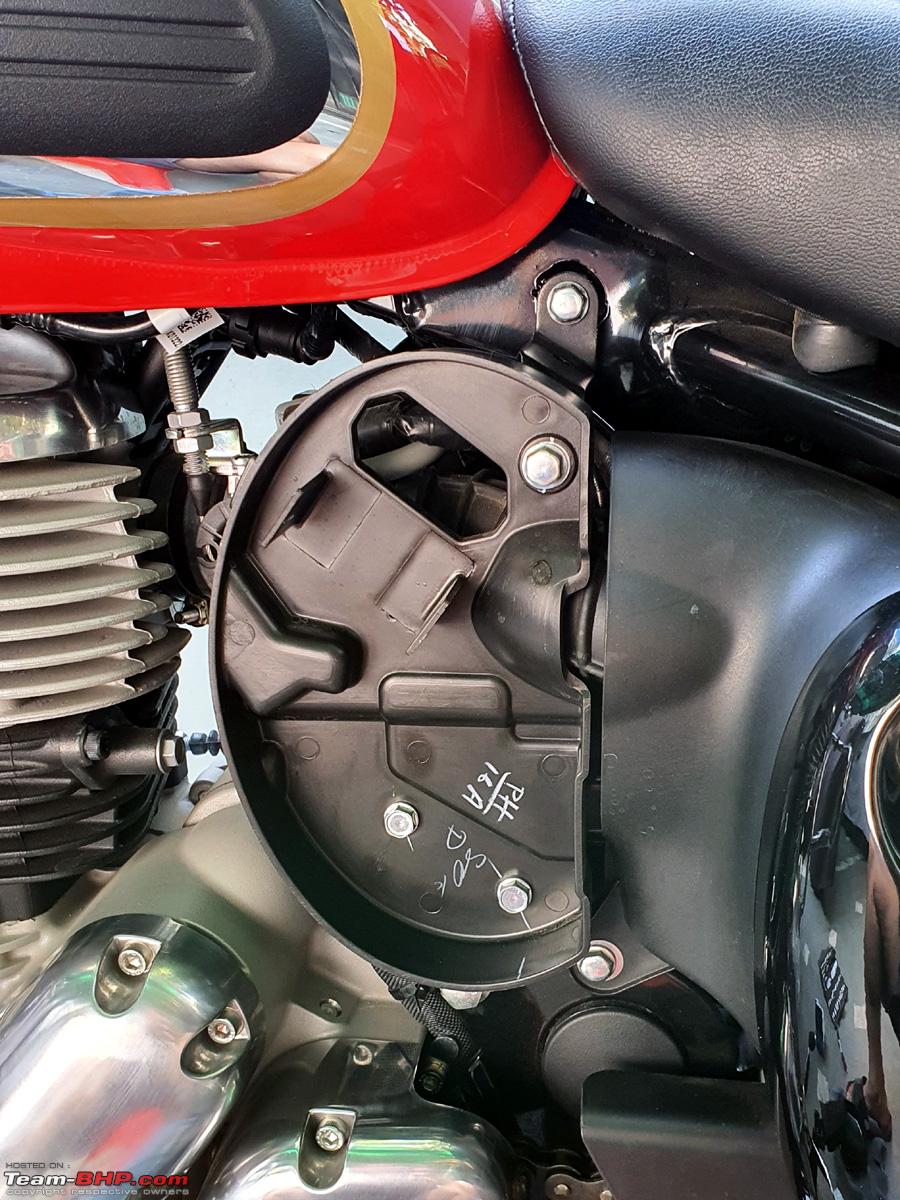 A view of the Right Side Box (Battery Compartment) with the Battery and Tool Kit Removed. Non corrosive plastic casing inside to give it that premium touch - 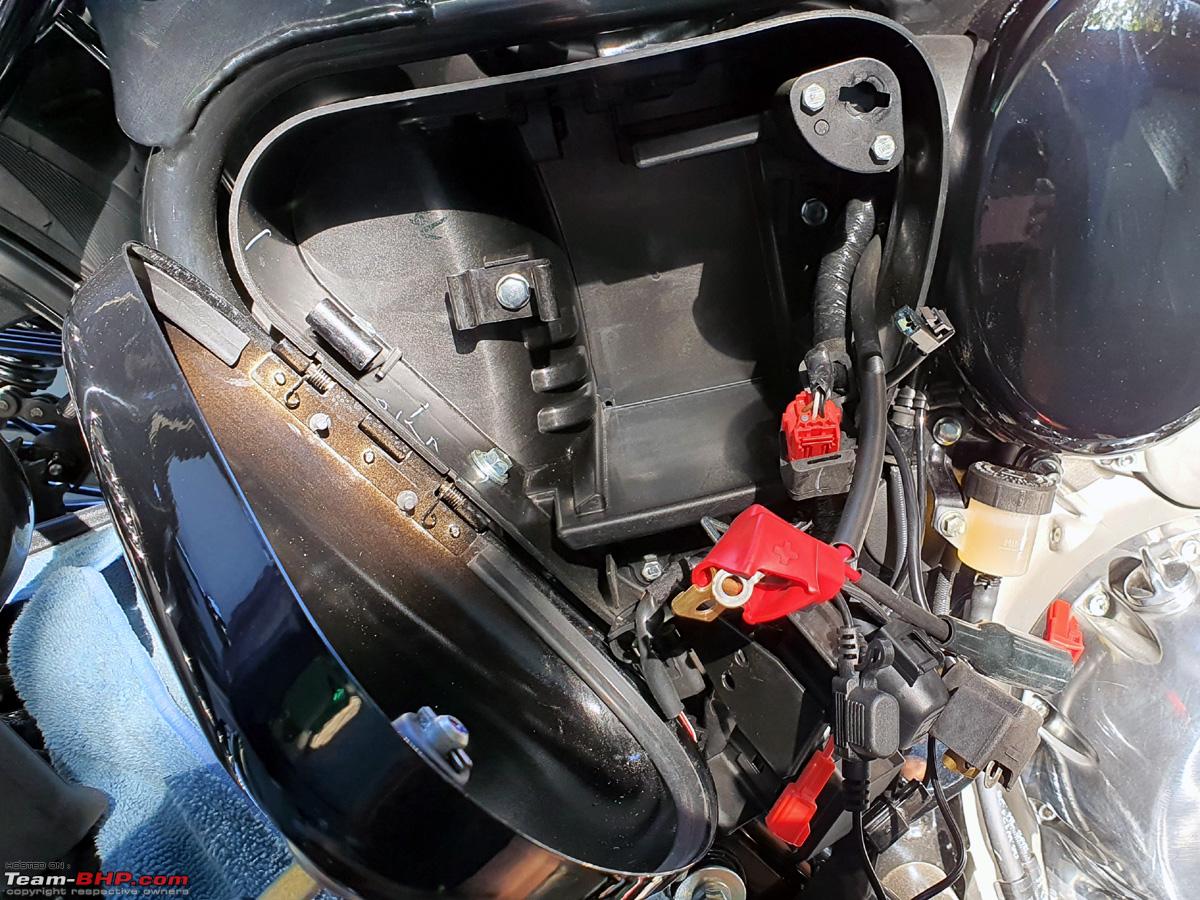 The Battery which is further encased in a good quality Rubber Frame for extra protection. The rubber casing was not really necessary but RE is going that extra mile in their fit and finish program - 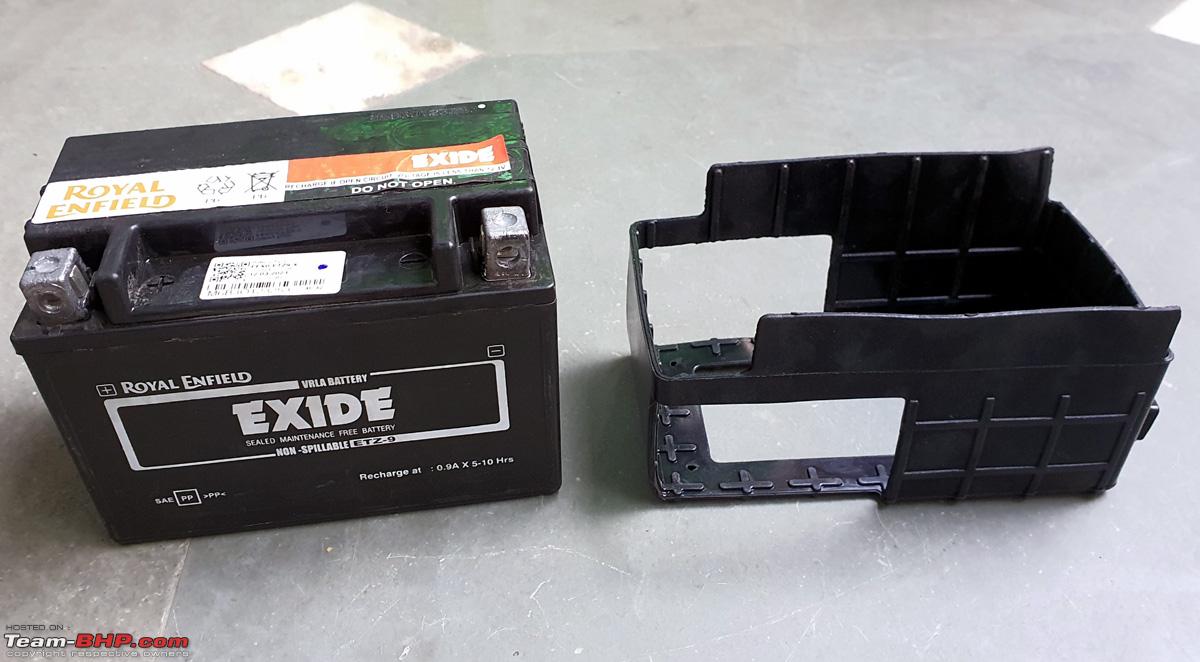 The battery model in my bike is an Exide ETZ-9. It's a 8Ah VRLA type that does not require any top ups for life as it is a sealed maintenance free type - 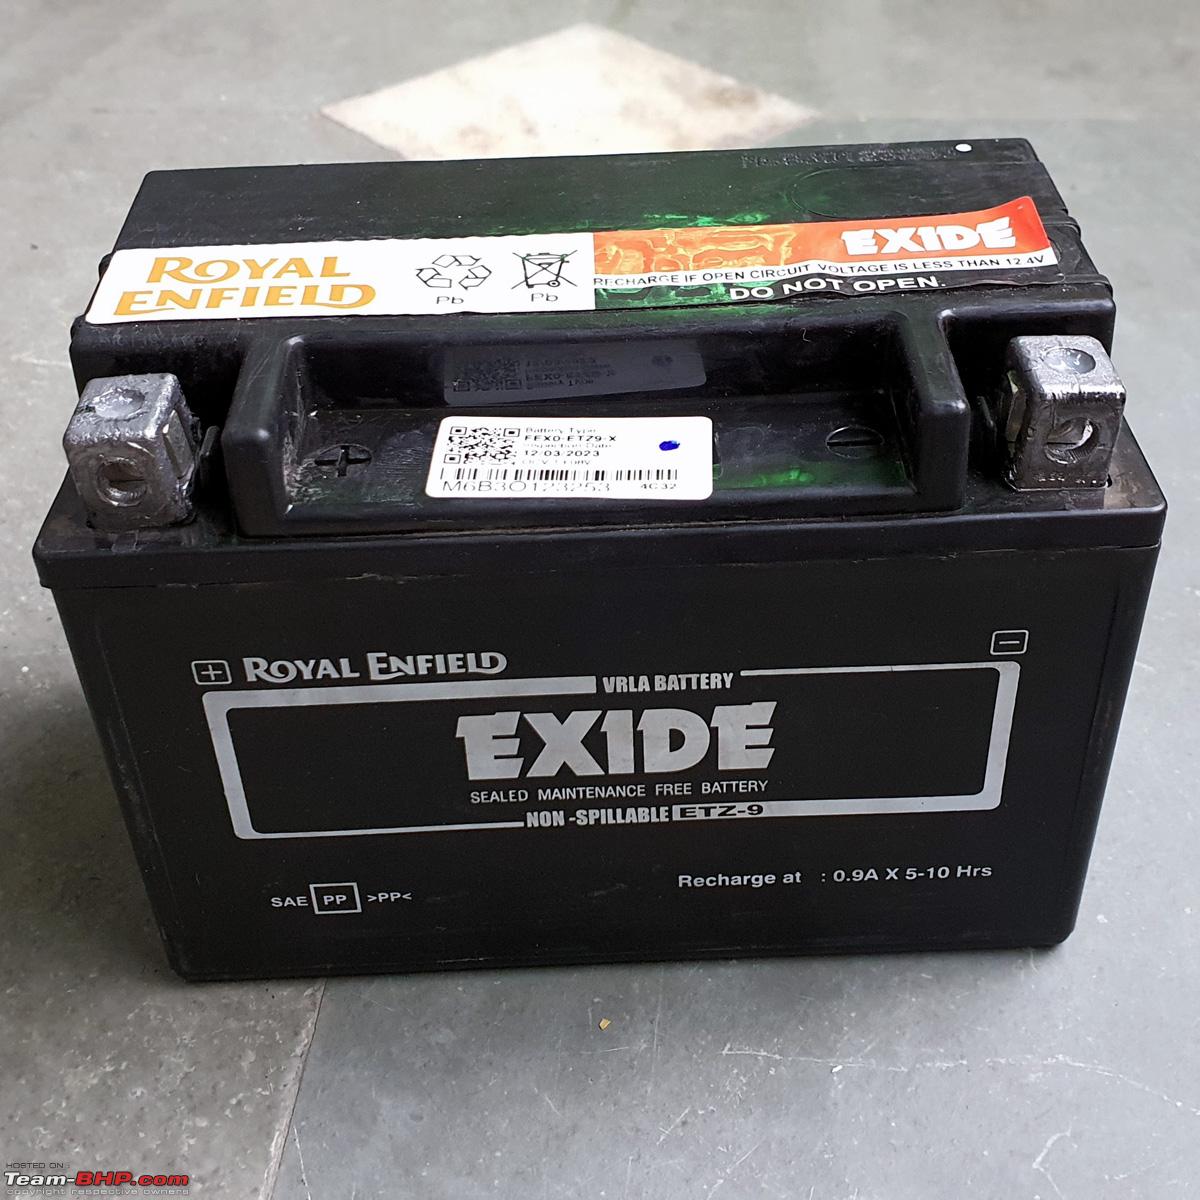 The manufacturing date on this battery was 12-03-2023 and the open circuit voltage (OCV) of this battery is specified as 13.08V - 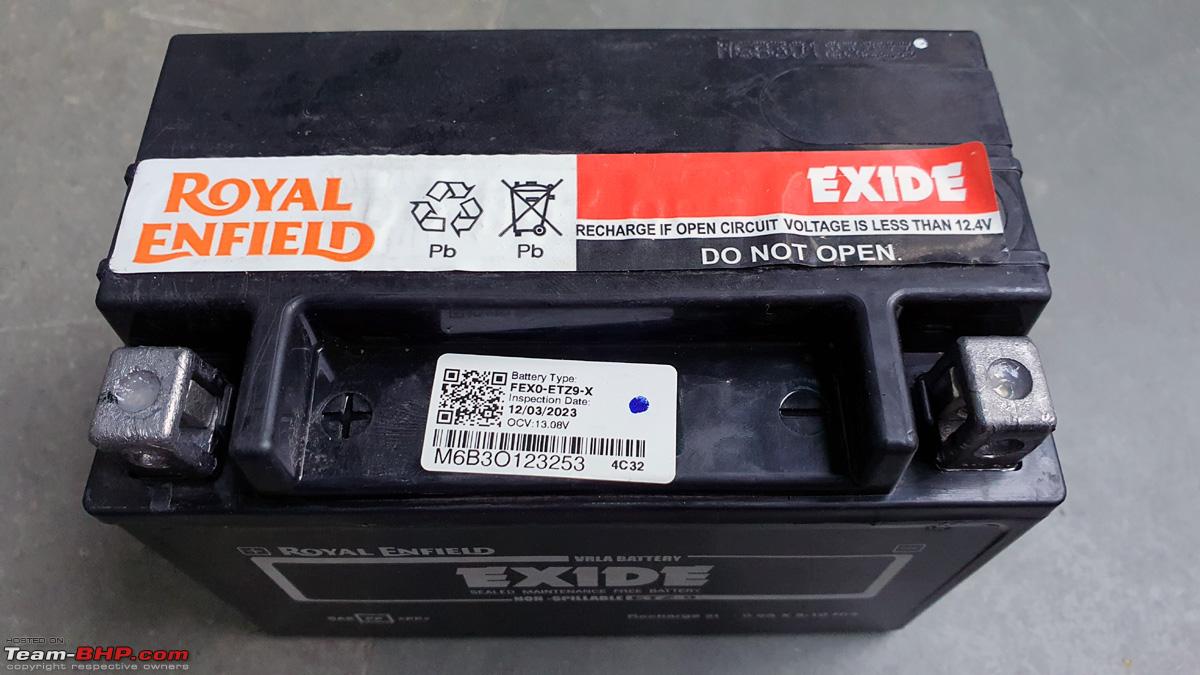 Did a nice 100km ride a few days back. Though the bike is still in it's break-in period and the user's manual specifies a speed limit of 70kmph for the first 500kms and 80kmph for the subsequent kms till 2000kms, I found the bike to be very eager and it crossed 100kmph easily in short bursts. But I mostly kept it below the speed limit specified. The best way to break-in your modern bike is to ride it at varying RPM's and not stick constantly to one cruising RPM. That's ME all glowing as I really didn't expect this bike to be this good, coming in from much bigger brands... lolz. So is it all the bike you will ever need? Time will tell but sure looks like that... 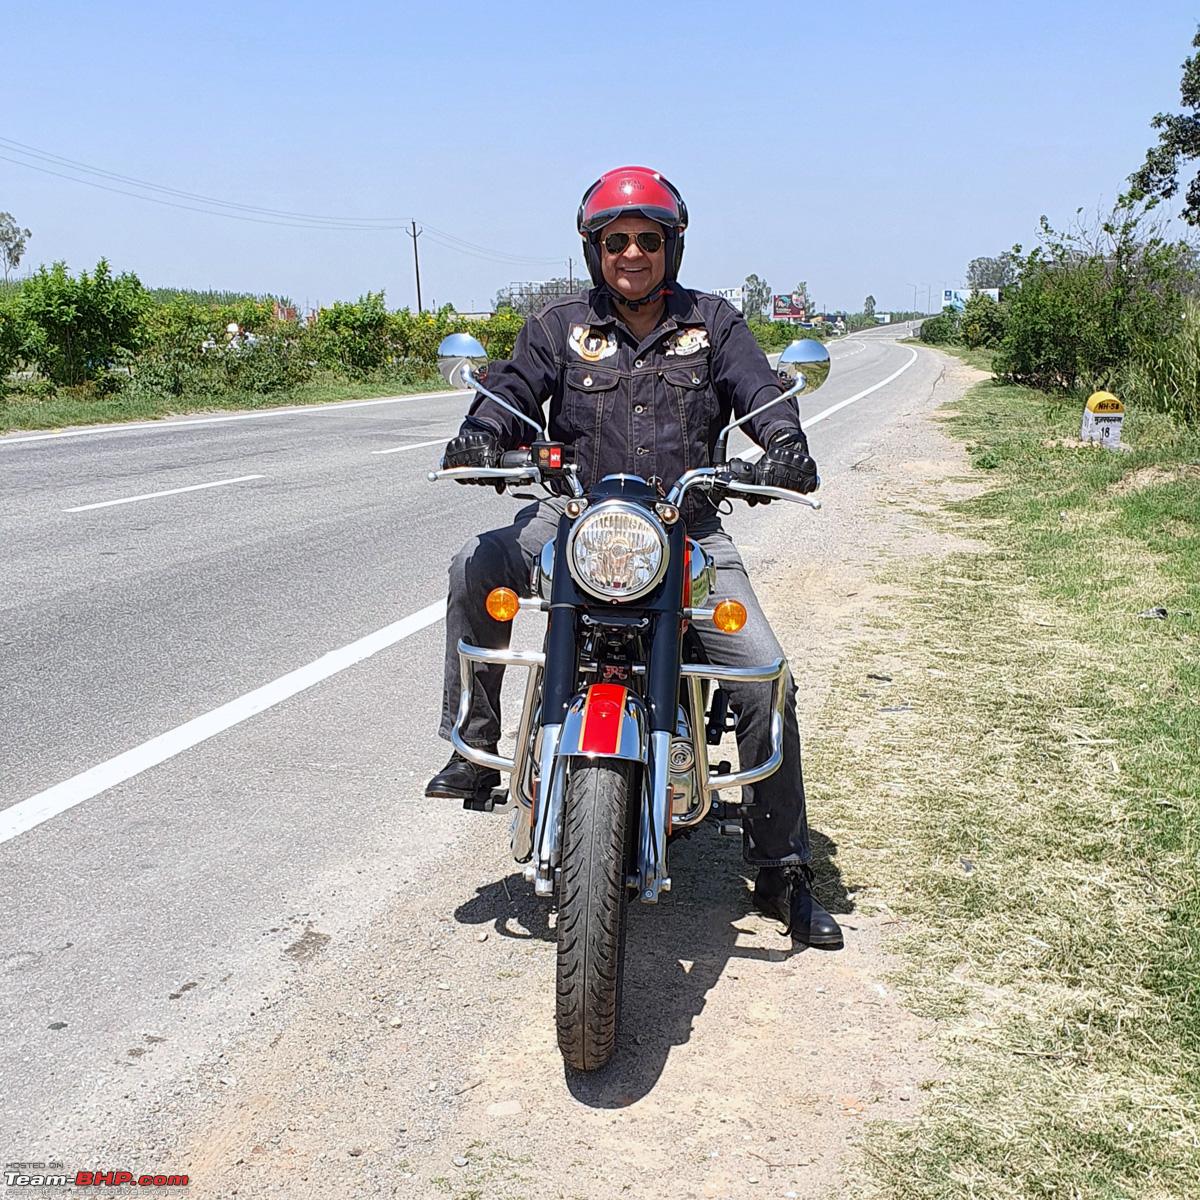 Few sunny highway shots from that small ride - 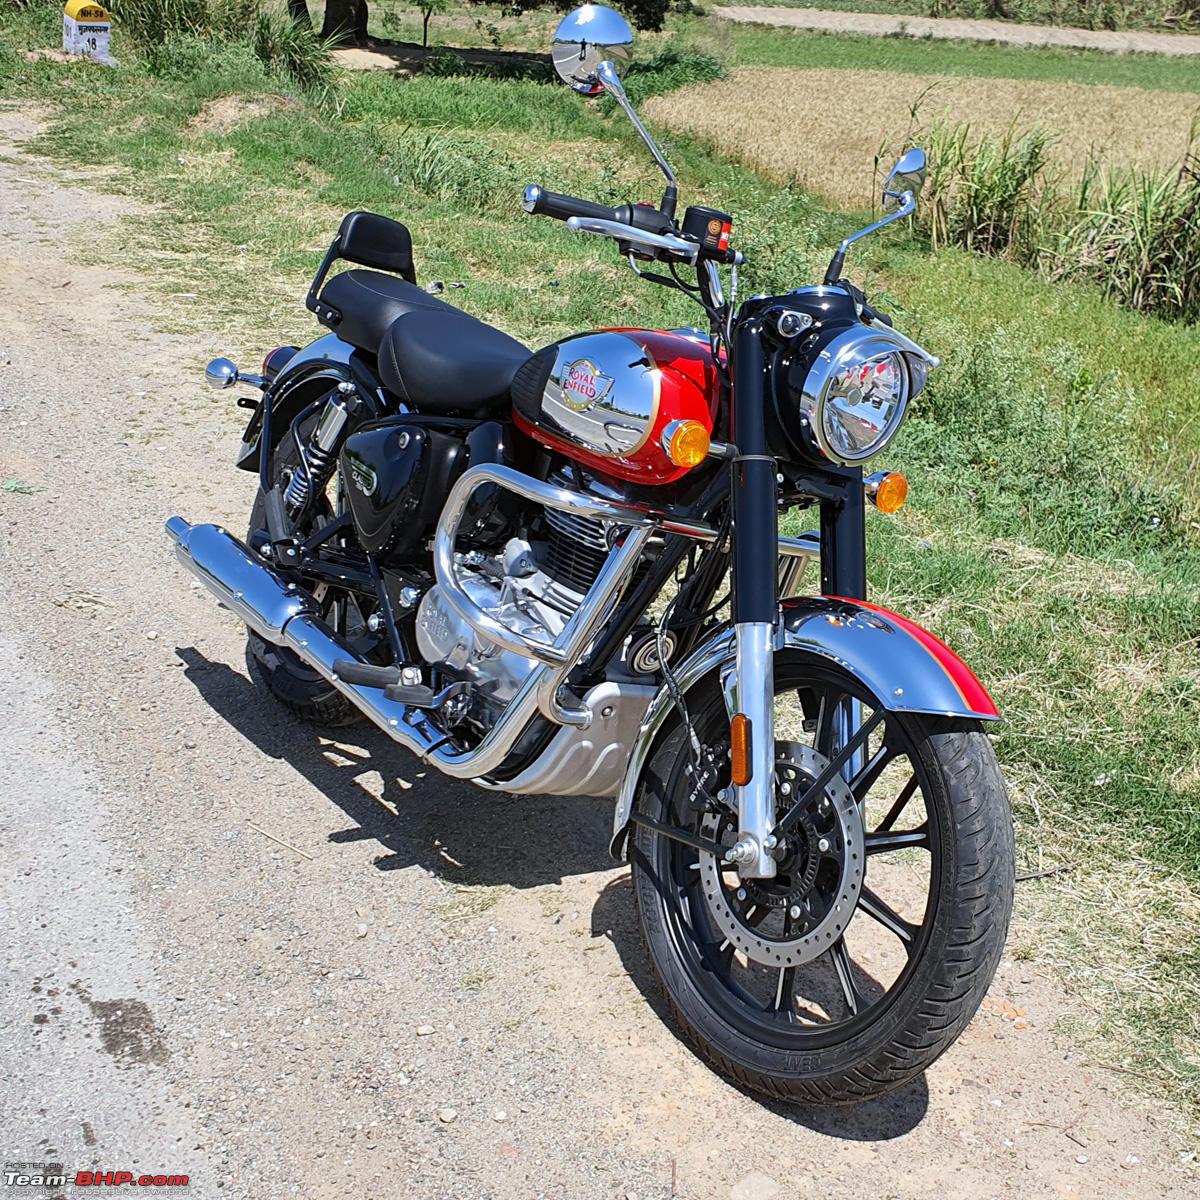  That's my bike now lovingly called "Lallan Taap" by my wife...Lolz (please excuse our Bhojpuri accent), with a matching RE original Helmet, which I had purchased long time back which had the Interceptor's Ravishing Red's - Red and Black theme. Somehow it matches this Chrome Red and Black variant perfectly. And no signs of any oil leakages or even bleeding from the head gasket ....lolz, which I had experienced on my first long ride of my brand new Himalayan in 2016. So full marks to RE for upping the quality quotient - 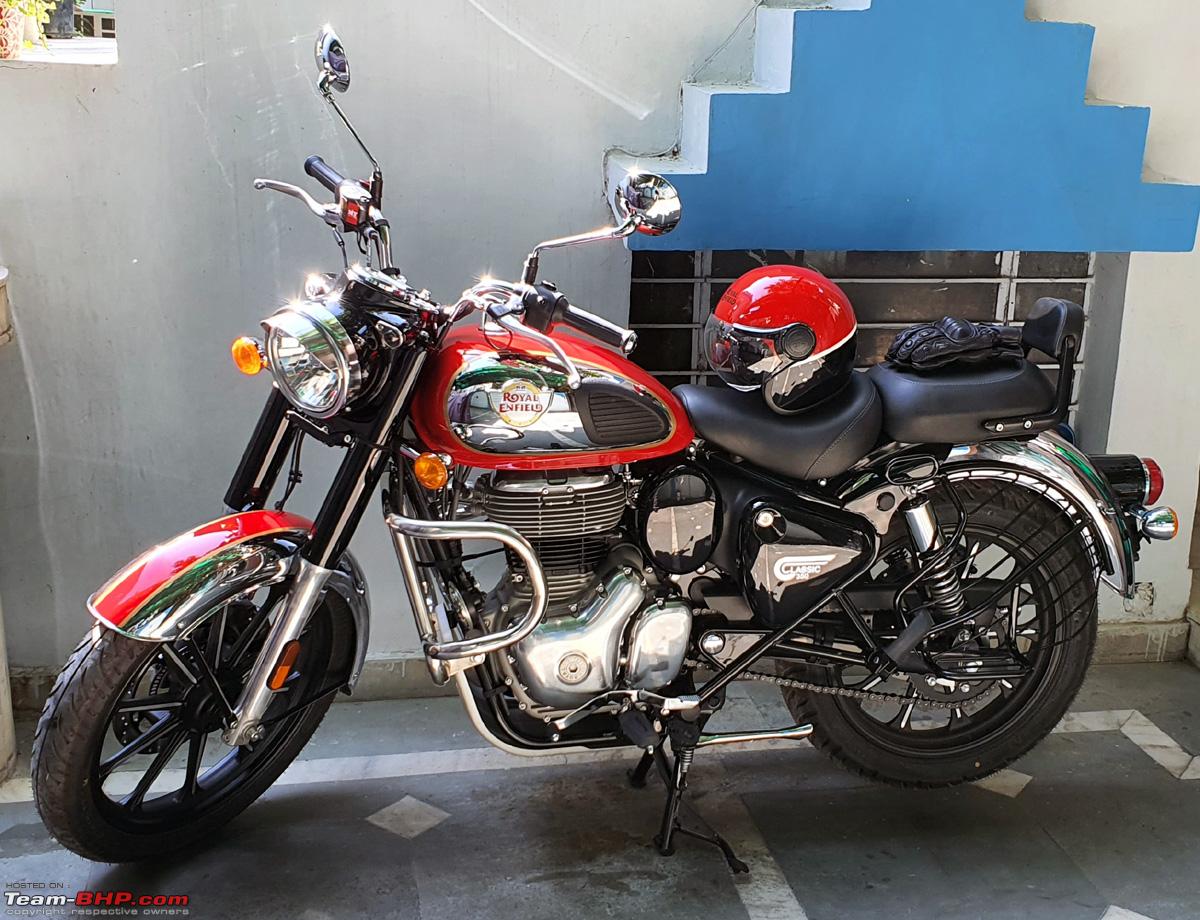 Cheers for now but much more to come... Last edited by dkaile : 24th April 2023 at 15:59. |
|
| (49)
Thanks
|
| The following 49 BHPians Thank dkaile for this useful post: | aargee, abhi_tjet, adrian, ajay0612, aman9393, anivy, Arun Varma, Carpainter, chinmaypillay, Cyborg, deerhunter, Dosa, DriverNo.420, Geo_Ipe, Gordon, GTO, irajput, Iyencar, JoshuaM, keroo1099, lovetorque, mh09ad5578, Mrs&Mr_Shenu, mugen_pinaki27, NitNac, pachchu77, Peri_patetic99, pjbiju, PM - B, RedPhobos, rendezvous3850, Ritkon, Roy.S, saikishor, sainyamk95, sai_ace, samabhi, sanjoyraju, Sayan, shancz, Shreyas Aterkar, shyamg28, SmartCat, somspaple, surjaonwheelz, Tgo, Vaishak, Viju, vikas8890 |
|
24th April 2023, 10:14
| #7 |
| Senior - BHPian | re: 2023 Royal Enfield Classic 350 | Chrome Red | The Comprehensive Review Fitting the Osram LED Headlight Bulb and Running Lights That the stock halogen headlights are weak on most bikes nowadays is a given. Switching to LED lights is again to compromise on the 'Classic' theme of this bike but then again practicality kicks in and I keep up with the NEO tag in this neo-retro bike. So upgrading the headlight bulb and the Position Lamps to LED is planned. Now choosing a LED Bulb is a process which I had already undergone while choosing one for my Baleno in 2020 and I opted only for renowned brand like Philips at that time. This time around I chose Osram, Germany, which incidentally was also the brand of the original Halogen bulb in the bike. There was a offer going on Amazon for the H4 Headlight bulb (pack of 2) along with 2x T10 LED Position Lamp bulbs at 3841/- which I went for. The H4's were 3416 for a pair so that works out as around 1700/- for the single H4 upgrade and the T10's were for 425/- a pair. The 2nd H4 was kept in reserve. Here are both the packs together as received in sealed packaging - 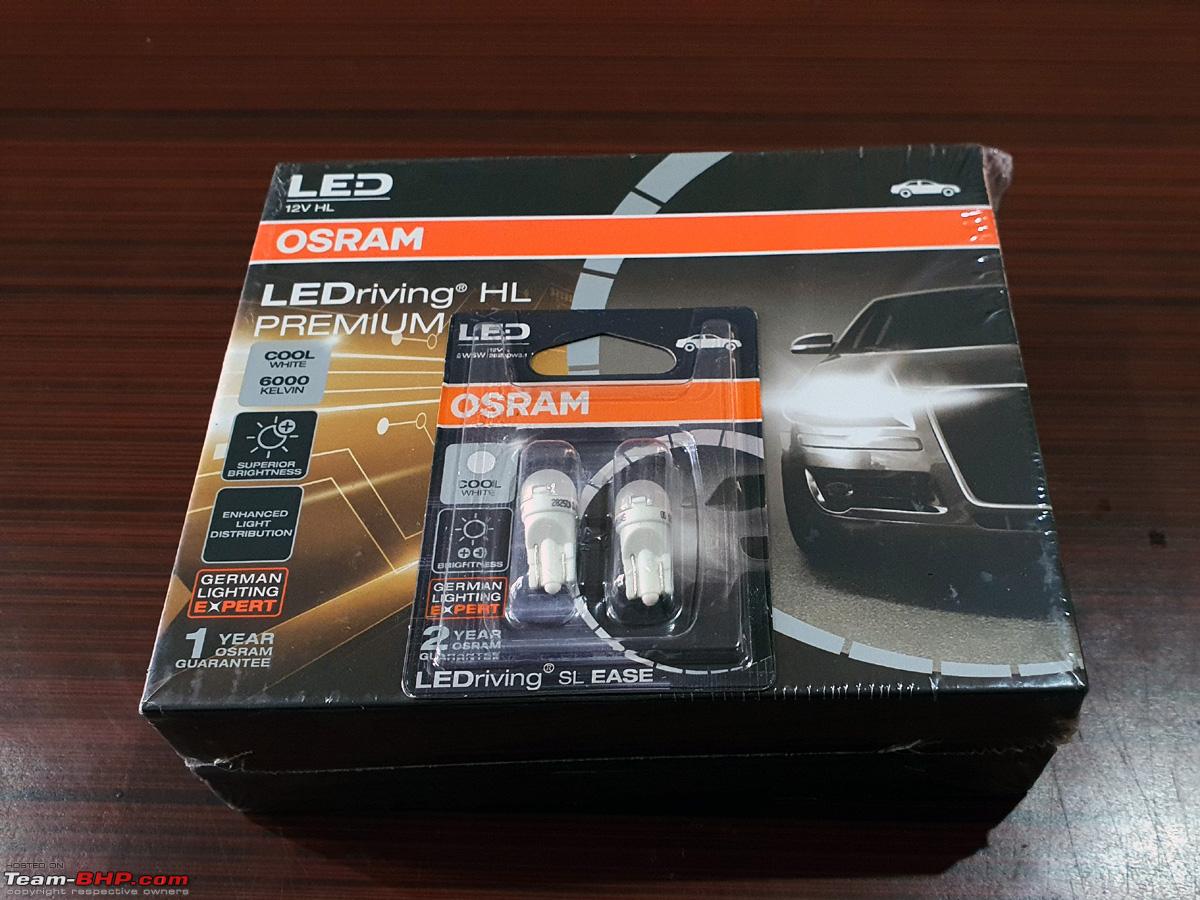 The MRP mentioned is 6270/- for the H4's and 480/- for the T10's. The wattage of LED H4's is 25/25W compared to the 55/60W of the Halogen's and the T10's are 1W each compared to the W5W of the originals. Though Osram is a German brand but the country of origin as with most brands today is China and Taiwan -  Comes in very high quality packaging. Extra zip ties and O rings are provided for the driver units. German quality reeks - 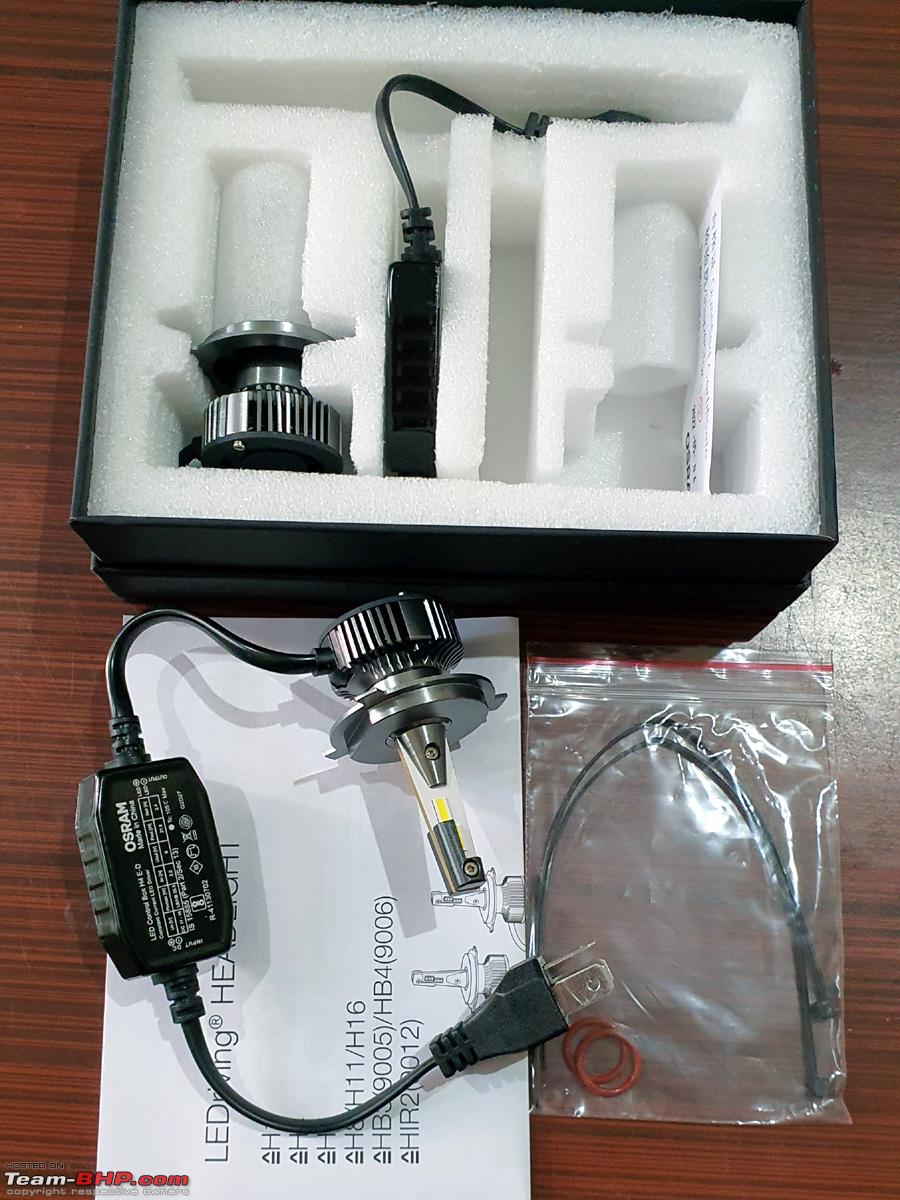 The Headlight opening is a simple 2 minute affair and is opened up by 2 Philips head screws on the sides of the chrome bezel - 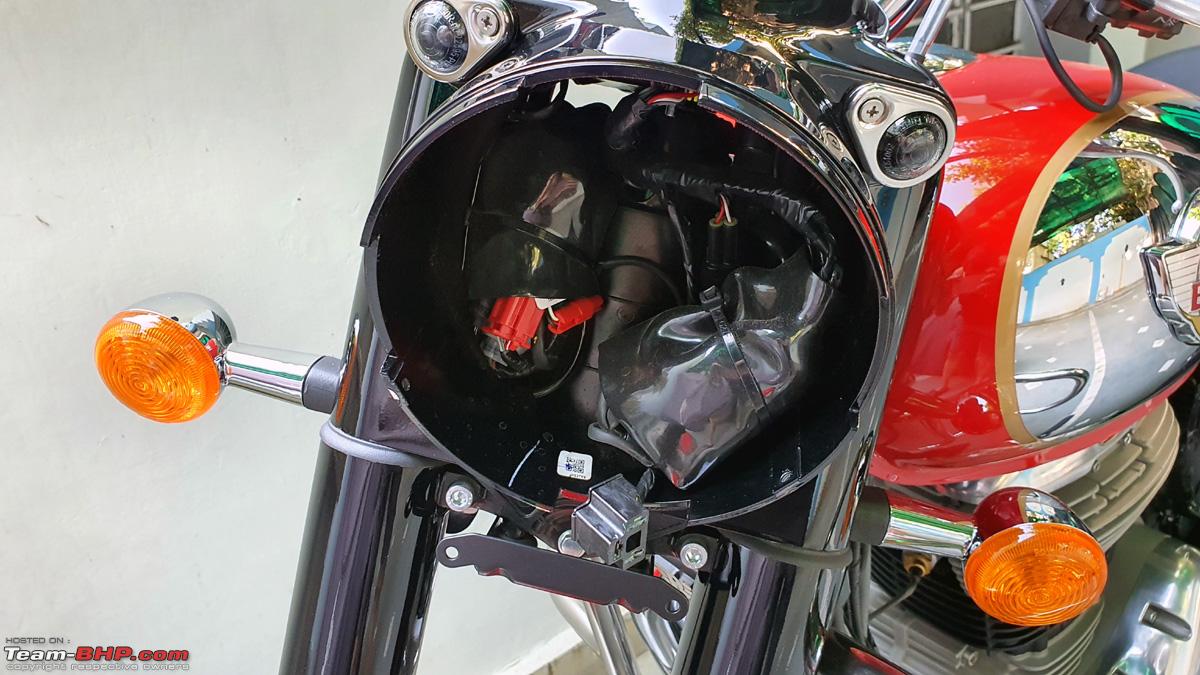 The original headlight is removed for installation. Notice the rubber Dust Cover with the original H4 in place - 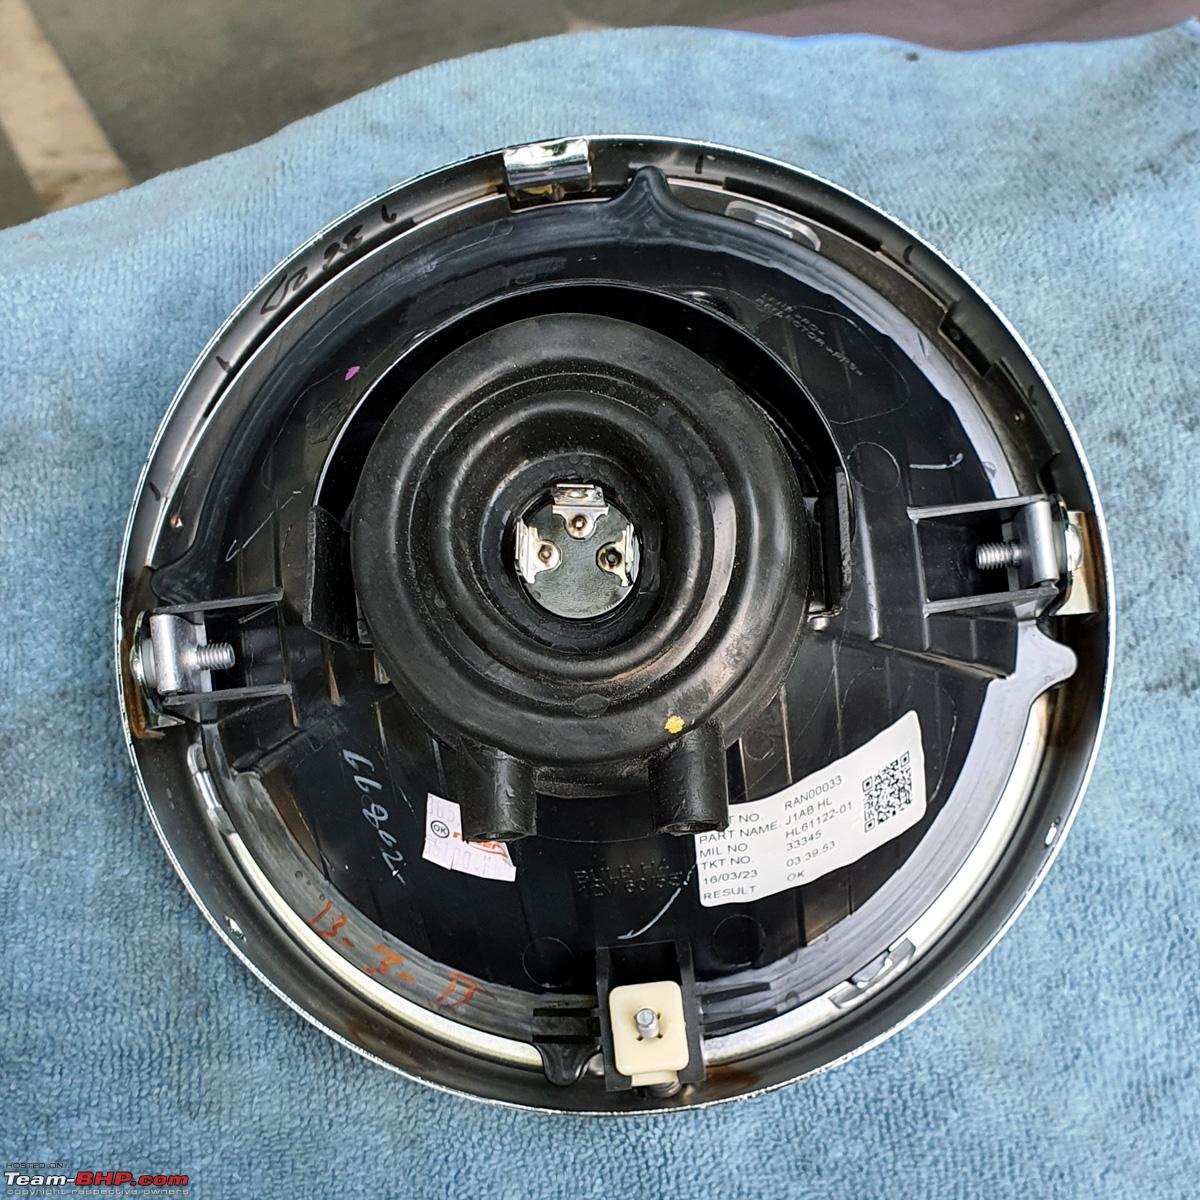 The trafficator's are opened up. Here's a view of them with the original Halogen Bulbs in place - 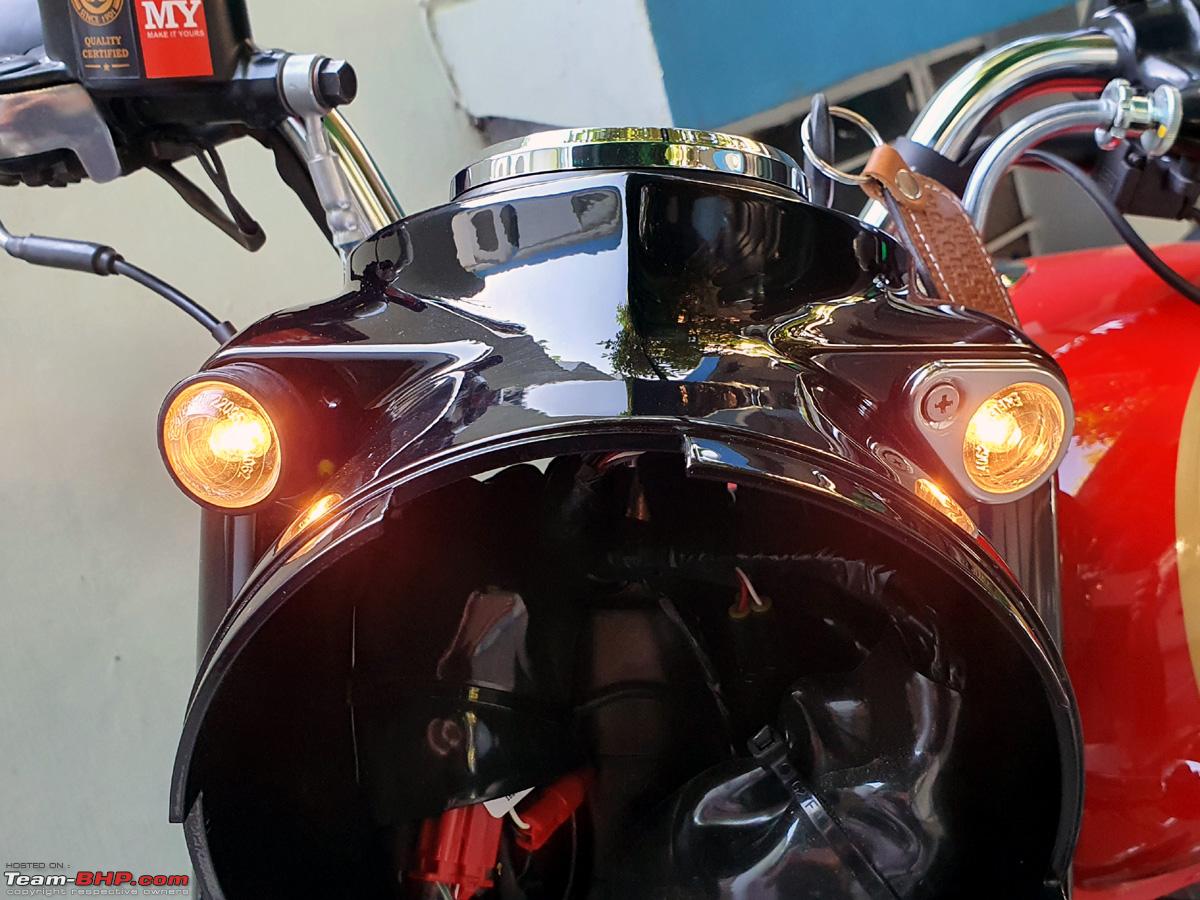 Comparison of the LED bulb with the original halogen. The LED's are at least twice more bright - 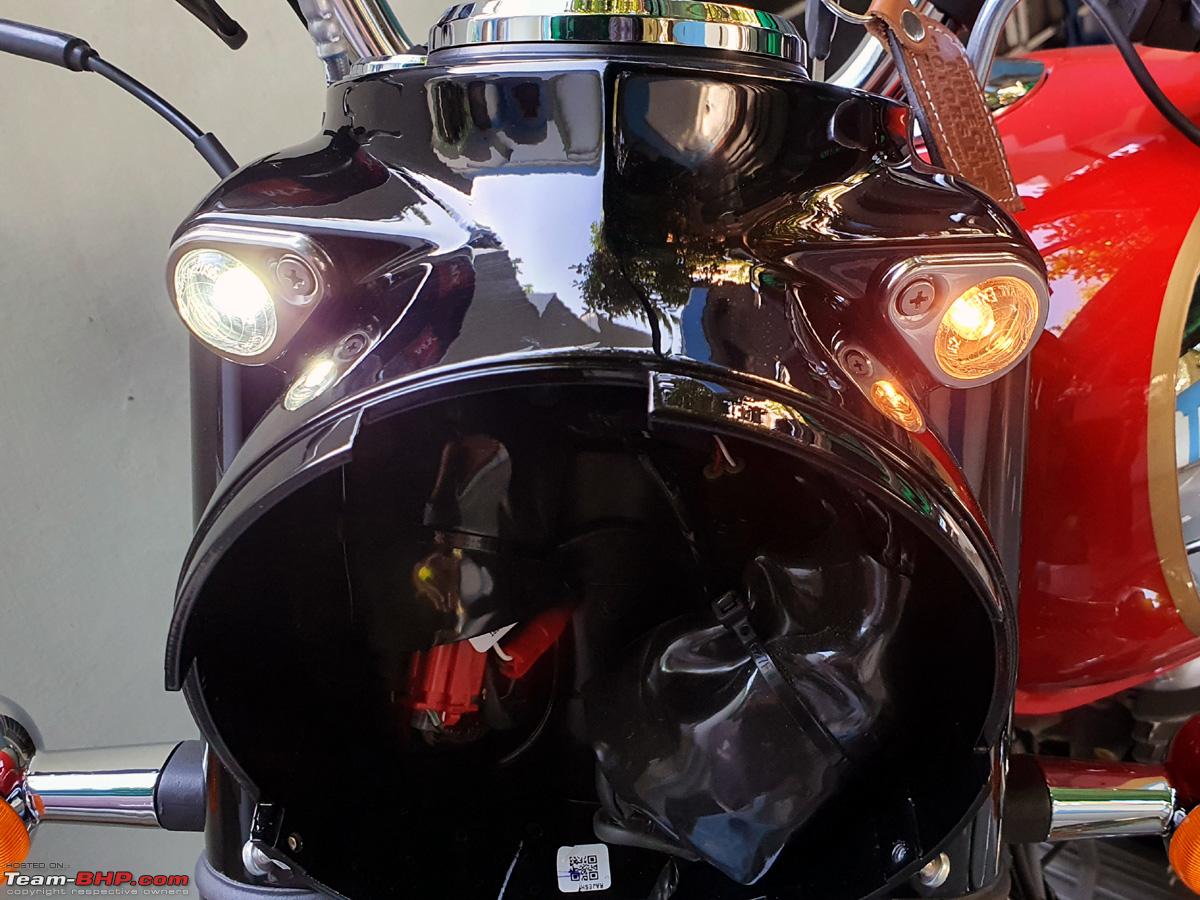 Both LED Position Lamp replaced - 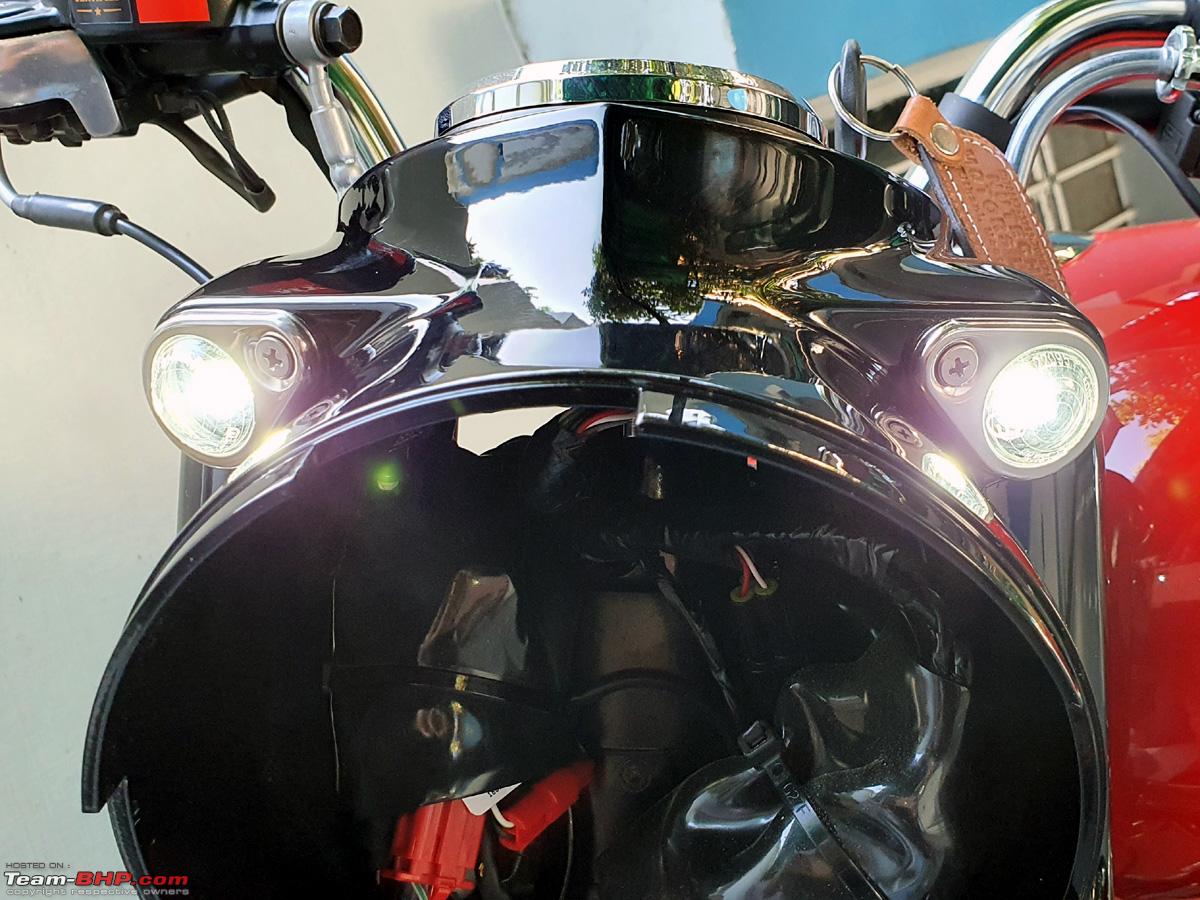 This is an important picture as it highlights what one needs to keep in mind while going for a replacement H4 LED bulb. The Height of the LED bulb should be near identical to the Halogen and the placement of LED and the Filament of the halogen should also be at near identical position. Only then will you be able to get the correct beam pattern in both Low and High beams with your stock headlight receptacle. Most Chinese brands do not pay such attention to detail which results in most common grievance of irregular beam pattern while replacing LED headlight bulbs - 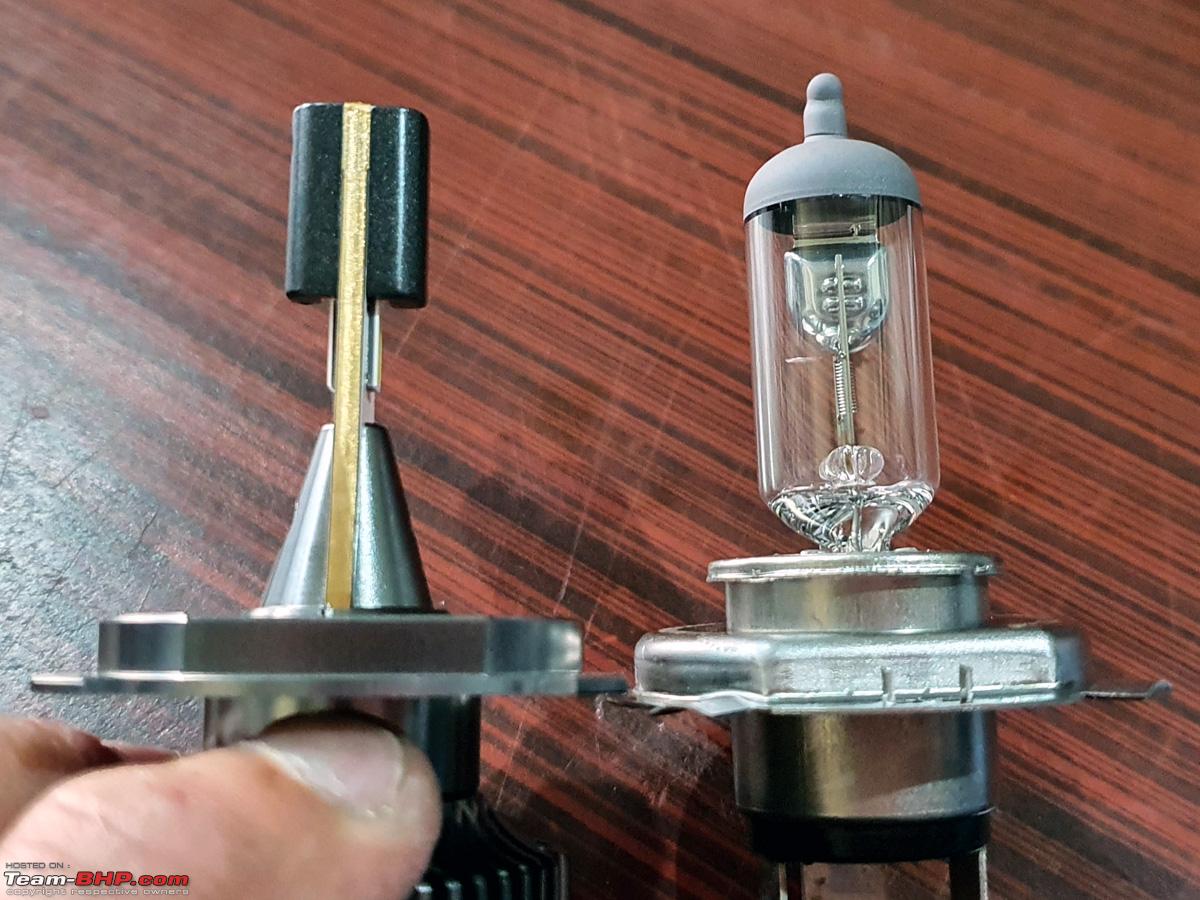 The LED H4 comes with a removable bracket for easy fitment into the headlight slot and then the rest of the LED assembly is pushed back inside this slot and rotated to it's perfect straight vertical position to ensure proper beam pattern. The original dust cover was not cut in any way and only the end beak was straightened out before reinstallation to accommodate the blower fan on the LED H4 - 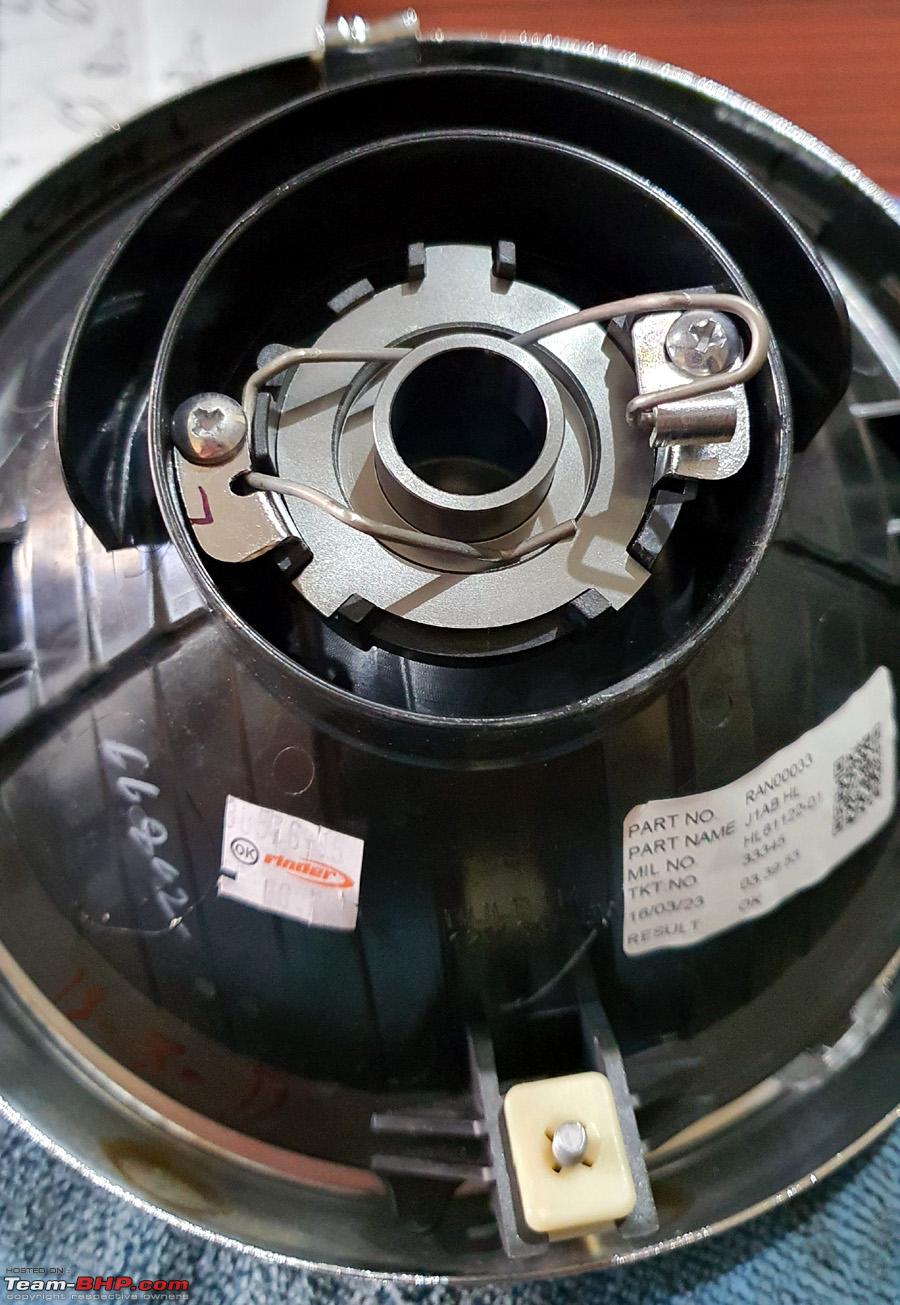 LED Headlight Upgrade complete and the new look looks better in my opinion with visibility increased to a great extent - 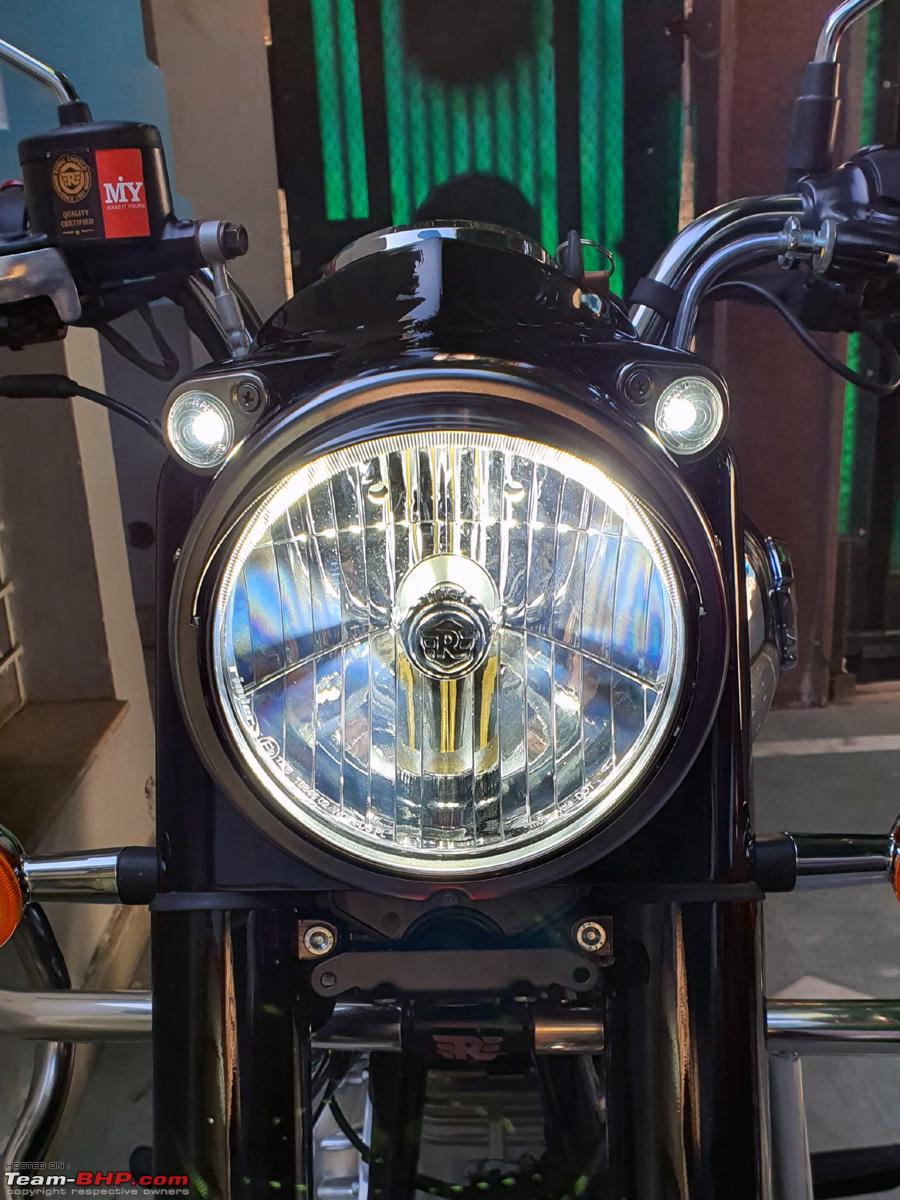 A look at the original Bike Cover from Royal Enfield. Though it is a little costly at 1100/-, it is worth the price as it comes with good quality water resistant material base, a zipped pocket for storage and good quality elastic bands at the base for a tight dust proof grip. Royal Enfield branding is a added bonus -  Cheers for now... Last edited by dkaile : 24th April 2023 at 16:02. |
|
| (32)
Thanks
|
| The following 32 BHPians Thank dkaile for this useful post: | aargee, achayan, adrian, ajay0612, aman9393, chinmaypillay, Cyborg, DriverNo.420, Gordon, GTO, irajput, isandy, JoshuaM, keroo1099, lovetorque, mh09ad5578, Mrs&Mr_Shenu, NitNac, Peri_patetic99, RedPhobos, Roy.S, saikishor, samabhi, sanjoyraju, Shreyas Aterkar, shyamg28, Skyline_GT, somspaple, Vaishak, Viju, Voodooblaster, xVpuredrive |
|
24th April 2023, 11:35
| #8 |
| Senior - BHPian | re: 2023 Royal Enfield Classic 350 | Chrome Red | The Comprehensive Review HJG LED Fog Lights & SIMTAC LED Indicator Bulbs Installation Now I had already been using these HJG LED Fog Lights for more than a year on my BMW R1250GSA for more than a year. People looking for a detailed installation can also browse my 1250GSA thread on TeamBHP for more information. Original wiring harness and switch of HJG were used which has exact sockets at all ends matching these HJG lights, so it was a just a matter of routing the wiring under the tank and then a simple plug and play affair. The HJG wiring is very similar to the Maddog Wire Harness Pro if not a bit heavier in gauge. You can have a look at Maddog India website for details about their products. The mount that was used was from Maddog which i had one lying around. One thing about the HJG wiring harness was that included a (read- cheap) flasher unit for fog lights included. I totally disabled and cut it off while attaching the harness. I had purchased all of this equipment a few months back for another fitment which didn't materialise and the cost back then was approx. 3000/- for the pair of lights, 300/- for the handlebar switch, 1200/- for the wiring harness and the light mount is approx. 1200/- from Maddog of which only the lower portion was used by me. I had these inline tap in connectors for the ignition switch which are provided by Maddog along with their wire harness pro, which I had lying around, which are custom made for the Classic 350 by Maddog to provide a plug and play solution to tap into the ignition wire of the Classic 350 without any wire tap or wire cutting. this proved a boon in this setup. The white wire connector is a 12V supply when ignition is on (which is the only one we need) and the red wire connector is direct 12V supply from the battery even when the bike is off (not needed in our setup) - 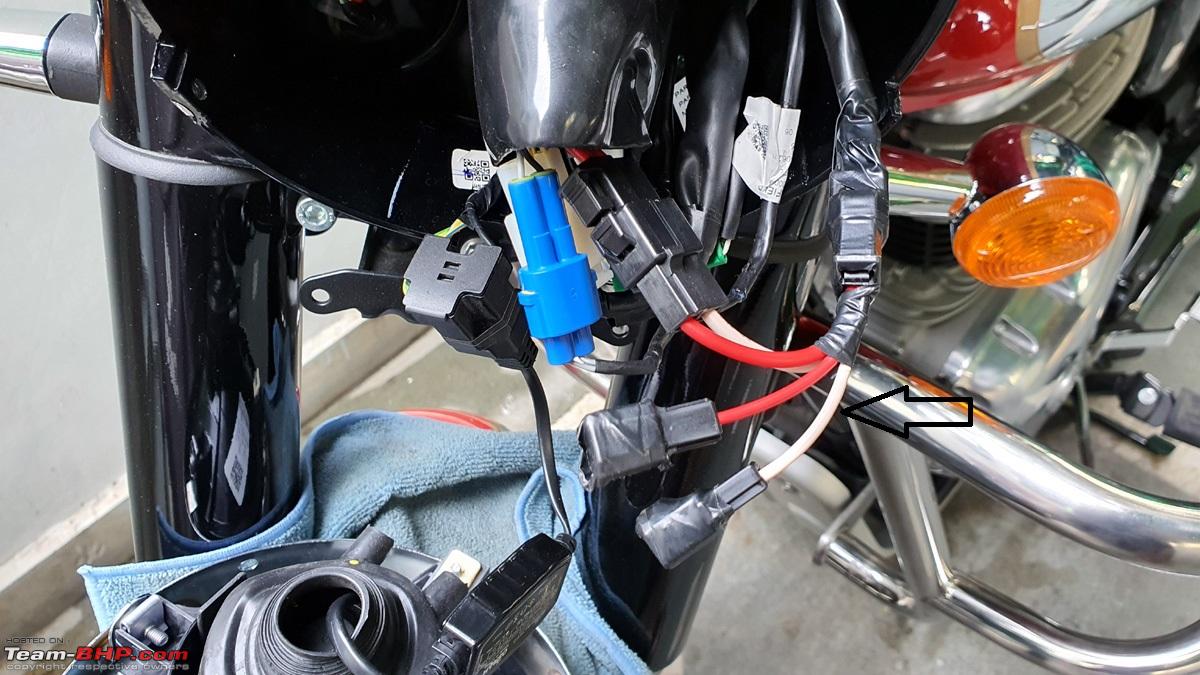 The HJG wire harness's ignition supply wire to the handlebar switch is now attached to the aforementioned White Ignition supply wire of the bike as shown by the arrow, so that the fog lights can only be switched on when the ignition switch is on -  The front seat is removed and the arrow highlights ample space below the seat to place the fog light relay and extra wiring harness - 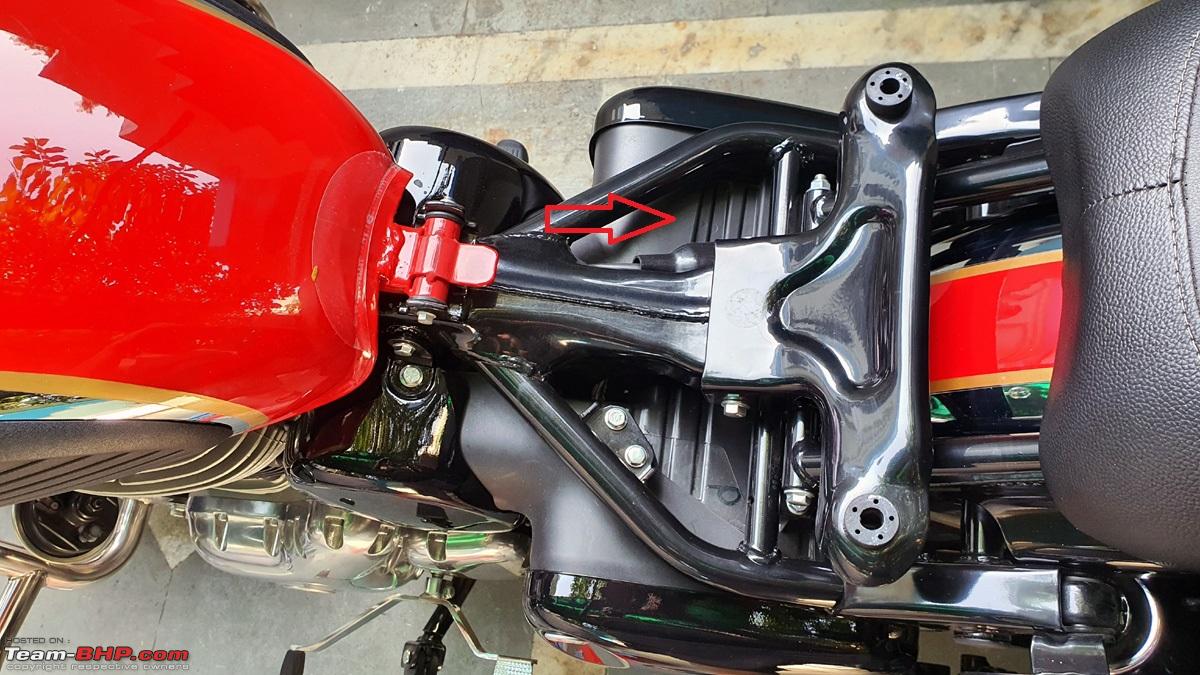 The tank is attached by a single long bolt as shown in the picture and this removed to facilitate slight lifting of the tank so that the wiring harness can be tucked safely and out of sight under the tank and zip tied - 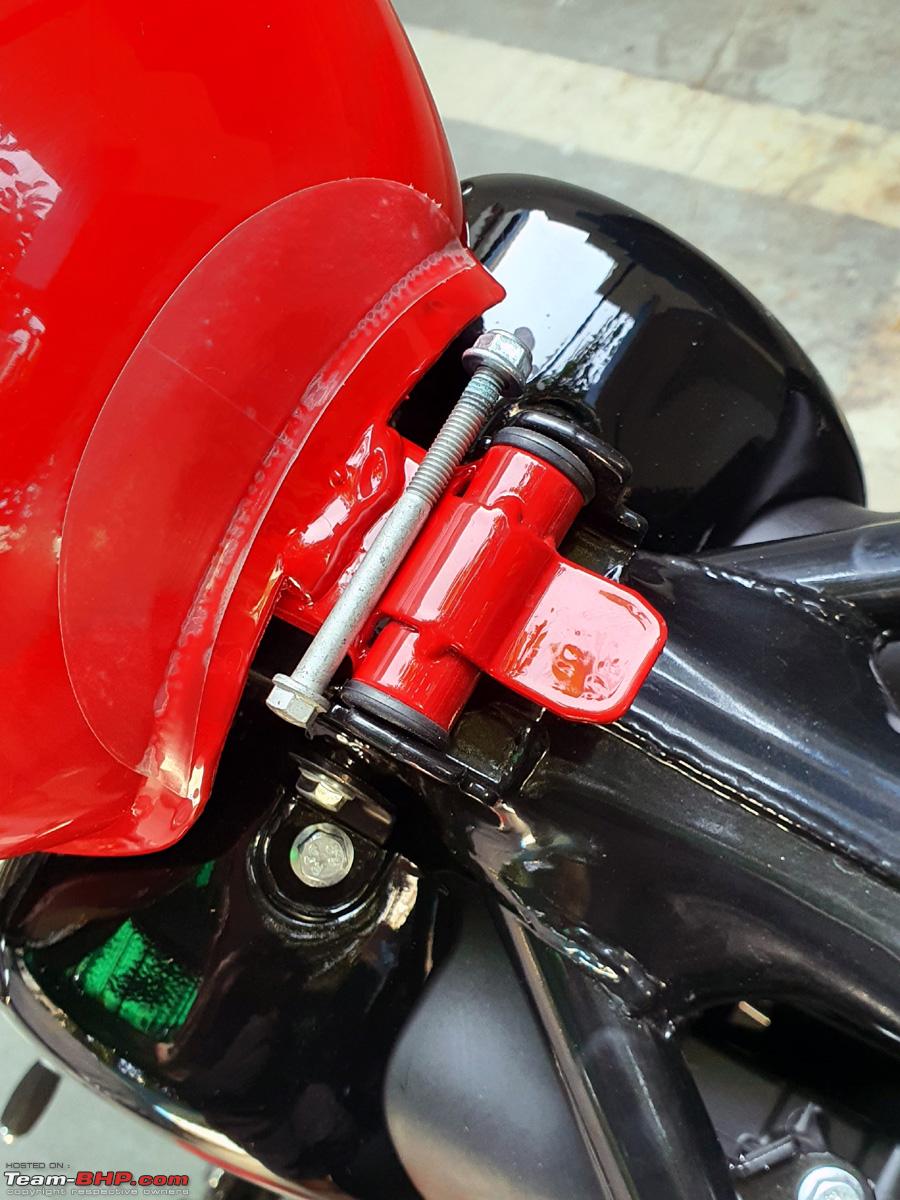 The Fog Lights installation is complete  Close-up view of the fog lights. The picture is self explanatory as the installation is a relatively simple process and just requires the proper tools to tighten the mounts and zip tie the wiring at the correct places - 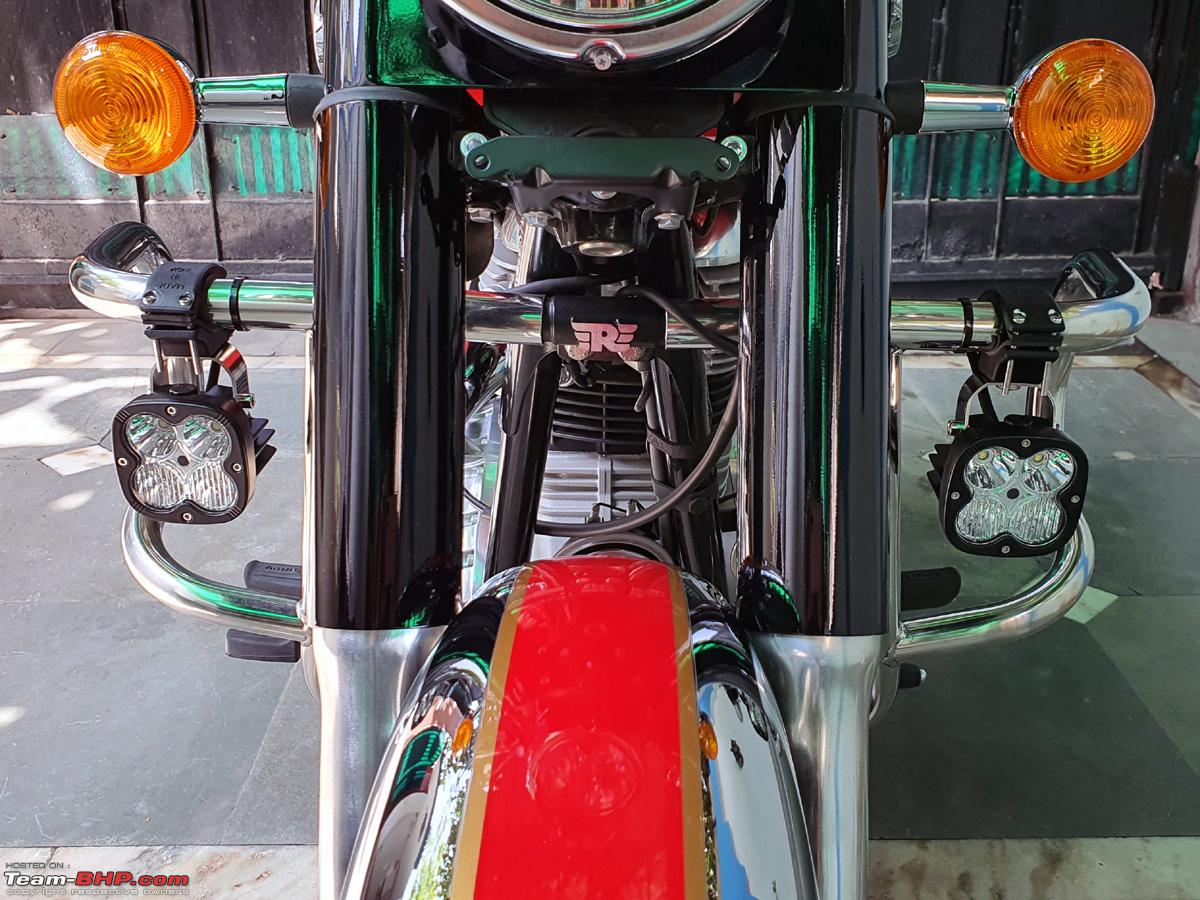 The HJG's comes with these Fog Light Covers with yellow glass inside which I converted to black fabric to keep the fog lights covered in the city for traffic regulation purposes - 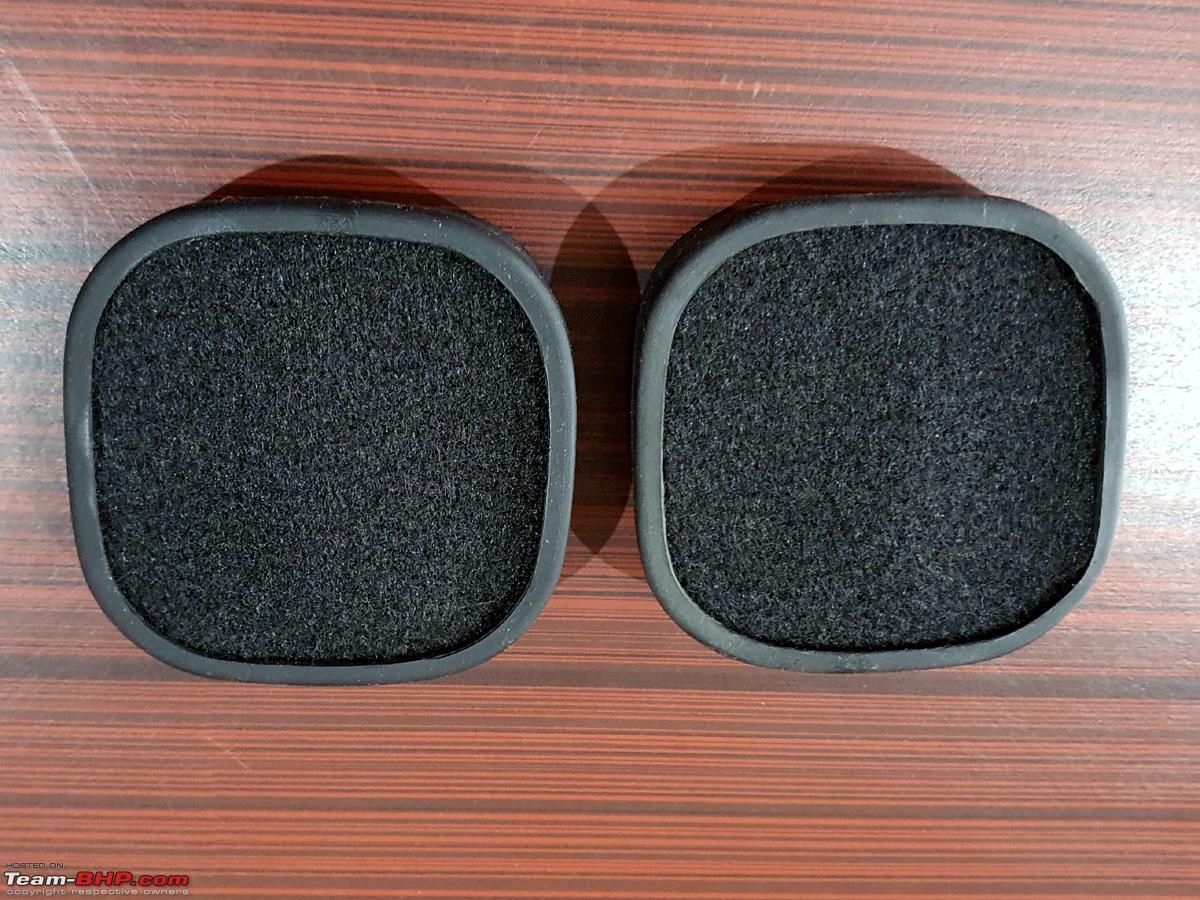 Here's the look with these covers installed for city right to ward off any enforcement eyes...lolz 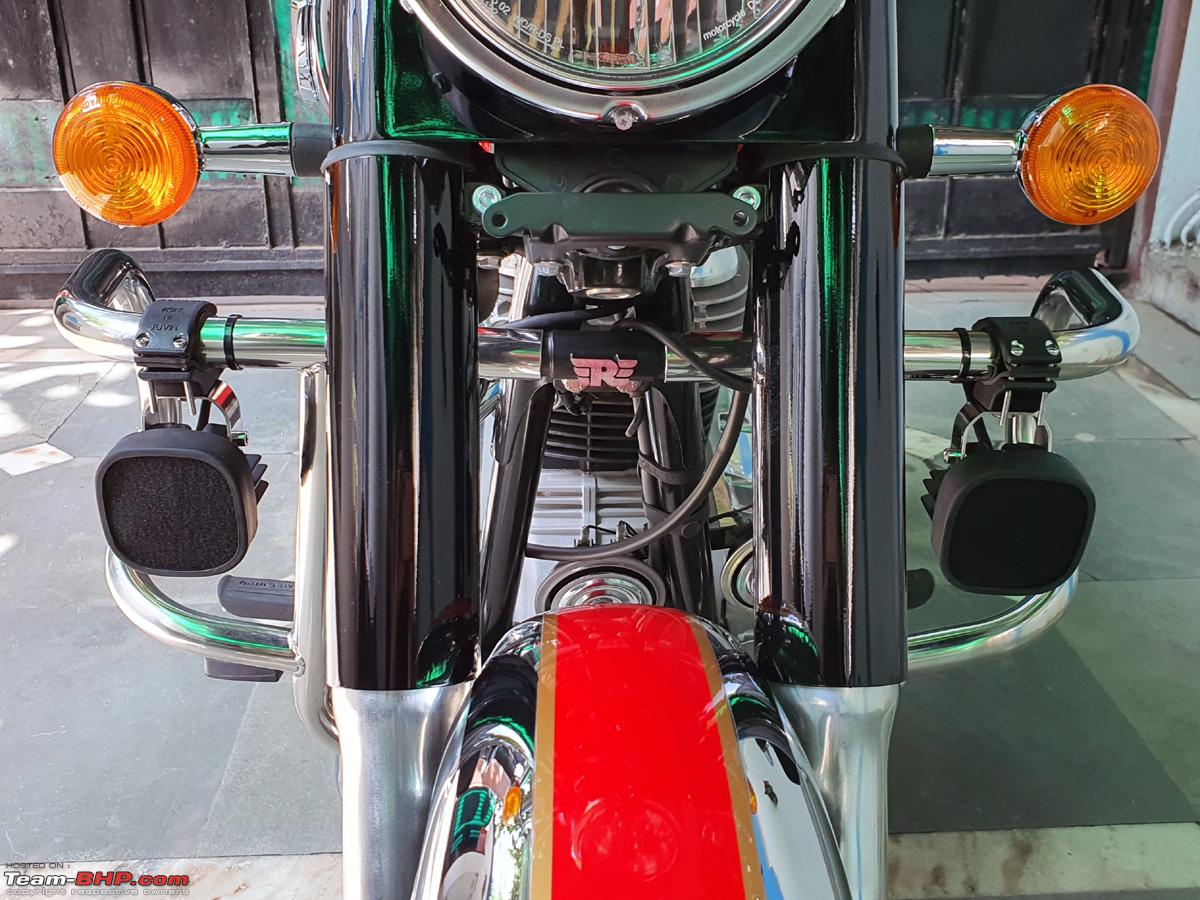 A close up of the same - 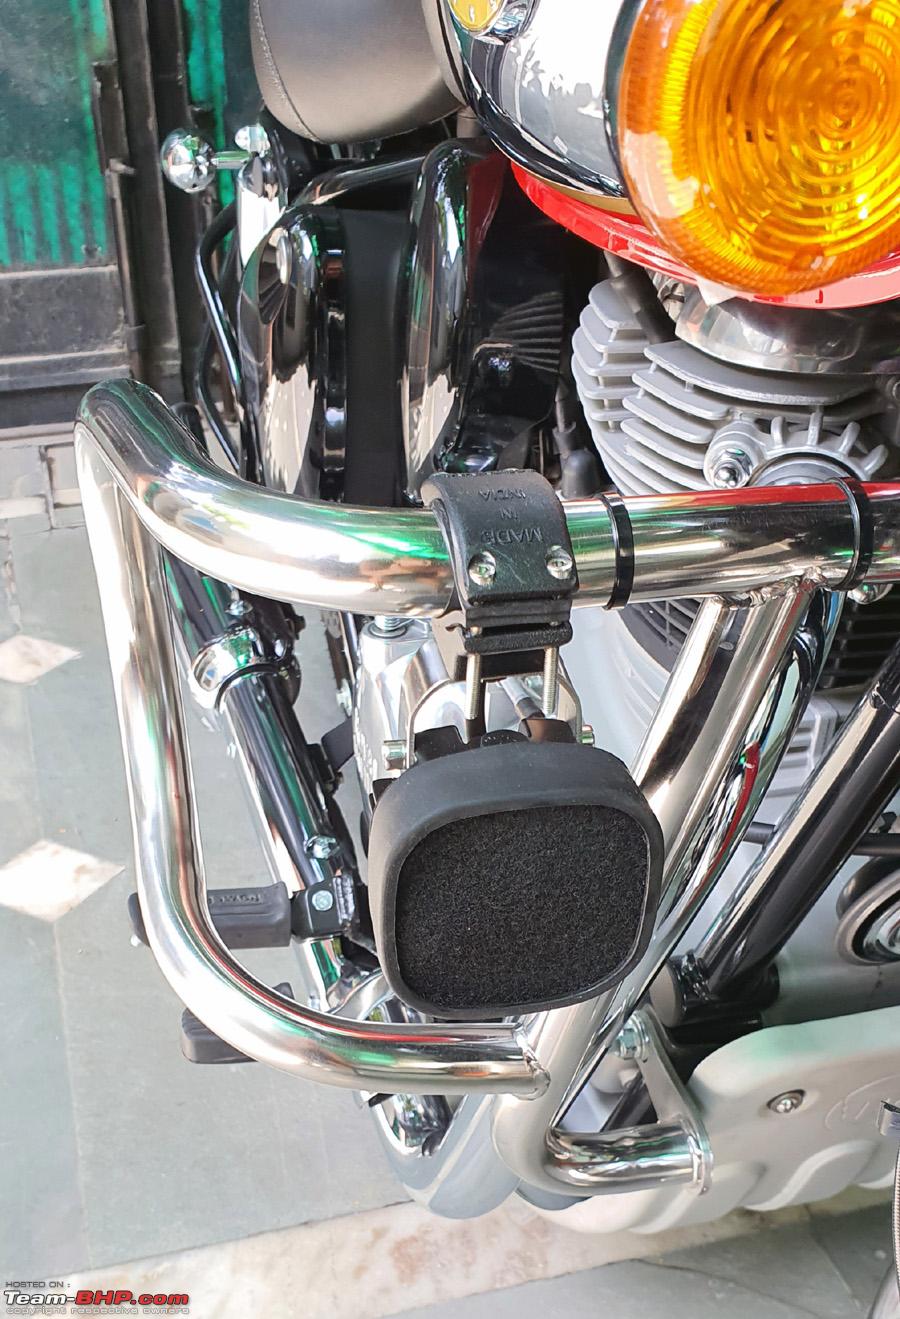 And the same covers with waterproof rubber padding inside for riding during monsoons - 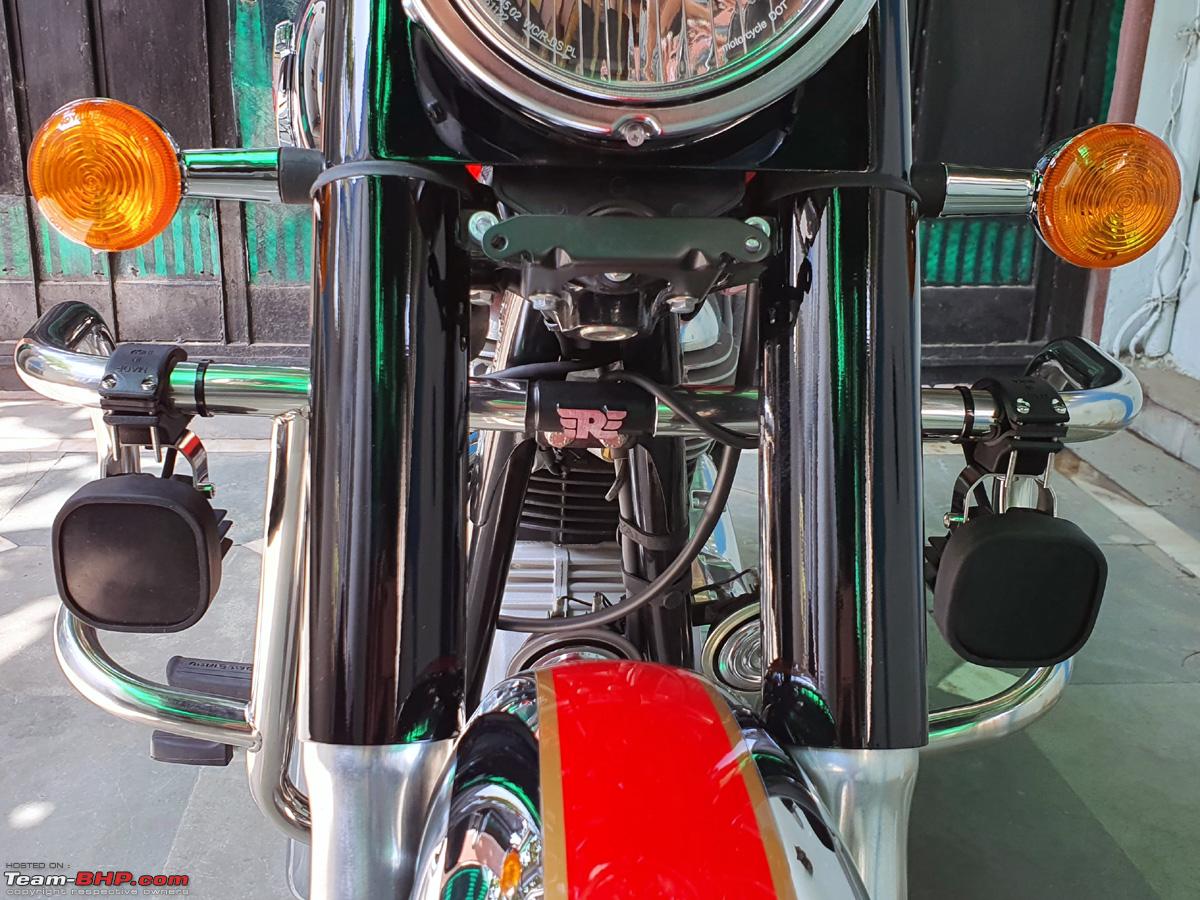 A close up of the same - 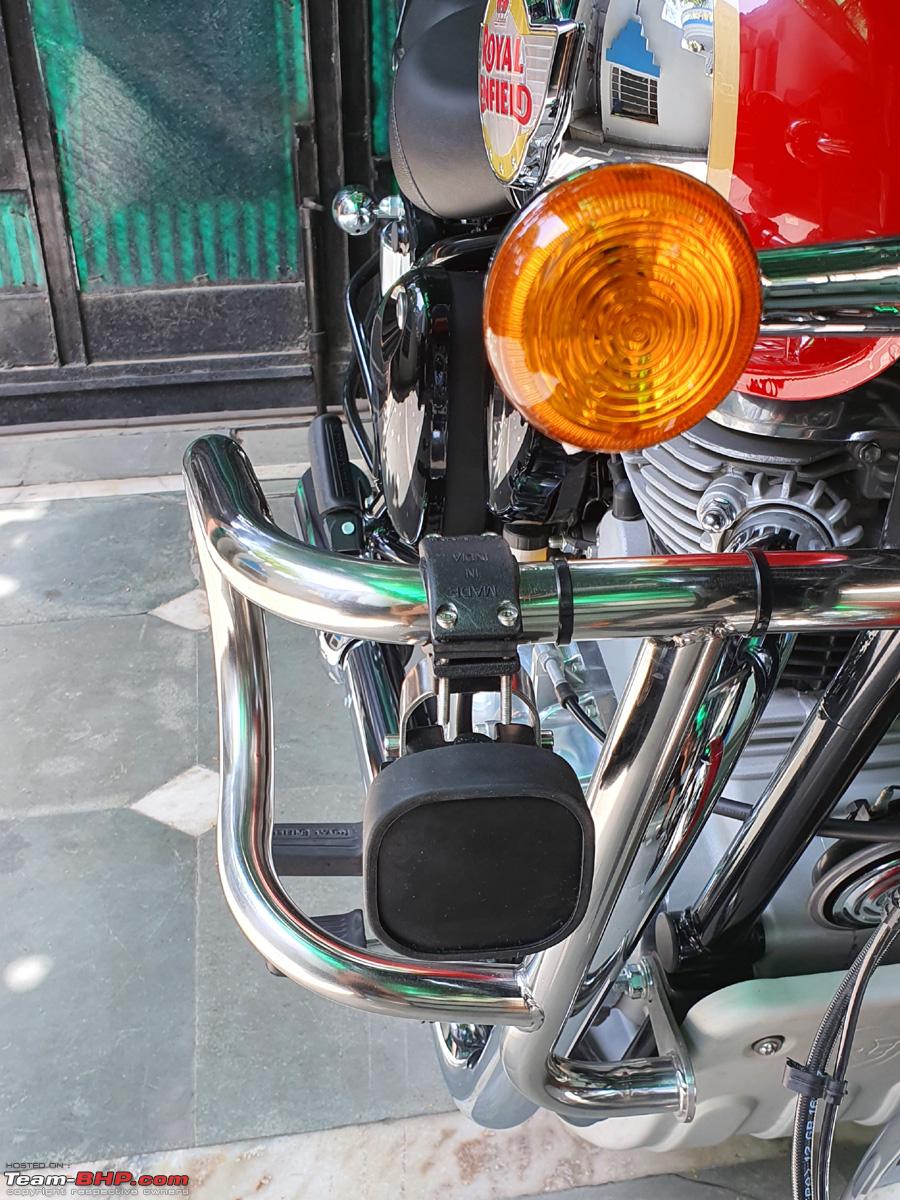 And these covers converted back to original with the yellow glass for riding during fog - 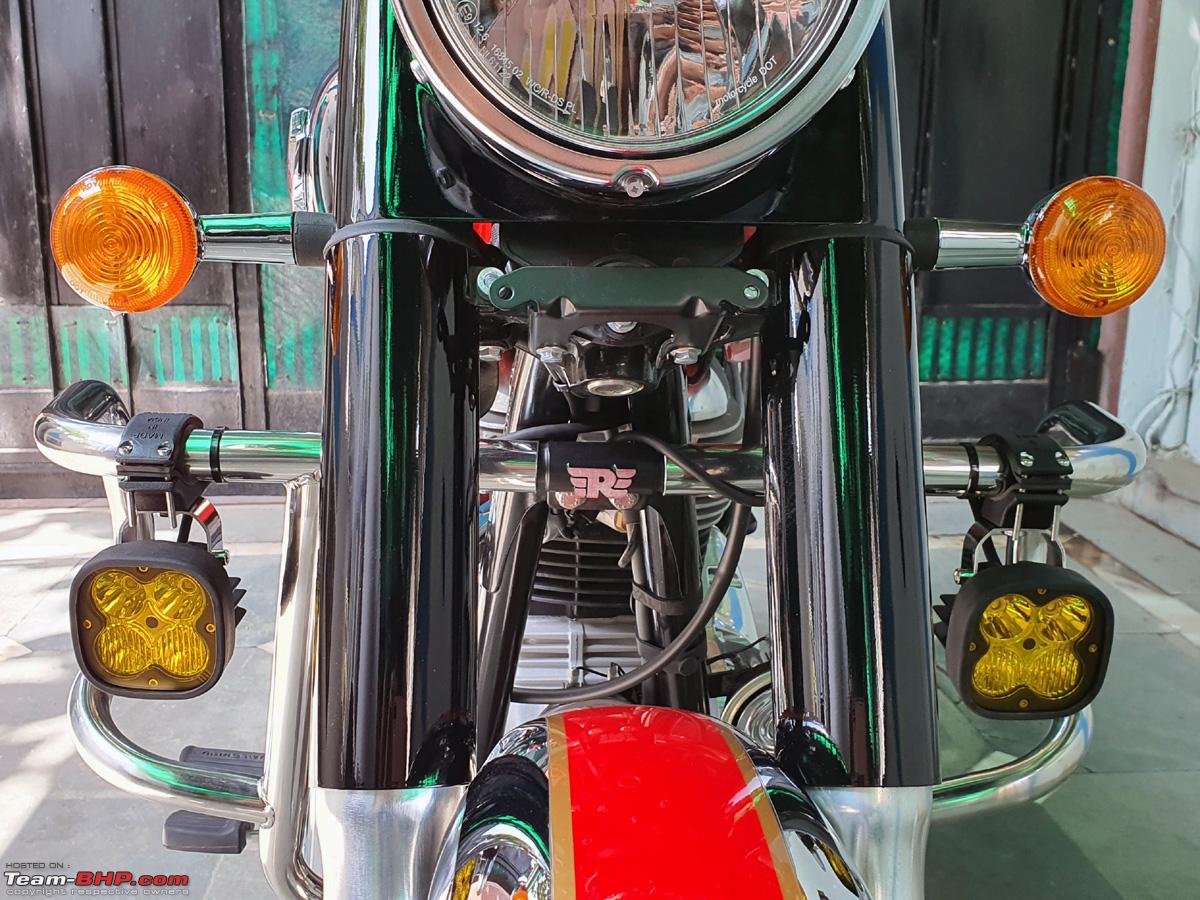 A close up of the same - 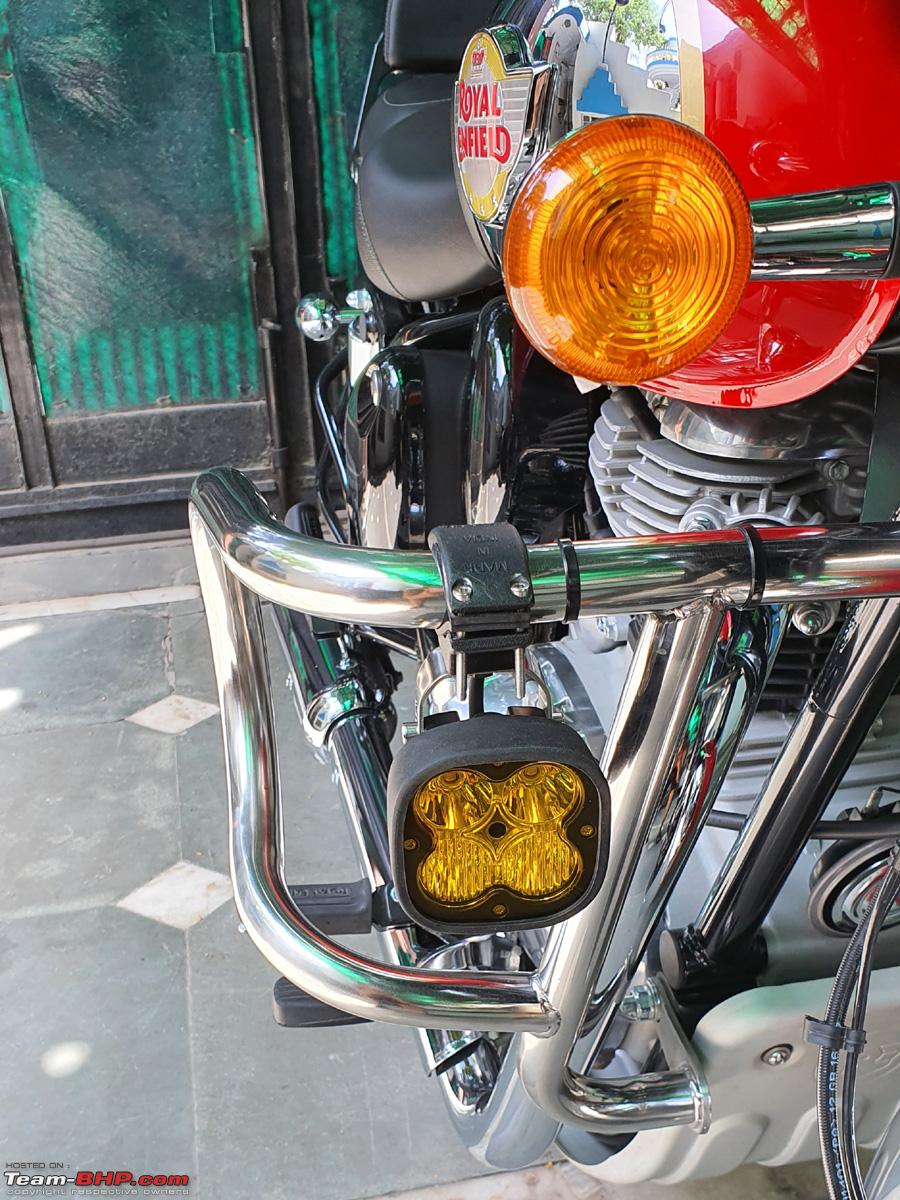 The Handlebar illuminated switch to control these lights. The red light inside the switch comes on when these fog lights are turned on - 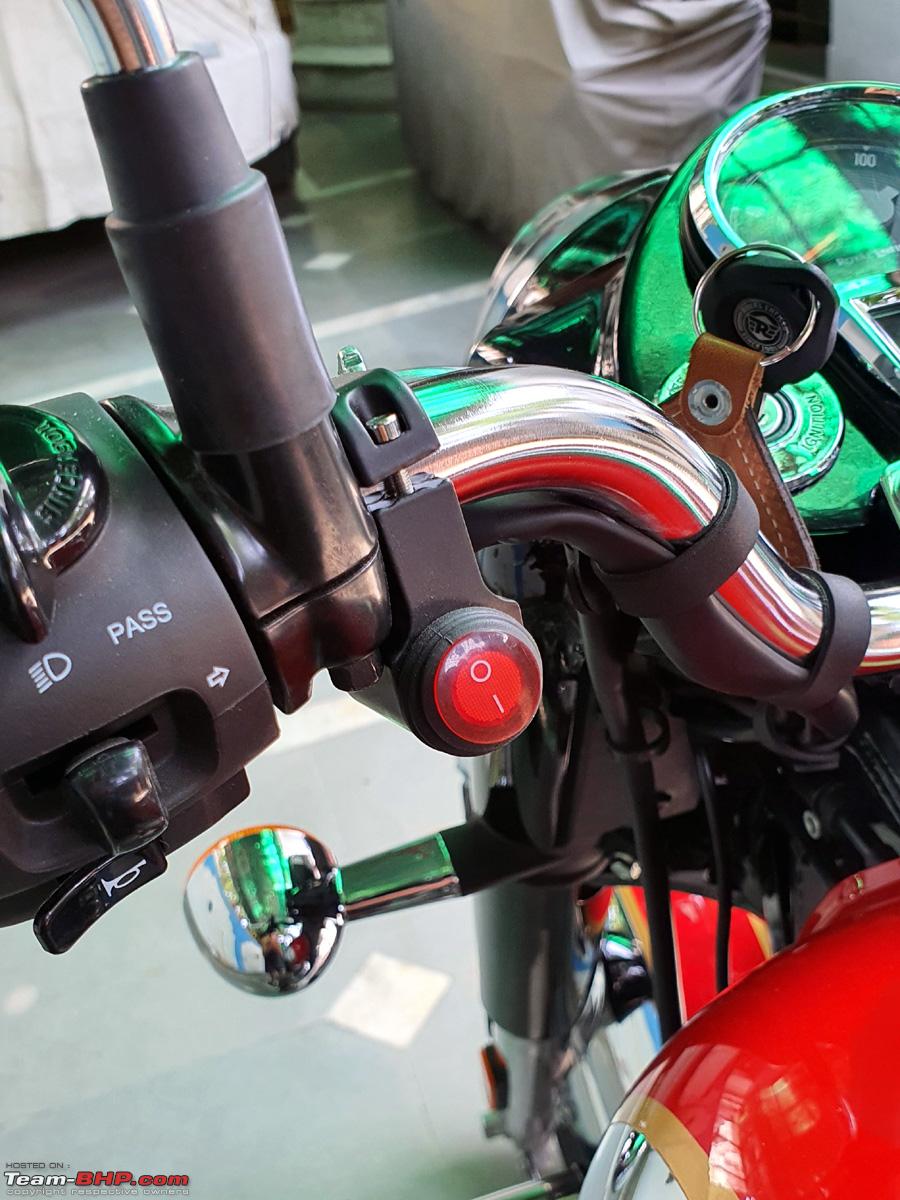 Here's the Night View - First with just the Position Lamps on -  Position Lamps with Low Beam - 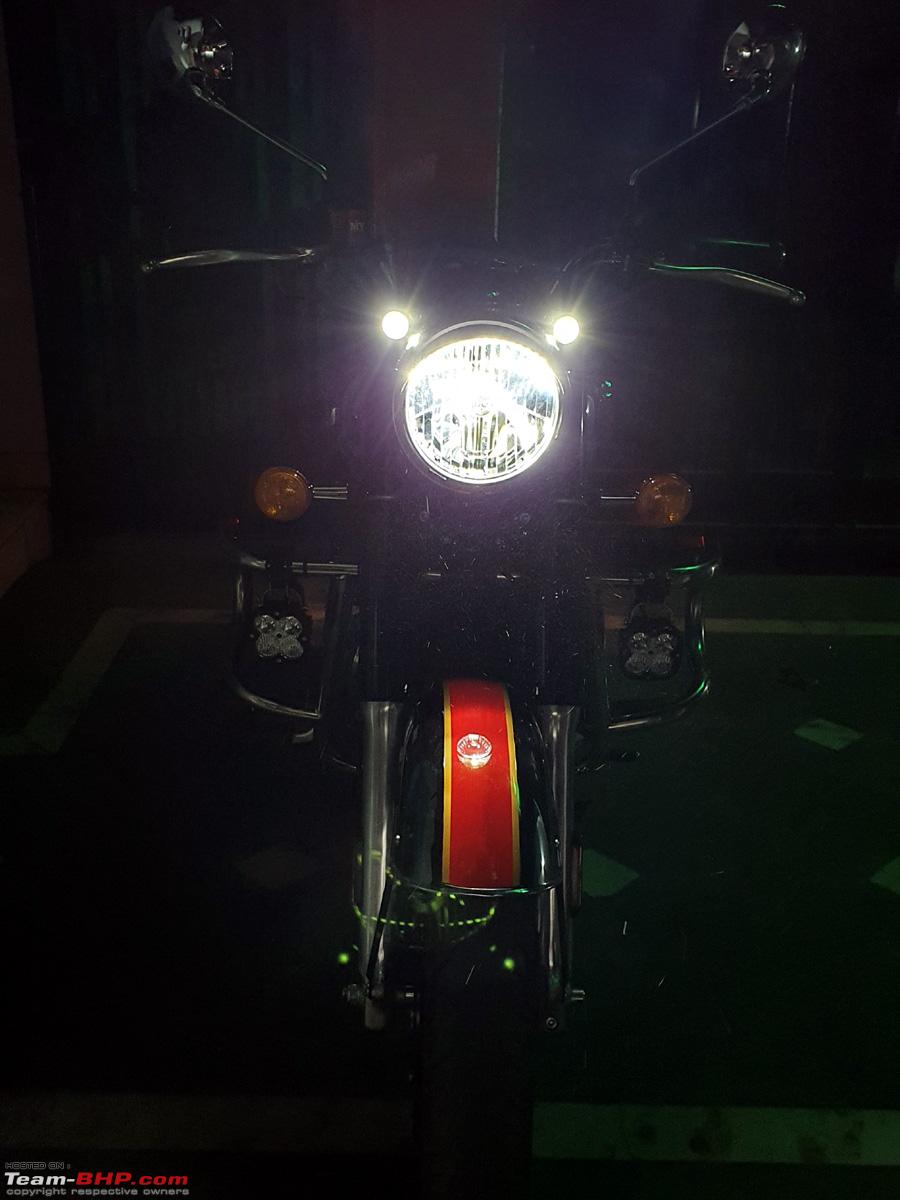 High Beam - 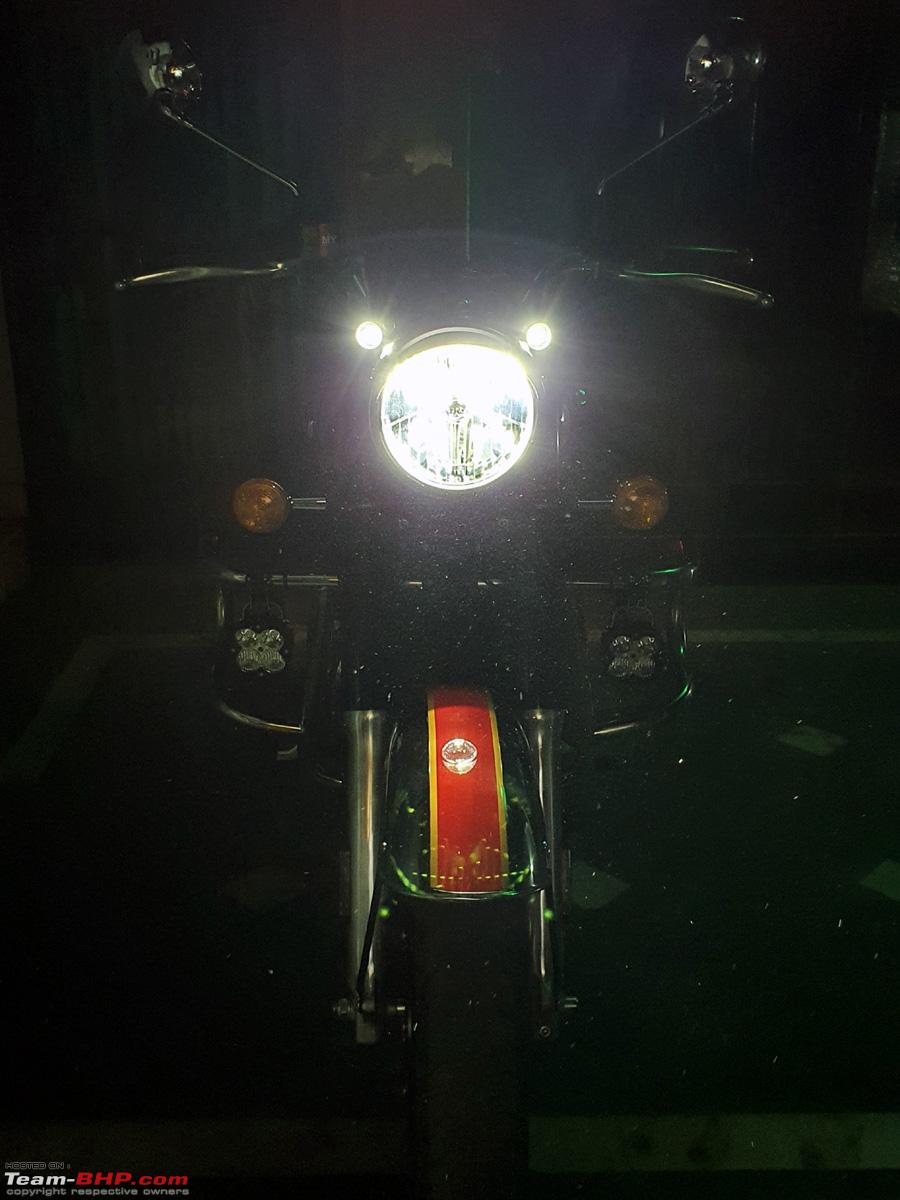 Headlights + Fog Lights on - 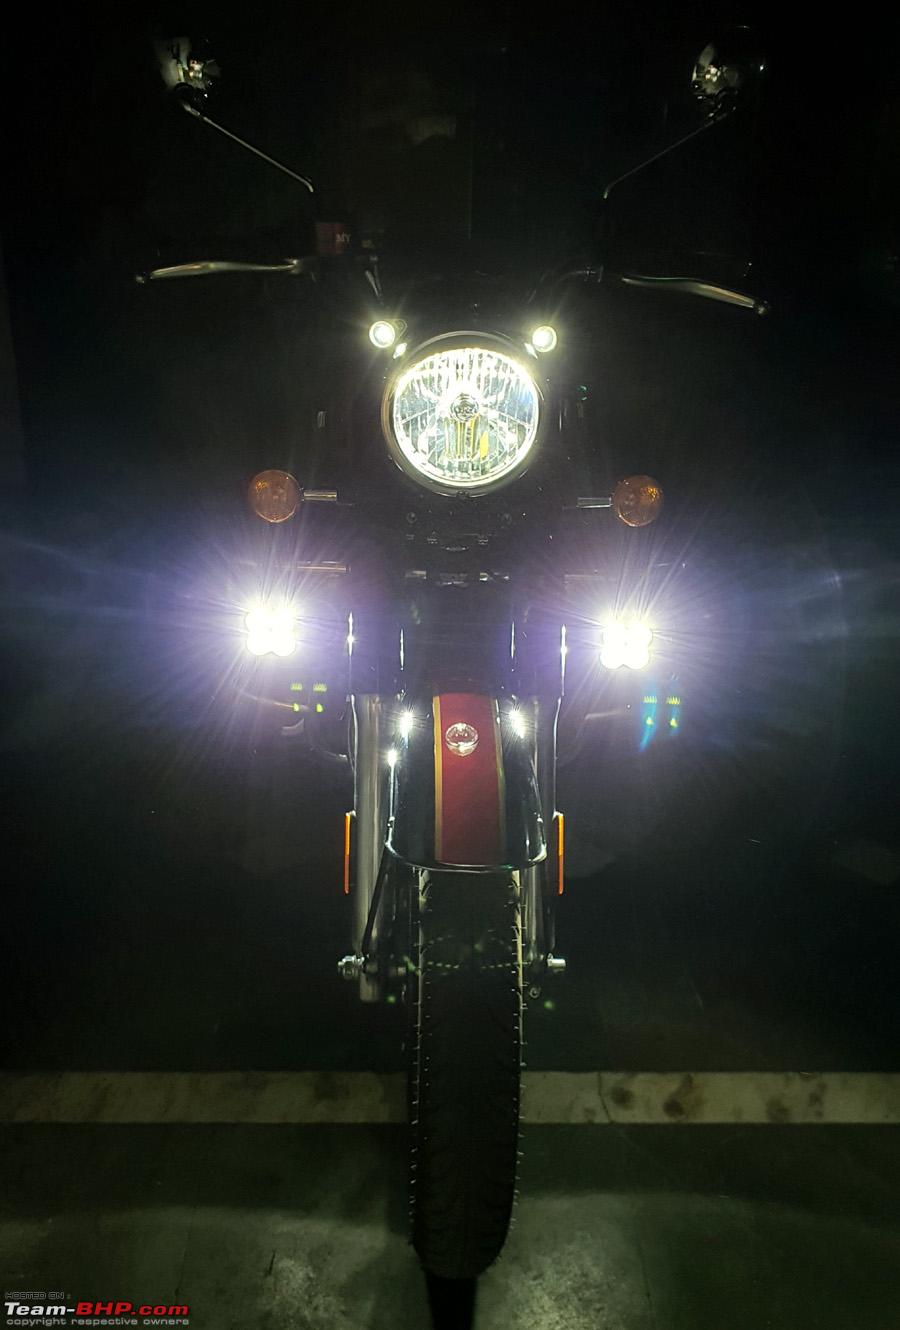 Close Up of the same. It is really very effective at night. I have positioned the Fog Lights beam in such a manner so as to NOT to blind the oncoming traffic and only illuminate the road below - 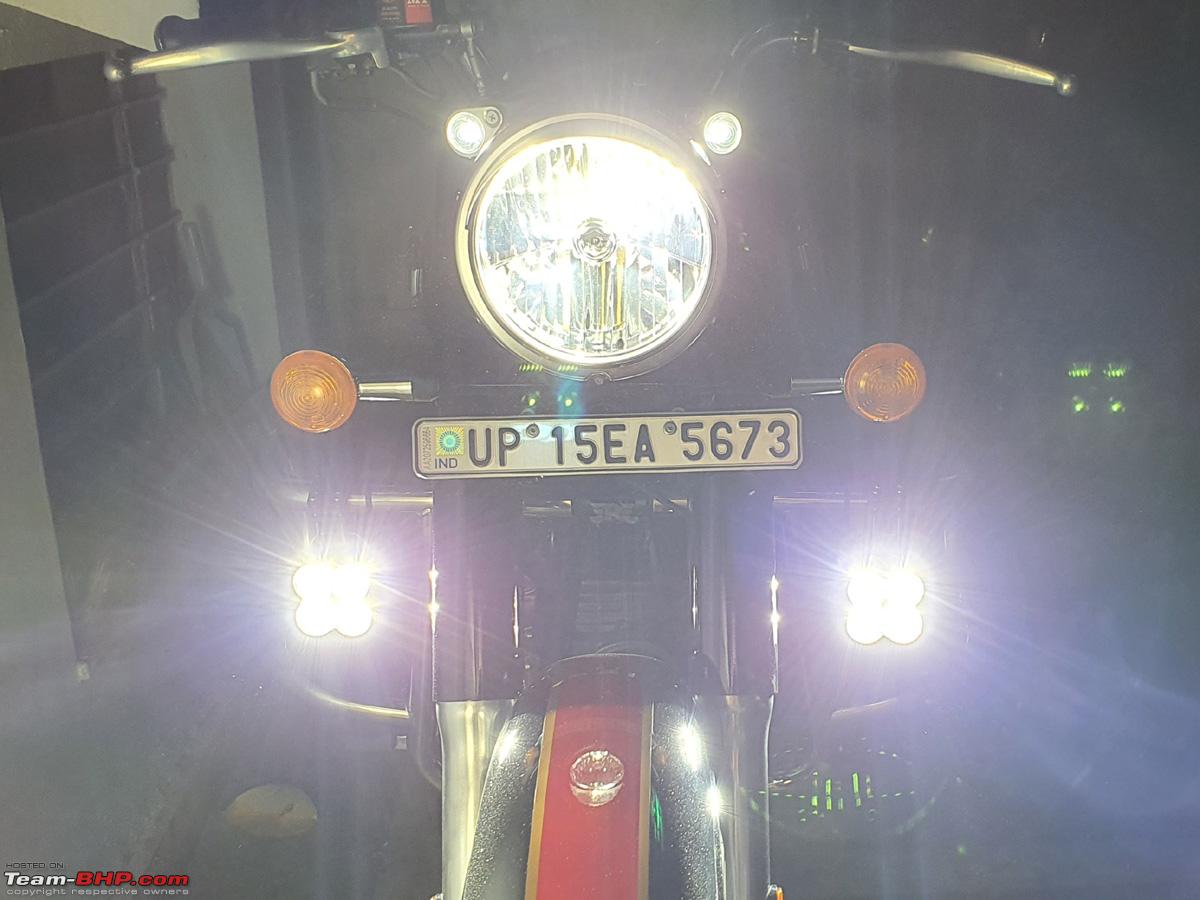 Rider's View with only the Headlights on at Low beam - 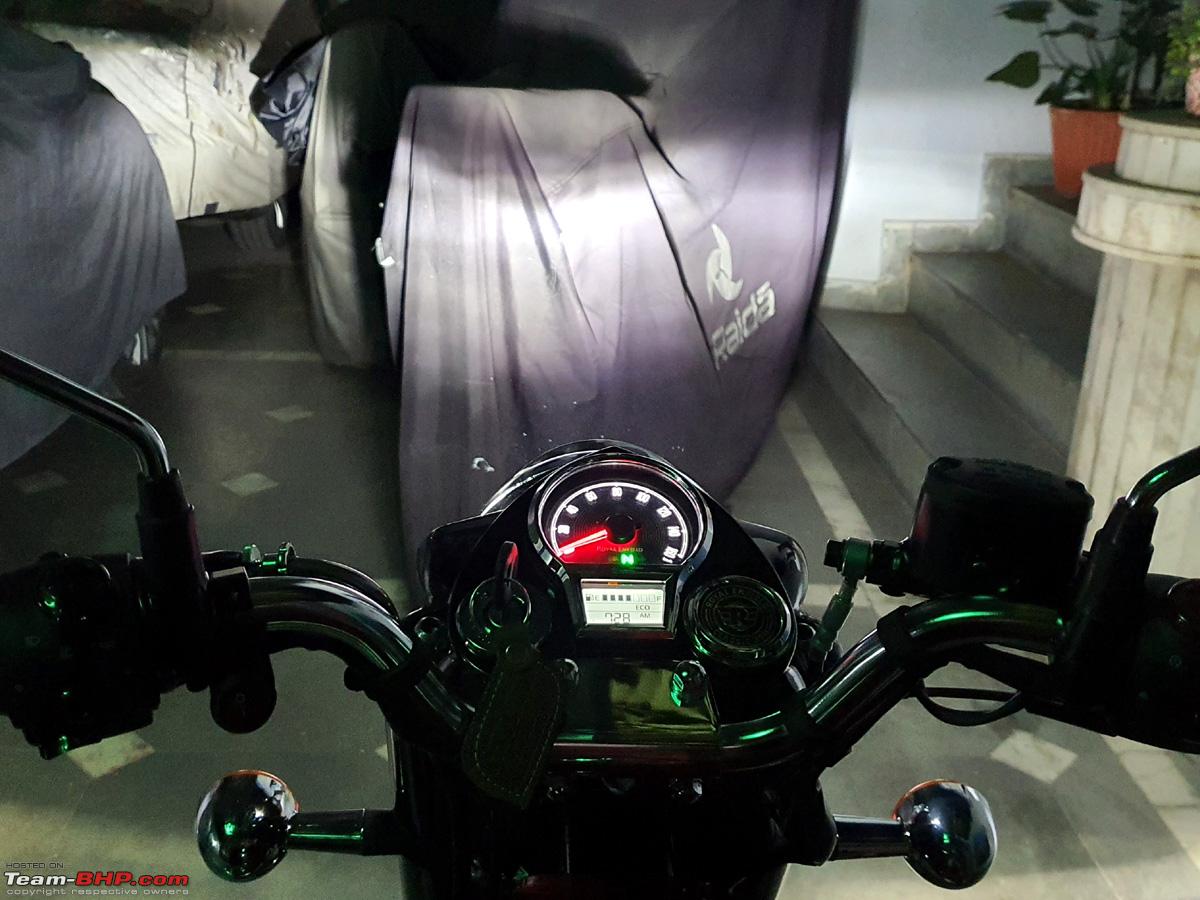 And then with the Fog Lights and High beam switched on. Notice the illuminated fog light switch - 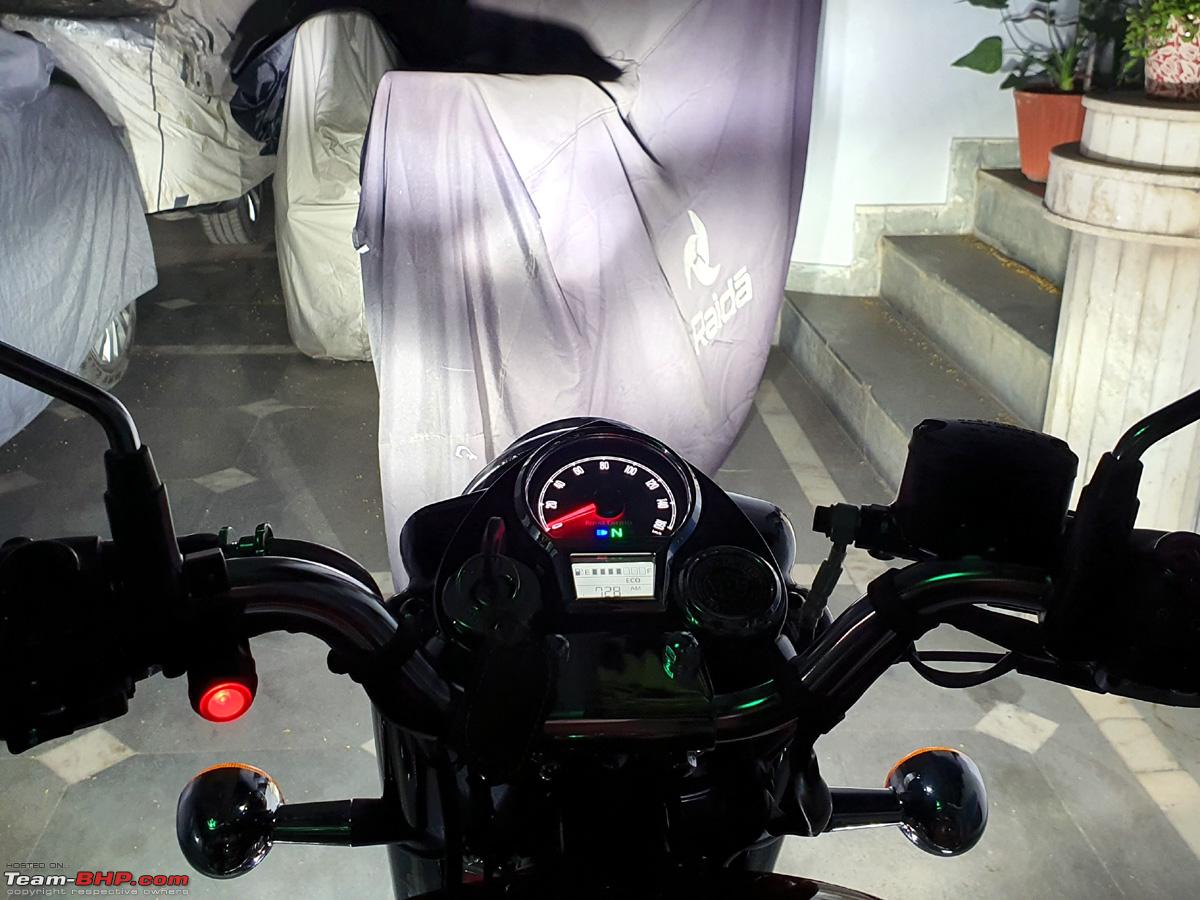 ------------------------------------ SIMTAC LED Indicator Bulbs x 4 nos. were further procured and installed directly from SIMTAC website - 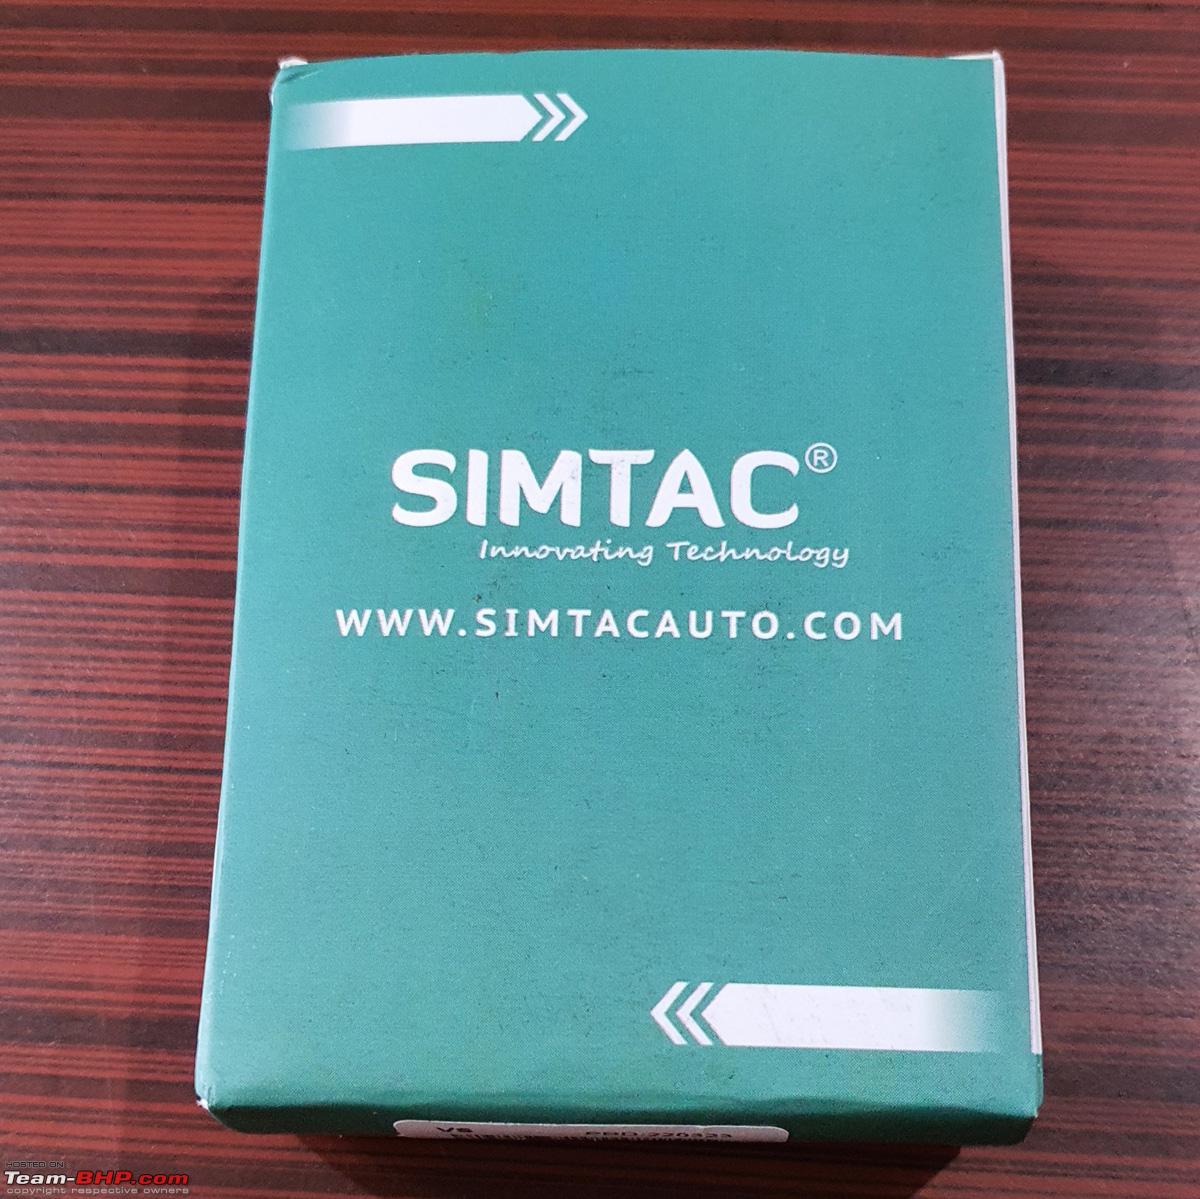 They claim and look to be Made in India. The MRP printed is 1199/- but the same was supplied by them at 599/- for the 4 pieces after a 100/- discount on their website price. They initially supplied these "cross-pin' bulbs which is the wrong ones for new Classic 350. So they picked these back up and supplied the correct "straight pin" bulbs which actually fit properly in this bike. All this was done very professionally by them through Whatsapp chat and delivery was through Bluedart which was included in the price. 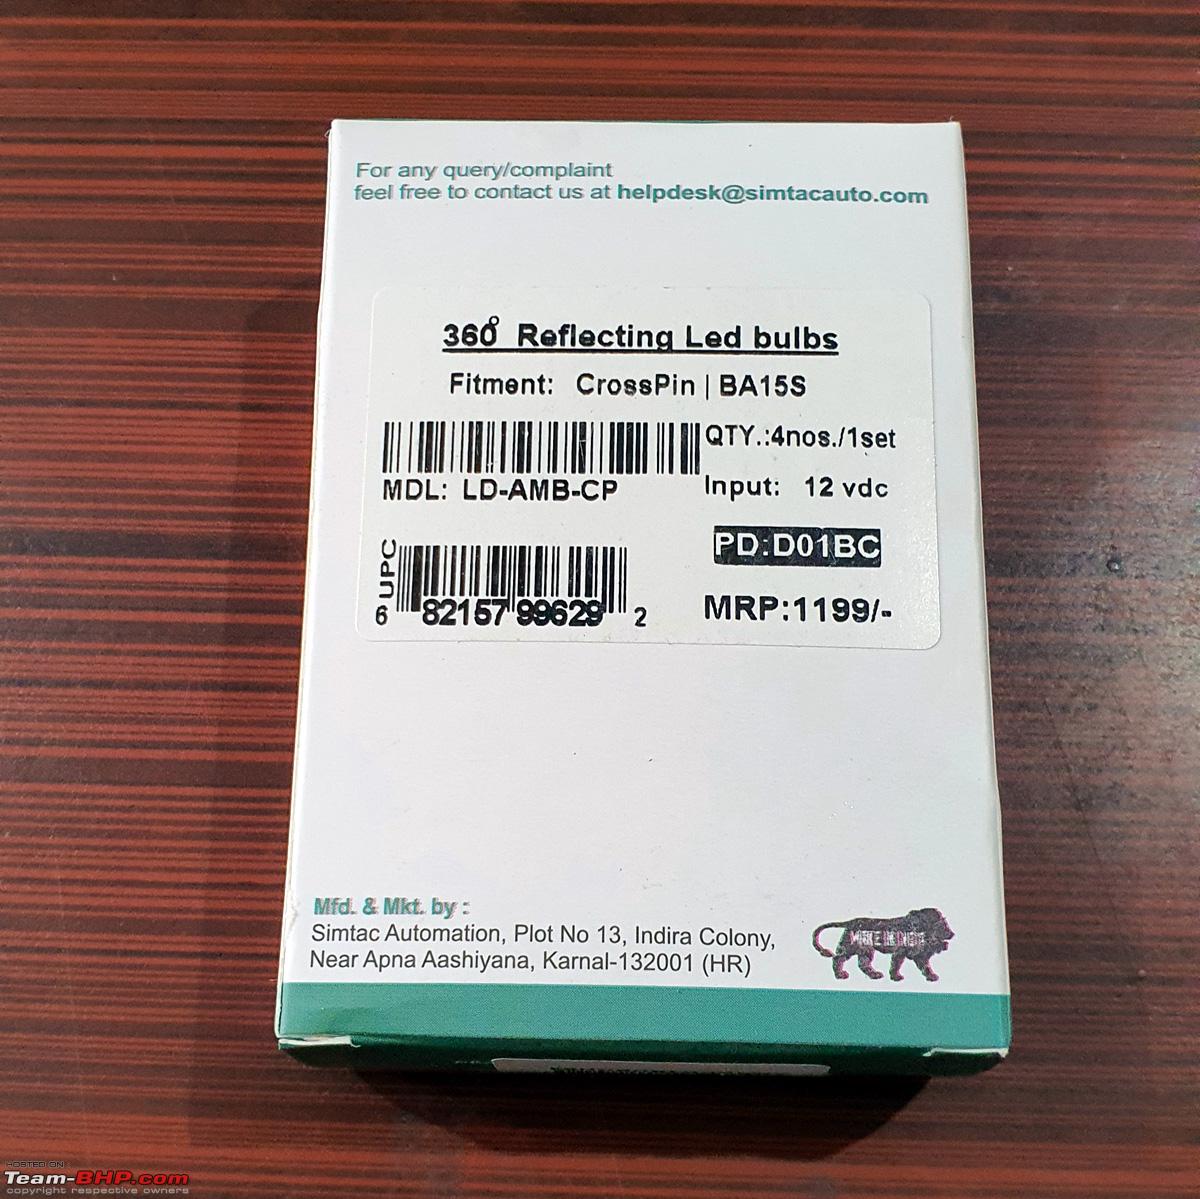 The LED Bulbs - seems to be Made in India with proper SIMTAC markings on them. But the illumination really blew me off. They are at least twice as bright as the stock halogen one's that come with the bike - 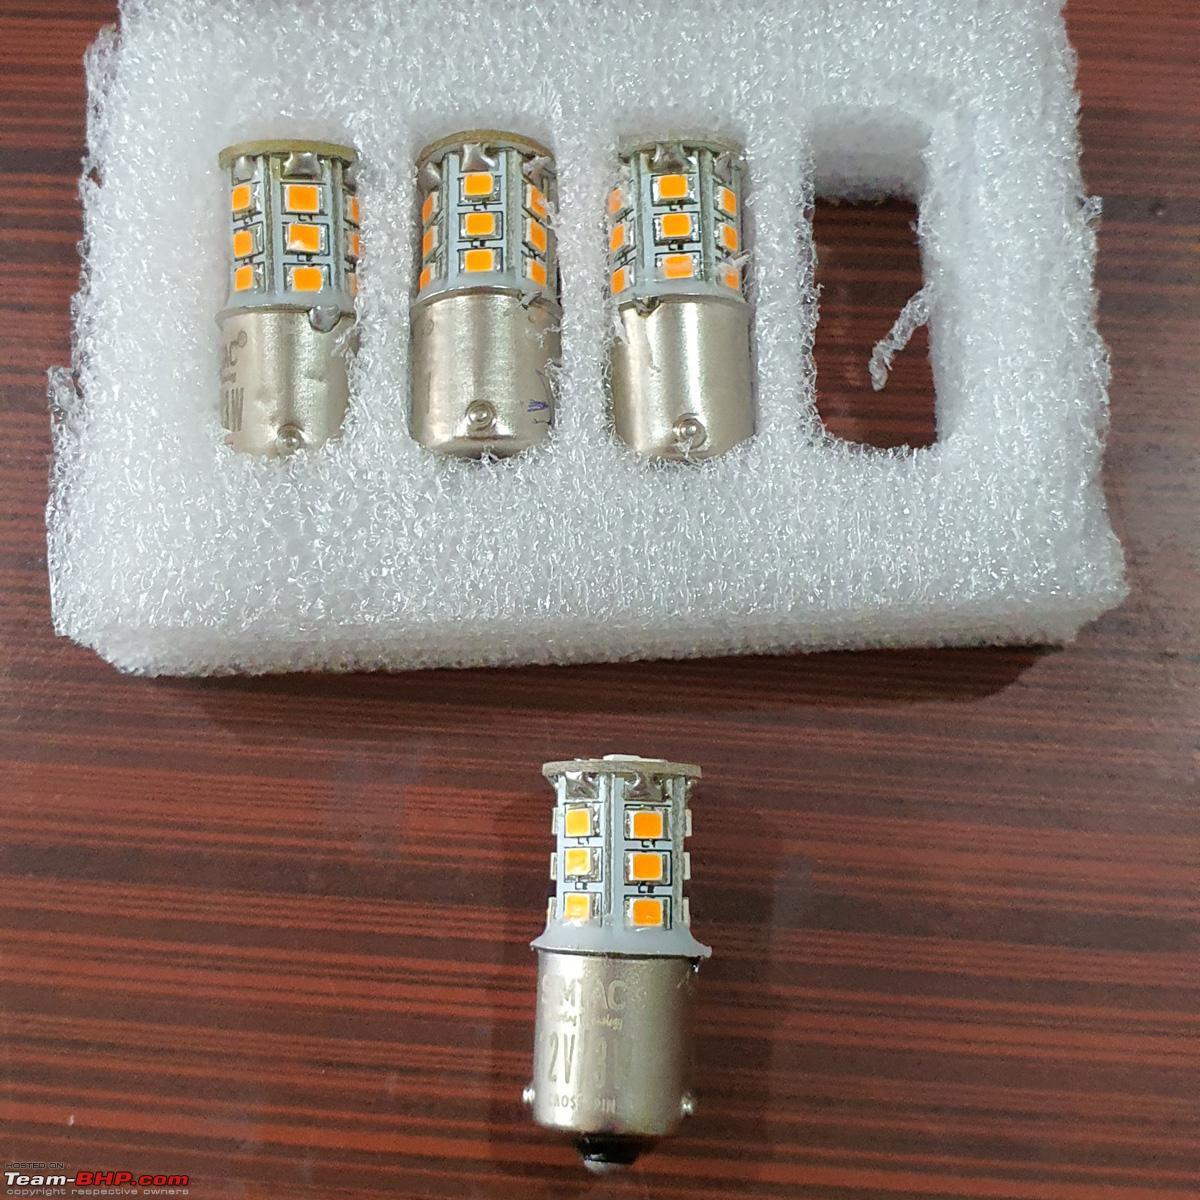 Installation is a simple 5 minutes affair with a thin Philips head screw to be removed from the lower back side of the indicator assembly which facilitates removal of the front orange plastic cap. The bulb is then just simply twisted out from it's socket - 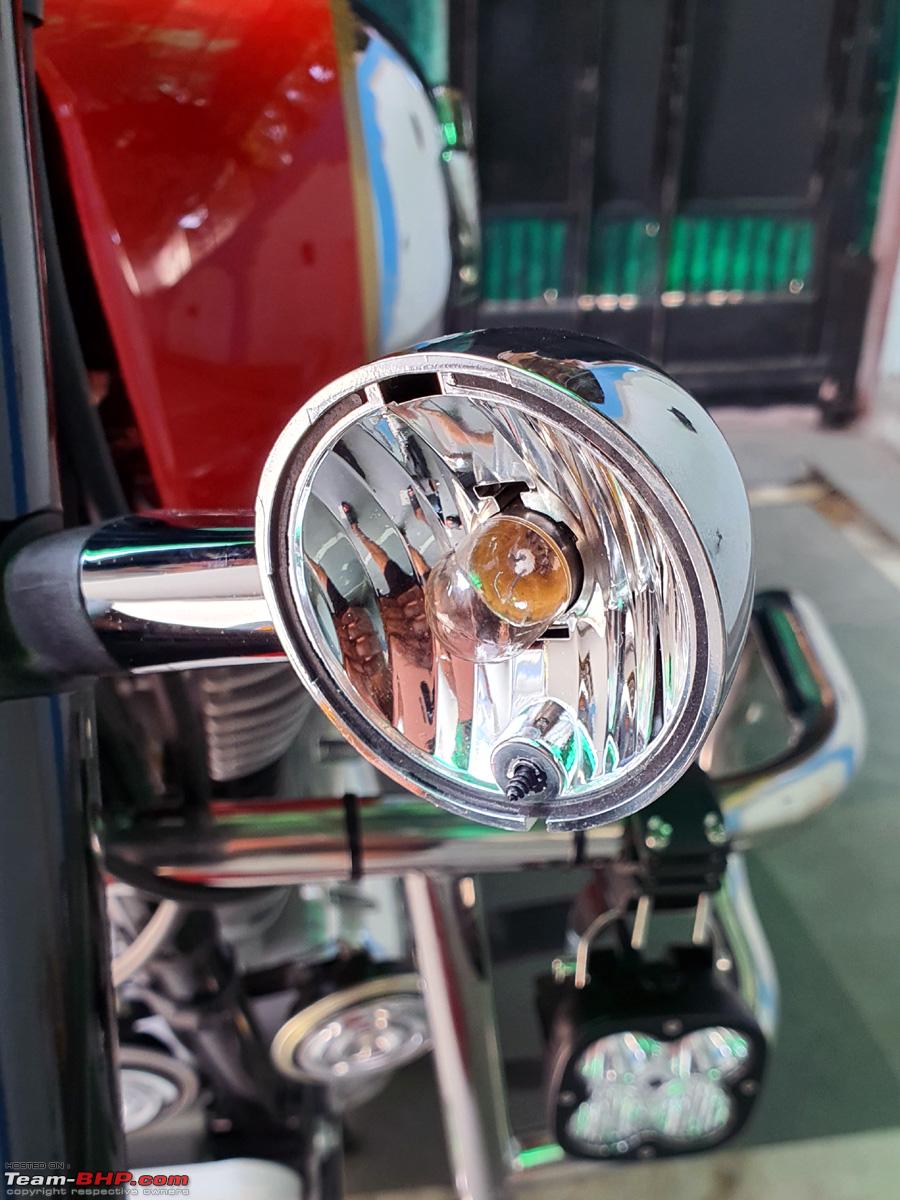 BUT this LED replacement led to HYPERFLASHING i.e. the indicators were flashing at a much faster speed than normal. The fix was a simple 60/- bucks solution which involved replacing the 2 pin stock flasher unit located in the battery box compartment with a DC flasher from any reputed manufacturer. I chose this Uno Minda one and the part# is mentioned in the picture. It was easily sourced from a local spare parts dealer - 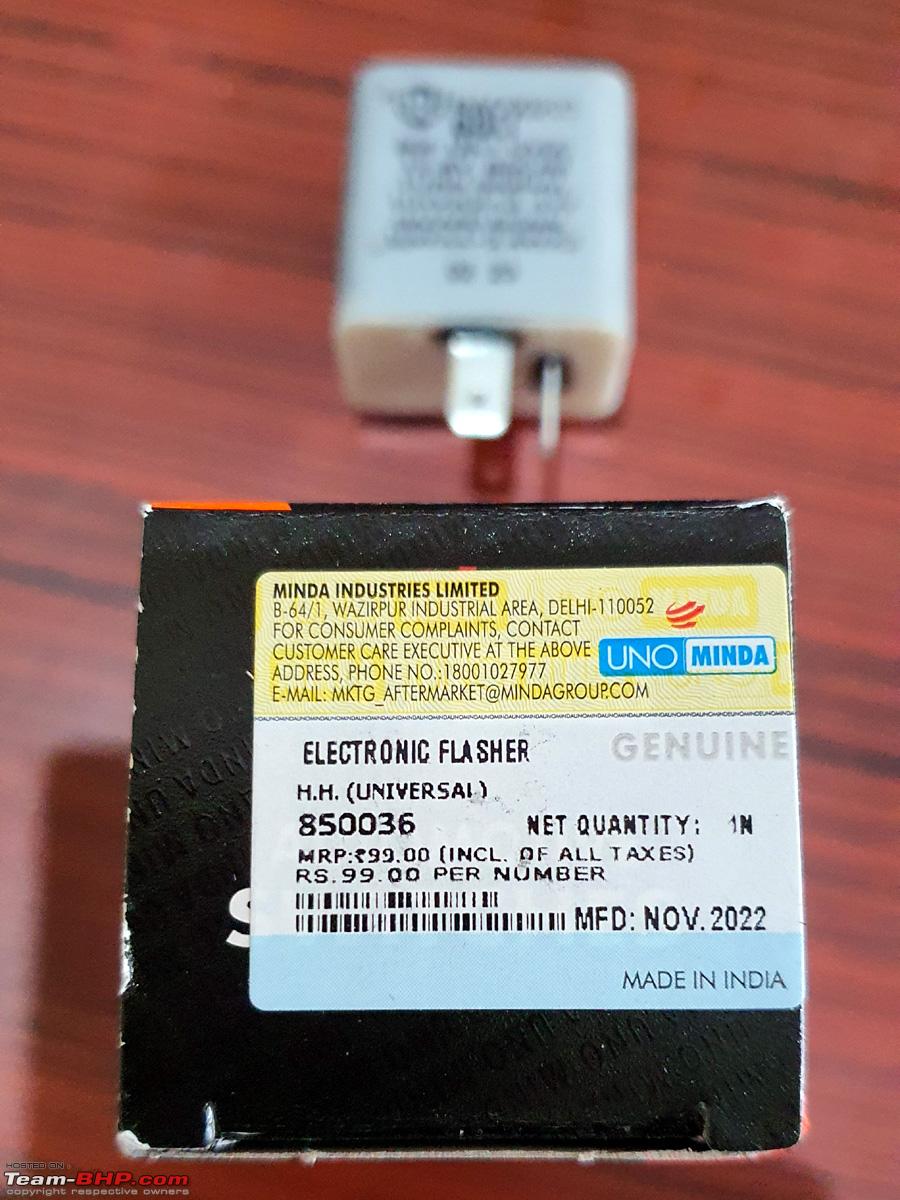 Here are both the stock and the Minda Flasher unit side by side - 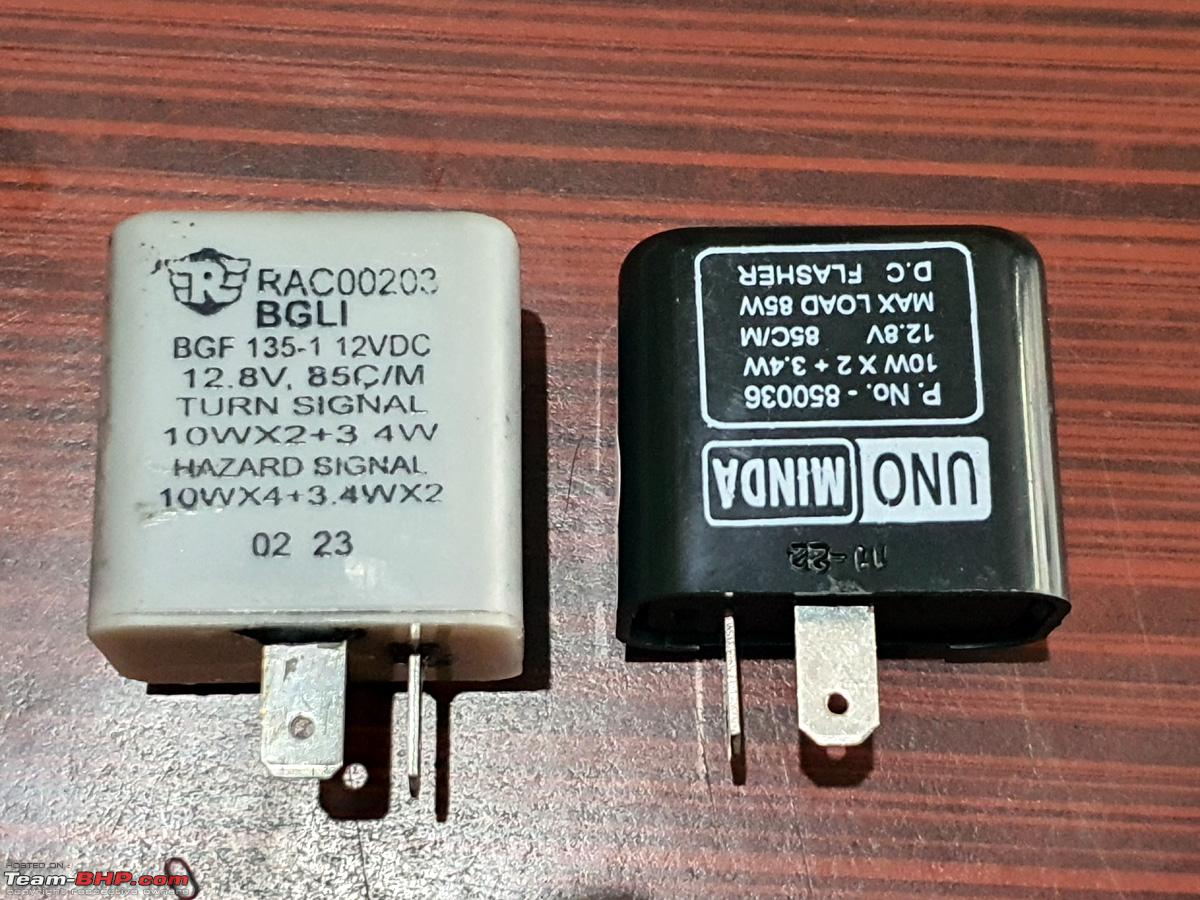 The position of the stock flasher unit in the battery compartment - 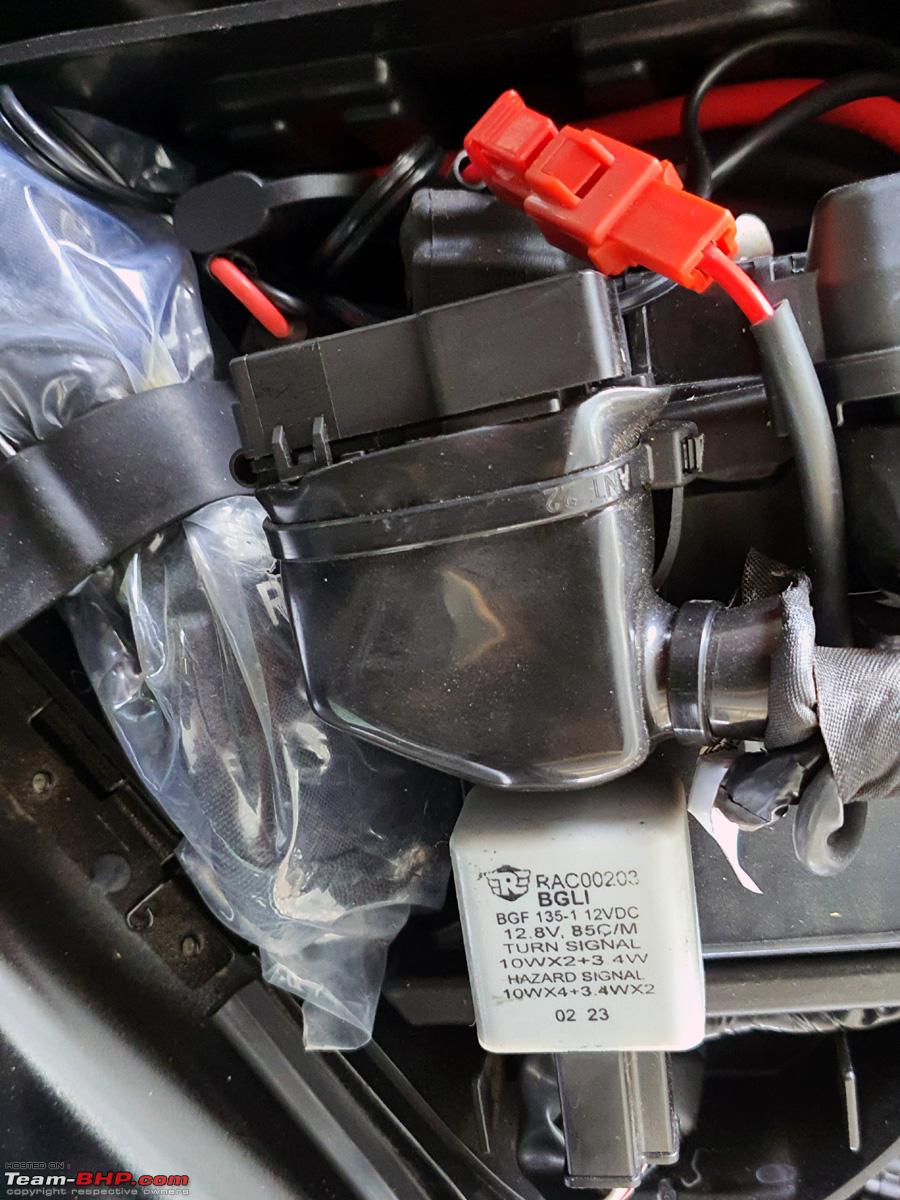 Replaced by the Uno Minda unit. It was a simple plug and play affair - 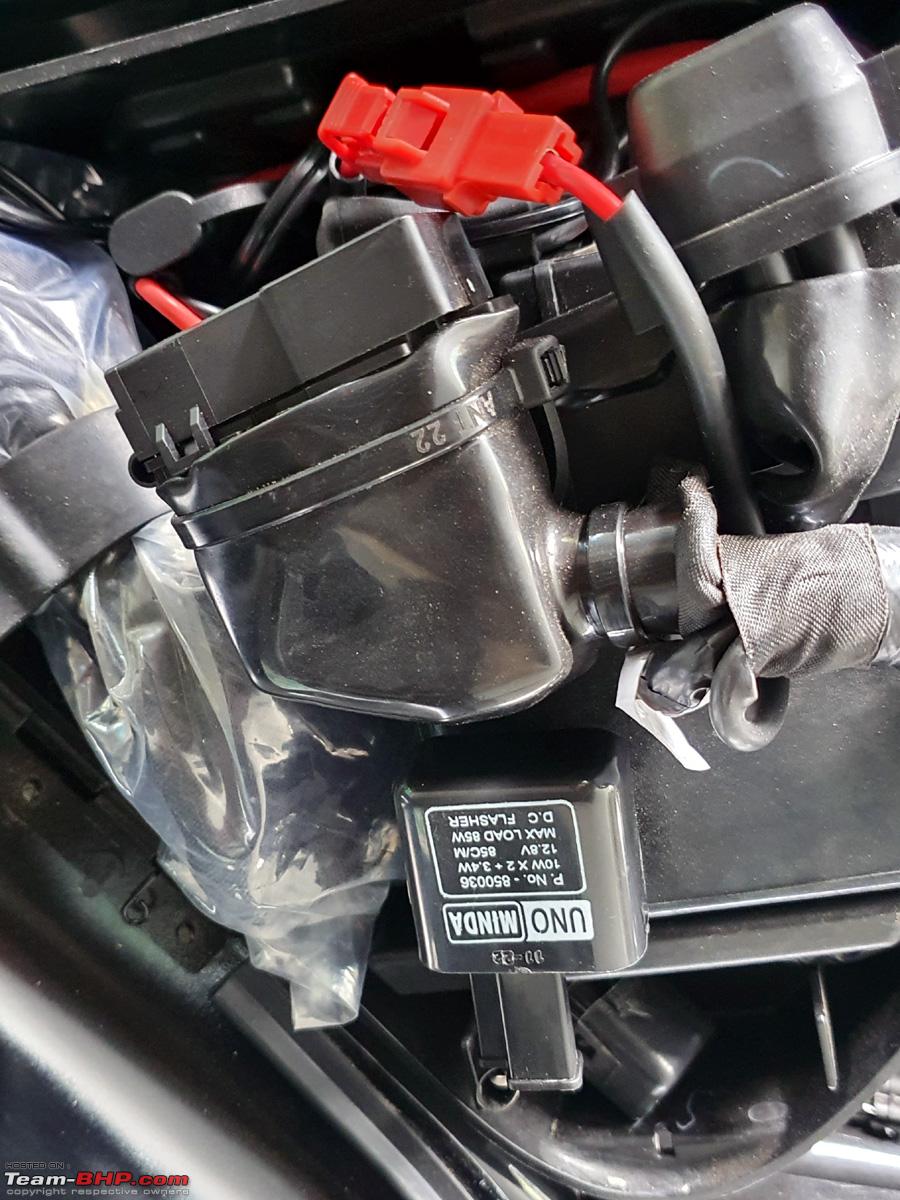 The flashing speed is now back to normal and the final effect is DAZZLING to say the least... lolz 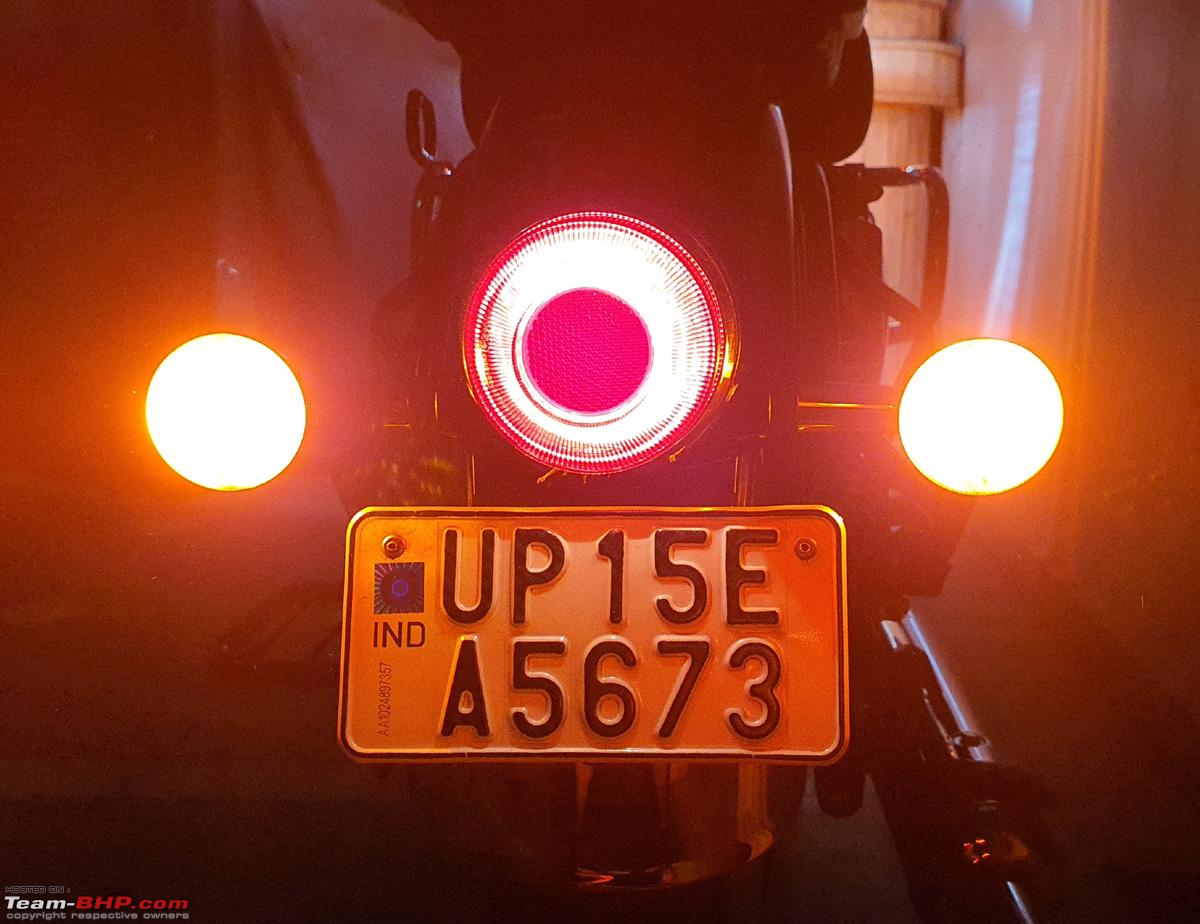 Cheers for now... Last edited by dkaile : 24th April 2023 at 16:05. |
|
| (25)
Thanks
|
| The following 25 BHPians Thank dkaile for this useful post: | aargee, achayan, adrian, aman9393, bj96, chinmaypillay, Cyborg, deerhunter, Geo_Ipe, Gordon, GTO, irajput, JoshuaM, keroo1099, mh09ad5578, RedPhobos, Roy.S, saikishor, Shreyas Aterkar, shyamg28, somspaple, surjaonwheelz, Vaishak, Voodooblaster, xVpuredrive |
|
24th April 2023, 13:25
| #9 |
| Senior - BHPian | re: 2023 Royal Enfield Classic 350 | Chrome Red | The Comprehensive Review Tripper Navigation Installation Now as the Tripper Navigation was out of stock when I had placed the order for my bike in March'23, it became available subsequently from April and now every new buyer of the Classic 350 dual channel has the option to provision the same for their bike at a additional cost of 5k through the MIY app. I had ordered the same at my dealer and the same came through in weeks time. They have increased the MRP now to 5560/- from the earlier 5200/-. I got the same for 5300/- with the mounting bracket included.  This is the mounting bracket part# and costs Rs. 35/- 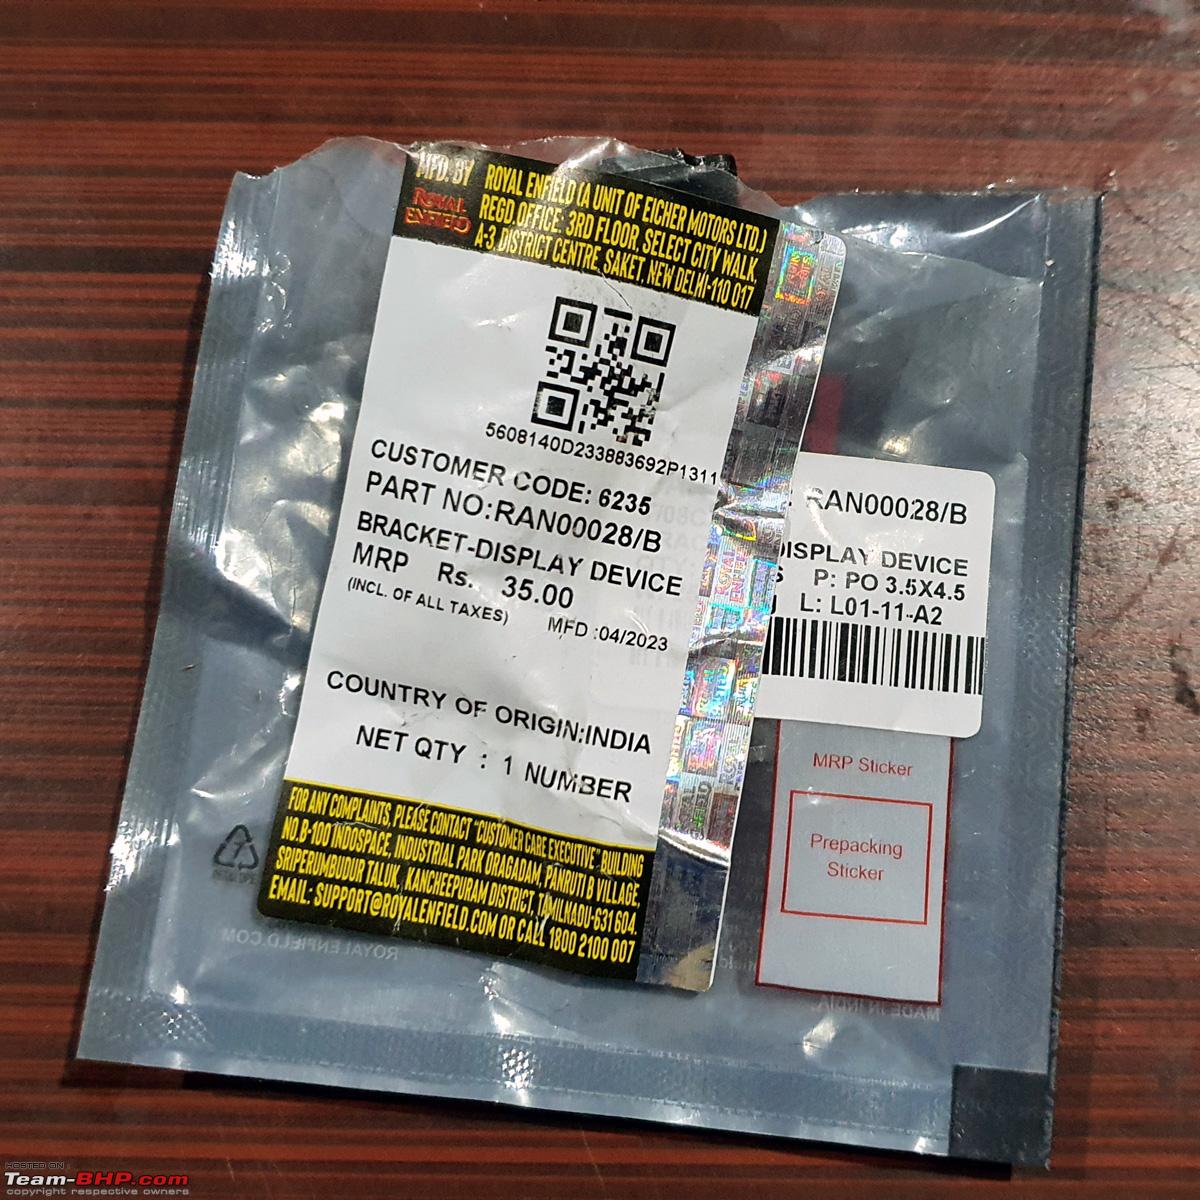 Now we ran into a hiccup when we started to search for the 6 pin Tripper Wiring Plug in the harness which previously used to be inbuilt into the bike. Seems now they have changed the wiring and removed that 6 pin plug with a 3 pin socket like in the Meteor 350. It now requires a Wiring Pigtail to convert the 3 Pin socket to 6 Pin plug which then connects to the Tripper. The same is used in the Meteor 350. Below is the part# and the cost is 200/-. Luckily it was available at another Meerut dealer and I picked it up from there to complete my setup - 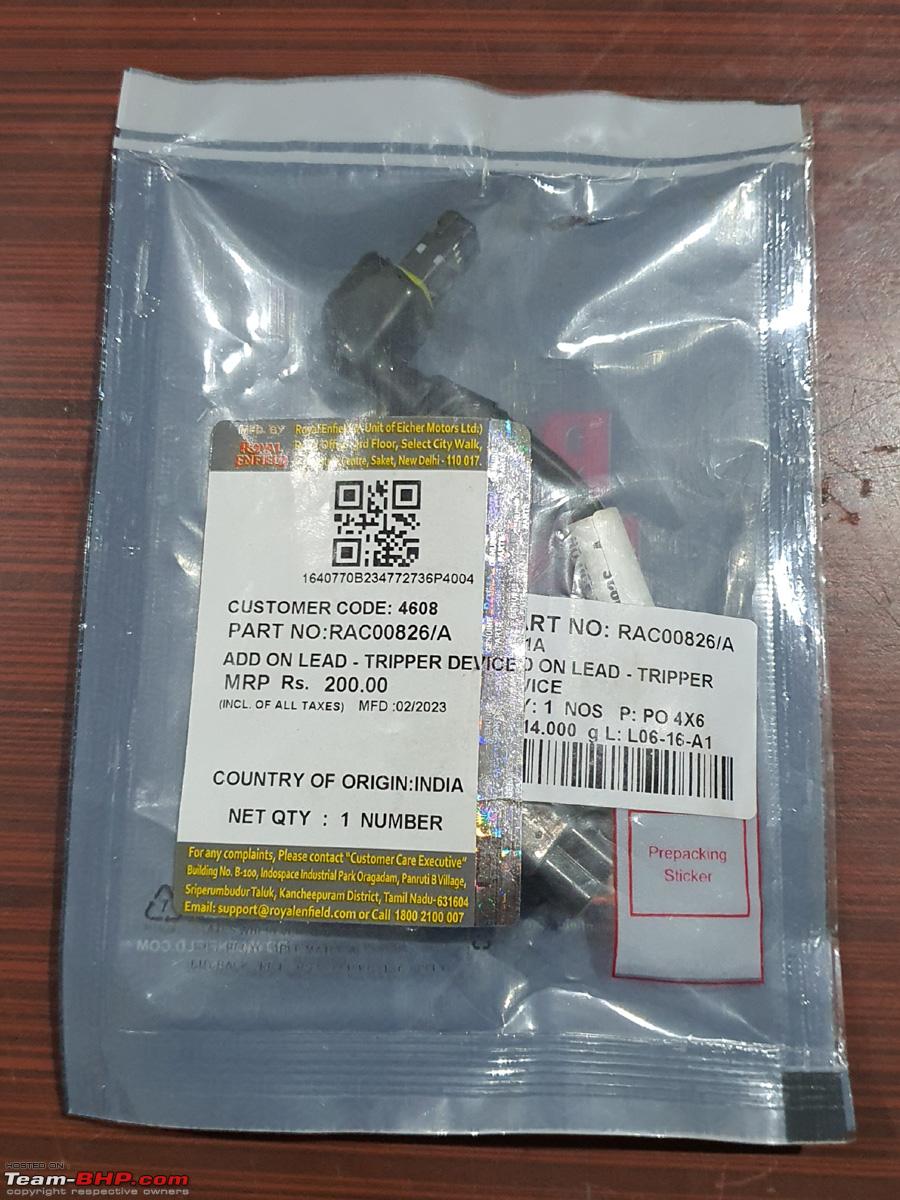 Here are all the parts required for the installation. The 10mm SS nut, SS washer and the plastic O ring were procured separately by me -  Here is how all these 3 parts assemble together to fit into the stock wiring harness -  This was the 6 pin Tripper socket that used to come earlier (photo from another bike at the workshop) -  And this is 3 Pin socket that is now present in my bike for the Tripper Installation - 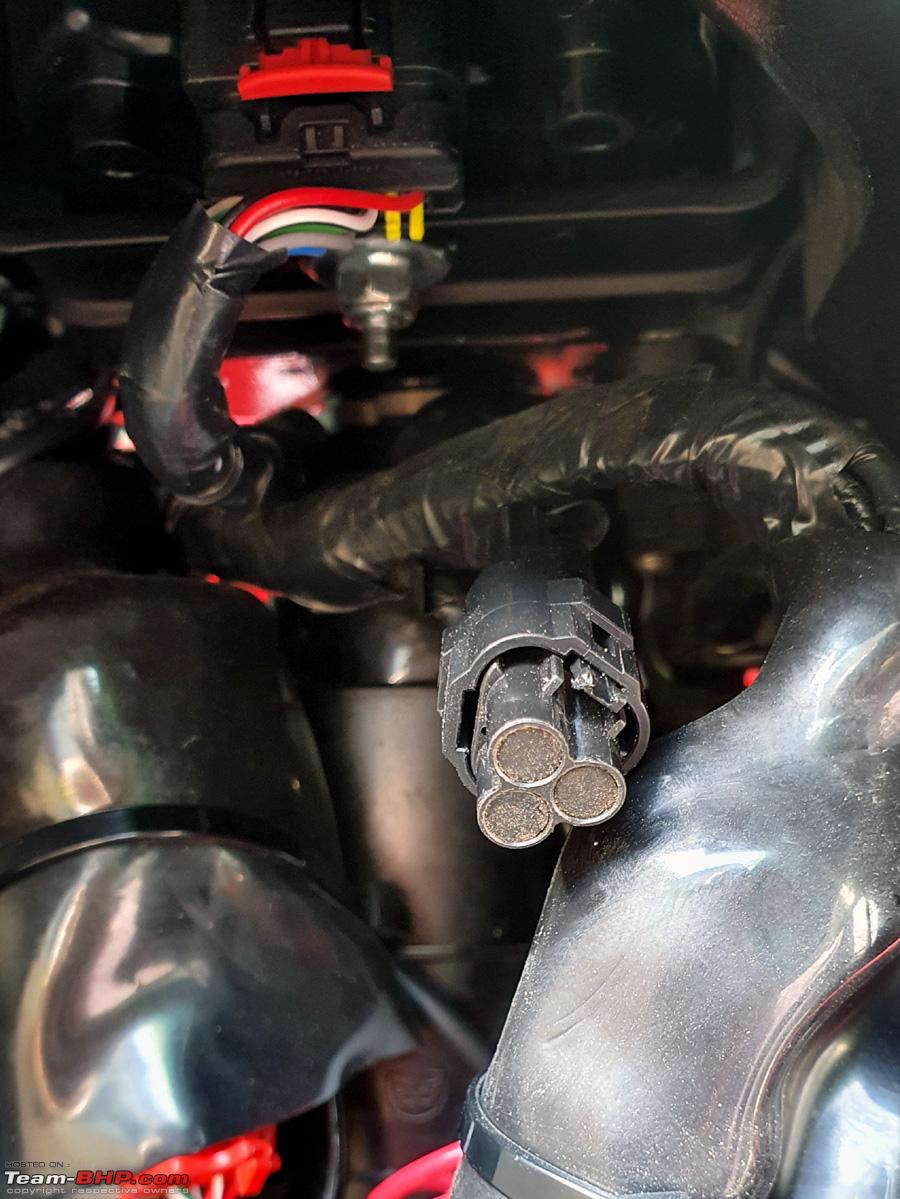 With the waterproof cover removed -  Close up of the socket -  The wiring of this socket in case anyone is interested. The Black is the neutral, Red is direct 12V supply from the battery and White is 12V supply from the Ignition switch - 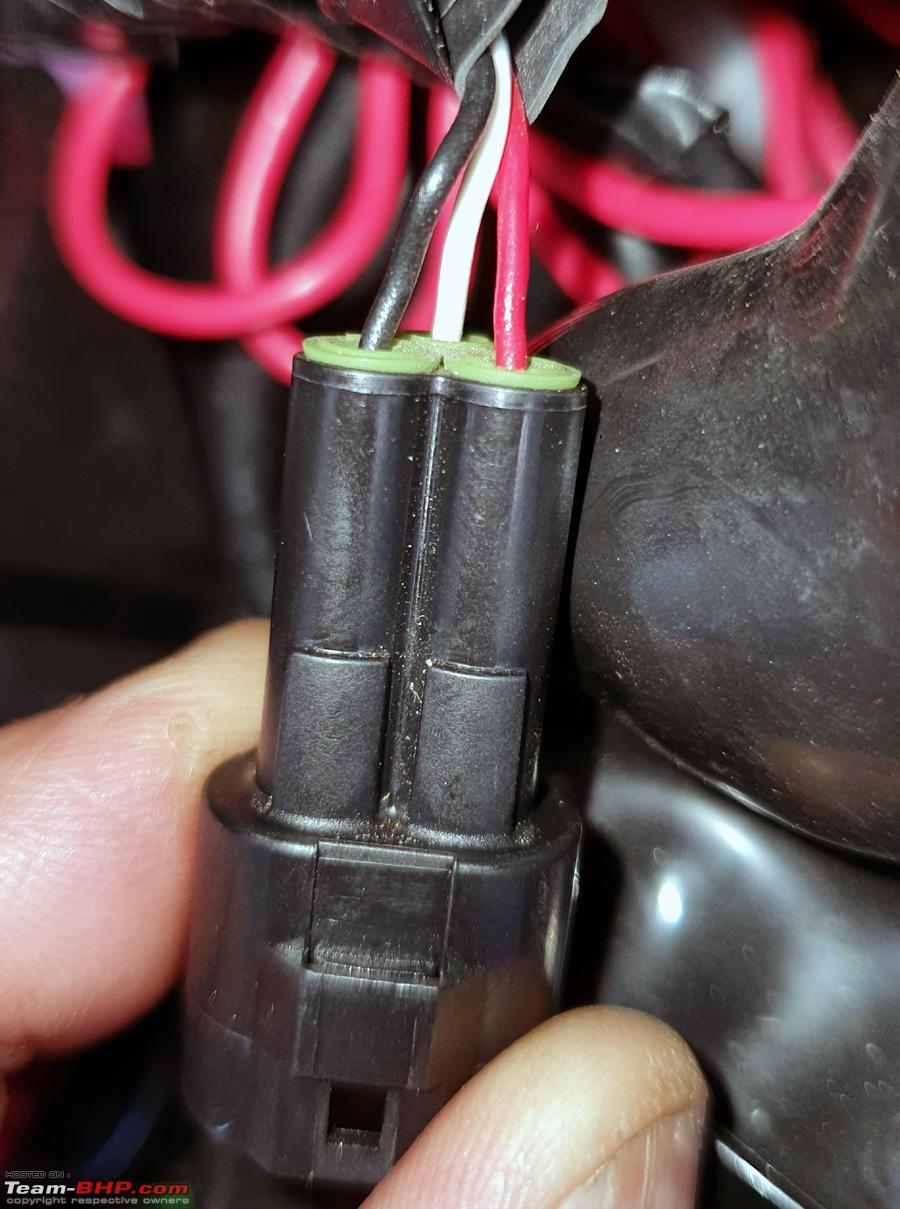 The main unit is attached to the bike's wiring harness for testing before final installation. Care must be taken to insert the 6 pin socket into the Tripper's main unit in the correct alignment and very gently, as it is known to get it's pins bent easily if proper care is not taken while inserting - 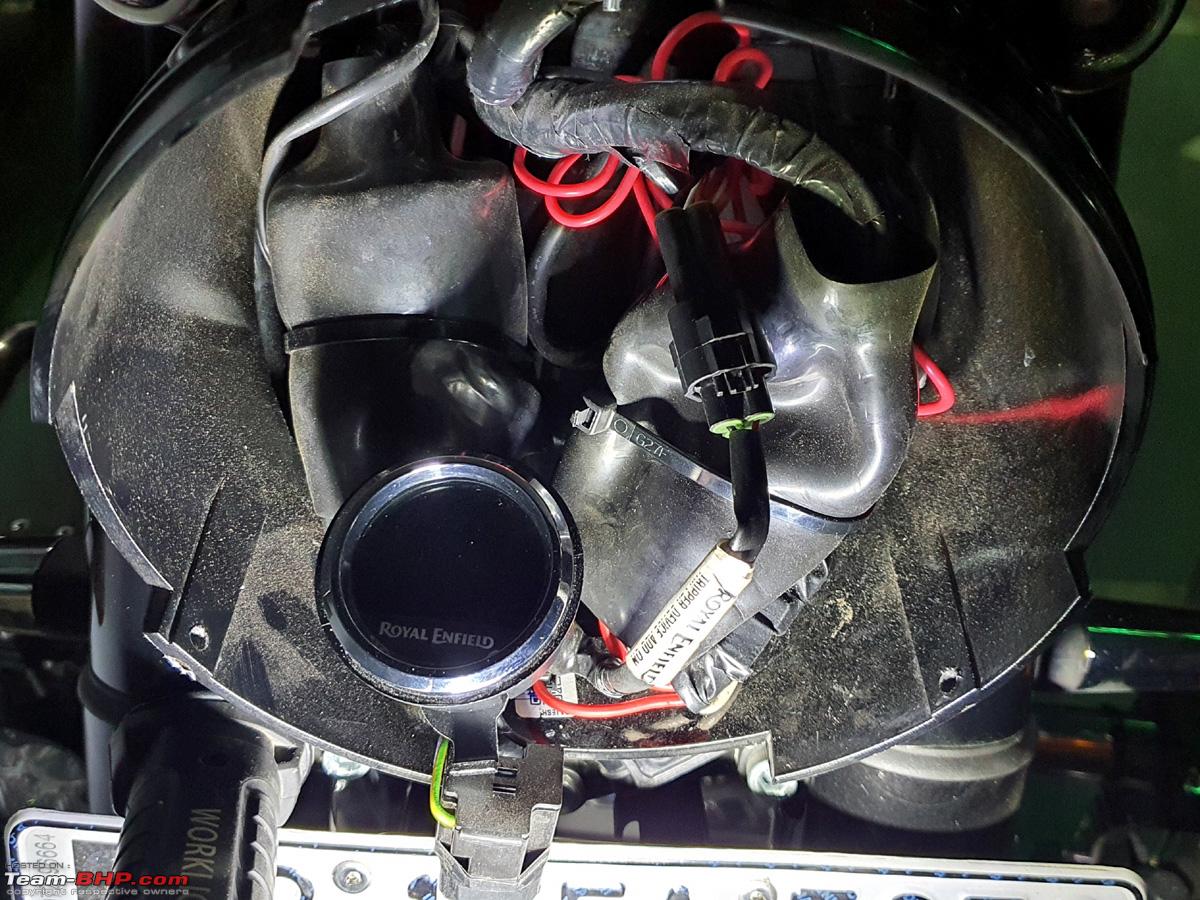 The first power on screen before being paired with your phone's bluetooth - 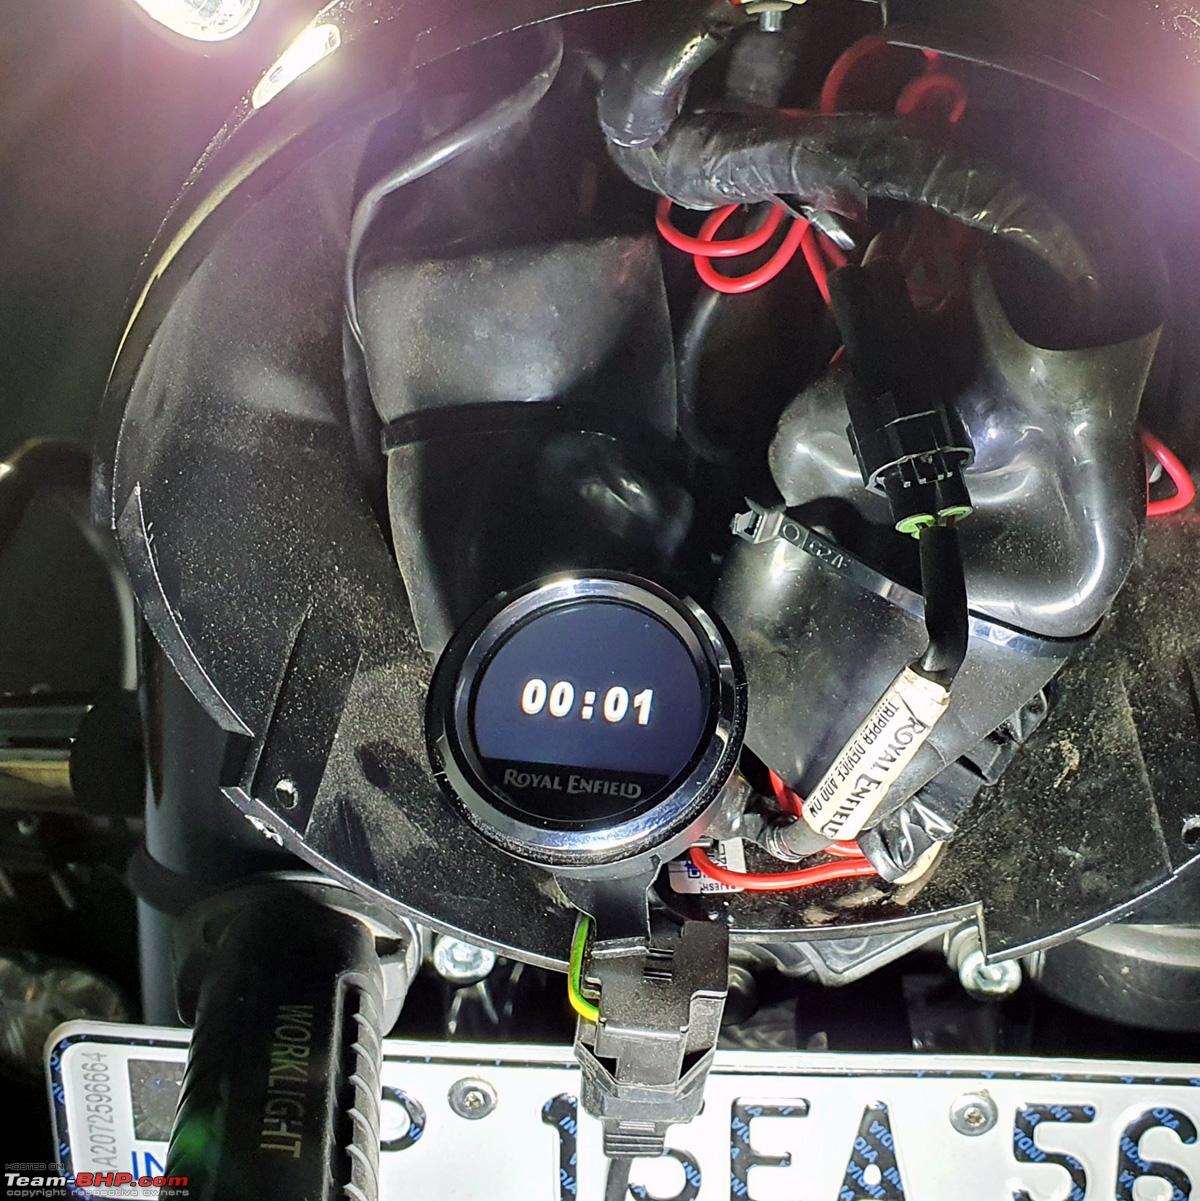 Now paired with my phone and displaying Turn by Turn Navigation Details from Meerut to Delhi - 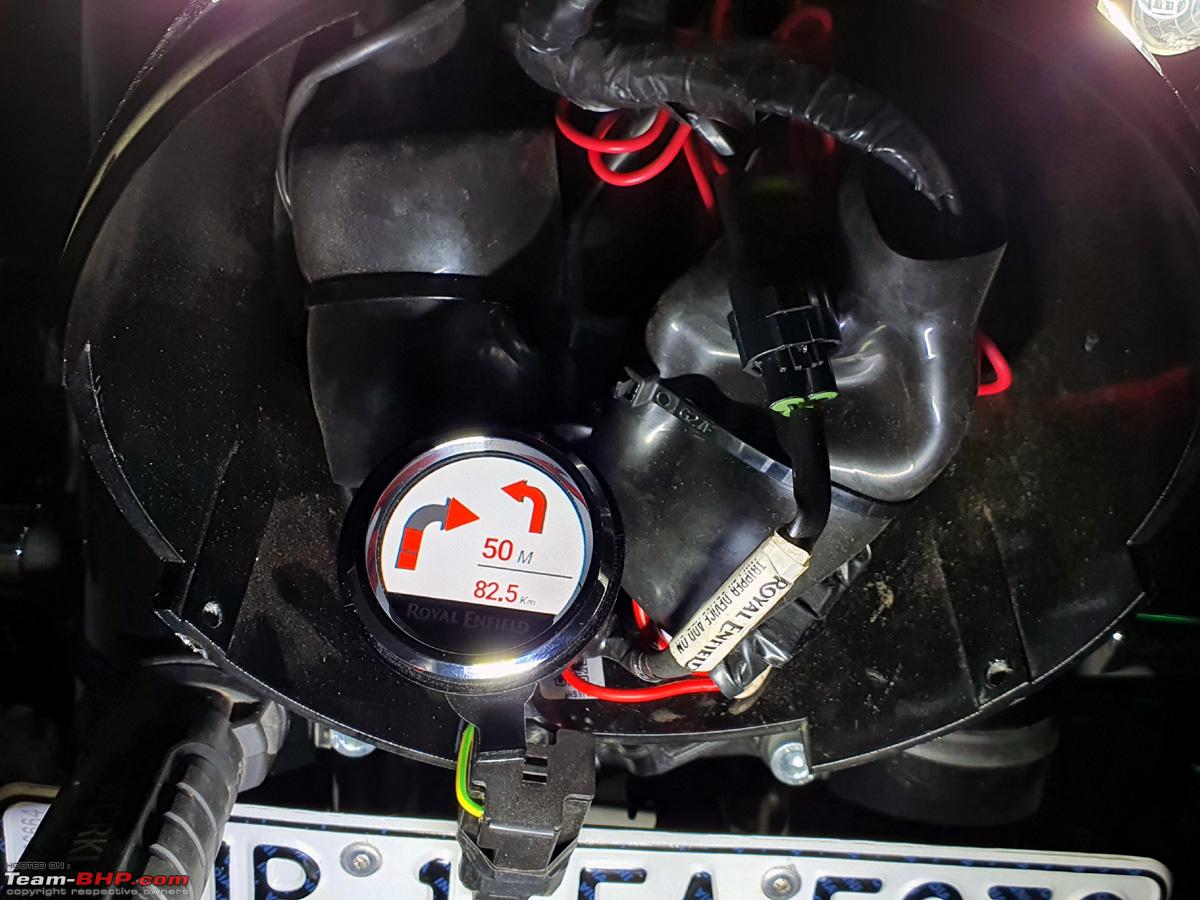 Displays only current time if no navigation is used - 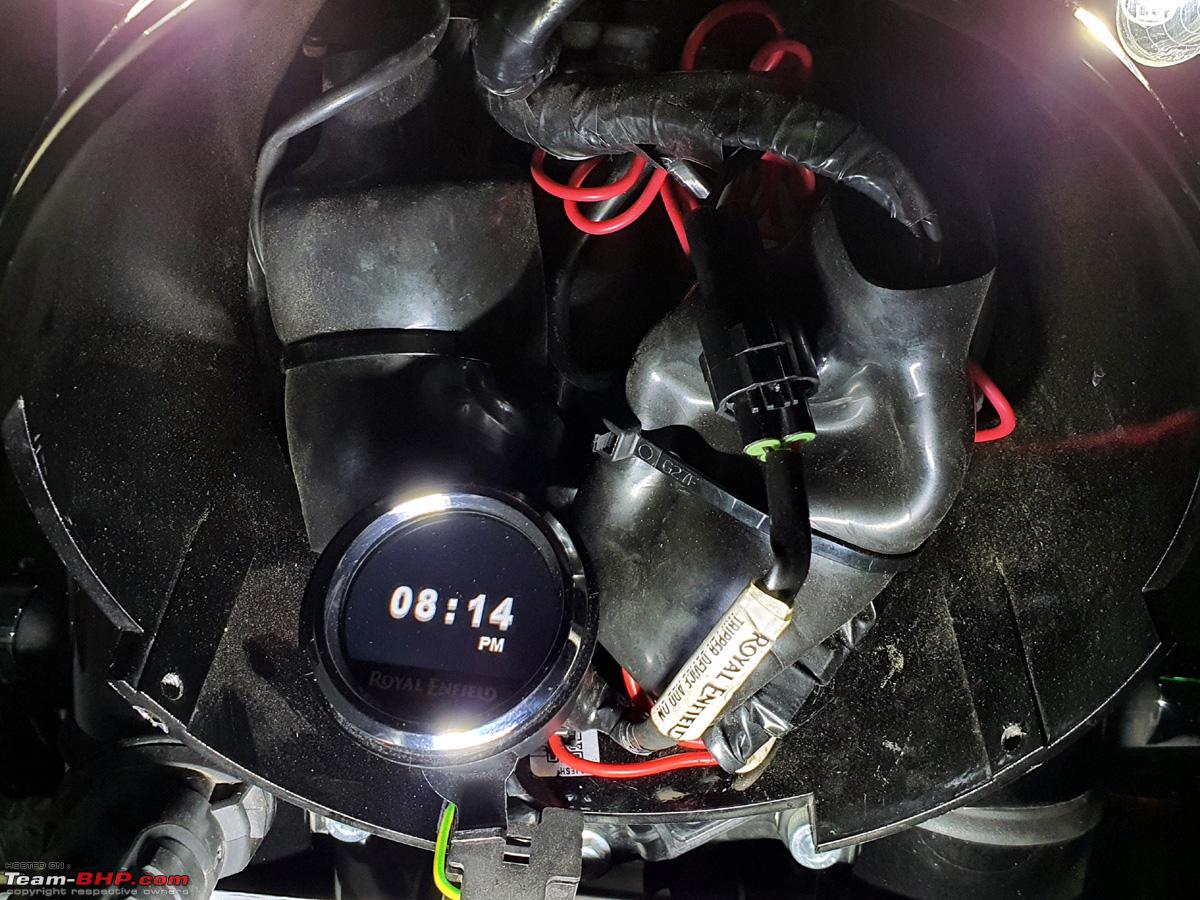 Now the final installation turned out to be trickier than I had imagined as I was doing it alone seeing YouTube videos. I was also proceeding without removing the whole instrument cluster nacelle as was the general procedure being followed at the dealerships which required a good 1-2 hours for that installation. The first step was to remove the Instrument Cluster which was a relatively simple process. It involved pressing down this red tab on the instrument cluster wiring socket - 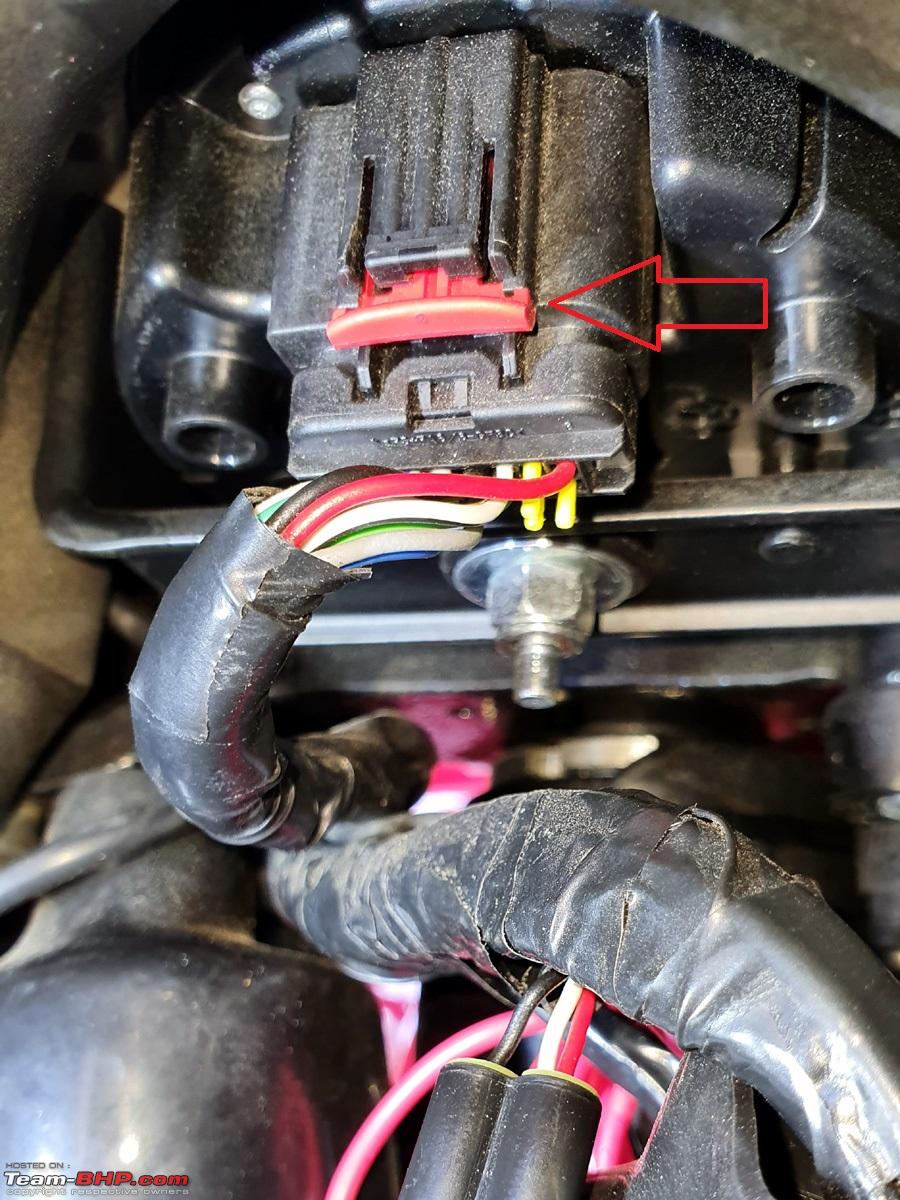 And then press black tab above and push down to remove the socket from the cluster. The 2nd step involved removing this 10mm nut and washer to remove the bracket holding the cluster in place - 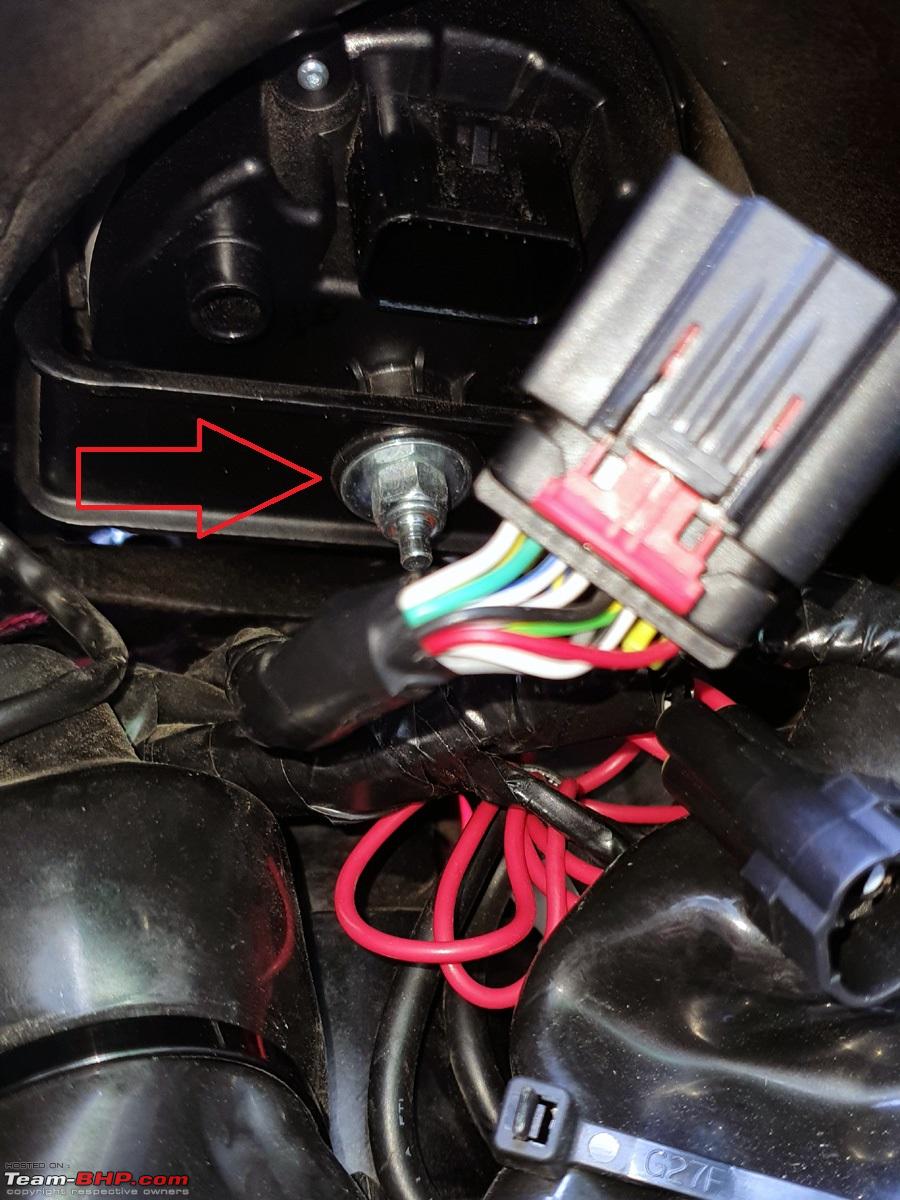 Here are the removed 10mm nut, washer and bracket holding the Instrument Cluster in place - 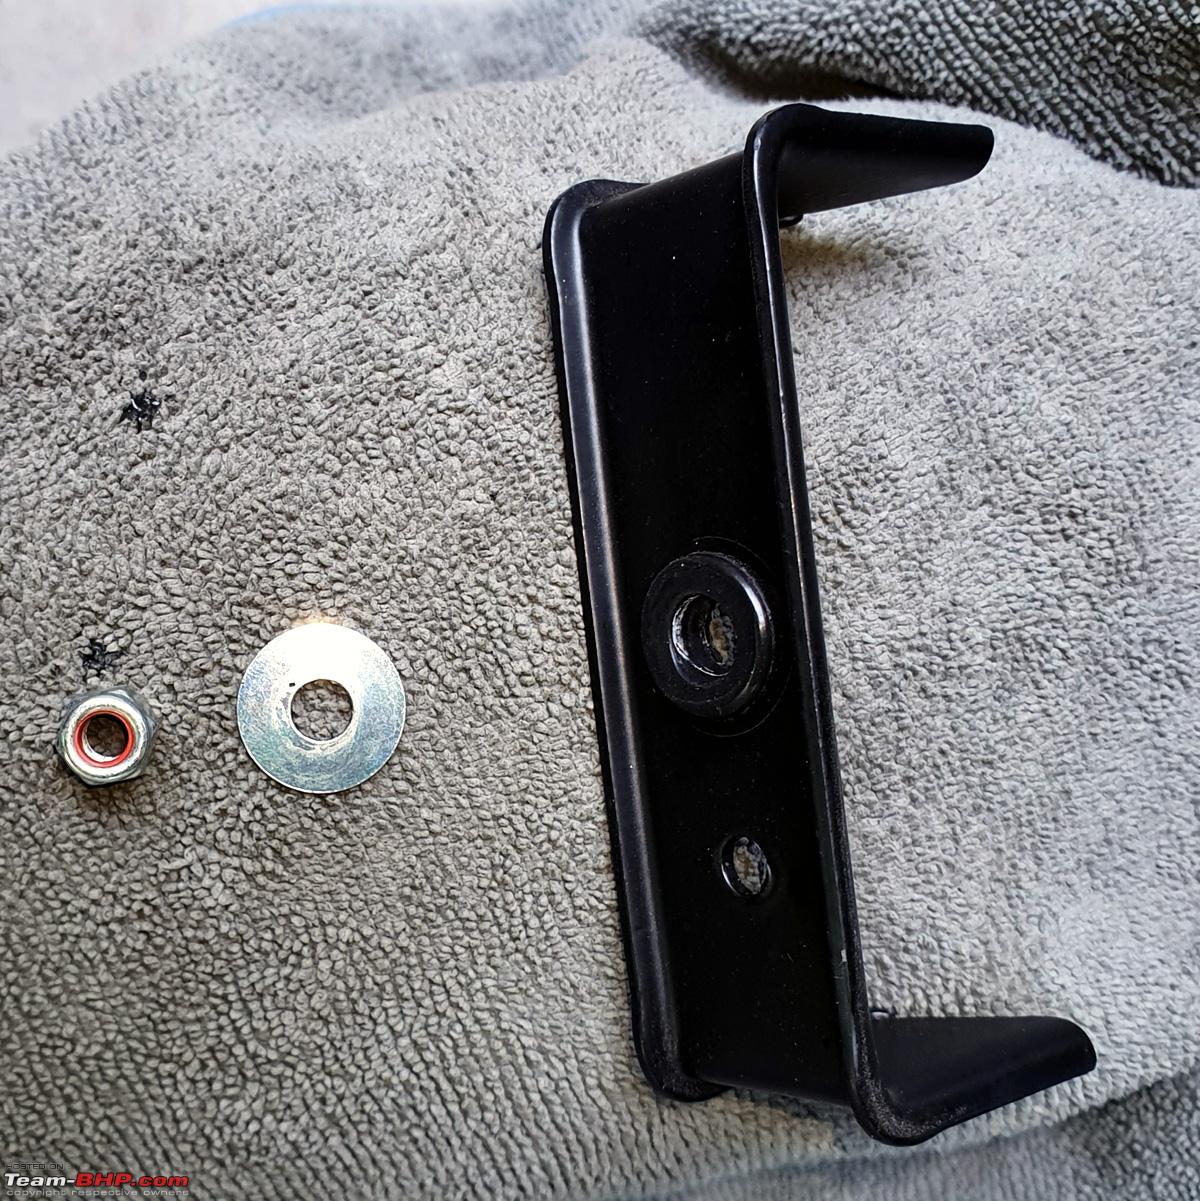 Then the Instrument cluster simply lifts up and is removed -  A view of the back of the Instrument Cluster and socket pins. Notice that now NO Electrical Grease is applied in these pins which earlier used to cause the sticking speedometer issue abroad - 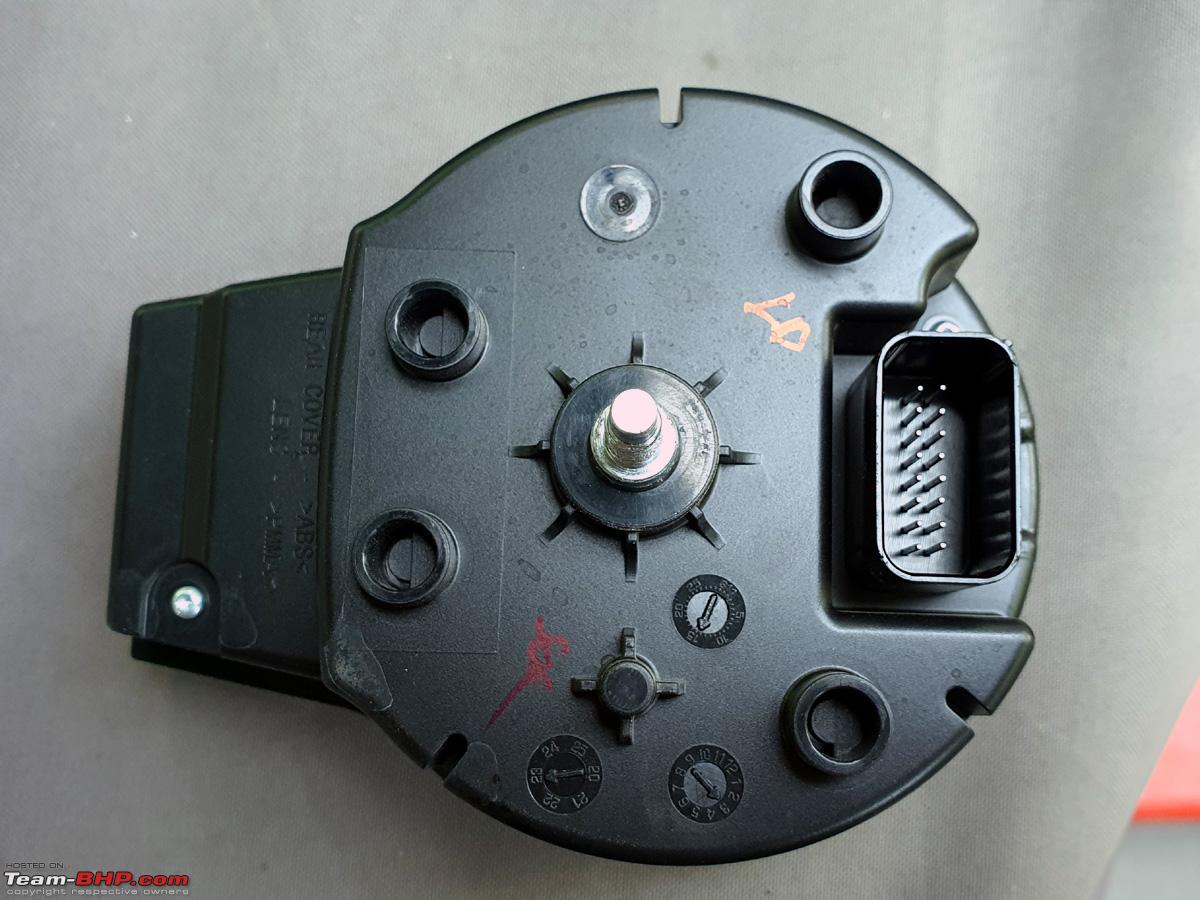 Side view and part# of the Instrument cluster manufactured on 21st March 2023. This must be the new cluster they must be upgrading to solve the sticky speedometer issue - 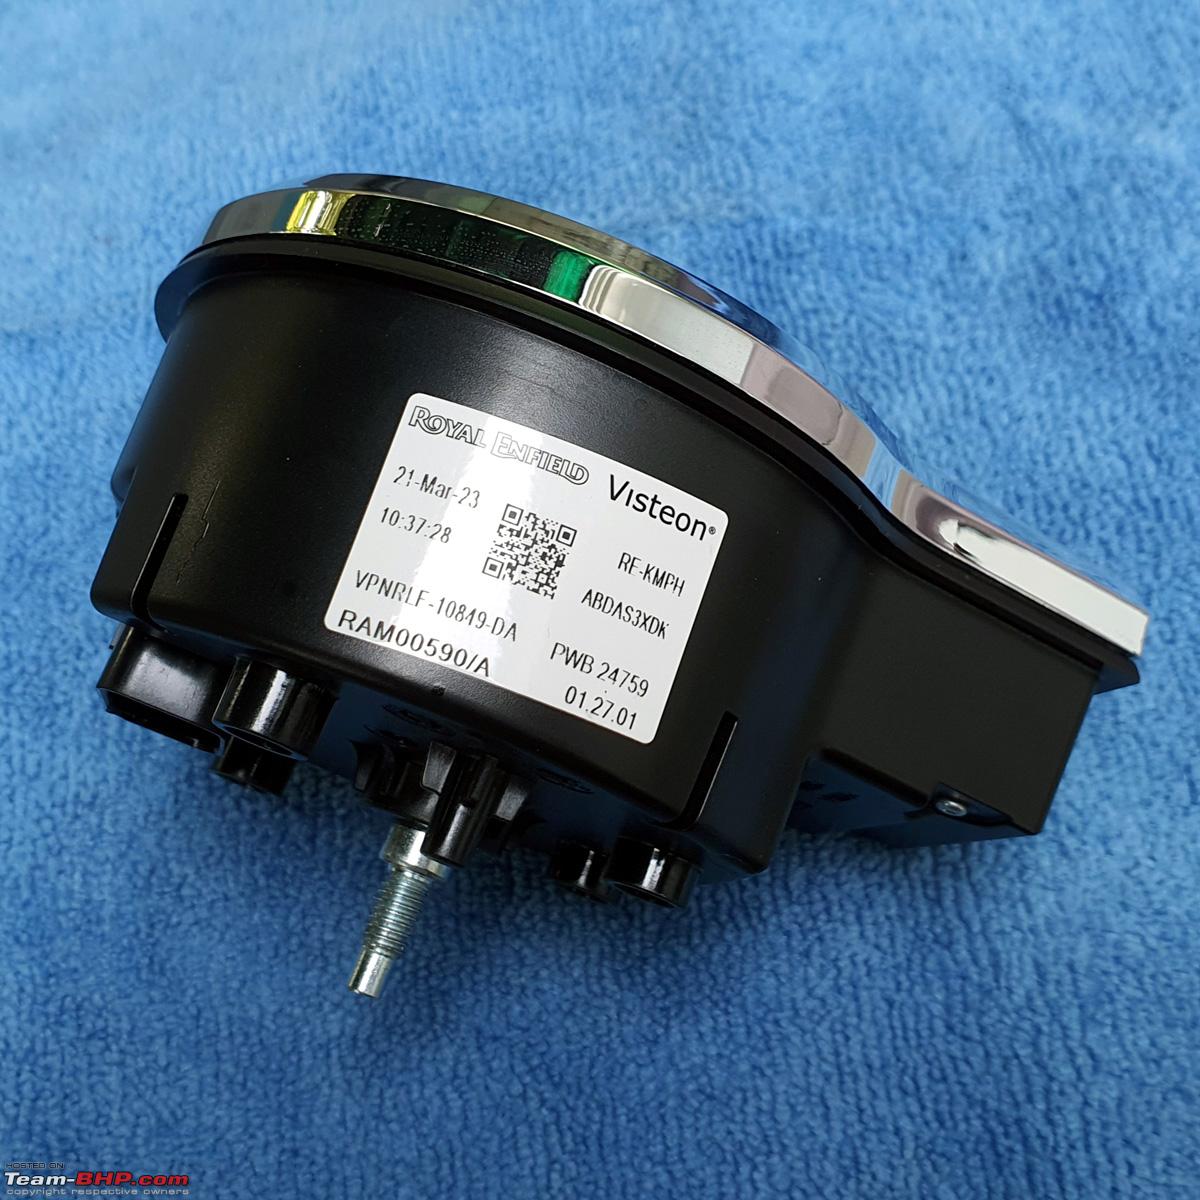 Top view of the nacelle with the cluster removed - 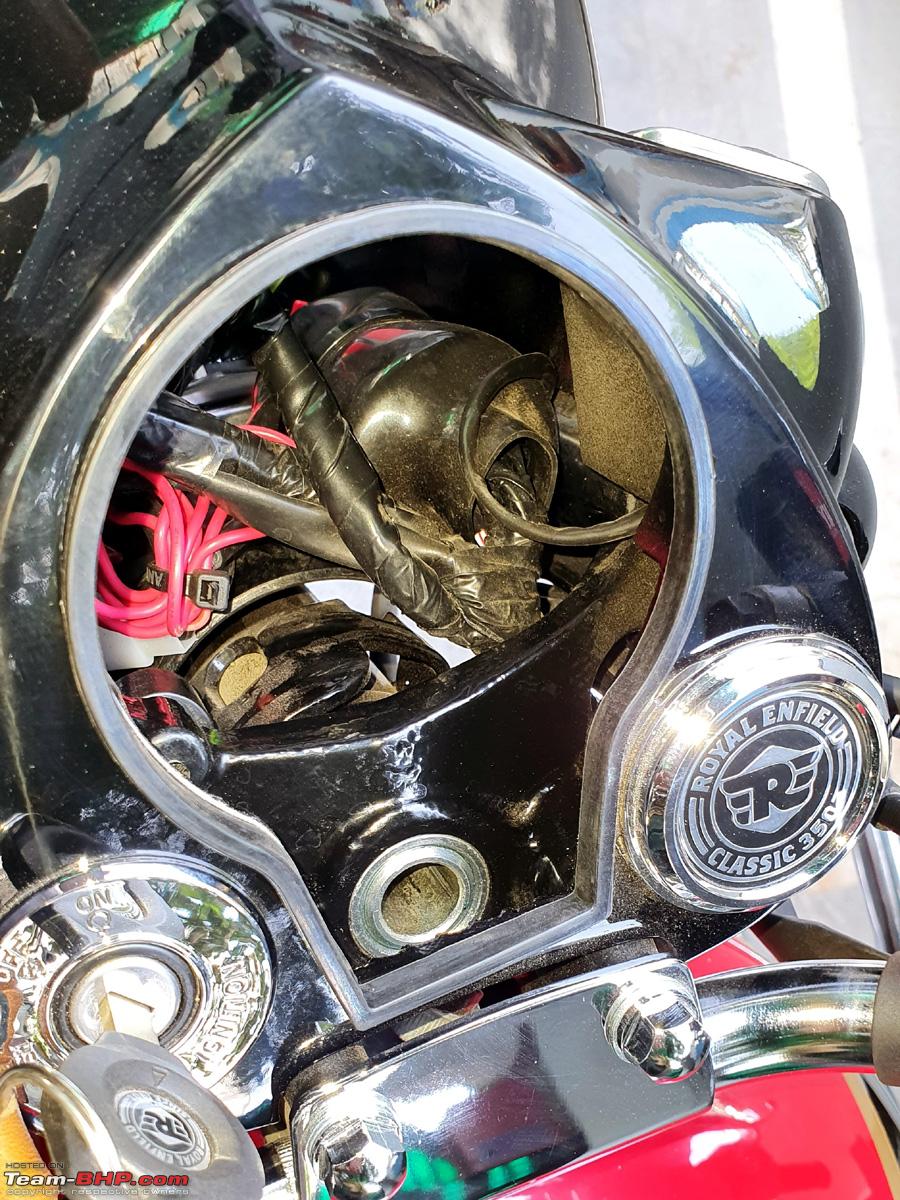 Now started the tricky part. To remove the RE Emblem Cover where the Tripper will eventually house itself, required the removal of this T20 torx screw. Space was limited and I had to wiggle a small T20 screw driver to remove this with some patience and the correct tools required -  Top view of the nacelle with the RE Emblem plastic cover also removed. RE has given a nice hole below the emblem cover to facilitate this installation as is visible in this picture, but it still requires some patience - 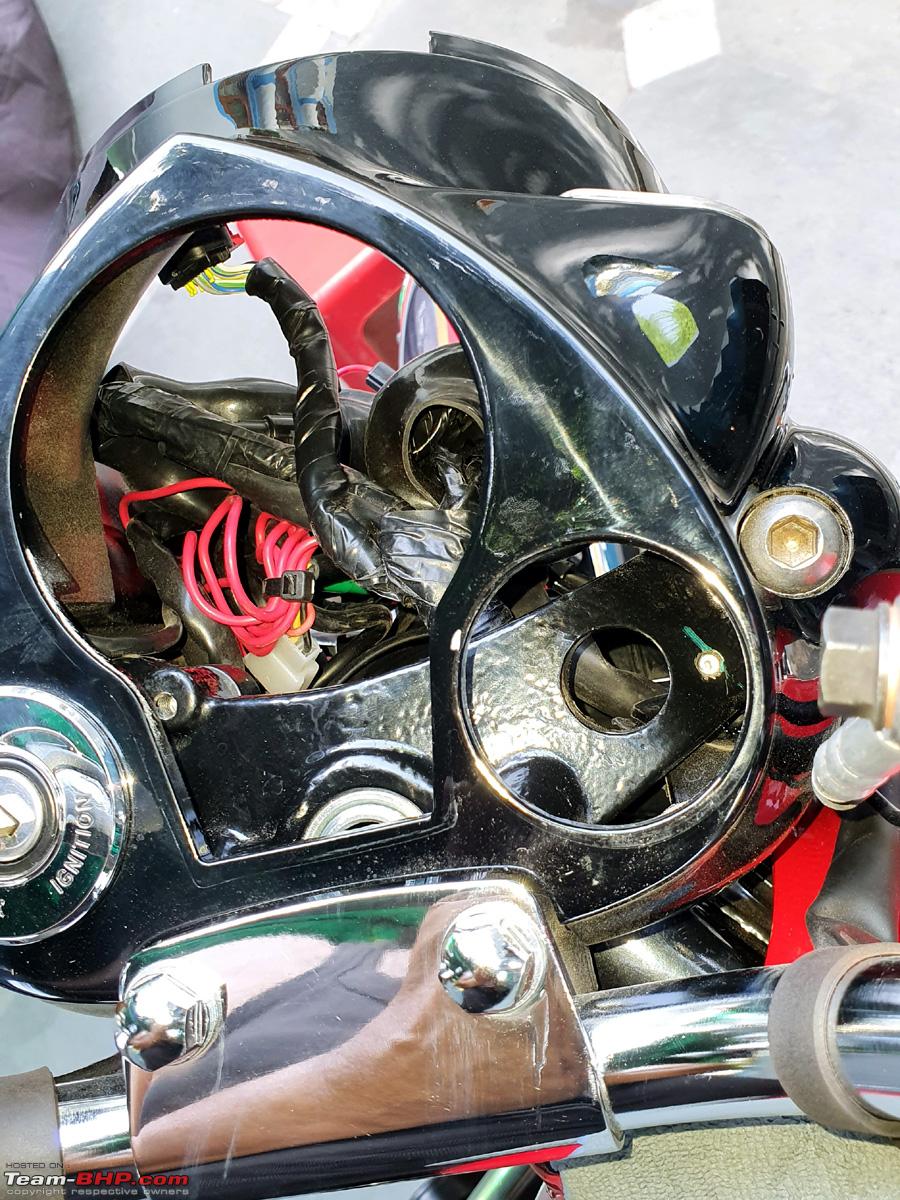 The Emblem Cover assembly removed with the T20 torx -  Here is how it assembles back. Now it was not needed and was stored securely -  Care must be taken to preserve the Rubber Beading of the instrument cluster properly as this will be required to waterproof the re-installation -  Loctite Blue 243 which was lying with me was used to install the new nut to the Tripper so that it does not come free with vibrations from the bike over time - 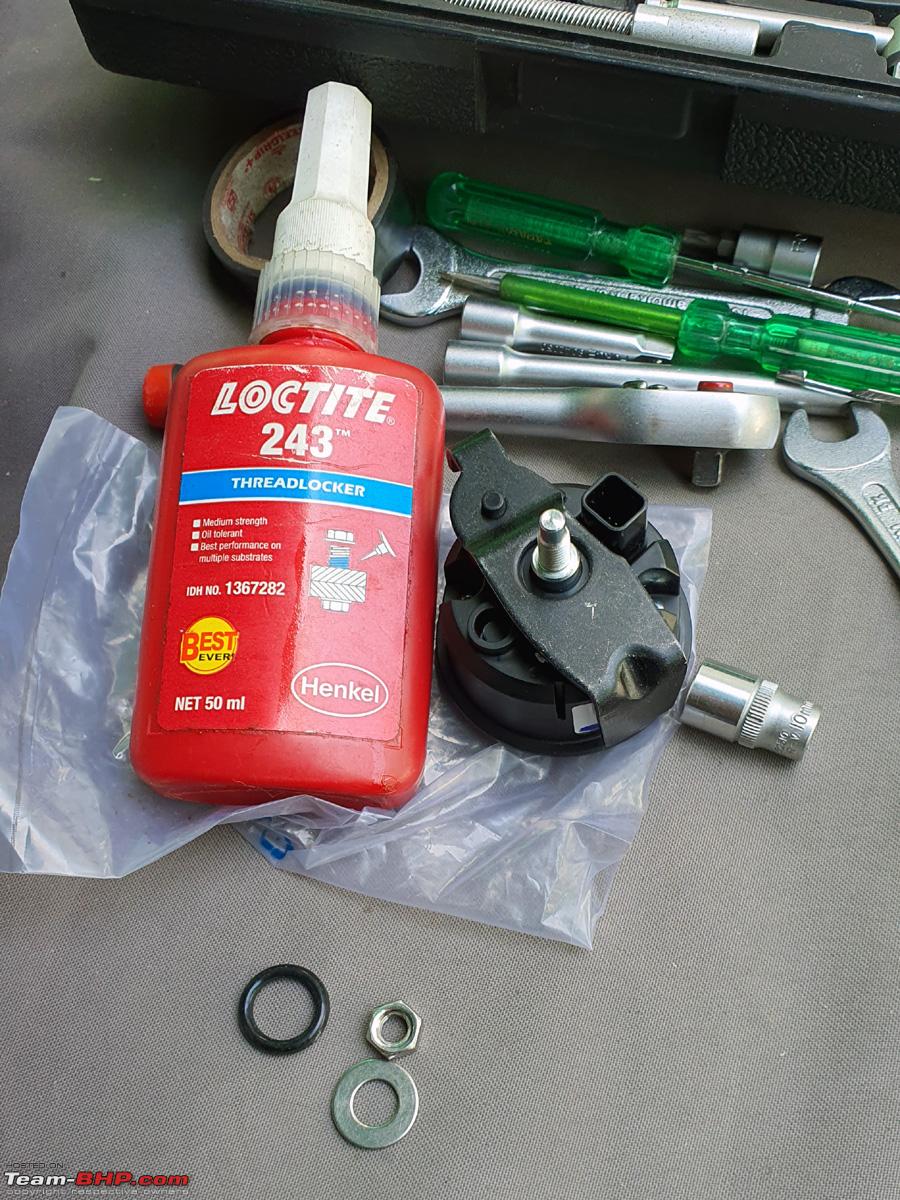 Here is how the Loctite was applied to the Tripper main unit. Pro Tip - I had to eventually stick the O ring and the SS washer to the bracket assembly with Feviquik so that it did not move while tightening the 10mm nut. My maximum time was wasted till I reached this solution and then it was a 5 minutes job - 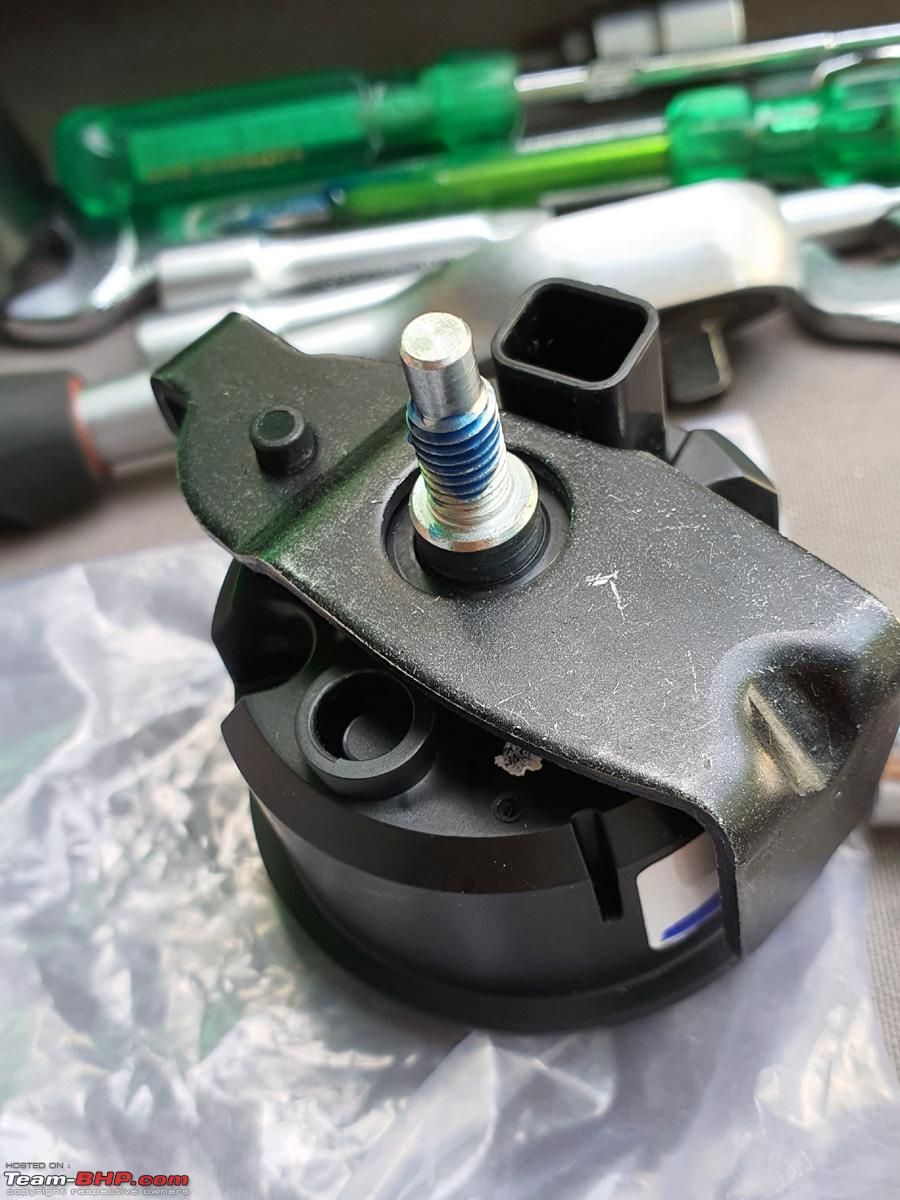 Finally Installed. It looks a little crooked in this picture which I eventually straightened out later (picture already posted in earlier post) and also had to realign the rubber beading, which is slightly visible on the right of the Tripper. Here is how it is visible in the Day Mode - 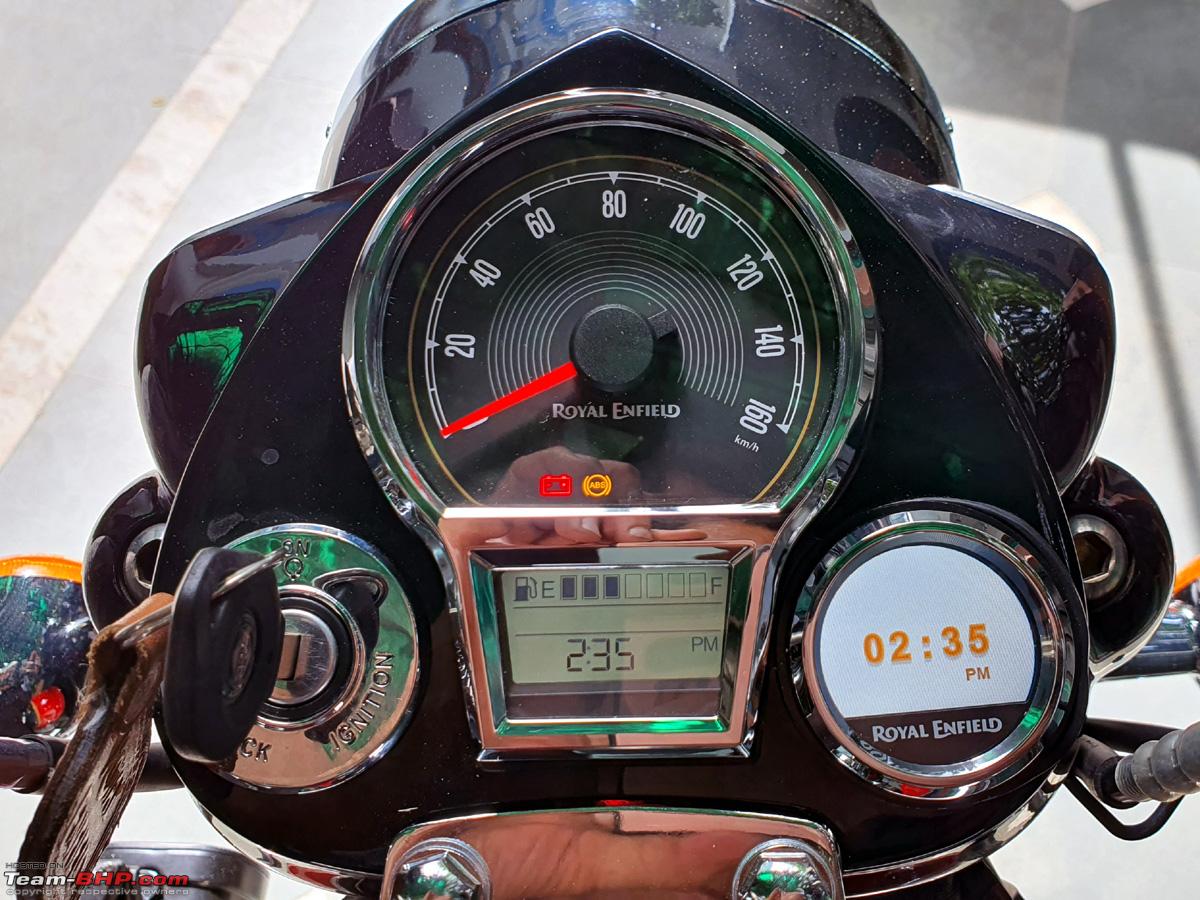 It automatically shifts to this Night Mode at night. Notice the purity of the White Instrument Cluster at night. I like this...Lolz - 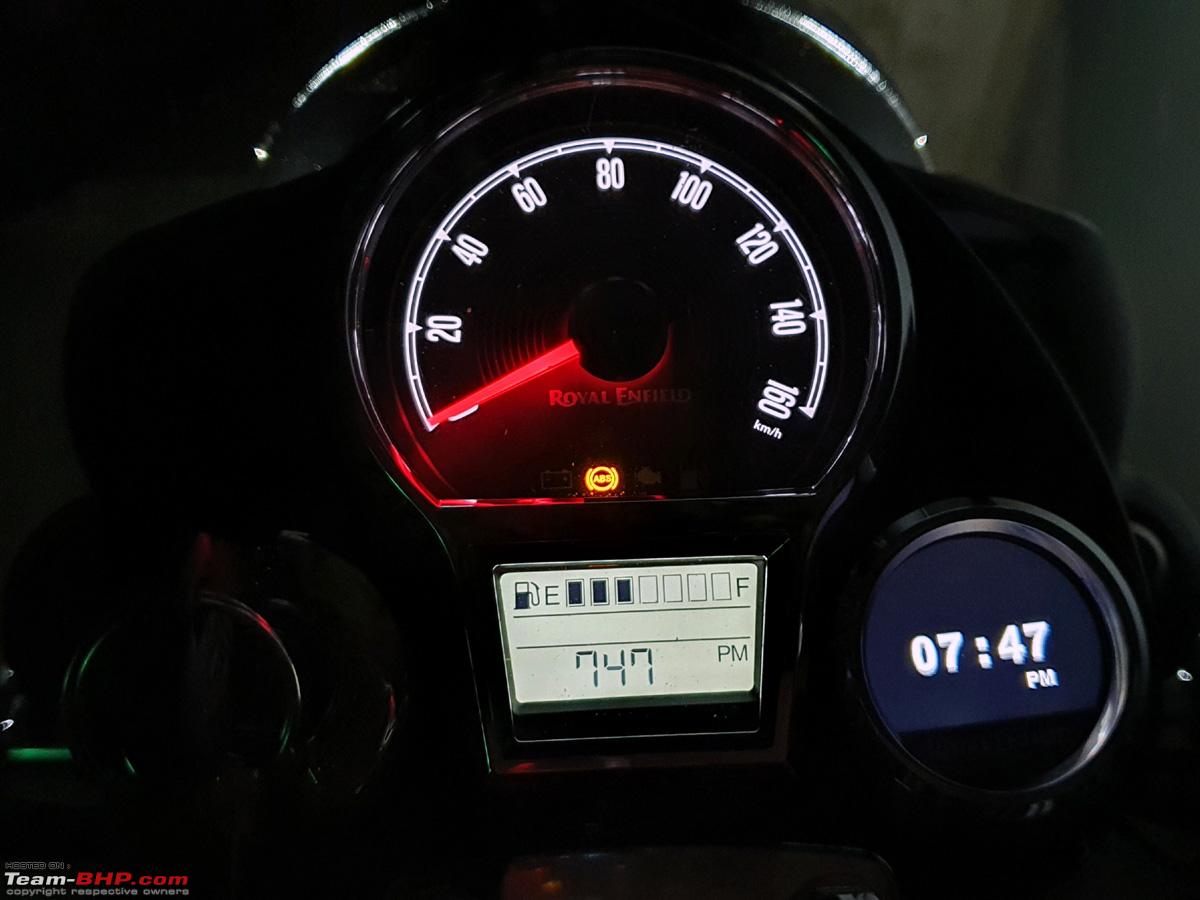 Cheers for now... Last edited by dkaile : 24th April 2023 at 16:10. |
|
| (29)
Thanks
|
| The following 29 BHPians Thank dkaile for this useful post: | aargee, adrian, aman9393, anivy, brownkaiser, Carpainter, chinmaypillay, Cyborg, deerhunter, Geo_Ipe, Gordon, GTO, irajput, JoshuaM, keroo1099, lovetorque, mh09ad5578, Mr.Ogre, pachchu77, Peri_patetic99, RedPhobos, rj22, saikishor, Shreyas Aterkar, shyamg28, Skyline_GT, Sunny_7937, surjaonwheelz, Vaishak |
|
24th April 2023, 14:34
| #10 |
| Senior - BHPian | re: 2023 Royal Enfield Classic 350 | Chrome Red | The Comprehensive Review Some final afterthought photos - A view of the Battery Box casing with the SAE Battery Charging Cable with inline Fuse (in case I ever need to charge the battery without removing it) that I have installed. It was procured from bikenbiker.com for 700/- bucks. Also visible is the Main Positive Cable of the Fog Light Wiring Harness with the in-built Fuse Holder for total protection of the circuit. All these cables get neatly tucked in the recess available inside. 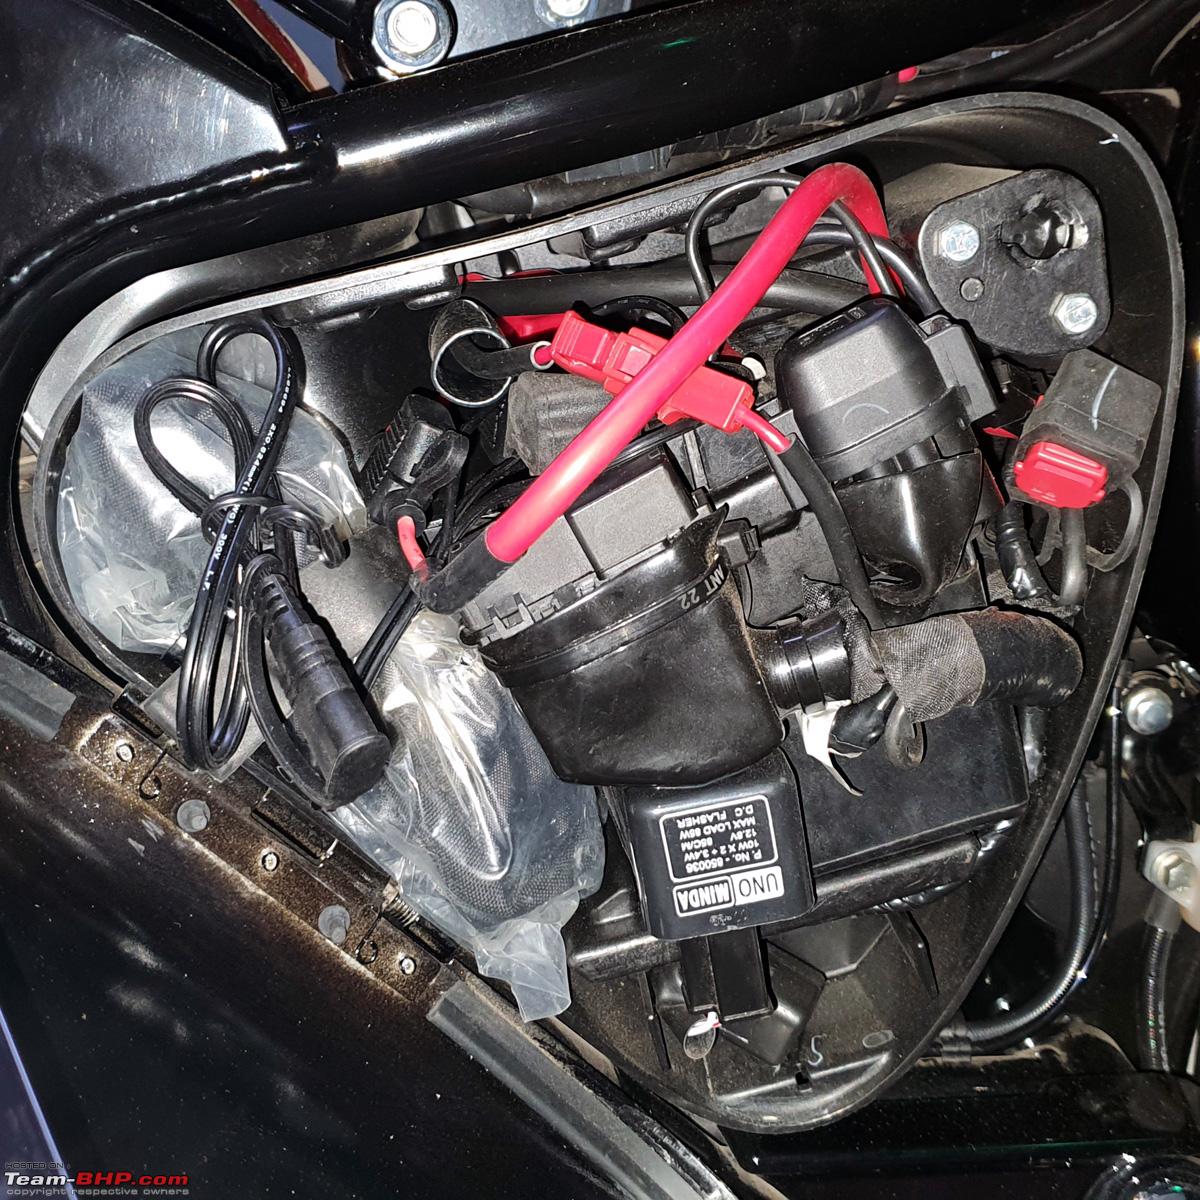 The Uno Minda OE K95 Horn set which was procured for 480/- for the twin horn set from the local market. Strangely it says D95 on the box but comes with K95 inside. There is a spare Low Tone Horn in the box that did not get used in place of the original.  The original RE Tool Kit that is supplied with the bike -  And all the Tools that are available inside it. Pretty well kitted - 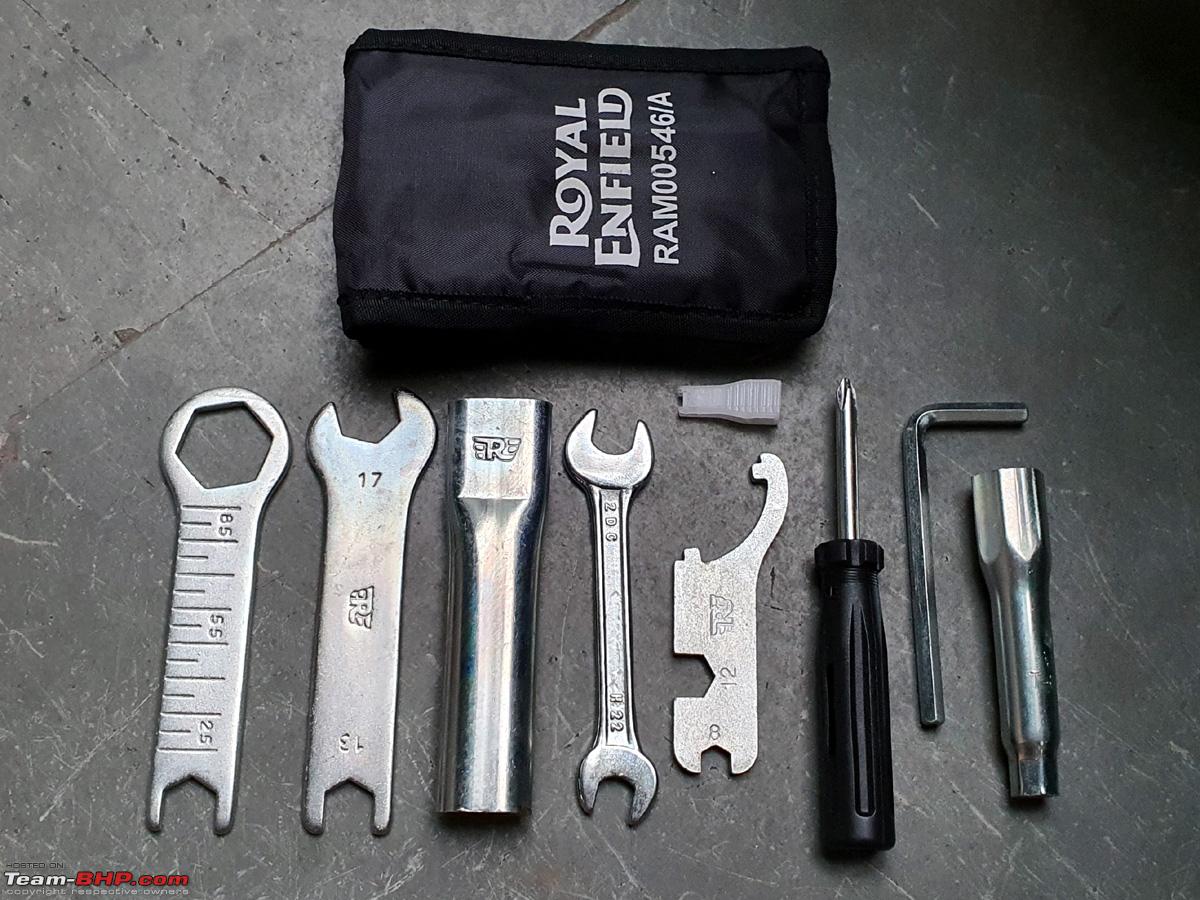 Procured a RE Metal Polish from the dealership fpr 315/- bucks. It does a pretty good job on the chrome parts and aluminium casings than many other products available in the market. Also visible are the extra parts from the bike that were removed like the stock pillion seat grab handle bar, original long bolt that was replaced by a longer one and while installing the engine guard, the clutch cable bracket that needs to be removed for installing the engine guard, some bolts and rubber parts and some rubber cable ties that I got from my friendly RE mechanic. 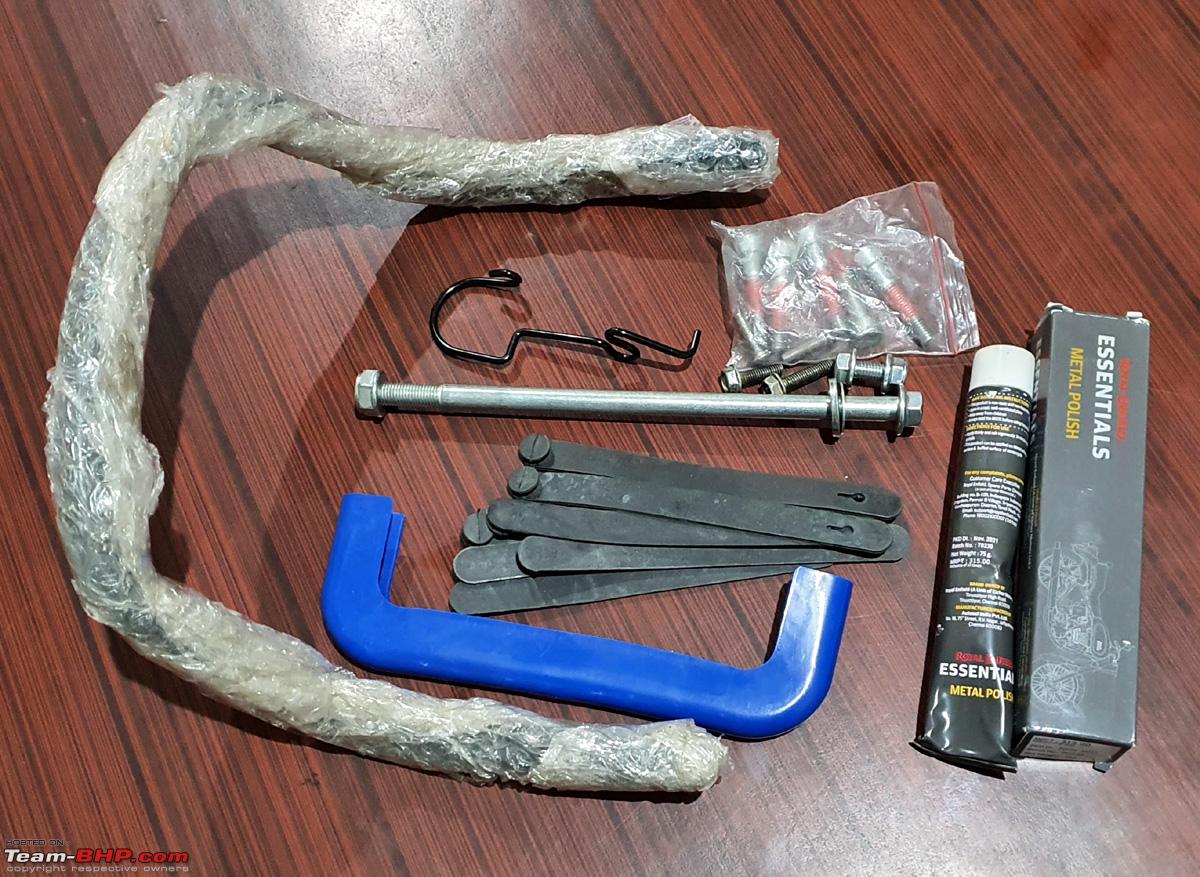 Parting recent pictures - 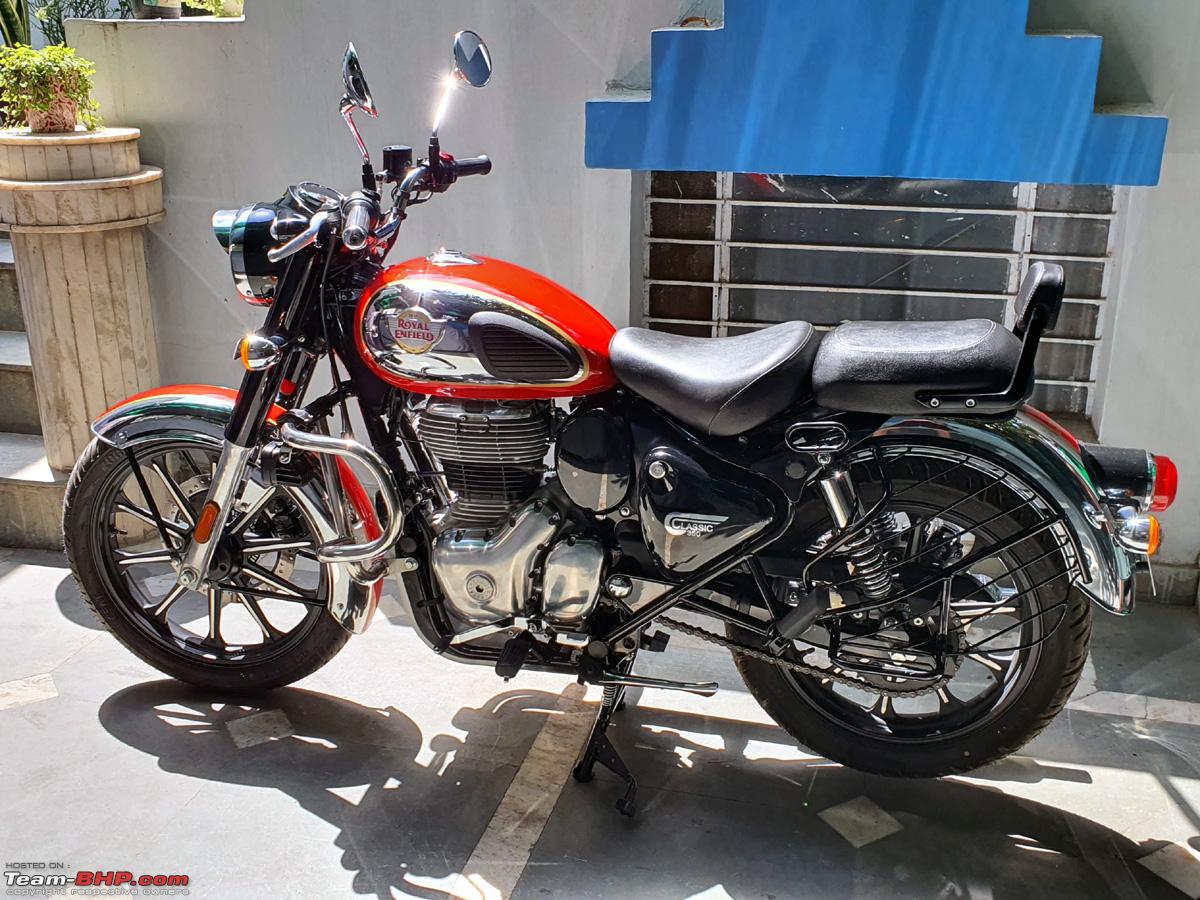 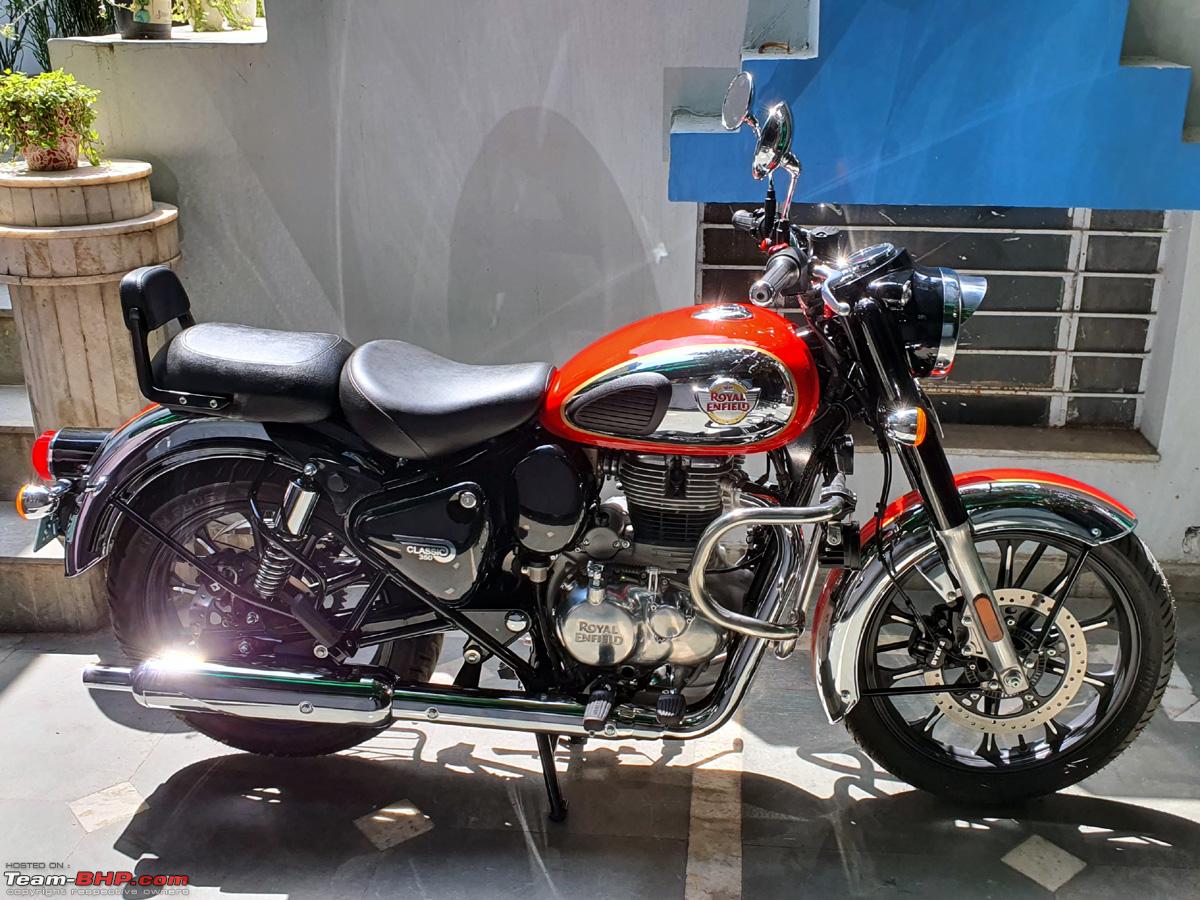 Summing up this review as a highly satisfied RE customer (for now). I would only wish that RE could add perhaps a Gear Shift Indicator like the Meteor 350 in the instrument panel, as all the hardware is already present. Rest, whether it will live up to it's tall claims and reputation, only time will tell... But things are looking very positive. Cheers... Last edited by dkaile : 24th April 2023 at 16:12. |
|
| (66)
Thanks
|
| The following 66 BHPians Thank dkaile for this useful post: | aargee, aastiksaluja, achayan, adrian, aman9393, anivy, Arun Varma, Axe77, bblost, bj96, chinmaypillay, Cyborg, Deepsp, deerhunter, DriverNo.420, Freespirit27, funkykar, Geo_Ipe, Gordon, GTO, HillMan, irajput, isandy, ITZ_Zeta, Iyencar, Kalesh, keroo1099, lovetorque, MadRasTan4986, ManasN95, mh09ad5578, Mr.Ogre, Mrs&Mr_Shenu, mugen_pinaki27, Nair.V8, oto_freak, pachchu77, Peri_patetic99, pjbiju, puneet1991, rakesh_r, RedPhobos, rendezvous3850, Ritkon, rj22, Roy.S, saikishor, sainyamk95, sai_ace, Sayan, Shreyas Aterkar, shyamg28, Skyline_GT, sole_rider, somspaple, srvshaun, Sunny_7937, surjaonwheelz, t18, TejasV, Tgo, theqca, Viju, vikas8890, Voodooblaster, xVpuredrive |
|
24th April 2023, 16:43
| #11 |
| Team-BHP Support  | re: 2023 Royal Enfield Classic 350 | Chrome Red | The Comprehensive Review Moving thread from Assembly Line. Thanks for sharing! |
|
| (2)
Thanks
|
| The following 2 BHPians Thank SmartCat for this useful post: | dkaile, GTO |
| |
|
25th April 2023, 08:41
| #12 |
| Senior - BHPian Join Date: Aug 2008 Location: Bombay
Posts: 1,277
Thanked: 1,847 Times
| re: 2023 Royal Enfield Classic 350 | Chrome Red | The Comprehensive Review Wow Dhiraj, that's the most detailed review of the new RE CL350 I've ever come across. Congratulations on the purchase. The motorcycle does look well put together with quality cycle parts. Having been owning them RE's from almost all generations, I must say that with the new platforms, RE has been upping the game. The only area of improvement is the wiring routing while covering/hiding them. Honda does a very good job of doing this. I remember adding black plastic sleeves over the wires as Honda does on their Unicorn and other models instead of just the black wiring tape that RE used to use. The new color scheme reminds me of the yesteryears Bullet CI Machismo and Bullet Campus/Deluxe, which used to come with similar red and chrome color combo. The UCE CL Chrome did come with a similar paint scheme but the CI Machismo is what is fresh in my mind. Do share some more experiences about the ride quality, engine tractability, sweet spot for cruising, etc. Also what is the standard + extended warranty on these motorcycles? While carrying out electrical mods, doesn't it void the warranty? |
|
| (8)
Thanks
|
| The following 8 BHPians Thank navin_v8 for this useful post: | achayan, dkaile, Dosa, Gordon, irajput, pachchu77, Peri_patetic99, Ritkon |
|
25th April 2023, 09:17
| #13 | |
| Senior - BHPian | re: 2023 Royal Enfield Classic 350 | Chrome Red | The Comprehensive Review Quote:
I have ridden this bike only a couple of hundred kms and will reserve judgement on many parameters till I cross a few thousand. But for now I can comment that the Ride Quality is excellent, compared to my Harley. Though the cantilever and telelever on the BMW are on another level. But then the cost of the suspension alone on the BMW must be more than the cost of this bike. So comparing apples to apples, RE has tuned the suspension for Indian roads just fine. Engine tractability is one of it's strong points considering it's just a 20bhp motor. Sweet spot for cruising should be slightly below 100kmph, anywhere between 80~90kmph. I found overtaking the vast majority of vehicles on our Meerut-Doon highway almost effortless. This was something I was not expecting. The bike was very eager to cross 100kmph and was rock steady at those speeds. Though I doubt it should loose steam after 120, but I have not crossed those speeds still, due to the bike being in break-in period. But isn't that all the power and speed we need for our roads? Standard warranty is 3 years/30000 kms. And 1 of year road-side assistance comes for free with the bike. I have not opted for any extended warranty. Periodic maintenance is every 6 months/5000kms which I feel should have been every 1 year/5000kms. All the electrical mods done by me have been done without cutting/splicing a single wire of the original wire harness and done very meticulously personally by me. I have done the same on my BMW personally. I don't trust any mechanic with my vehicles. All products attached are from reputed manufacturers and have been tested by me for years on other bikes. And all these mods are reversible and going back to stock setup would just take a few hours. So I don's foresee any warranty issues there. Also I don't foresee me doing very high mileage on this bike as it will mostly be doing city duties. But it is fun little machine and I am loving every moment owning it for now. Cheers... Last edited by dkaile : 25th April 2023 at 09:24. | |
|
| (8)
Thanks
|

| The following 8 BHPians Thank dkaile for this useful post: | ajay0612, Arun Varma, Cyborg, irajput, pachchu77, R3DJiVE, RedPhobos, shyamg28 |
|
25th April 2023, 09:53
| #14 |
| BHPian Join Date: Sep 2021 Location: Sydney
Posts: 261
Thanked: 1,044 Times
| re: 2023 Royal Enfield Classic 350 | Chrome Red | The Comprehensive Review I think with the new 650 cc twin and this J series engine Royal Enfield have definitely turned a whole chapter. I never liked Royal Enfield's because of their lack of overall quality, refinement and reliability. However, I got a chance to ride my friends Meteor 350 here and was astonished by the smoothness and refinement of the motor. Gears slotted perfectly and the bike was easy. If there was no Royal Enfield branding it would be hard to believe they were the manufacturers. The bike is still with him and has been reliable so far with hardly any niggles. I am quite excited and may add a Super meteor to accompany my Versys 1000 i.e. if I do not end up blowing my money parked for 2nd bike on the MT-10 that I have been eyeing for a while. Last edited by Mr.Ogre : 25th April 2023 at 09:55. |
|
| (2)
Thanks
|
| The following 2 BHPians Thank Mr.Ogre for this useful post: | dkaile, pachchu77 |
|
25th April 2023, 10:25
| #15 |
| BHPian Join Date: Dec 2020 Location: Kolkata
Posts: 46
Thanked: 205 Times
| re: 2023 Royal Enfield Classic 350 | Chrome Red | The Comprehensive Review Kudos for delighting us with such a detailed review. Reminds me of the "classic" (pun intended) Team-BHP reviews. I must urge you to keep us updated with your time in the company of this beauty, on how the engine performs as it breaks in, especially in terms of NVH, reliability etc., how the chassis and brakes perform over time, how confident it feels on various road conditions, so on and so forth. I would also be curious to know you plan to keep the chrome bits shining. One thing that caught my attention was, you not opting for the extended warranty. Wouldn't you consider that a bit of unnecessary risk, considering it's a brand new Royal Enfield? To end, I wish you many happy miles on your Lallan Taap (by the way, would you be kind enough to enlighten on what it means?). Last edited by Ritkon : 25th April 2023 at 10:27. |
|
| (3)
Thanks
|
| The following 3 BHPians Thank Ritkon for this useful post: | dkaile, DriverNo.420, pachchu77 |
|