Team-BHP > Motorbikes


Reply
  Search this Thread
17,290 views
Old 14th January 2020, 15:08   #16
Senior - BHPian
 
svsantosh's Avatar
 
Join Date: Mar 2008
Location: Dubai
Posts: 4,135
Thanked: 7,125 Times
Final Prototype

You may have seen the two biggest challenges in this project was achieving the 'Dimensions of the Riders Body Frame' and 'Dimensions of the motor drive Cum Crankshaft'.

The Video in the previous video shows the crankshaft was taken care of... but the shock turned out to be a 'Juggadu' something I am not entirely happy. I still wanted a mono shock to complement the uniqueness of the project, but I had to make do a setup to bring the project onto the road.

Ended up with this setup! (Smirk Emoji!)

Fun DIY @ Home - Pocket e-Bike - The eCati-dual-final-shock.jpg

Fun DIY @ Home - Pocket e-Bike - The eCati-dual-final-shock1.jpg

Having achieved the final pic, almost immediately after the picture was taken, I had the privilege of the 1st dry run from mech;s place to my home - courtesy - the time tested bike-bike leg-push-tow (lol).

About 15 minutes later, Mech had the privilege to test his uniquely put together engine himself! He was confused nonetheless!


To be continued...
svsantosh is offline   (10) Thanks
Old 14th January 2020, 15:51   #17
Senior - BHPian
 
svsantosh's Avatar
 
Join Date: Mar 2008
Location: Dubai
Posts: 4,135
Thanked: 7,125 Times
Re: Fun DIY @ Home - Pocket e-Bike - The eCati

Quote:
Originally Posted by BoneCollector View Post
...I'm an electronics man
I need your help in case I fry something in the kit. lol

Quote:
Originally Posted by blackwasp View Post
...at least on the scale you are doing.
Actually its not that complicated, may be I put things across in a complicated way here. It is just overcoming 1 or 2 technical challenges, rest is very basic stuff.

Quote:
Originally Posted by Thermodynamics View Post
Interesting DIY, one question, why didn't you consider a scrap TVS-50 instead of Crux, wouldn't that be a lot simpler ?
Geared bike... PS - TVS50/Scooty is already conquered last time around.

Quote:
Originally Posted by condor View Post
Santosh, that is an awesome DIY ! Just looking at this thread makes me feel like driving down to check it out in person, and ride it.
Welcome anytime, I am 6kms from Hosur flyover. PM if you want to come down.

Quote:
Then again, something like this should not be a surprise when we consider it is you who is doing it
I am floored! thanks a ton!

Quote:
Originally Posted by skyocean View Post
...the time you are spending with your kid will definitely turn into solid memories which your boy would boast about his entire life...
My primary purpose for any thing I attempt to do for my son.

Quote:
Originally Posted by srini1785 View Post
......using a V Belt....
I am all ears

Quote:
I am assuming that you are planning to use the clutch / gears of the ICE. You can also consider controlling speeds electronically. All the best.
Yes, your point seen in above video. There is a 3 speed throttle available in the market, I am trying to source it. (wicked grin)

Quote:
Originally Posted by Mr.Boss View Post
Do you mind sharing the spec of electrical portion?
I procured (Qty 4, 12V * 4 = 48V) 18Ah SMF (sealed maintenance free) Lead Acid AMARON UPS Batteries.

Last edited by svsantosh : 14th January 2020 at 15:53.
svsantosh is offline   (4) Thanks
Old 14th January 2020, 16:29   #18
Senior - BHPian
 
svsantosh's Avatar
 
Join Date: Mar 2008
Location: Dubai
Posts: 4,135
Thanked: 7,125 Times
Current Setup

The current setup under testing. Note - batteries are fastened using a rubber tube (cut to resemble a rope). I do not have a choice, but have to resort to some juggad to hold the heavy batteries together.

In Hindsight...

1) Four 18Ah batteries are very heavy though you 'may' get a good range. Should have settled for 7Ah or 12Ah ones.

2) Top speed is very less, maxed out at 30+/- Kmph, need to oversize primary from motor output or under size the final at rear wheel (not until son masters the A-B-C)

3) Chain drive for primary is very noisy, Need to do a V-Belt pulley (which was scrapped earlier, hence 'Status Quo will change!').

Fun DIY @ Home - Pocket e-Bike - The eCati-1st-look-face....jpg

Fun DIY @ Home - Pocket e-Bike - The eCati-1st-look1.jpg

Fun DIY @ Home - Pocket e-Bike - The eCati-1st-look2.jpg

*****************************************

Of course 'The eCati' has been road-tested (on desolate rural roads around my home that leads to the nature trail in above pic)... But a proper video from a 'Nature-trail Only' rider being a 'Legally Authorized Adult donning a helmet' shall be posted in near future. It is to keep the overall forum spirit in mind.
svsantosh is offline   (22) Thanks
Old 16th January 2020, 10:28   #19
Senior - BHPian
 
svsantosh's Avatar
 
Join Date: Mar 2008
Location: Dubai
Posts: 4,135
Thanked: 7,125 Times
Giving it a 'Normal' Look

As such this contraption looks 'X-Men'ish'... and my son sorely missed the normalcy of other two wheelers in the scooty project. He always used to ask 'Daddy I want a horn, a headlight, a brake light, the indicators, etc etc'.

So this time around, I overcame my 'Mortal fear' of electricals/electronics and took a plunge. Ended up disassembling the chinese console and did a 'Transplant' job into the OE Crux speedo unit. It was well spent 2 hours.

Opened up...

Fun DIY @ Home - Pocket e-Bike - The eCati-speedo-disassembled.jpg

The casing...
Fun DIY @ Home - Pocket e-Bike - The eCati-chinese-speedo.jpg

The color lights are only functional, son loves them! Top Half 4 dots is the Volt meter and a 'overload' indicator (its not lit up now)
"NOTE - SON DIGS THE KEY SLOT IN SPEEDO CONSOLE""

Fun DIY @ Home - Pocket e-Bike - The eCati-lit-up.jpg

Found use of the old plastic inner mudguard from OE setup, and refit the metal one in front, functionality is acheived for now!

Fun DIY @ Home - Pocket e-Bike - The eCati-mug-guards.jpg

Next in plan is a DRL type full time headlight and a stop lamp and a proper horn, fingers crossed.

(PS - Battery fabrication pending, Pongal holidays now)
svsantosh is offline   (9) Thanks
Old 16th January 2020, 10:49   #20
Senior - BHPian
 
svsantosh's Avatar
 
Join Date: Mar 2008
Location: Dubai
Posts: 4,135
Thanked: 7,125 Times
The only "Engineered Thing" in this Build

Credit to a mechanical engineer who reports to me in my current company who took sometime off to make this hand sketch. We didnt use a micrometer and stayed put at a digital vernier at most. Saved some money but "Not" pressing out the timing sprocket and visually assumed some dimensions like bearing center and overhang and bearing stopper step, etc. Creative liberties were mixed with old school mechanical engineering to suit the ideas in the head.

To further save funds, we stayed at Lathe (turning job) finish and didnt goto grinding finish. Its working so far, if needed we will manufacture a new shaft.


Open tolerances, it went on and off the lathe a few times for minor removals. We had kept a generous 0.2 stock for as-is need.
Fun DIY @ Home - Pocket e-Bike - The eCati-hand-sketch.jpg

MOC - EN24 rolled 300mm*30mm raw material.

Fun DIY @ Home - Pocket e-Bike - The eCati-turned-shaft.jpg

Ps - No dwg for the final shaft, we just shaved it off per need and added a key way for the hub+sprocket combo.

Last edited by svsantosh : 16th January 2020 at 10:51.
svsantosh is offline   (7) Thanks
Old 16th January 2020, 11:40   #21
Distinguished - BHPian
 
condor's Avatar
 
Join Date: Jun 2006
Location: Speed-brkr City
Posts: 16,007
Thanked: 16,306 Times
Re: Fun DIY @ Home - Pocket e-Bike - The eCati

Santosh, the way this is progressing, I hope you are documenting the work you are doing. I'll say it again - this is one awesome project !
condor is offline   (2) Thanks
Old 17th January 2020, 09:15   #22
BHPian
 
Join Date: Jul 2010
Location: Bangalore
Posts: 245
Thanked: 621 Times
Re: Fun DIY @ Home - Pocket e-Bike - The eCati

Haha this brought a huge smile on my face! Must be a lot of fun doing it!

Cheers!
vishwasvr is offline  
Old 19th January 2020, 11:05   #23
Senior - BHPian
 
svsantosh's Avatar
 
Join Date: Mar 2008
Location: Dubai
Posts: 4,135
Thanked: 7,125 Times
Re: Fun DIY @ Home - Pocket e-Bike - The eCati


Linked up a LED Headlight, Stop lamp and a Horn from a functional switch gear.

From Mobile, E&O.E...
svsantosh is offline   (3) Thanks
Old 3rd February 2020, 11:40   #24
Senior - BHPian
 
svsantosh's Avatar
 
Join Date: Mar 2008
Location: Dubai
Posts: 4,135
Thanked: 7,125 Times
One Step Closer to Final Version...

After the possibility of such a bike a.k.a 'eCati' was proven (in above posts) I wanted to tweak a few things, weld a few things in place, up-size a few things...

1) The primary drive chain slot was fouling with the engine case (inner side) and also would have posed a challenge for the future 'Toothed Belt a.k.a Cog Belt' idea (still up in my head somewhere, yet to materialize)

So I sawed the slot to a bigger section...

Fun DIY @ Home - Pocket e-Bike - The eCati-bigger-slot.jpg

Fun DIY @ Home - Pocket e-Bike - The eCati-bigger-slot1.jpg

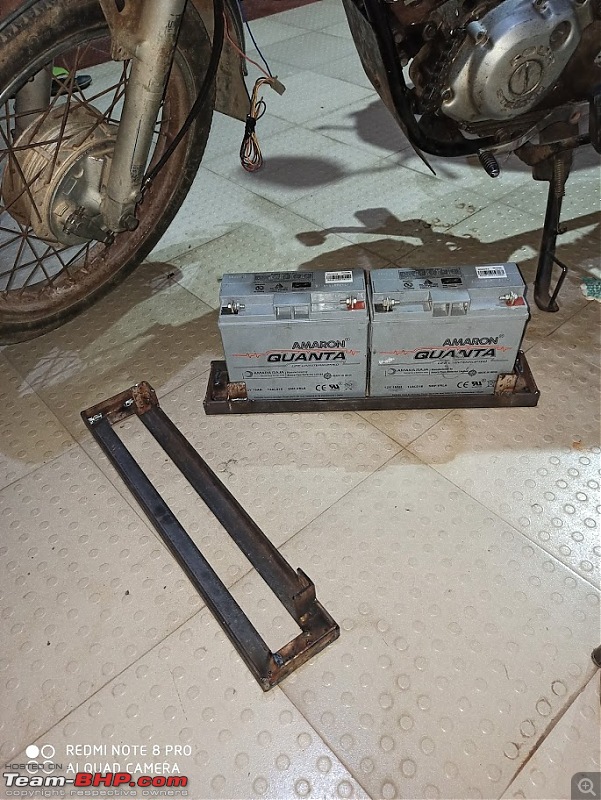
2) Batteries were dangling around and a permanent solution was imperative...


Fun DIY @ Home - Pocket e-Bike - The eCati-battery-bay.jpg

Fun DIY @ Home - Pocket e-Bike - The eCati-battery-bay1.jpg

3) One of the BIGGEST issue earlier on was the lack of steam going up in an incline or flat lining at 25Kmph (give or take). I narrowed down the issue to a very small primary sprocket and decided to up-size it by a generous amount... result was this!

Fun DIY @ Home - Pocket e-Bike - The eCati-bigger-sprocket.jpg

Fun DIY @ Home - Pocket e-Bike - The eCati-bigger-sprocket1.jpg

Fun DIY @ Home - Pocket e-Bike - The eCati-sprock-fitting.jpg

4) Got a FN-W (W - welder) to my home for welding the Battery brackets onto the chassis. (a few burnt grass blades are better than a weld-stained floor tile)

Fun DIY @ Home - Pocket e-Bike - The eCati-weld.jpg

Fun DIY @ Home - Pocket e-Bike - The eCati-weld1.jpg

5) Final outcome for now...

Fun DIY @ Home - Pocket e-Bike - The eCati-final.jpg

Fun DIY @ Home - Pocket e-Bike - The eCati-final1.jpg

Fun DIY @ Home - Pocket e-Bike - The eCati-final2.jpg

Bike easily cruises at 40Kmph(+/-) and inclines are easier to climb... But one of the issue faced already is when I revved the system hard, the main power wire from the 3rd & 4th battery (+ & -) melted and I had a complete power shut down in the middle of the trial run - had to push it back home and identify the root cause using a multi meter and check for continuity. I need to learn soldering and upsize all the 1Sqmm and 0.5Sqmm wires to a bigger one with a proper lug.
svsantosh is offline   (1) Thanks
Old 3rd February 2020, 11:53   #25
BHPian
 
Join Date: Dec 2005
Location: bang
Posts: 886
Thanked: 3,186 Times
Re: One Step Closer to Final Version...

Quote:
Originally Posted by svsantosh View Post
Bike easily cruises at 40Kmph(+/-) and inclines are easier to climb... But one of the issue faced already is when I revved the system hard, the main power wire from the 3rd & 4th battery (+ & -) melted and I had a complete power shut down in the middle of the trial run - had to push it back home and identify the root cause using a multi meter and check for continuity. I need to learn soldering and upsize all the 1Sqmm and 0.5Sqmm wires to a bigger one with a proper lug.
Congrats on the ride. The bike gets better and better on every update. In addition increasing the wire sizes, i would suggest that you put a fuse of suitable capacity on the positive lead wire. It would prevent melting of wires.

If wire melts then it means overload. The motor is drawing much higher current during running and it would need a through investigation. What is the hp of the motor that you are using?. Does the motor overheat?.

Last edited by srini1785 : 3rd February 2020 at 12:01.
srini1785 is offline  
Old 3rd February 2020, 12:42   #26
BHPian
 
Join Date: Nov 2013
Location: Bir-Billing, HP
Posts: 478
Thanked: 897 Times

Hi,
Correct me if I am wrong, but you are using lead-acid batteries, right. Any reason why you didn't spring for LiFePo4 batteries which are purpose built and much more suited for e-bike projects. They support a very high rate of discharge, as high as 6C for some good batteries.
rdst_1 is offline  
Reply

Most Viewed
Thread Tools Search this Thread
Search this Thread:

Advanced Search

Copyright ©2000 - 2024, Team-BHP.com
Proudly powered by E2E Networks