Some background
My Pulsar 200 NS was overdue for service and maintenance due to me being but with work. I use my bike for my commute to work because of which I had not found the time for maintenance. The lack of time was only one reason. The other was that I was unhappy with Bajaj dealer service because of inflated bills and slow work. The service bills always seemed to be 2000+ and the job always seemed to take 2 days or more. The alternative was finding a local mechanic. I have got some small jobs done in the past from a nearby mechanic and I had seen the low quality of his work. So I finally decided that I would service the bike myself. The day for the job finally came recently when I had the weekend to myself.
I had planned on doing only the basics: flush and bleed both the brakes, replace the air filter, clean the carburettor, clean and lubricate the chain, clean the spark plug, and replace the clutch and accelerator cables. I managed to finish the jobs over the course of 2 days since I couldn't spend 1 full day to finish all the jobs.
I wanted to share my experience of brake flushing and bleeding because of trickiness of the task. The other jobs are relatively straight forward since it's mainly cleaning and replacing.
Tools used:
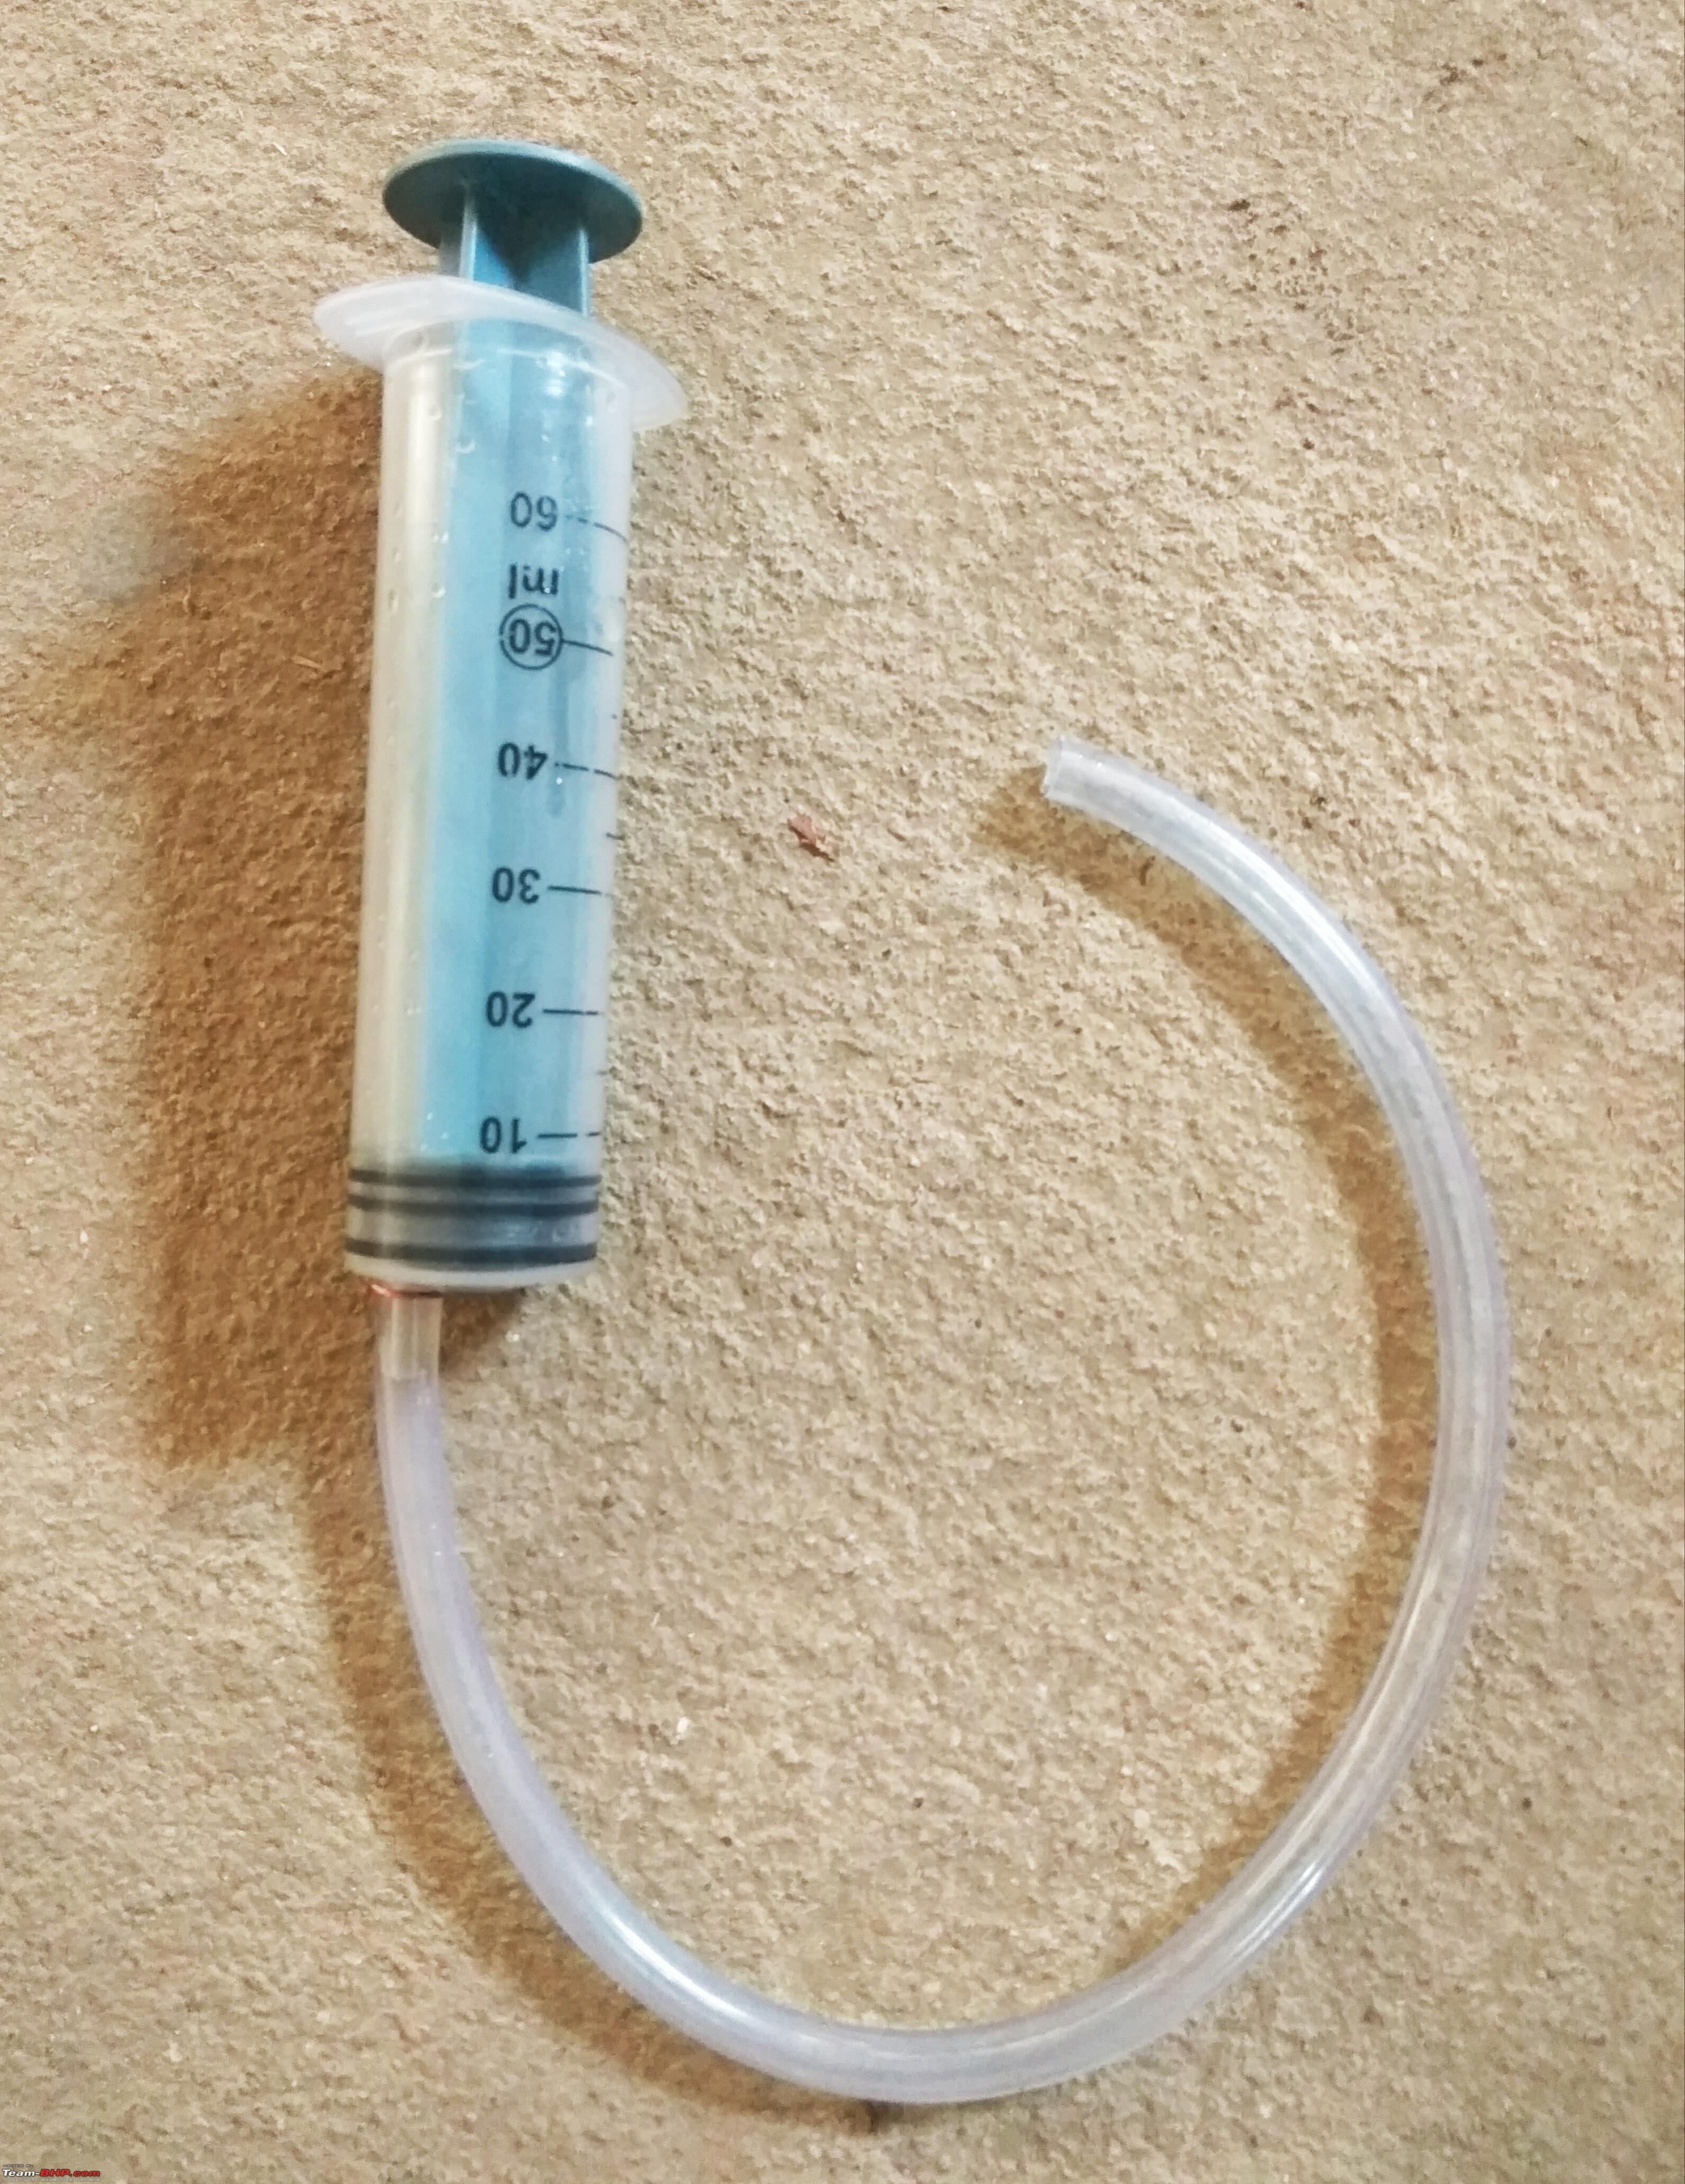
50 ml or preferable larger syringe (from a medical shop or pharmacy)
PVC tubing to fit the brake bleeding nipple
tightly (from a hardware shop)
Thin steel wire or cable ties to clamp the PVC tube (from a hardware shop)
Spanners
Screw drivers
Clean cotton rags
Consumables used:
DOT 4 brake fluid from a sealed container. Expect to need at least 50 ml for a single brake caliper so buy at least 100 ml.
WD40 spray
The standard method of brake bleeding
The standard method involves keeping the brake lever pressed and opening the bleed screw to relieve pressure, re-tightening it and then repeating the process until the brake lever feels firm.
I learnt a few years ago that this procedure does not work while trying to bleed the brake on my previous bike, a Yamaha FZ16. I spent almost an hour trying and finally gave up and took the bike to a mechanic!
Some research told me that in most small bikes the master cylinder is too small to push enough fluid through the system with each stroke to really move an air bubble.
The reverse bleeding method
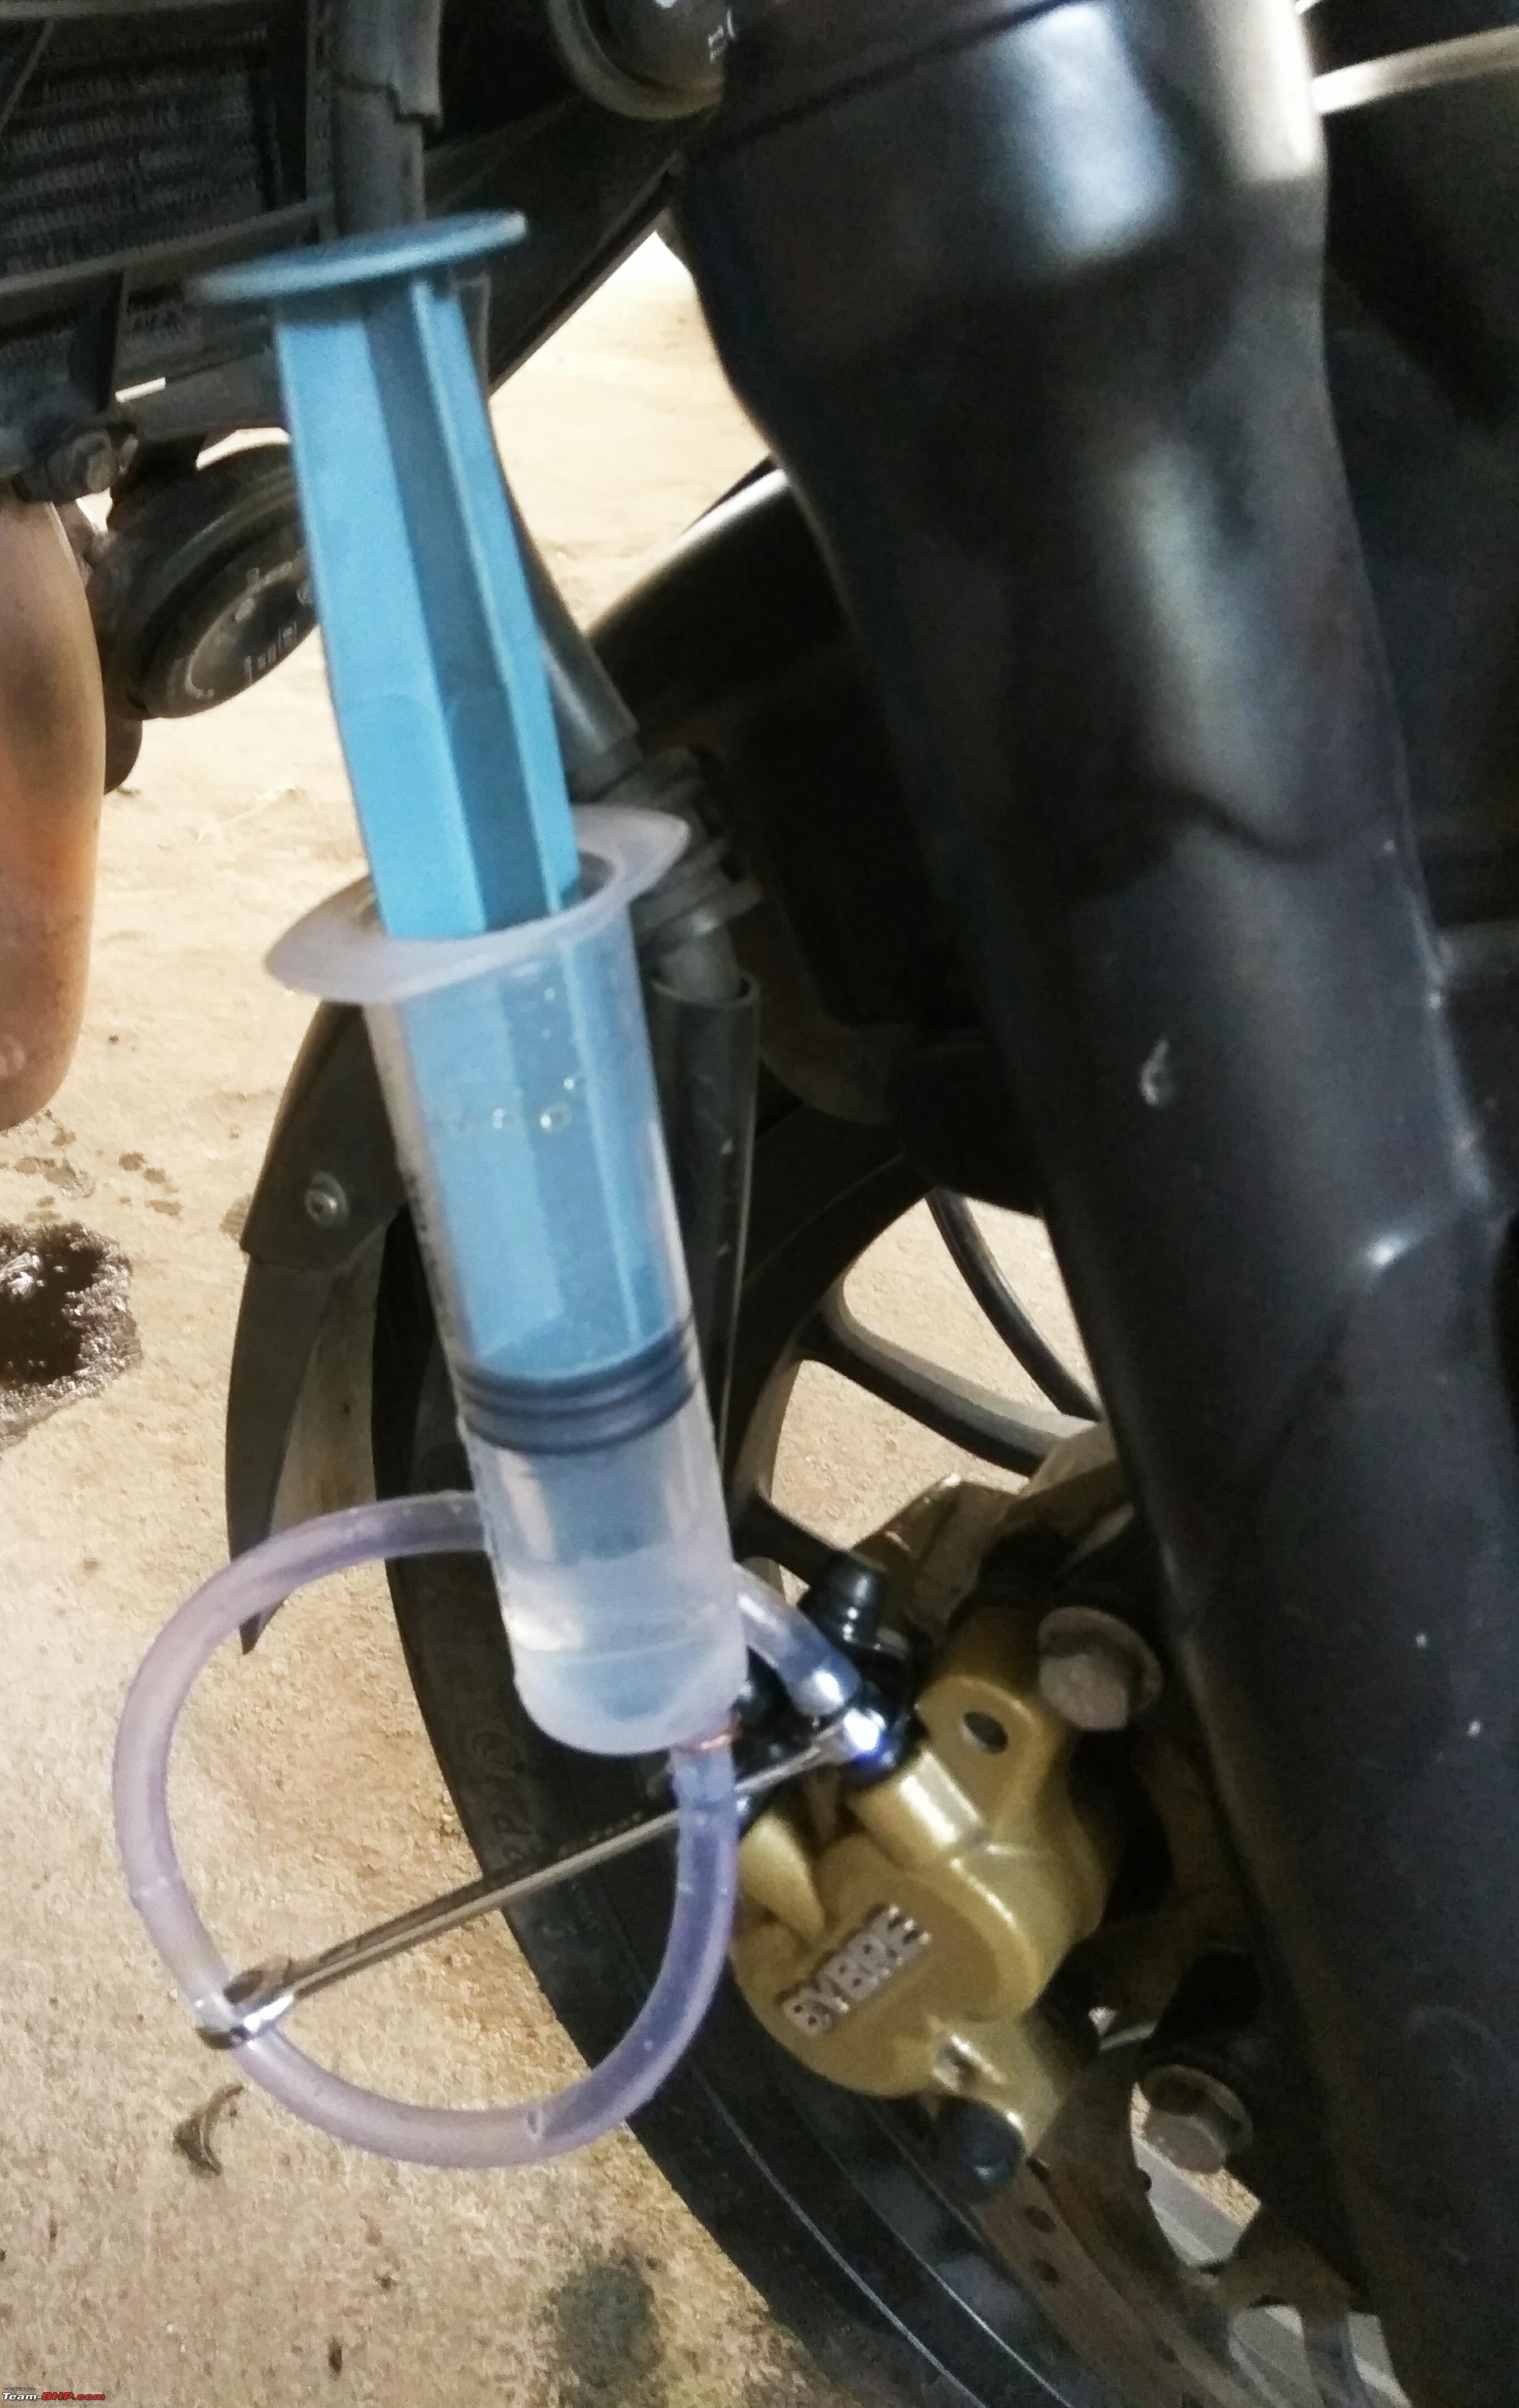
Reverse bleeding involves pushing fluid from the brake caliper to the master cylinder with a syringe.
The advantages of reverse bleeding
1. Air is less dense than brake fluid. Pushing fluid from the bottom of the system (the brake caliper) to the top (the master cylinder) works with the tendency of air bubbles to move upwards rather than fight it as with the conventional method.
2. Fluid is pumped through much faster since the syringe is much larger than the master cylinder. This makes it more likely that air moves along with the fluid and not just sit on the side of the fluid path. The faster flow also ensures that old fluid is flushed out
3. The system is pressurised during the process so air cannot enter accidentally.
The disadvantages of reverse bleeding
There might still be some air bubbles trapped in a dead zone of the caliper where the fluid do not really flow.
The process:
This video explains the process very well and this is what I used to learn how to do it.
Some tips based on my experience
Tip 1: Remove all air bubbles before bleeding!
There was air in the tube so this had to be removed by pushing it towards the top of the syringe. This was done by tapping the tube for several minutes until all the trapped air moved upwards. I found that there were several small bubbles near the tip of the syringe where the tube connected to it. This required quite a bit of tapping to persuade them to move. This process of removing all the air in the tube requires patience and there are not shortcuts.
Tip 2: Keep an eye on the master cylinder while reverse bleeding to prevent overflowing!
The empty master cylinder will be filled up with fluid from the caliper so be sure to keep checking the fluid level.
The master cylinder can be emptied using a second clean syringe or a clean rag to soak up the fluid.
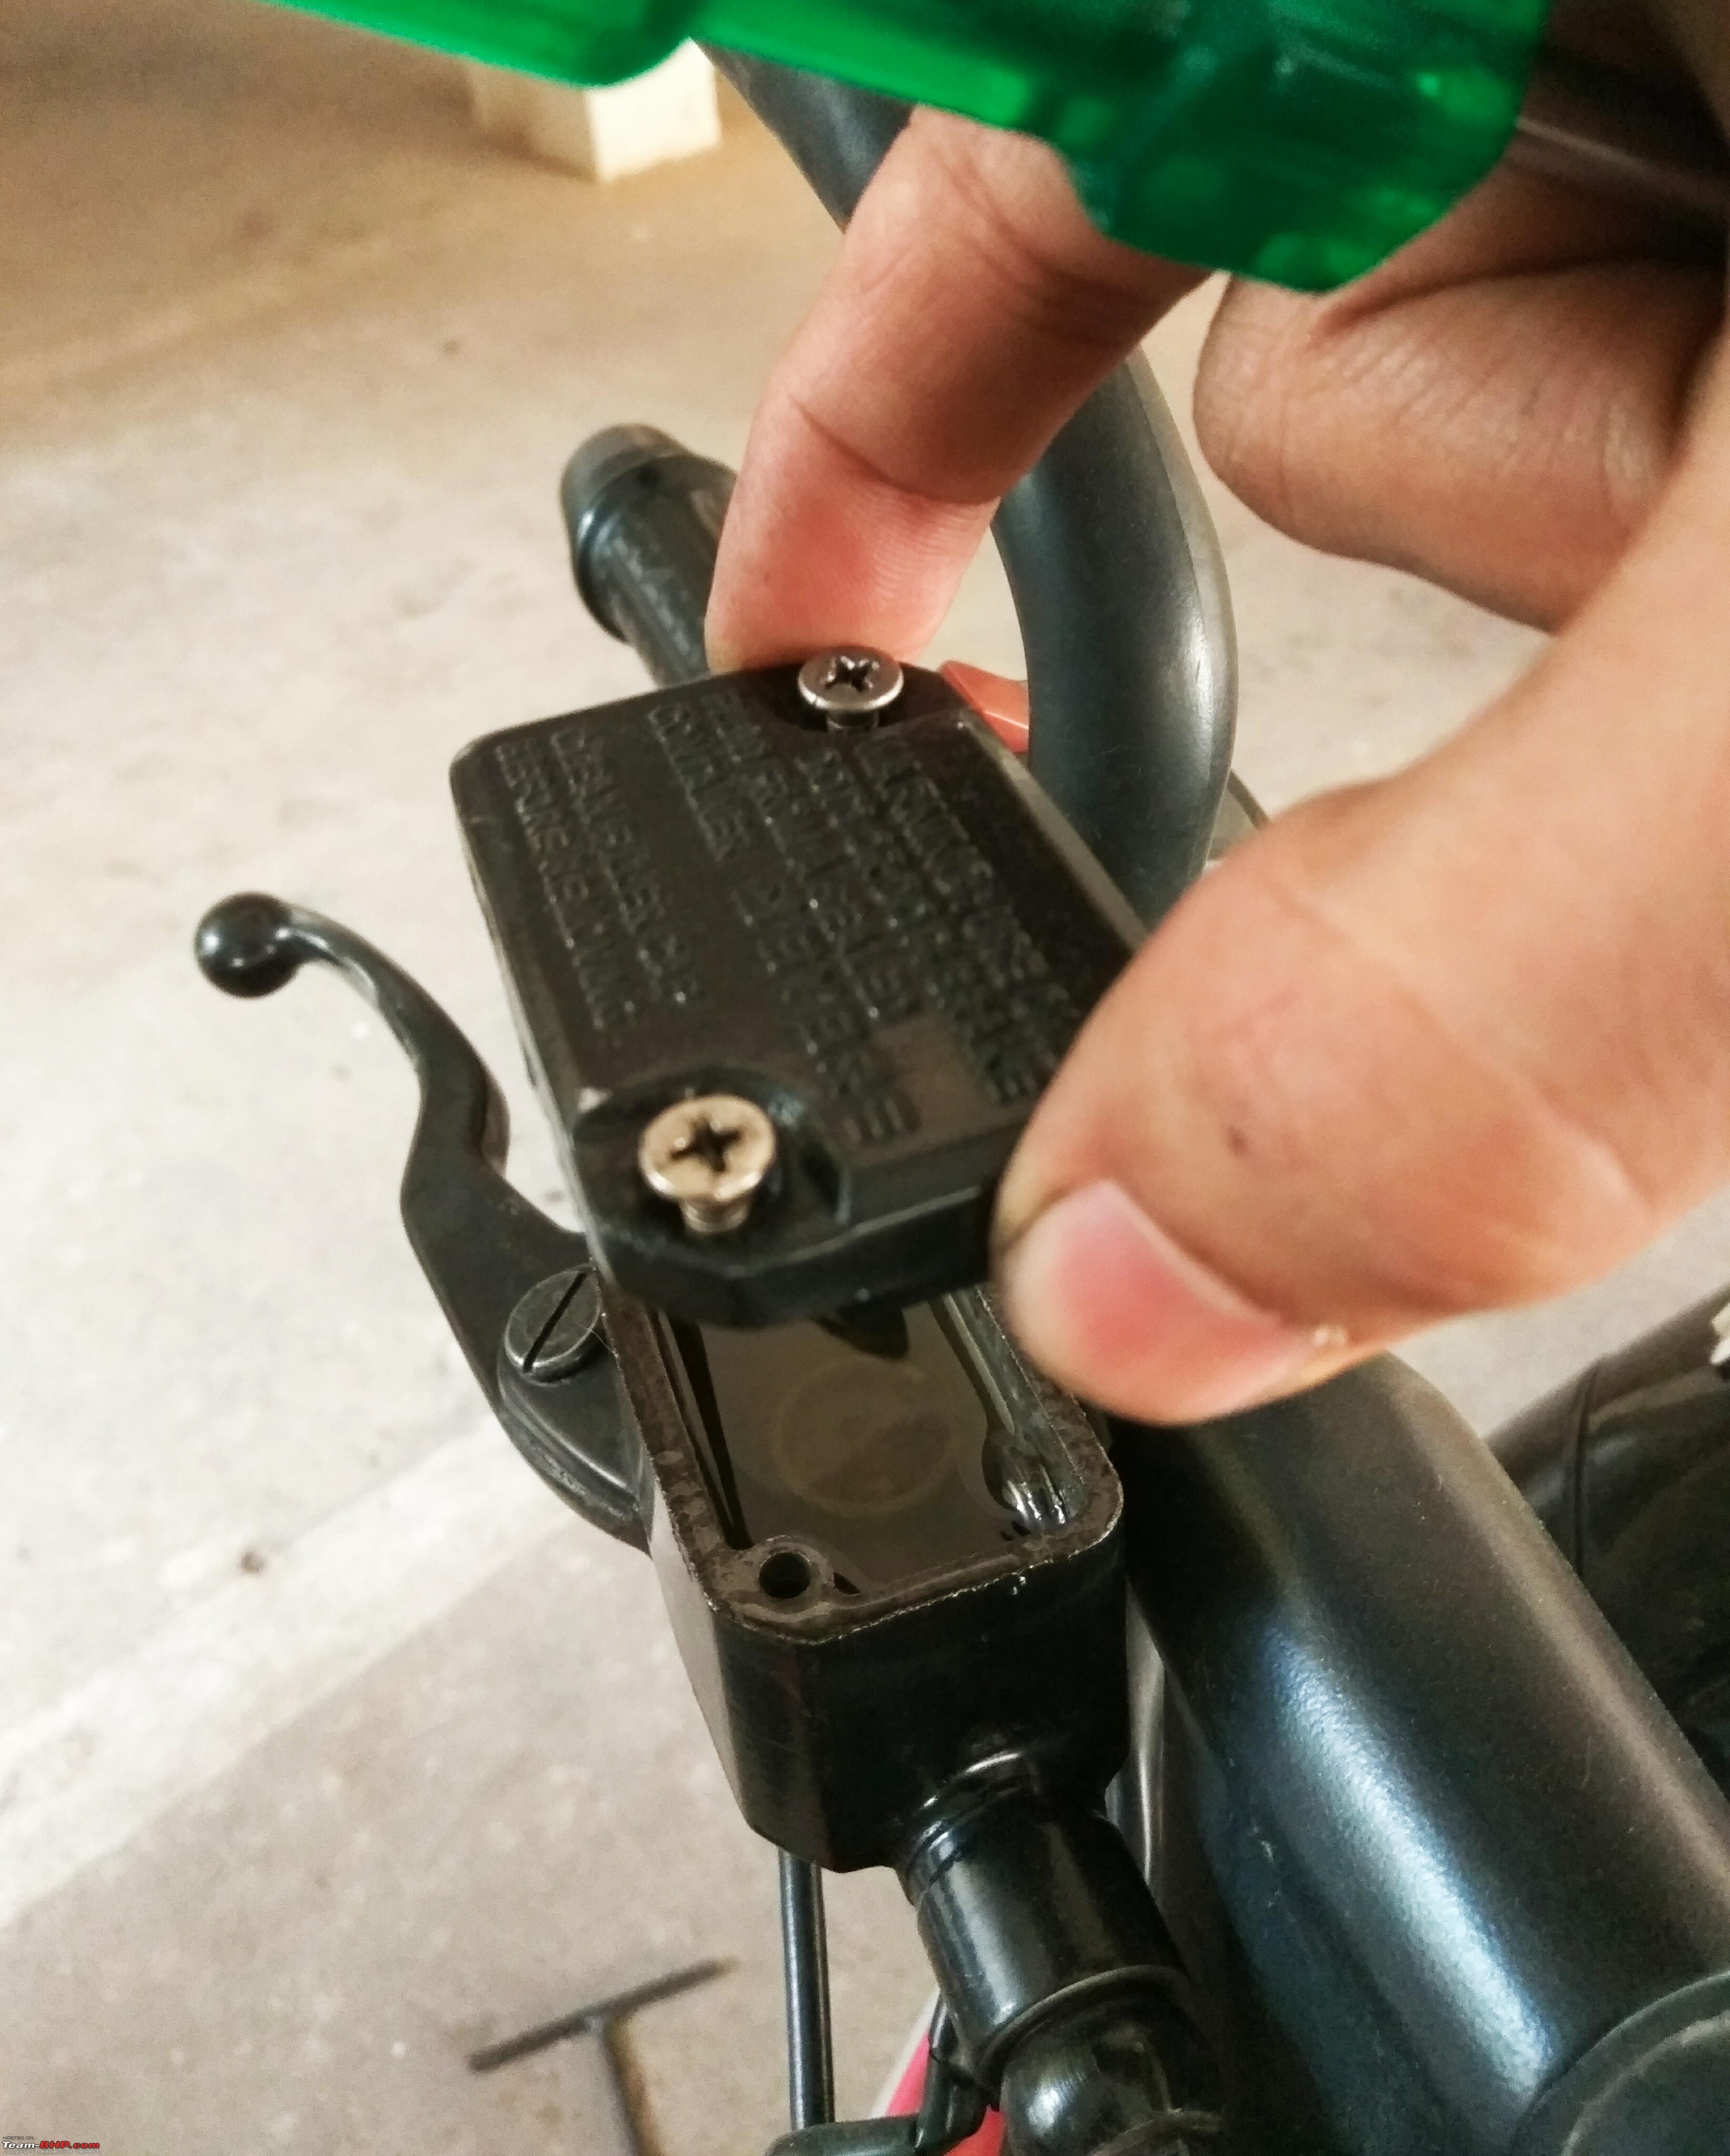
Tip 3: The brake bleeder valve/screw might be rusted. Clean it before getting started.
Spray WD40 or a good penetrant spray to free it up. Remove rust by rubbing with fine (120 or 160 grade) emery paper. Don't forget to clean the centre hole. To make sure that dirt in the centre hole is removed, hold the brake lever pressed and open the bleeder screw and then retighten the screw after the brake lever stops. This will cause the fluid to come out and push out the dirt. Do this a few times. The dirty fluid can be soaked up with some rags. Don't use the clean tubing and syringe as that would contaminate them.
Tip 4: While pushing in fresh fluid, don't open the bleed screw too much or press the syringe plunger too hard.
With pressure from the syringe, if the bleed screw is open too much, the fluid will leak out from the threads. So open the screw about 1/8 or 1/6 of a turn.
Excessive pressure on the syringe plunger can also make the fluid shoot out of the port in the master cylinder! So press the syringe plunger only as hard as required.
Excessive pressure on the syringe plunger can also make the tube slip off the ends!
Tip 5: You will have to stop in the middle to remove more dirty fluid from the master cylinder.
Be sure to close the bleed screw while you continue pressing the syringe plunger to ensure that the system is always pressurised.
Tip 6: Reverse brake bleeding may not be enough!
You might be wondering why I spent all this time explaining reverse brake bleeding only to say that it might not be enough. The reason is that there might be some air bubbles inside the brake caliper that might not get dislodged during reverse bleeding. How do I know this? Because even after reverse bleeding I was not entirely happy with the feel of the brake lever. It was a big improvement over the feel before bleeding but I knew that it was not how it should be. So what was the solution? Vacuum brake bleeding.
What is vacuum brake bleeding?
It is basically the opposite of reverse brake bleeding. Brake fluid is sucked from the bleed screw instead of being pushed through it.
What are its advantages?
Stubborn air bubbles in the brake caliper can be removed from the system as vacuum is more likely to dislogde air bubbles than positive pressure.
This method is also faster than the conventional brake lever pumping method.
What are its disadvantages?
The fluid moves from the master cylinder towards the brake caliper and this fights the tendency of air to rise inside the brake fluid.
It is not as fast as reverse bleeding because only a limited amount of vacuum can be applied before air starts leaking through the bleed screw threads and between the tube and bleed screw.
Any dirt in the master cylinder will be drawn downwards along with the fluid so flushing is a longer process.
Why not use only vacuum brake bleeding instead of reverse bleeding?
Because of the disadvantages listed above.
The method:
Step 1: Use the same syringe and tube as before. Connect the tube tightly to the syringe with wire or cable tie.
Step 2: Press the syringe plunger all the way in.
Step 3: Connect the tube to the bleeder screw nipple and clamp it with wire or a cable tie.
Step 4: Pull back the syringe plunger to create a vacuum in the tube and check for air leaks. If there are no air leaks, proceed as follows.
Step 5: With one hand pull back the syringe plunger and create a vacuum. With the other hand, loosen the bleeder screw with a spanner. Loosen just enough to see fluid come through. There may be very small air bubbles. If big air bubbles come through this means that outside air is leaking in. If that happens, close the bleeder screw while there is still vacuum in the syringe. Repeat from the vacuum process. If the plunger has moved to the end of the syringe, the tube has to be disconnected from the bleeder screw and the process repeated from step 3.
Step 6: Once the fluid coming through the tube no longer contains any small air bubbles close the bleeder screw.
Step 7: Check the brake lever feel. If there is still some sponginess, repeat the vacuum bleeding process.
Warnings
Brake fluid is not good for health! Use eye protection at least. Also use thin gloves if you have sensitive skin.
Brake fluid is harmful to paint so clean any spilled fluid quickly with soapy water.
Don't over-tighten the brake bleeder screw!


 20th December 2018, 13:01

 (15)
Thanks
(15)
Thanks