| Re: Ridden: Royal Enfield Interceptor 650 & Continental GT 650 Twin
Quote:
Originally Posted by ku69rd  The stuff looks real good, do keep us posted on how your experimentation goes. Congrats on your ride, was not aware that you too joined the bandwagon of the twins. Do post some pictures of your bike 
Good Luck.. |
Thank you sir!
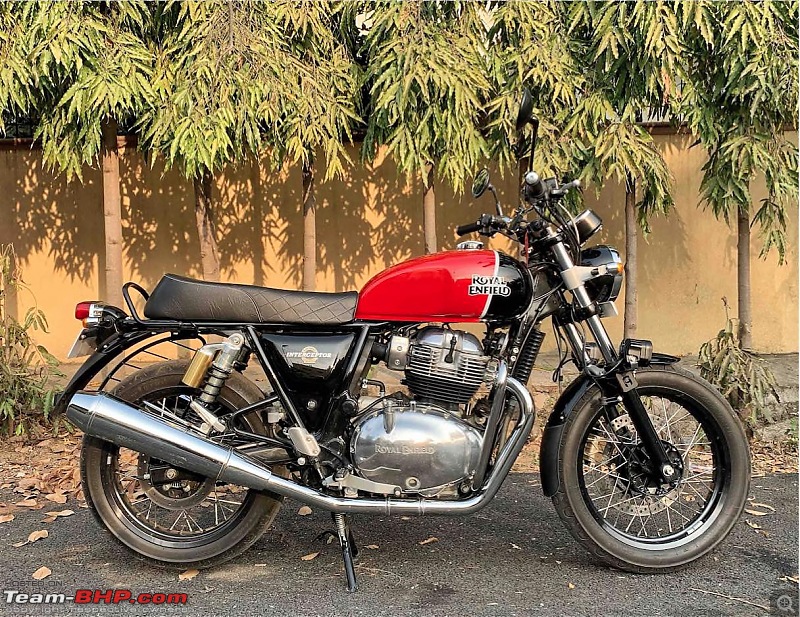
I am indeed aboard the hype train, and i must say, it's be a good ride so far! Got myself the RR and have put about 5K Kms on it since June.  Notable Mods: Notable Mods:
The usual suspects:[list][*] Seat: Wanted to get the seat's foam padded/replaced on the OE base plate at Rao's, like what people usually do, but realized that the OE fiber/plastic base plate was pliant, and this would be good opportunity to address it. Instead figured i would probably get the base plate fabricated and solve both issues in one go. The more time i spent with the fabricator, who was teasing me with the old RX100's seat, the more it was growing on me -- not gonna lie -- (images below for reference). It was either the familiarity of the seat or its well rounded proportions, the decision was easy. If only the seat and trim (aluminum beeding) dint taper upwards at the back, i would have installed the seat lock pin, removed the seat railing and called it a day. (sigh!) The gap between the seat and the rear mudguard was fairly noticeable, and those aluminum trims are pre bent into shape  . So i ended up getting a new seat base plate, seat foam and a seat lock pin, padded the seat at the back to cover the gap, and shaped it to resemble the stock seat for now. When i get around to source an aluminum trim i like, will go back to work on the seat and finish it. For now i have the stock seat as is for the city and a separate seat firm and better padded for long-ish rides.   - Lights: As woefully inadequate the stock headlights are, i dint want to change the stock headlight beam/lens. Dint want to mess with the looks
 . Instead picked up a pair of 40W LED unit to serve as aux lights that i get to add/remove for highway/city riding respectively. The additional aux port in the headlight bucket made this a no brainer DIY. . Instead picked up a pair of 40W LED unit to serve as aux lights that i get to add/remove for highway/city riding respectively. The additional aux port in the headlight bucket made this a no brainer DIY.
- Suspension: The front end is fairly well sorted for the most part. I dint want to fiddle with it until i understood the OE setup. So i started out by figuring out the sag values for my weight, picked up a pair of pre-load adjusters and went about dialing it in. With only 110mm travel, and rider's sag being roughly about 9% of that (for my weight), dialing in the preload was effectively eating into the suspension travel without doing much to the ride quality.
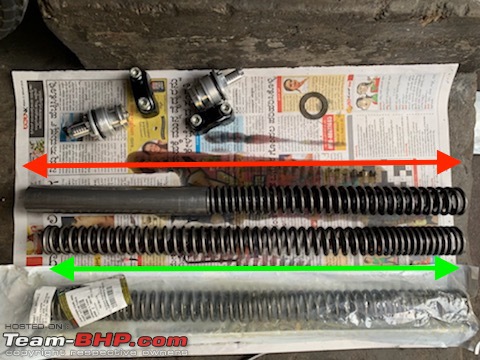
 So the next step was to find a spring with a different spring rate and then see if i could have it work for the same tuned length. On inspecting the TB and Himalayan springs, i suspected the Himalayan "could" probably give me more room to work with (both in terms of a plush ride and some additional suspension travel).
Side by side, the OE stock suspension spring + spacer is indicated by the red line, while the Himalayan spring is indicated by the green line below. The Himalayan spring is slightly shorter than the stock spring+spacer.  With all else being the same, swapping just the stock springs+spacer for the Himalayan spring would have the front end of the bike squat lower by roughly 2 cm. I have added a spacer to fix this and increase the suspension length ever so slightly. This setup renders the suspension slightly more plush compared to the stock setup, but is eager to dive on hard braking. I feel the increase of the overall volume in the suspension will now need to be compensated with additional oil in the place of displaced spacer + more air.
In the forthcoming weeks, i would be experimenting with the volume of oil (same grade) and dialing in the preload to fine tune it. Will keep this thread updated on my findings along the way.
PS: I am treading new ground here with suspension and putting most of my theoretical understanding to the test. If you guys see any flaws in my assumptions or understanding, do feel free to call them out. I would be happy to course correct!
Quote:
Originally Posted by ashishk29  Where did you source the preload adjusters from? The quality looks good. |
These are generic preload adjusters for a 41mm fork. While you may not find many (or ones moderately priced) for the INT 650 exclusively, there are plenty of good quality and affordable ones out there for the Yamaha R3. And here's a little secret, any of those would do too - it's a direct fit. Mod Note : Click here to view our pictorial help article on uploading pics.
Please submit images ONLY via the Team-BHP Attachment System.
Last edited by moralfibre : 6th January 2020 at 15:43.
Reason: Formatting attachments
|  (1)
Thanks
 (1)
Thanks
 (2)
Thanks
 (13)
Thanks
 (1)
Thanks
 (17)
Thanks
 (2)
Thanks
 (13)
Thanks
 (2)
Thanks
 (3)
Thanks


 Sorry for the quality of the pics, I wanted to click some pics on my DSLR but i was too excited to do that!

 . So i ended up getting a new seat base plate, seat foam and a seat lock pin, padded the seat at the back to cover the gap, and shaped it to resemble the stock seat for now. When i get around to source an aluminum trim i like, will go back to work on the seat and finish it. For now i have the stock seat as is for the city and a separate seat firm and better padded for long-ish rides.


