| |||||||

| Search Forums |
| Advanced Search |
| Go to Page... |
 |
| Search this Thread |  116,967 views |
 5th March 2025, 20:29
| #106 |
| Distinguished - BHPian  | Re: My Barn Finds: Yamaha RD 125 & RD 200 Paris-Delhi-Mumbai @ 80 Nothing can happen before time and that stands true for the RD 125 rebuild. My second bike that I bought back in 2006 and it costed me peanuts especially when you look at RXs that cost ten times its price today but, back then for me it costed me more than my monthly salary and was a big stretch and I was clearly not financially prepared to rebuild it. In 2010 I did try rebuilding it along with my RD 200 but due to unavoidable circumstances we couldnt finish it then. Luckily for me that was a blessing as I clearly needed a new tank as the one that came on the bike was beyond repair. Also, I needed a set of new exhaust and both of them happened in quick successions last year as I found a decent complete set of exhaust from the US and my friend Moneet found a good tank in Paris itself. The RD 125 coffin tank especially is a very difficult to find piece and to find one in a good condition is even more difficult. But, as I have been saying in my previous posts my stars are aligned this time and my friend Moneet found a good tank and that too in Paris. He shared me the link back in September last year which I quickly approved and he called the owner who was not staying too far away from his house and he could pick it up personally. Unfortunately Moneet could not meet the owner until early December and the owner was kind enough to hold on to the tank till then. Now, the biggest dilemma was that of how to get the tank to India, neither Moneet or I were travelling to Paris/India. So, I asked him to ship it to India which I knew would cost a bomb. The quote he got online was around 148, which later we found out was the minimum amount and the actual post office charges could be much higher depending on the final package dimensions and weight. While I told Moneet to still go ahead with it he was not comfortable as the price of the tank is 80 and shipping it would cost double of that and then customs if any back in India. So, he was on a lookout for a cheaper alternative and during one such conversation a friend of his who was visiting India offered to hand carry it. Her sweet gesture just didnt end there as she even couriered it to Mumbai from Delhi free of charge. Truly blessed to have such people around who would do such good deeds especially for a friends friend. 🙏🏻 Now, I can send the parts for paint and hopefully by next week we can have the RD 125 standing on its own feet Some pictures Christmas is long gone but the goodies still keep arriving. I am a complete madman to even attempt to do two full and some semi rebuild in one go and that too of rare bikes.  Skinned down the outer tape packing  First glimpse  Peekaboo.. The OE Japan made tank cap packed and secured  The detailings on four decade old tank  The inside packaging  Up close. Wrapped up in a towel for added protection for the long journey  The pink foam up close. Did its job well. 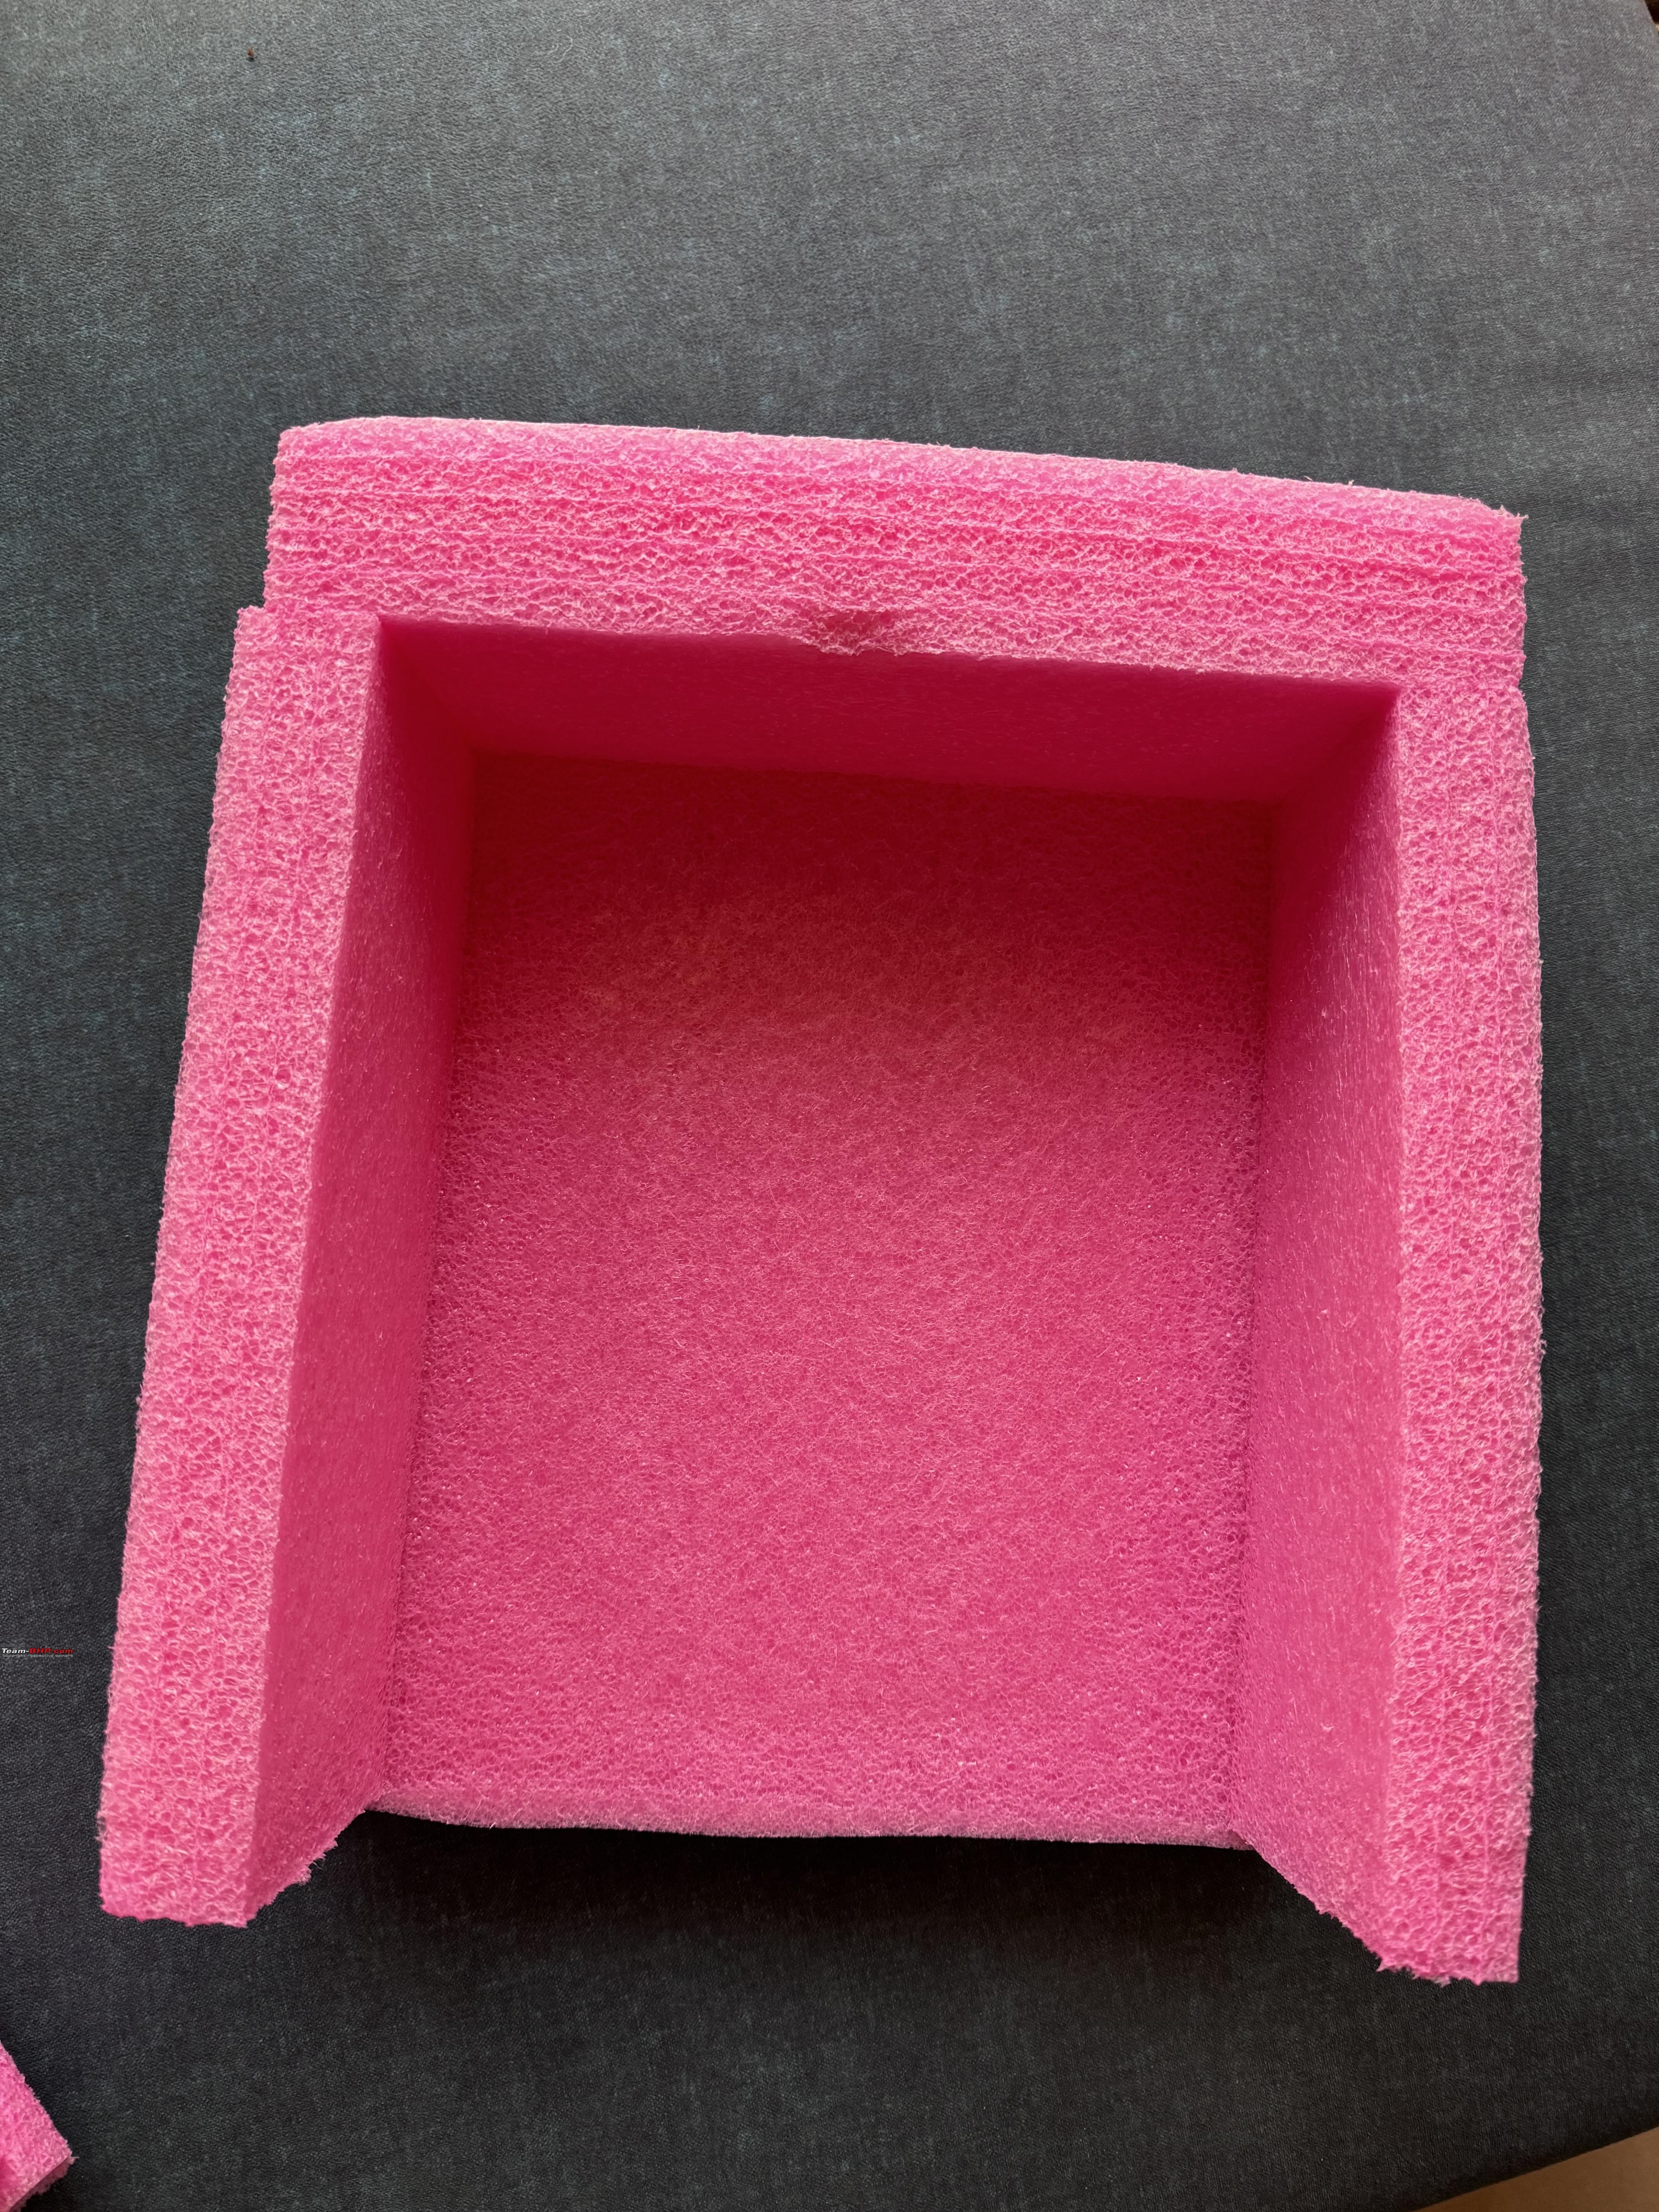 The beautiful coffin tank. Have to choose the right red shade for this unique designed tank  Side view  Indian RX tank cap is a direct fit on this one. The OE cap which came along doesnt have the key so will have to change the internal lock  Design details from the side view  OE fuel tap  Mad in Japan  Bottom view with the OE tank cap packed on the top left  |

|  (5)
Thanks (5)
Thanks
|
| The following 5 BHPians Thank SnS_12 for this useful post: | b16h22, Cyborg, LJP, v12, Wageabond |
| |
|
7th March 2025, 21:40
| #107 |
| Distinguished - BHPian | Re: My Barn Finds: Yamaha RD 125 & RD 200 Time to paint With the arrival of the tank I have all the parts that need to go to Sumant at OCD Detail Studio for paint. This is the third bike of mine that he is going to paint and the details on this one is hopefully going to be less challenging compared to the previous two. The decals which are very minimal compared to the previous two are also less complex in nature to execute. The paint shade we have finalised is Ducati Red with pearls. The parts that are going to be painted red are the front and rear mudguard the tank and both the side panels. The front fork bottoms will be in Titanium/Gun metal as the other two and all other remaining parts will be painted black. We wanted the colour to really pop and no better red than the Ducati red and I also happen to have one in the garage with subtle hints of that same red shade for inspiration  Just waiting on the Michelin tyres to arrive so that they can be fitted on the rims before they go for paint. They are expected next Wednesday so hopefully Thursday the parts can go for paint. On the RD 200, Tony has repaired the OE kick shaft and will now prepare the panel fins in aluminium. So, once those parts are ready they can go for painting as well. Some pictures . The front end of the OE kick shaft for the RD 200 has been repaired and now the kick boss can fit properly. But need the OE spring as well so back to ordering from Yambits. Parts, Parts and more Parts  This is the OE kick shaft with spring and kick boss of the RD 125, which is off the same dimensions  Next up is the plastic fins that fit on the side panels that are missing on the RD 200. Very difficult to source and next to impossible to get a new set.  So, the next best option is to make one in aluminium  The RD 125 parts are ready for paint. As I said earlier, the cosmetic details on this one are not complex to capture. Notice the side panels are plain with no fins. The second time they will be painted and I am glad that the Titanium grey shade never actually turned into a complete bike.  OE Yamaha badging that will go on the engine covers after the paint but before the clear coat  This one is a proper JDM motorcycle  Part numbering  Trying to capture the details of the coffin tank  Preparing for paint  Took off the rubber mount and fuel transfer tube  Time for some in house paint colour inspiration  Ducati red it is with pearls  Golden wheels will turn all black though  Never used 15 year old rubber. Rebuilds on rear bikes are never cheap and you can never have a fixed budget especially if youre seeking PERFECTION  Taillight bracket courtesy Tonys treasure trove  Will be painted black as well  Rear mudguard with the chassis mounting and taillight mounting holes  Will be sanded down to the metal  This is how my RD 200 would have looked back in 1979  Mine though will have a lot less chrome  |
|
| (3)
Thanks
|
| The following 3 BHPians Thank SnS_12 for this useful post: | b16h22, brownkaiser, Cyborg |
|
10th March 2025, 11:04
| #108 |
| Distinguished - BHPian | Re: My Barn Finds: Yamaha RD 125 & RD 200 Maiden highway run cut short It had been a few months since I took the RD 200 on the highway for a longer run and planned to do that this Sunday. In preparation for the Sunday ride washed and polished the RD 200 and RZ 350 on Saturday. This was the first wash and polish session done by me post the repaint and I will let the pictures speak the results for itself  The plan was to ride upto Bombay Coffee House and this time my other two friends joined in too. However, once I reached Mahim the throttle cable started acting funny and just like the RZ the rpm wouldnt drop when the throttle was cut off. I messaged my friends that I would head back but they then rather decided we have breakfast back in Mahim and head back together. I had to do multiple stops to adjust the throttle and once I got back on the highway the issue disappeared. Gladly I could ride back home and will get this inspected the next time I am at Tonys. Some Pictures First polish session after the wash  Results under the sun  Up close  Top view  Glad avoided the top decals. Would have made the tank too busy and make it look much more smaller  What a colour contrast and the sight of those twin cylinders and exhaust. Dont miss the rear footrest which are mounted on the swingarm. Pillion will have a proper leg day on this one  Love the decals and the colour combo  A coincidence that the needle tips of the speedometer match the tank shade??  One of the fast rider of our group gets his new daily rider which is in its engine running in period  Ride cut short thanks to the throttle issue. But that is what adds to the charm if these two strokes  But the food made up for it  Back home getting introduced to its younger bigger displacement sibling  Face to face  Up close. The RD 200 came with 18 spoke wheels but we shifted to 17 alloys and that is the reason for lower stance  Only a 50cc engine difference on paper but the actual difference in styling and engine characteristics is night and day  1979 vs 1972  I dont know the actual specks of the DS but it rides and sounds very different from the Indian RDs. And being 100cc smaller in displacement over the Indian RDs still feels much more powerful..  Almost 30 kg weight difference in these two 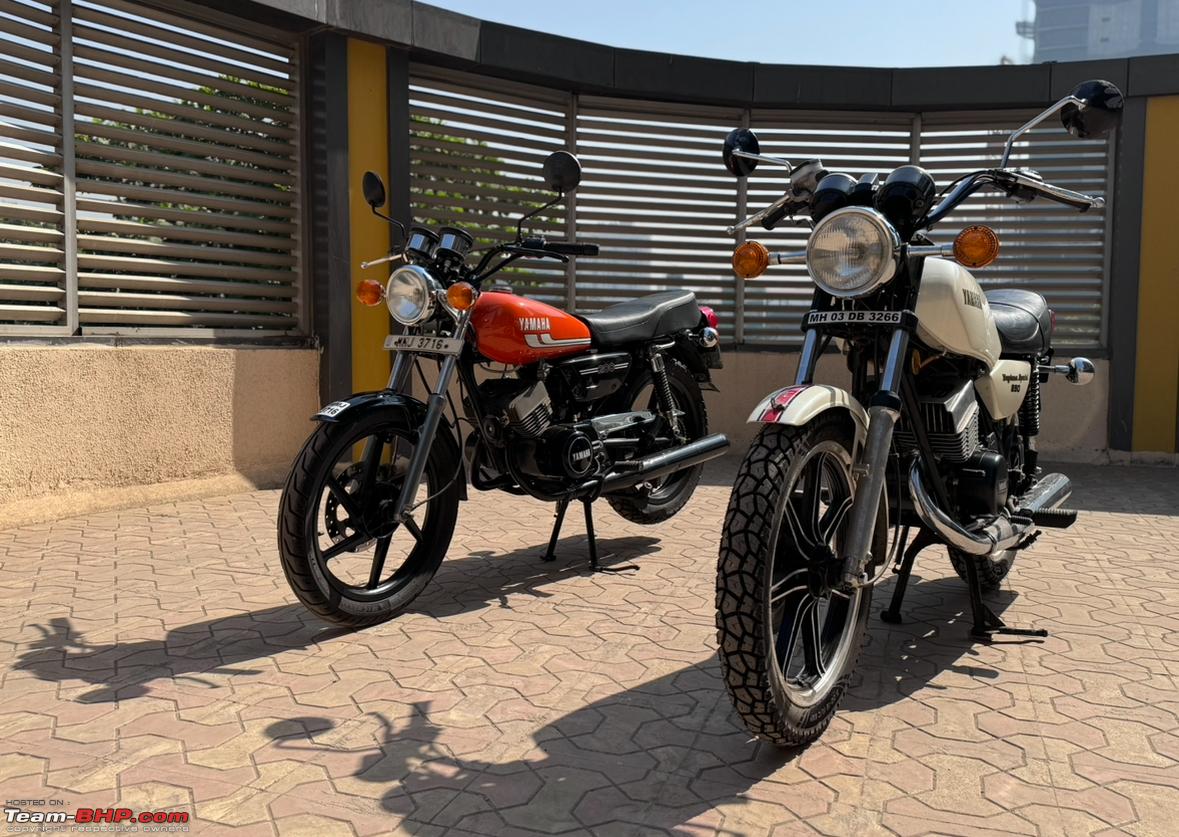 All that weight is on the frame and alloys which are much more chunkier on the DS  A unique trivia is that both have speedos which are in MPH  Two uniquely designed tanks  Standing solo and will still attract a crowd  Meeting the big daddy from the family lineup  |
|
| (7)
Thanks
|
| The following 7 BHPians Thank SnS_12 for this useful post: | b16h22, Bhuvan, Cyborg, FlankerFury, Freespirit27, GB muthu, sole_rider |
|
17th March 2025, 11:59
| #109 |
| Distinguished - BHPian | Re: My Barn Finds: Yamaha RD 125 & RD 200 Precision Machining To maintain such a big collection of rare motorcycles is only possible when you have someone extremely knowledgeable to work and maintain them. And when that person is a perfectionist just like you it can create wonders like none other. I had mentioned that I was having difficulties in finding the fins that fit on the RD 200 panels. When I mentioned this to Tony and while we were brainstorming on what is the next best alternative he came up with the idea of making a set in aluminium. Machining parts for the RD 200 is something that is not new and we have made quite a few parts in house. But this needed precision on a next level because we wanted to recreate the same design as the original has and the measurements had to be perfect for to it have a perfect seat. Tony as usual worked out his magic and the finished product is nothing short of being magical to see and hold in your hands. Now, we will have to get the curvature correct before the piece can be sent for painting along with the RD 125 parts. Further, I went ahead and ordered a pair of kick springs to be used on the RD 200 and a kick from Ebay along with a tacho cable each for the RD 200 and RD 125 and and throttle cable for the RD 125. Since, I had no one coming down from UK immediately I couldnt order from Yambits and had to rely on Ebay instead. Kick springs are arriving from Thailand and cables and the kick from Germany..Now, you can understand why maintaining a track of cost for such rebuilds never make sense as it can never give you a true picture of what sort of budget one has to expect other than knowing that it is going to turn out to be very very expensive  Some pictures The original seat of the RD 125 and the half broken rear seat cowl. The seat lock mechanism is similar to the RXZ and now have to figure out if someone can make a same seat plate and repair the rear seat cowl as well 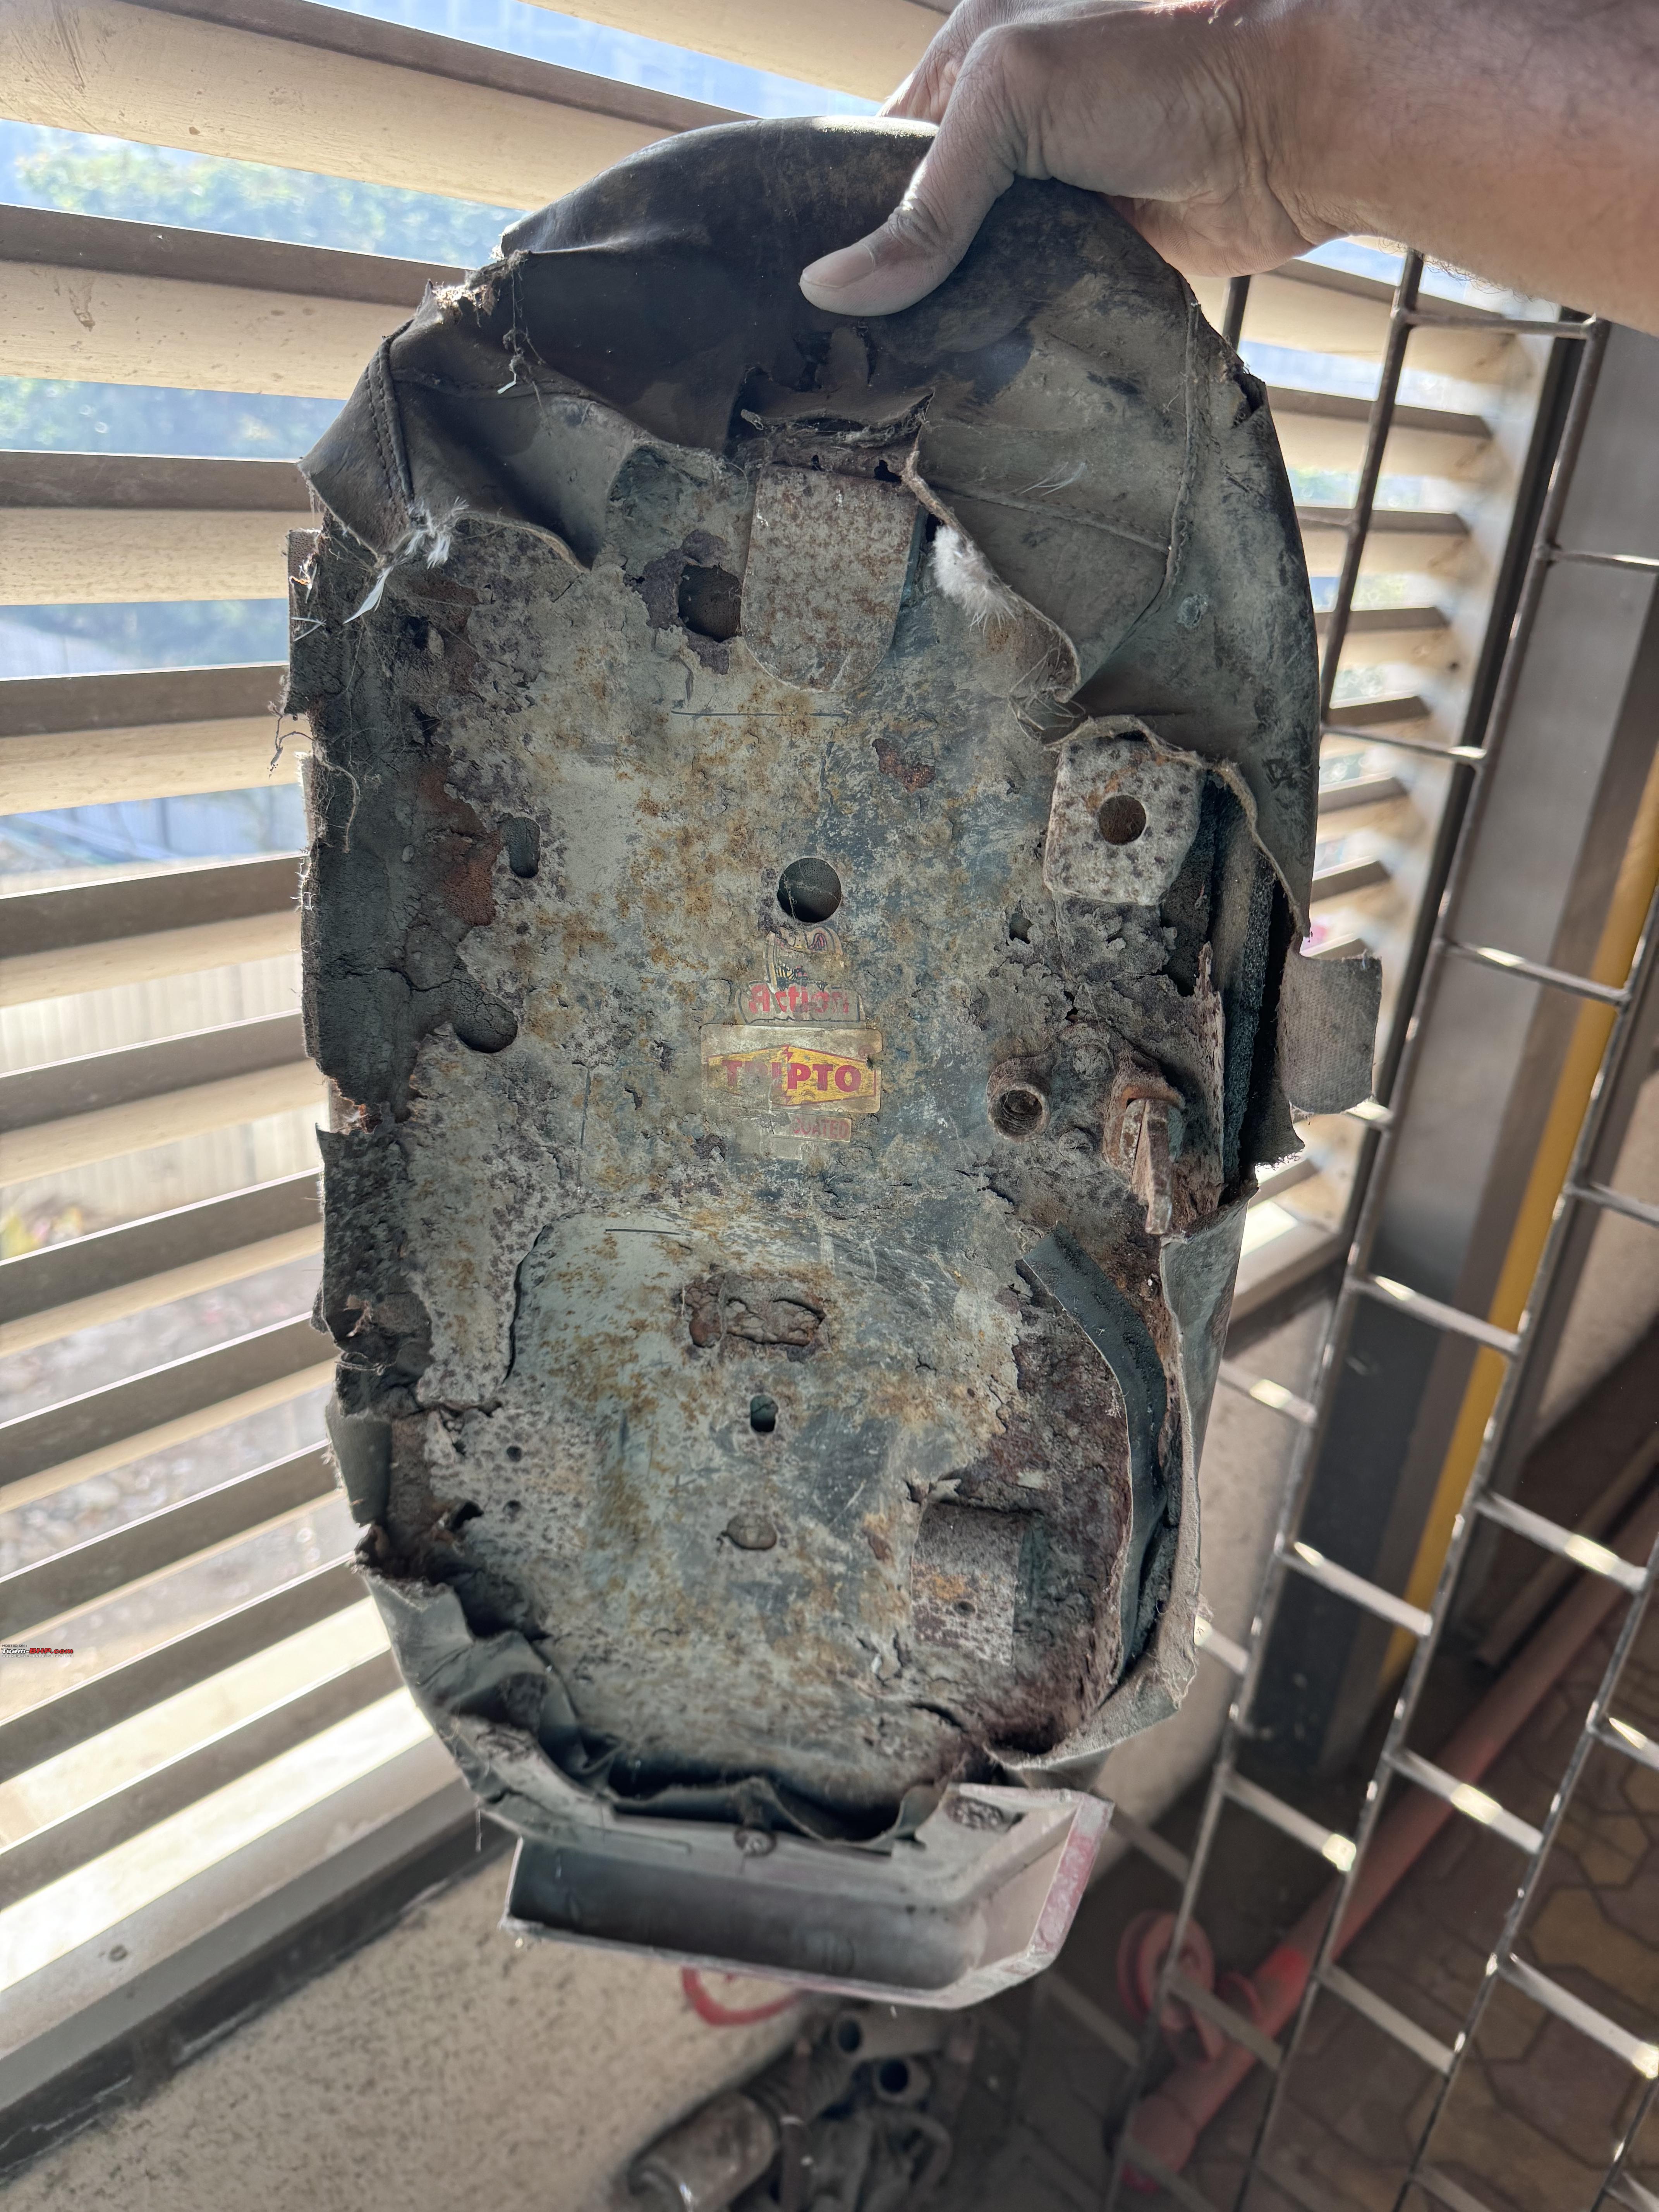 The seat lock similar to the RXZ  Fins for the RD 200 made out of aluminium and machined to perfection on a milling machine    What a perfect seat  Will have to bend them slightly for a perfect seat  Planning to paint the fins in same titanium grey shade as the fork legs. So, now with addition of the fins and once the kick and kick spring arrives the internal can be changed back to OE with the OE kick and new clutch cover  Kick spring for the baby RDs arriving from Thailand  OE kick for the RD 200 arriving from Germany  OE tacho cable for the RD 200 as the one we have on the bike currently is a bit too long  Back tyre finalised for the RD 125. Had to settle with Apollos as Michelin were out of stock with no confirmation when a set would be available next  Front tyre  Throttle cable for the RD 125  Tacho cable for the RD 125. Since the 125 is a DX edition the bottom end of the cable is different from the RD 200.  |
|
| (2)
Thanks
|
| The following 2 BHPians Thank SnS_12 for this useful post: | Cyborg, keroo1099 |
|
17th March 2025, 20:24
| #110 |
| Distinguished - BHPian | Re: My Barn Finds: Yamaha RD 125 & RD 200 "Bend it like Beckham"  Tony shared with me pictures of the aluminium fins with the perfect curvature that he achieved by pressing them into shape over a piece of wood. That is the benefit of working with aluminium soft yet strong and wont rust as well. Now, these two can go in for paint along with the other RD 125 parts Some pictures Look at those curves. So close to the OE fins  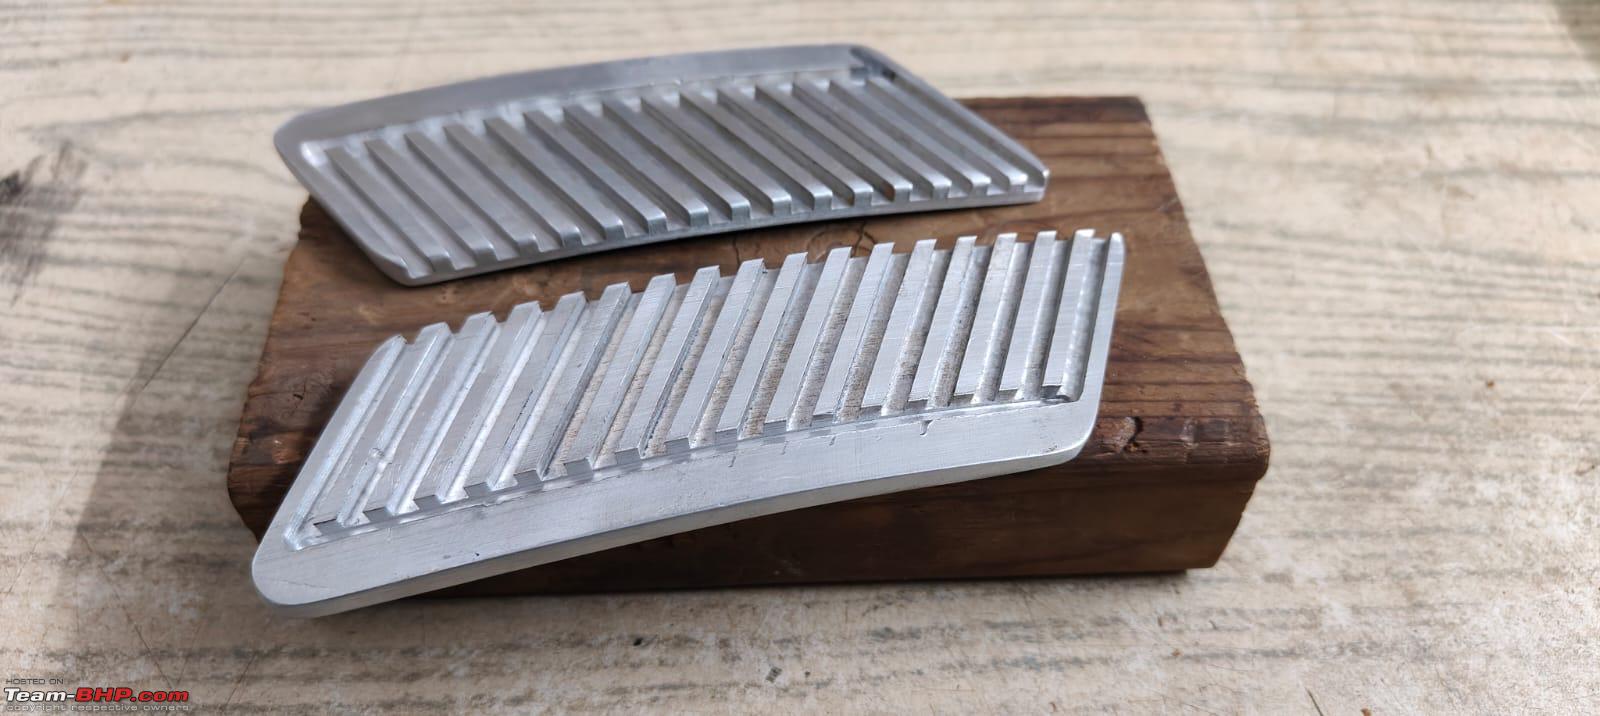 Not a flat sliding in surface anymore    Both are not of the equal lengths and initially we thought we need to take measurements of only one side and replicate the same for the other. Good we cross checked that on the paper reference we had made.  |
|
| (6)
Thanks
|
| The following 6 BHPians Thank SnS_12 for this useful post: | Burjis Zaveri, Cyborg, digitalnirvana, Freespirit27, John P Daniel, manishalive |
|
26th March 2025, 11:03
| #111 |
| Distinguished - BHPian | Re: My Barn Finds: Yamaha RD 125 & RD 200 RD 125 Paint 2.0 The RD 125 parts have finally gone for paint and this is the second time they are getting painted after a gap of close to 15 years. Rusting is a major issue on older bikes and when a bike is left out in the open for decades at a stretch it just makes matters worst. The OE tank had already rusted beyond repair and had to source a used one to replace it and the next metal part which needed attention was the the rear mudguard which had developed many small rust holes which had to be filled up and smoothened out. Luckily all the old paint and base coat was completely scrapped out which made us aware of these issues to be fixed or else the paint would have eventually bubbled up again. Even though the process is taking longer I am glad we are doing a proper job and giving all the attention and care these rare bikes need and deserve. The engine of the RD 125 is ready with the coil plate being fitted and once its put on the chassis the final timing can be marked on the bike. Hopefully, by next week the RD 125 will be standing on its own feet once again and we can work towards firing it up for the first time in decades. Looking forward Some pictures . Magnet fitted on the engine  Coil plate. Converted to CDI and wont be running on points any longer for ease of maintenance 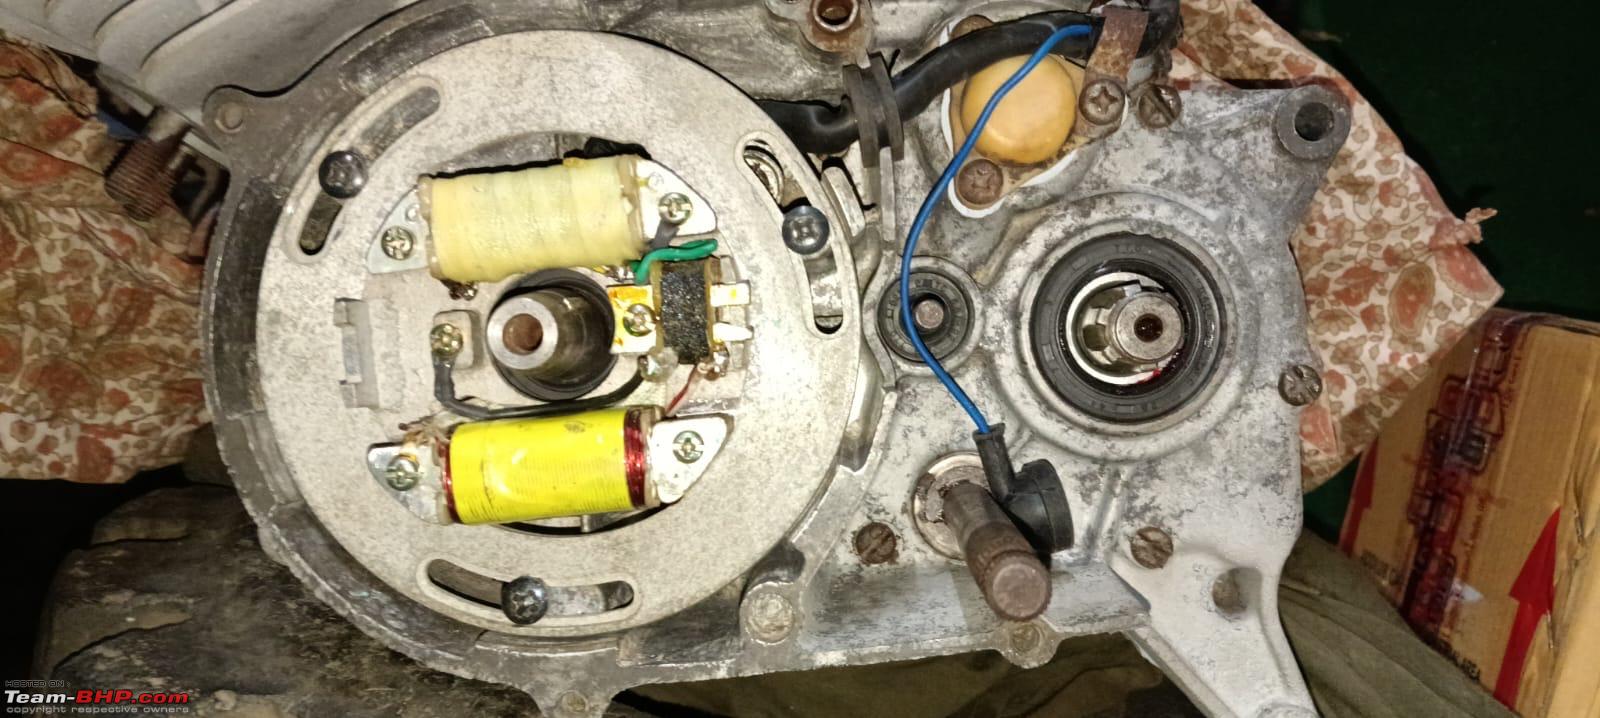 The carbs have been thoroughly cleaned  Body parts being sent for paint  The remaining batch of parts  All the plastic parts will be cleaned thoroughly and a protective coat would be applied  All the parts scraped down to the metal. The problematic rear mudguard stands out now showing its true condition  A lot of pin rust holes have to be filled up  The OE RZ front brake master cylinder cap. When you decide to rebuild a bike to OE spec you just have to go all out. Mine being a JDM spec has the Kanji lettering and I was not happy with the black finish from the powder coating process as it was too thick so getting it painted instead.  Getting parts painted of three different bikes and dont miss the side cover fins for the RD 200 in the right bottom corner. This last few months have been a marathon rebuild exercise.  Up close  Time to iron out imperfections to get a smooth finish   And to fill up a few for a stronger base that will last a few more decades   All set to get the striking Ducati Red shade  Parts continue to arrive back at home  The missing kick spring for the RD 200 came in from Thailand. Ordered an extra piece and this time the parts attracted custom duty as well. You cant be lucky always  |
|
| (4)
Thanks
|
| The following 4 BHPians Thank SnS_12 for this useful post: | Cyborg, digitalnirvana, KarthikK, krishnaprasadgg |
|
4th April 2025, 16:00
| #112 |
| Distinguished - BHPian | Re: My Barn Finds: Yamaha RD 125 & RD 200 19 years later the RD 200 is finally 100% complete A bike that came to me in 2006 and had multiple issues and missing parts that had to be painstakingly addressed one by one and with its fair shares on ups and downs we finally managed to get everything addressed 100% to our satisfaction. Rebuilds like these are rare to come by as the time and commitment required is not something an individual would like to get involved in and ultimately such rare bikes end up in the scrape yard.. Now, its time to enjoy the fruits of our hard labour and looking forward to welcome the RD 125 home soon too. Some pictures.. The final desired look 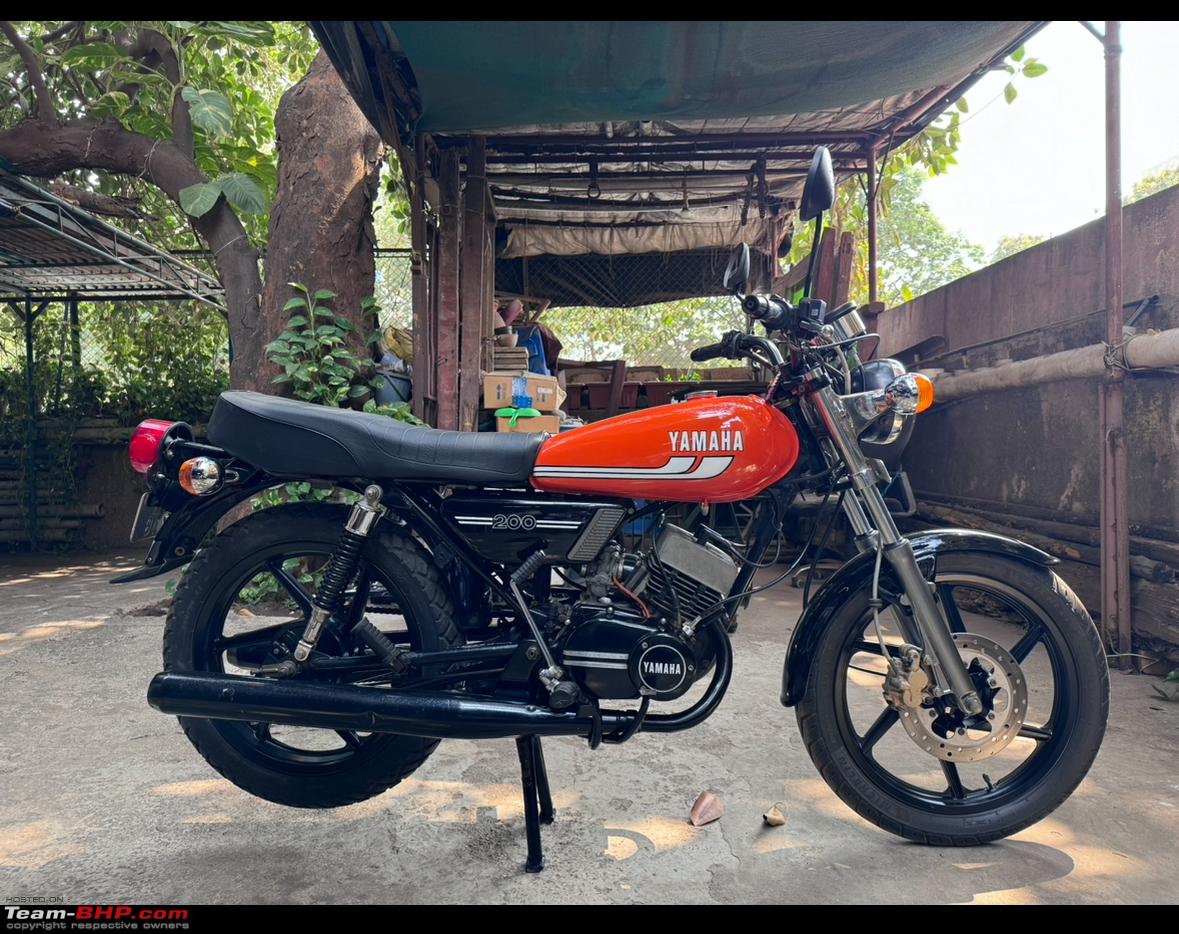 The new painted clutch cover with the OE kick and painted fins  Up close  Back angle  Front angle  Fins up close.. Looks proper OE but in Aluminium  Perfect seat. Tony got the bend spot on  The other side  Front view  Look at the details 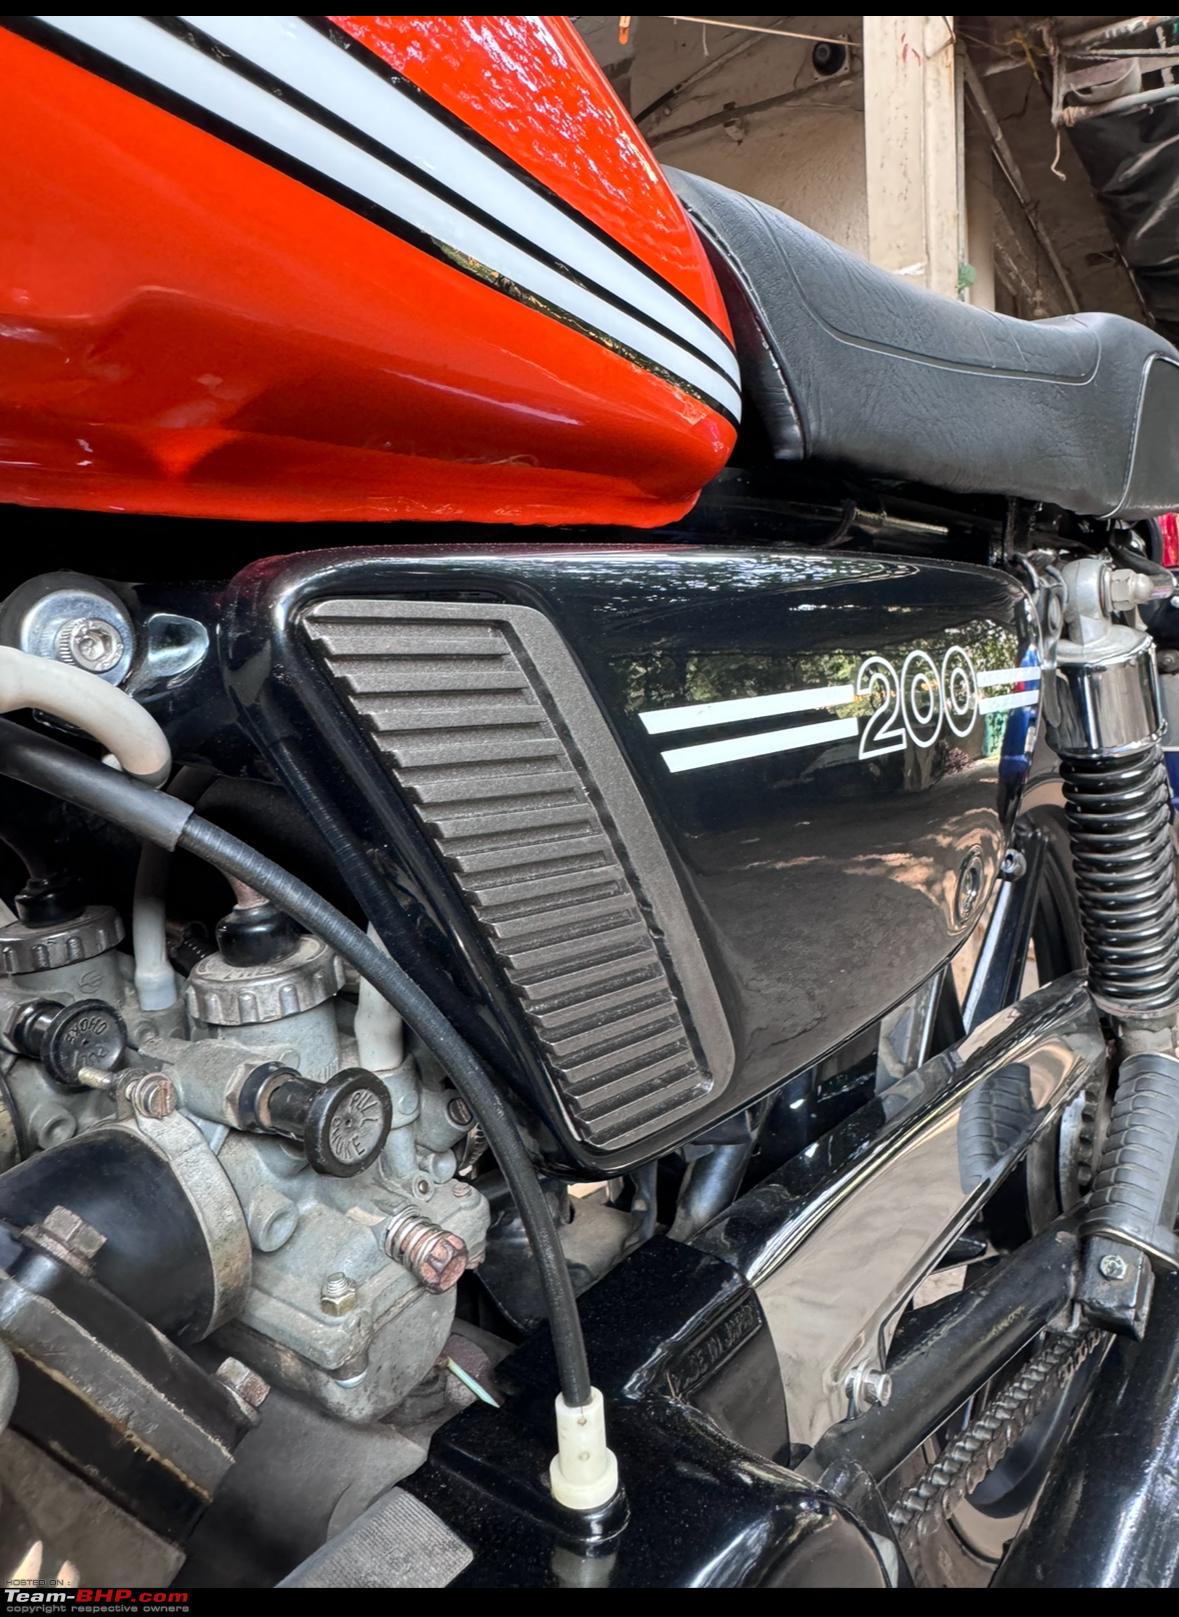 Details from the back  Changes on the tank as well  OE tank cap with Yamaha tuning fork logo. The one previously that came with the bike had a lock and was OE as well but I didnt have the key for it  Random clicks  What a beauty  Trying new angles  Parts arrived from Germany  Kick for the RD 200 followed by the OE tacho cable for the RD 200 on the bottom left followed by tacho and accelerator cable for the RD 125  OE tacho cable goes on the bike  Proper length  Top mounting on the dial gauge  Fresh from paint the RD 125 parts  Looks fabulous. This one is going to be a looker too  No decals all done in paint  Including the front number  If you think the orange on the RD 200 was a catchy colour wait for the RD 125 to get done  Top view   Love the red shade. Ducati colours never disappoint   |
|
| (54)
Thanks
|
| The following 54 BHPians Thank SnS_12 for this useful post: | Baristyro, batterylow, brownkaiser, Cyborg, CzechItaliaMoto, dhruvritzed, digitalnirvana, dkaile, d_himan, el lobo 6061, ex-innova-guy, FarazS, FlankerFury, Freespirit27, GreenerPlanet, Grimlock, gunin, InControl, ishan0278, ITZ_Zeta, jithin23, jomson13, JunkyardHunter, justin.das, KarthikK, keroo1099, klgiridhar, krishnaprasadgg, LJP, mac187, minzanurag, MotorDev, Mrs&Mr_Shenu, nettooran, oilman, Omkar, Pennant1970, pritanshchandra, r0nit7, Rachit.K.Dogra, rajvardhanraje, ramnaresh_2000, Raskolnikov.R, sainyamk95, sandeepmohan, sanjayrozario, Sebring, Sharanam, Shobhitsaxena, SilverSmoke, spookey, TORQUEINDUCTION, vinya_jag, Yieldway17 |
|
6th April 2025, 19:05
| #113 |
| BHPian | Re: My Barn Finds: Yamaha RD 125 & RD 200 Wow! Thats a wonderful bike. I have seen a few RD200s and RD125s on classifieds here in Canada. |

| (4)
Thanks
|
| The following 4 BHPians Thank QuilonSpitfire for this useful post: | KarthikK, mugen_pinaki27, nettooran, SnS_12 |
|
6th April 2025, 20:23
| #114 | |
| Distinguished - BHPian | Re: My Barn Finds: Yamaha RD 125 & RD 200 Quote:
My RD 200 as per the RC records is supposed to be a 1982 model but in reality as per its engine number series is a 1972 model so its the oldest motorcycle in the collection. The RD 125 DX is a 1979 so the RC records have captured that correctly. It is a single owner motorcycle and was used sparingly and left to rust out in the open for many decades for some reason. I never got to meet the owner and only spoke with him on the phone as the deal was done with the mechanic with whom the bike was parked. Took a good six months of constant pestering for him to finally speak to the owner and agree to sell the bike to me.. And now after 19 years with me its heart will finally scream again and smoke a few four strokes on the streets of Bombay Some pictures for nostalgia A RD 125 DX with alloy wheels from factory somewhere in India  The decals is what stands out and can be used to identify if the model is JDM spec or not  Top view  MRF tyres  How mine looked when i brought it in 2006  The JDM spec decals  No 125 decal on the side panel unlike the US and European models  The painted panels in the exact same decal design but in paint 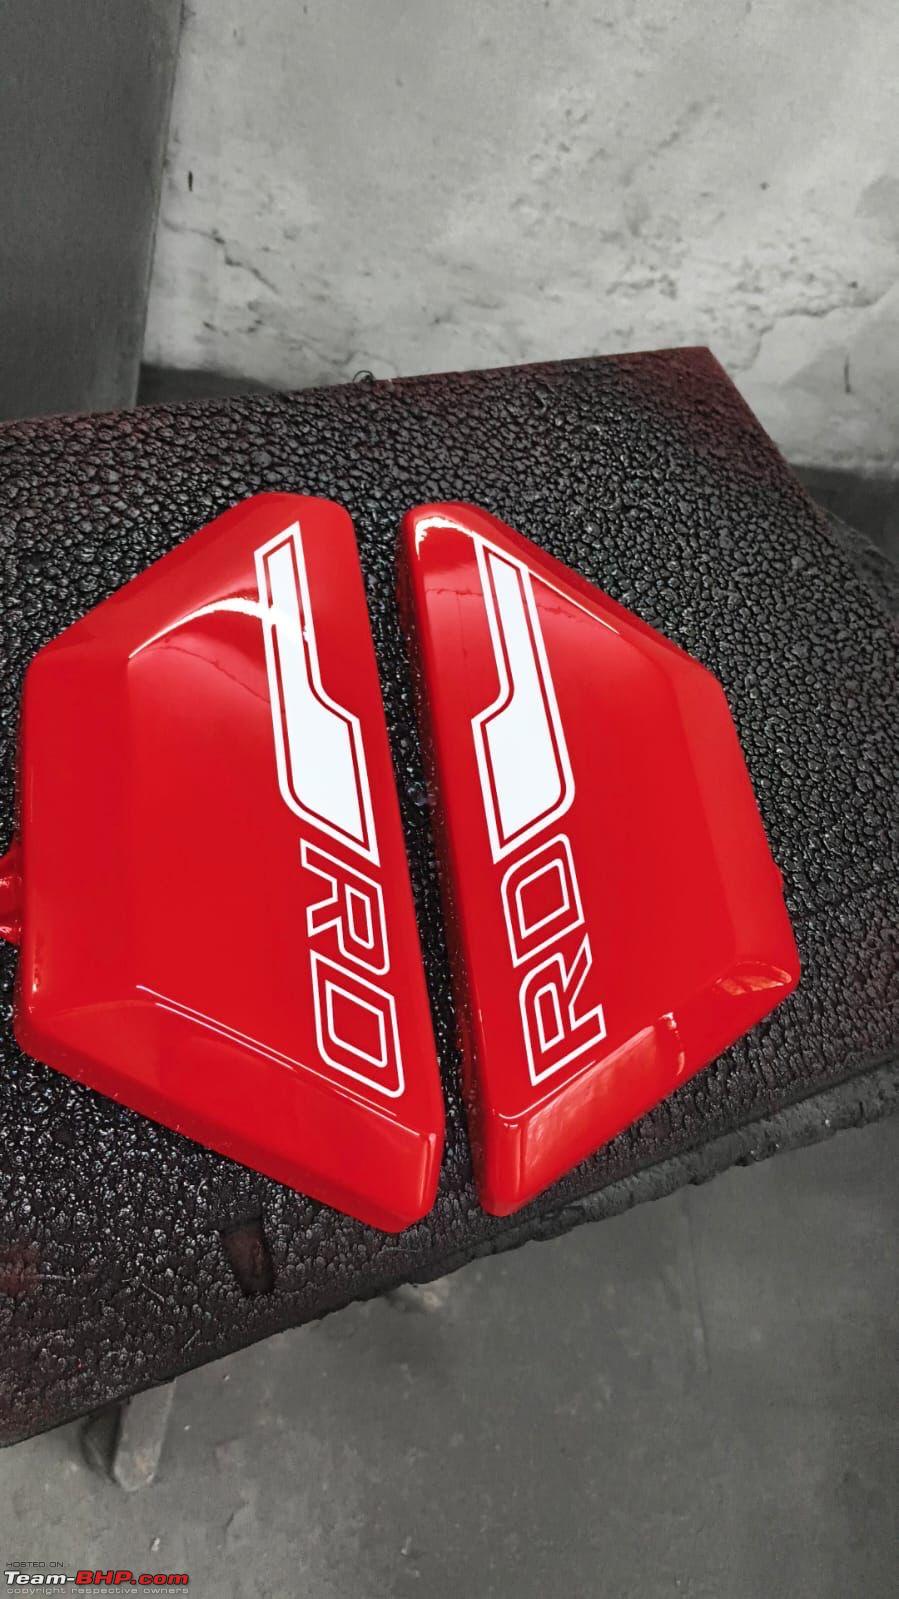 This is how my bike would have looked when it rolled off the factory floor and came to Bombay in the late 70s   | |
|
| (29)
Thanks
|

| The following 29 BHPians Thank SnS_12 for this useful post: | AROO7, catchjyoti, CrAzY dRiVeR, Cyborg, DasAutoFanatic, digitalnirvana, d_himan, Freespirit27, Goku_YNWA, gunin, holdoyn, InControl, ishan0278, jomson13, KarthikK, klgiridhar, matrix1984, Mrs&Mr_Shenu, mugen_pinaki27, Pennant1970, qr20de, Ripper, Rpm300, saitvsk23, Samba, sanjayrozario, Sebring, Wageabond, yd_gli |
|
7th April 2025, 21:22
| #115 |
| Distinguished - BHPian | Re: My Barn Finds: Yamaha RD 125 & RD 200 My 1st barn find is back on its feet After decades of neglect the RD 125 restoration is now closer to completion than ever before. The last time it was standing on its own feet it went into hibernation again for close to 15 years with just the frame and missing its engine. Now, finally we are just days away from hearing her come to life once again and will be our first time listening to a 125cc parallel twin two stroke sing. Cant wait Some pictures Fitting the main stand to the frame before the front and rear suspension and tyres go on  There she is standing on her own feet once again 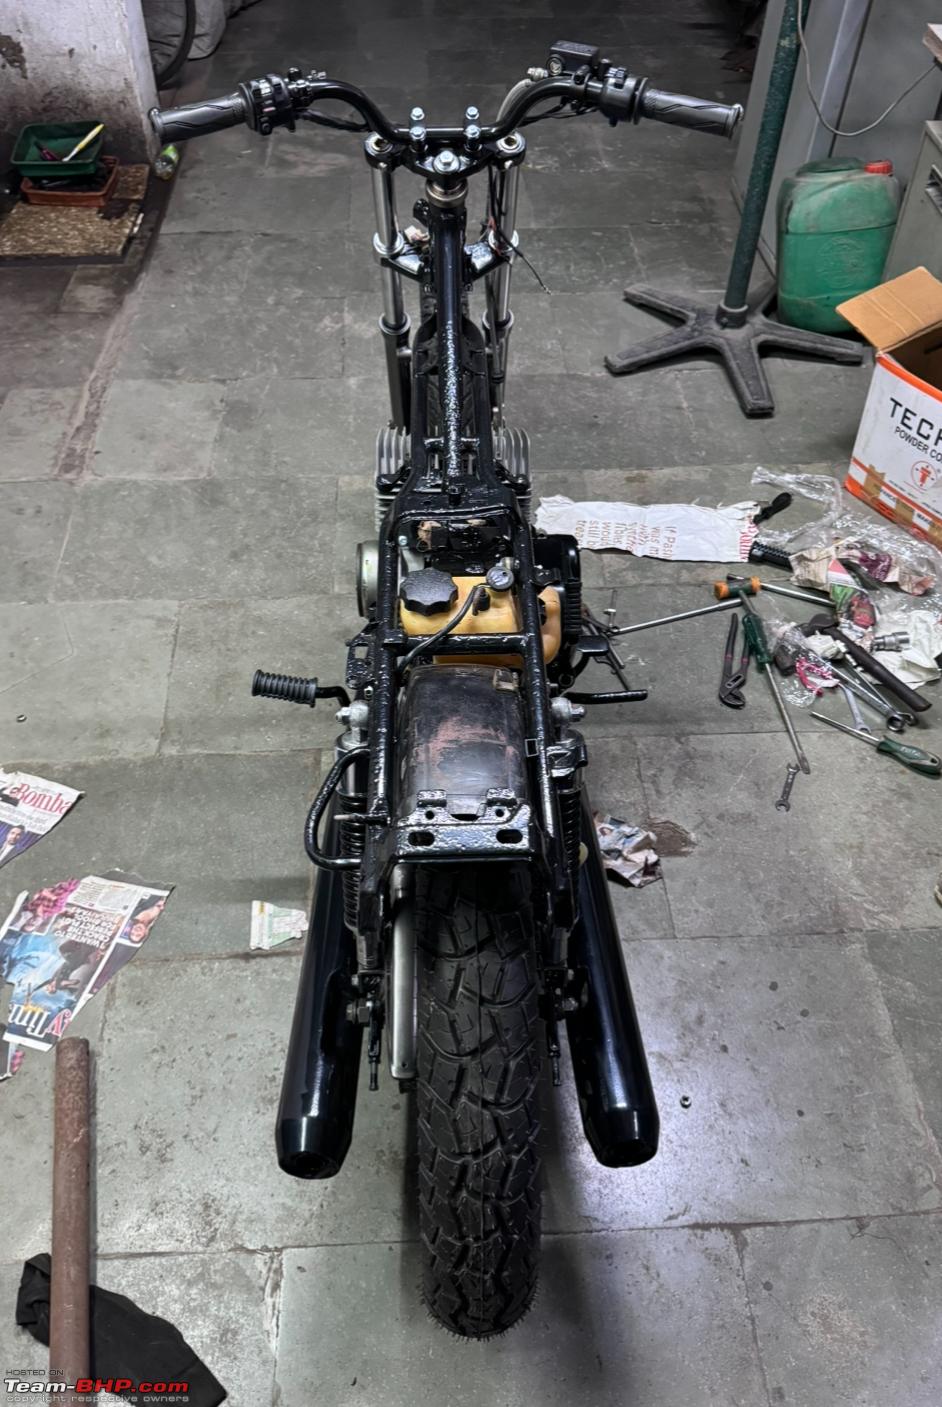 One shiny little 125cc heart goes on too  Front view  Proper stopping power for this 18 bhp light weight screamer  Up close  Carbs and wiring harness will go on next to check the timing  Top view  Oil tank in plastic unlike the RD 200 which is metal unit like the RD 350  Unique rear suspension mount and dont miss the foot peg mounting as well  Rear view of the twin pipes  Twin cylinder with twin down pipes a view which will grab a lot of attention  Sprocket set chain and chain guard go on as well  The oil level electronic indicator not sure if its functional still after almost 45 years.  Going to soon look smoking HOT!!!   |
|
| (14)
Thanks
|
| The following 14 BHPians Thank SnS_12 for this useful post: | anilp, Baristyro, CrAzY dRiVeR, Cyborg, DasAutoFanatic, Freespirit27, Goku_YNWA, Klub Class, musclecar, Rpm300, sainyamk95, sanjayrozario, SilverSmoke, Wageabond |
|
12th April 2025, 01:30
| #116 |
| Distinguished - BHPian | Re: My Barn Finds: Yamaha RD 125 & RD 200 Ignition after decades of Hibernation The wiring harness is done and all the lights have been fitted on the RD 125 minus the battery. A lot of correction and metal work was done on the carbs especially where the bowl fits and we were praying that it will hold well without any leaks and we would be able to start the bike. These parts are really old and ideally a new set of carbs would be required but getting one is a task of its own so we did our best to salvage the carbs. We wanted to get the bike started asap to ensure all the critical parts are taken care off and we can then focus our attention to the other cosmetic work that is pending. The carbs were fitted on the bike and filled with petrol to ensue no leaks and then the 2t oil tank was filled up and the pump was bled. Then the moment finally came when all systems were go to kick start the bike. A few initial kicks didnt create and magic so we thought maybe the back pressure is not enough and inserted the baffles in both the mufflers. Post that the bike was still not firing up and the timing gun was taken out and we decided to advance the timing and that change is what made all the difference and the engine finally woke up from its very longgg slumber..For a screamer of a heart she has the sound track was very muted even compared to the RD 200 but no complaints and we will only hear and feel her real character when we put her in motion. Have waited for this day for 19 long years and the bike itself would have given up hope in believing that she would fire up once again.. But she was neglected for years at end even under my ownership but was never forgotten. My second bike and my first barn find was alive and kicking once again Now, though the engine has fired up the timing still needs to be advanced further but the coil plate is already at its most extreme position so that needs to come off to be machined out further. Also, a bracket has to be fabricated to mount the front mudguard and the meter bracket and also the seat base plate has to be fabricated from the original seat which has disintegrated over the years. So, the bike visually looks complete more than ever before but still a lot of small stuff needs to be done before the build is 100% complete and I can taken my maiden spin on the RD 125 Some pictures An investment made 15 years ago finally gets the opportunity to go on the bike and not just remain an expensive trophy lying in my part collection. Costed me 20k each landed cost though back in the day.  How many meters is too many meters? Have a extra speedometer only with chrome body for the RD 125 and a full set with an additional tacho for the RD 200. All are old new unused stock.  You guys maybe we wondering what is the RZ tank doing with the RD tank?  Well, for some reason the epoxy internal coating on the RZ failed and had to redo it.  But instead of redoing epoxy coating we applied something else this time around  This product was suggested by Sumants painter who had used it earlier on a tank that belonged to a Parsi gentleman and had asked the painter to apply it on the interior. Its made in the US and is quite expensive 6k for 236 ml which is good for a single tank. Luckily I got a good deal for a 946 ml can on Amazon.  This is how it looks and we have still lot of quantity left after applying on the RZ and the RD 125 tank. Will be applying on my other RDs too.  Applied a layer on the outer portion of the carbs as well to seal all the small cracks and pores  Taillight bracket with the reflectors and taillight  Top view with the rear indicators  Taking shape  Trying on the tank to check the T movement to avoid it from touching the tank  While looking at the rear end I noticed a big difference compared to the RD 200  The length of the silencer unit. The RD 125 ones are very short in comparison  Top view of the front end. Meter bracket is yet to go on and needs some fabrication work  The front mudguard too needs some fabrication before it can go on the bike  Time to do some spot welding  The T plate turning radius needs to be tightened up a bit to avoid hitting the tank  So spot weld on both sides  This is the final result  Time to fit in the carbs  One mans trash is other mans treasure. The OE seat being transported to Tonys  Original keys which are just to be kept as souvenirs now  The refurbished tiny carburettors  Finally go on the bike  Time to fill up the 2T oil tank  And bleed the oil pump  Silencers to go in the muffler unit  What a sight. Never gave up hope on this special one and its has indeed turned out to be a very special rebuild.  The timing has to be set and the coil plate has to be taken out. Still a weeks work left on it before I can swing my leg over it for the first time ever since 2006..  |
|
| (13)
Thanks
|
| The following 13 BHPians Thank SnS_12 for this useful post: | arnav17, b16h22, blue_wizard_v12, Burjis Zaveri, condor, dailydriver, Freespirit27, jomson13, Maverick_4662, mugen_pinaki27, Roy.S, sanjayrozario, vaasu |
| |
|
13th April 2025, 08:02
| #117 |
| BHPian | Re: My Barn Finds: Yamaha RD 125 & RD 200 That's a pretty long muffler unit for a 125. I remember my Yezdi with a 250 Roadking engine having a much shorter one. This is what must be keeping the screamer muffled,  Very interesting build, way to go! |
|
| (1)
Thanks
|
| The following BHPian Thanks Freespirit27 for this useful post: | SnS_12 |
|
13th April 2025, 10:18
| #118 | |
| Distinguished - BHPian | Re: My Barn Finds: Yamaha RD 125 & RD 200 Quote:
Looking forward to ride it and compare how both actually compare in performance in the real world.. To ride something that was manufactured in the late 70s for the first time in 2025 is surreal and feels very very special.. Truly blessed to be experiencing just moments and making such memories in life Received this image of the fabricated bracket to mount the meter and the ignition key. For the ignition key I had an original metal key set with steering lock and tank lock of the RX which I am using on the 125 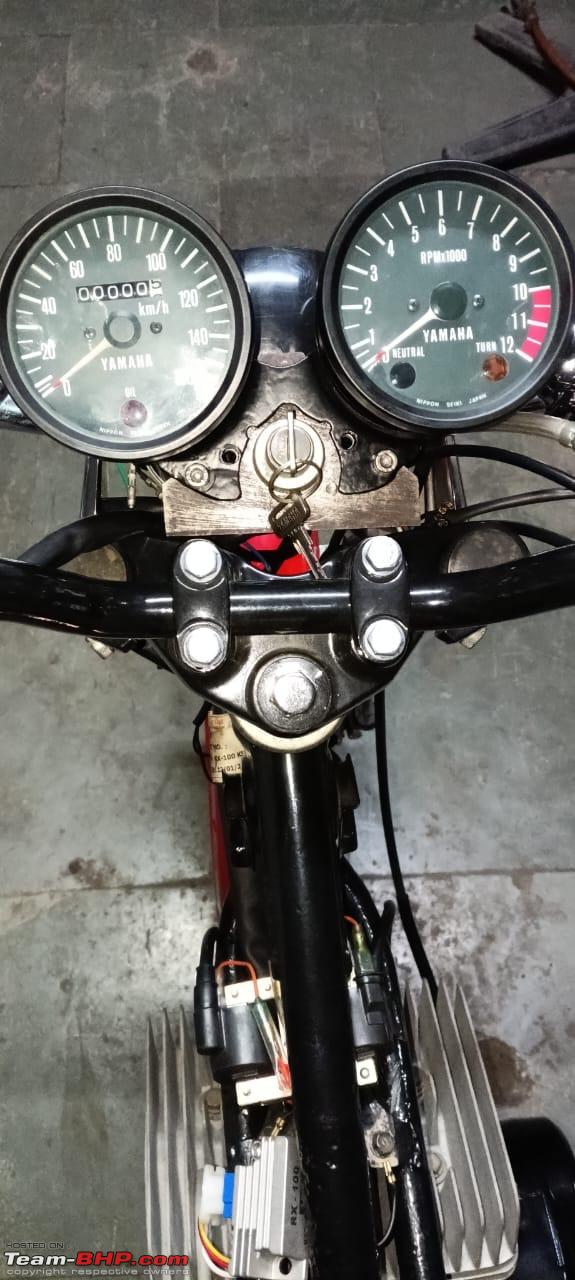 Video of the first startup for viewing and hearing pleasure | |
|
| (8)
Thanks
|
| The following 8 BHPians Thank SnS_12 for this useful post: | anilp, arun1100, Cyborg, DasAutoFanatic, Freespirit27, jomson13, mugen_pinaki27, sanjayrozario |
|
25th April 2025, 00:52
| #119 |
| Distinguished - BHPian | Re: My Barn Finds: Yamaha RD 125 & RD 200 Maiden ride on the RD 125 and the RD 200 growls even louder With the engine now running, we could now focus on finishing up the cosmetic bits and especially the seat. My OE seat was rusted beyond repair and I couldnt find a replacement one on Ebay. So, we had no option but to fabricate one and the seat base chosen was of that the RX. The hinges were made in house and days were spent in just getting the alignment perfect for the seat plate. Also, we had managed to make a spare key for the original seat lock which was opened and serviced and repaired. Once the desired alignment was achieved the seat was sent to a welder to weld the hing bolts in place and add extra metal sheet to extend the base of the seat plate to cover the chassis better. Once, this was done a coat of the rust paint used to coat the inside of the tank was applied. For the RD 200 we had applied fibre glass back in the day to increase the seat strength and prevent it from rusting and that is still holding up well. Next, the seat guy was called with the foam to make measurements before he took the seat base with him to finalise it and apply the seat cover. Now, the bike was ready for its maiden run and it had to be prepared for its proper long ride as well as I had to visit the RTO with the bike to get its registration renewed. Since, this bike was lying around I hadnt renewed the registration and fitness and I still had the original RC book. Last year around May I had handed over the documents to my agent and the process took really long as the records had to be pulled out as my details had not been captured in digital format and there was another issue with the engine number which was not common. More on that later. Now, with the papers processed the bike was required for a physical inspection and my agent called me in late December last year enquiring on the progress of the build and when can he made the necessary payments to get an appointment date fixed. With all the delays the day came in really close as my agent was away in May and wanted to get the work done in April and I had only this week as I am travelling for work in the last week of April. So, the bike had to be ready at any cost and I took for its first maiden spin in the complex and then out on the road. The bike rode and sounded beautiful but the carburettor setting was not perfect. These are very old carbs and had deteriorated quite badly especially the carb bodies. So, even with new internals they were a pain to set up as they would go off with smallest of inputs and we also had to to block the choke off completely as it had a leak even in the off position. So, we did our best to get the bike working and I set off to the RTO office with a small prayer. A few kms in and the rpm started going up on its own when the clutch was pulled in and especially when the bike was put in neutral. I didnt want to touch the carbs and I managed to reach the RTO office somehow. The bike immediately commanded attention from folks present there and they couldnt believe that it is a 1979 built motorcycle and especially that it is not an RD 350 and a RD 125 with twin cylinders instead. There was a brand new Ducati V4 on a flatbed which had come in to get registered as well and all the crowd was gathered around my bike instead Now, I was hoping that I would be done and out of there in 30 mins as the place was really dusty and plus the heat but, then things dont happen so easily for me do they. I had mentioned that my engine number was unique and that was a reason that delayed the paper processing at the backend in the RTO. Now, that same issue came to haunt me when the RTO officer saw my paper and immediately said this has been re stamped and he cant pass it. Firstly, its not easy to re stamp the number on the engine block and get the factory groves as well and the other issue is when the engine and chassis number are completely different when a donor engine or chassis is used. But in my case the engine number is just a three digit number for some weird reason and that is what was mentioned on the original RC book as well. The RTO guy was not even ready to listen to our argument and then my agent said that I will have to bring my bike again in May. Now, I was in no mood to go through this ordeal again and said try and convince him and do whatever it takes and I will wait it out till we get the papers signed today itself. So, a 30 min job took over 2 hours but the work was done. Now, came the difficult ride back home as the bike would just not idle and the fuel mixture was feeling lean as the gear shifts had done harder and the rpm continued to rise. Managed to get bike back to Tonys place and when we checked the carb the left cylinder was running a rich mixture. We did a lot of changes to the air screw mixture and needle setting which made the fuelling much better and the bike more rideable but still it was not 100%. So, now we have decided to see if we can fit the RX 100 carbs instead as that setup is working beautifully on the RD 200, but then the RD 125 is a much smaller engine so need to see what best can be done with the 20 mm carb to replace the OE 18 mm ones. Speaking of the RD 200 I rode that to Tonys today and the new clutch plates has made that bike into a complete beast with everyone turning their heads the moment I approach or do a fast overtake. Its a proper missile on two wheels but I felt it had room more improvement and especially at the top end of the power band. So, the main jets were drilled to the next bigger size and what a world of a difference that has made. The intake growl has grown louder and the thing just moves like a mad two stroke on the slightest of throttle input. Just love it.. Some pictures . Front mudguard goes on the bike  Adaptor plates made from aluminium to mount them on  Top view  Front view is now complete  Speedometer all set to roll in the first km  Metal key. Its an OE key set made for the RX  OE old brittle carbs connected to the OE airbox  Time to manually drill. The long contraption to get the perfect angle  Close up  Seat pin goes in perfectly  Perfecting the seat alignment before the hinge bolts are tightened up to finalise their spot  Metal duplicate key to operate the OE seat lock  Open view  Closed up and the final resting spot  Side view. You can see the cap between the seat and chassis which has to be filled up now with the extra metal piece around the original seat base plate  Seat supports been fabricated  Iridium plugs go in  The seat base plate with the extension and after rust paint coating was applied  The bottom look  Time for the RD 125 to go for its maiden spin with the RD 200 by its side.  Seat has arrived as well  Front side  Seat lock hook mounted on  Rubber dampers mounted as well  Time to go on the bike  The final look  Finally its time for things to finally align up  Like, literally. Sumant has done yet another fantastic paint job  First few kms roll on  First spin on the main road  |
|
| (7)
Thanks
|
| The following 7 BHPians Thank SnS_12 for this useful post: | chiranjitp, Cyborg, holdoyn, Pennant1970, Roy.S, sanjayrozario, Wageabond |
|
25th April 2025, 01:10
| #120 |
| Distinguished - BHPian | Re: My Barn Finds: Yamaha RD 125 & RD 200 Some more pictures
Made a quick stop at OCD to show the bike to Sumant but he was unfortunately not in town. The current gen 150 and the oldie parallel twin 125 for comparison  Well Hello Hello!  Two striking red trouble makers at the RTO grounds today  But the BaBy RD drew the major crowd  Patiently waiting it out for the officer to finally agree to sign off my papers  Could this unique RD have suffered the same faith if I hadnt bought it in 2006?  They stand together at the same spot where they first met in 2006.  What a journey this has been  And looking forward to making many memorable memories together on the streets of Mumbai and beyond..  Km reading for the day  Before and after pic of the RD 200.. 19 years apart  And for the RD 125  My babies were neglected for decades even under my ownership but were never forgotten. My first thread on Team BHP now finally has a happy complete beginning |
|
| (43)
Thanks
|
| The following 43 BHPians Thank SnS_12 for this useful post: | 5hank3r, aargee, ads295, after, anilp, anivy, b16h22, chiranjitp, Cyborg, deep_bang, ellip5i5, F138 V8, Freespirit27, Gaur, hobbit, holdoyn, inclmal1, jithin23, JunkyardHunter, Kams_cars, Meteormariner, Mr.Ogre, nikhil.neon, NomadSK, Omkar, Pennant1970, pritanshchandra, Roy.S, sainyamk95, saitvsk23, sanjayrozario, Santy19, Sen, sf-24, Sophomore, spookey, Torino, Tvk1991, v12, Vinod_nair, vivekgk, Wageabond, windrider |
|