| |||||||

| Search Forums |
| Advanced Search |
| Go to Page... |
 |
| Search this Thread |  36,337 views |
 8th August 2024, 22:58
| #1 |
| Distinguished - BHPian  Join Date: Jun 2012 Location: BengaLuru
Posts: 5,954
Thanked: 21,222 Times
| A guide to retrofits on VW/Skoda MQB Cars in India Introduction: If you are specifically looking for the park sensor upgrade, skip to post 3. Adding features to VAG Group cars by retrofitting parts into them isnt something new here as well as in International markets. Its fun, the results are pretty convenient, you learn a lot and at the same time blow time and money with high chances of blowing more time and money and face failures as you get hands deeper into this. Many TBHPians have done a lot of such upgrades, and those were the ones who inspired me to even get my hands on a VAG product in the first place.. The MQB cars especially A0IN cars are very country specific and are mostly developed and exported to emerging markets. To make things worse, the Slavia and Kushaq have made its way into lesser markets other than India compared to Taigun and Virtus so there is hardly any international discussions about the same. Compared to the cars sold in developed markets, there are lot of differences at least with electronics and the attention to detail. When I purchased the Slavia, I was sure that someday I would get my hands onto modding the car not for performance, but such retrofits. It is not because of something I badly miss in the car, but the joy of getting something more from the car without making it look like an aftermarket accessory. Actually these components are not very expensive both as components from China, or OE spares brought from abroad. Having had a career in the automotive systems domain for nearly a decade now, it was time to work on my own car which is actually more simpler than what I do at work. But before continuing any further, I would like to convey my sincere thanks to cardiagn.com for all the service info and wiring diagrams. They have an unbelievable collection of technical data across brands which is just insane. Other acknowledgements will follow as appropriate. I hope this thread is useful to some people at least, and I sincerely hope you do not brick your car doing something that was not supposed to be done. And please dont ask the warranty question. I cannot answer the same. Last edited by audioholic : 13th August 2024 at 22:39. |

|  (46)
Thanks (46)
Thanks
|
| The following 46 BHPians Thank audioholic for this useful post: | 5hank3r, abhishek2684, AdvanceStarter, ankitsharma, aravindb_0711, Astriez, CafeRacer16, captain planet, CEF_Beasts, CentreOfGravity, Chetan_Rao, chinmaypillay, digitalnirvana, Dr.Vikas, GaryTSI, GTO, harikrishnansp, Harjot37, Hoonigans, Jabber, k0p, lancer_rit, MismatchD, Mitadru, MotorDev, Mu009, navinkamath4657, ndnesh, neochanger, Pennant1970, punto_, Rajeevraj, Rohit_Quad, Roy.S, rphukan, rroy92, SaiChaithanya, sanjayrozario, SunnyBoi, theexperthand, true_sedan, tsi_niks1989, vijaysrk, Vik0728, vinaygeorgeroy, VinNam |
| |
|
8th August 2024, 23:25
| #2 |
| Distinguished - BHPian Join Date: Jun 2012 Location: BengaLuru
Posts: 5,954
Thanked: 21,222 Times
| Re: A guide to retrofits on VW/Skoda MQB Cars in India MQB Electrical architecture: Modern vehicles have multiple electronic controllers for various functions. What started decades ago as an Engine Control Module(ECM), a lot of control modules have joined the bandwagon over the years to be generically referred to as an Electronic Control Unit(ECU). Based on their function and complexity, ECUs communicate with each other, as well as offer diagnostics via networks. These networks run across multiple ECUs and enable them to communicate with each other on a common bus. Having Japanese and German cars with me, there is a huge difference in their philosophy including how the electronics and networks are designed. The Japs still rely on old school principles of electric signals being sent as analogue wires, and are having a hard time switching to modern in-vehicle networks out of absolute necessity. The Germans OTOH had in-vehicle networks from a looong time and had CAN bus implemented for most of the components which meant lesser analogue wires that went around from one ECU to another. You can read more about in-vehicle networks here https://en.wikipedia.org/wiki/Vehicle_bus and the excellent VAG self study programme http://www.volkspage.net/technik/ssp/ssp/SSP_269_d1.pdf and There were plenty of benefits in such an arrangement but it came with the issue of increased complexity when diagnosing electrical problems. You could no longer just hold a multi meter against a bunch of wires and troubleshoot why the bulb wouldnt turn on. The latest cars have gigabit ethernet communication and a host of other networks including many different CANs, lots of gateways to switch between networks and dedicated audio-video networks, optical fibre communication etc. The MQB A0-IN architecture was derived out of the global MQB platform and due to cost reduction needs, some of the complexity was omitted to the extent possible. This also includes the task of reducing excessive electronic controllers in the vehicle and either completely eliminating them or replacing them with simpler units without any networking. One such example is the door control units. Earlier cars including Polo, Vento etc had a dedicated ECU for each door, which would receive a networked signal from the Body controller and then decode it into individual functions such as windows, electric mirror control, door lock control etc. In the MQB IN, only driver door gets a controller, while the rest of the doors operate with analogue signals from the BCM. Thats how cost reduction has happened. The result - Only driver door gets one touch up down while other doors dont get it. Similarly, the popular function of mirror lowering when you put the car into reverse does not work, since it was a function of the Door controller. Digging deeper into CAN - The VW way: See what an entry level car like the VW Polo had in 2002:  Source: http://www.volkspage.net/technik/ssp/ssp/SSP_238.pdf There is a network of different ECUs, all connected via CAN networks. For anyone who has studied computer networks, the topology is very comparable to a network with similar number of computers. Each computer can be disconnected from the network without causing severe issues. Similarly, ECUs on the CAN network can be disconnected or added without causing severe issues. By severe, I mean there will be communication between other devices, but the absence of a certain ECU might trigger errors in other ECUs which might have some dependency. You see different CAN networks here in Red(Drivetrain CAN) and Black(Convenience CAN). They both are connected to the diagnostics plug which also serves as a gateway between the two networks. As the diagram goes, the powertrain related components are all on one network, and the various convenience features are all on another network. There is also data exchange that happens between these networks for various reasons. The climate control unit for example on Convenience CAN wants to interact with the engine control module and vice versa for the operation of the AC and hence, there will be cross CAN communication. Why separate CAN networks? The answer is easy - to control network traffic and prevent overloading of the CAN due to too many controllers on the same network. The same concept has been carried forward till date, with the addition of networks and introduction of Ethernet based networks for high traffic controllers like ADAS, Infotainment etc since they have data needs that will exceed the capacity of CAN. Present day VW/Skodas have multiple CAN Bus networks such as:
 https://www.researchgate.net/figure/...fig1_336068161 They have all evolved due to increasing amount of controllers and the data they exchange. The main difference between these networks is their transmit speed, data packets that are present and various strategies to turn them on or off. The devices on Convenience CAN remain ON for a period of time after the ignition is turned off, whereas the devices on the extended, powertrain buses sleep sooner, mostly as soon after ignition is turned off. Like how we have a network of switches and servers, in the car there are gateways which serve as the main junction between various CAN networks. The gateway transfers certain messages from one network to another, and will accommodate different data rates. The powertrain CAN runs at a higher speed compared to the convenience CAN. The gateway also contains a list of the various ECUs in the car and tracks their health, startup, shutdown etc and needless to say, a gateway failure can brick your car and leave it stuck in a place without even moving. The list is referred to as Installation list and can be editable to enable and disable communication between those modules. How this background helps in mods and retrofits Thanks to global presence of these brands and availability of diagnostic tools, with this info we can add controllers in the car and get them to work with minimal tampering of the existing wiring. Of course we would add a lot of additional components and wiring, but the existing wiring stays intact to the best extent possible and should not affect their functions. The parking sensor installation here is an example, but most of the mods involve accessing one of the CAN networks to be able to enable the new component to talk to the existing components. We can use diagnostic tools like ODIS, VCDS, OBD11 to enable and disable installations which is shown in this page https://www.ross-tech.com/vcds/tour/...ation-list.php . It is pretty easy and just involves ticking a box or in newer cars editing a drop down list. Even if a certain ECU is disabled in the gateway, it can still perform and communicate. However, the gateway detects this as a rogue module which was not meant to be there and can throw error codes and even prevent passing messages from this controller to others. If a module is coded in the installation list but is not physically present in the network, again it would cause an error about loss of communication with that module. Hence, ECUs which are not present in the car can be added, removed and integrated with the rest of the car by tweaking gateway settings AND making some other adaptations on a case to case basis. This is the advanced use of coding tools compared to just changing adaptations or coding on existing components. Tapping into the CAN network: CAN communication happens through one pair of wires, CAN Low and CAN High. Modules on the network are connected over the same running CAN bus wires and with junctions. The most popular way of accessing the CAN network is to get a CAN Tap which will prevent any splicing of the wires and issues that can arise out of it. It requires the pins to be de-pinned from the existing connector and that can be done with a de-pinning tool. It is recommended to use the right tools only and not substitutes to prevent any damage to the stock couplers and the pins. Once depinned, the wires are rerouted through this connector which will allow branching of the CAN. One pair of wires go back to the connector where the OE CAN wires were removed from, and another pair will head to the new component. Even in the absence of the new component, the network will work without any issues or errors. So technically this is still a coupler to coupler fitment and we do not have to cut or splice wires.  Last edited by audioholic : 17th August 2024 at 22:12. |
|
| (30)
Thanks
|
| The following 30 BHPians Thank audioholic for this useful post: | 5hank3r, aravindb_0711, Astriez, CafeRacer16, captain planet, CEF_Beasts, Chetan_Rao, chinmaypillay, digitalnirvana, Gannu_1, GaryTSI, GTO, Harjot37, JDMBOI, LastPanicker, lovetorque, MotorDev, museycal, Newtown, PNTEN, Rajeevraj, Roy.S, sanjayrozario, Santo_the_bong, Saturn-V, Sen, Shanksta, SunnyBoi, theexperthand, Vik0728 |
|
13th August 2024, 23:12
| #3 |
| Distinguished - BHPian Join Date: Jun 2012 Location: BengaLuru
Posts: 5,954
Thanked: 21,222 Times
| Re: A guide to retrofits on VW/Skoda MQB Cars in India 8K Parking sensor retrofit - Background: The Slavia came with a basic three sensor parking setup with just an audible warning. I initially wanted to only upgrade the reverse camera and leave the sensors untouched, but the retrofit bug bit me since these parts are inexpensive and the results are totally OEM. At the same time, I noticed that Skoda started selling a cheap aftermarket sensor set for front parking and that didnt even have proper integration with the car(imagine having to turn on a switch manually to activate). The 8K(Kanal for channel) Optical Parking system is pretty common across VAG group cars and has these salient features:
I scouted on Alibaba/Aliexpress for this kit and was able to find plenty of options. For a landing price of roughly 15k including customs and some other incidentals, this was much VFM compared to the accessory sold for 7k plus installation. Of course, there is lot of installation effort involved here, but the results are no where comparable between this and the aftermarket setup. 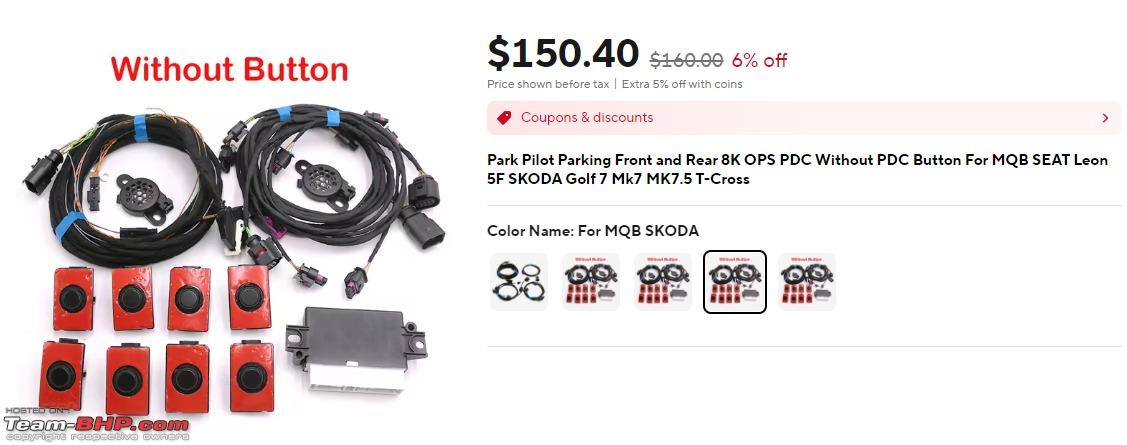 The contents of this kit will be typically:
Other kits also come with a switch to activate PDC, but in my case, we dont have anything for the Slavia center switch layout and whats better, the Infotainment head unit already has virtual buttons similar to ESP on/off which act as switches. For the final installation itself, if you want to skip the background effort that I will now mention about, you can skip to here: Proof of concept: There is just no documentation of this install anywhere except for international models. There was only one example on social media where a Kushaq got this kit but since this guy was marketing the product, absolutely no info was shared about the installation or product. Thats what triggered me to get to this task and share information. Having got all the items delivered quickly by DHL, I spent countless hours studying wiring diagrams of both Slavia and other models. I only knew it would work, but not sure how to get it working. Experiment stage 1 - Getting the controller onto vehicle network Owing to an earlier experiment upgrading the reverse camera, I had already made a CAN tap as explained earlier. The CAN Tap was made from infotainment which was on the convenience CAN bus and I could try some quick tests. Result: FAIL. I got the PDC controller up and running, coded into the gateway and hooked up all the sensors to the harness. The infotainment display promptly displayed the PDC menu and page, but none of the sensors reported any obstacles. The PDC module had a ton of errors with missing messages from Engine controller, ABS, Transmission and would not work apart from displaying the image of the vehicle. This was how the test setup looked like  : : At a certain point of time, my car was at this state as my dad gaped at it and my wife was out of town   Tapping the powertrain data bus This is how the electrical network architecture of the Slavia looks like: 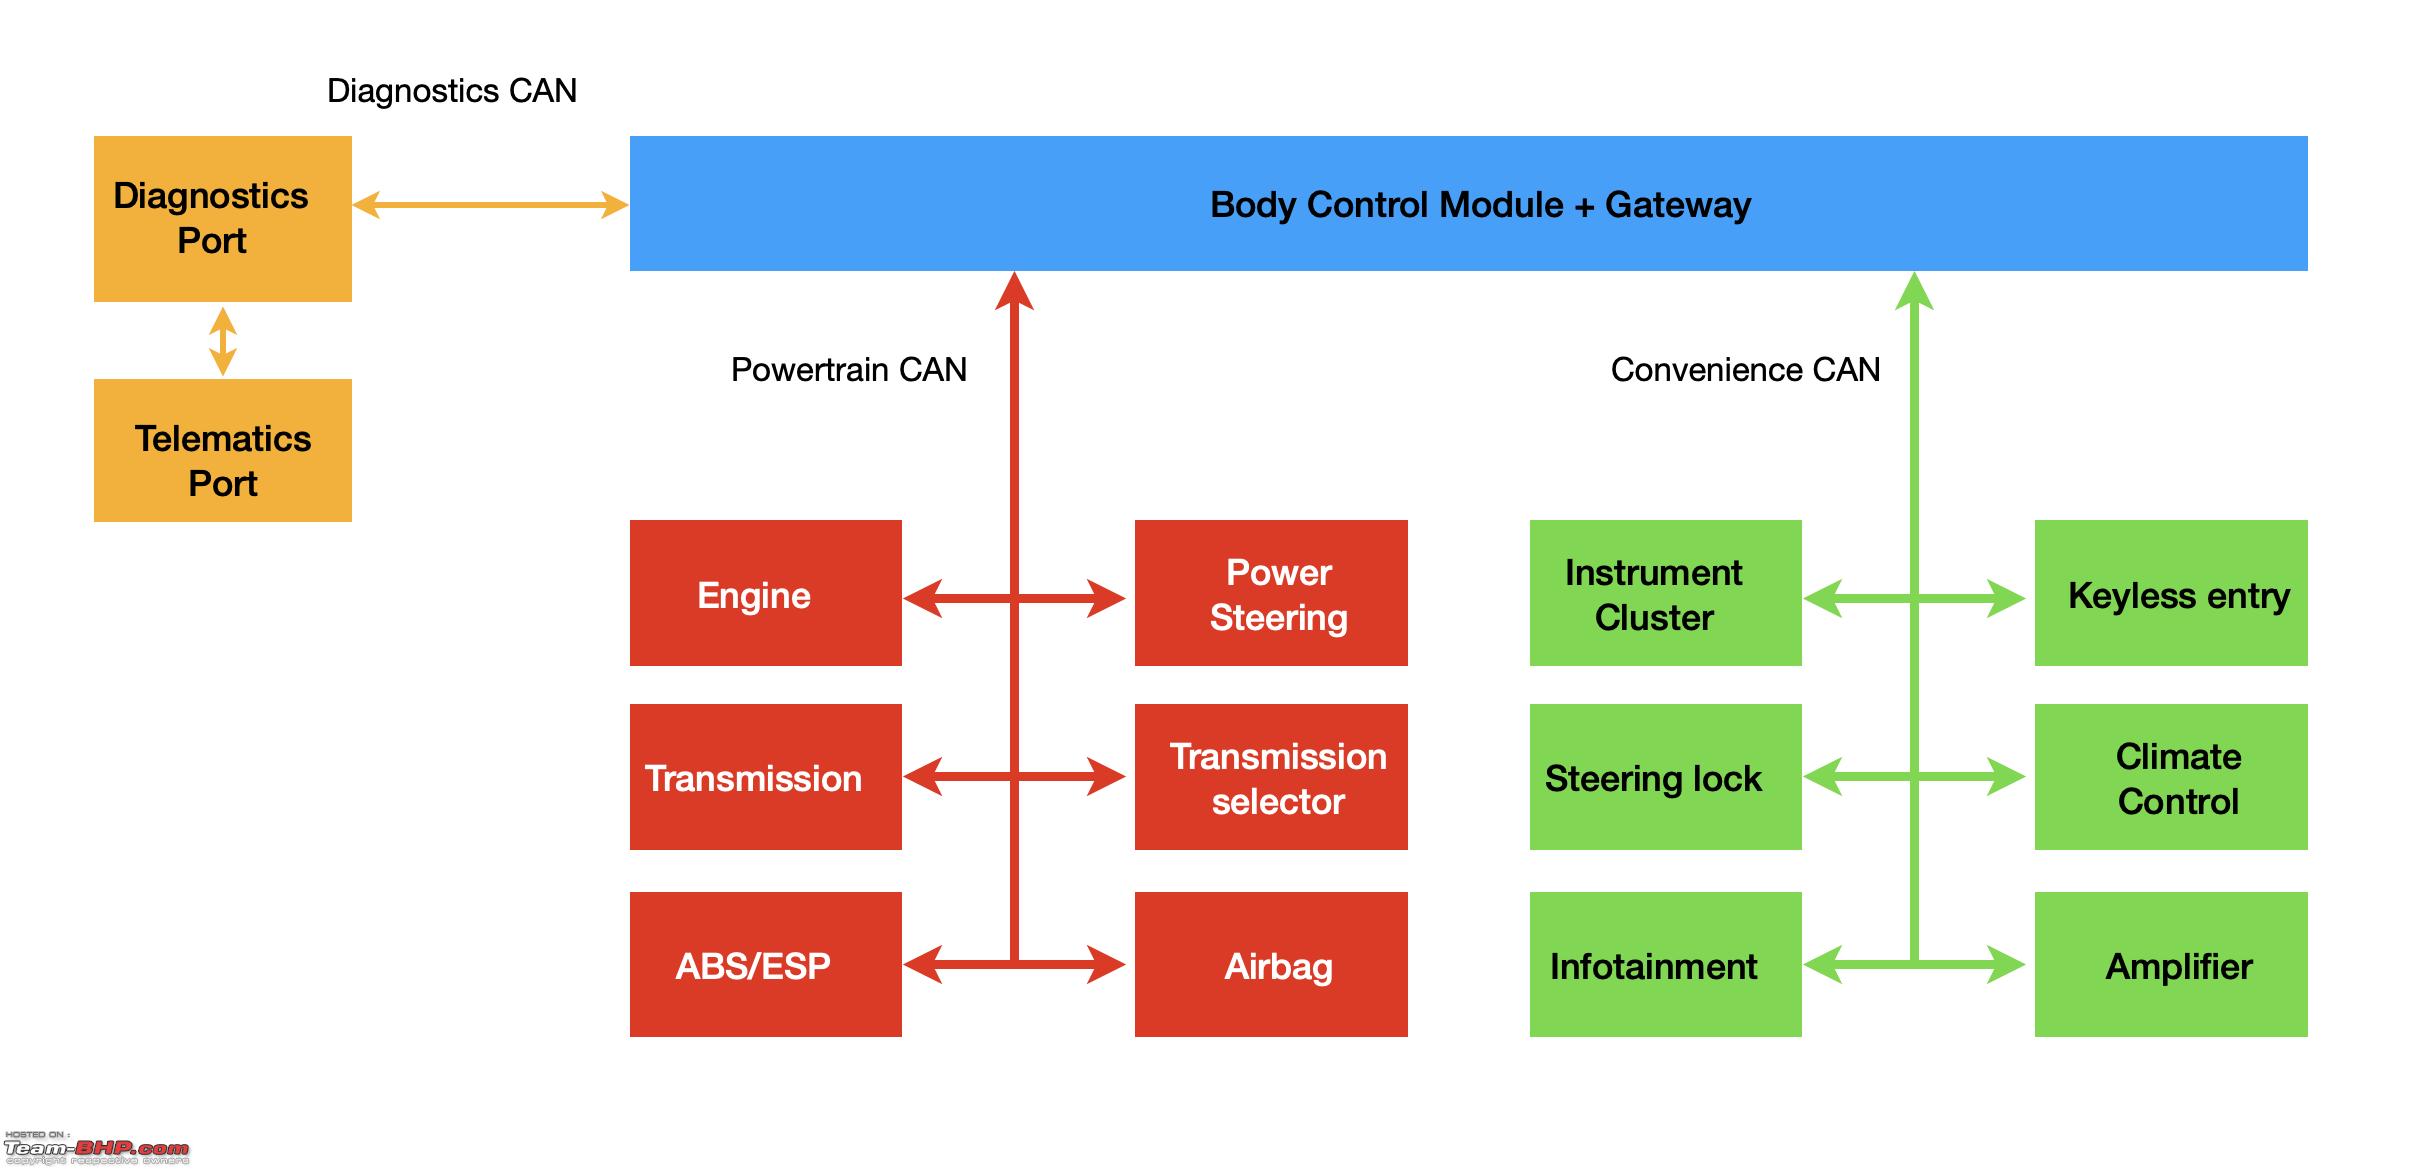 International variants come with a network gateway which is the popular choice for tapping into the CAN, but here in MQB A0IN cars, the gateway function is included within the BCM which means I had to tap at the location where all the Powertrain CAN(PCAN) modules would meet at the BCM. Tapping a connection here would mean, in case anything gets messed up with the tap or a loose connector, the entire powertrain CAN will be bricked and we would have all sorts of errors and malfunctions happening within the car. So the BCM was ruled out. Note that we can connect the additional modules wherever within the network as long as two different CAN networks are not clubbed or the pins arent reversed. Inside the cabin, three candidates have connections on the PCAN sorted by the ease of access to their wiring - EPS controller, Airbag Controller and the gear selector lever. The EPS connector however had bigger terminals which would not let me use the tap I had. Airbag controller was something I would not touch and I finally had the gear selector lever as the only option left but still with a risk - If this tap acted up, I would lose gear selection capability and that would brick the car. Before you start, we need mandatory tools:
Preparing for the Final Install: Now that various technical aspects have been figured out, we will focus on these key areas which will act as the guide for the installation of 8K OPS: 0.1 Removing battery power from the car: Before we dig into electrical changes, the car can be powered down by this simple method. The red tab must be pulled downwards from the BCM until it clicks out of place. Then it should be removed by hand by pressing its sides and the entire power from the car is disconnected. Last edited by audioholic : 17th August 2024 at 22:31. |
|
| (26)
Thanks
|
| The following 26 BHPians Thank audioholic for this useful post: | 5hank3r, aeroamit, aravindb_0711, CafeRacer16, CEF_Beasts, Chetan_Rao, chillax12, chinmaypillay, digitalnirvana, d_himan, Gannu_1, GaryTSI, Harjot37, Jabber, JDMBOI, MotorDev, museycal, Rajeevraj, Roy.S, sanjayrozario, Santo_the_bong, Sen, Shanksta, stashing_GT, SunnyBoi, theexperthand |
|
16th August 2024, 10:53
| #4 |
| Distinguished - BHPian Join Date: Jun 2012 Location: BengaLuru
Posts: 5,954
Thanked: 21,222 Times
| Re: A guide to retrofits on VW/Skoda MQB Cars in India 1. Laying down the harness The kit comes with four wiring harnesses:
2. Powertrain CAN(PCAN) Tap from gear selector lever(Note: I am developing an improved way to handle this):
Once this is done, the CAN extension wire that is available T Tap harness can be connected to the PDC wiring harness. This will enable the PDC to communicate on the PCAN. 3. Accessing the OE Park Distance control unit: The intention of this is to Remove power from the existing PDC unit and power the new one and mount the new PDC unit in the same location. The OE PDC Unit is located under the dash and has to be accessed via the passenger footwell area. Accessing this requires removal of the glovebox as well as a fit body to reach there . Given how well these Germans are packaged, there is no way we can manage without this. We start with removing the side panel of the dashboard. This is very simple and can be done by a trim remover tool. Then there are 8 screws that need to be unscrewed to release the entire glovebox and its frame. The cooled air pipe can be simply detached to let the glovebox completely free   After the glovebox is removed, we can find the PDC unit with a bright white base. It has one main connector with 26 pins which can be detached by turning the plastic tab away from the wire and this will eject the connector without effort.  The PDC ECU is mounted using two push type plastic rivets whihc can be removed easily by pressing the center of the rivet from the opposite direction since thats anyway exposed to us. After removing, here is the OE PDC which is a 3 channel unit v/s the upgraded 8K unit:  While both the units have the same layout and connector pins, the 8K PDC has a second wiring harness for the front sensors in addition to the other harness of the rear sensors as well as rest of the components. The 8K PDC can be installed in the same place as the existing 3K PDC and the latter can be removed from the vehicle and stored at home. 4. Power for the PDC module: The OE PDC module in the car is powered with its own 7.5A dedicated fuse and is powered by the KL15 power line which is active only during ignition ON. The replacement PDC also requires the same. Hence, instead of tapping power from elsewhere, I just depinned the power wires from the OE harness and moved the wires to the new harness. Pin number 13 is for GND and pin 14 is for the positive connection. Same goes into pin 13 and 14. This solved the problem of having to wire new power connection into the main junction box. 5. Virtual buttons for triggering park assist: Conventionally, the PDC ECU comes with a switch that is used to trigger Park assist manually or turn it off when it turns on unnecessarily. This is one option for cars like Taigun, Kushaq and even Virtus where international variants will come with a button for the same. But for the Slavia I was not able to find one. The Skoda Fabia has the same button layout as the Slavia but its Park button was clashing with the seat ventilation control button hence that was not an option. With earlier tweaks using VCDS, I had figured out that the head unit supports virtual buttons for these functions. But I was not sure about the wiring of the same. Thanks to a friend Sharon, he sourced me the manual of the infotainment itself. There it had the right pinouts and all I had to do was to wire the switch pin to the head unit and voila, it worked flawlessly. If not for him sharing the pinouts, I had to manually check every pin on the head unit to see which one is for the PDC.  The Grey connector which is a part of the Quadlock houses the pins for CAN as well as the PDC switch. PDC is assigned to pin 3 of the grey connector which is numbered on the connector itself. There is no wire originally in pin 3 hole hence we just have to unlock the pins by lifting the tab as shown below and then insert the terminal from the PDC harness and lock it in place.   Last edited by audioholic : 17th August 2024 at 23:02. |
|
| (22)
Thanks
|


| The following 22 BHPians Thank audioholic for this useful post: | anandhsub, aravindb_0711, CEF_Beasts, Chetan_Rao, chillax12, digitalnirvana, dkaile, Dr.Vikas, Gannu_1, GaryTSI, Harjot37, Jabber, JDMBOI, Jeroen, MotorDev, NerdyMillennial, Rajeevraj, revverend, sanjayrozario, Santo_the_bong, SunnyBoi, theexperthand |
|
16th August 2024, 13:34
| #5 |
| Distinguished - BHPian Join Date: Jun 2012 Location: BengaLuru
Posts: 5,954
Thanked: 21,222 Times
| Re: A guide to retrofits on VW/Skoda MQB Cars in India Now that the interior work and wiring is complete, its time to head the exterior. If until now the work was a one man job, here is where you will need some extra pair of hands or even better professional help. Thanks to Sunny and Nikhil who lent me some of their equipment and tech to perform the finishing act of this project and also got the sensors painted to body colour  Drilling the bumper was my last activity and so should be everyone's. I did it only after I verified the entire setup works. And to drill it, I sourced a hole punch tool instead of a hole saw. The punch tool is the recommended tool to get an accurate and OE type of hole without any rough edges that need further sanding.  This is a must for the parking sensors which do not have an outer shroud. Here is a video by our own Ganesh Balan explaining the tool and the process of cutting the holes since I was not able to document the same: The bumper removed and harness laid out:   Look at how many screws and fasteners hold the bumper in place - about 30 of them. Compared to this, I can single handedly remove the bumper of my Crysta with just 10 screws.  The holes for the front bumper were marked based on symmetric measurements and key areas were the sides of the number plate, and the area below fog light which will allow detection of obstacles that are not so tall like kerbs or low walls. The rear bumper unfortunately had the OE sensors and there is no way to get accurate detection by using the side sensors and adding only two extra holes. Hence I went with punching four new holes in the bumper. The area around the holes are cleaned well with IPA and the sensors can be pasted in the orientation as shown  See the excellent results the hole punch delivers, without any trimming needed:  Note: The mild distortion you see is the PPF which was also cut by the punch. Since this is a TPU PPF, it resists the hole punch and tries to stretch as the hole is punched, finally giving up with some distortion around the edge. The wiring is routed along the sensors and anchored tight with only the main harness connector left free:  Coming to the rear bumper, since it already had the stock sensors, the wiring was easier. This is the grommet that will allow the Harness 1 to reach the exterior of the vehicle:   The OE harness and new harness side by side - And finally we have two connectors that would lead to the cabin harness.  The final result after the bumper was fitted back in place - A meticulous job done by the fitter:    Last edited by audioholic : 17th August 2024 at 22:52. |
|
| (31)
Thanks
|
| The following 31 BHPians Thank audioholic for this useful post: | aeroamit, anandhsub, aravindb_0711, CEF_Beasts, CentreOfGravity, Chetan_Rao, chillax12, chinmaypillay, digitalnirvana, dkaile, d_himan, fluidicjoy, Gannu_1, GaryTSI, Harjot37, isotope729, JDMBOI, MismatchD, MotorDev, NerdyMillennial, Rajeevraj, Rjeevan, sane_traveller, sanjayrozario, Santo_the_bong, Sen, Shanksta, SunnyBoi, theexperthand, Vik0728, VinNam |
|
16th August 2024, 23:34
| #6 |
| Distinguished - BHPian Join Date: Jun 2012 Location: BengaLuru
Posts: 5,954
Thanked: 21,222 Times
| Re: A guide to retrofits on VW/Skoda MQB Cars in India Coding changes to make this whole system work: The PDC module which was earlier present in the car was a standalone module - It worked based on signals from the sensors and was only triggered by the reverse gear. The output was only beeps. Compared to this, the 8K PDC integrates with the car over CAN to enable lot of features and customization and hence, quite some modules need to be coded. At least this is how much I did and got it working: Address 19 - CAN Gateway:
Address 5F - Infotainment
Address 10 - Park/Steer Assist You can customize options here and can refer to long coding. The following things have to be changed:
Address 17 - Instruments Enable parallel parking assistance in long coding Address 01 - Engine Check the bit corresponding to 'Parking aid installed' Last edited by audioholic : 17th August 2024 at 22:27. |
|
| (18)
Thanks
|
| The following 18 BHPians Thank audioholic for this useful post: | 5hank3r, aravindb_0711, CEF_Beasts, Chetan_Rao, chillax12, digitalnirvana, Gannu_1, GaryTSI, Harjot37, JDMBOI, Jeroen, MotorDev, N1m1z, Santo_the_bong, Sen, sh3lby, SunnyBoi, theexperthand |
|
17th August 2024, 22:42
| #7 |
| Distinguished - BHPian Join Date: Jun 2012 Location: BengaLuru
Posts: 5,954
Thanked: 21,222 Times
| Re: A guide to retrofits on VW/Skoda MQB Cars in India Final results are something that will anyway satisfy, since there was so much of effort involved. However, since it was the first time for me, the effort looks to be huge. But if I have to do this again, what was a weeks job will now be reduced to a days job since the tips and tricks are well known Coming to how this works, I have created a video documenting the same here: The auto detect feature can be annoying in traffic, but its built for situations where you might have some low height objects appearing as you drive or imagine a scenario where a kid walks in the immediate front of the car, whose height is less than the bonnet so isnt visible from the drivers seat. Thats a problem this tries to solve. The system mutes itself after a while if you are stationary and there is a vehicle too close, so that much of smartness has been already implemented  Given that, everything in this system is adjustable, as seen in the video hence we can also turn down the volume of the park assist speakers or even mute them. Final notes, hope this thread was worth a read and of benefit. I would be happy to share any more info thats required and also in case anything has to be corrected. And I wish there could be some more retrofits coming in. Fingers crossed. Last edited by audioholic : 17th August 2024 at 23:05. |
|
| (102)
Thanks
|
| The following 102 BHPians Thank audioholic for this useful post: | 5hank3r, A.K., aeroamit, aj.jaswanth, AlQuazi, anandhsub, androdev, aravindb_0711, ashivas89, Astriez, Balthazar, Blue Vitriol, CafeRacer16, Carzman, catchjyoti, CEF_Beasts, CentreOfGravity, Chetan_Rao, chillax12, chinmaypillay, Clayton Crasto, cooldip, dennisjs, dieselteen, digitalnirvana, dkaile, Doc_nerd, Dr.Naren, dragntailonfire, DriverLess, durvient, d_himan, Elegant, epijay, ex-innova-guy, fancygamer, Fiestaboy, fluidicjoy, Game_of_Roads, Gannu_1, GaryTSI, Gotham, Harjot37, Highh5, hrishig, isotope729, itwasntme, JDMBOI, Jeroen, Joseph Jos, kapilsharma80, Kevinrevvz, Keynote, lancer_rit, lemedico, Lemonysnicketz, LeoSam, Manoj2268, mmridul, MotorDev, museycal, N1m1z, ndnesh, NerdyMillennial, Newtown, praveen789, psmenon, punto_, RAC, RaiAnish, Rajeevraj, redRider13, redruminator, revverend, ringsoftime, rkv_2401, Rohit94AD, Rohit_Quad, Rshrey22, s4ch, Santo_the_bong, sathya.bhat, Sen, shiv4747, Shreyfiesta, sid18, SilverSmoke, steadfast, subie_socal, sujithsidhardha, SunnyBoi, Taha Mir, theexperthand, TokyoDrifter, TorqueAddict007, true_sedan, VeluM, vidyanand, Vik0728, VinNam, VtechSupreme, YK85 |
|
18th August 2024, 05:03
| #8 |
| Team-BHP Support  | Re: A guide to retrofits on VW/Skoda MQB Cars in India Thread moved out from the Assembly Line. Thanks for sharing! |

| (2)
Thanks
|
| The following 2 BHPians Thank Aditya for this useful post: | digitalnirvana, MotorDev |
|
18th August 2024, 11:04
| #9 |
| Team-BHP Support Join Date: Jul 2010 Location: Bangalore
Posts: 6,767
Thanked: 28,162 Times
| Re: A guide to retrofits on VW/Skoda MQB Cars in India Sankalp, some serious DIY chops on display, and a very useful addition to the car, kudos! Thanks also for the car architecture bits.  |
|
| (5)
Thanks
|
| The following 5 BHPians Thank Chetan_Rao for this useful post: | audioholic, digitalnirvana, GaryTSI, MotorDev, ndnesh |
|
18th August 2024, 11:57
| #10 |
| BHPian Join Date: Feb 2024 Location: Jaipur
Posts: 39
Thanked: 200 Times
| Re: A guide to retrofits on VW/Skoda MQB Cars in India Absolutely amazing execution audioholic. Definitely a solid upgrade from OEM. While I don't think I have it in me to put the kind of effort you have. If there was an FNG that could take up this task, I would easily pay double for this compared to the shoddy work Skoda is offering. I remember seeing another post about these 2 brothers that retrofitted a 1.4 TSi Octavia into an L&K, which makes me feel like once you start retrofitting you won't be able to stop. Looking forward to seeing what you do next to your car. |
|
| (1)
Thanks
|
| The following BHPian Thanks VtechSupreme for this useful post: | audioholic |
|
18th August 2024, 12:56
| #11 |
| Distinguished - BHPian | Re: A guide to retrofits on VW/Skoda MQB Cars in India Excellent job! I like the hole punch tool. Very convenient for these sort of jobs! Works just as well on sheet metal too! Jeroen |
|
| (5)
Thanks
|
| The following 5 BHPians Thank Jeroen for this useful post: | audioholic, blackwasp, MotorDev, sagarpadaki, Sen |
| |
|
18th August 2024, 13:34
| #12 |
| Newbie Join Date: May 2021 Location: Alappuzha
Posts: 17
Thanked: 79 Times
| Re: A guide to retrofits on VW/Skoda MQB Cars in India Neat job!! The retrofitting ability of VAG cars is just on another level no other manufacturer can match the same. It wouldve been nicer if there was a physical switch to manually turn on the system other than the virtual button on the touch screen. |
|
| (2)
Thanks
|
| The following 2 BHPians Thank 2JZ-GTE for this useful post: | audioholic, Shreyfiesta |
|
18th August 2024, 18:44
| #13 |
| BHPian Join Date: Apr 2023 Location: CCU-BLR-HYD
Posts: 48
Thanked: 106 Times
| Re: A guide to retrofits on VW/Skoda MQB Cars in India Great job. I noticed that you have boot release activated in the infotainment as well. I was looking to code my Virtus and was specifically looking for the boot release I had seen one in YouTube. How/Where did you get this done? |
|
| (1)
Thanks
|
| The following BHPian Thanks sid18 for this useful post: | audioholic |
|
18th August 2024, 21:52
| #14 |
| Newbie Join Date: Jul 2022 Location: Pune
Posts: 5
Thanked: 8 Times
| Re: A guide to retrofits on VW/Skoda MQB Cars in India Great effort! Totally enjoyed reading a well documented in depth way to do a customer job. I think you should also make a video about it for better reach. Cool work bro! Cheers |
|
| (1)
Thanks
|
| The following BHPian Thanks mayankshekharr for this useful post: | audioholic |
|
18th August 2024, 21:58
| #15 | |
| Distinguished - BHPian Join Date: Jun 2012 Location: BengaLuru
Posts: 5,954
Thanked: 21,222 Times
| Re: A guide to retrofits on VW/Skoda MQB Cars in India Quote:
Last edited by audioholic : 18th August 2024 at 22:02. | |
|
| (1)
Thanks
|

| The following BHPian Thanks audioholic for this useful post: | sid18 |
|