| |||||||

| Search Forums |
| Advanced Search |
| Go to Page... |
 |
| Search this Thread |  23,185 views |
 8th August 2024, 16:19
| #1 |
| Newbie Join Date: Aug 2024 Location: Kozhikode
Posts: 12
Thanked: 189 Times
| My i20 Diesel's N Line Transformation: A Comprehensive Modification Journey Hello Team-BHPians, I have been an avid reader of Team-BHP for a long time and recently became a member. I am thrilled to share my small automobile journey with my car, including all the modifications and upgrades I've done to make it special. 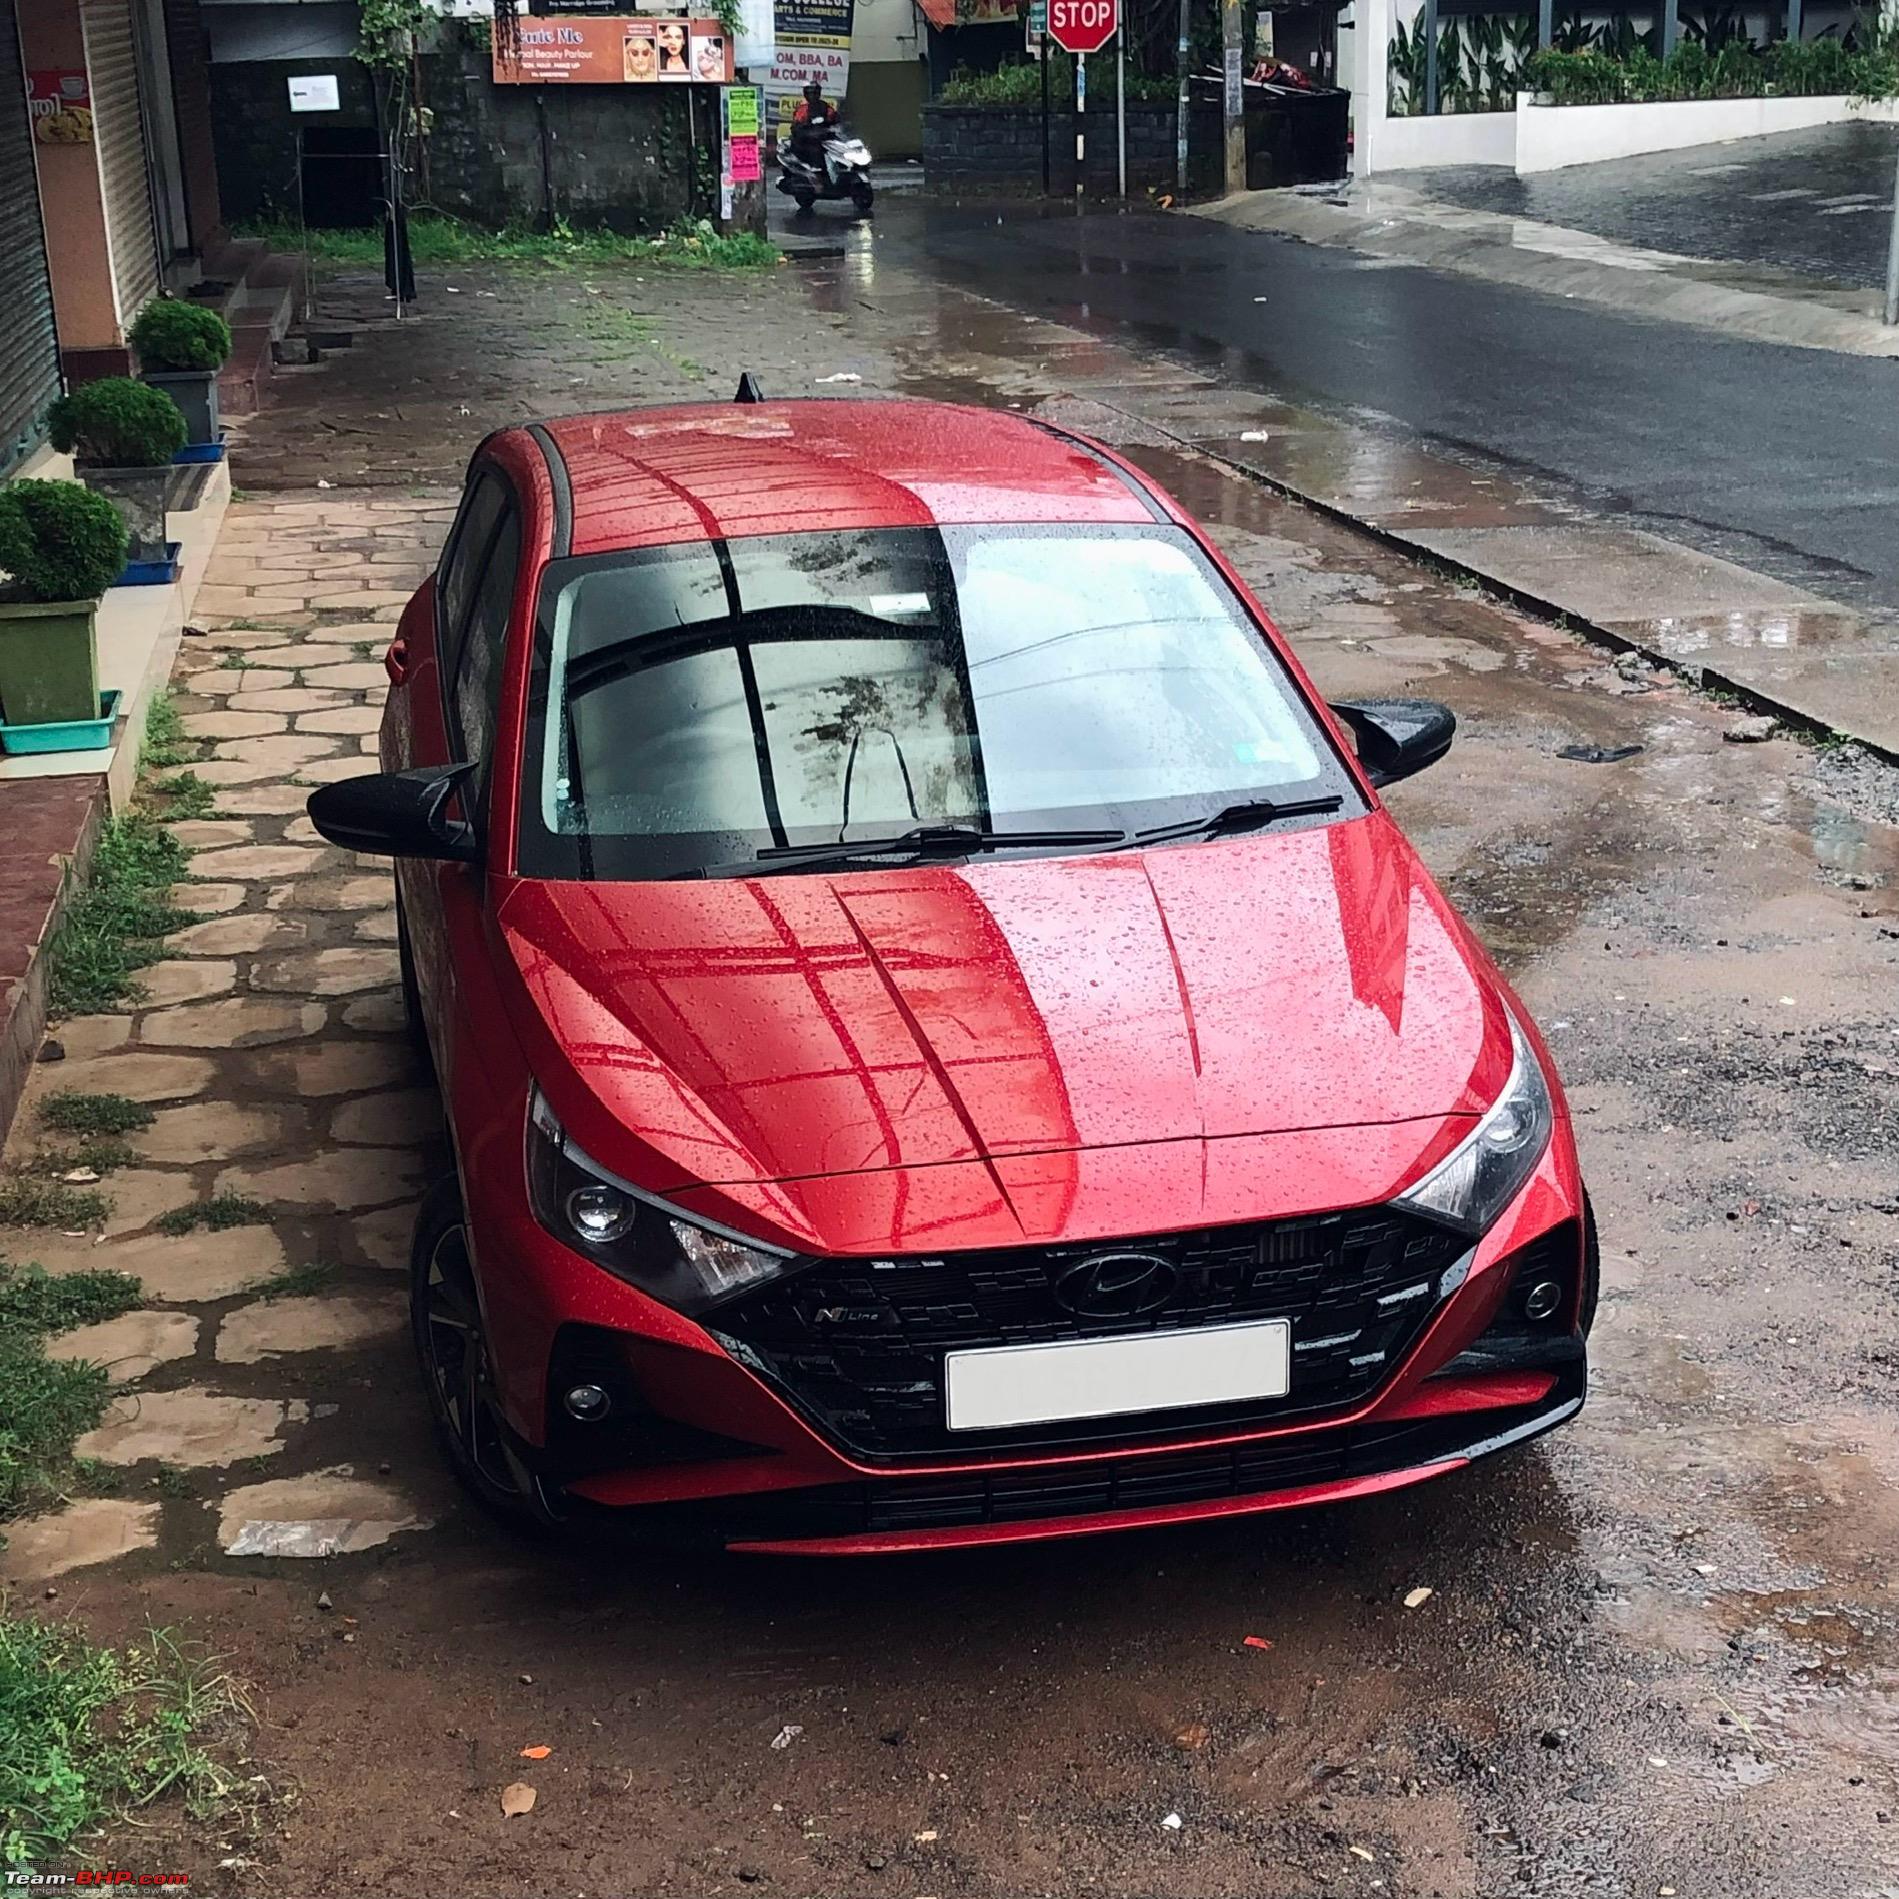 How I Ended Up Buying the i20 in 2021Before diving into the modifications I've done to my car, let me share a quick story about how I ended up purchasing the Hyundai i20 in 2021. My requirements were quite specific: I needed an engine that wasn't less punchy, a high level of fit and finish, and ample space in the rear to comfortably seat three passengers. With a budget of around 8-9 lakhs, I shortlisted three hatchbacks: the i20, Baleno, and Altroz. I didn't consider any other segments beyond hatchbacks. Baleno and Altroz were good options as well. With Baleno, I needed a little bit more punchy engine, while with Altroz, fit and finish, and Tata service history were concerns. Nonetheless, both were very nice cars for that budget range. Ultimately, the 1.5 CRDi engine in the i20 was the perfect touch for me. With its whopping 240Nm torque and the initial push it gave for such a small car, along with the option to explore remap options if needed, it sealed the deal. I was a fan of the i20N, which was available only in Europe at the time, so the design aspect of the i20 gave me the feeling of getting a mini i20N. The looks of the i20 caught my eye especially the front and cuts and creases, which had a modern touch that appealed to me. The interior stood out as top-notch compared to the others. However, the rear design was a bit of a letdown due to the chrome strip and the somewhat disproportionate rear top area. The i20 1.5 diesel variant almost perfectly matched all my requirements, though I had to stretch my budget by about 1.2 lakhs for the Sportz variant. I was aware of potential DPF issues before purchasing, but after learning that Hyundai has been selling DPF-equipped vehicles outside India for a long time, I decided not to worry. Understanding how the DPF works further reassured me, and so far, I've experienced no major issues with it. After a few months with the car, I delved deeper into understanding the DPF system. I purchased a decent OBD II connector, but none of the available apps were providing proper DPF readings for my car. Determined to find a solution, I connected with the developer of the Car Scanner app and provided them with my car's readings to add the Hyundai 1.5 CRDi car profile and he added that to his app. After a few weeks, I gained access to my DPF readings and thoroughly examined how it works, providing me with a clear picture of my car's DPF behaviors. This entire journey could be a story for another separate post.  Comprehensive List of ModificationsI was particularly keen on maintaining a subtle and understated aesthetic with my car modifications, avoiding anything that would make my car stand out excessively. I opted for subtle OEM-like modifications, ensuring that they wouldn't compromise the security of the vehicle. After all, this car serves as both my family's primary mode of transportation and a means of travel, rather than being solely a project car for me. I took a hands-on approach to most of the upgrades, personally handling the installations myself. However, I refrained from modifications involving painting, as I was skeptical about aftermarket accessory shops dealing with my car, particularly when it came to the removal of trim. I was concerned about potential rattling issues that could arise from such modifications. In fact, I implemented various measures to prevent rattling throughout the installation process, which I'll detail shortly. Additionally, when I started the modifications, the i20 N Line hadn't been launched yet. However, after its release, many of my modifications were aimed at transferring my i20 sportz to i20 N Line diesel variant, which Hyundai didn't offer. Moreover, due to budget constraints and the desire to experience the feeling of a new car after each modification, I spaced out the installation of each modification over several months. I will explain each modification I made in detail, However, since I did not initially plan to document these upgrades, which took place over the last three years, I don't have a complete photo or video record of the entire installation process. I will attach any available photos of each upgrade. Tyre and Alloy Upgrade The very first modification I tackled was upgrading my tyres and alloys, a common starting point for many car enthusiasts. The decision to change the tyres stemmed from the factory-fitted CEAT Secura tyres, which proved to be noisy and rigid. Paired with the stiff suspension setup of the i20 diesel, these tyres only exacerbated the issue. To remedy this, I opted to swap out the CEAT Secura tyres for Continental UC6 tyres. The difference was immediately noticeable, both in terms of reduced road noise and improved grip on various surfaces. Following the tyre upgrade, my attention turned to the alloys. The stock wheel caps on the i20 Sportz resembled alloy wheel, which didn't quite align with my preferences. I began exploring various aftermarket alloy options, but I was hesitant about Indian brands due to concerns about durability and performance. While some international options caught my eye, they often came with a hefty price tag. It was during this search that I considered Hyundai's own alloy offerings. This option provided two key advantages: reasonable pricing and easy replacement in case of single alloy damage. Amidst my search, I stumbled upon the alloy wheels from the Verna Turbo model. These wheels featured a unique diamond-cut design with a glossy black finish a departure from the typical gray finish found on most Hyundai alloys. After some virtual experimentation with Photoshop to visualize how they would complement my fiery red i20, I was convinced of their compatibility. I made the decision to go for the Verna Turbo alloys, completing the first phase of my wheel related upgrades.  Adding Auto-Dimming IRVM One feature notably absent from the standard i20 variants, including the Asta O, was an auto-dimming IRVM. Initially, I didn't consider it a significant omission, thinking that manually adjusting the mirror at night and returning it to its normal state in the morning would suffice. However, I found myself occasionally struggling with the adjustment, leading to moments of confusion and inconvenience during nighttime driving. It was then that I decided to take matters into my own hands and add this feature to my i20. My search for options began with exploring offerings from Hyundai themselves. However, the OEM option proved to be prohibitively expensive. So, I decided to explore other car companies' OEM options. Aftermarket solutions were my last resort, knowing that a single company manufactures IRVMs for many car brands, resulting in nearly identical fits. Turning to other company OEM solutions, I considered two alternatives: the Honda frameless IRVM and Maruti's auto-dimming IRVM. Interestingly, both options were manufactured by the same company, resulting in nearly identical fits. Initially, I leaned towards the Honda option, but a sudden and significant price increase from around 800 to 6,000 rupees led me to reconsider. Ultimately, I opted for the Maruti variant, commonly found in many of their car models. After testing it in a Maruti vehicle and being impressed by its quick response and effectiveness, I made the decision to proceed. Despite the slightly flimsy plastic construction, the functionality far outweighed any minor concerns. Because I'm not that good with electronics, I always seek help from my friend Subith. He also owns the same generation i20, and we’ve done almost all of these mods in both cars, with only a few differences. He actually created the entire wiring and setup when he was doing the mod in his car and sent it to me, which made the installation much easier for me. With the addition of necessary wires and couplers, the installation was smooth, and the Maruti part integrated seamlessly into my i20. Although the Maruti part didn't provide a perfect fit for covering the wires, a Hyundai part served as an ideal solution. In the end, I achieved the perfect fit for an auto-dimming IRVM at a fraction of the cost.  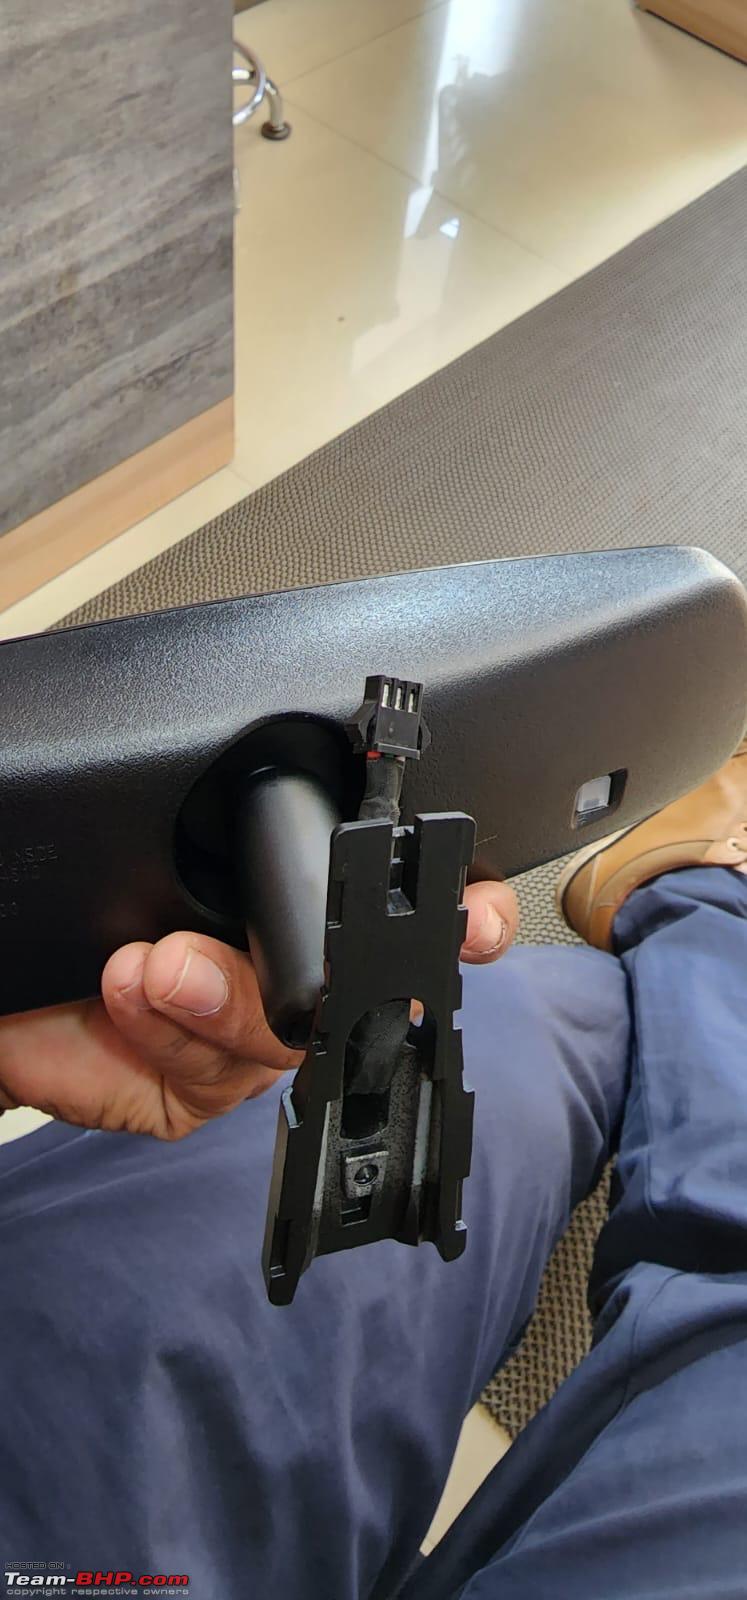    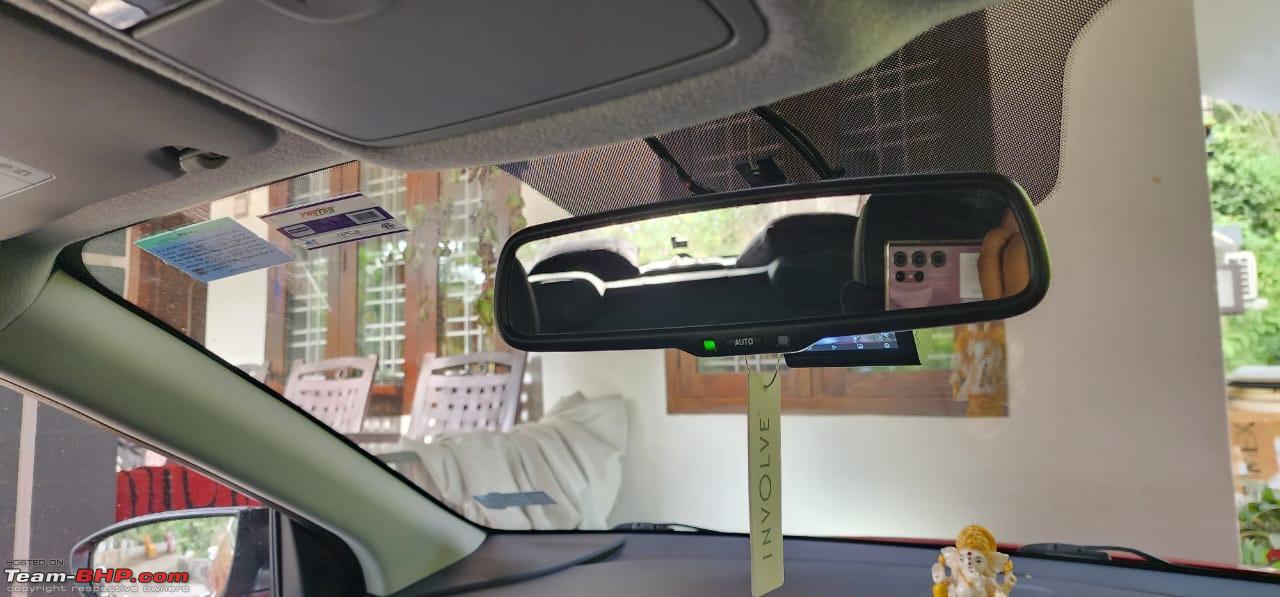 Headlight and Other Lighting Upgrades This was the upgrade I truly needed, not just for better night driving performance but also to enhance the car’s aesthetics. Upgrading the headlights would significantly elevate the front look of my car. From the beginning, I wanted this upgrade and even consulted the Hyundai service center team about it. Unfortunately, they had no experience with this swap for the i20, although they had done it for the Creta. I patiently waited for them to be ready by my next service, but received the same response. Frustrated with the wait, I decided to start my own research. This led me to the well-known coupler market in Delhi. I contacted a few sellers and found someone who had already done this upgrade. I purchased the coupler from him before acquiring the headlights. During my search for the coupler, I discovered a large market for second-hand headlights. Surprisingly, I found projector headlights for the i20 available at a fraction of the price of new ones. Being from South India, I wasn’t initially aware of this market. However, I realized these headlights came from accident vehicles and might have undergone some repairs. I thoroughly examined the pictures and even did a video call inspection before placing an order for a pair. When I received both the headlights and the coupler, I noticed some minor scratches here and there, but nothing major. The headlights were working perfectly. I also asked the coupler guy to make my cornering lamp functional. While it couldn’t work like other cars' cornering lamps that turn on with the steering change, he wired it so that the cornering lamps would be on whenever the headlights were on. I was okay with this compromise, as it meant my cornering lamps were still somewhat functional with this upgrade. The installation process was straightforward with the couplers I had purchased. The new headlights not only enhanced the night driving experience with better visibility but also gave my car a sporty, upscale look. The beam was more focused and brighter compared to the stock halogen headlights. Additionally, I made some other lighting upgrades. I replaced the fog lights with LED ones, which matched the brightness and color temperature of the new projector headlights. I also upgraded the interior lights and number plate lights to LEDs These lighting upgrades collectively transformed the overall appearance and functionality of my car, making it safer and more stylish.   i20 N Line Launch When I initially purchased my i20 in June 2021, I couldn't help but inquire about the possibility of an i20 N Line launch, spurred by leaked test mule images. However, like many sales representatives eager to secure a sale, I was assured that such a launch was highly unlikely. So, when the i20 N Line was eventually unveiled, I was impressed by Hyundai's execution of the N Line, with its subtle yet impactful design upgrades that didn't resemble typical aftermarket modifications. The aggressive front, sleek side skirts, and refined rear bumper elements and spoiler with side wings were all meticulously crafted, elevating the i20's aesthetic appeal. Additionally, the mechanical enhancements, particularly the steering finish, left a lasting impression, making it one of the best in its class. Nevertheless, whenever I encountered an i20 N Line on the road, I couldn't help but be captivated by its presence. At that time, I read a discussion on Team-BHP where someone was asking if they should sell their regular i20 and get the i20 N Line or just modify their current car. I was in a similar situation, but I wasn't ready to give up my 1.5 CRDi. Since Hyundai doesn't offer that option with the N Line, modification was the only option for me. During this time, I had the opportunity to connect with like-minded i20 owners who shared my passion for modifications. Together, we formed a small but dedicated group focused on discussing potential upgrades and supporting each other throughout our modification journeys. I'm grateful for the invaluable assistance and camaraderie provided by Subith, Prasad, Sushant and Jayant. First N Line Specific Modification: Diffuser and Exhaust Tip As I mentioned initially, the rear design of the i20 was a major letdown for me. However, Hyundai addressed this with the N Line by adding a new spoiler, side wings, a more aggressive diffuser with an exhaust tip, and darkening the rear chrome line. Regarding the chrome line, I applied two layers of sticker red and black transparent vinyl, giving it an integrated look with the tail light assembly. The N Line rear enhancements were appealing, so just a few weeks after the N Line deliveries began, I ordered the spoiler, side wings, and rear diffuser. I received the parts within a few weeks and I gave them to paint all to black. But then realized that installing the spoiler would be tricky. Unlike typical spoilers that have holes for screws, the N Line spoiler had built-in screws requiring a precise template for drilling. Unable to find such a template, I decided to wait and see if anyone else shared a tutorial or guide oN Line. Unfortunately, no such resources appeared. In the meantime, I installed the rear bumper diffuser with the exhaust tip cut-out. I purchased an N Line like exhaust tip from AliExpress since a similar exhaust tip wasn't available in India. I had it shipped to a friend in Dubai who then forwarded it to me, along with some small cosmetic items which I'll detail later. The bumper diffuser installation was straightforward. I removed the screws and clips, detached the rear bumper, and disconnected all associated wiring. When working on modifications involving clip removals, I usually order extra clips beforehand to avoid any potential rattling issues. This preparation was handy later when dealing with door panels, but it wasn't necessary for the bumper diffuser. After removing the stock diffuser, I installed the N Line diffuser. For the exhaust tip, I took it to a local welding shop to have it welded onto my stock exhaust. I also sprayed some 3M Silencer Coating on it to avoid the well-known Hyundai exhaust rusting issue in the future. Initially, I was concerned about the exhaust tip being slightly larger than the N Line tip, but over time, I grew to appreciate its more aggressive appearance.   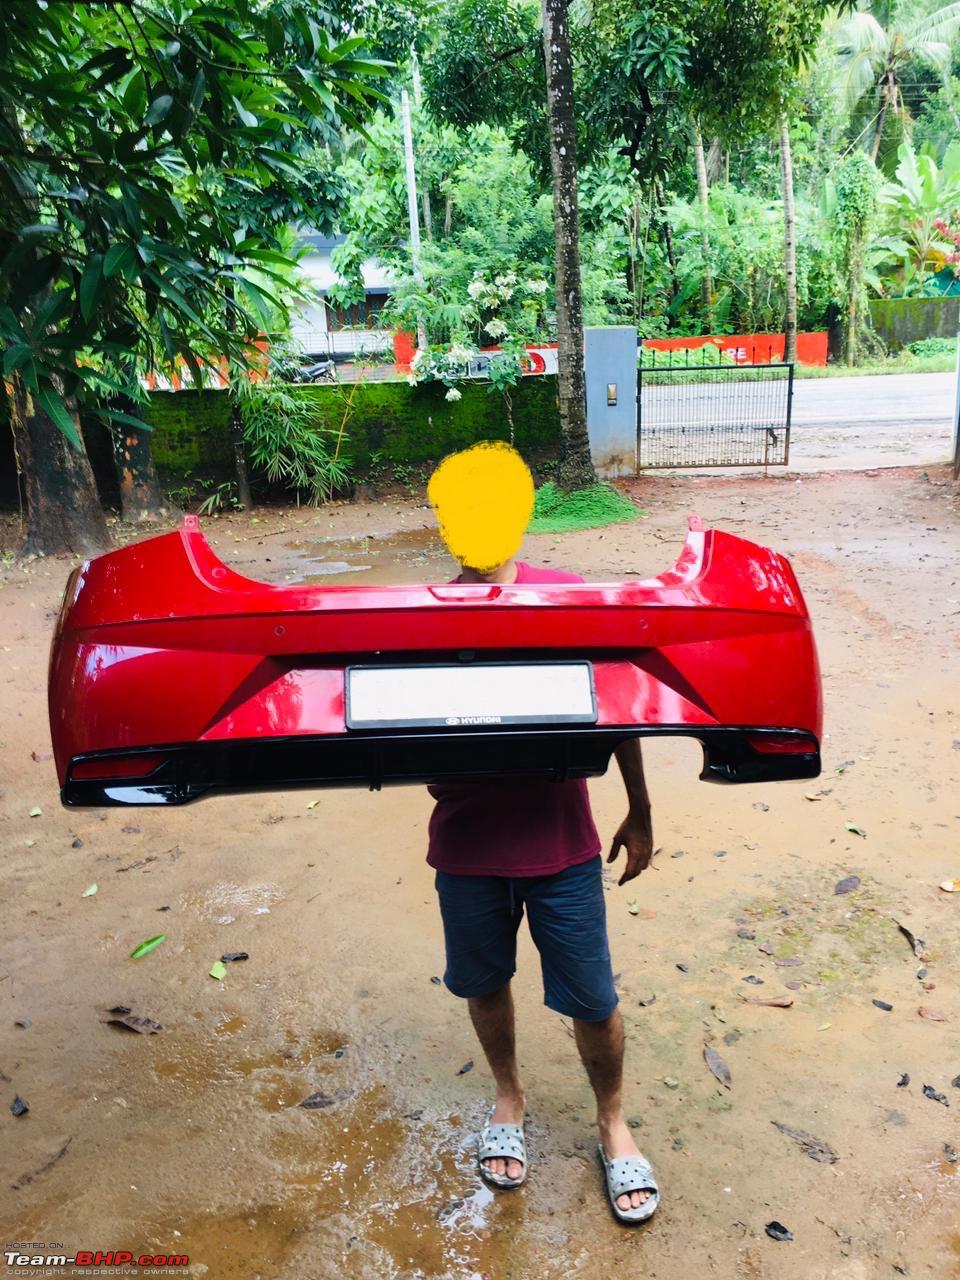  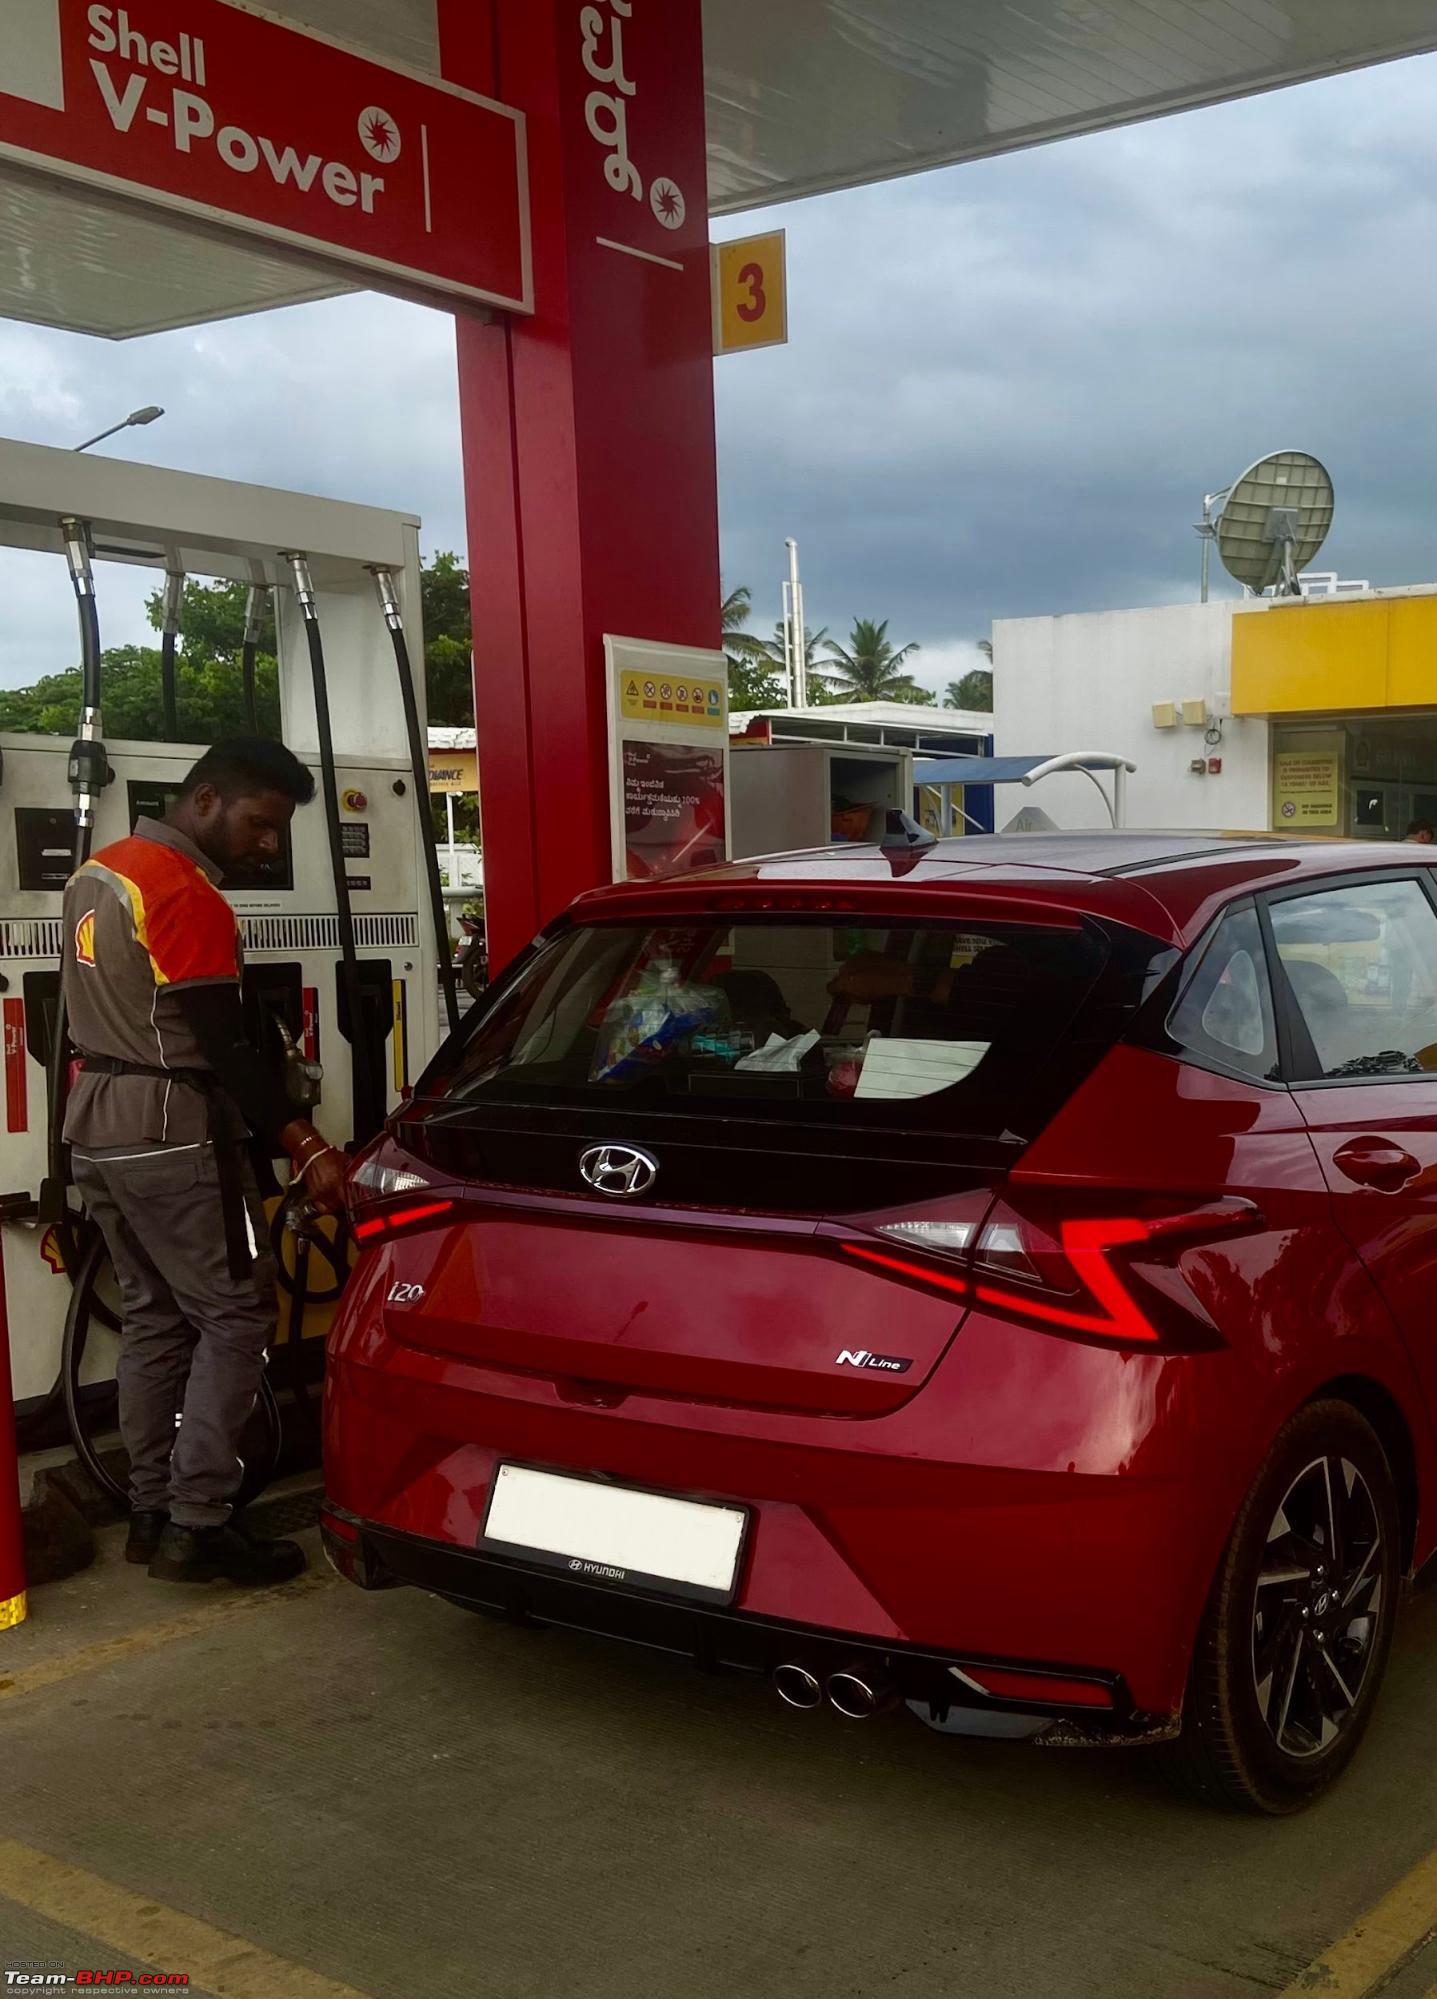 N Line Spoiler and Side Wings This modification proved to be a bit tricky for me since it involved drilling into the car, which raised concerns about potential water leakage. I approached several shops near me, but none were willing to take on the task as they lacked experience and the necessary drilling template for this installation. The side wings, however, were straightforward; they simply required pulling off the old ones and pressing the new ones into place using normal clips. However, I couldn’t install them without the spoiler, as Hyundai had integrated both spoiler and side wings very well. Weeks passed with the painted spoiler and side wings sitting idle. Finally, I decided to tackle the installation myself. I researched the process and settled on using a hole saw drill bit for the task. Before drilling into the car, I practiced on metal sheets of similar thickness to ensure precision. The N Line spoiler had four screws, two in the middle and two on the sides. I opted to use only the side screws to minimize the number of holes, confident that the water drainage system inside the tailgate would handle any potential leakage. The spoiler also came with ample 3M tape, which I supplemented with extra tape in the center for added security. One fine Sunday morning, my nephew and I decided to proceed with the installation. We gathered all necessary tools and supplies the day before, including red touch-up paint for the drilled areas. My nephew held the spoiler in place while I assessed its alignment from various angles, ensuring it was positioned correctly since the screws prevented a precise fit without careful inspection. After marking the drilling spots and double-checking the measurements, I nervously began drilling. To my surprise, drilling into the car was easier than my metal sheet practice runs, indicating Hyundai used relatively soft metal there. With both side holes drilled, I turned my attention to the interior of the tailgate, where Hyundai had conveniently provided markings for drilling. Following these guides, I drilled the necessary holes and achieved a perfect fit for the spoiler. Before final installation, I painted the drilled areas to prevent rust and cleaned other surfaces with an alcohol solution to ensure strong adhesion for the 3M tape. We then installed both the side wings and the spoiler successfully. This transformation gave the rear of the car a sportier and more proportionate appearance, renewing the vehicle's overall look and giving me a fresh car feeling. It was a proud moment for me, and subsequently, I even assisted a friend in installing the same spoiler on his car. To this day, neither car has experienced any water leakage or related issues.  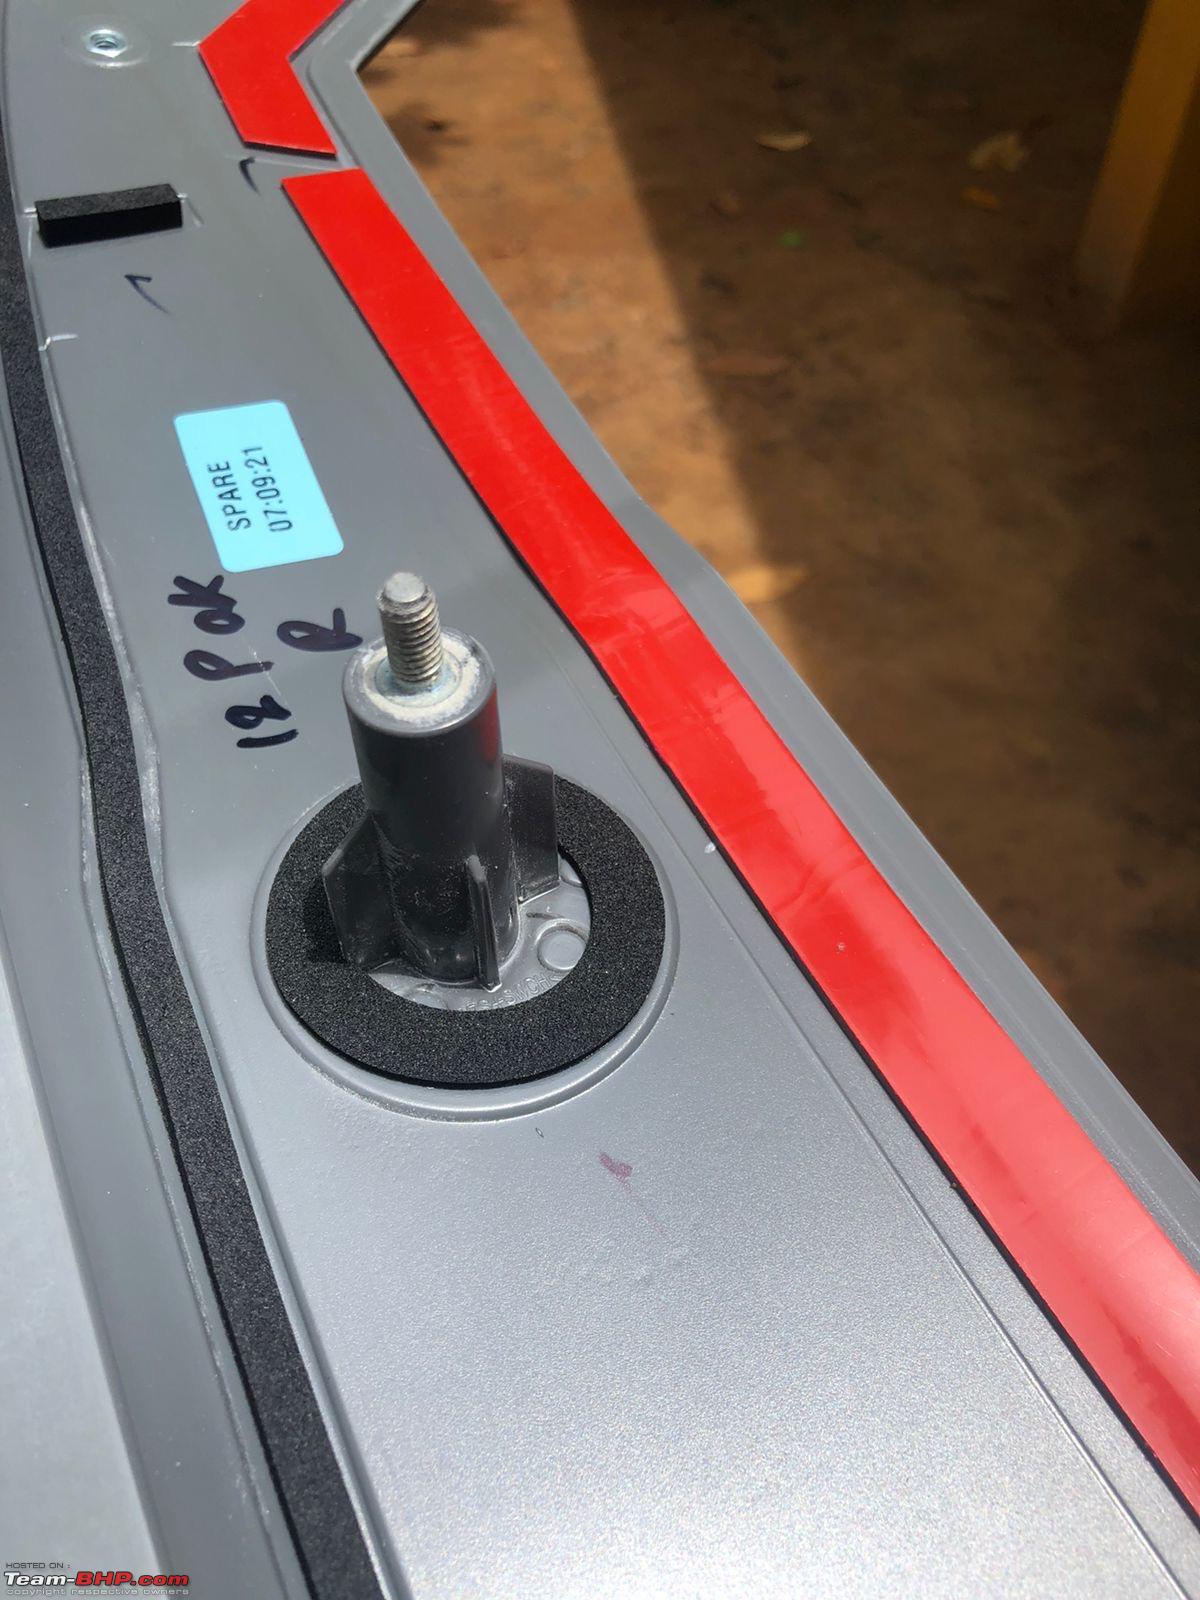   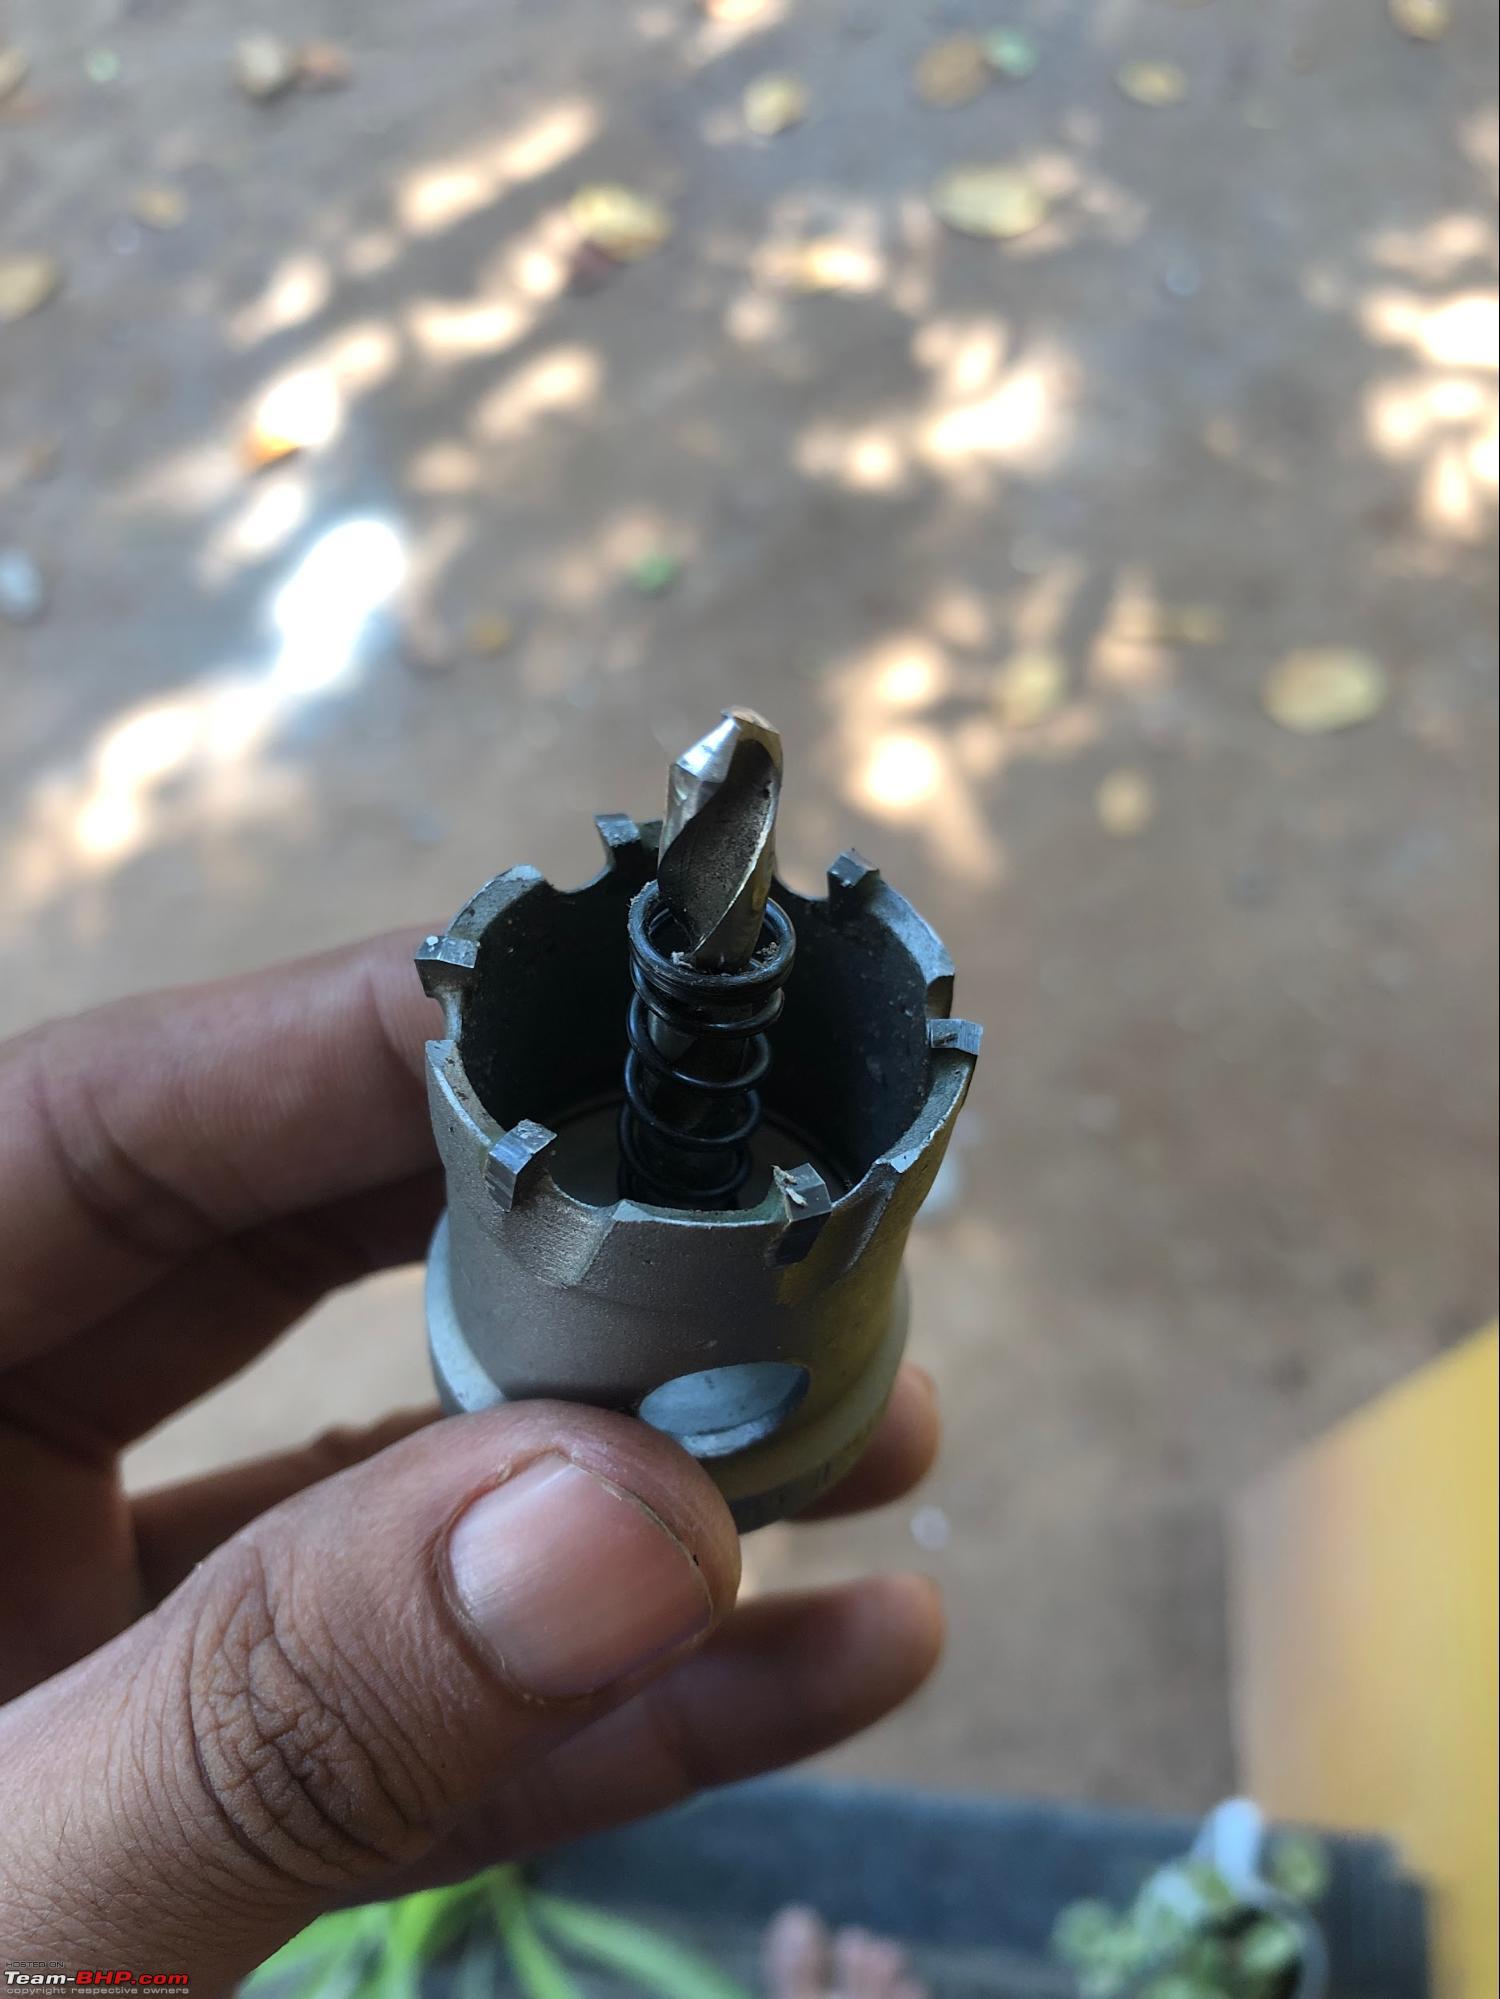     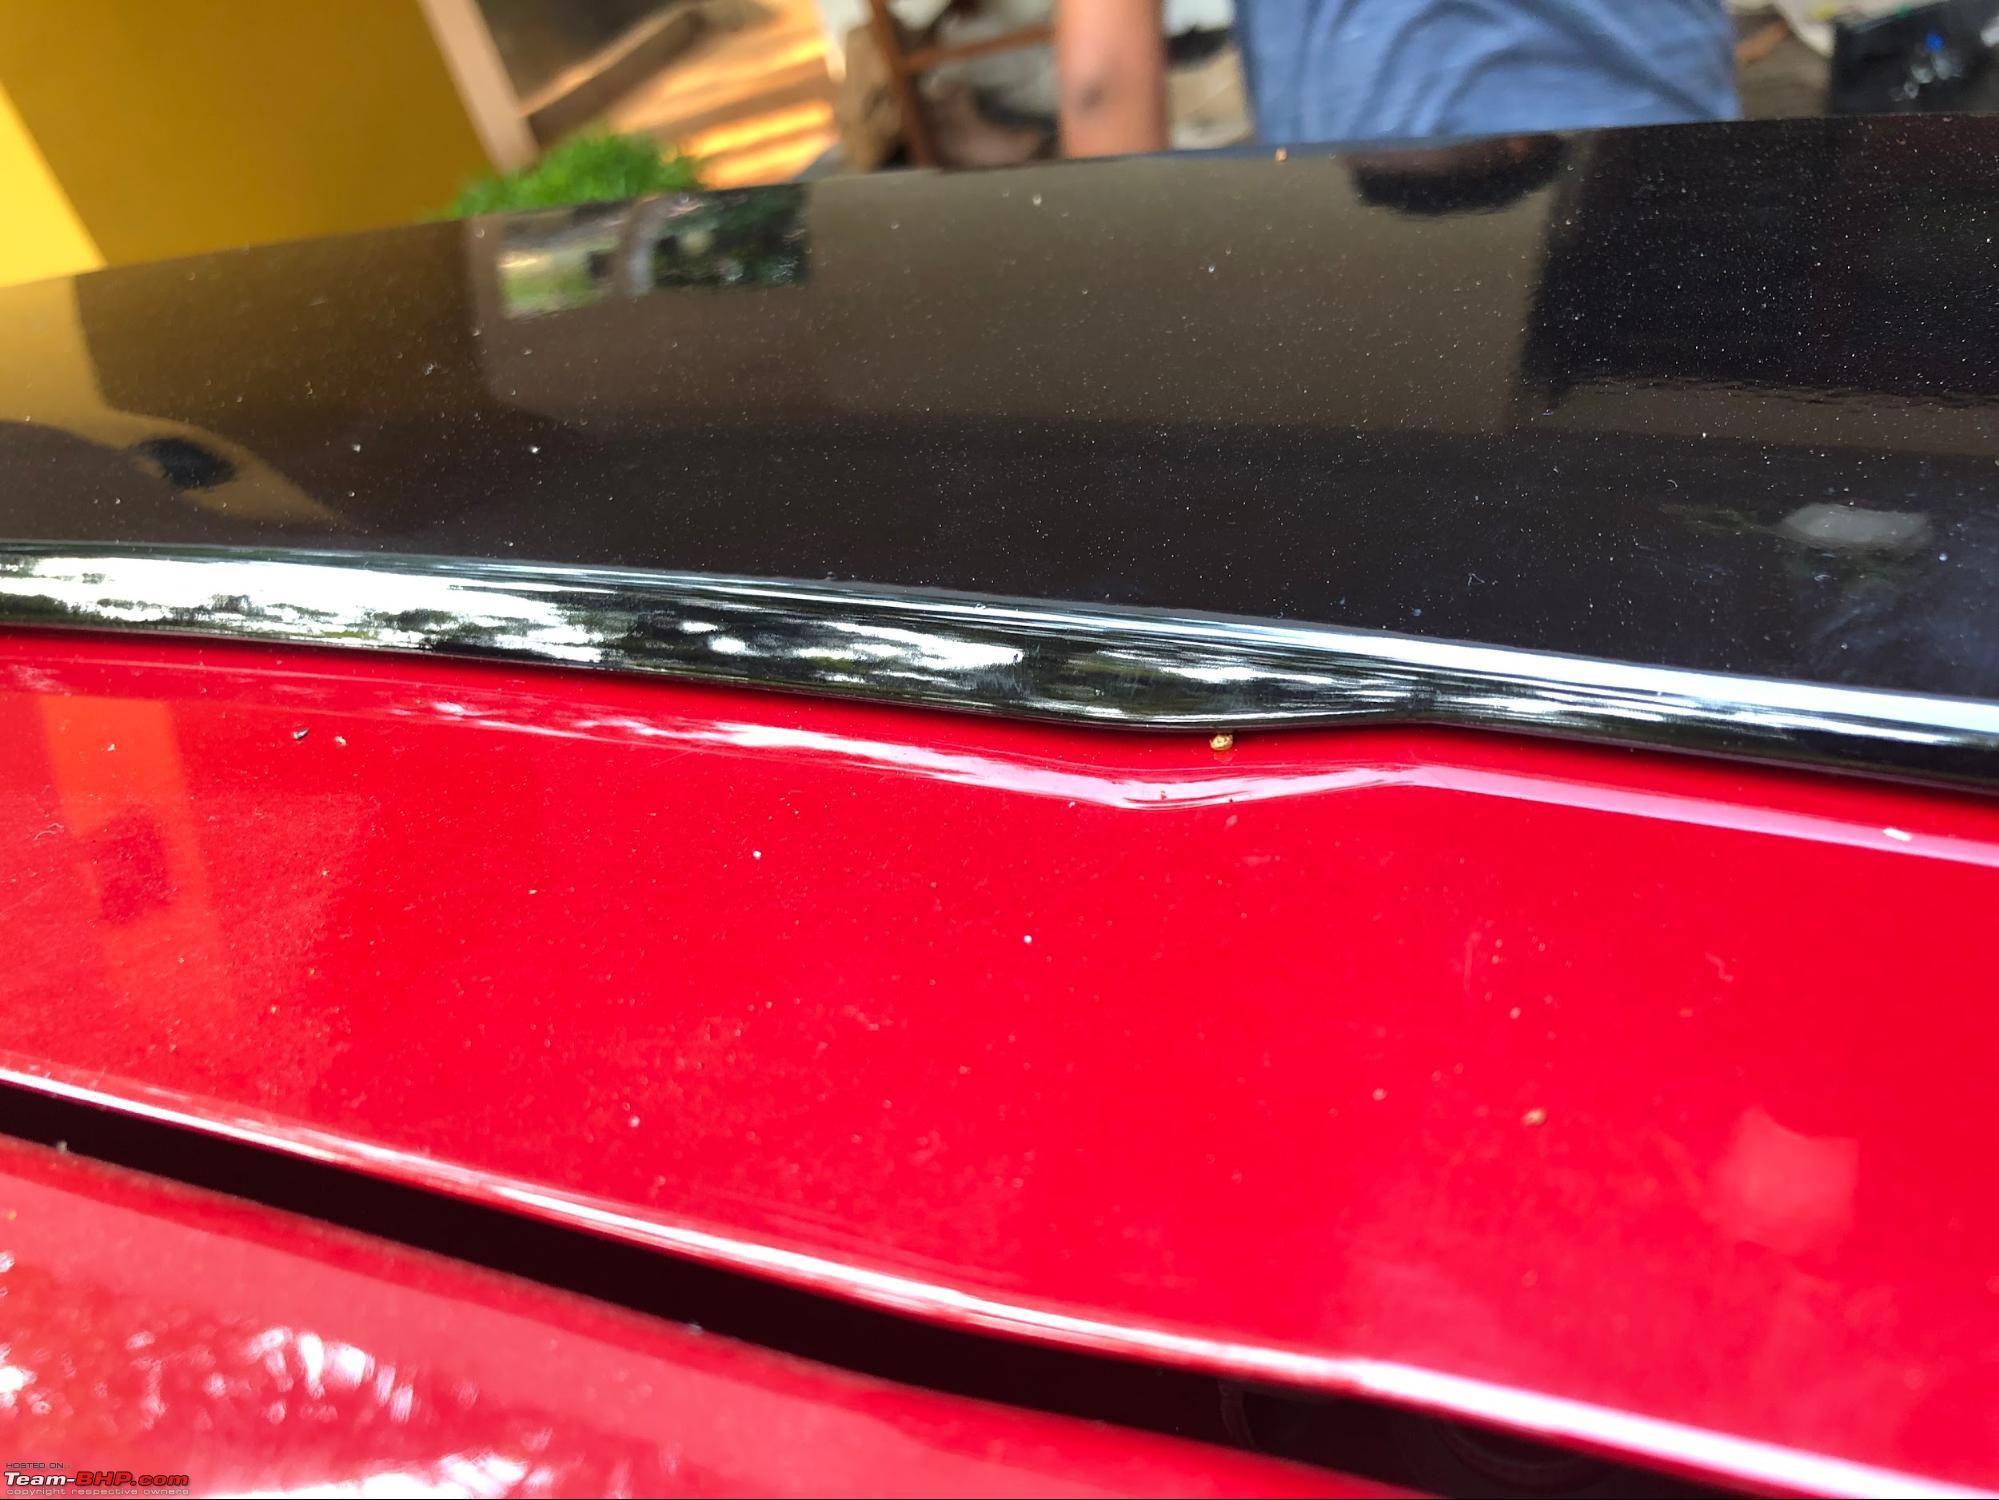  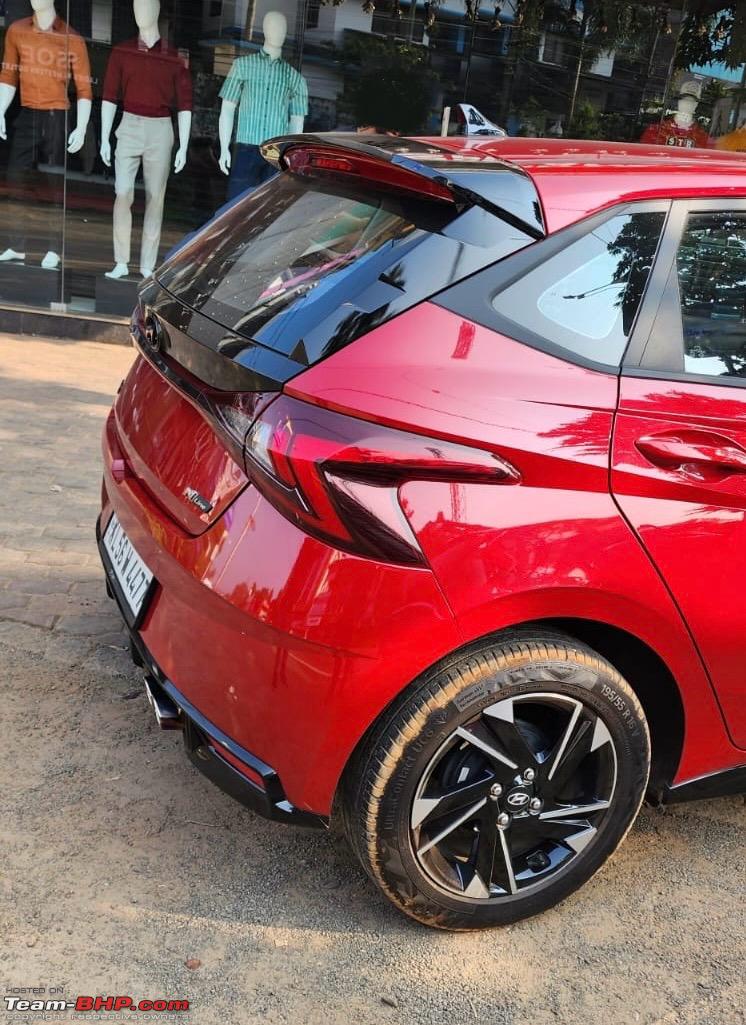 (1/3) Last edited by hasgardee : 8th August 2024 at 18:07. |

|  (36)
Thanks (36)
Thanks
|
| The following 36 BHPians Thank hasgardee for this useful post: | adityan27, anivy, Anonymous guy, arnav17, ashis89, AYP, brownkaiser, CEF_Beasts, Civic_doc, dailydriver, Doonite, Gannu_1, GaryTSI, gauravanekar, GTO, gururajrv, Joe367, kiranknair, libranof1987, lovetorque, MMH, mugen_pinaki27, myavu, NarediAni7518, PearlJam, ron178, Roy.S, saikishor, sanjayrozario, Sridhar K, StormShadow, swiftnfurious, vigsom, vivek_saha1304, Wageabond, yogiii |
| |
|
8th August 2024, 16:31
| #2 |
| Newbie Join Date: Aug 2024 Location: Kozhikode
Posts: 12
Thanked: 189 Times
| Re: My i20 Diesel's N Line Transformation: A Comprehensive Modification Journey N Line Gear Knob One of the main attractions for me in the i20 N Line was the gear knob on the IMT variants (since a manual wasn't available at the time). Both the IMT and my diesel i20 have a 6-speed gear knob, so I thought I could simply swap the gear knob without any additional effort. However, this proved to be another tricky and costly modification. First, I tried to find the part number for the N Line IMT gear knob but couldn't locate it in the catalog. I then contacted Hyundai Service Center and discovered that Hyundai only sells the entire gear knob assembly, not just the knob itself. This was a letdown, so I initially decided not to pursue it further. However, I then explored options outside India and looked into N model cars available abroad. In most cases, Hyundai doesn’t provide part numbers just for the gear knob. Since my car has a pull-up reverse due to the six gears, I needed five parts for the swap: the gear knob itself, boot cloth, spring, lower skirt, and upper skirt. However, most catalogs didn't list the lower skirt, possibly to prevent easy swaps to normal cars. While browsing the i30N catalog, I found the part listed with a part number. I quickly connected with a few eBay sellers and a contact in Korea who deals with Hyundai parts. He confirmed he could arrange it, though it might take some time. Remarkably, he arranged everything within two weeks and sent it via postal service. Sending through postal service meant lower customs duty compared to DHL, which would have added at least 50-60% of the part cost. The boot cloth was the only part I didn't buy from them; I got the part number from the Indian i20 IMT variant and ordered it locally. Finally, I had all the parts and began the installation. The only issue was a height discrepancy between the lower skirt and the connection with the upper skirt. I trimmed a bit off the lower skirt and used PTFE sealing tape to connect them perfectly. The installation went smoothly without any disassembly issues. Despite the challenge in finding all the parts, once everything was gathered from different sources, it worked like a charm. This modification significantly enhanced the interior ambiance and feel, making it a worthwhile effort.    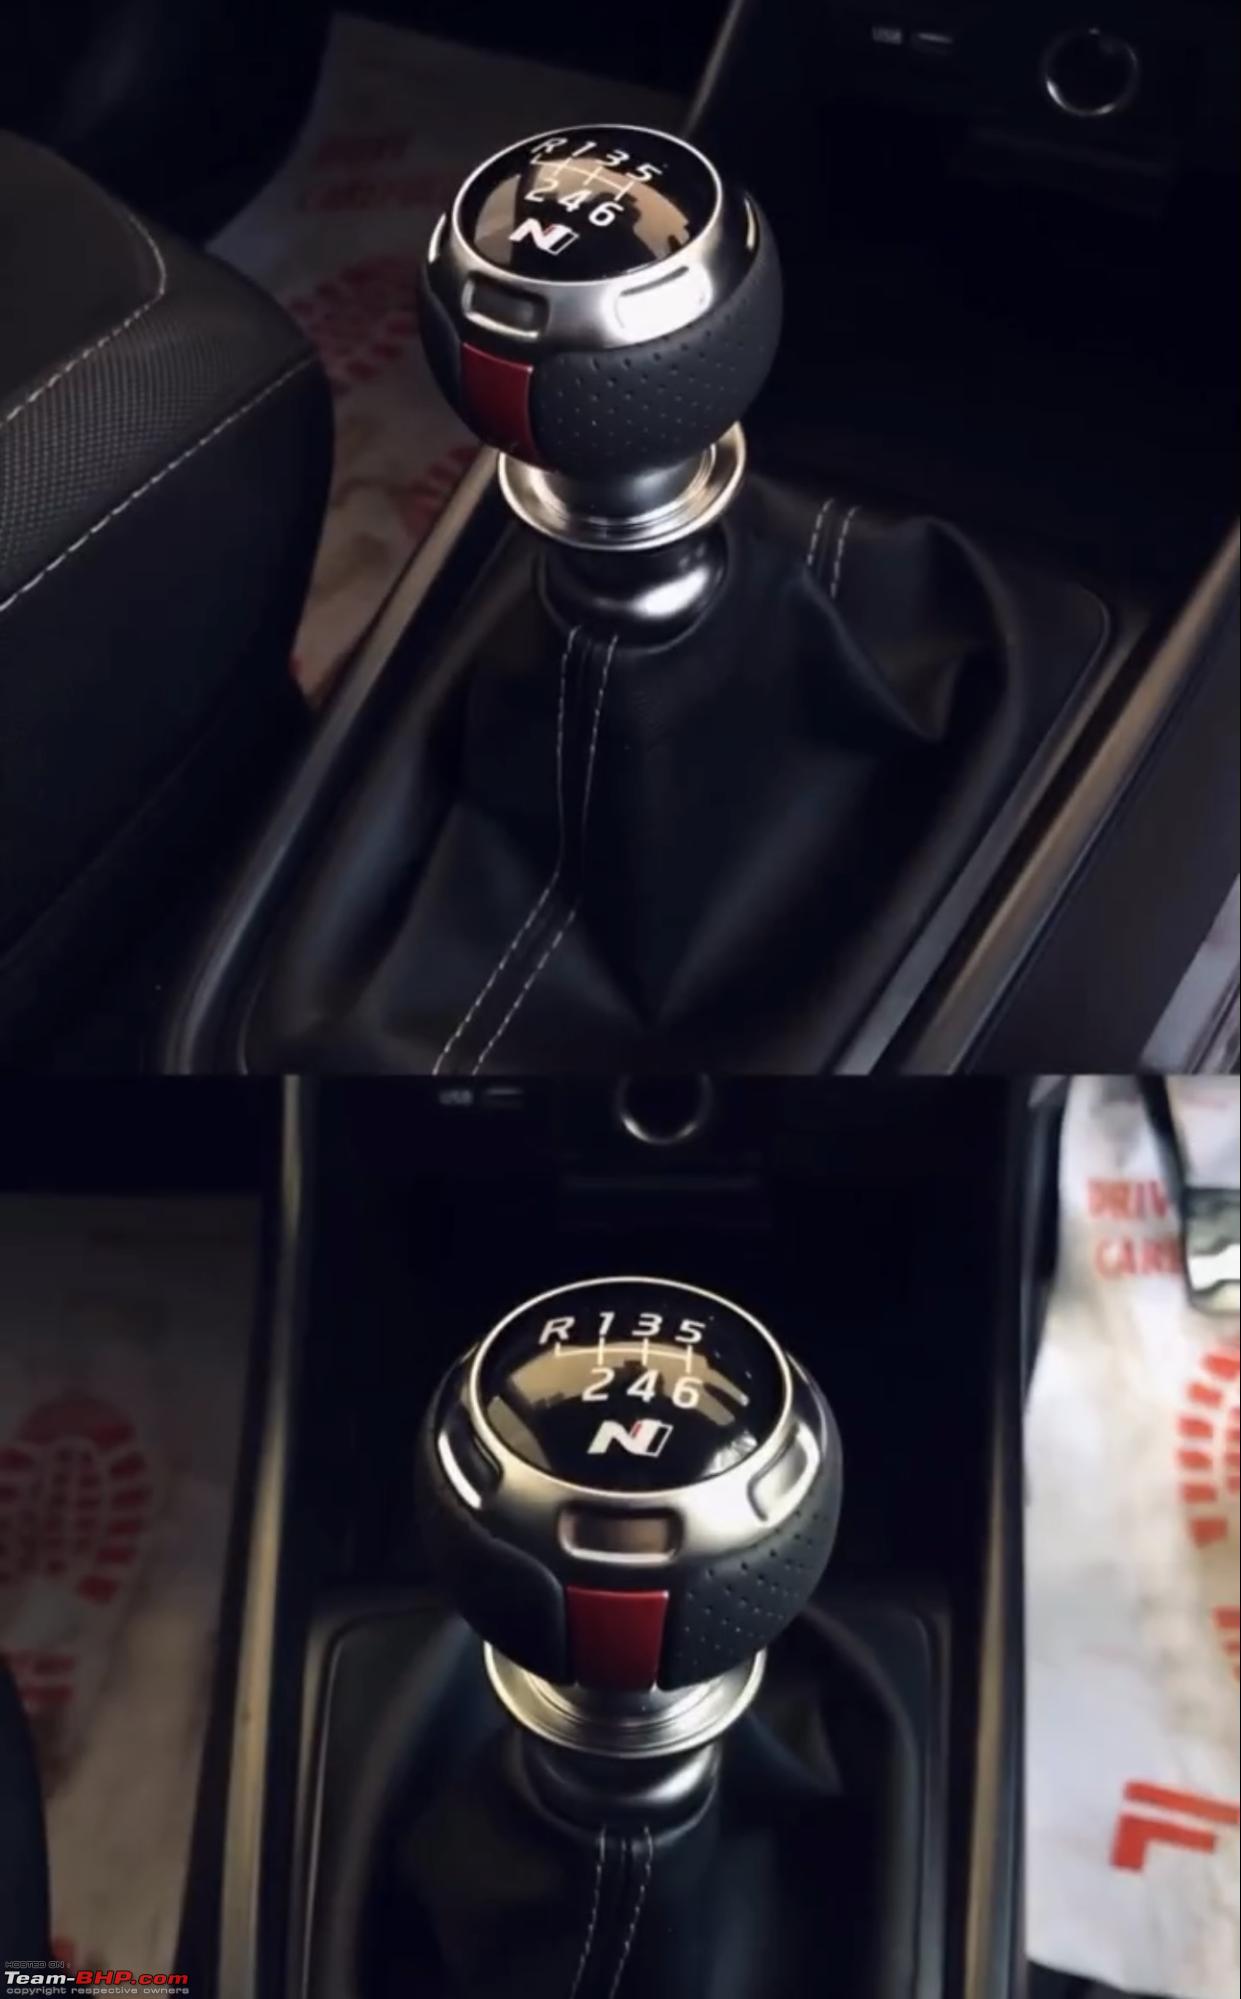 N Line Front Bumper with Grills and Fog Housing As I mentioned at the beginning, every upgrade happened in between a few months gap, and this was the first modification I thought of doing. However, due to its compatibility doubt and cost, it got delayed. Regarding the N Line front bumper, there were a lot of components to change: the top bumper, lower bumper, fog housing, fog light, grill, tow hook cover, and wheel guard. After seeing a detailed YouTube video by someone who had already done this upgrade and explained it very well, I decided to go for it. I ordered everything from Hyundai's service center and asked them to paint it. One small customization I did here was changing the lip color. Normally, in the red i20 N Line (which is somewhat rare), the lip is gray. I decided to try it in the same fiery red (R4R) as my car's body color, rather than the red that comes with other N Line colors. They painted everything, and I went to the showroom for the installation. This was the modification I was most excited about. The transformation was incredible my i20 went from a less aggressive look to a super aggressive, yet not overdone appearance. The red lips turned out perfectly, adding a unique touch to the front end. A few months later, I even added the side skirting from the N Line. Together, these modifications complemented each other, giving the car a proper N Line look from the outside.   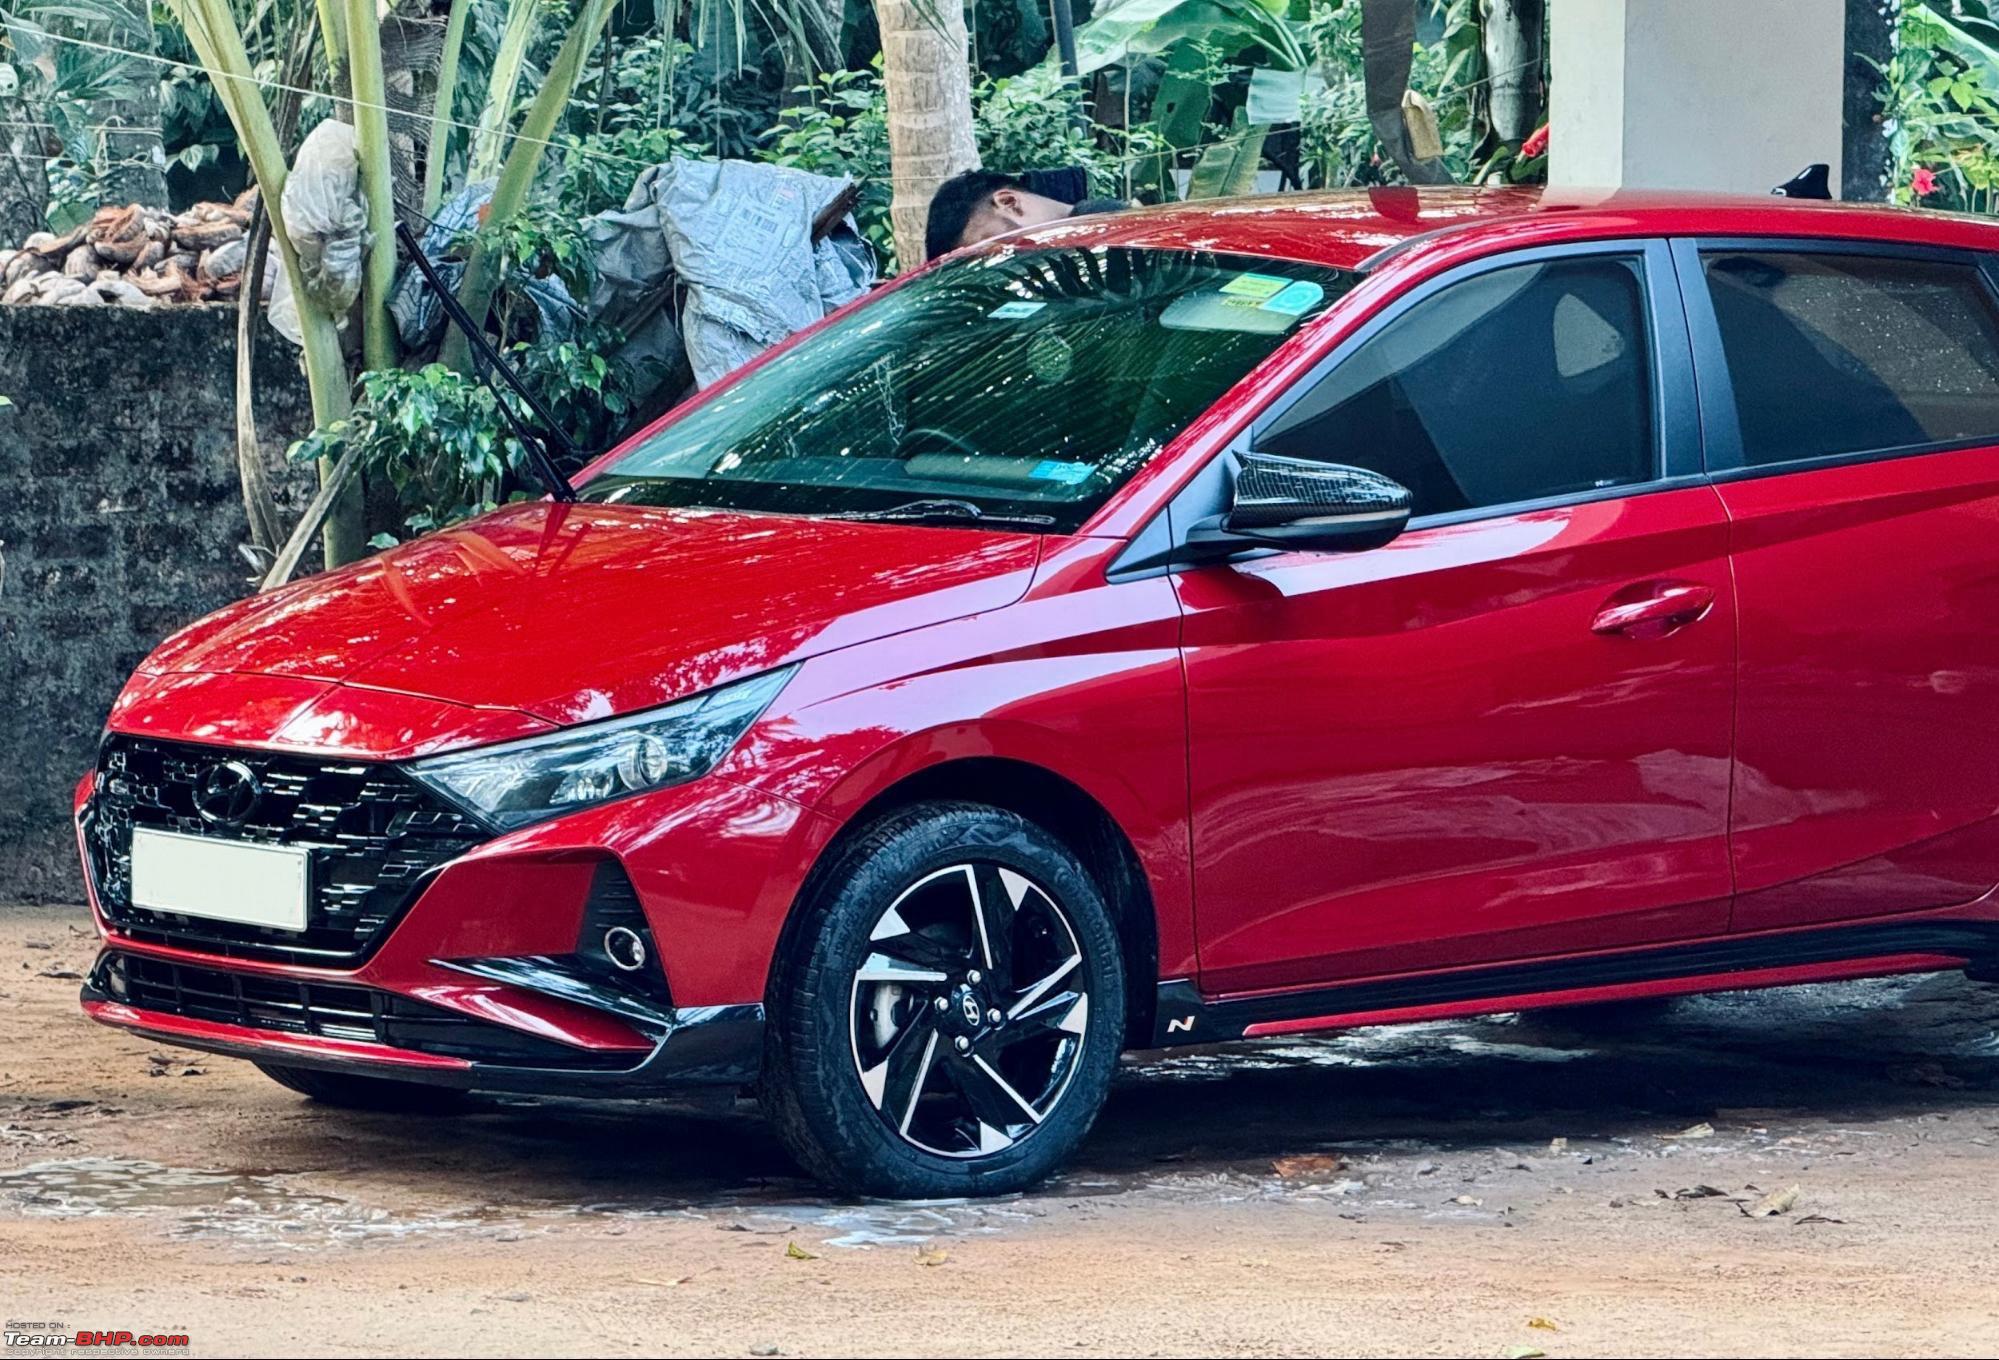   The Mighty N Steering Wheel This upgrade was the one I really, really wanted, but initially thought I'd never go for it due to the pricing. In fact, it's probably the most costly N Line upgrade I did. I wasn't planning to do this until I found someone who had done it through Instagram. I connected with that guy, who happened to be one of the members of the small group I mentioned earlier, Sushant. He gave a really nice review, as expected, and mentioned that the installation is very straightforward—just remove the old one and install the new one with the same wiring and coupler. However, with the steering, we needed to change the airbag as well. After several weeks of thinking, I decided to go for it. I ordered it from Hyundai, and it arrived within a month. However, there was a mistake from the service center—they ordered the normal i20 airbag instead of the N Line airbag. So, I had to wait another 3-4 weeks until the correct N Line airbag arrived. Once I collected both parts, I installed them myself since it was super easy. Meanwhile, I also added cruise control with just an extra wire connection, a modification many might know about through YouTube. After installing the mighty proper N steering wheel, what a difference in touch and feel! The enhancement in look was incredible. On top of that, I bought a Hyundai logo overlay in black color and added it to the steering, making it even sportier by eliminating the chrome feel from the steering. Just after one month, another group member was about to install an N Line steering wheel. At that time, Hyundai was increasing part pricing by 20-30% for most parts, which affected Korean imports like this steering wheel as well. He mentioned they increased the price by a whopping 10k overnight for both the steering and airbag combined, affecting almost every part of Hyundai.     Seat Cover and Rear Headrest This upgrade isn't specific to the N Line, but I felt it was essential to enhance my seat covers and add rear headrests. One of the most frustrating things Hyundai did with the i20, in all variants except the topmost Asta (O), was to omit proper rear headrests. Once I sat in the rear seat, I noticed how uncomfortable it was, especially when I was sleepy and couldn't find a proper place to rest my head. This made me decide to add rear headrests. The only option to get proper rear headrests was to change the rear seat's backrest, which was quite costly through Hyundai. So, I opted for a custom solution. Since I was planning to upgrade the seat covers, I thought I'd buy the headrests from Hyundai, modify the metal part of the existing seat to fit the headrests, and then finish it with new seat covers. Even in the Sportz variant, there was a small, useless bump to mimic a headrest. My plan was to install the headrests, remove that bump, and cover the seat with new fabric. Initially, I thought this would be simple because I'd seen many people do it for Maruti cars. However, Hyundai uses circular pipes inside the seats, whereas Maruti uses square pipes, making it easier to install metal pieces. Hyundai's circular metal pipes and clips for the headrest to sit in the two levers were also in circles, requiring more intricate work to fit. After examining how Hyundai did it, I tried to replicate it using some metal items. Although explaining the process is complicated, I'll add some photos here to illustrate. This turned out to be a long R&D process to make it perfect. Since I was adding headrests, I decided to add three instead of two, as most of the time, my family of three sits in the back. Also, three headrests look nicer, which I noticed when Hyundai released the i20 with three headrests. With my plan, I went to the same local welding shop where I did the exhaust tip modification. I grabbed all the metal sheets and shapes I needed and explained my goal to the welder. He was very interested and helpful with this unique project. After almost 3-4 hours of work, it was done perfectly. However, I still needed to add holes and remove the fake headrest bump from the rear seat. Next, I moved on to adding new seat covers. I didn't want to mimic the i20 N Line seat covers because I aimed for more cushioning and thigh support. I had a design in mind from the Hyundai Sonata N Line 2024, which uses a combination of artificial leather and dotted Alcantara. Since durable Alcantara was costly and hard to find, I decided to use a combination of Nappa leather and dotted leather. While I knew it wouldn't be an exact match, I hoped to achieve about 80% resemblance with some tweaks. The shop agreed to this plan, and I also planned to add leather cushioning to all door pads. They completed the work in 2-3 days. Although the result wasn't perfect, they achieved about 80% of what I envisioned with some adjustments. I added a 3D metal N logo to the seat covers, which I bought from AliExpress, and they installed all three headrests as well. The final output was good, significantly enhancing the interior feel more than anything else. The seating was more comfortable, and the thigh support was excellent, making a noticeable difference in overall comfort and support.      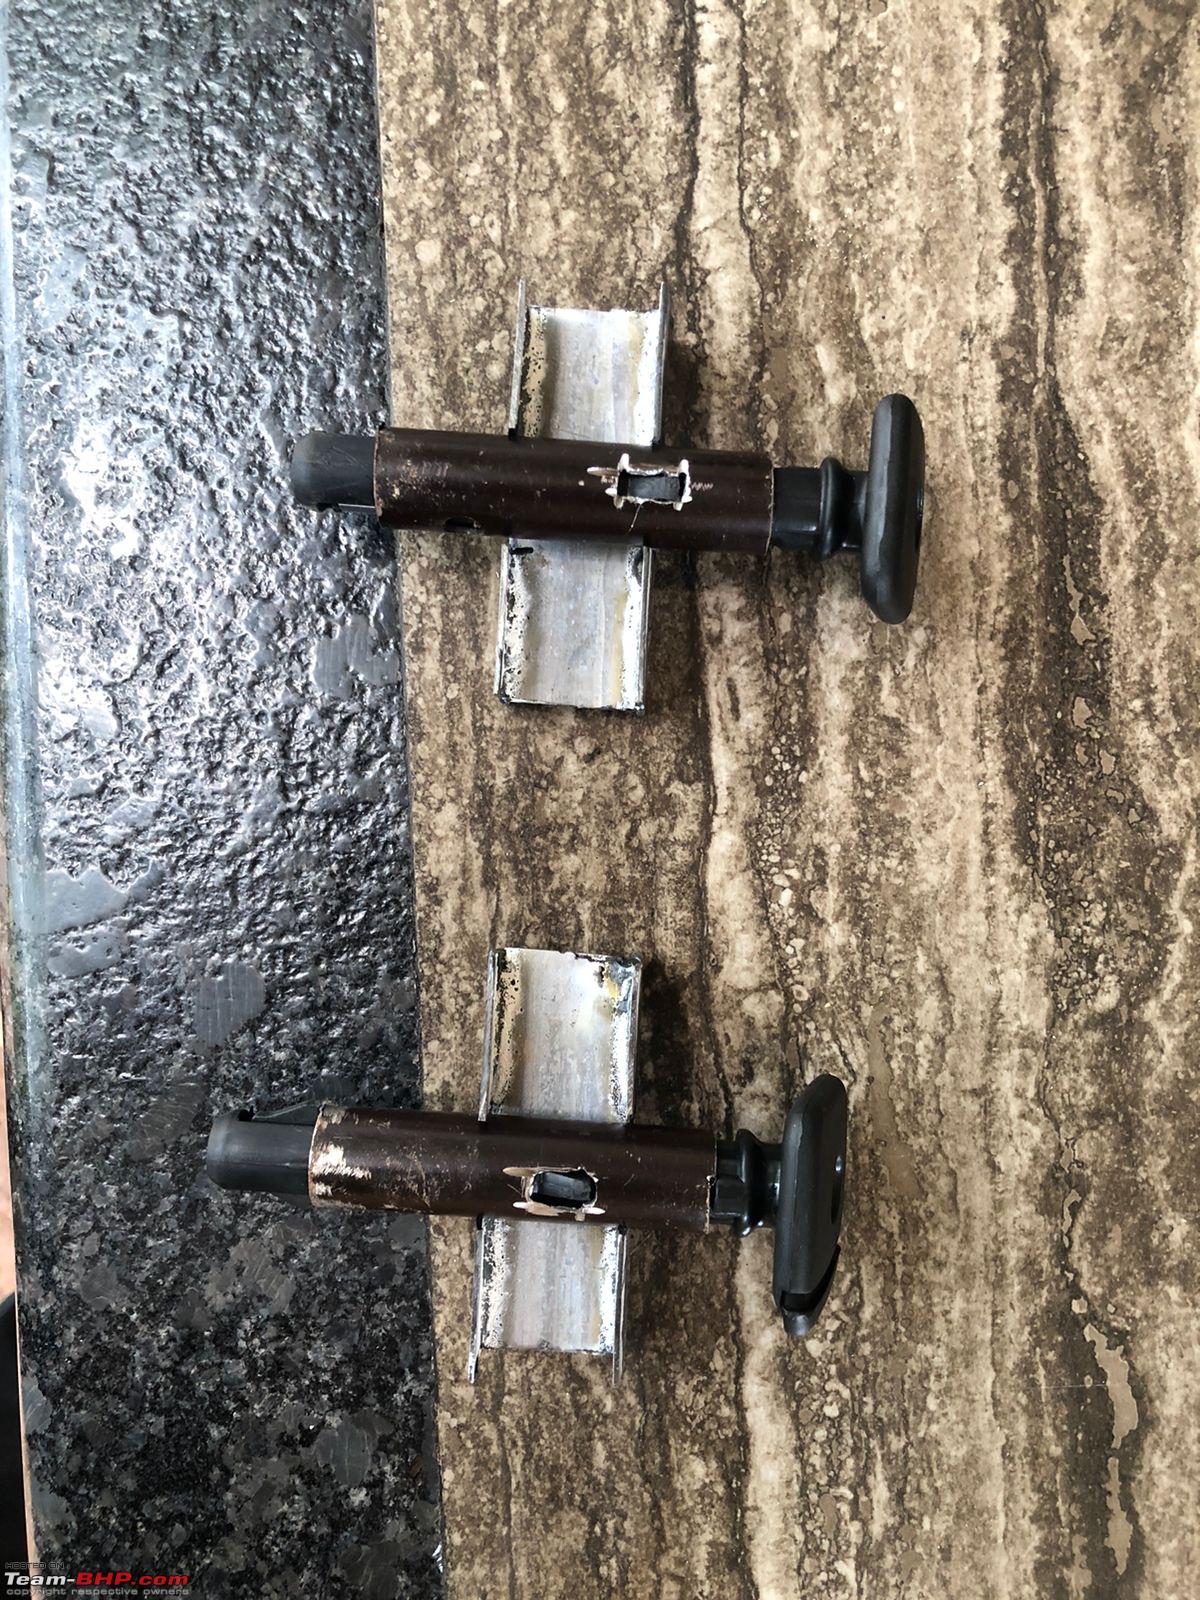    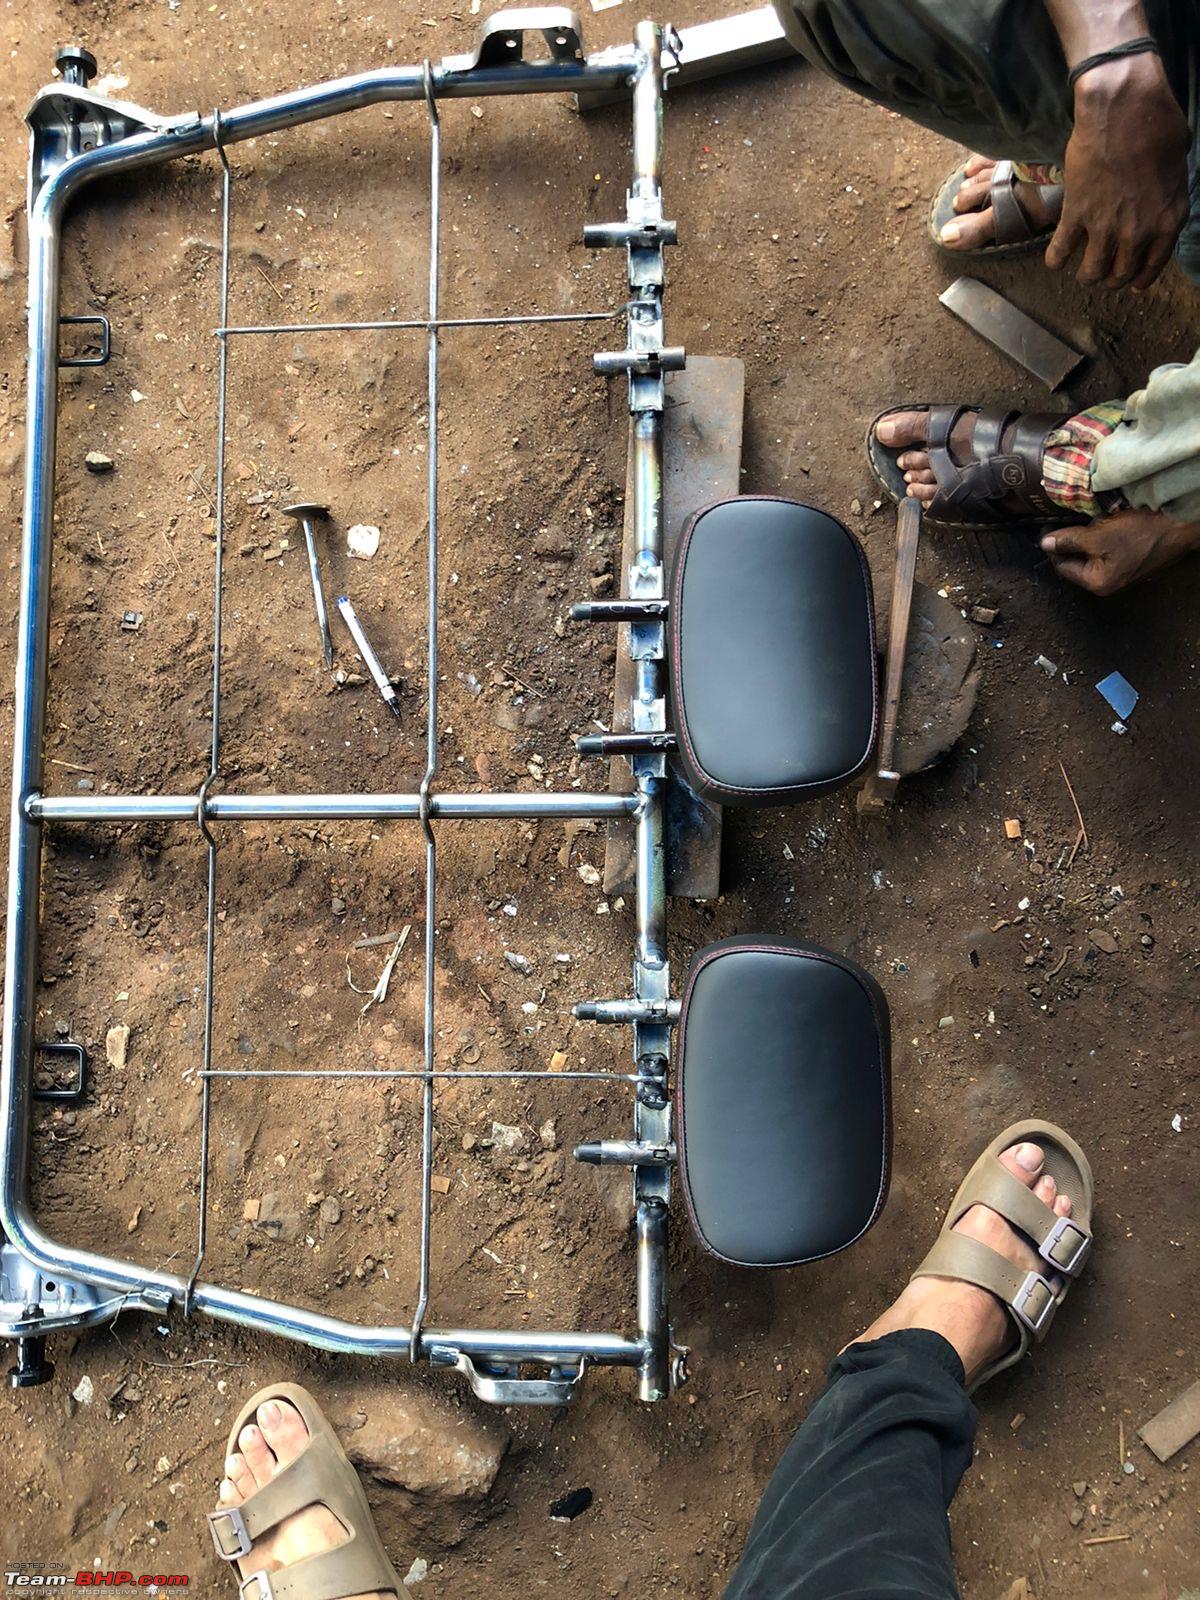    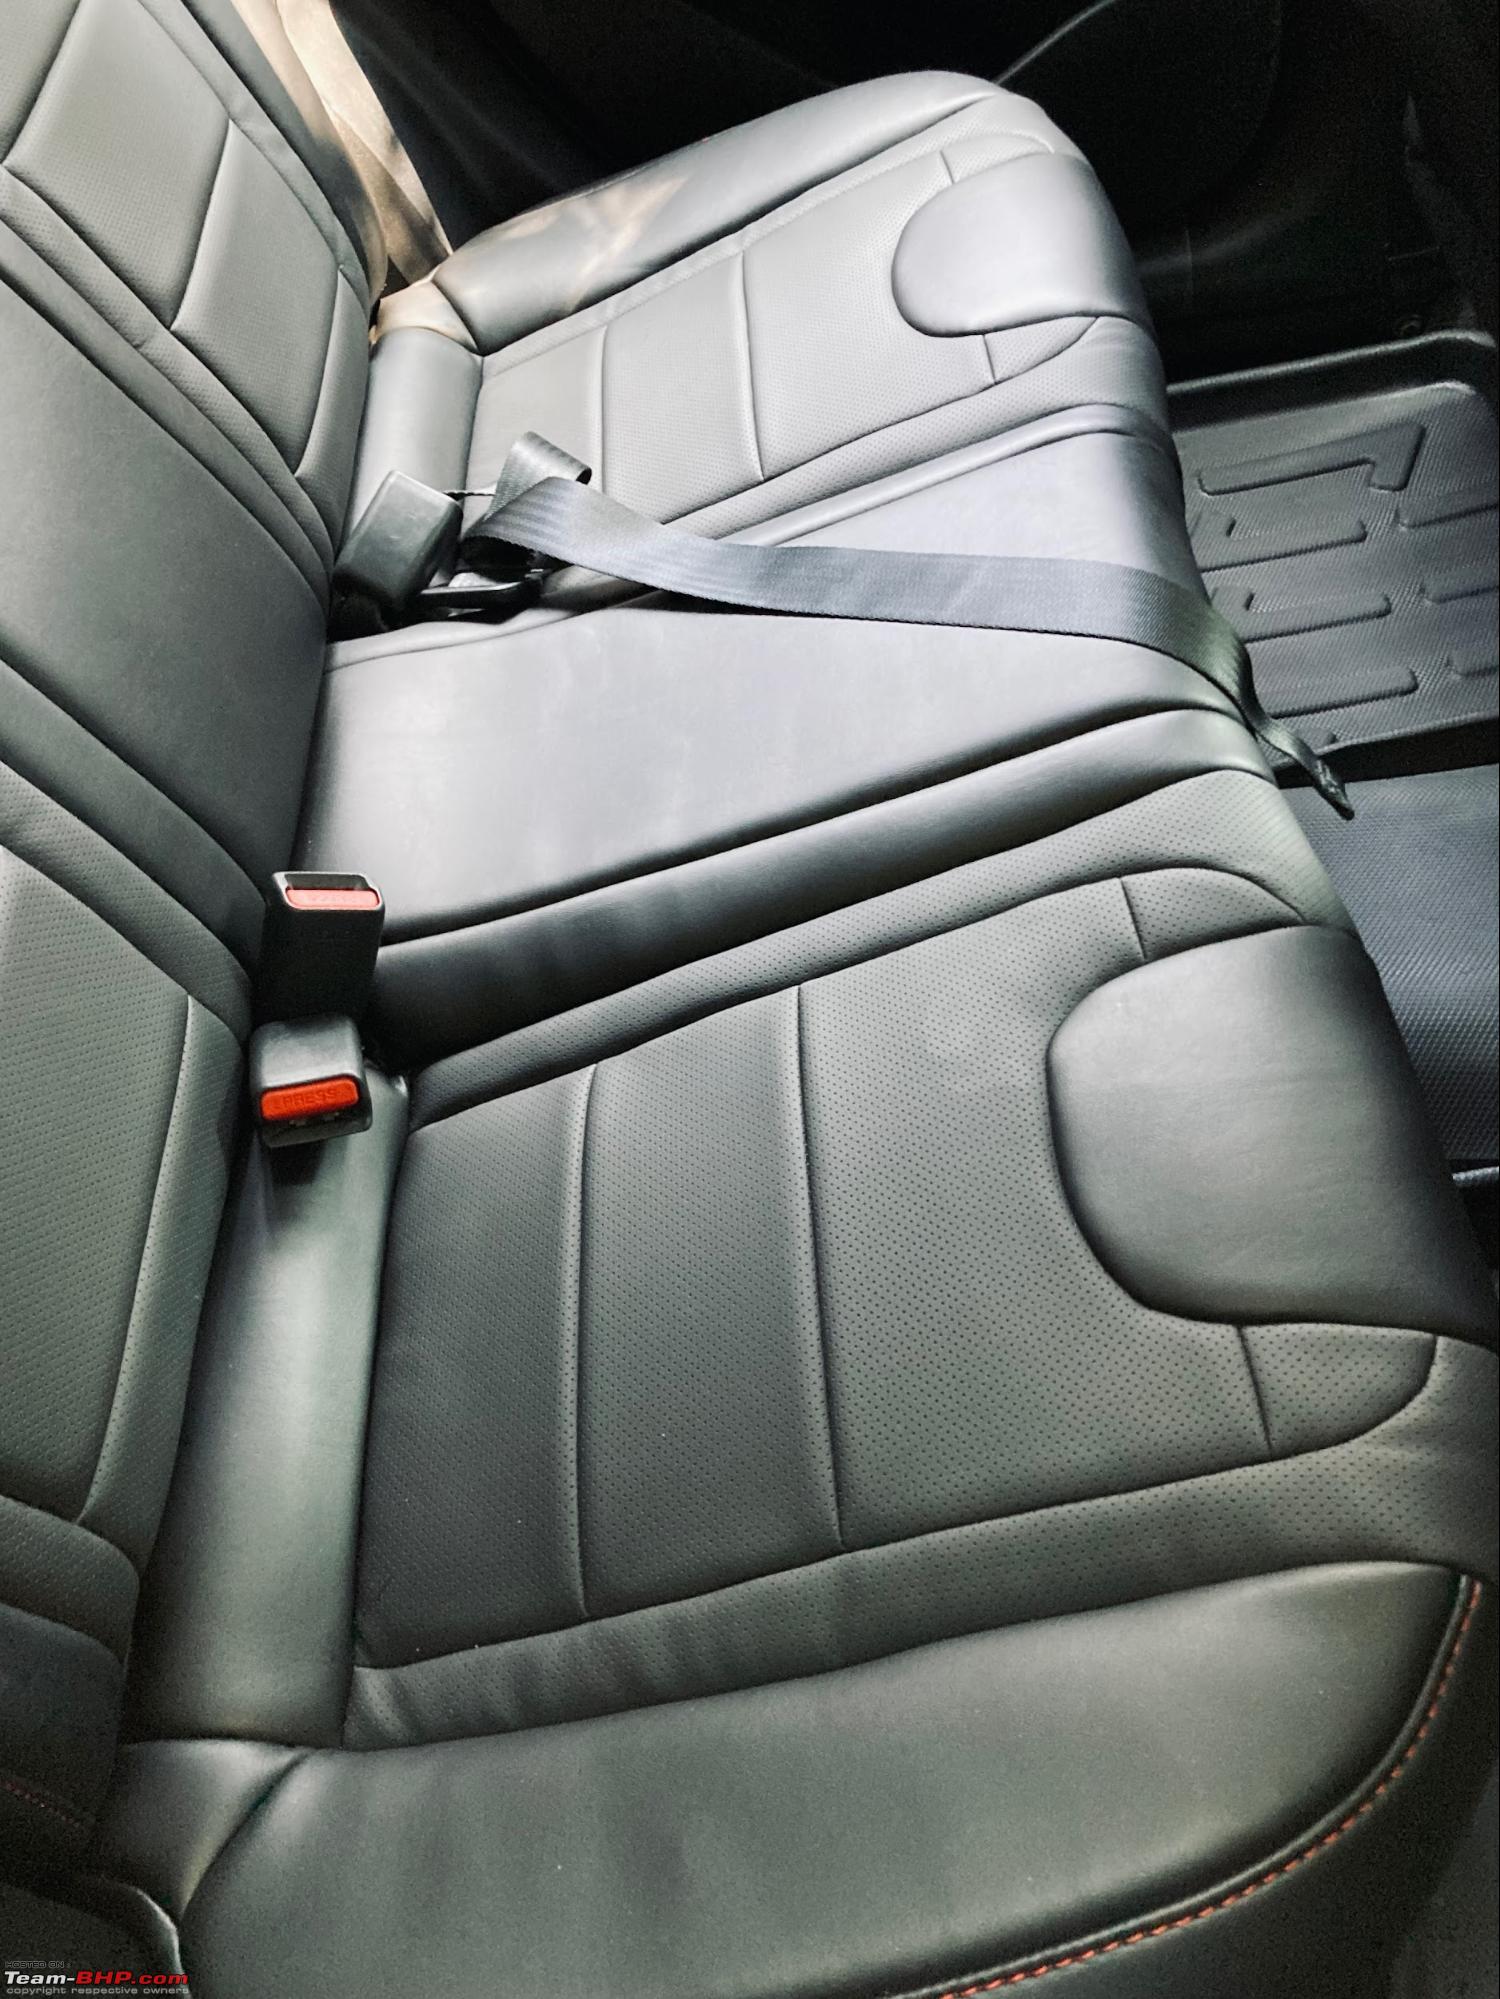    (2/3) Last edited by hasgardee : 8th August 2024 at 17:11. |
|
| (43)
Thanks
|
| The following 43 BHPians Thank hasgardee for this useful post: | adityan27, anivy, Anonymous guy, ashis89, asingh1977, AYP, brownkaiser, CEF_Beasts, chaksjr, dailydriver, Doonite, DriverNo.420, Gannu_1, GaryTSI, GForceEnjoyer, GTO, gururajrv, JoshuaM, karan561, kiranknair, klgiridhar, krishnakumar, libranof1987, lovetorque, Mallucarguy, MotorDev, mugen_pinaki27, myavu, NarediAni7518, PearlJam, ron178, Roy.S, saikishor, sanjayrozario, shikh_oberoi, SRISRI_90, ssoni.1411, swiftnfurious, vigsom, Vikash Kumawat, Wageabond, YD14, yogiii |
|
8th August 2024, 16:33
| #3 |
| Newbie Join Date: Aug 2024 Location: Kozhikode
Posts: 12
Thanked: 189 Times
| Re: My i20 Diesel's N Line Transformation: A Comprehensive Modification Journey Blacking Out My Interior Just Like N Line To finish the interior work and give it a sporty feel like the N Line, I decided to make my interior fully black by changing the side panels, sun visors, roof handle and headliner. Regarding the headliner, being a Sportz variant, it had an old-school fabric headliner. I aimed to transform that into a textured material with cushioning. As for the side panels, sun visors, and clips, Instead of painting the existing parts, I felt it would be better to replace them.So, I ordered those parts directly from Hyundai. There were around 10 parts to order, and since most of them were plastic, they weren't very costly. Most of the parts were actually sourced from the Hyundai service center with the help of my friend Prasad. He managed to get the proper part numbers ordered for us, thanks to his close connections with the Hyundai service center team and the fact that he has a Hyundai showroom near his home. For the roof handles, I chose the new Verna roof handles with a soft-close feature and had them painted black with powder coating. The original roof handles would make a noise when someone let go of them suddenly, so this upgrade eliminated that issue. I also had the interior lights removed and painted black at the same shop. Since installing the headliner involved using adhesive, I handed this task over to a professional shop. While they were removing the headliner, I asked them to damp the roof as well because I could hear a lot of noise from the roof when it rained. I already had all the black parts, and since headliner removal might require removing those parts, I gave them to the shop to change as well. Meanwhile, I gave all the parts to the painting shop to be painted black. The entire process took just one day. The next day, I received all the other parts back from the painting shop, and I assembled everything. With the interior fully blacked out, the car's inside felt more cohesive and sportier. While an all-black interior can sometimes make a space feel less roomy, the transformation added a touch of elegance and sportiness that I was aiming for. Everything came together really well, completing the full black interior upgrade successfully.  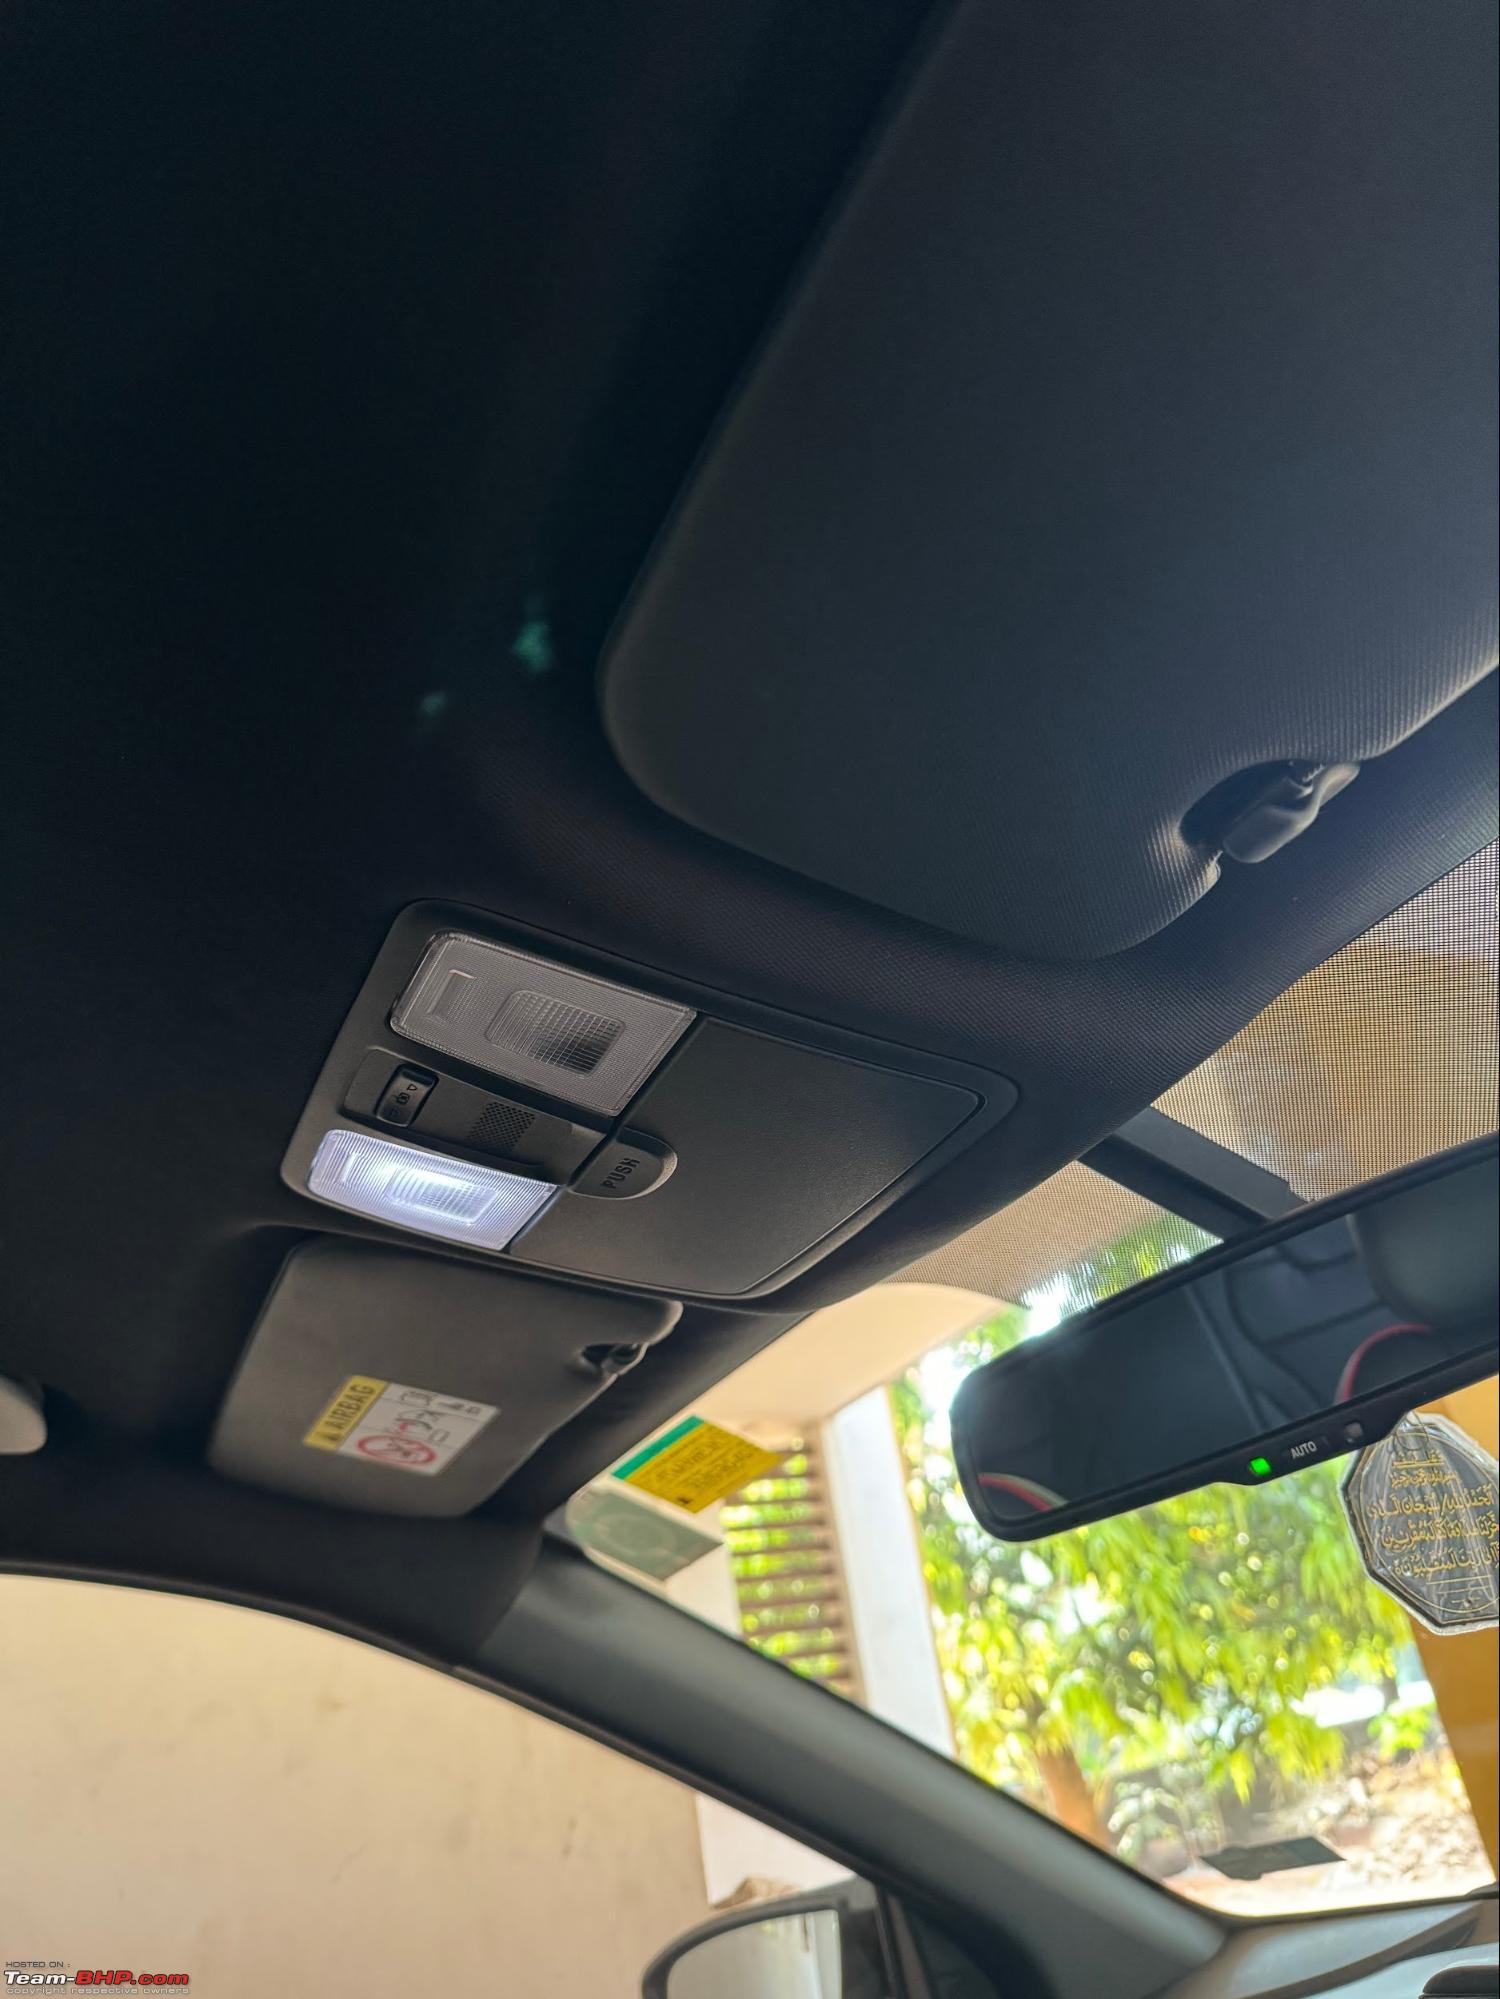 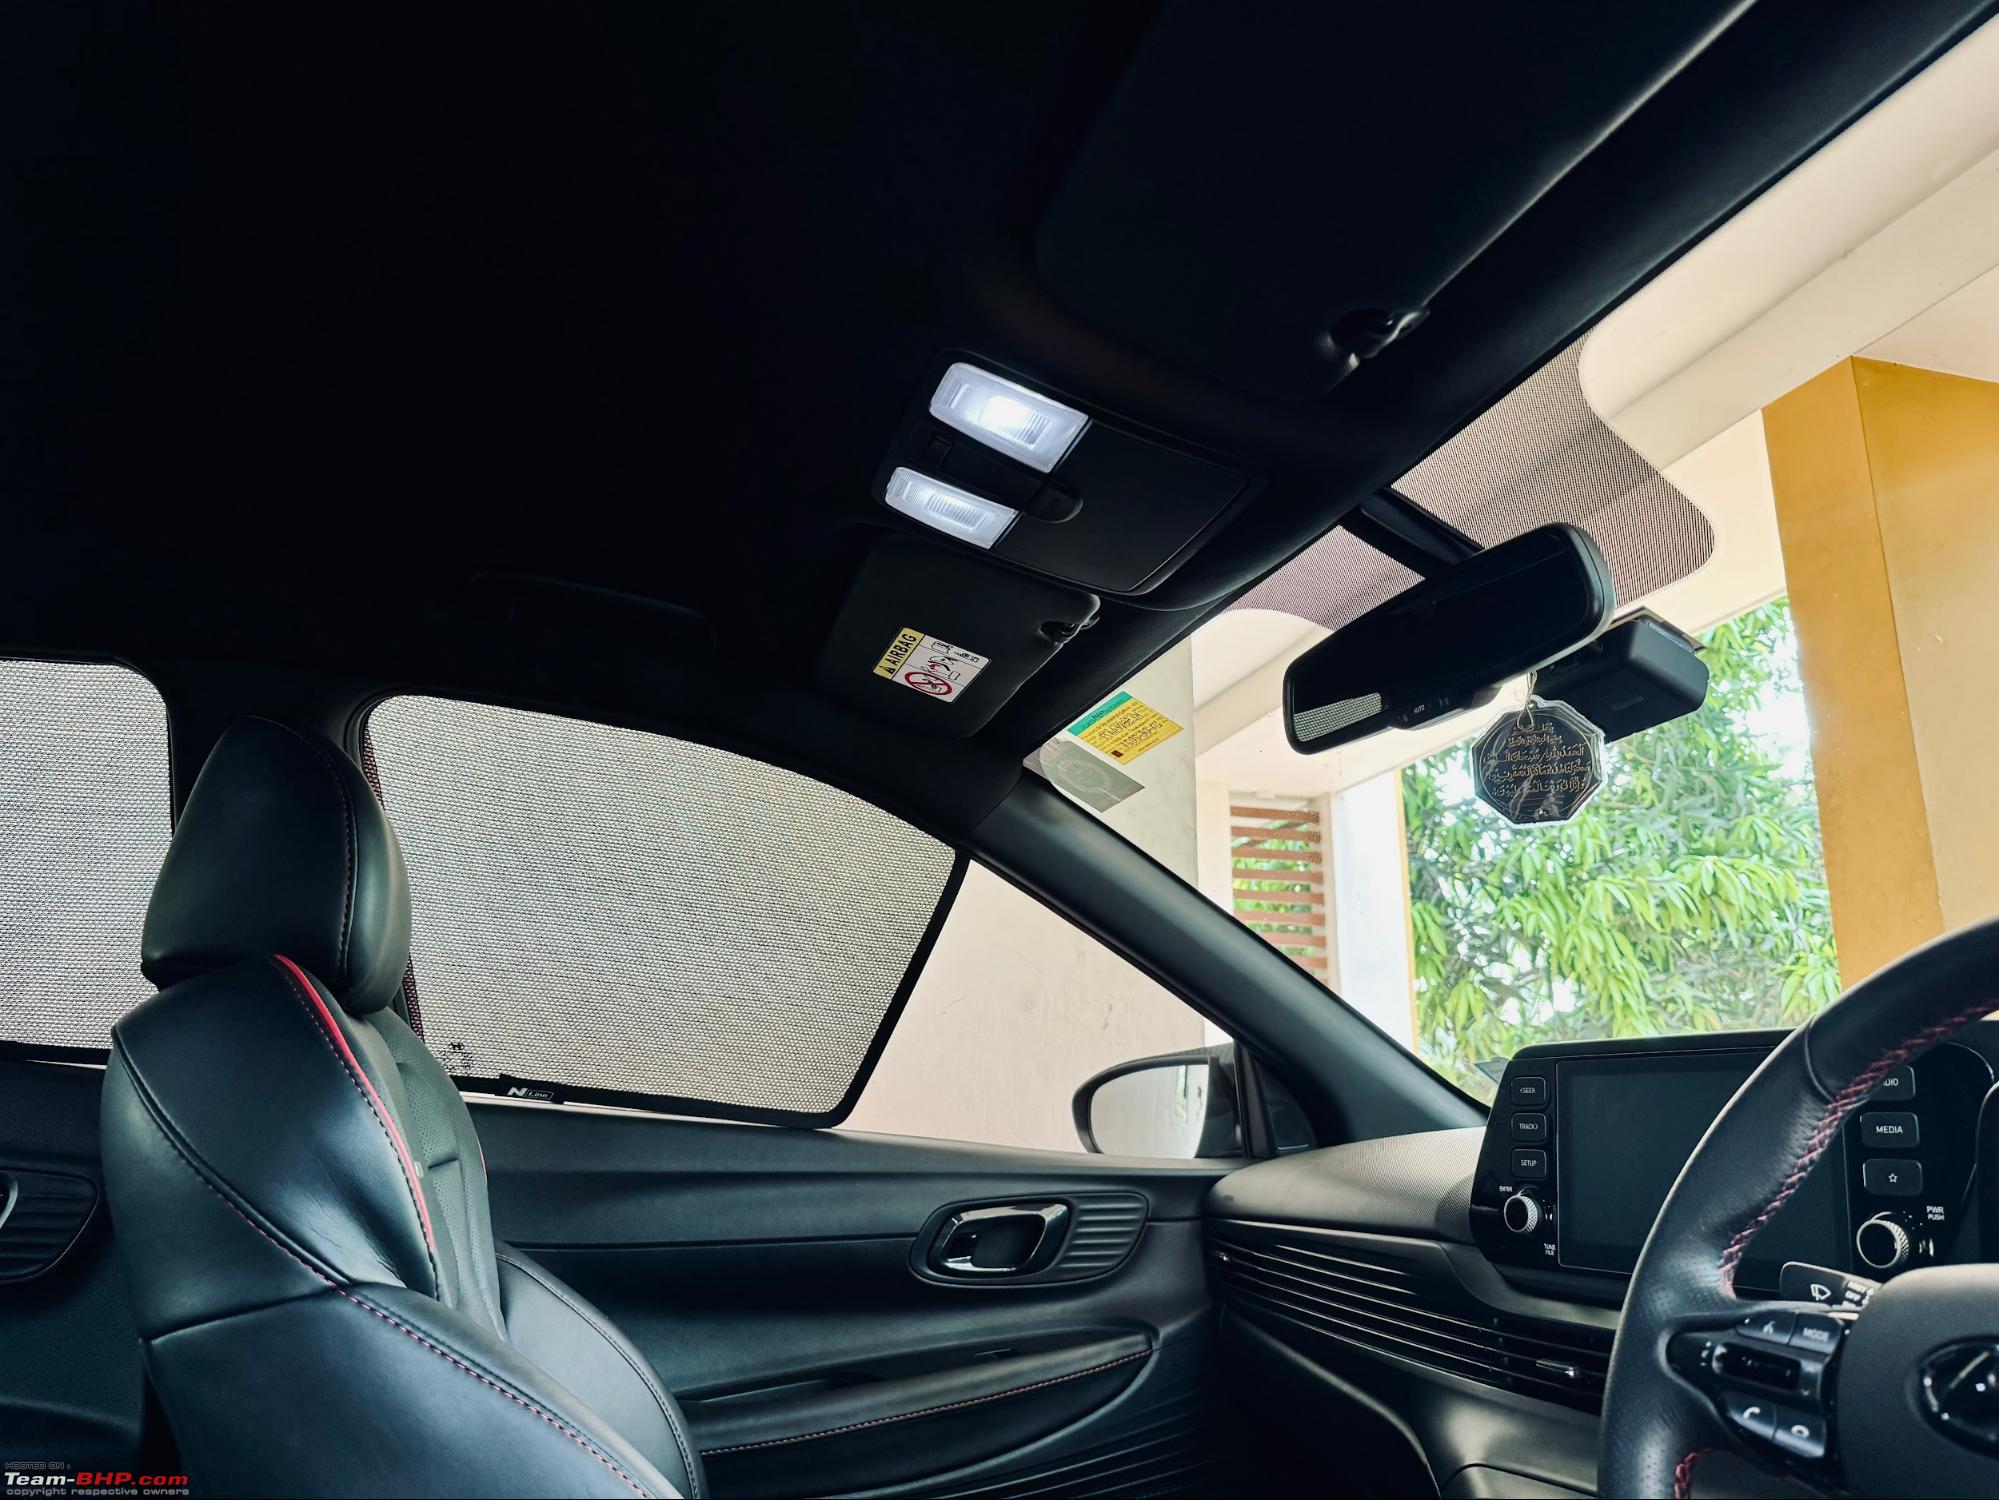  Some Cosmetic UpgradesAside from the major enhancements, I also made several minor cosmetic upgrades to my car, most of which I purchased from AliExpress. These small changes significantly contributed to the overall sporty and stylish look I was aiming for. Sporty Mirror Cover in Carbon Fiber Finish 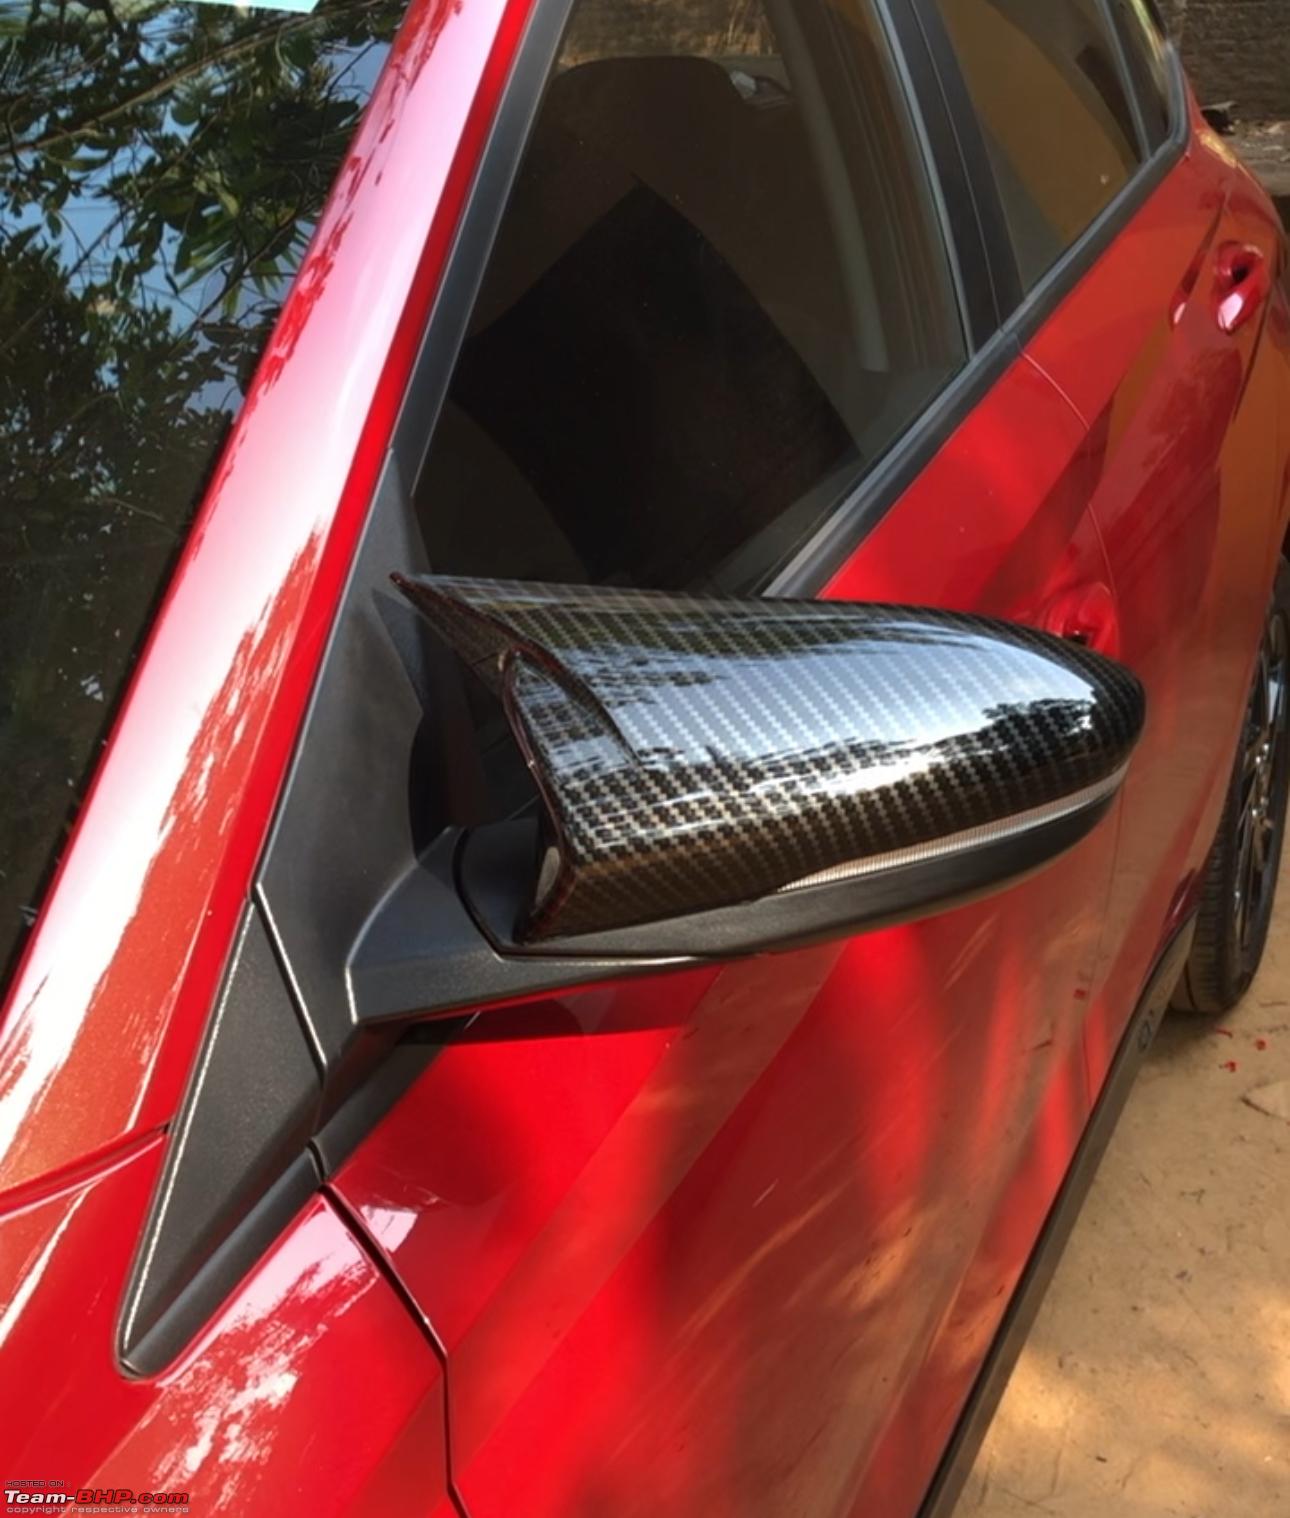 N Wheel Cap 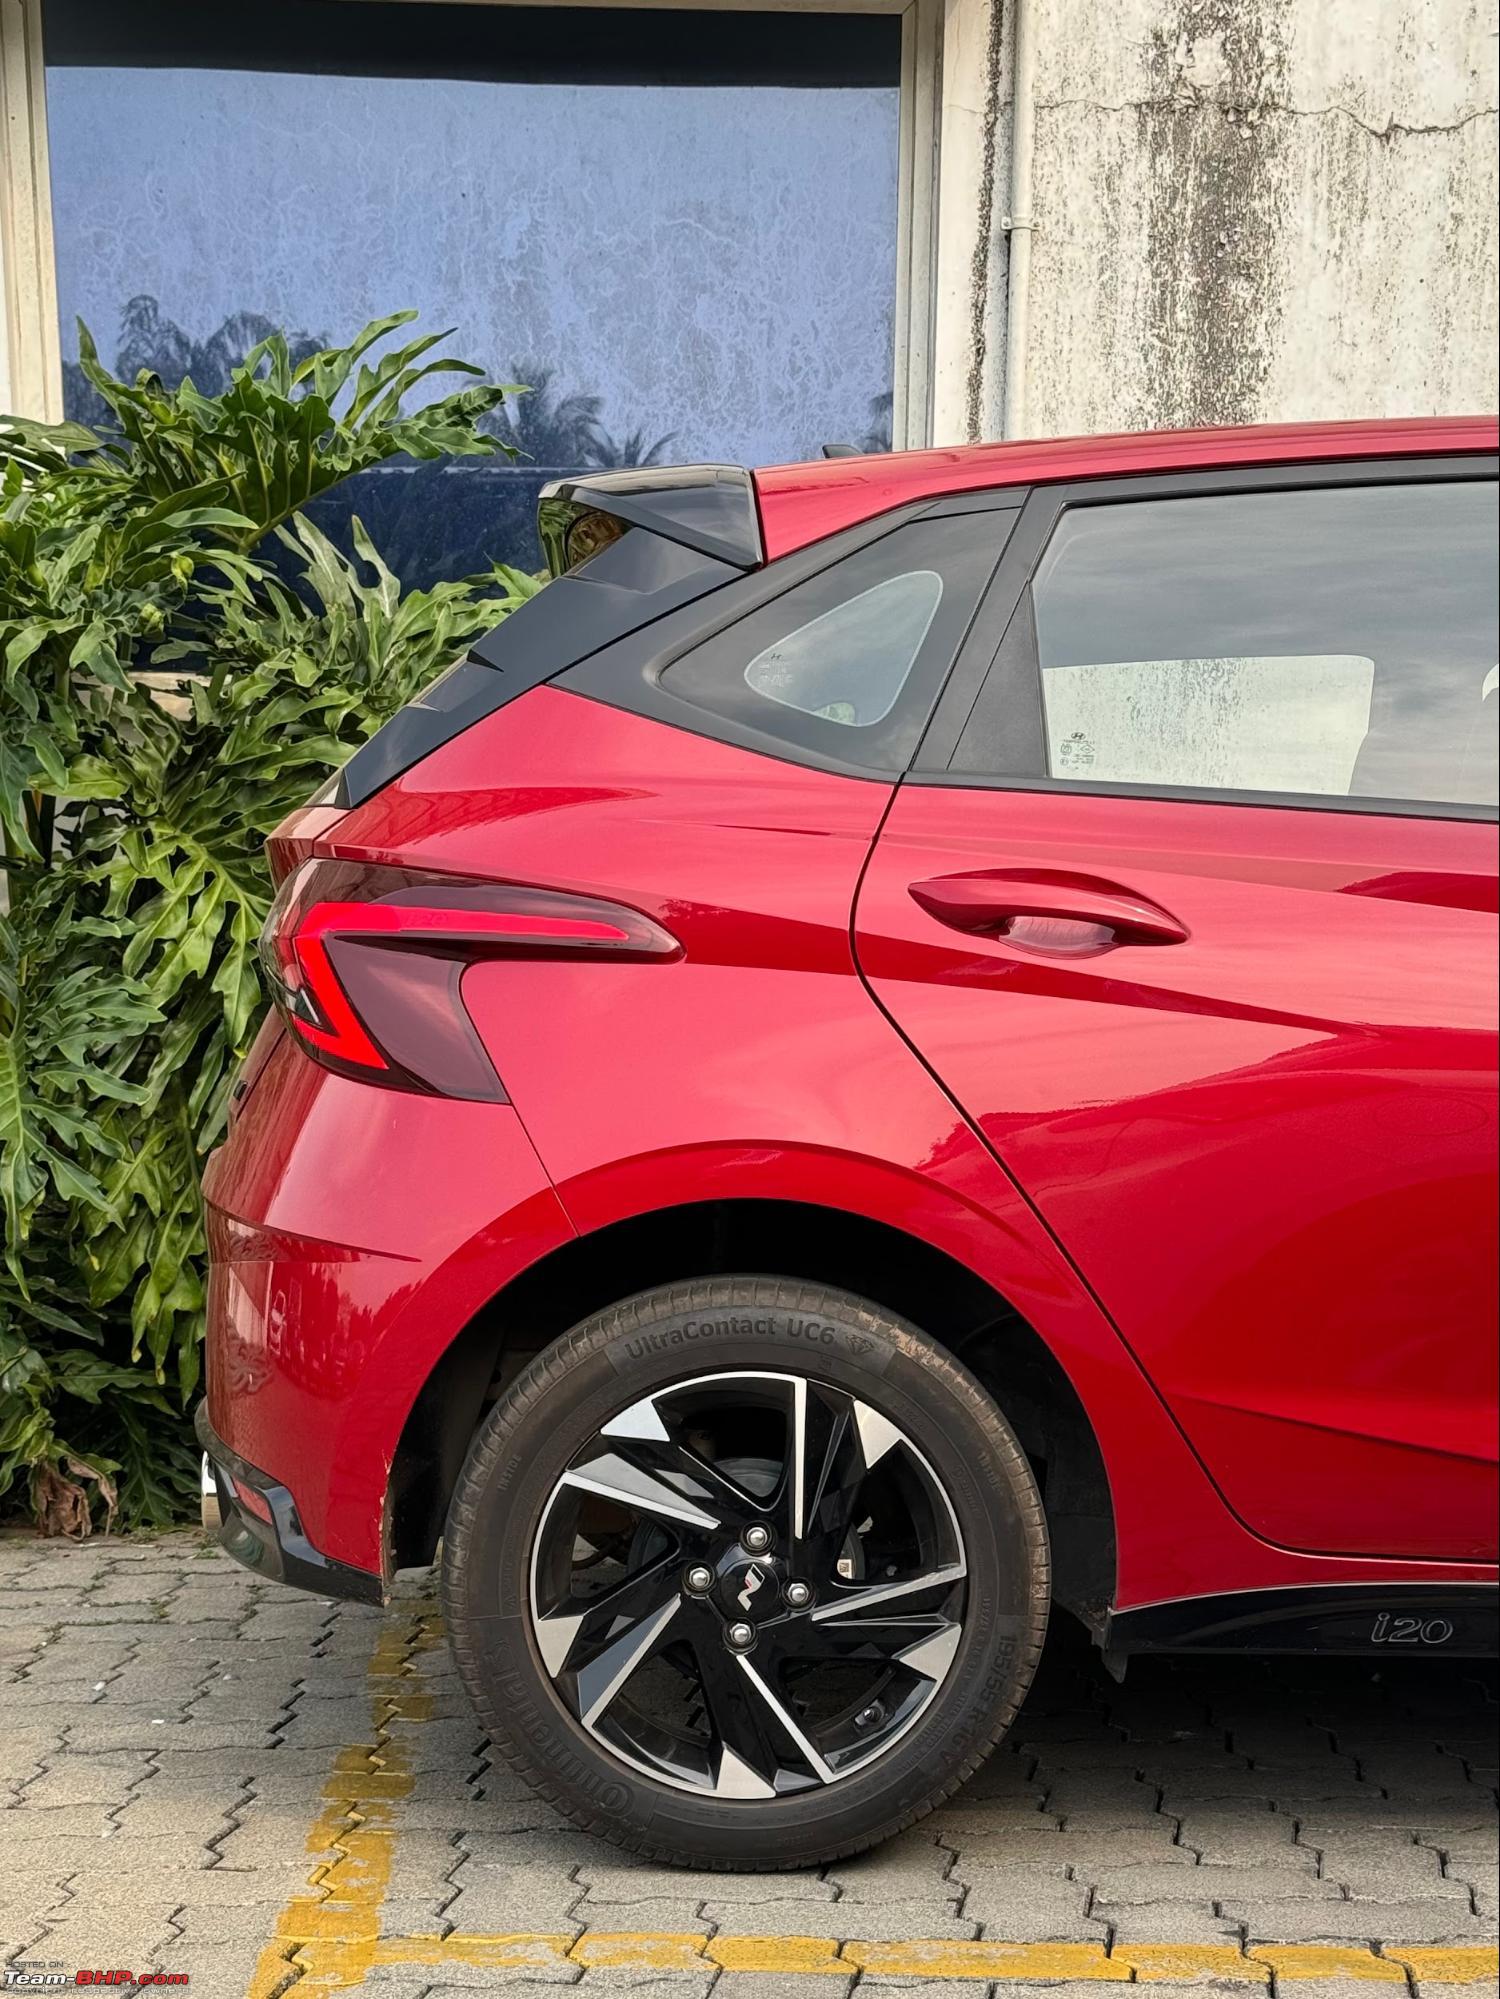 N Door Lock Cover  Rear Panel Custom Paint Job I decided to paint the rear panel on top of the tailgate from black to red and the logo to black. This was the hardest panel to remove due to the numerous clips, many of which were not easily accessible. Despite the challenge, the upgrade was worth it. From certain angles, the red panel with the black logo looks awesome, giving the car a unique and aggressive rear profile. Although from other angles, I sometimes prefer the original black look, the black logo on the red panel stands out nicely and aligns with the sporty theme.    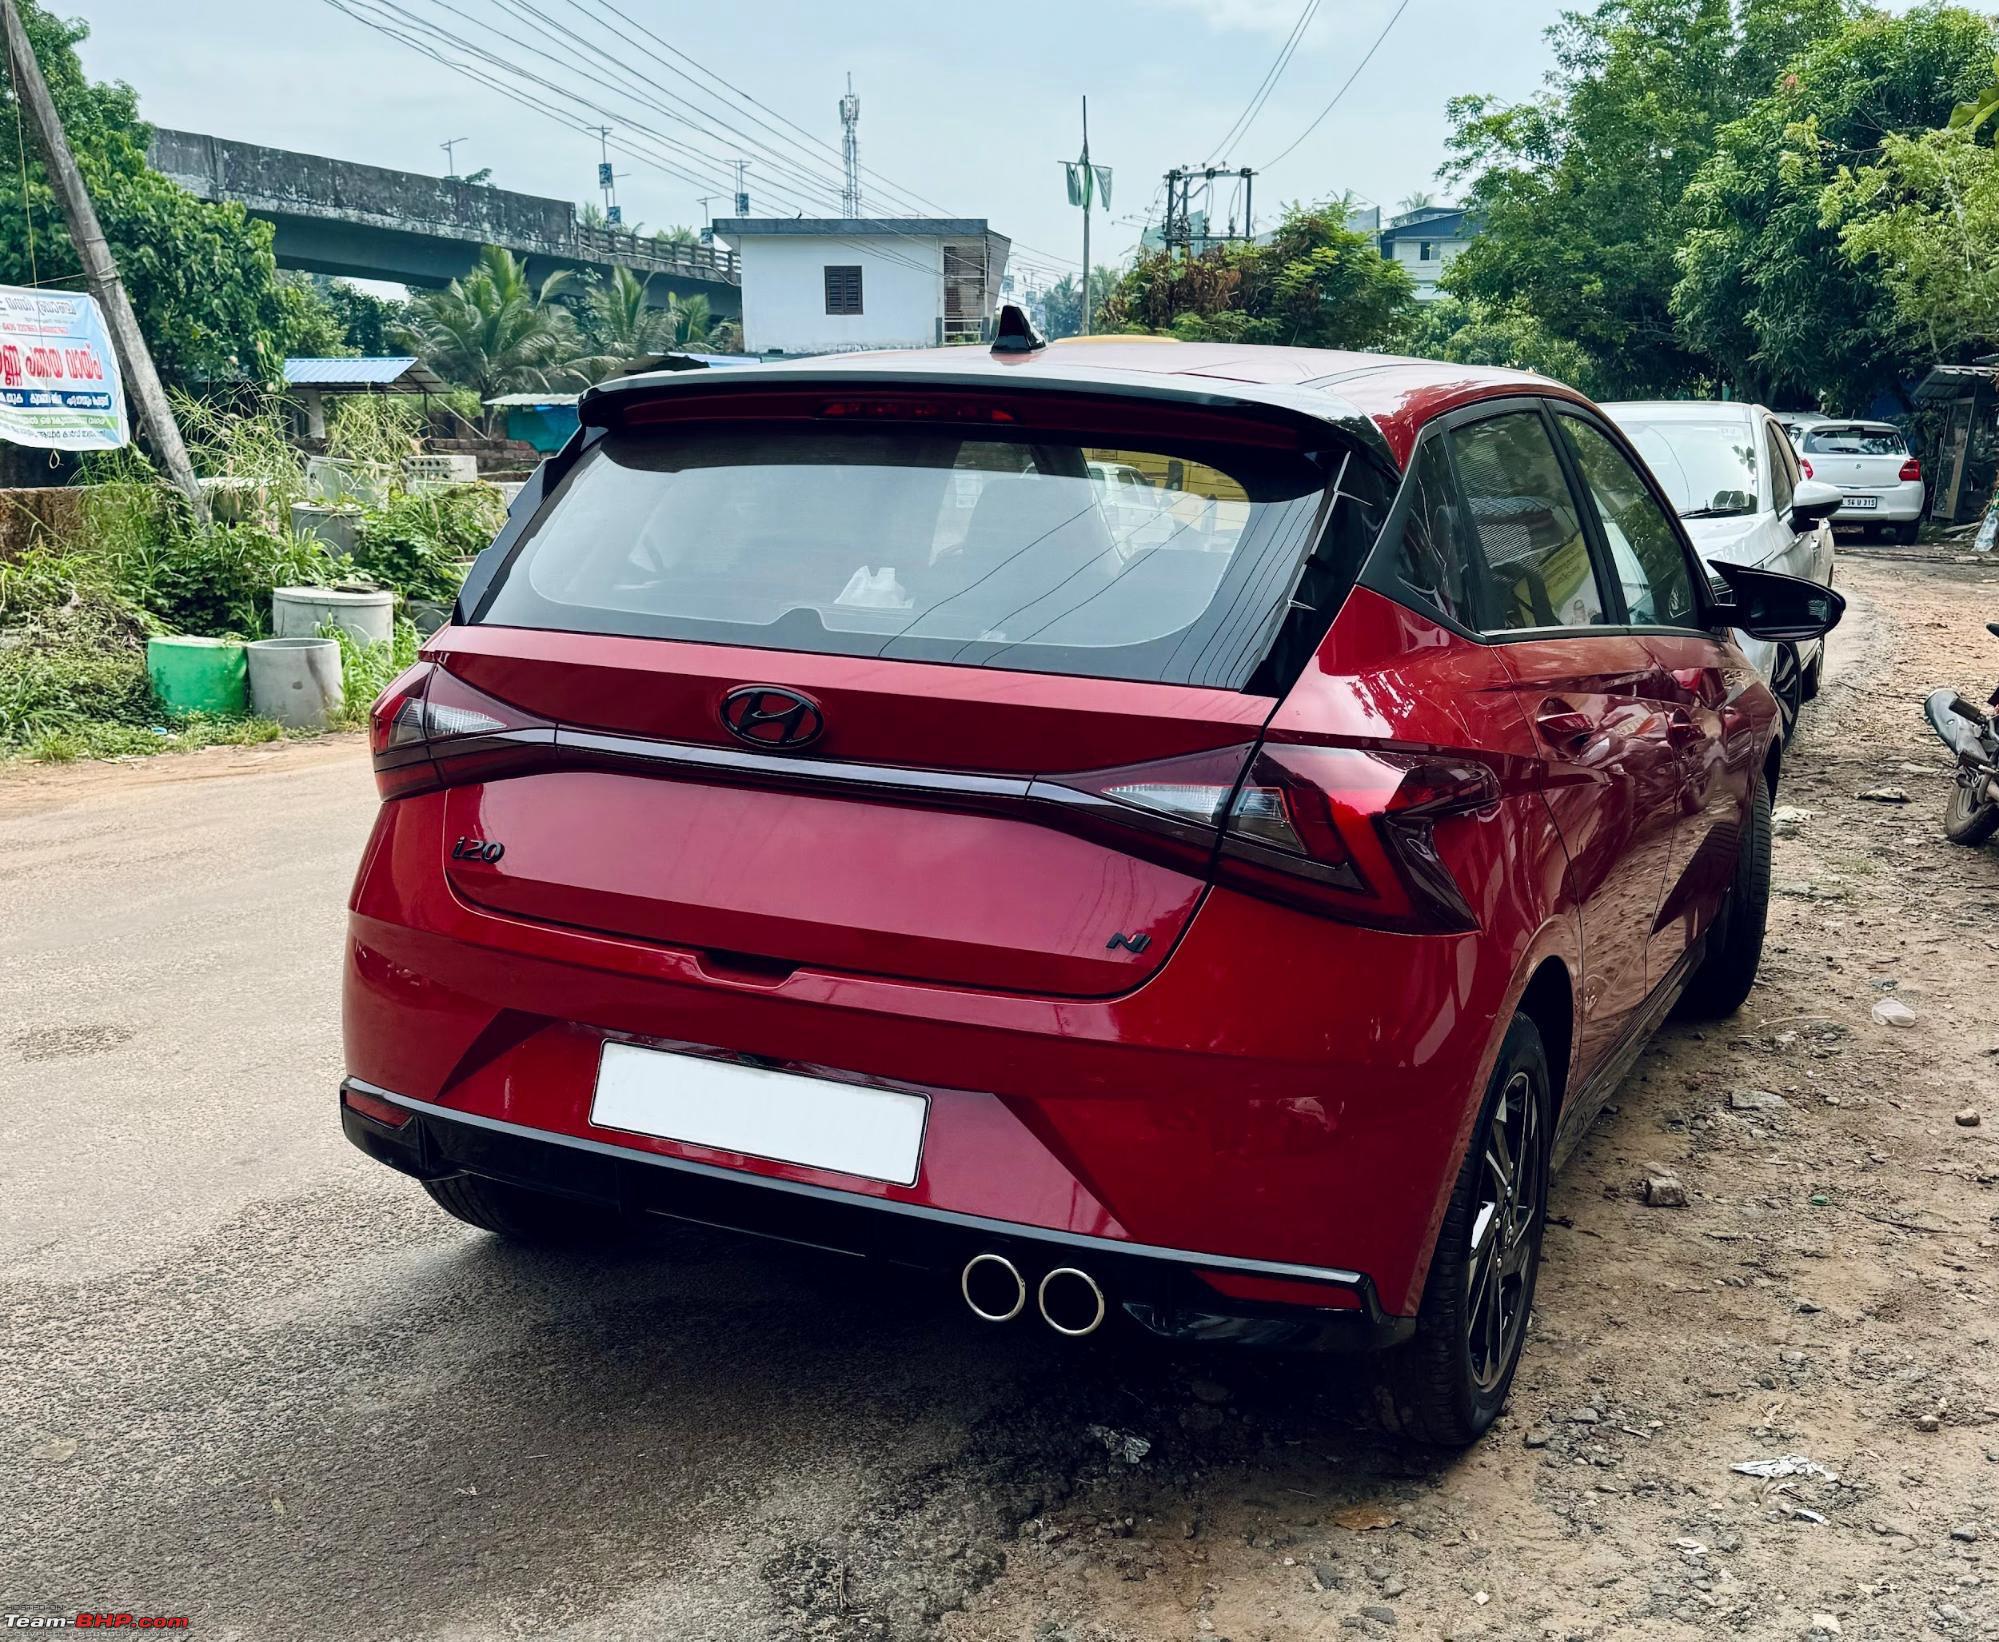 A Modification I Really Wanted to Do, But Couldn't One modification I really wanted to do, but couldn't, was upgrading the manual AC controller to an automatic one. This is one aspect that made me regret choosing the i20 Sportz at that time. You might wonder why an automatic AC is such a big deal for me. It's not just about the operational convenience; it's about the look and how much it enhances the cabin experience. The manual AC unit in the i20 Sportz is one of the most boring I've seen in recent cars. In contrast, the automatic AC unit is among the best, adding a modern and sophisticated touch to the interior. I tried hard to find a way to upgrade my manual AC unit to an automatic one without having to change the entire harness. Unfortunately, I couldn't find any workaround to make this happen. I'm still looking forward to a potential solution, but I believe it might not be possible without significant changes. A Performance Upgrade I'm Considering I'm planning to explore a performance upgrade for my i20, particularly focusing on tuning the 1.5 CRDi engine. Currently, tunes are available for the same. But, I'm a bit hesitant to proceed to tune with the WGT turbo, so I'm contemplating whether I should swap the WGT with an FGT turbo from one of these other cars(creta,verna,kia siblings) before going for a stage 1 tune. I believe the FGT would yield better results, but I'm curious if anyone has tried this swap before. When I checked, it seems that most components in the engine are similar to those in cars with the FGT turbo.  i20 1.5D Exhaust manifold diagram 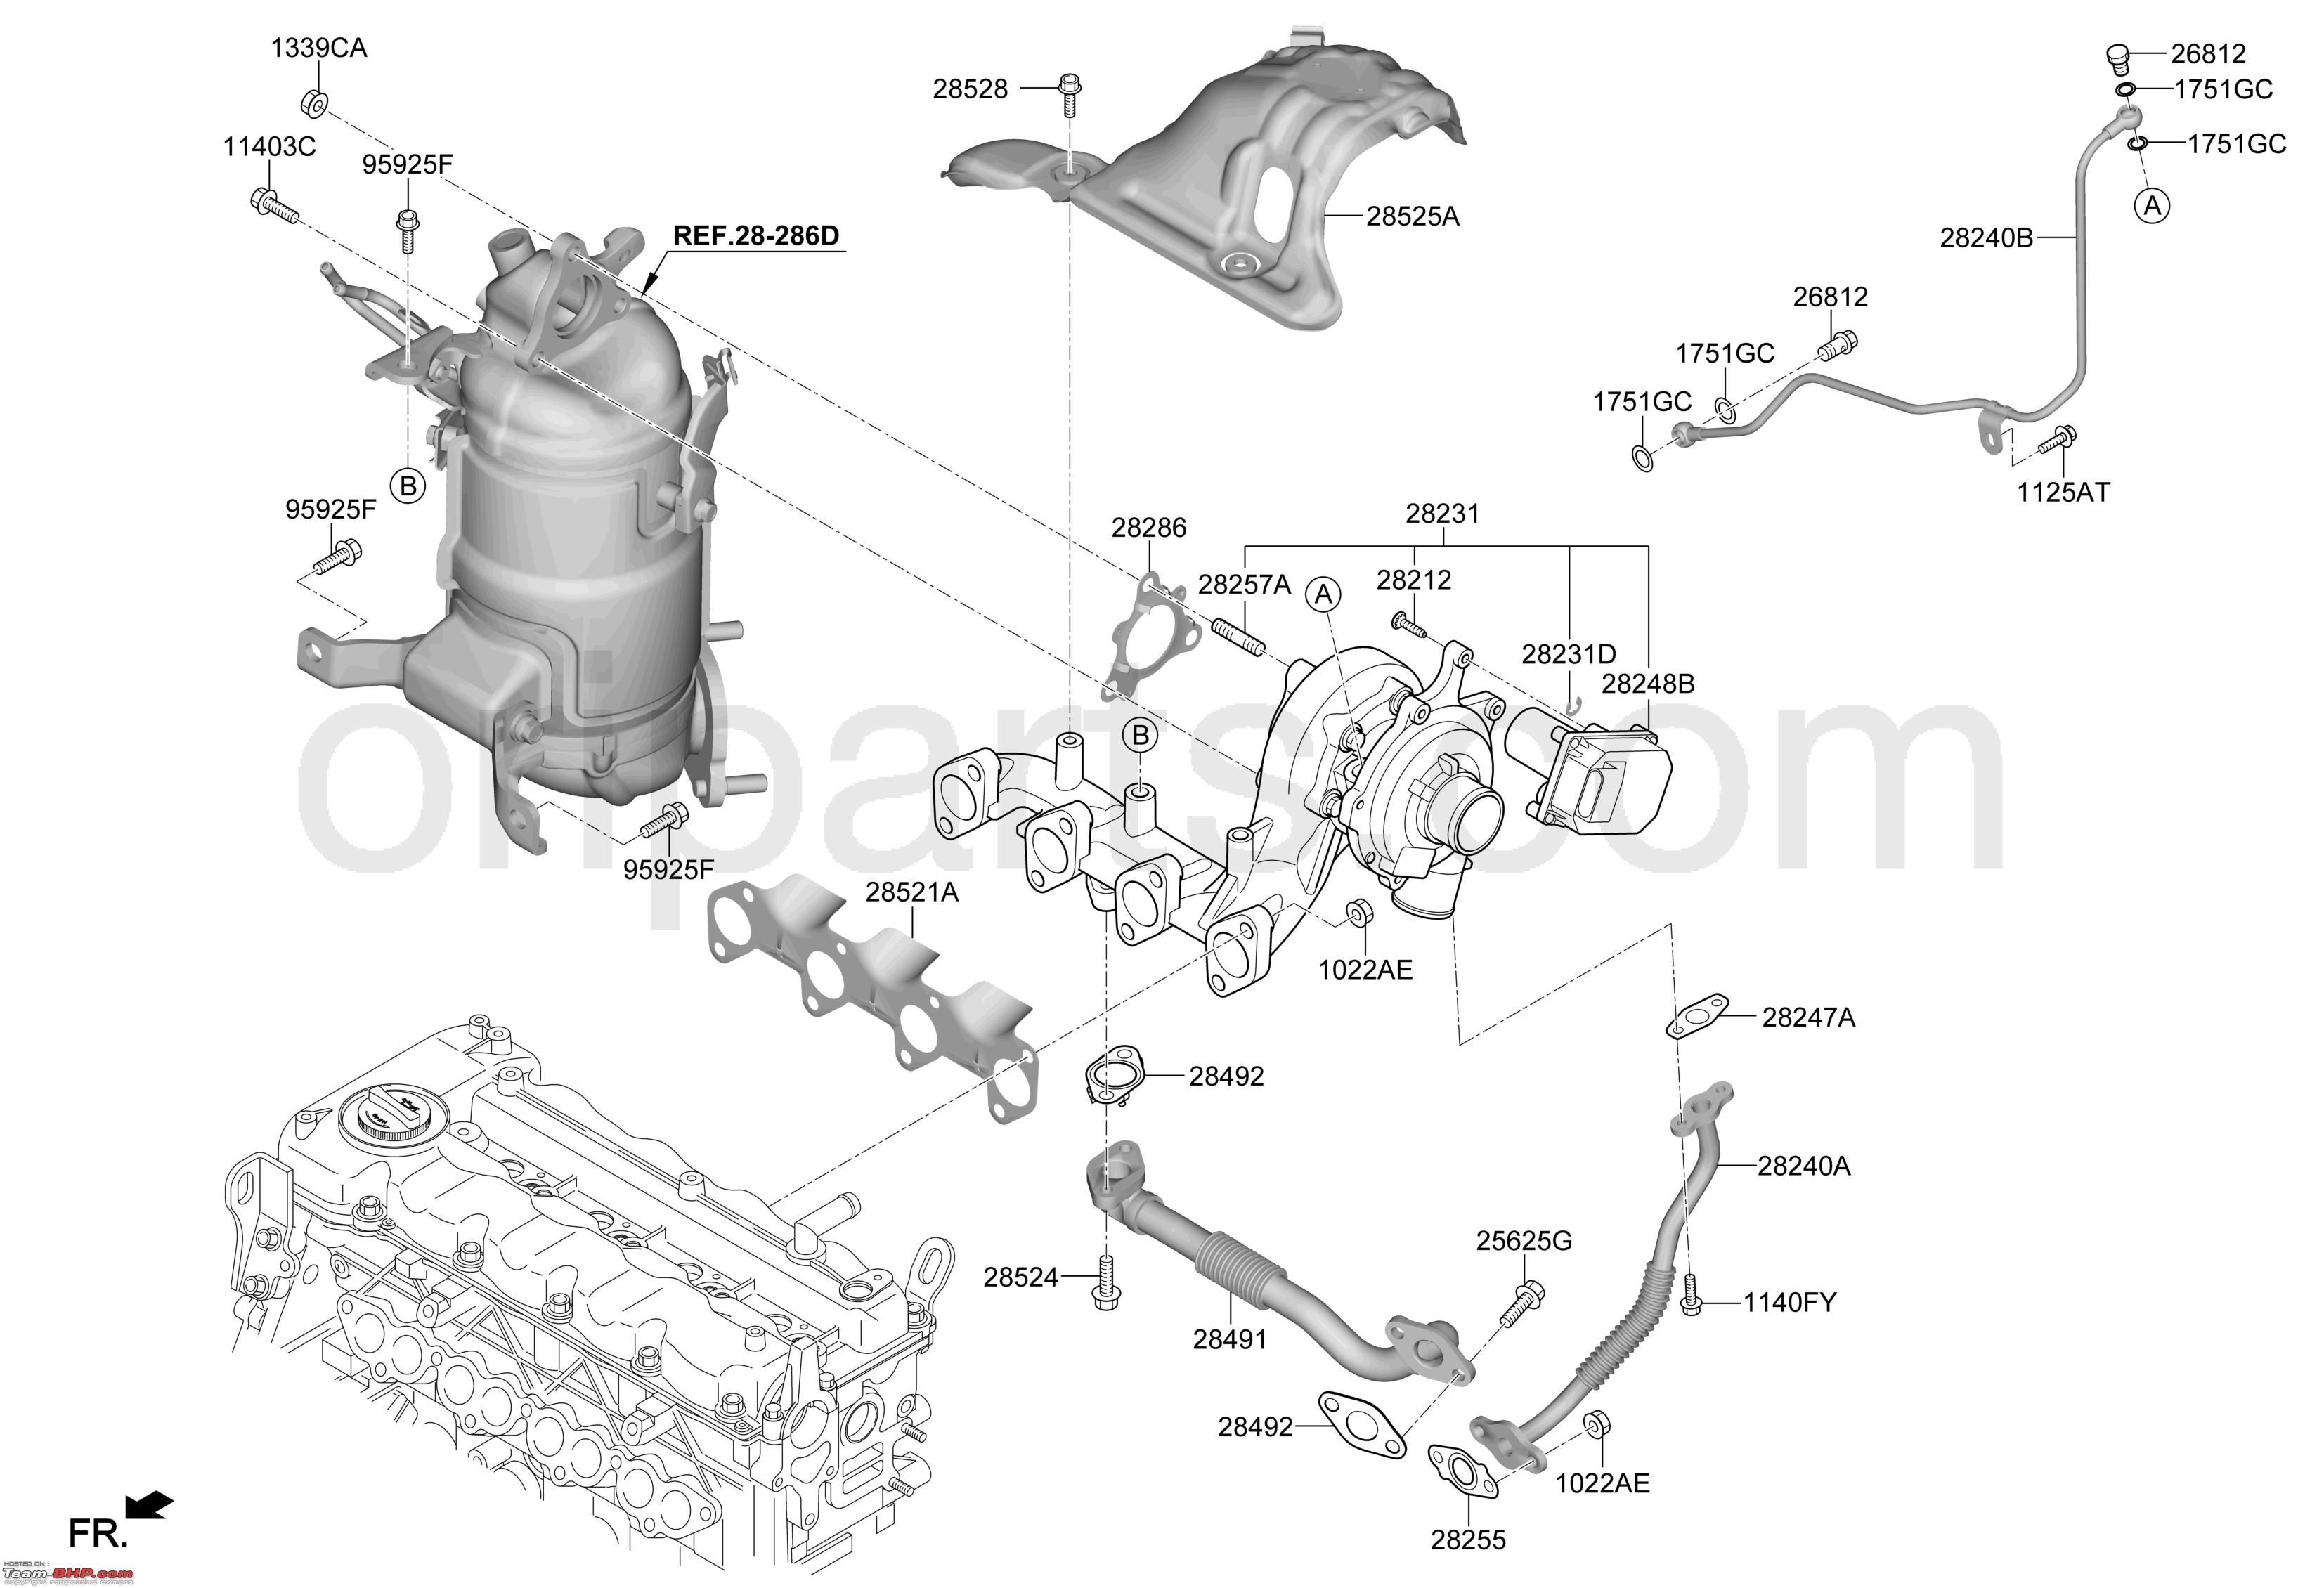 Creta 1.5D Exhaust manifold diagram My main concern is whether, after swapping in the FGT turbo, anything beyond stage 1 tuning might be required to fully optimize performance, or if the swap itself could introduce any issues. Any insights from those who have attempted this would be greatly appreciated! On the Road to More.. All these upgrades cost me around the same as jumping to a higher variant or more, but for me, it feels like I now have a special car. The process of making these modifications has given me an understanding of how many of these components actually work and has encouraged me to undertake more modifications in the future. I know this has been a very long read, but I hope you found it helpful or enjoyable. Thanks for taking the time to read about my modification journey. (3/3) Last edited by hasgardee : 9th August 2024 at 12:46. |
|
| (92)
Thanks
|
| The following 92 BHPians Thank hasgardee for this useful post: | 16000rpm, aayushchhallany, abhijitrpatil, adityan27, anandhsub, anivy, Anonymous guy, Arjan, arnav17, arungeorge, Ashdel, ashis89, asingh1977, AsphaltNomad, AYP, Balaji31582, Balthazar, Batfreak, blackwasp, black_and_red, blueberry, BoneCollector, brownkaiser, CafeRacer16, catchjyoti, CEF_Beasts, chiekennugget, CJP, dailydriver, delusional_fool, dieselteen, ex-innova-guy, flotsam, Freespirit27, Gannu_1, GaryTSI, GForceEnjoyer, GTO, gururajrv, ike, iSubham, Joe367, Joseph Jos, JoshuaM, karan561, kiranknair, libranof1987, Livnletcarsliv, lovetorque, ManasN95, mercrun, mugen_pinaki27, myavu, Nature&Me, naveen.raju, Night_Fury, Nrulz, Omkar, PearlJam, Ptr11s, PWRUP, Reinhard, ron178, Roy.S, sachin_cs, saikishor, Sakbir74, sanjayrozario, Santy19, Saturn-V, SavoyWalrus, Shreyfiesta, Snowflakes, SRISRI_90, SS338, ssoni.1411, Suchu90, sudeepg, swiftnfurious, Tanveer02, Tgo, Tom.Koshy, TorqueAddict007, Tpsdhiraj, Tvk1991, VigneshMC, vigsom, Vikash Kumawat, vn_92, Wageabond, ynike99, yogiii |
|
9th August 2024, 22:43
| #4 |
| Team-BHP Support  | Re: My i20 Diesel's N Line Transformation: A Comprehensive Modification Journey Thread moved out from the Assembly Line. Thanks for sharing! |

| (2)
Thanks
|
| The following 2 BHPians Thank Aditya for this useful post: | GTO, hasgardee |
|
10th August 2024, 10:07
| #5 |
| BHPian Join Date: May 2023 Location: MH 02
Posts: 311
Thanked: 752 Times
| Re: My i20 Diesel's N Line Transformation: A Comprehensive Modification Journey Woah, this is amazing! Kudos to your time and dedication to make this car all it could be. I love the interiors! |
|
| (2)
Thanks
|
| The following 2 BHPians Thank JunkyardHunter for this useful post: | adityan27, hasgardee |
|
10th August 2024, 10:30
| #6 |
| BHPian | Re: My i20 Diesel's N Line Transformation: A Comprehensive Modification Journey Brilliant! That's quite an extensive mod job. Loved every bit of this transformation. A diesel-powered N-Line is the best of both worlds. I've actually heard about your car earlier from the comment section of BHPian Vivekji05's Youtube community post. Wishing you more happy miles with the i20. |
|
| (6)
Thanks
|
| The following 6 BHPians Thank Shreyfiesta for this useful post: | adityan27, GaryTSI, hasgardee, klgiridhar, swiftnfurious, Wageabond |
|
10th August 2024, 11:29
| #7 |
| BHPian Join Date: Feb 2024 Location: Jaipur
Posts: 105
Thanked: 410 Times
| Re: My i20 Diesel's N Line Transformation: A Comprehensive Modification Journey You have done all the mods very well, the steering wheel looks amazing. Do we need to cover all these extra added parts under insurance? Like you added Alloys, Headlights and steering wheel, in any unfortunate incident, will insurance company give the claim without any drama ? |
|
| (5)
Thanks
|
| The following 5 BHPians Thank Vikash Kumawat for this useful post: | adityan27, black_and_red, catchjyoti, GaryTSI, hasgardee |
|
10th August 2024, 12:23
| #8 |
| BHPian Join Date: Feb 2006 Location: Bangalore
Posts: 900
Thanked: 2,894 Times
| Re: My i20 Diesel's N Line Transformation: A Comprehensive Modification Journey Damn good! This is amazing how you have accomplished such a transformation. I love the N Line and that steering is very tastefully done! Congratulations on getting the mods done so well. |
|
| (1)
Thanks
|
| The following BHPian Thanks sudeepg for this useful post: | hasgardee |
|
10th August 2024, 13:56
| #9 |
| Newbie Join Date: Jul 2024 Location: Bangalore
Posts: 22
Thanked: 54 Times
| Re: My i20 Diesel's N Line Transformation: A Comprehensive Modification Journey As someone who's a big fan of the actual i20N and who does want to buy an i20 N Line one day, the list of modifications you've done to give the N line treatment to an otherwise conventional diesel i20 is absolutely amazing and inspiring. I hope someday I take a step above and do something even crazier �� |
|
| (2)
Thanks
|
| The following 2 BHPians Thank AceCombatFanIN for this useful post: | adityan27, hasgardee |
|
10th August 2024, 14:18
| #10 |
| Senior - BHPian | Re: My i20 Diesel's N Line Transformation: A Comprehensive Modification Journey May I suggest adding a rear wiper along with washer. That one mod alone will improve the aesthetics of the rear profile, while adding usefulness as well. |
|
| (5)
Thanks
|
| The following 5 BHPians Thank Geo_Ipe for this useful post: | adityan27, Doonite, GaryTSI, hasgardee, saikishor |
|
10th August 2024, 17:34
| #11 |
| Newbie Join Date: Dec 2023 Location: pune
Posts: 1
Thanked: Once
| Re: My i20 Diesel's N Line Transformation: A Comprehensive Modification Journey Great. Could you kindly share the part number for the metal driving pedals and the auto dimming IRVM please? Last edited by KarthikK : 10th August 2024 at 17:56. Reason: Typo fix |
|
| (1)
Thanks
|
| The following BHPian Thanks kamal55 for this useful post: | hasgardee |
| |
|
10th August 2024, 18:05
| #12 | ||||||
| Newbie Join Date: Aug 2024 Location: Kozhikode
Posts: 12
Thanked: 189 Times
| Re: My i20 Diesel's N Line Transformation: A Comprehensive Modification Journey Quote:
Quote:
Quote:
Please note that all this may vary depending on the insurance company. My current insurer is Chola MS. Quote:
Quote:
I'm really glad you found the modifications inspiring. I'm sure when the time comes, you'll take it to the next level with your own unique touches. Wishing you the best of luck in making that dream a reality Quote:
| ||||||
|
| (2)
Thanks
|

| The following 2 BHPians Thank hasgardee for this useful post: | adityan27, swiftnfurious |
|
10th August 2024, 18:16
| #13 | |
| Newbie Join Date: Aug 2024 Location: Kozhikode
Posts: 12
Thanked: 189 Times
| Re: My i20 Diesel's N Line Transformation: A Comprehensive Modification Journey Quote:
https://hyundaimobisin.com/products/genuine-accessories/new-venue/928/sports-paddle-cover As for the auto-dimming IRVM, its sourced from Maruti cars. I can share an online purchase link for that as well. https://boodmo.com/catalog/part-mirr..._view-6788737/ | |
|
| (1)
Thanks
|
| The following BHPian Thanks hasgardee for this useful post: | swiftnfurious |
|
10th August 2024, 22:24
| #14 |
| BHPian | Re: My i20 Diesel's N Line Transformation: A Comprehensive Modification Journey Very well executed and frankly these are exactly the kind of posts for which I joined TBHP for! Just a word of caution which I'm a sure you seem to have taken care of also, is the safety factor of airbags and there connections. Take care and keep them coming. Cheers. |
|
| (2)
Thanks
|
| The following 2 BHPians Thank Freespirit27 for this useful post: | adityan27, hasgardee |
|
10th August 2024, 22:36
| #15 |
| Newbie Join Date: Aug 2024 Location: Kozhikode
Posts: 12
Thanked: 189 Times
| Re: My i20 Diesel's N Line Transformation: A Comprehensive Modification Journey One major mod I missed earlier was the speaker upgrade and door damping. Speaker Upgradation and Damping I never thought I'd upgrade the speakers in my car, as I'm not a hi-fi music enthusiast and don't feel the need for a home theater setup inside my vehicle. My current four-speaker setup with Arkamys was doing okay for me. However, a few times, I noticed that when I listened to the same music on my earpods and in my car, some instrument sounds were missing in the car. This led me to look for a setup that could provide more detail and clarity without being a bass-heavy system, and I wasn't interested in running a lot of wires, especially from the battery. I decided to simply replace the speakers with better quality ones. I shortlisted a few brands and focused on the sensitivity rating of the speakers, as higher sensitivity would ensure better sound quality from the stock head unit without needing an amplifier. My plan was to use 6.5-inch components for the front and 5.25-inch coaxials for the rear. After considering options from Gladen, Morel, and Focal, I almost settled on Morel Maximo Ultras. Then, I came across a YouTube video about a plug-and-play option released by Morel for Hyundai cars: the 6.5-inch components and 5.25-inch coaxials. The advantage was that no wire cutting or additional crossover and tweeter setup was neededthey provided exact fits for Hyundai cars. This seemed perfect for me to avoid extensive wiring work. I read more about Morel's integration series, already available for BMW and Mercedes, and now for Hyundai and Suzuki. Expecting a similar response to the Maximo MKIII speakers, I decided to go for the Morel integration series speakers, IP-HYU62 and IP-HYU5C. I connected with several automobile stores across India and got a great deal from Kolkata. I'm from South India, and I noticed that automobile accessory costs are generally higher in the South compared to the North. So, I paid for the items and had them couriered with a warranty card and invoices. I also planned to do door damping with STP sheets, bought together with a friend for a discount. We aimed to do the damping ourselves to save costs and achieve decent results. The goal was to reduce vibrations and add weight to the doors, which were light due to Hyundai's compromise on metal quality. This also aimed to resolve the common door-closing issues in new i20s. I did the door damping based on online tutorials using a good roller and tools. It was more challenging than expected, but I managed to secure it properly. I also dampened the plastic trims and boot trim. While doing this, I noticed that some clips were loose or broken from previous openings. I had already bought a 10-pack of clips, so I replaced the broken ones and used wiring cloth tape to make them sturdier. I added small pieces of foam to the wiring connectors as well. After installing the new speakers, which was easy due to the plug-and-play design, and reassembling everything, I tested the setup. Driving over potholes, I noticed that all rattling noises were gone, and only the tire noise remained. This was a relief as even small rattling noises irritate me. For the sound quality, I recorded a few songs before the installation and compared them afterward. I played the music at the same volume, using the same phone for playing and recording. The difference was significant, especially in the treble and midrange. The upgrade provided the detail and clarity I wanted. Comparing the before and after audio, the improvement was noticeable, though not a drastic change. However, for an easy integration and the price, I believe the upgrade was worth it.  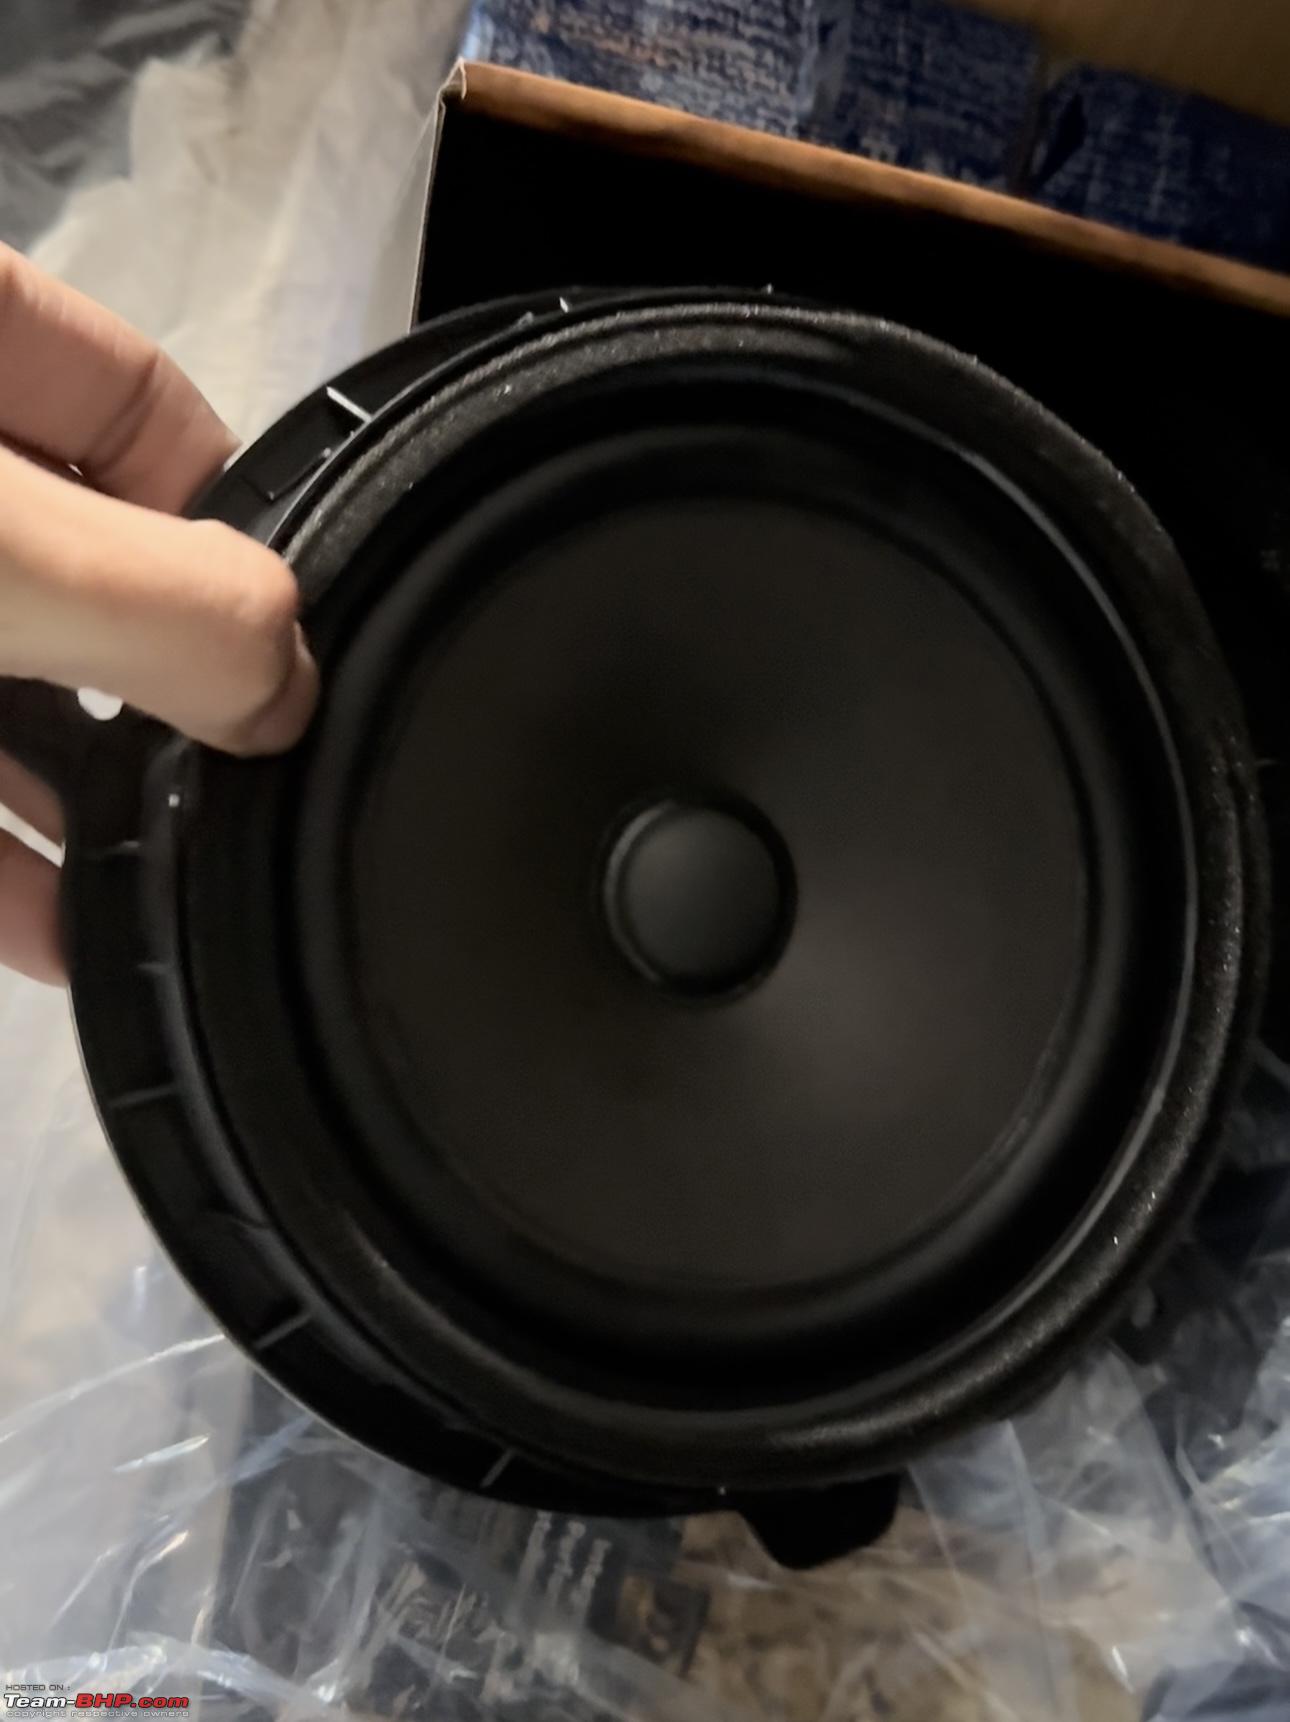 Stock 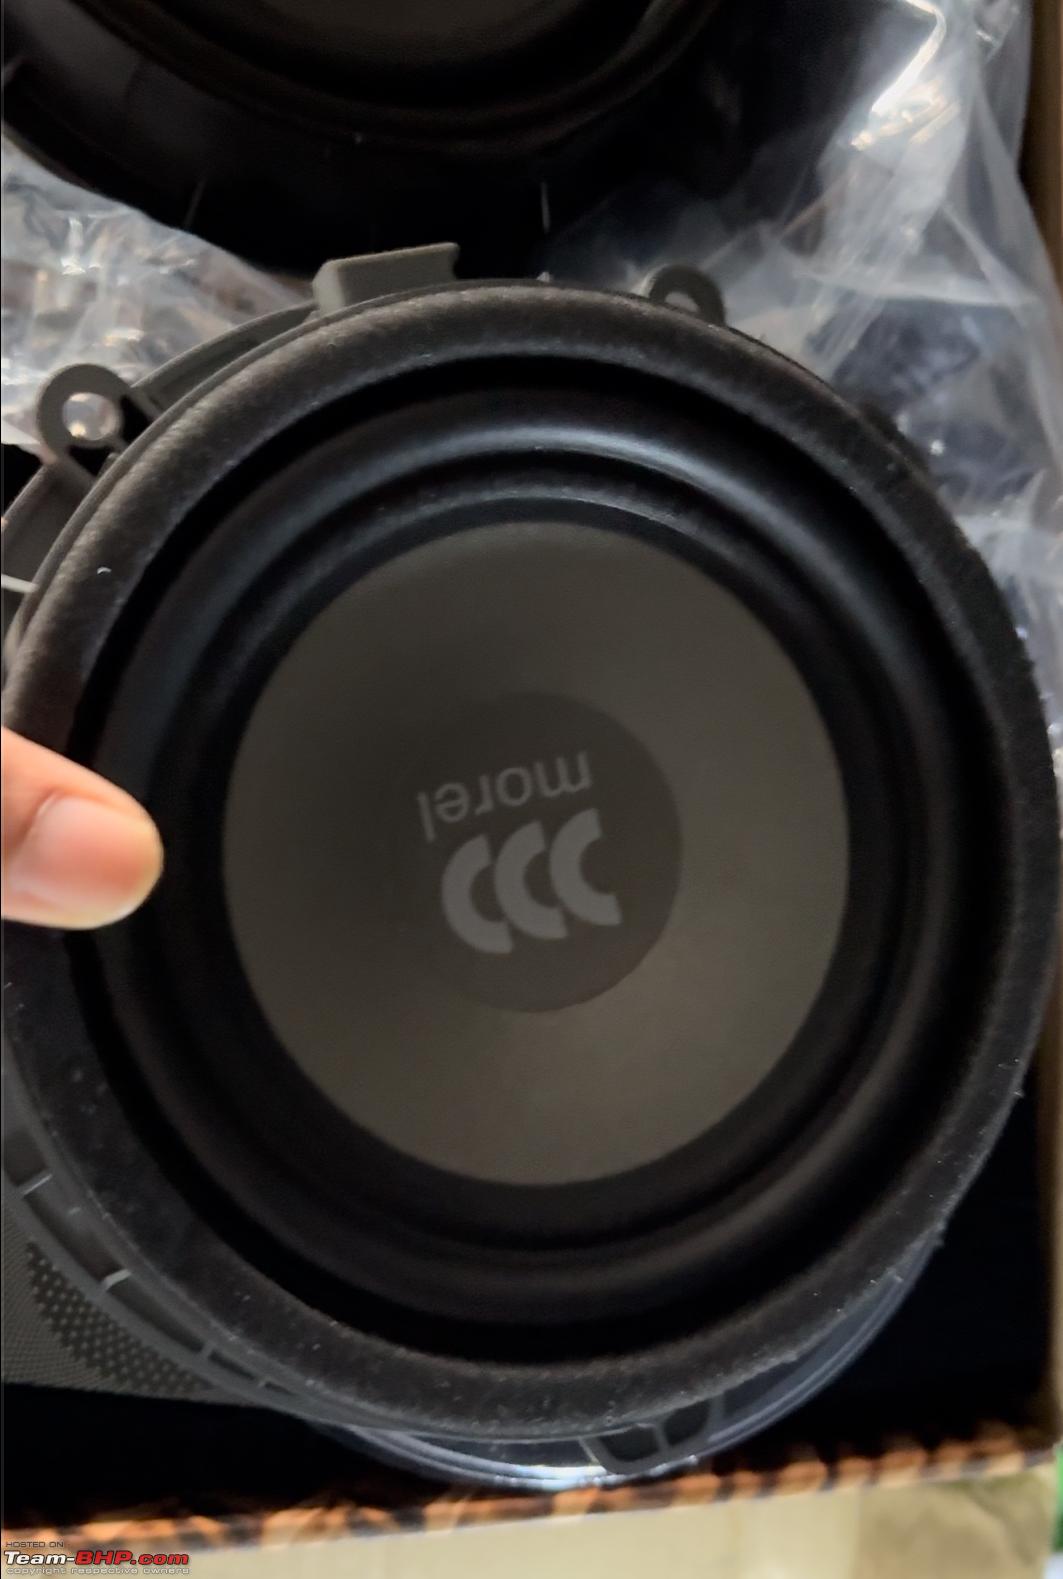 Morel I'll be attaching a YouTube video below that I created, showcasing the before and after audio recordings. While the video might not fully capture the true results due to audio recording and uploading compression and other factors, if you're keen on hearing the difference, I recommend using headphones. otherwise, the difference might be less noticeable. |
|
| (9)
Thanks
|
| The following 9 BHPians Thank hasgardee for this useful post: | adityan27, GaryTSI, GTO, M124, rroy92, saikishor, swiftnfurious, Wageabond, yogiii |
|