| |||||||

 |
| Search this Thread |  209,791 views |
 26th July 2017, 23:07
| #76 |
| Senior - BHPian Join Date: Dec 2006 Location: Mysore / B'lore
Posts: 1,696
Thanked: 4,265 Times
| Re: Life with a Red Mitsubishi Cedia The exhaust manifold heatsheild was first removed sometime back to install the Evo O2 sensor. During that time I saw how bad the bottom portion was..I hadn't cleaned/polished it when I cleaned it the first time. It wasn't shining as well as the day I polished. Since its metal, it cant be polished too many times else it will lose its texture and start looking like something else. So decided to clean it one final time and make sure I don't have to clean it again in the future. First step was remove the heatsheild. The manifold was all dusty and rusty. 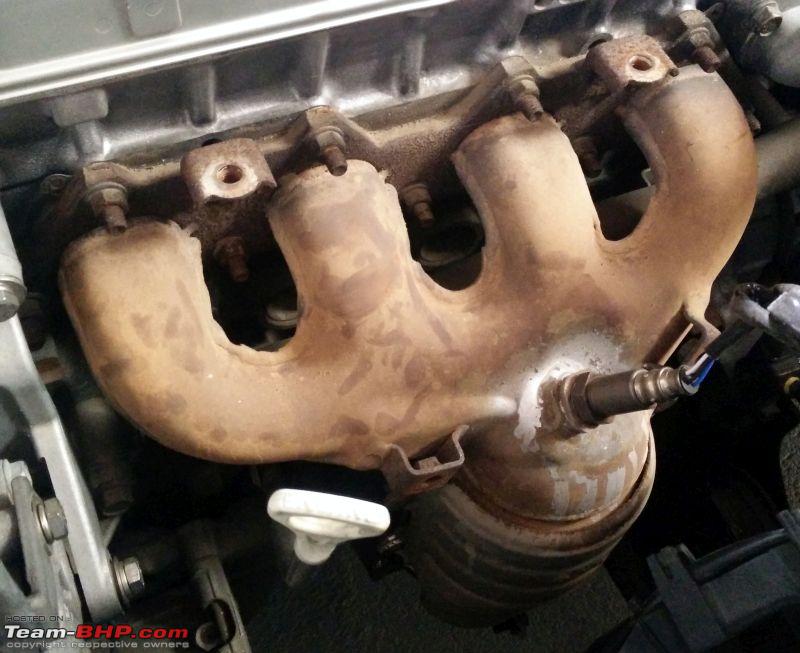 This is how the bottom portion looked. There is silver paint run from when I tried painting the bolts, detailed few posts back 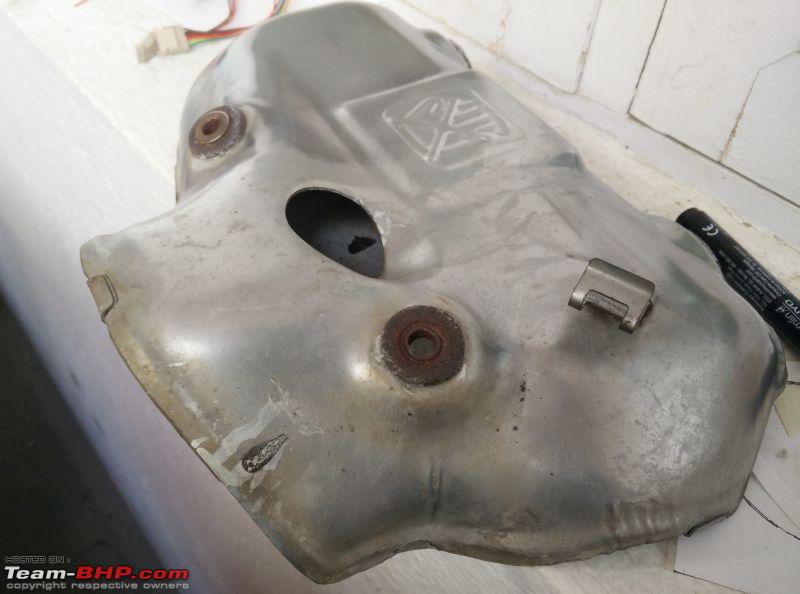 Cleaned up. The silver paint wouldn't come off easy and the black spot didn't shift. Left them as is for now. 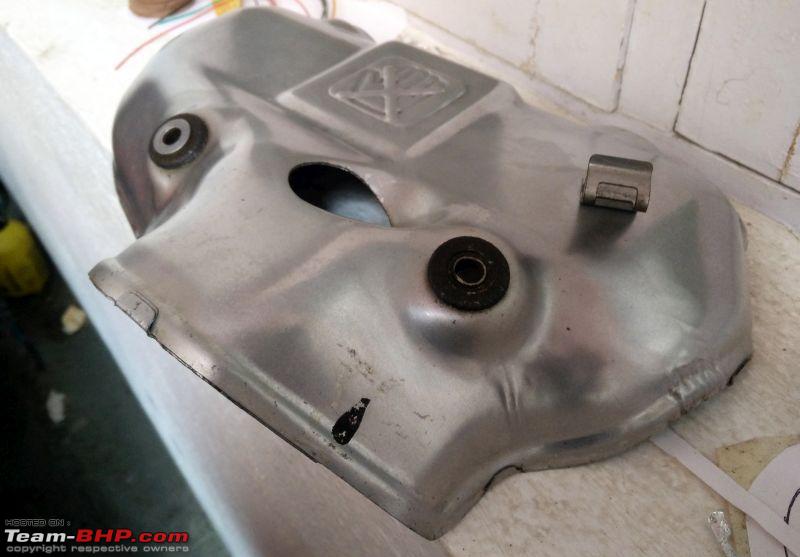 Paalis time! Small portion polished as a test spot. 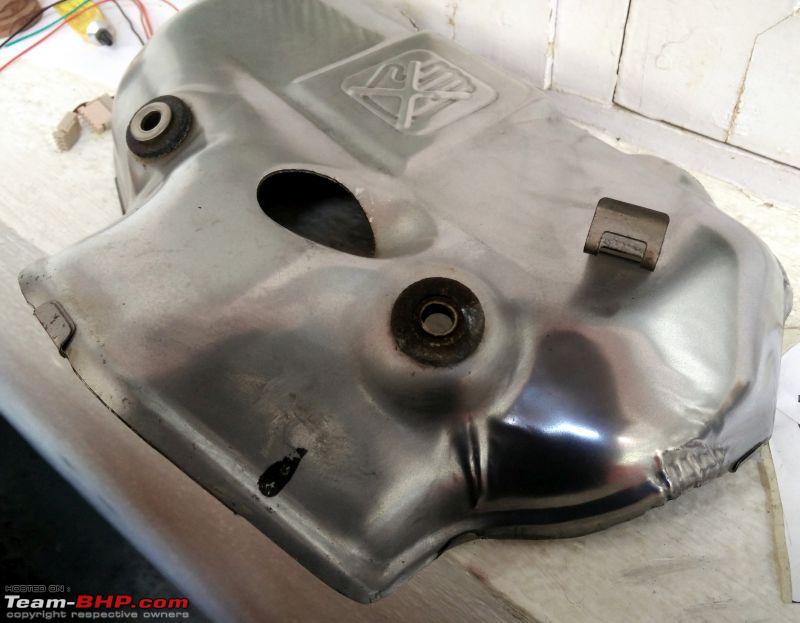 Work in Progress 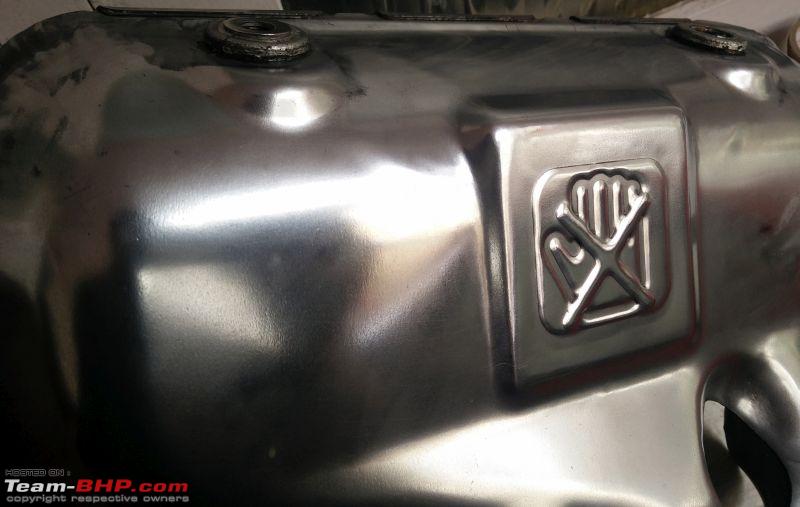 All done! 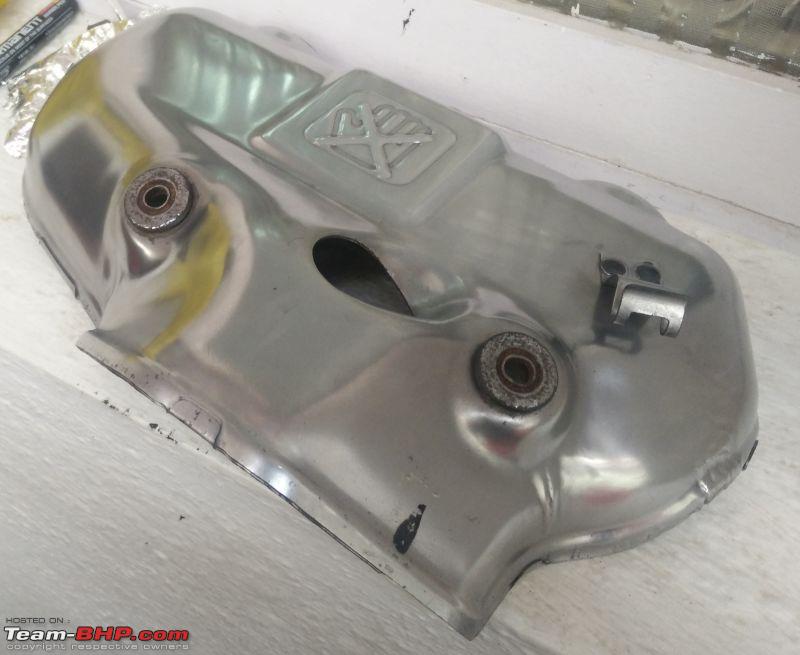 To protect this finish, I sprayed couple of layers of High Temp Clear coat. There shouldn't be any fading ever after now onwards. 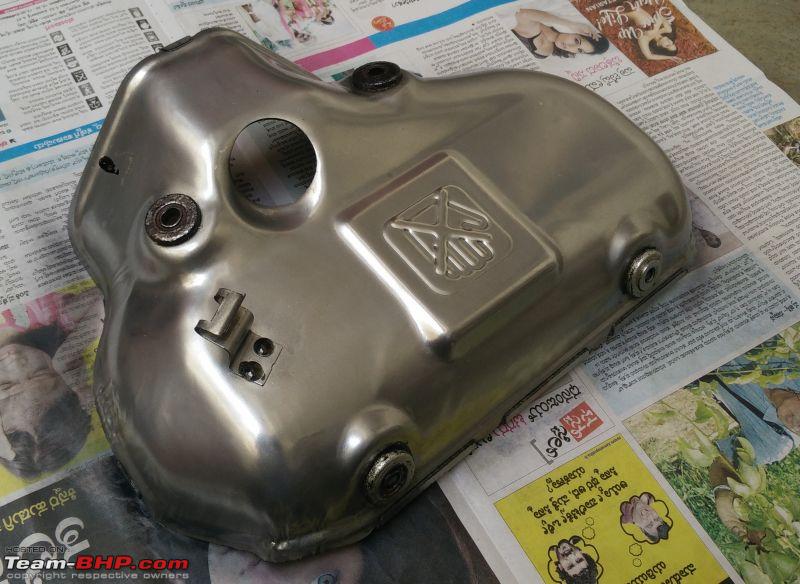 As I started initial baking process with a heatgun, started to see a huge increase in gloss. Took this video to show how good the heatsheild looked Next was to tackle the manifold itself. First step was to clean it and take ff as much rust without using any abrasives. Cleaned and restored the aluminium pipe behind the manifold which connects thermostat to water pump. 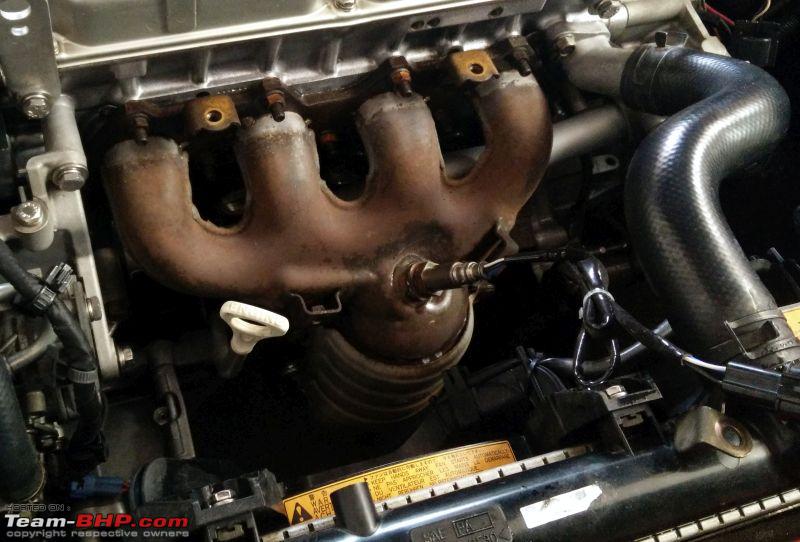 Liberally applied rust convertor. 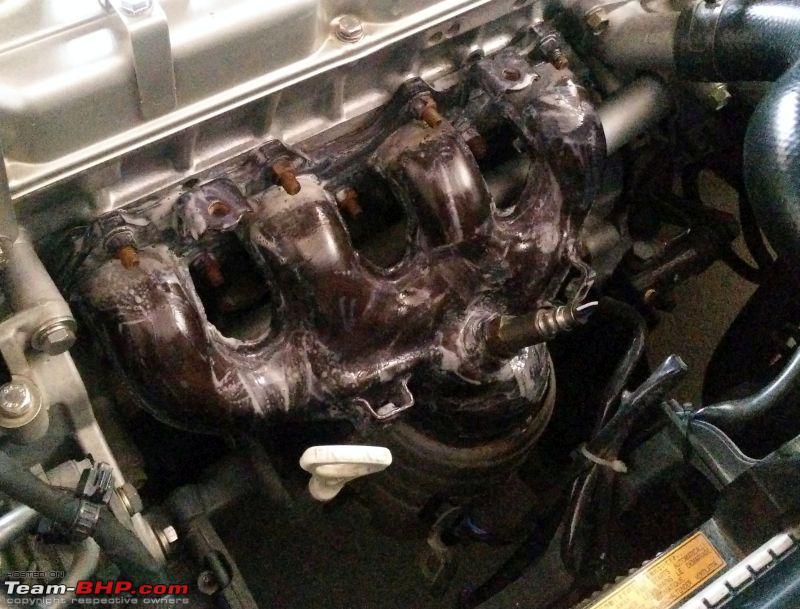 While the rust convertor did its job, poished the heatsheild covering the catcon. The nuts were rusted very bad; any attempts to remove them would have damaged the sheild and so did not attempt it. This pic shows after/before. The difference was staggering 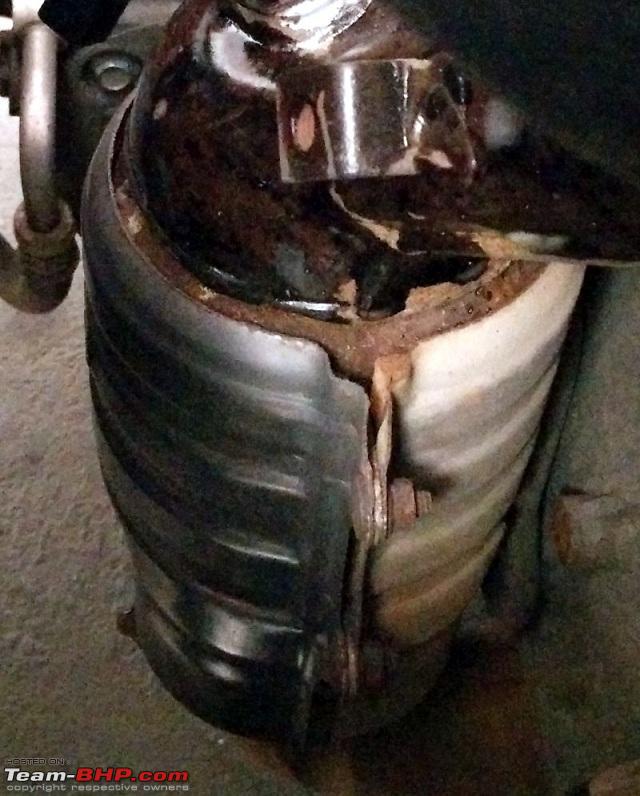 Completed. 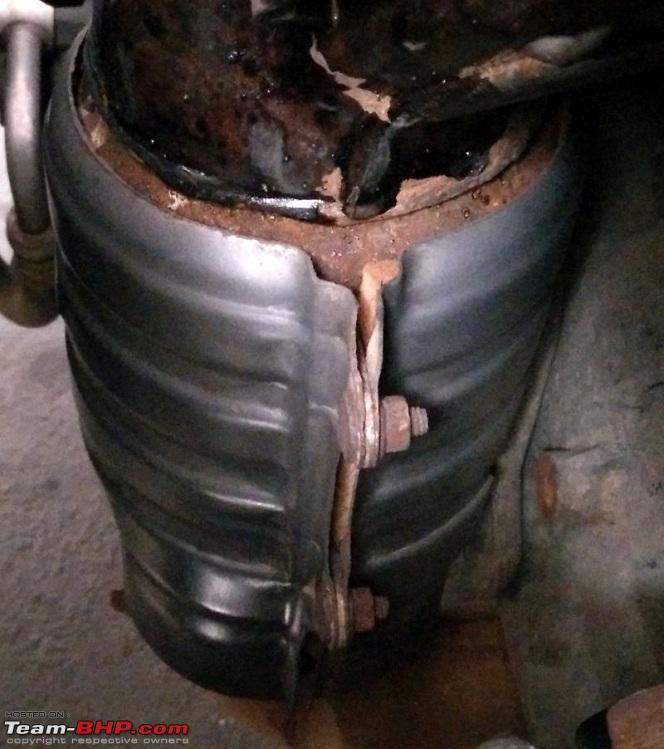 With the convertor and clear coat dried, time to assemble everything! 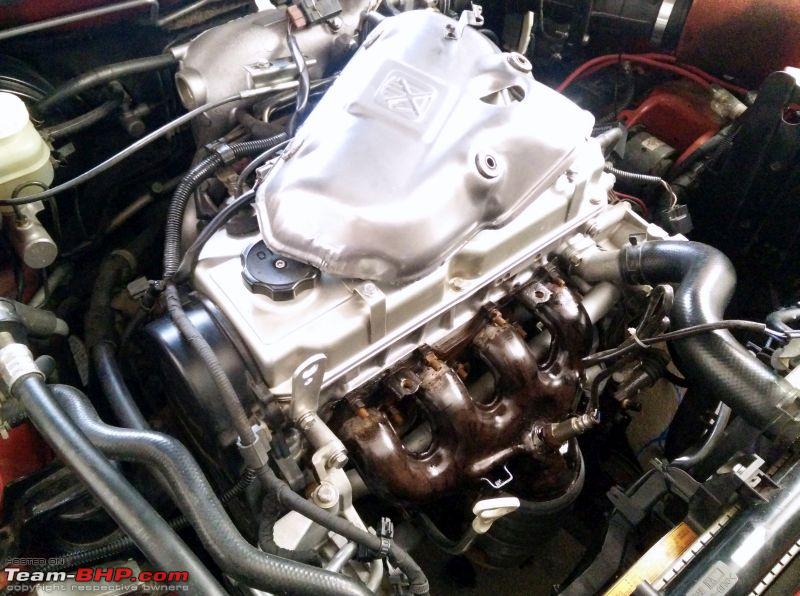 After fixing the sheild, I immediately took it off. The area around the O2 sensor looked brown/rusted and I did not like it. So did some rudimentary masking and painted the area with matte black heat resistant paint. Painting the whole manifold is a huge pain with masking everything around taking too much time. 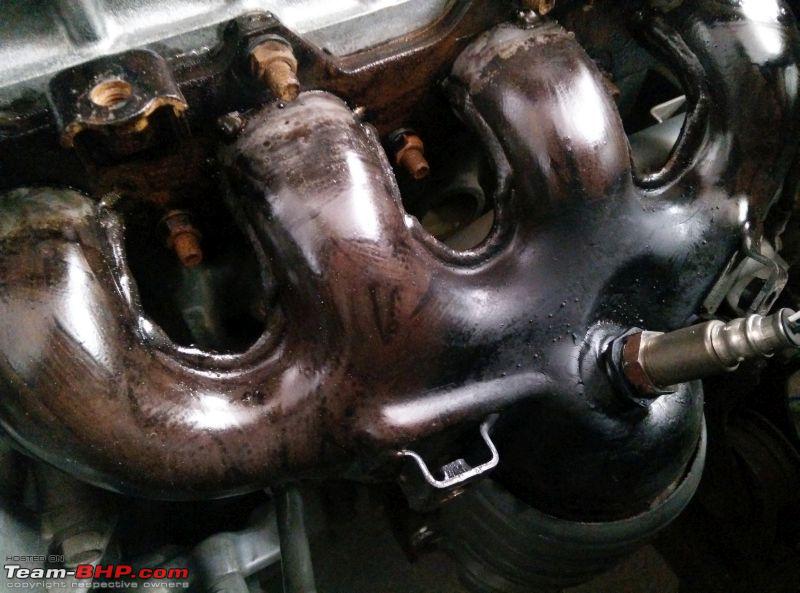 Reflections looking nice. Polish it too much and it will lose the brushed look. This is a perfectly good compromise. 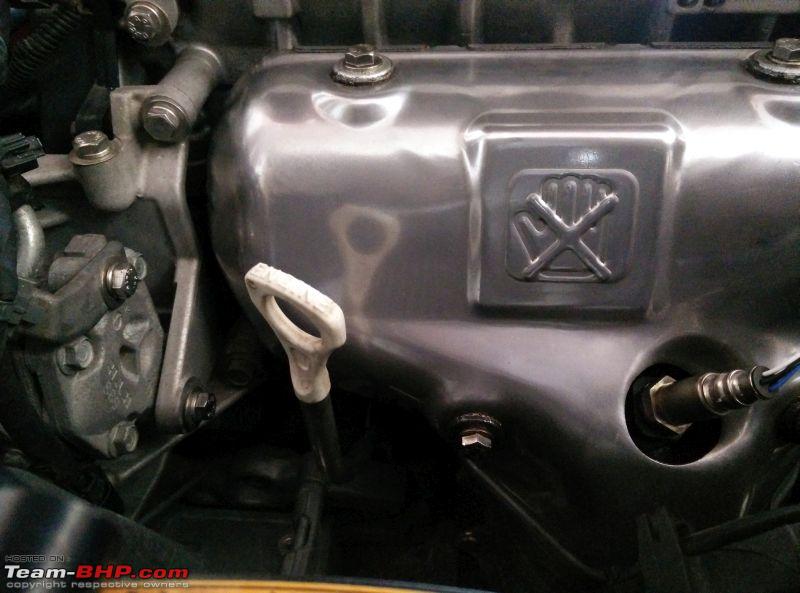 Once its on the car, started it and left it to idle for 20 mins for all the paint to cure properly. While the car was idling, played around with the head unit and the music quality improved so much! The vocals started sounding muddy with the enclosures, I managed to dial out most of it using the EQ. Will find the root cause and fix it once and for all soon. Finally fixed back the mesh grill after what seemed like an eternity. Hallelujah! 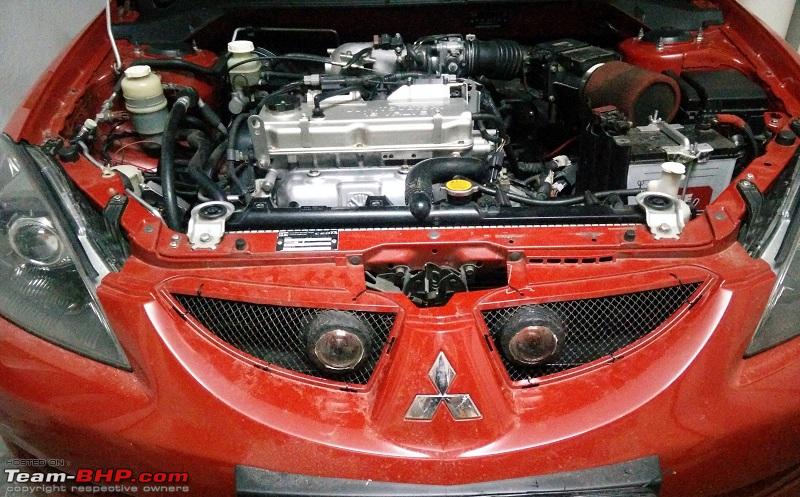 Last edited by SunnyBoi : 26th July 2017 at 23:30. |

|  (24)
Thanks (24)
Thanks
 |
| The following 24 BHPians Thank SunnyBoi for this useful post: | abirnale, akshay380, dark.knight, Dennis, DrANTO, fusionbang, Karthik Chandra, Klub Class, Leoshashi, manas_270, mjumrani, null, paragsachania, R2D2, Rahulkool, raihan, sukiwa, sumeethaldankar, theexperthand, Torino, Trojan, vaasu, Varun_HexaGuy, Viju |
| |
|
28th July 2017, 09:23
| #77 |
| Senior - BHPian Join Date: Dec 2006 Location: Mysore / B'lore
Posts: 1,696
Thanked: 4,265 Times
| Re: Life with a Red Mitsubishi Cedia Few months ago when I was fitting and testing the projectors in my headlight, they suddenly started misbehaving. Turns out my battery had completely discharged  I took it to the friendly neighborhood battery guy who opened the cells and saw the fluid level was almost half! Way below the minimum mark. I had never thought of checking the battery ever, I'm to be blamed. I took it to the friendly neighborhood battery guy who opened the cells and saw the fluid level was almost half! Way below the minimum mark. I had never thought of checking the battery ever, I'm to be blamed.Lately I was getting a feel that the battery isn't holding much charge. Cranks were slow, voltage was dipping to < 12V with key on, if I turn on 4 projectors with car off, only 2 light on, a third lights with a weird color and fourth doesnt even bother turning on. Start the car, normal behaviour ensures. Yesterday I finally decided to replace the battery and I wanted to put in the biggest battery possible. I have six projectors, 2 amps and a load of additional electronics in the car with plans to add more. Having a bigger battery will help massively. I did my due diligence and a DIN55 would be able to fit. The stock battery is a 35aH unit that is common with many cars. It never filled up the battery tray, the gaps always irritated me because cleaning the gaps around it was difficult. 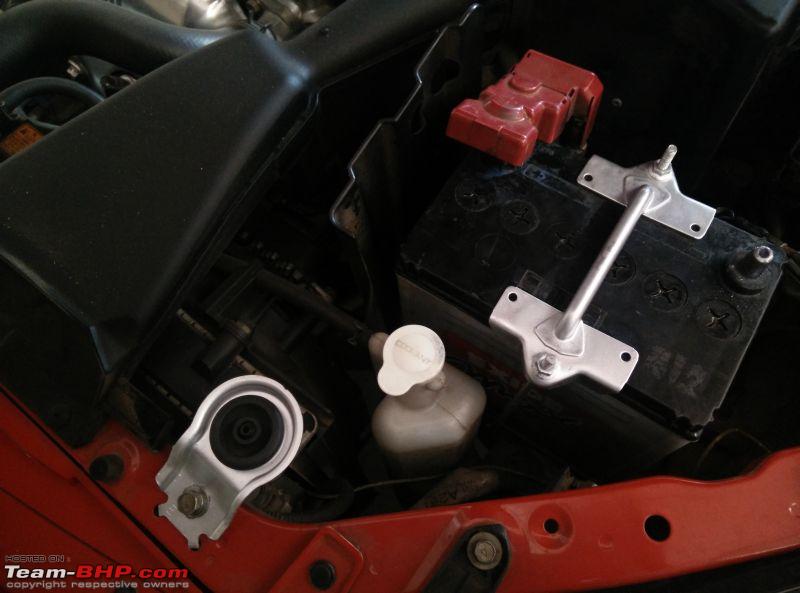 Went out and bought an Amaron DIN55 battery. I bought the R version which has the same terminal orientation as my existing battery. This is where my problems began. Took the battery to Vinaya Engineering Works and got a battery clamp made. The stock clamp wouldn't fit since it was made for a smaller battery. 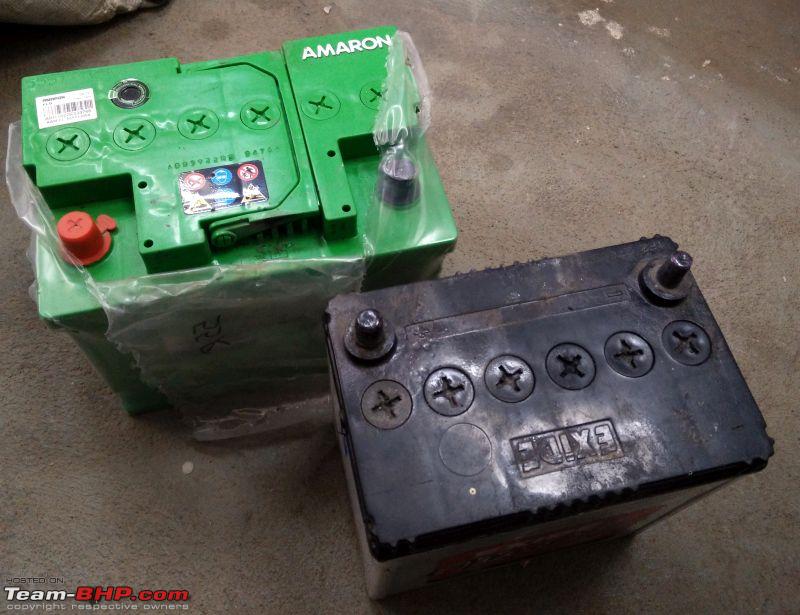 Since thew battery tray was out, cleaned it and coated it with an excellent trim coat. All that TLC made it shine as much as my paint  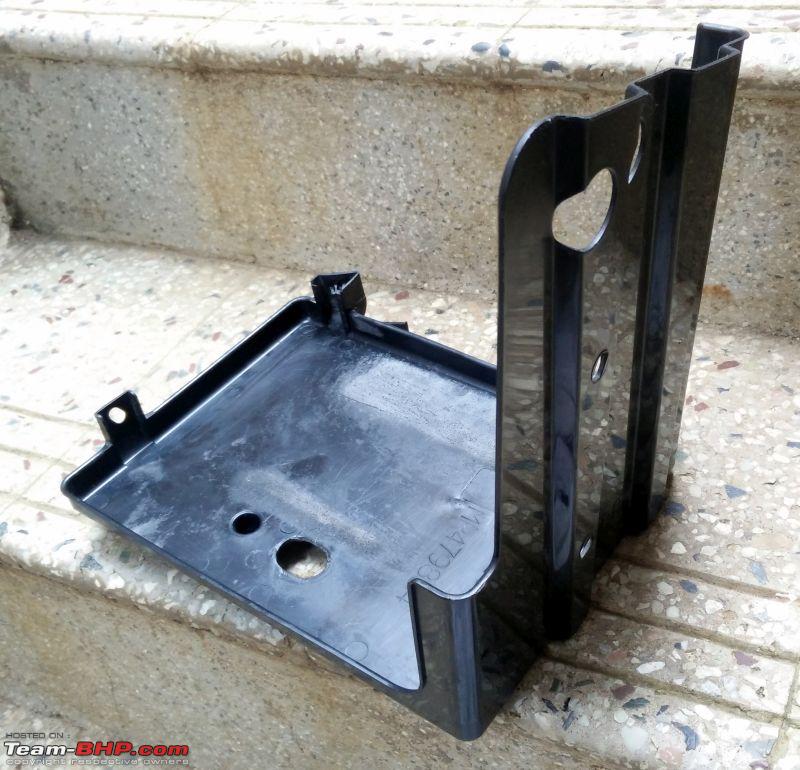 So the new battery fits! I was able to reuse the stock hooks to keep the battery in place. I needed new battery terminal clamps because of bigger terminals. The air filter too is fouling with the battery. Somehow managed to fit the ground plug without any cutting etc, but the positive lead fell short by ~4 inches. This gave me a big headache. After this incident, I realised if I had bought the battery with terminals reversed, I could have flipped the battery and the positive would have fit. 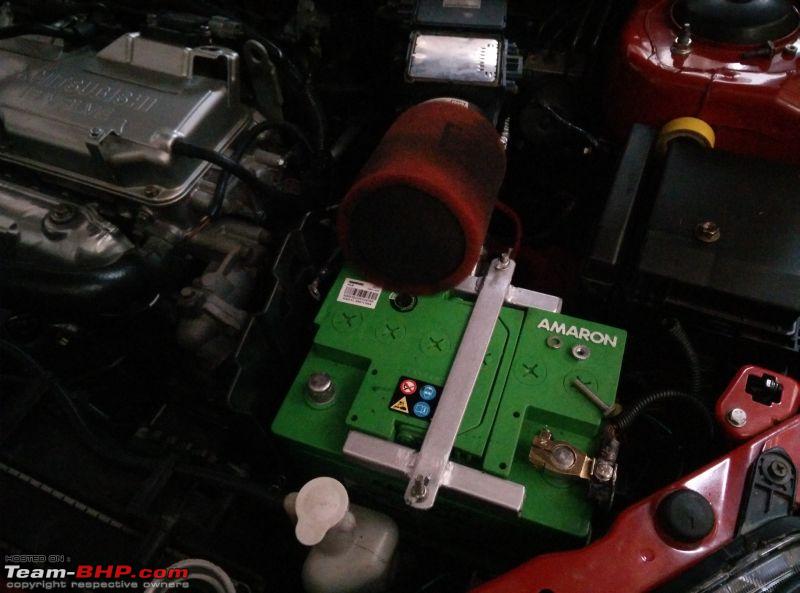 Play around with the clamp holding the air filter and pushed it back just enough 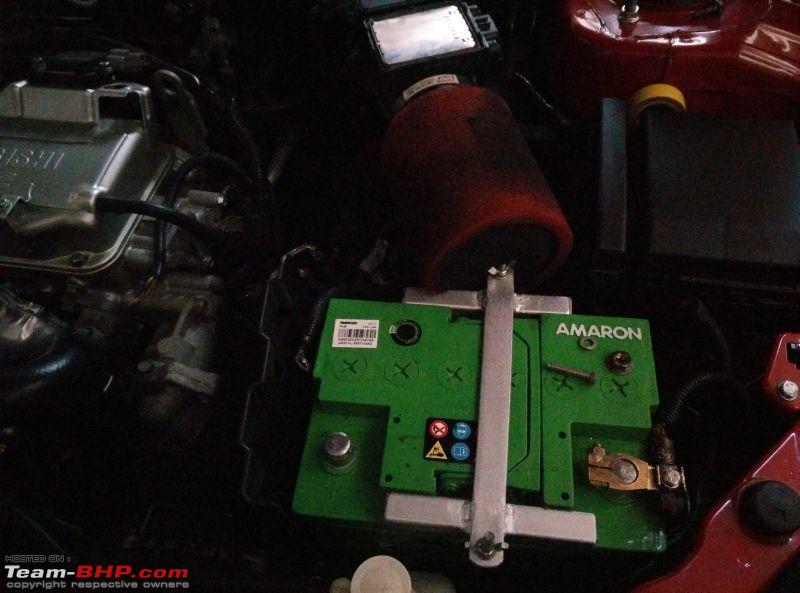 In the meanwhile a tiny winged fella gave me companion while wrenching 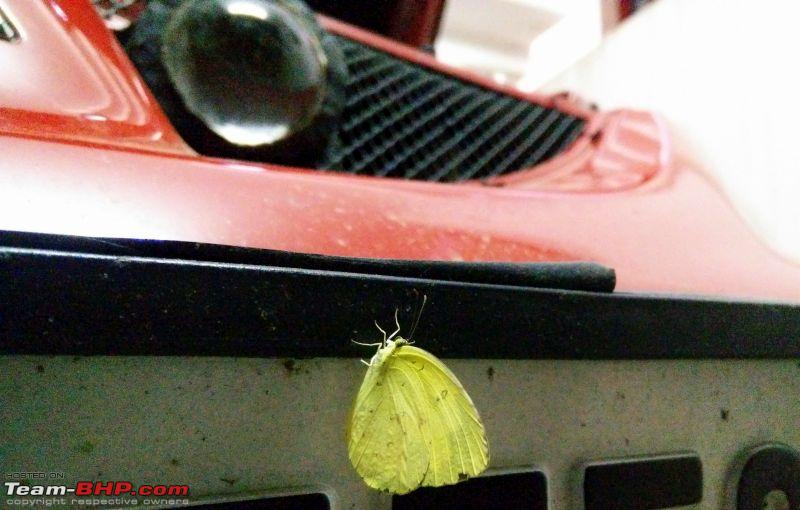 I rummaged through my wire stock, thickest wire I had was 16 sqmm left over from amp wiring. I also bought huge lugs, although I could fit just two 16sqmm wires on it, crimped them and made the extension. I want to replace this section with a 0/2 guage wire; since 2* 16 sqmm is actually equivalent to a 22 sqmm cable. Once everything was fit, covered everything using self fusing tape making it fully waterproof. I even used red tape for positive and black for negative. Form and function covered hehe. 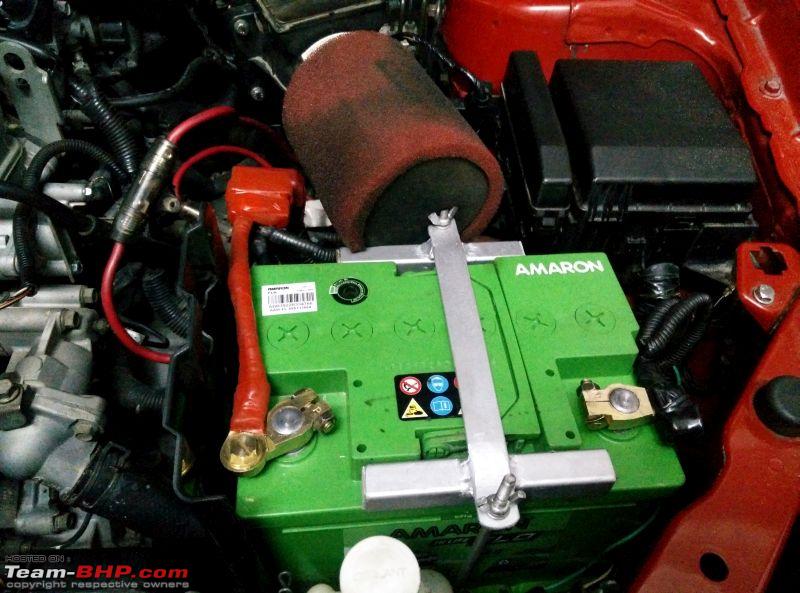 Whole engine bay. Doesn't look that bad! I was a bit apprehensive on buying a green battery, I would have preferred a black or maybe red (Exide?). I just need to get those flaps which cover the terminals and I'll be truly set. 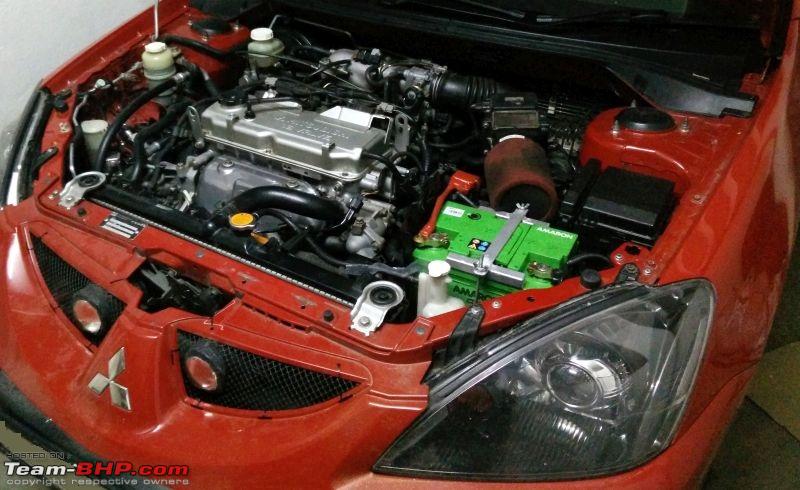 Another chance to blow my trumpet :P check out the reflection! 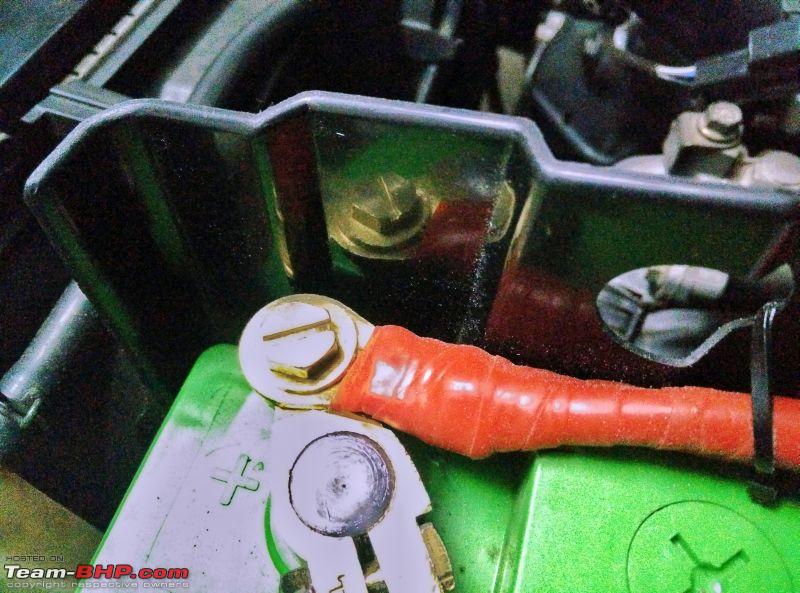 Does it work? Yes! The car cranked up so fast; even the starter motor spun definitely much faster, even faster than when I got the car 1.5 years ago! Totally worth going for a bigger battery. |
|
| (15)
Thanks
|
| The following 15 BHPians Thank SunnyBoi for this useful post: | abirnale, dailydriver, Dennis, DrANTO, fusionbang, keroo1099, Klub Class, paragsachania, R2D2, Rahulkool, sukiwa, theexperthand, Varun_HexaGuy, Viju, viXit |
|
31st July 2017, 23:13
| #78 |
| Senior - BHPian Join Date: Dec 2006 Location: Mysore / B'lore
Posts: 1,696
Thanked: 4,265 Times
| Re: Life with a Red Mitsubishi Cedia Took out the wiper cowl one fine day to check if there is any rust underneath. this was a big problem in one of my Palios, a bunch of hay blocked the drain pipe under the wiper cowl, that led to the whole area rotting. Wanted to prevent that from happening. Took out wiper arms, removed the cowl. Dirty but no rust! 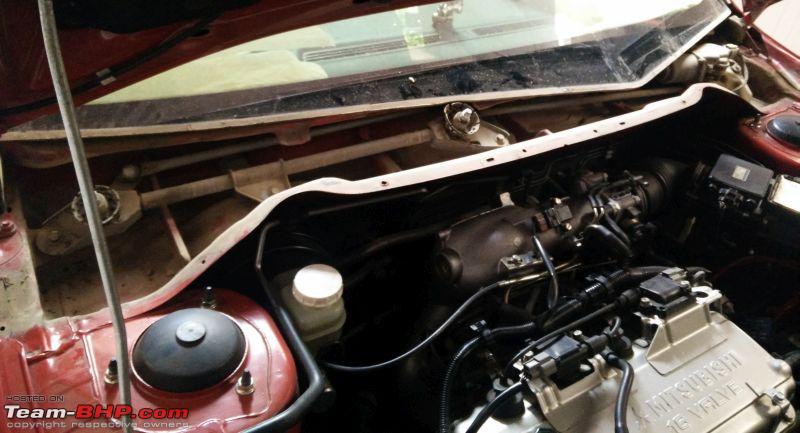 Before 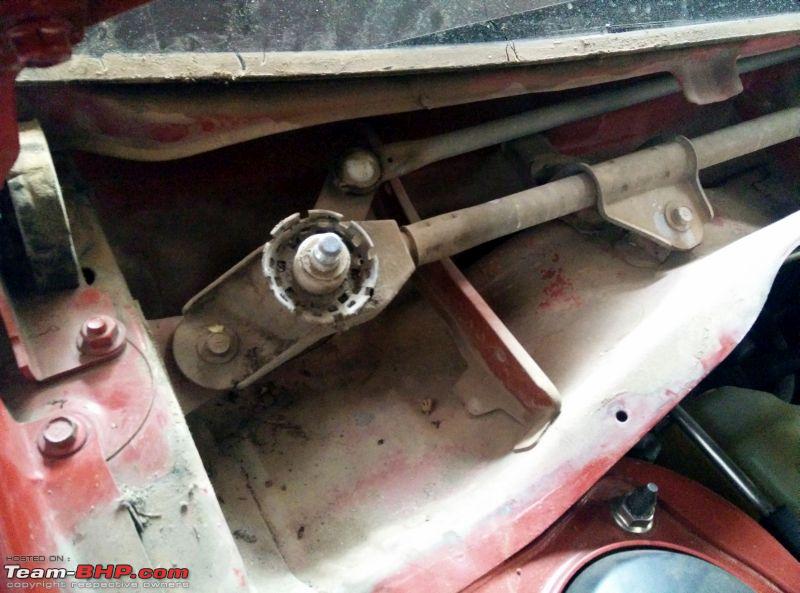 After 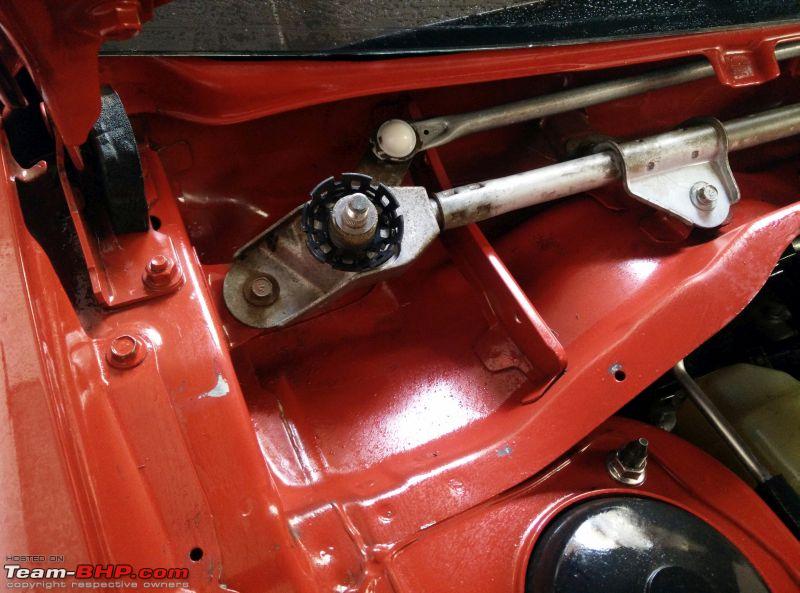 The whole cowl was looking yellowish when I got the car. I had spent a long time getting it to look black. I could not get to the corners because of the wiper arms. Now I can clean everything. 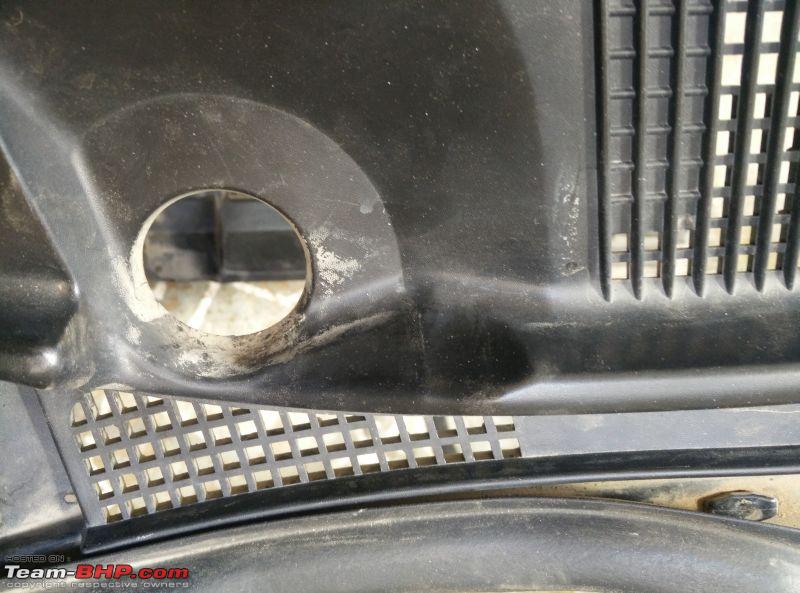 Wiper motor after cleaning. Nice and shiny 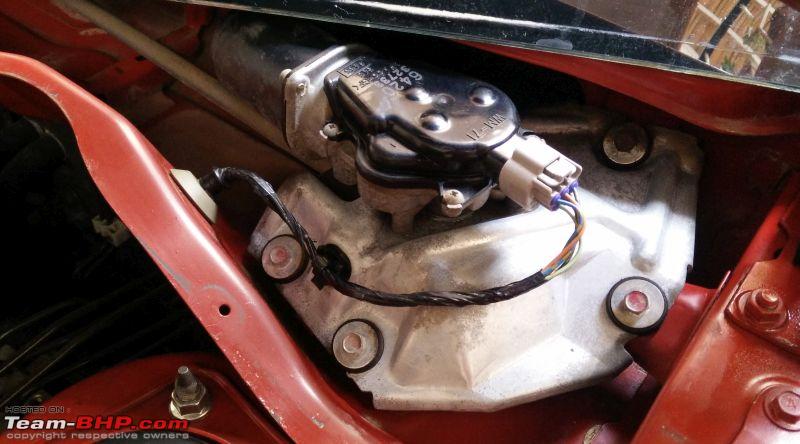 After cleaning, I was left with tons of hard water marks like these  Begone! 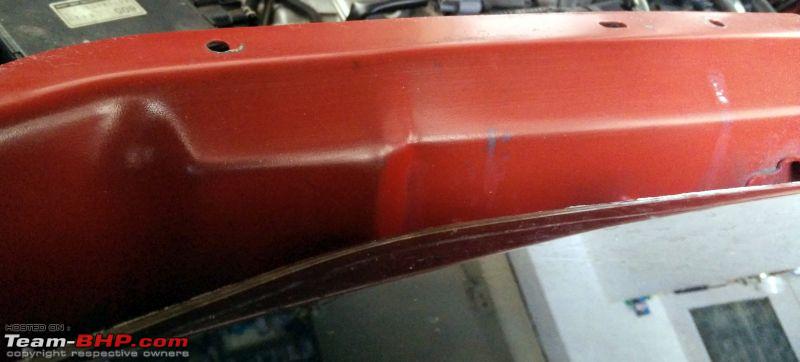 Cowls cleaned; applied a thin coating. 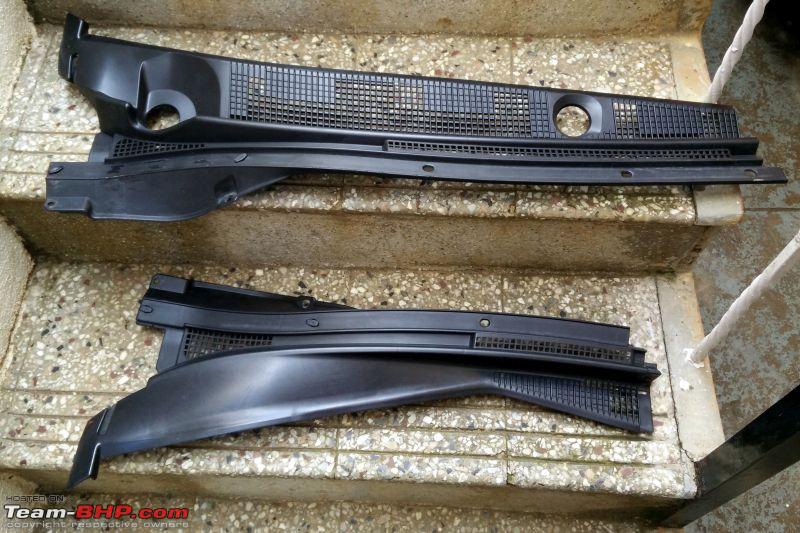 Wiper arms painted matte black; the powder coat had faded and chipped at multiple spots. 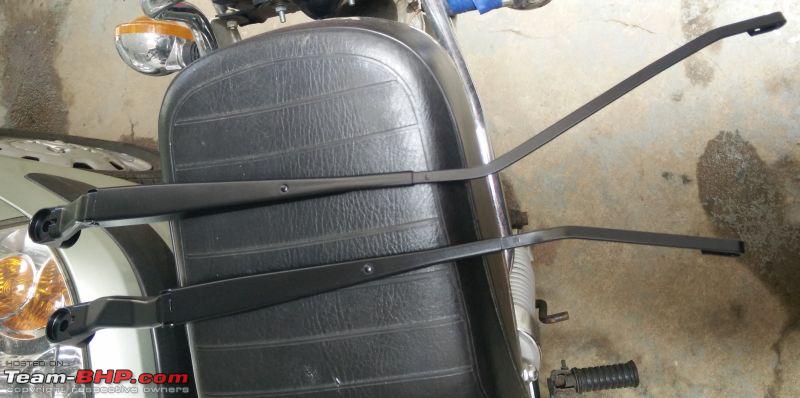 Everything put together! I skipped putting the EPDM seal below the arms; it became near impossible due to my stupidity and I need to dismantle everything again in order to just put that seal back on. Oh well, will do that after a week or so.  Next was the engine guard. It was broken and was taken off to drain the coolant earlier on. I had not fixed it back because I wanted to repair it and then only put it back. Pieces  Tacked in, but there are pieces missing? I got a patch piece for it  All done!  Polished and coated it next morning 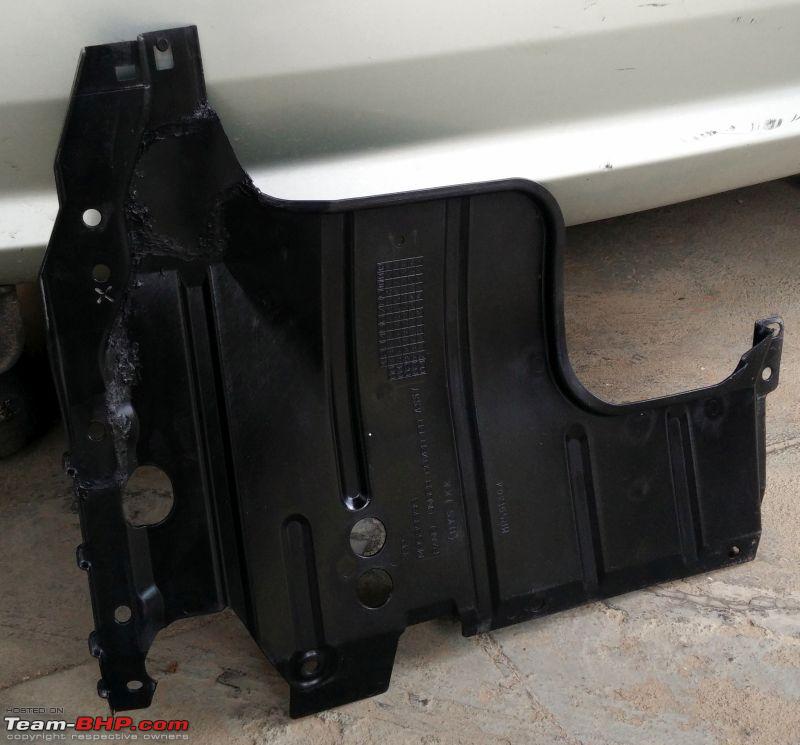 Fixed it back using new clips 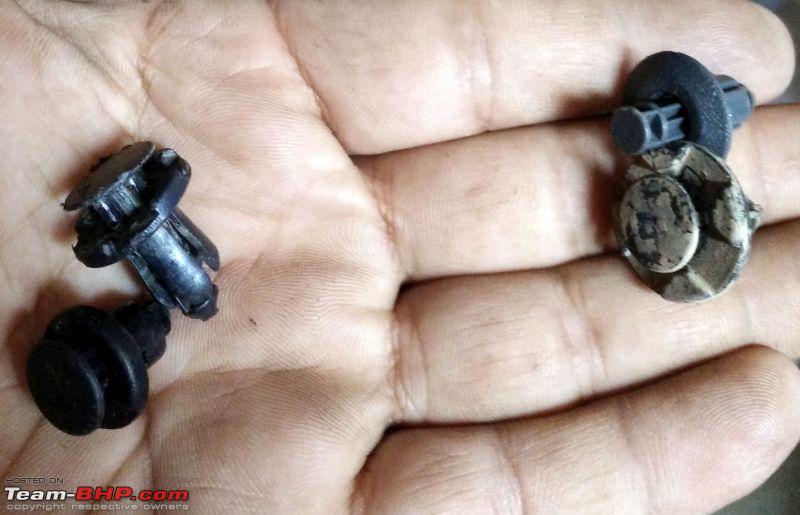 Next for cleanup were few clamps in the engine bay that looked past their prime. Example, clamps around the power steering reservoir. 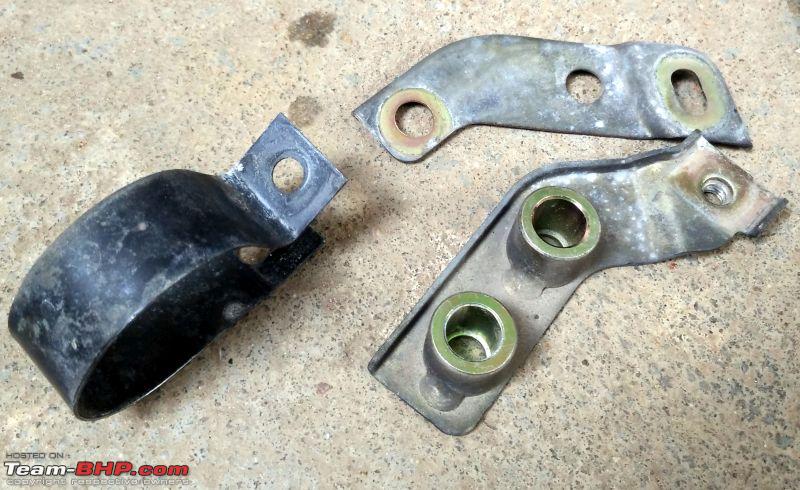 Plastic parts of the radiator was also on cards for restoration. They had become grey after 10 years.  Timing belt cover. Pretty grey and dull 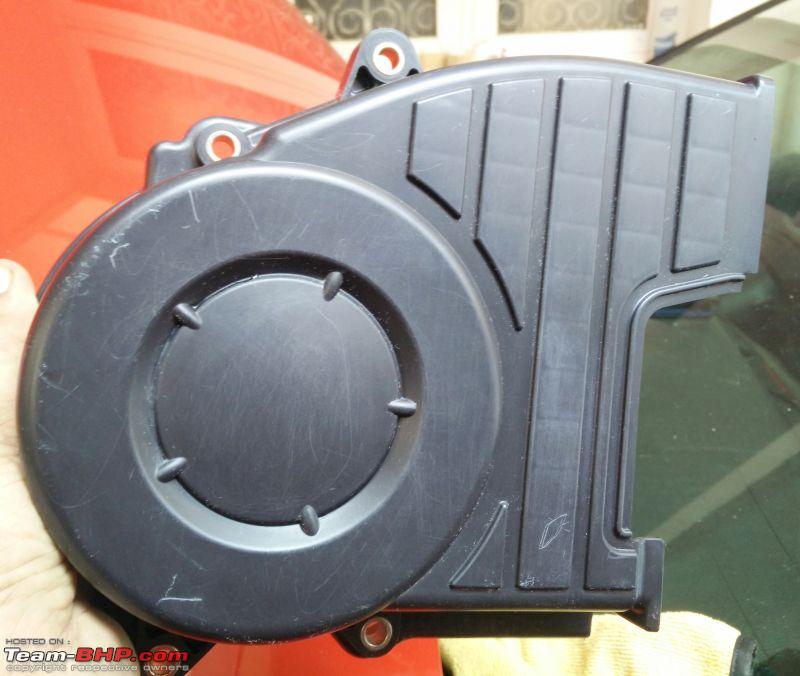 This is how it looked after I was done with it 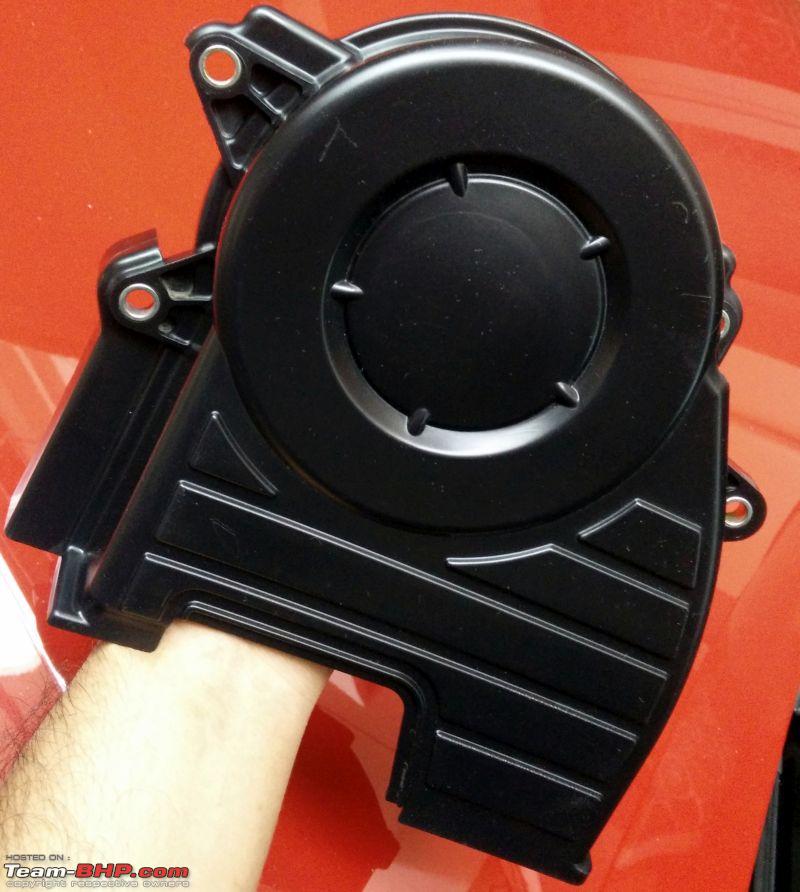 All the oils and dirt around the timing belt were cleaned. There was some oil left due to a leaking valve cover, which I had replaced earlier on, but I hadn't cleaned then. 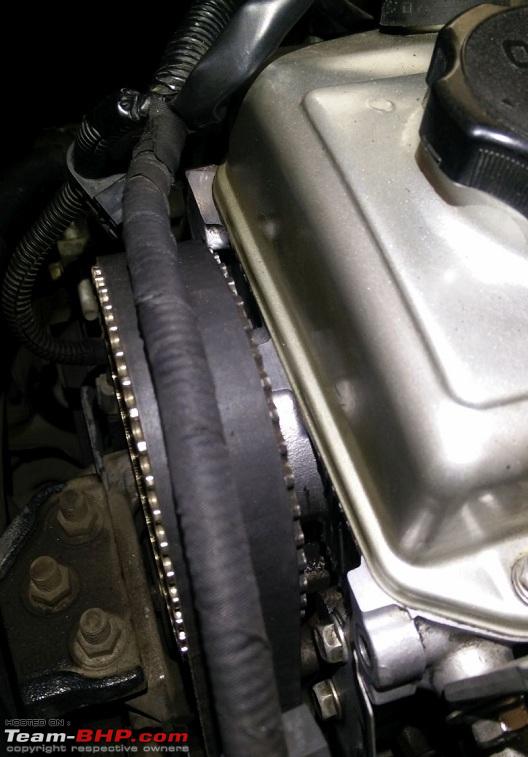 Various bits and pieces painted. I ended up removing every metal bracket holding wire in the engine bay and painting them silver. 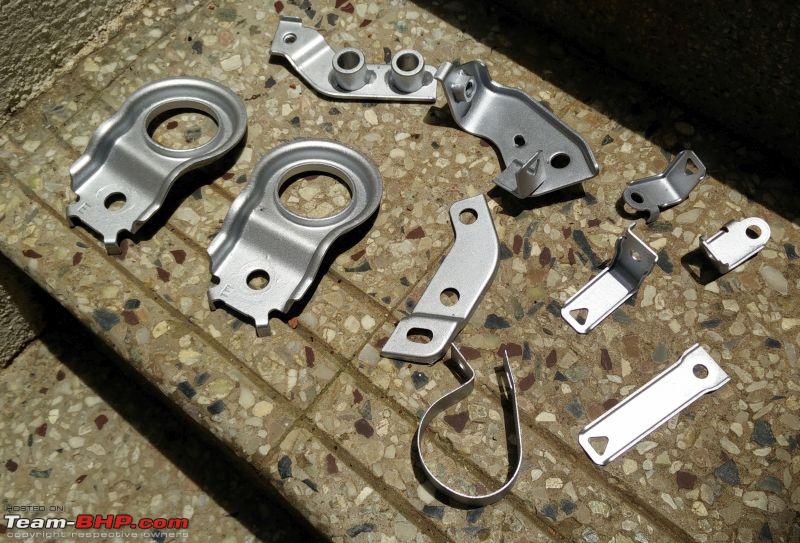 Power steering brackets replaced. Waxed the strut towers with a high temp wax that should last in harsh engine bay conditions. 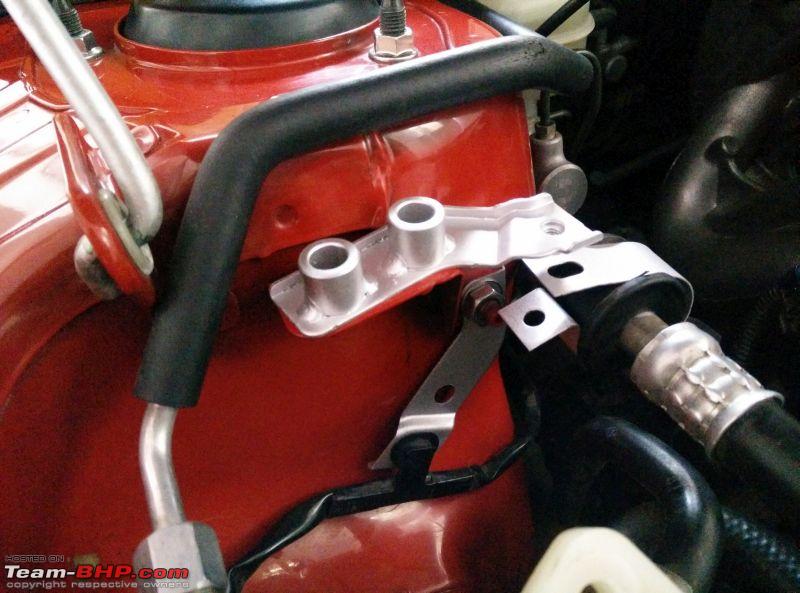 Radiator and fan shroud now looking black. I'm not satisfied with the look, I might do it again sometime in the future. 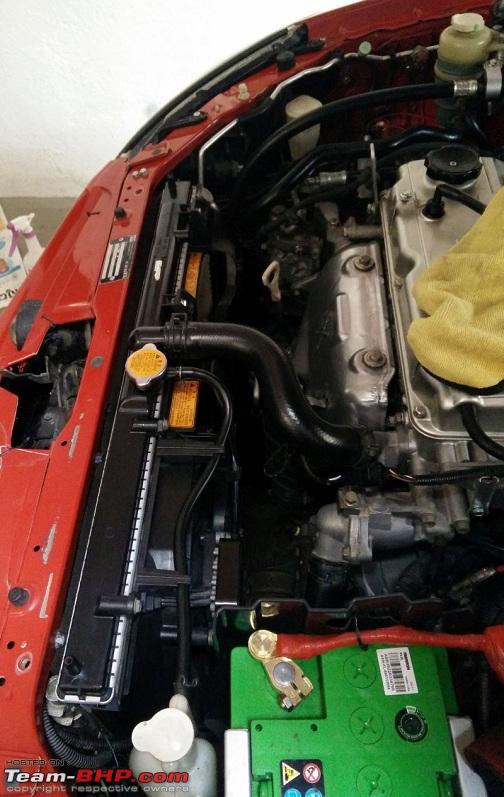 The coolant level in the reservoir has dipped below minimum. I did check the water pump when I took off the timing belt cover, there are no leaks. This must be the coolant sucked in to displace any leftover air pockets after coolant flush and fill. No worries, will top it up when I go to Bangalore.  Engine bay at end of day today. The timing cover stands out, rather disappears because it has suddenly become so black!  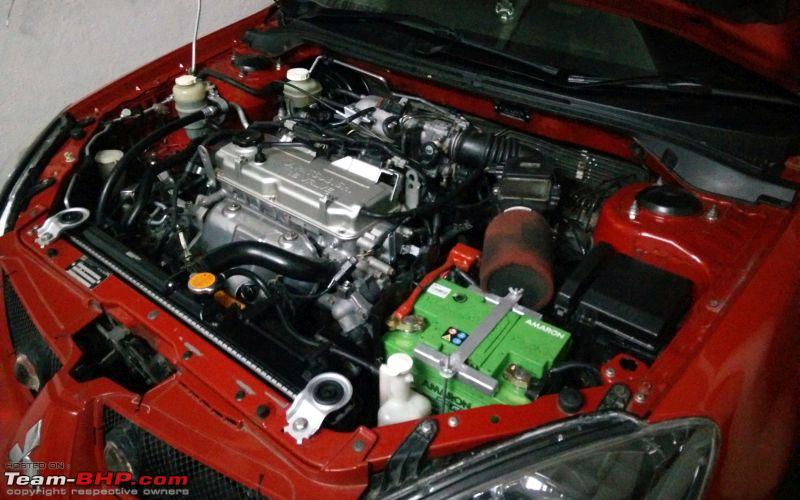 Last edited by Aditya : 1st August 2017 at 07:15. Reason: Typos |
|
| (23)
Thanks
|
| The following 23 BHPians Thank SunnyBoi for this useful post: | BigBrad, deetjohn, Dennis, DrANTO, fusionbang, gpa, GTO, james, Karthik Chandra, keroo1099, Klub Class, Leoshashi, mjumrani, motorpsycho, paragsachania, reignofchaos, samaspire, sukiwa, theexperthand, Torino, vaasu, Varun_HexaGuy, Viju |
|
1st August 2017, 12:46
| #79 |
| Senior - BHPian Join Date: Dec 2006 Location: Mysore / B'lore
Posts: 1,696
Thanked: 4,265 Times
| Re: Life with a Red Mitsubishi Cedia With the engine looking better what about the exterior? There was a small accident that happened on the roof by a large monkey, which led to tiles breaking and falling on the car This is how the car looked after I picked off all the broken tiles. Glass took a lot of impact and there are deep scratches, however the glass is still intact. Phew! Smudge marks indicate where the tiles impacted the glass 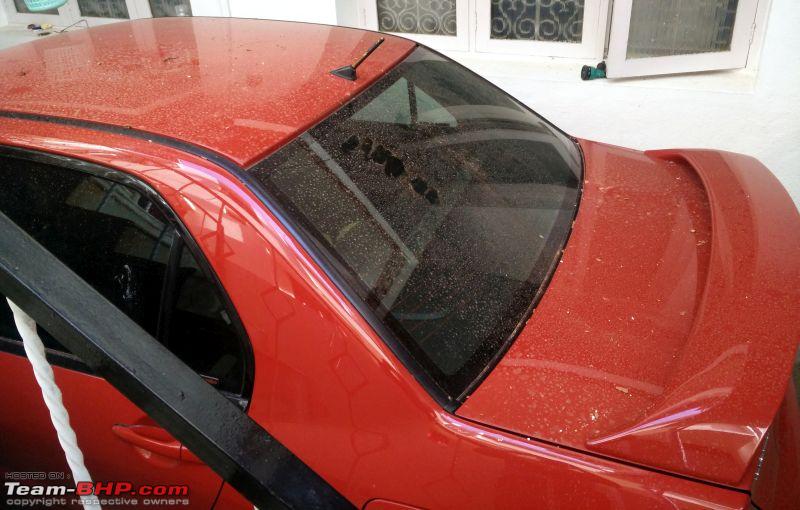 Water beading from trim and wiper arms. Naice! 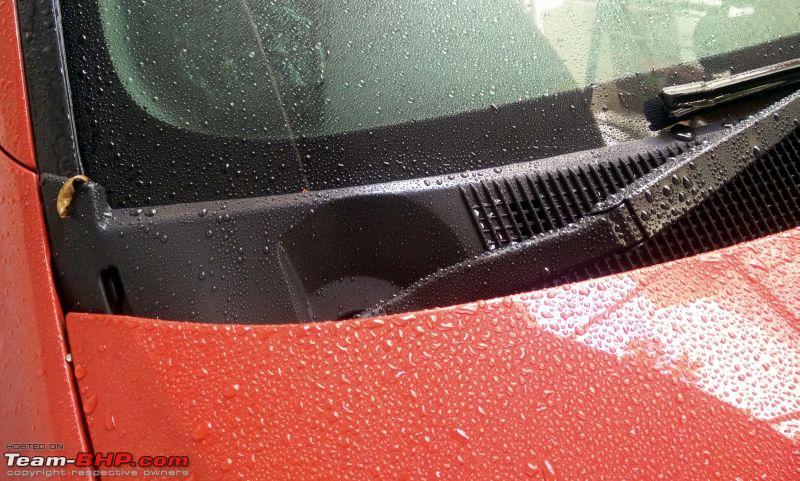 This is how the car looked after just a wash. I wanted to go further anyway, hoping a round of waxing will hide few of the scratches caused by the tiles. 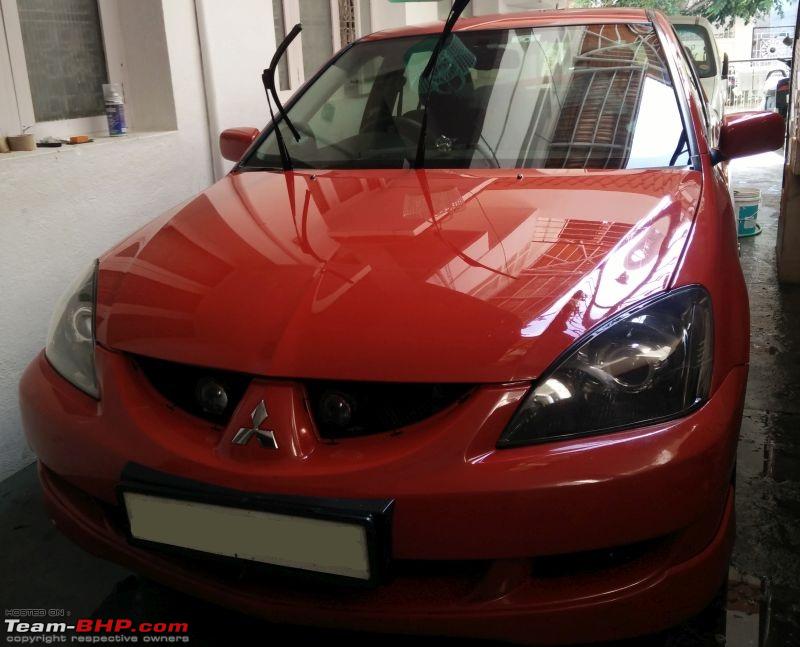 Did it work? Well, mostly no. Lot of the big scratches and dents are easily visible. But here are the afters 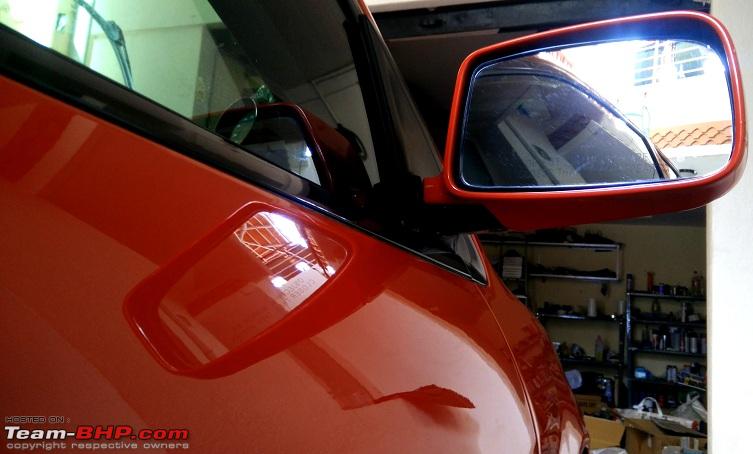   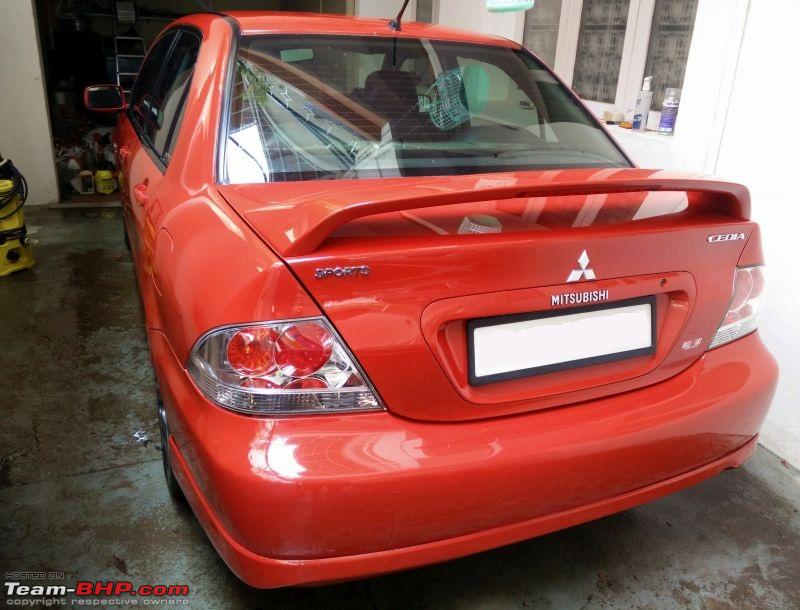 Here you can see the dents. Lots of them around the antenna and whole of boot has scratches and dents. 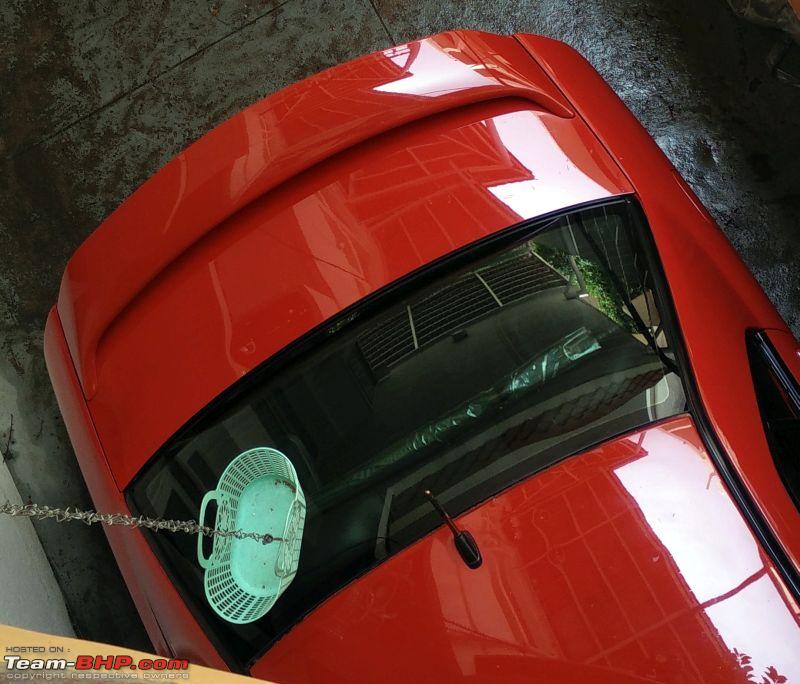  Here's a video to show the whole car. |
|
| (16)
Thanks
|
| The following 16 BHPians Thank SunnyBoi for this useful post: | dark.knight, Dennis, james, Karthik Chandra, keroo1099, Klub Class, mjumrani, motorpsycho, paragsachania, R2D2, sai_ace, sukiwa, S_U_N, theexperthand, Varun_HexaGuy, Viju |
|
1st August 2017, 18:51
| #80 | |
| Distinguished - BHPian Join Date: Apr 2013 Location: Beans Town
Posts: 1,847
Thanked: 8,360 Times
| Re: Life with a Red Mitsubishi Cedia Quote:
 Bring on the mini-suction/glue based dent removers, or knowing you, would you rather remove the roof headliner and tinker from inside? Bring on the mini-suction/glue based dent removers, or knowing you, would you rather remove the roof headliner and tinker from inside? | |
|
| (3)
Thanks
|

| The following 3 BHPians Thank dark.knight for this useful post: | SunnyBoi, S_U_N, TheHelix0202 |
|
2nd August 2017, 08:58
| #81 | |
| Senior - BHPian Join Date: Dec 2006 Location: Mysore / B'lore
Posts: 1,696
Thanked: 4,265 Times
| Re: Life with a Red Mitsubishi Cedia Quote:
They're not easily visible in pictures but very obvious in videos/in person. I've tried to highlight in these pictures : 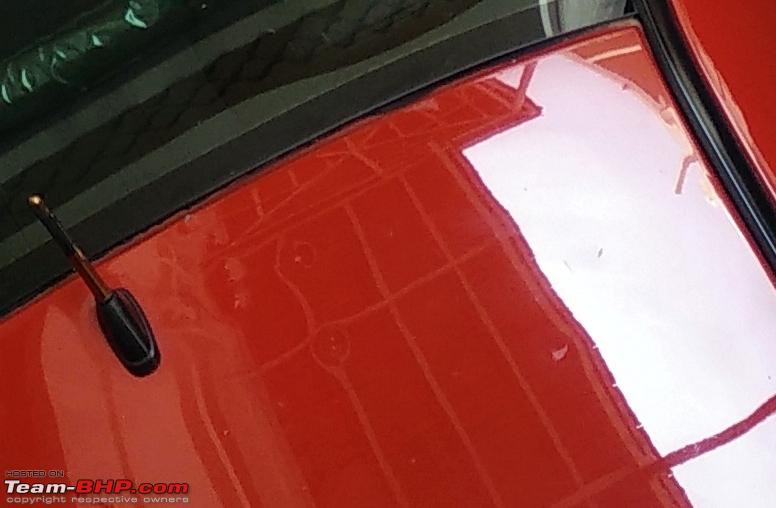 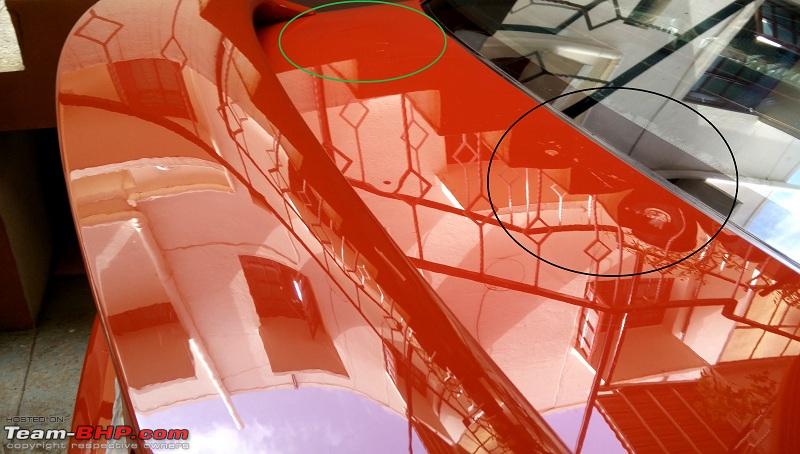 I got a VAT69 bottle for the car in addition to the older tavern before anyone gets antsy, its a small bottle of colour matched paint. OT was for the bumpers which was slightly darker for the body, now got the lighter shade in VAT69. Yay!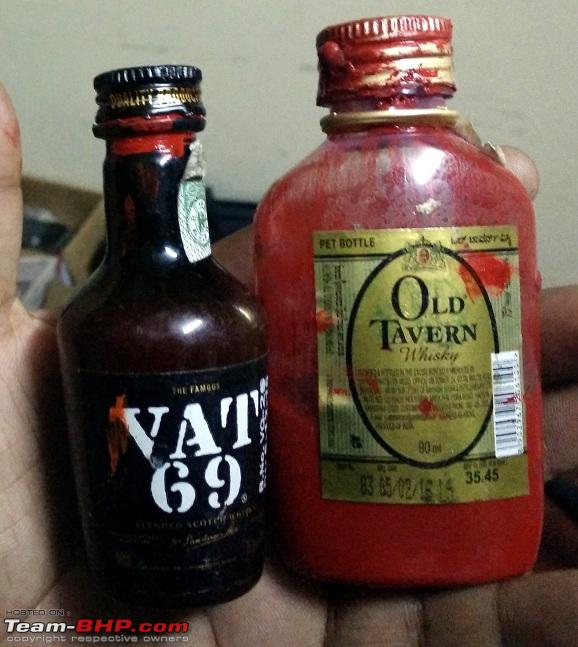 Few pictures of the car after the wax session. I am genuinely surprised how long this paint is looking good. It has already been 1 year and 2 months since any sort of polishing work went into it.    Last edited by SunnyBoi : 2nd August 2017 at 09:01. | |
|
| (14)
Thanks
|
| The following 14 BHPians Thank SunnyBoi for this useful post: | arvindmanju, BUXX, DrANTO, flyingkolors, fusionbang, james, Karthik Chandra, Klub Class, R2D2, rakesh_r, sukiwa, theexperthand, Varun_HexaGuy, Viju |
|
19th August 2017, 00:06
| #82 |
| Senior - BHPian Join Date: Dec 2006 Location: Mysore / B'lore
Posts: 1,696
Thanked: 4,265 Times
| Re: Life with a Red Mitsubishi Cedia Started experimenting mixing different colours of Rustoleum peelcoat on the AC panel; put few more coats of peelcoat on the radio relocation panel to cover the wear and tear patches. 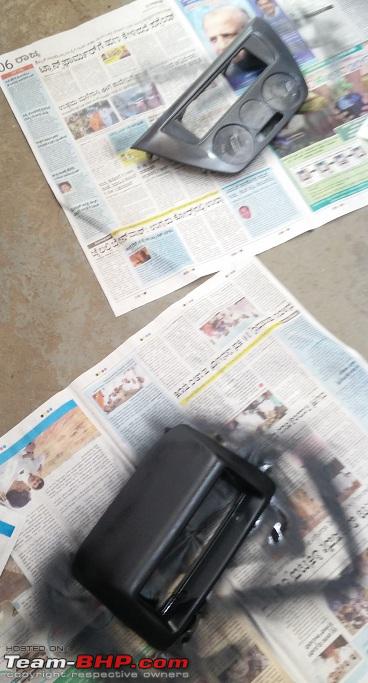 Bottom panel has dual colors mixed, top portion is just graphite. There is a difference and I like it! I will probably paint the whole thing sometime next month.  Here's one of the deep gash on the Rear fender, ideal candidate to test out the VAT69 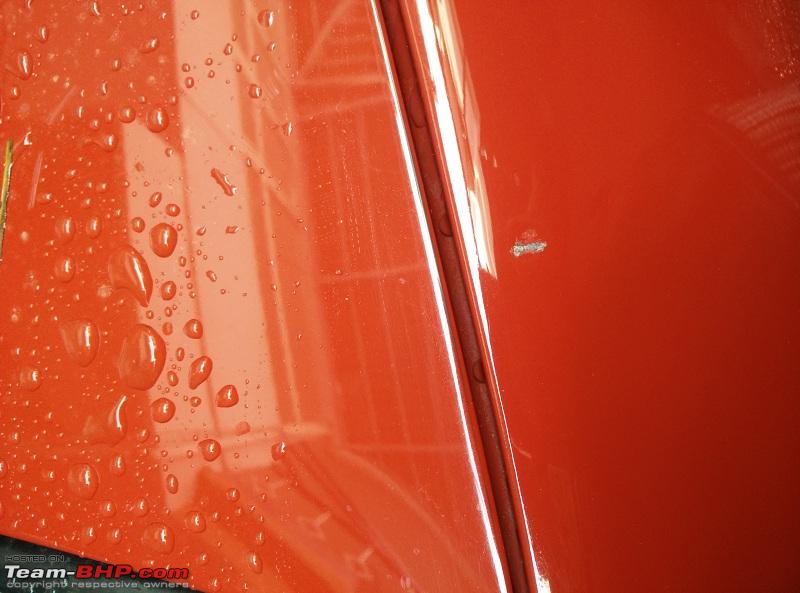 Paint matches well; phew! Its not 100% but better than seeing a scratch anyway. Marked out the area where scratch was present. 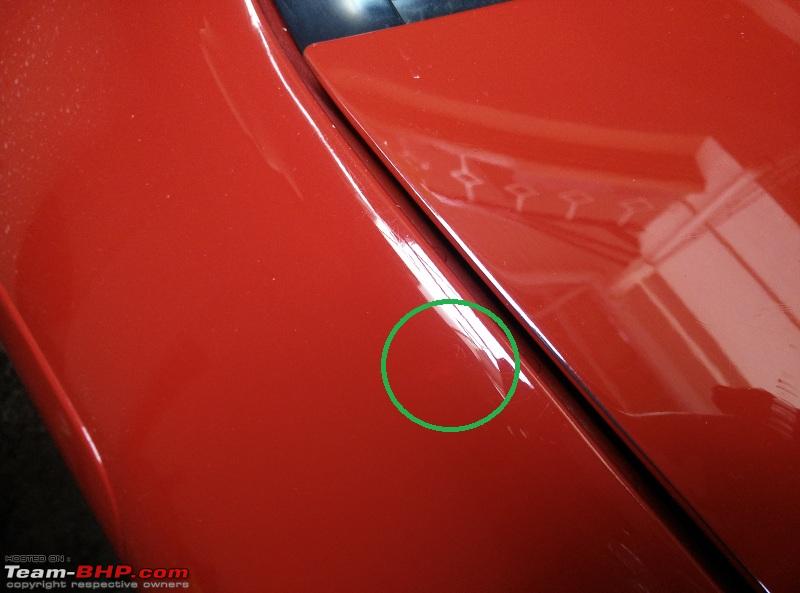 Bought a Gates Alternator belt. This has to be the first and only local part I've bought for my car during my ownership! Everything else was sourced from USA/Dubai 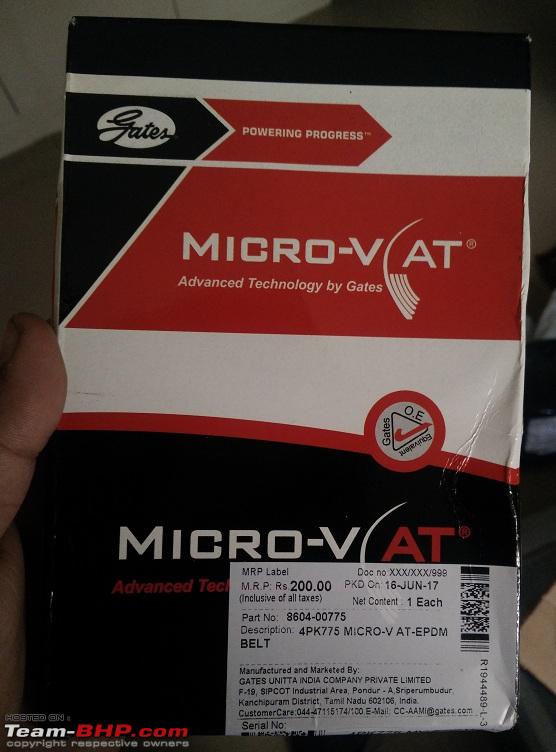 Few days later, landed up again at Blackworks. Stole some old SS braided brake hoses from a shivik Here they are!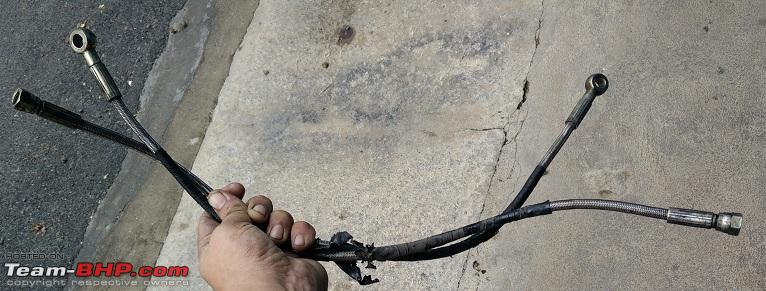 Hose length was the same as the Cedia and Civic, Excellent! After installing, the joint kept leaking. Turns out the Civic uses an inverted flare fitting to pair with the metal brake line, whereas the Cedia uses the normal flare fit. Oh well, I tried.  While walking around Blackworks, spotted an extremely dirty engine bay. My OCD senses kicked in and it was the perfect way of blowing off steam  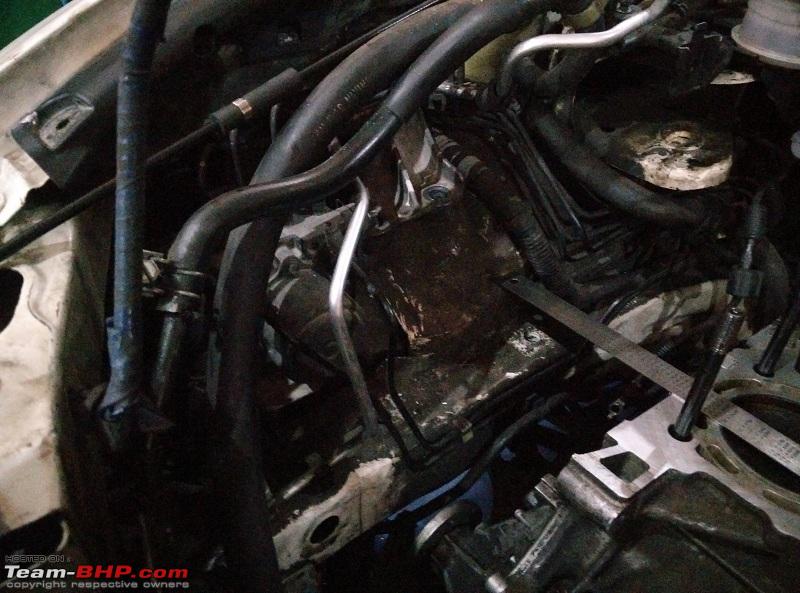 Lil bit of cleaner put on and left to dwell 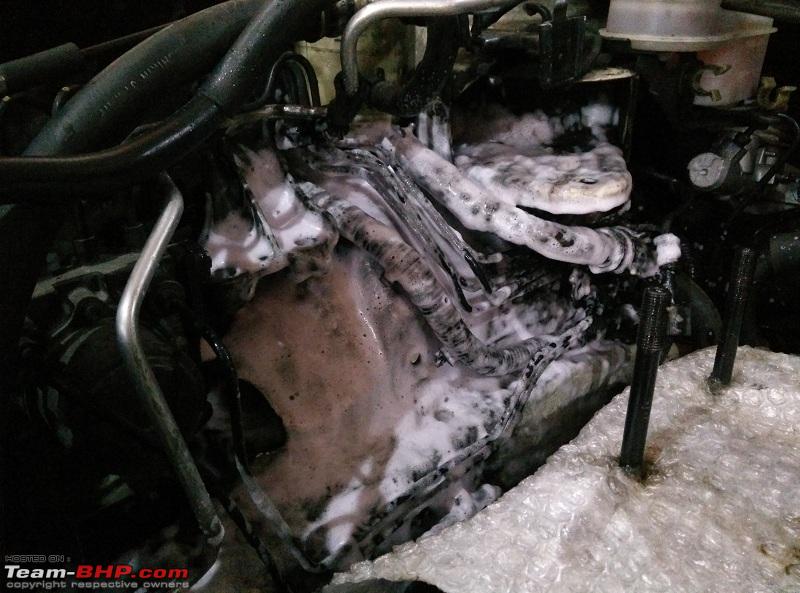 Wiped off. I did not have any good clothes or brushes with me, I had to use just cotton waste and mop up the dirt and grease. Not bad for a half hearted attempt. 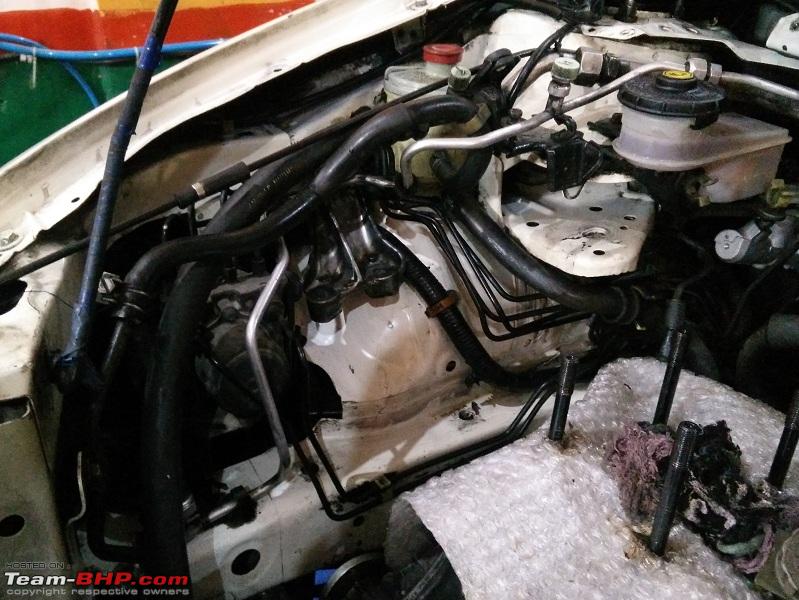 I had a bottle of fresh Tutela Top4 brake fluid, used it to bleed and flush the front brake lines. This was my last bottle of brake fluid and I had to get more. So went to the friendly neighborhood Fiat showroom and bought these  Couple of weeks back, bought more fluids as emergency stock. 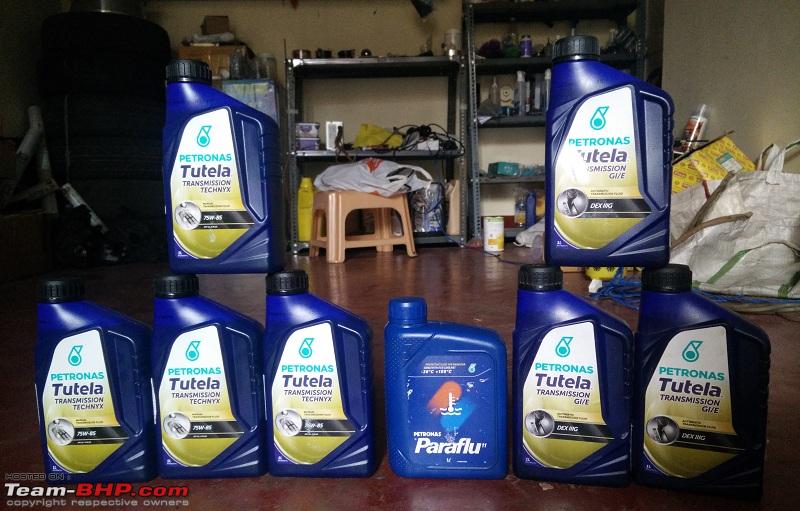 |
|
| (11)
Thanks
|
| The following 11 BHPians Thank SunnyBoi for this useful post: | Dr.Naren, DrANTO, fusionbang, Karthik Chandra, Klub Class, Leoshashi, mjumrani, motorpsycho, R2D2, Varun_HexaGuy, Viju |
|
26th August 2017, 23:41
| #83 |
| Senior - BHPian Join Date: Dec 2006 Location: Mysore / B'lore
Posts: 1,696
Thanked: 4,265 Times
| Re: Life with a Red Mitsubishi Cedia I have always liked a no-wire clutter free car. I had put in two extra cigar sockets under the dash over a year ago, one socket for the dashcam and one for a Aukey 4-port charger. The way I had installed it, I had two 6 feet AWG24 USB cables running from the front through the center console and exit near the seats. 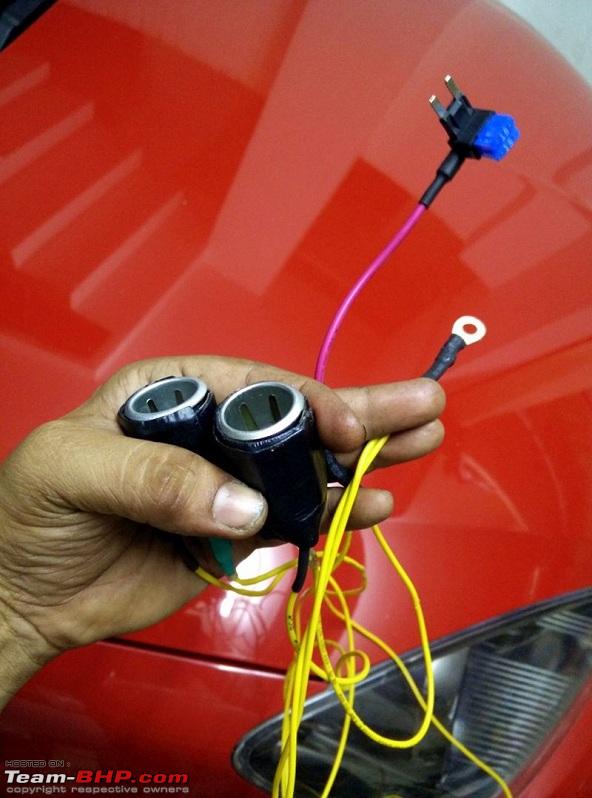 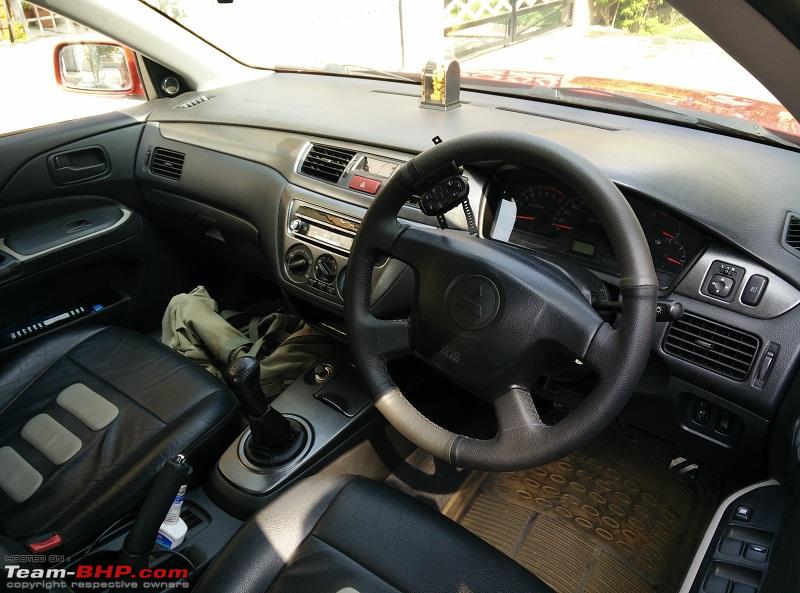 The wires used for these two sockets were very long; a result of my relative inexerience back then. I had bunched up the wires, used a cable tie to secure them. The second socket was installed somewhere above the clutch pedal (monoprice cables coing out of the chargers visible in the pic as well) 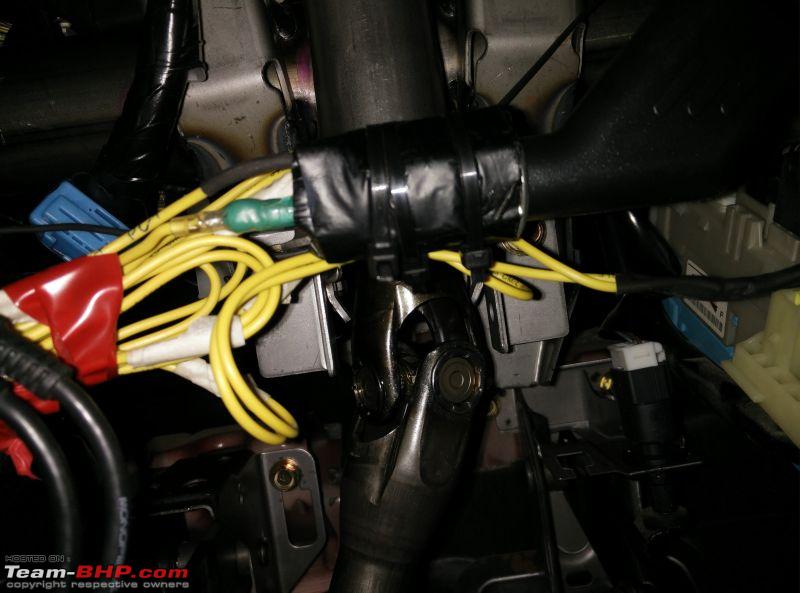 Ever since, I have added few more electronics such as DAC/Tablet AEM Wideband Electrochromatic mirror Voltmeter With all these added, the wiring slowly became a mess. Final nail in the coffin was the aukey 4 port charger dying last week. This time I wanted to get a simple 2 port charger, install it inside the center console and have shorter USB wires come out of it. Retain the front socket with another 2 port charger to power the DAC. Removed the center console to begin. 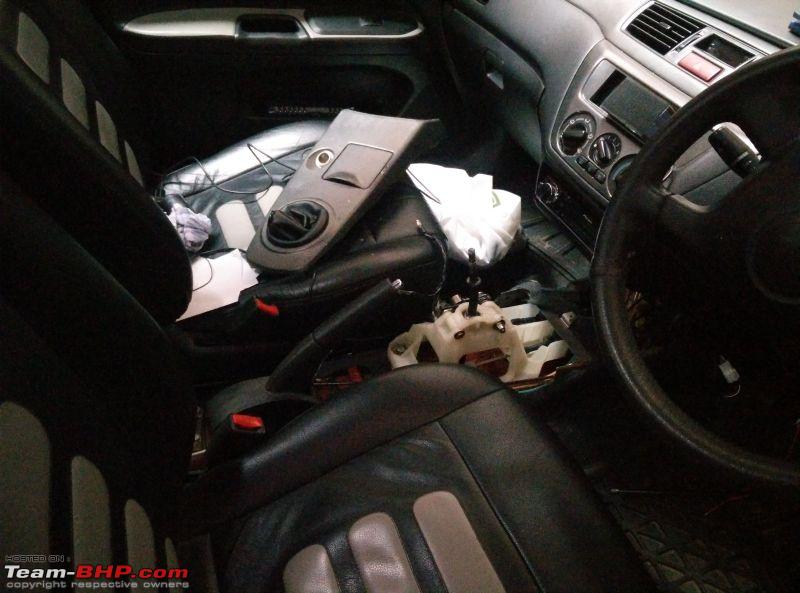 While the CC was removed, the gearshift console looked shabby. Time for a repaint! 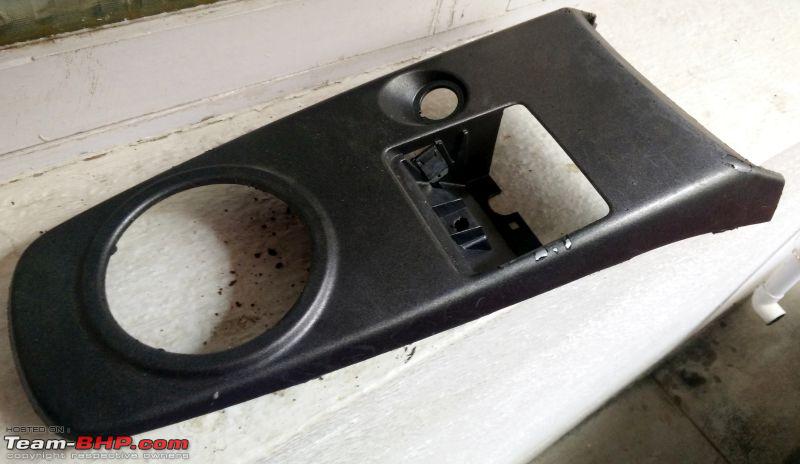 Peeling the old paint is so theraupeutic 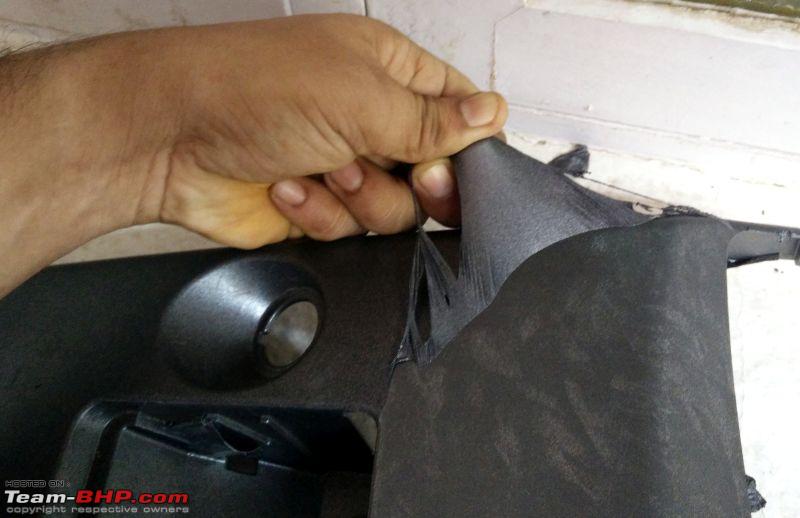 While I was layering on paint, I added the extra socket in the center console. Tapped the wires from stock cigar socket. 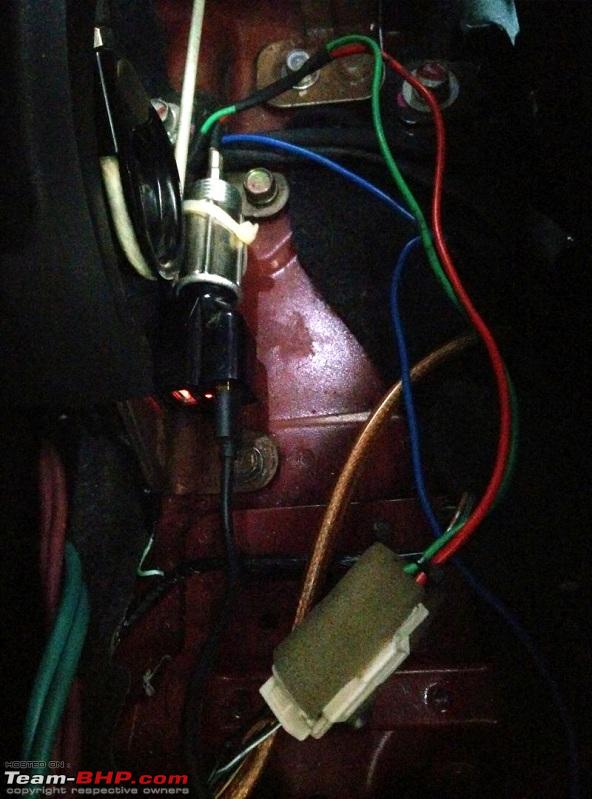 Paint done  At this point I was done with today's task. However the wire mess under the dash bothered me - half of me wanted to take care of it some other day, other half wanted to fix it today itself. After a long thought, opened the lower dash and found this mess. 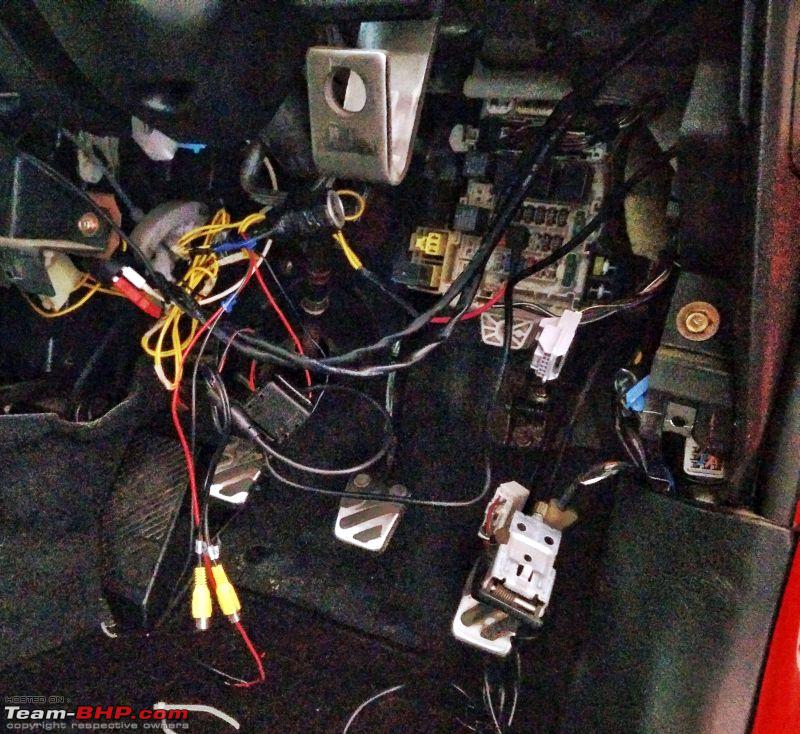 Wow. I never expected it to be so messy. This HAS to be fixed. But how? Wow. I never expected it to be so messy. This HAS to be fixed. But how?I went back into the garage and saw this scrap piece of plastic, possibly from some sort of laptop cooler. This is when I had an outlandish idea..perhaps overambitious but I wanted to give it a try. 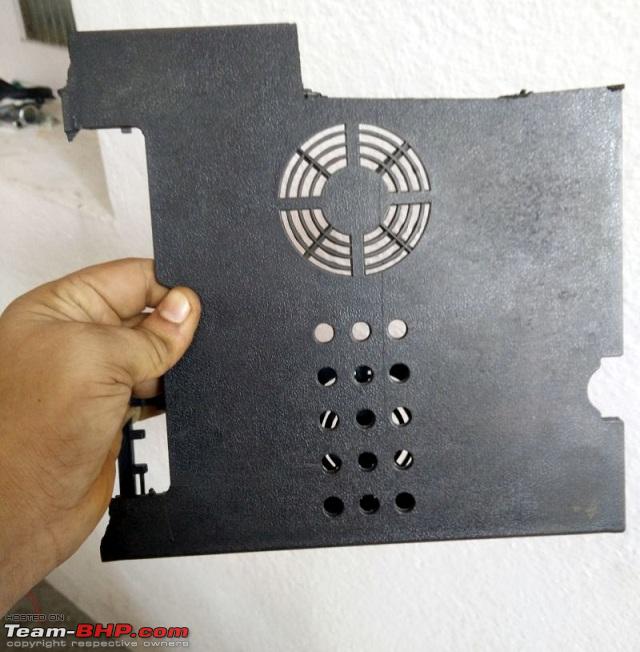 Few hours later, this was the end result. What is it you ask? 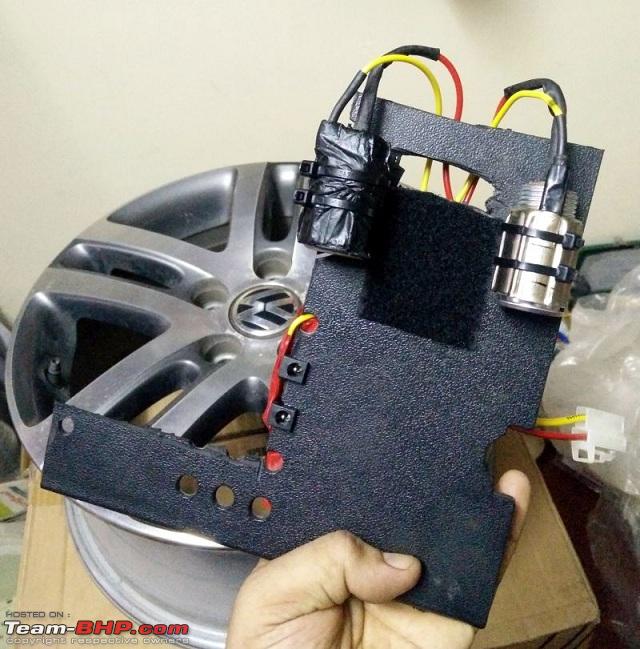 Instead of having cigar sockets dangling everywhere, I moved all the electronics onto a single panel - made from the laptop cooler. There are the two permanent features aka cigar sockets. There's a piece of velcro which will secure the filter for electrochromatic mirror. The filter is something thats not permanent and maybe removed from the car and hence its made such a way. There are two sockets on the left, which supply 12V. I reused laptop power sockets for this since I had a few spare ones left after fixing mine. On the right is the input 12V, one wire will be a ground and other will come from a fuse tap. Details here : http://www.team-bhp.com/forum/gadget...ml#post4257944 Here you'll see fuse tap, ground terminal plus female pin is visible. The box for EC mirror has a laptop power socket soldered and filter unit has a velcro to secure it. 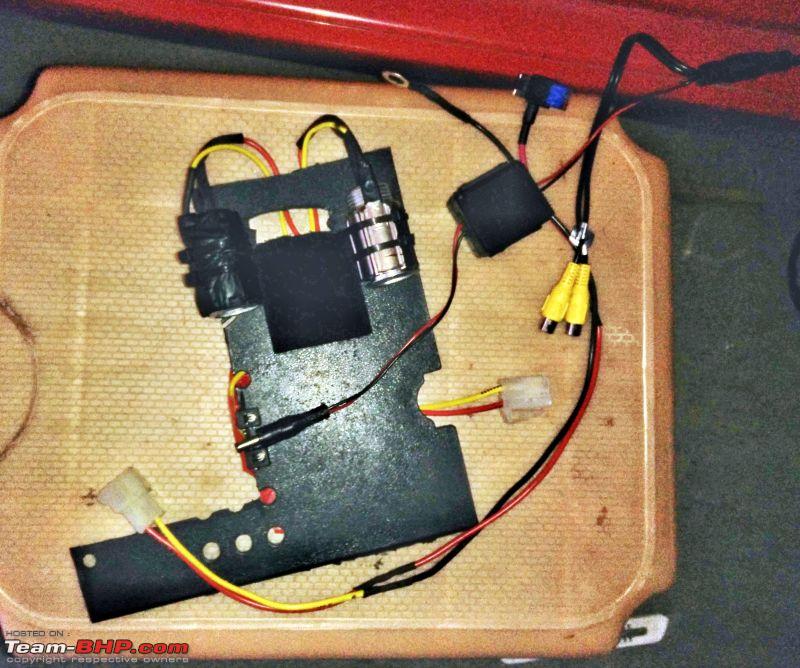 This is how it looks with it in place and everything connected. It sits between brake and clutch pedals on the firewall so it won't come in the way of pedals ot strike the leg in any way. 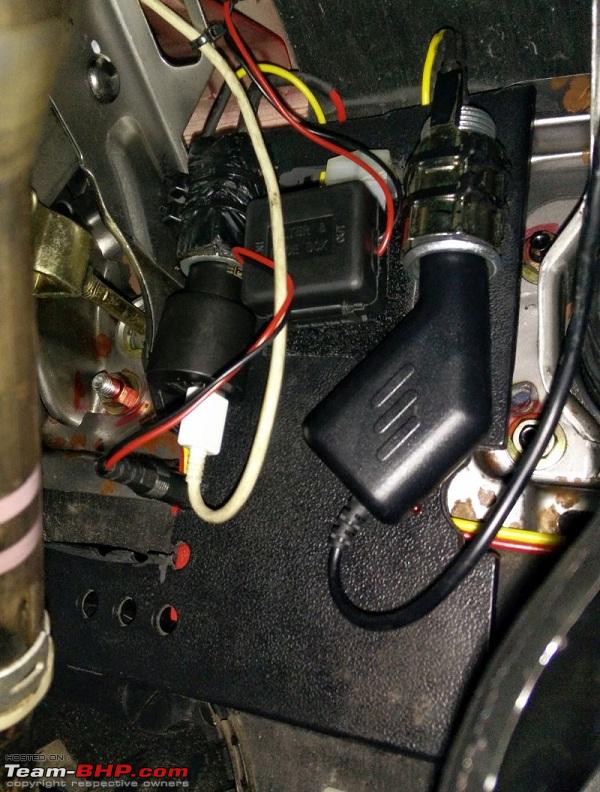 OK, does it work? HELL YEAH!!!  After shot. The red USB plug is deprecated and will go away, the only loose wire is the microphone wire which will be properly routed when I take out the head unit. 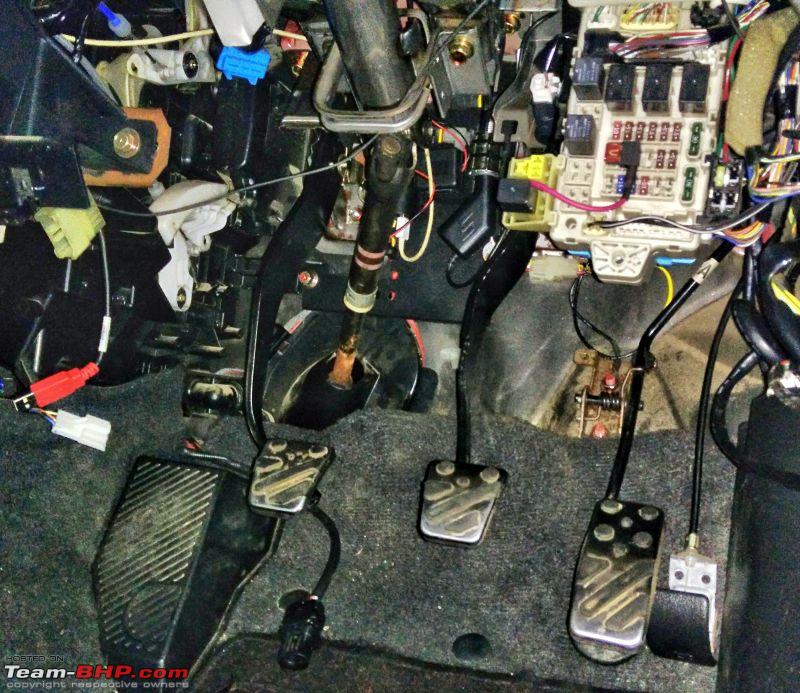 I've made this for modularity as well. There is enough space for upcoming electronics, all I need to do is solder a laptop connector for power and its plug and play! If I ever wanted to take this off, I just have to undo one clip and remove one nut! Last edited by SunnyBoi : 26th August 2017 at 23:46. |
|
| (8)
Thanks
|
| The following 8 BHPians Thank SunnyBoi for this useful post: | dailydriver, Klub Class, Leoshashi, mjumrani, motorpsycho, R2D2, vaasu, Varun_HexaGuy |
|
30th August 2017, 18:09
| #84 | |
| Senior - BHPian Join Date: Dec 2006 Location: Mysore / B'lore
Posts: 1,696
Thanked: 4,265 Times
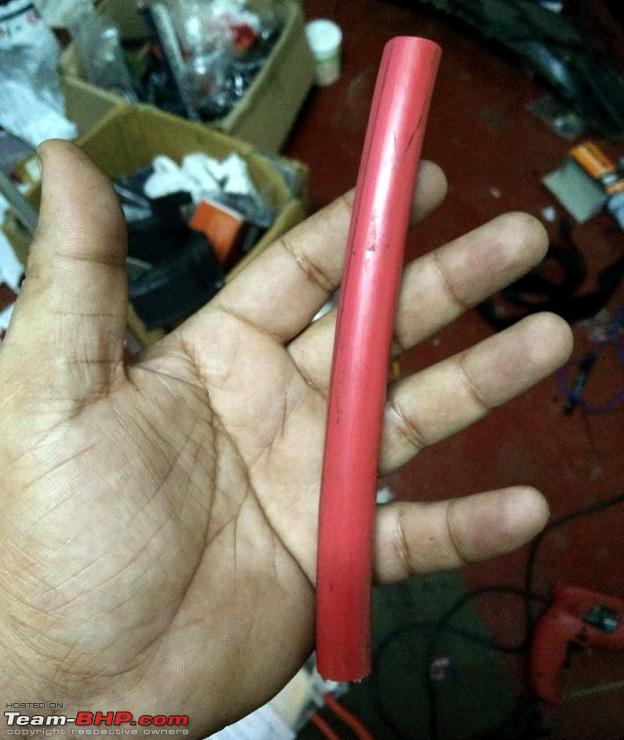
| Re: Life with a Red Mitsubishi Cedia Did more wire cleanup 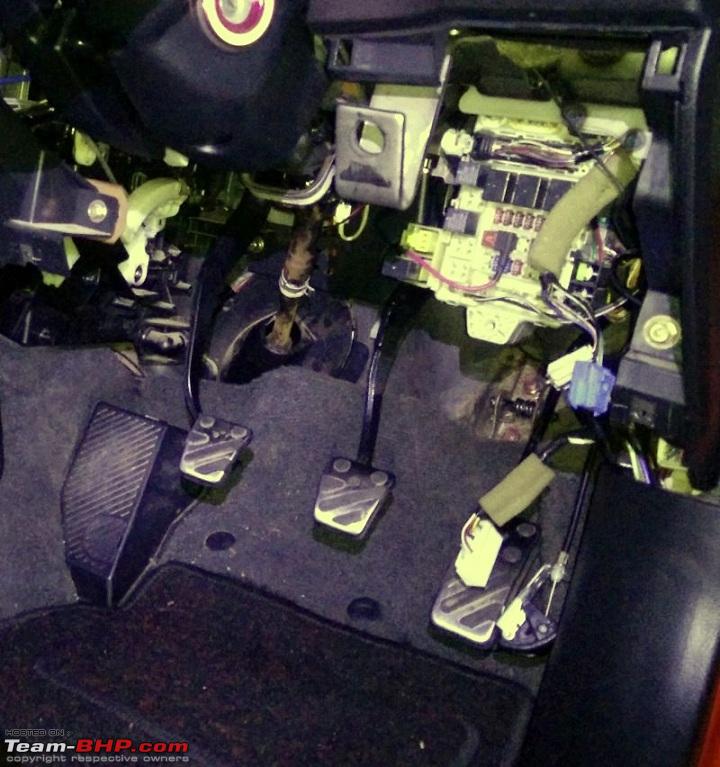 Cleaned up the ABS pump for better brake feel  Before 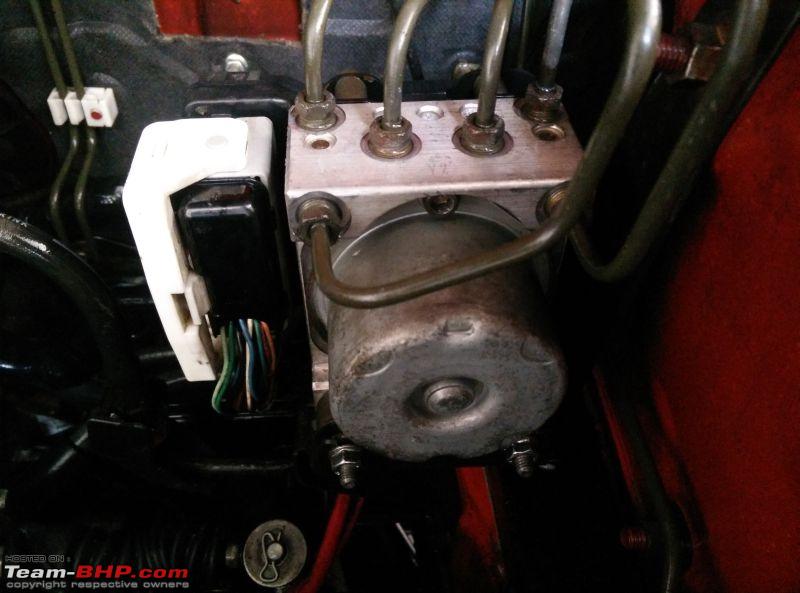 After 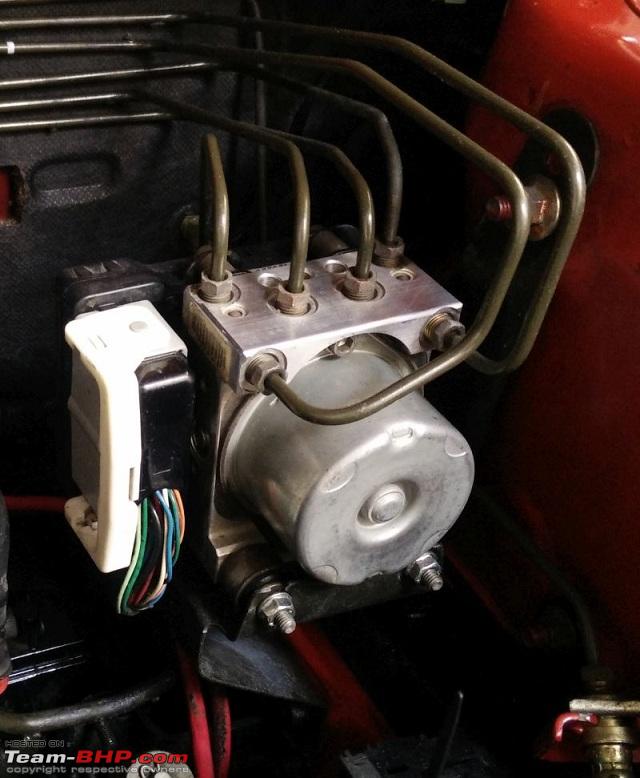 After the recent night drive, the headlights were flickering badly; I knew the root cause was the wiring somehwere since it would go away when I shake the headlight wiring harness. Turns out it was the only wiring jugaad I knowingly did not fix the last time. The original wiring for left low beam was damaged and the Mitsubishi ASS had passed a wire from right to left. In typical fashion it was just twisted and taped which had come off. I did not fix it earlier and thought I'd do a proper fix. Right now it had to be fixed.  Anyways, soldered and heatshrinked. The headlights are now solid with zero flickering.It was super tough to do everything without removing the battery, phew! 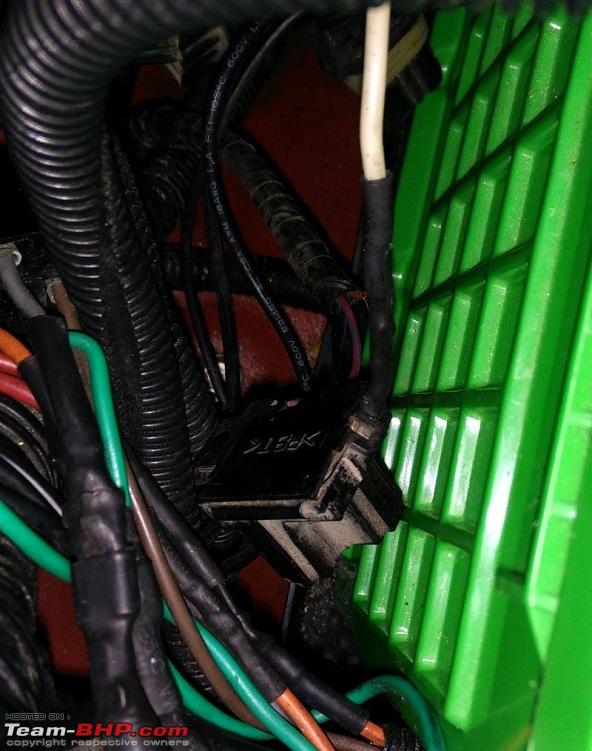 This was a sign - I fixed any and all potential wiring hazards 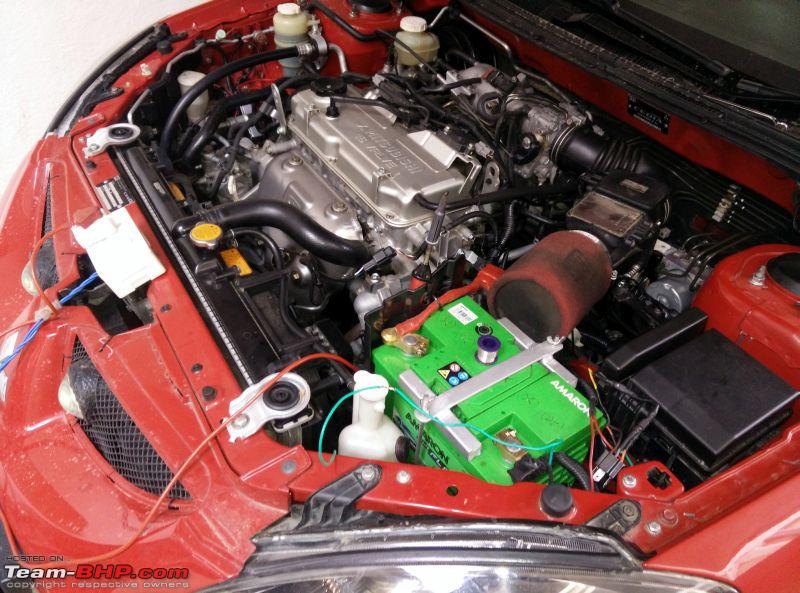 One of the wires on the headlight relay burnt up and was shorting itself on the gearbox  Fixed with silicon tape; relocated the relay so that nothing touches it 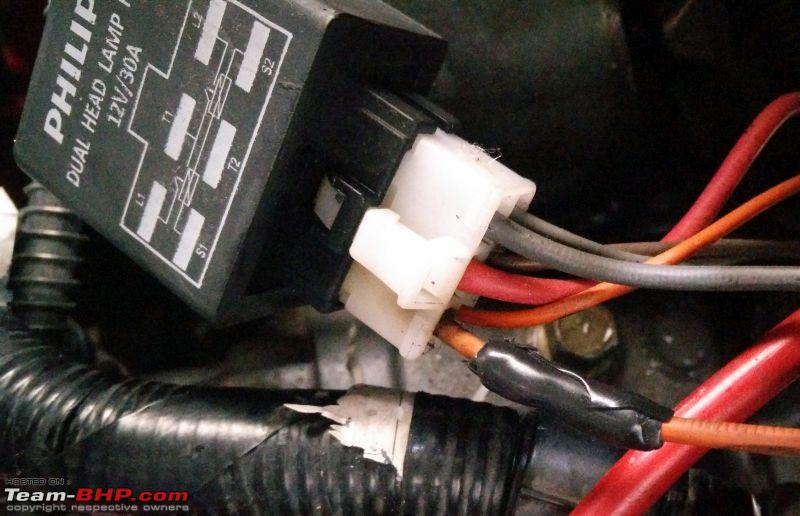 Made a cheap laptop charger which will be placed permanently in the car. Instead f making a box for it, I just reused the box it was shipped it 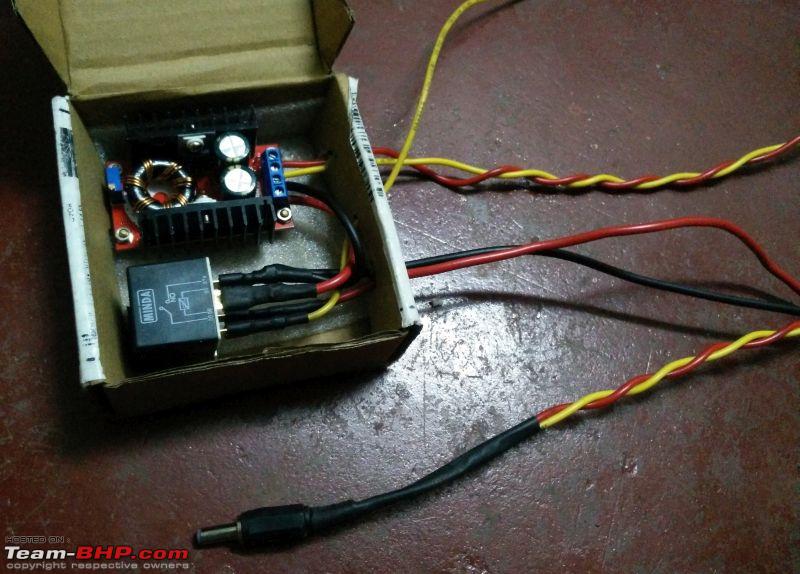 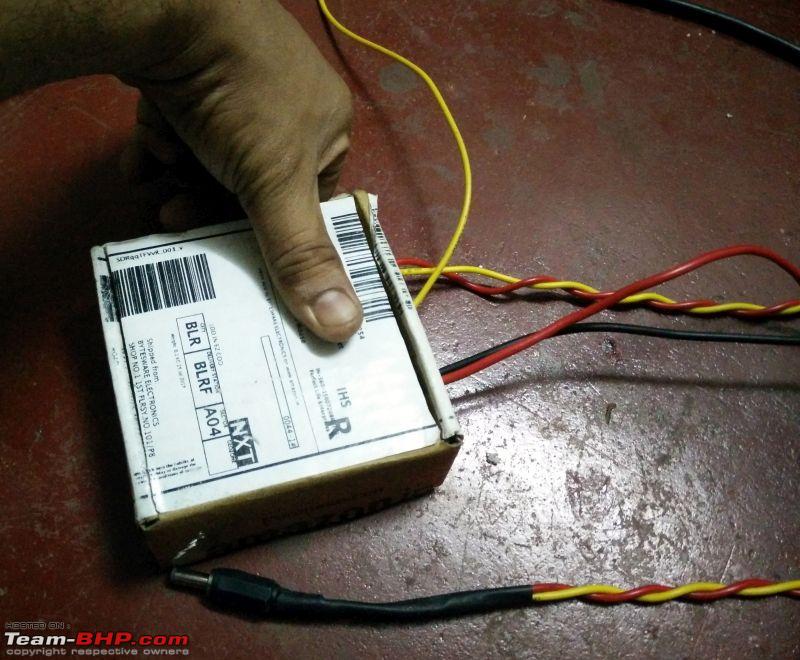 The short shifer was revised so that it was longer but the throw remained similar. Did it work? Obviously yes! 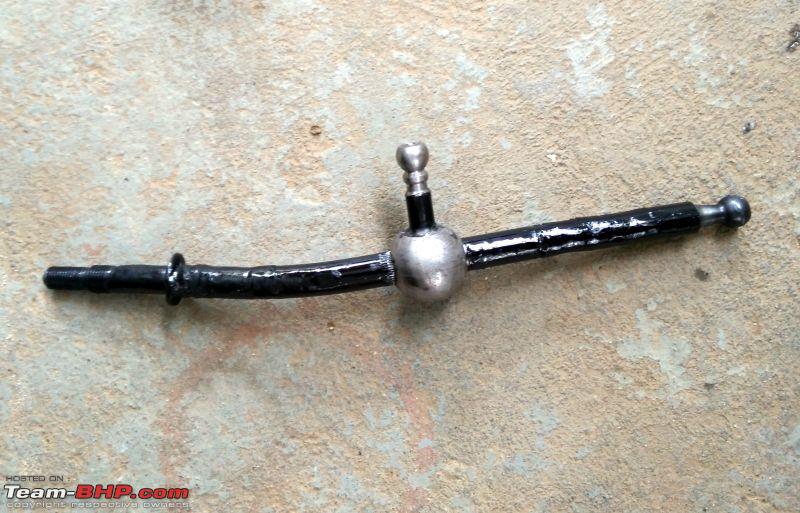 Quote:
 I used huge lugs which needed superhuman strength to crimp. You cannot even bend these with pliers and I dont have a vice to crimp them. Then how? 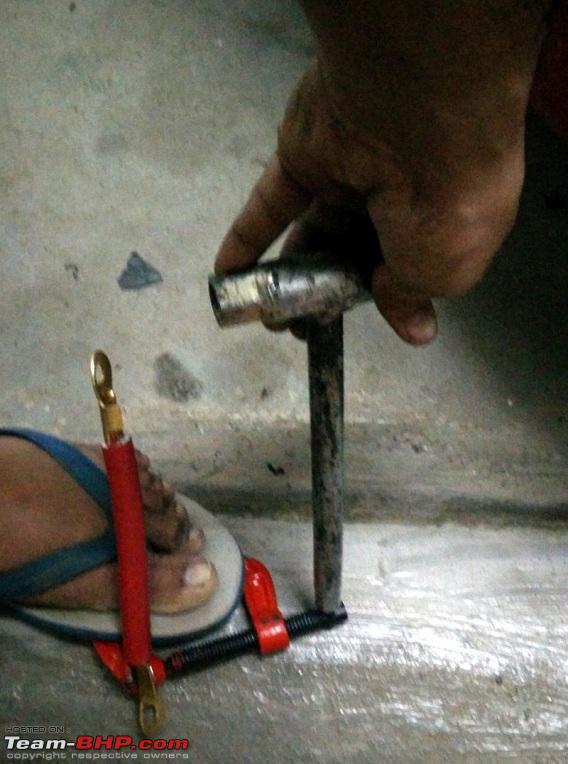 Out comes the C clamp! It needed some ingenuinity to crimp them and a huge amount of strength. Crimped..phew 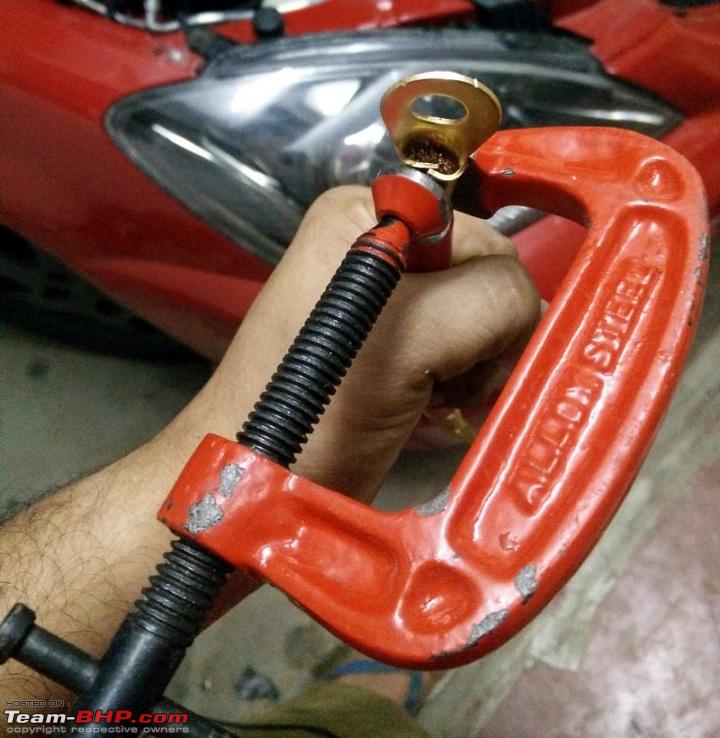 Both sides done  Ends filled with dielectric grease and taped up with silicone tape. All set to be installed into the car!  | |
|
| (8)
Thanks
|
| The following 8 BHPians Thank SunnyBoi for this useful post: | dailydriver, gpa, Klub Class, motorpsycho, R2D2, sumitsinha0280, vaasu, Varun_HexaGuy |
|
1st September 2017, 07:21
| #85 | |
| Senior - BHPian Join Date: Aug 2008 Location: Bangalore
Posts: 1,789
Thanked: 342 Times
| Re: Life with a Red Mitsubishi Cedia Quote:
Unrleated question - have you noticed a dulling of your headlight reflectors or the transparent plastic when using these bulbs? | |
|
| ()
Thanks
|
|
1st September 2017, 09:38
| #86 | |
| Senior - BHPian Join Date: Dec 2006 Location: Mysore / B'lore
Posts: 1,696
Thanked: 4,265 Times
| Re: Life with a Red Mitsubishi Cedia Quote:
Dulling of headlights when using 100/90 bulbs is very common. First symptoms will be a section of reflector looking grey and faded, as reported by many Figo/Aspire owners. Next will be dulling/greying/yellowing of the headlight lens (outside plastic cover) from the inside. It again depends on the quality of relectors. My Original Palio headights (AL, made in brazil) worked very well with 100W in both high and low beams. Newer reflectors fade much faster. More I look into my car, I see ore electrical issues, sigh. I use 16sqmm power cables, I'm sure this Blaupunkt amp was never designed to take in. No matter how tight I secure the wires, they keep slipping off like this one  I got few lugs which will fit into the slot for amp power. However they wouln't take the whole 16sqmm. Solution? SPlit it into two, crimp them separately  Used red silicon tape for positive and black for ground as insulation.  Dirty car, wash time! 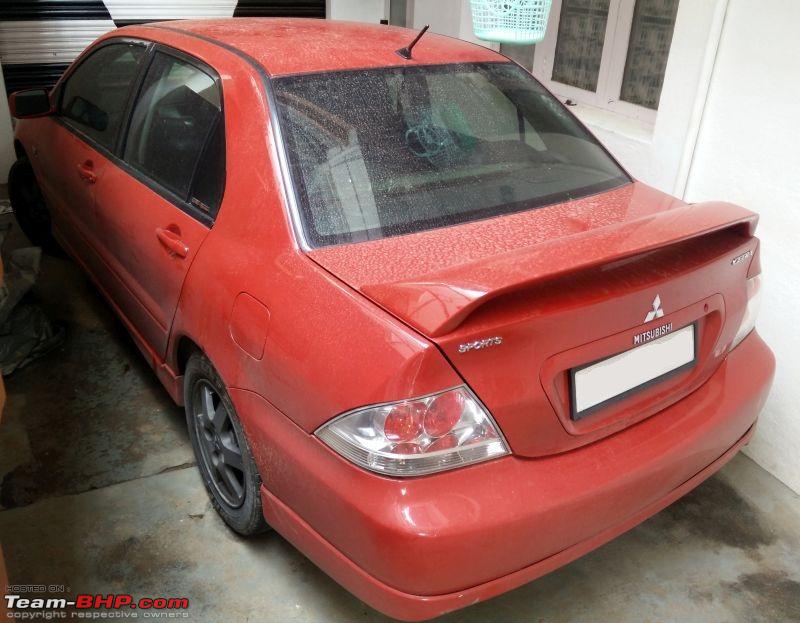 Finally decided to tackle the underhood insulation! Covered the engine with plastic, not because of damage but I did not want to spend extra time cleaning the engine bay again. 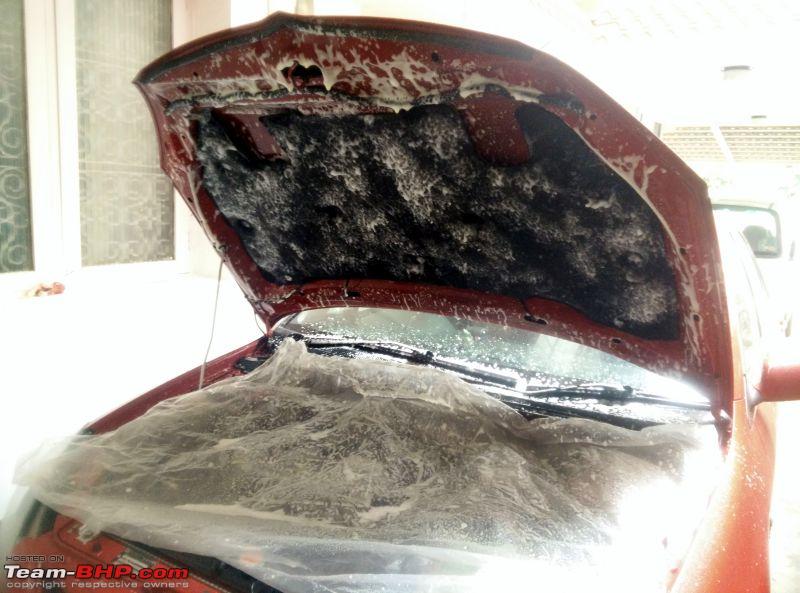 Spotted this critter on my car, trapped in a water drop. Weird part is it started moving and it buzzed off sometime later. 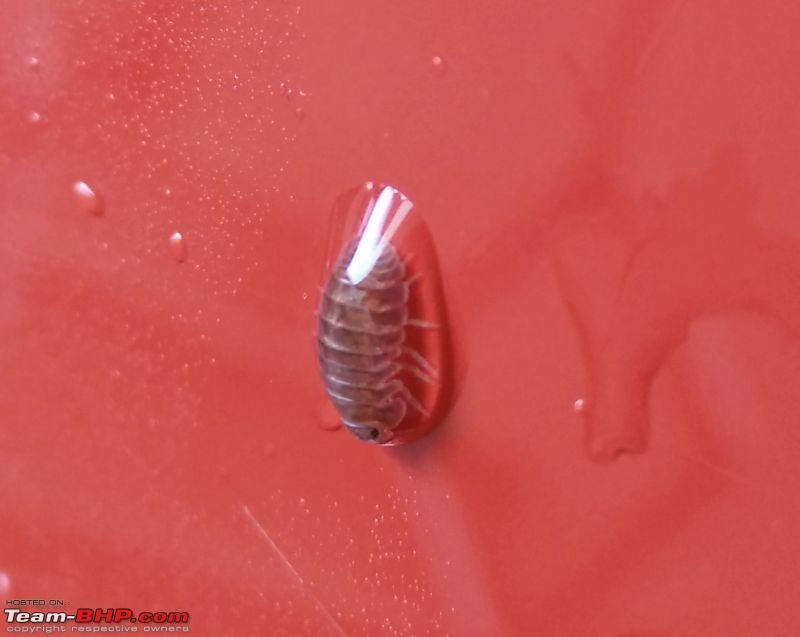 Looks red again. 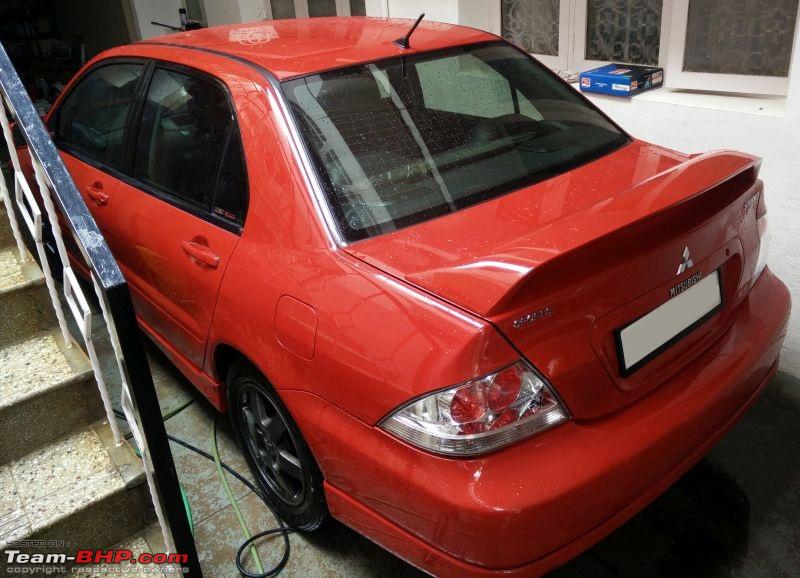 Next day, this is how the insulation looked post cleaning and drying. The white parts center rib portions is where the fluff has disappeared. 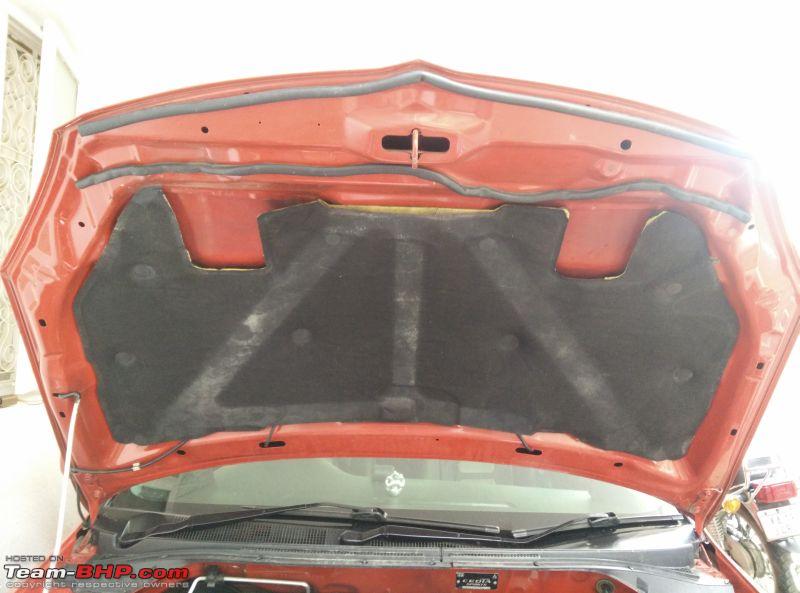 I took out my expensive can of fabric paint and gave the whole insulation a thorough paint job. Looks much better and lot blacker 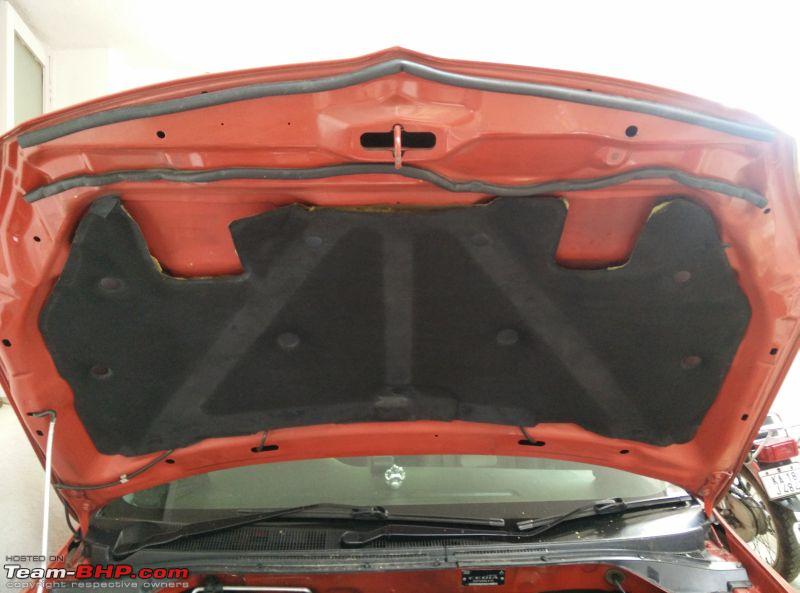 Engine bay - you can see now the hood insulation is so much blacker. I think I'm pretty much done with it, very few components left to clean. Sigh... 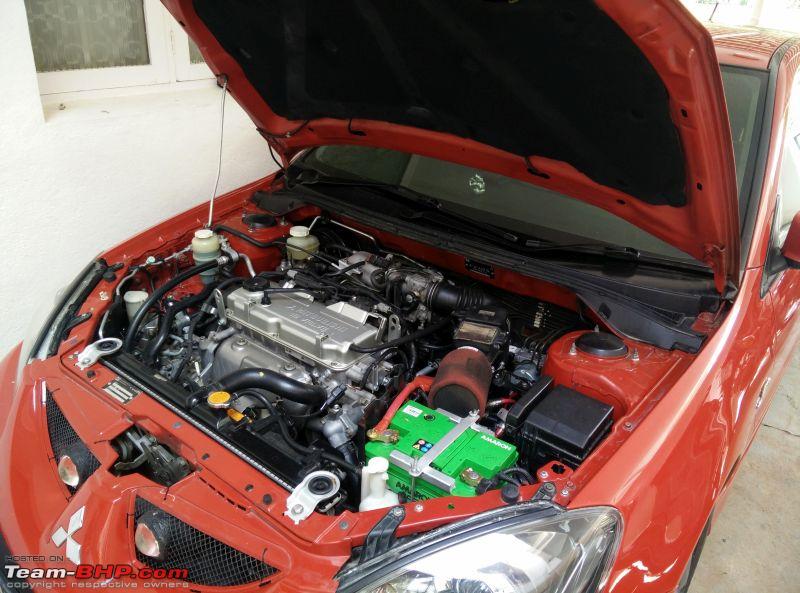 The gear shifter. I raised the height by 1 inch but the throws remain almost the same because of supporting mods. In hindsight, I should have raised it only by half an inch. Oh well..  | |
|
| (5)
Thanks
|
| The following 5 BHPians Thank SunnyBoi for this useful post: | DrANTO, gpa, Leoshashi, R2D2, Varun_HexaGuy |
| |
|
1st September 2017, 12:51
| #87 | |
| Distinguished - BHPian  Join Date: Oct 2008 Location: Pune
Posts: 3,237
Thanked: 5,782 Times
| Re: Life with a Red Mitsubishi Cedia Quote:
It is for this reason that I never recommend high wattage bulbs. Better to buy high output premium bulbs, for e.g. Philips Vision Plus, that are of the same or nearly the same wattage as OEM parts. Retro fitment of HIDs/LEDs is possible provided you can adjust the headlamps to cut the glare (say for e.g. via a projector) which can be dangerous to oncoming drivers. Some cars like the 10G Corolla Altis in the top end auto and manual trim come with OEM HIDs and automatic headlamp leveling. The same car with halogen bulbs has reflectors that look the same but have a different design. The idea is increased illumination without damaging any electrical parts or blinding oncoming traffic. | |
|
| (2)
Thanks
|
| The following 2 BHPians Thank R2D2 for this useful post: | gpa, SunnyBoi |
|
1st September 2017, 13:09
| #88 | |
| Senior - BHPian Join Date: Aug 2008 Location: Bangalore
Posts: 1,789
Thanked: 342 Times
| Re: Life with a Red Mitsubishi Cedia Quote:
 and apologies for going off topic. and apologies for going off topic.So far I have used only Philips Xtreme Vision bulbs on both my cars. However on a drive from BLR to Pune in the night with rain, I found the illumination to be lacking especially at speeds above 80 kmph and hence with another upcoming drive later this year I'm planning to switch to 90/100W setup with ceramic holders but I don't want the headlight lens or reflectors dulling and hence checked if it was a good idea to proceed. | |
|
| (1)
Thanks
|
| The following BHPian Thanks gpa for this useful post: | SunnyBoi |
|
1st September 2017, 13:15
| #89 | |
| Distinguished - BHPian Join Date: Oct 2008 Location: Pune
Posts: 3,237
Thanked: 5,782 Times
| Re: Life with a Red Mitsubishi Cedia Quote:
 again. again. It is not that reflectors and lenses discolor immediately. It takes time. So here's what I suggest. Buy ceramic holders, get your wiring changed to take the load of 100/90W bulbs. Use the setup temporarily for your BLR-PNQ trip and switch back to your Philips Xtreme Vision bulbs once you're done. Bulb swaps are an easy DIY task. In this way, you have extra illumination when you need it with a much lower risk of damaging the reflectors/lenses in the long term. | |
|
| (3)
Thanks
|
| The following 3 BHPians Thank R2D2 for this useful post: | gpa, Leoshashi, SunnyBoi |
|
3rd September 2017, 03:02
| #90 | |
| Senior - BHPian Join Date: Dec 2006 Location: Mysore / B'lore
Posts: 1,696
Thanked: 4,265 Times
| Re: Life with a Red Mitsubishi Cedia Interesting discussion happening above about lights! On the topic of lights, my tail lamp cluster had been acting up. Brake light wouldn't come on as well as reverse lamps. I first suspected the wiring for the tail lamp cluster because I saw lights come on momentarily when I was shaking the wires. Took out the wiring and removed all insulation. I soldered all butt connectors to rule out loose connections. Rigged up a test wiring harness and tested out all bulbs as well as the wires to see which wires upon shaking causedthe bukb to die. Here I found out my LED brake bulbs were bust - replaced them with incandescent ones for now. Whereas on the car, I was getting frustrated at not getting any voltage on the reverse light wire. There was no fuse in the manual to check as well. I decided to check all the fuses once anyway. While checking, I found one fuse blown - it was for low beam. Fuse number 19 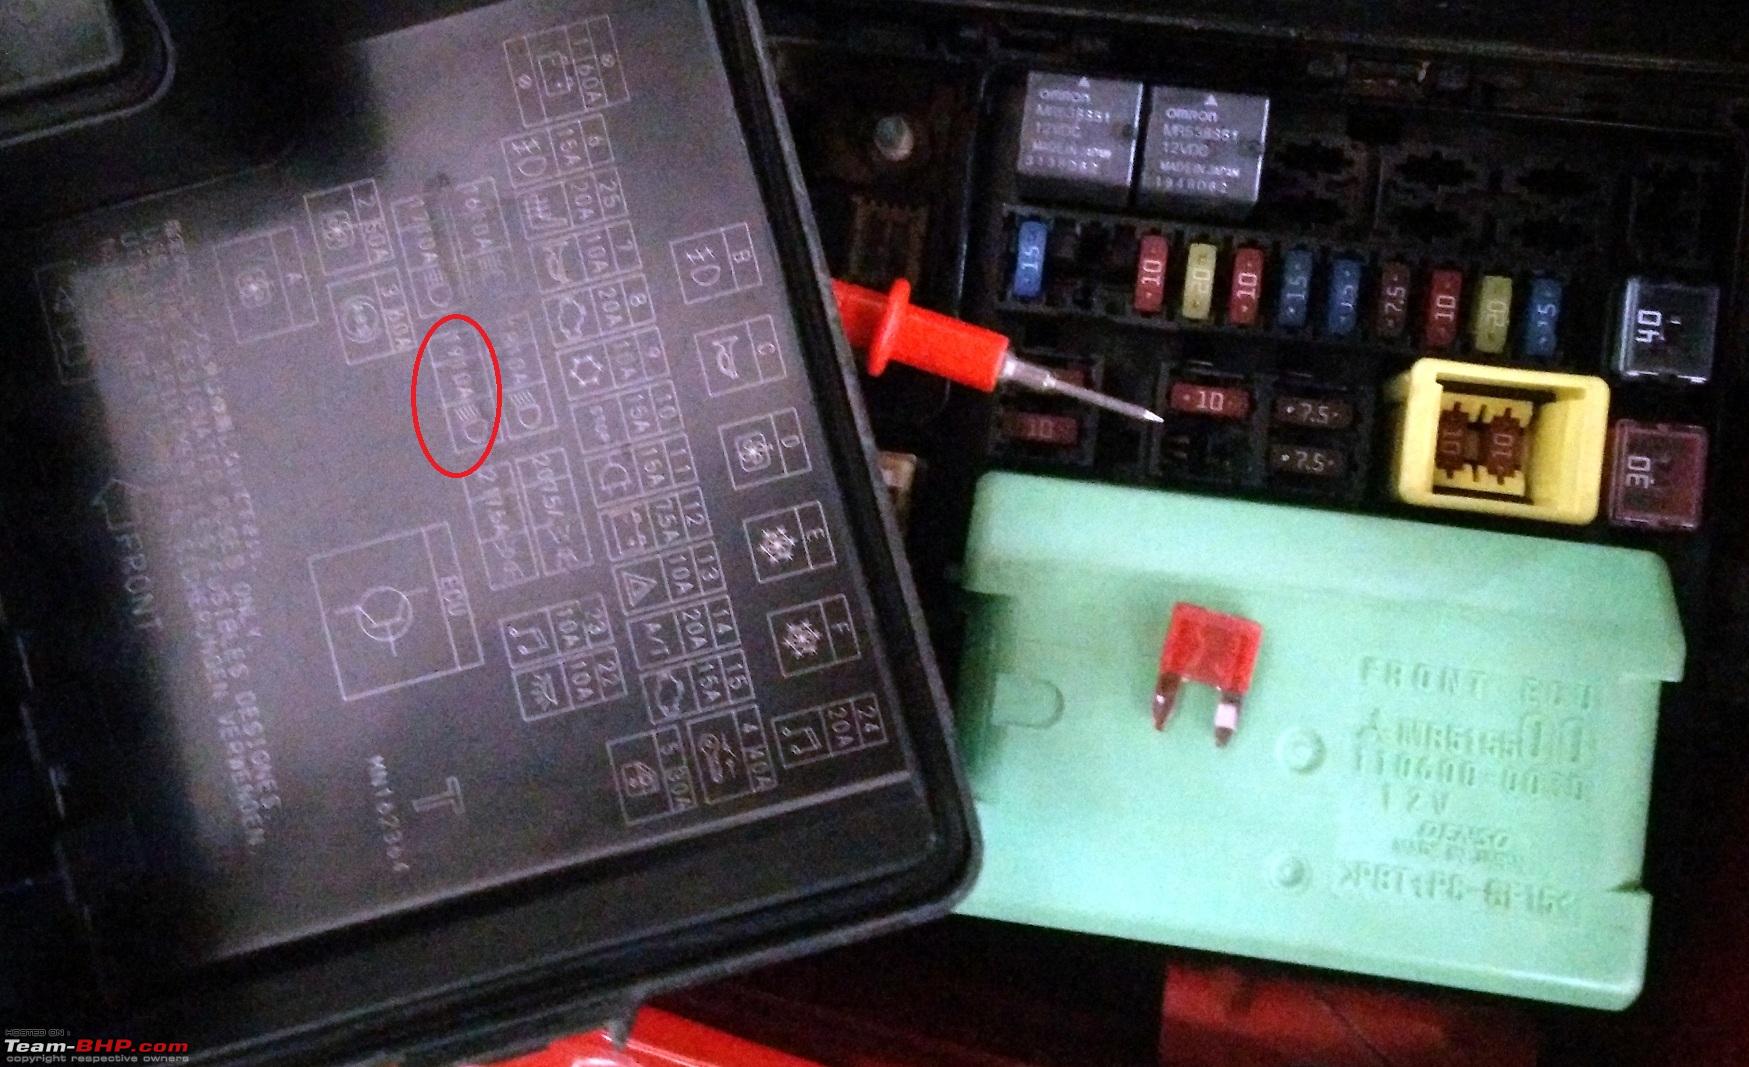 I then remembered about the wiring jugaad - Quote:
Replaced the fuse with a new 10A, turned on the key and headlight. I suddenly hear lot of whirring noise around the battery. I start panicking on what this noise might be and run back and turn off the key. I rememebred something then - Could this be the headlamp adjustment motor? Its been dead ever since I got the car, traced out all the wires and everything was intact - I even tested it with different motors and a new levelling switch! but no avail. Last time while diagnosing I had disconnected levelling motor on the driver side. I connected it back and turned on the ignition. I heard the same whirring noise but on the right side! I can not believe it!, the headlamp levelling motor is working!!! Woohoo! At this moment I did not know how or why changing that particular fuse, meant for a low beam headlight got the levelling motors working. More on this later. I took out my multimeter and checked for voltage across the cut and frayed wire - it is showing voltage! Woohoo! To celebrate the fact my car will now be electrically 100%, I decided to give the H4 connectors an upgrade - to new Ceramic holders! I had a few pairs left over from hacking Philips H4 wiring looms for projectors and used a pair on mine. Ceramic holder in! Connected to projector wiring harness. 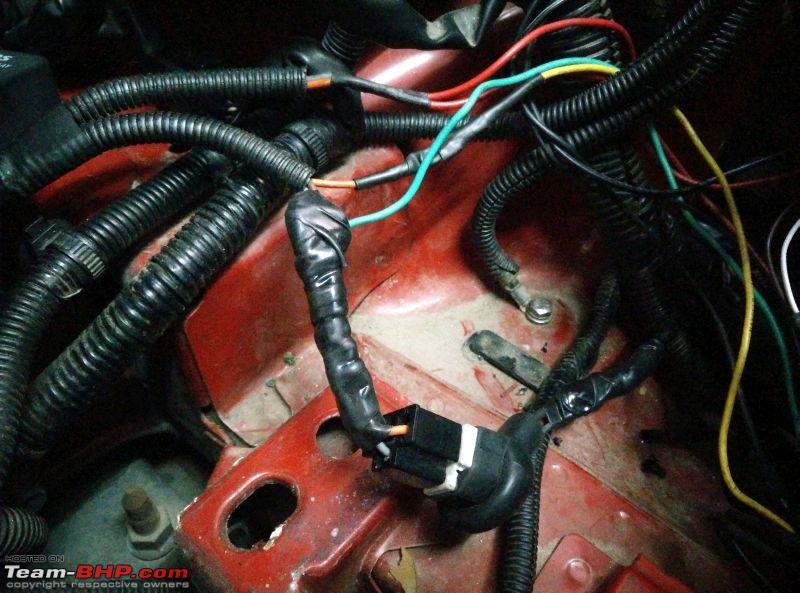 Driver side holder replaced as well, I taped it up with silicon tape tomake sure no water gets into it and causes any short circuits.  In the meanwhile - back to the original problem - non working reverse lights. The real reason why I wanted these lights to work was because I have a rear view camera I wanted to fix and the reverse lights need to work before I can put them in. After exhausting all fuse options, I decided to check the reverse switch on the gearbox with my test harness. I got zero continuity with reverse gear engaged - so the switch was dead. To make sure, I jumped the reverse switch pins on the wiring harness and you will not guess what happened next! 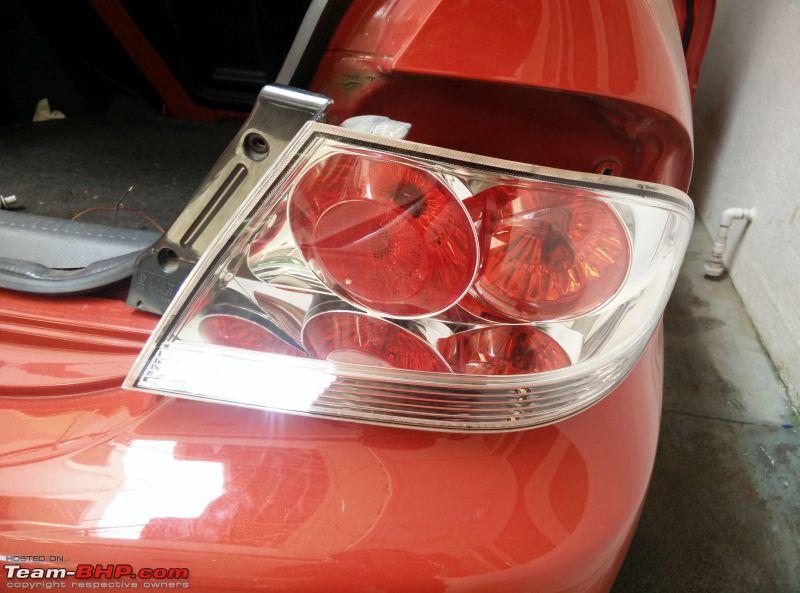 Oh yes the reverse lights are on! Which makes sure switch was the root cause of the lights not working. A good friend was sending me few goodies from USA and I thought I could order the switch to his place. I checked ASA and got the part number. Checked all Mitsubishi part vendors, few had stock but due to Hurricane Harvey everyone was quoting delivery dates of 2 weeks! I checked Autozone and sure enough one of the nearby stores had the part with them. My friend, Vas agreed to go and pick it up from them, which means I will have the switch with me within a week! Woohoo! He had sent this on whatsapp few days back :  Hell yeah! You da real MVP! Later, I revisted the headlamp levelling wiring diagram (PS : This is not there on any service manuals - I'd save this if I were you) and the first thing I notice was Fuse 19 on the diagram. WHAT?? The solution was in front of me all this time and I missed it!  This incident just shows the level of attention to detail required to do the right job. I have been ignoring simple tools such as fuses for so long, lesson well learnt. | |
|
| (6)
Thanks
|
| The following 6 BHPians Thank SunnyBoi for this useful post: | gpa, Klub Class, R2D2, reignofchaos, S_U_N, Varun_HexaGuy |
|