| |||||||
| Search Forums |
| Advanced Search |
| Go to Page... |
 |
| Search this Thread |  1,880,823 views |
| | #1096 |
| Senior - BHPian Join Date: Sep 2014 Location: Chennai
Posts: 5,072
Thanked: 9,318 Times
| re: VW Polo GT TDI ownership log EDIT: 9 years and 178,000 km later... Asking here as there are remarkably few GT TDI threads. A friend has a formerly bhpian owned one that's near the 60k mark. At the 60k service in VW Palace Cross Malleshwaram, the SA found worn out steering bushes on his own accord, rather than based on a reported issue, and is now laser focused on my friend buying an entire new steering assembly to fix this. Seems like prescribing a heart transplant to treat heartburn after a heavy meal but what do I know. Is there any good FNG near Koramangala / HSR in Bangalore that can provide a second opinion on this? |
| |  ()
Thanks ()
Thanks
|
| |
| | #1097 |
| Senior - BHPian | re: VW Polo GT TDI ownership log EDIT: 9 years and 178,000 km later... |
| |  (1)
Thanks (1)
Thanks
|
| The following BHPian Thanks Ramsagar for this useful post: | hserus |
| | #1098 | |
| Team-BHP Support  Join Date: Apr 2013 Location: Madras
Posts: 7,335
Thanked: 20,671 Times
| Update at 5+ years and 1,40,000 km: What’s up guys! Sorry for this delayed update. The car completed 5 years of ownership on the 7th of October last year. Here are some of the updates in no particular order.  2017 - 18: 30,108 km Save for the short drive to Belur/Hassan/Shravanabelagola during May and a drive to Mahabalipuram during Diwali, we couldn’t do any major trips owing to our tight work schedules. And as if that weren’t enough, the price of diesel shot up to Rs. 80 for a litre! That’s when I decided to switch to a more economical means of transport for visiting my hometown over the last 4 months – Indian Railways! Mechanically, the car is holding up well and continues to do its duty as a daily driver without any issues *knocks on the table*. The timing belt and the related parts + the accessory belt were replaced during the 1.2L km mark at the FNG. I am still holding on to the stock clutch assembly. It has become hard over time and gives a painful workout to the left knee; this is very evident when I return home in stop-and-go traffic. This isn’t a problem when I take her out in the highways though. Once the odo hits the 1.5L km mark, I intend to replace the clutch assembly. A friend Nikhil also pitched in that VW has reduced the prices of the clutch assembly. 5th anniversary: My parents were with me at Chennai during the occasion and we did the customary puja at our apartment complex after a wash and wipe the previous night:   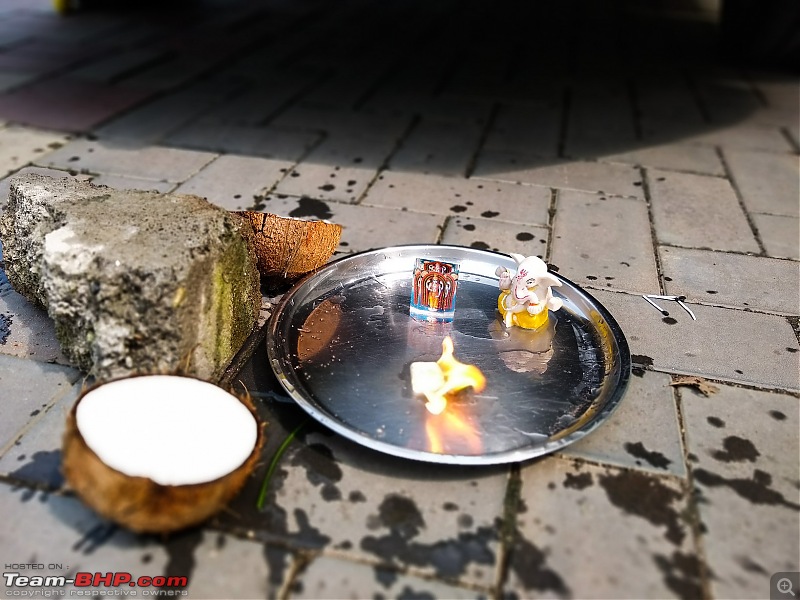 Here’s for another year! Praying and hoping that this will be a fuss-free year with at least 2-3 good road trips thrown in. Bosch Pressure Washer: I have been eyeing a pressure washer for some time now and it was going to be a Karcher or a Bosch. The Karcher ones were pricier and had fewer customer support centres but got good reviews from existing owners. The Bosch units were available from a cheaper price point, had a better customer support overall but there were mixed reviews about the entry level units. Both the camps invariably had disgruntled owners who have had issues with bad plastics, the built-in pump/motor giving up early on, broken and kinked hoses etc. After much research, I ended up getting a Bosch unit from Amazon last year – the Aquatak 125 along with the 6 m extension hose. 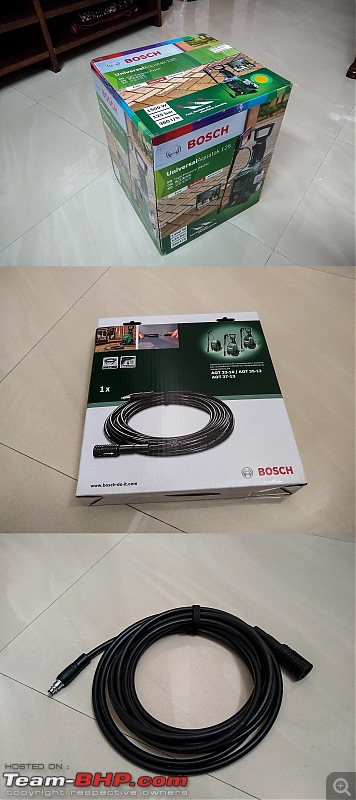  During the demo run, these were the results with Bosch’s bundled detergent nozzle:  Clearly, the purpose of the bundled detergent bottle was not to generate foam. And that’s when I read up on the MJJC’s foam lance and how it is popular amongst foam wash enthusiasts. Sourced one with the correct brass adapter from Aliexpress (choosing the right adapter for the pressure washer is important; it isn’t one type fits all).  And check these out, with the MJJC foam lance and the WaveX foam wash concentrate:  While most car wash solutions will foam to some extent, I bought a WaveX foam wash concentrate from Amazon. With a snow foam lance attached to a pressure washer, it produced a really thick foam with just two capfuls of the concentrate on the 1L MJJC bottle! I also ended up misplacing my Meguiars wash mitt when I had relocated from Gujarat and was relying on the cheaper mitts all this while. Chanced upon a ‘Crab All-Over Body Mitt’ in Amazon and sourced it. It works as good as the Meguiars mitt and is a whole lot cheaper but on the downside, it becomes really heavy once it is soaked in the solution.  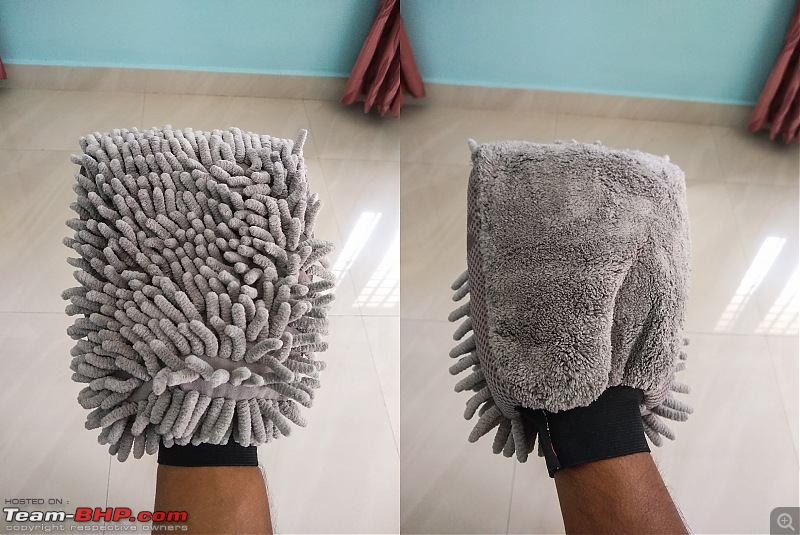 I was taken aback when I had noticed that not much foamy water has spread to the road outside our residential gate after I had washed it down with the pressure washer! Realised that the water consumed by the pressure washer is a lot less compared to using a garden hose. One thread that helped me immensely was Samfromindia's Review: Bosch AQT 35-12 Electric Pressure Washer. If you plan to get a pressure washer, do give it a read. D-BHPian Leoshashi also clarified a lot of doubts I had concerning the MJJC snow foam lance; especially, the adapter bits. The MJJC foam lance comes with difference sockets to fit the pressure washers available in the market. Thanks to both of you cats!  Mirror, mirror on the wall:   (The last detailing job was done over an year back!) There are a few things to keep in mind while using a pressure washer that I had learnt from various sources. I’ve listed them below: a. Never let the pressure washer run dry. The inlet hose must be connected to a water source which is turned on at all times or the bucket in which the hose is inserted, must be filled.Here's the break-up of the parts, their source links and the prices: Bosch Aquatak 125 – Amazon, Rs. 10,399 Bosch F016800361 6m Extension Hose – Amazon, Rs. 999 MJJC snow foam lance – Aliexpress, 22.9 USD WaveX FW1K foam wash concentrate (1 L) – Amazon, Rs. 442 Crab All-Over Body Mitt – Amazon, Rs. 290 A clean-up job: Beige upholstery = huge pain to maintain! I use a couple of thick, long Turkish towels to cover the front seats and a couple of them at the rear bench so they don’t get spoiled during the day-to-day usage. Especially since I drive to our shipyard often in the dirty overalls with other colleagues in tow. While cleaning the front seats were a little easier, the rear one was a big pain! The upholstery design made it even harder. Despite cleaning it on a few occasions, I’ve noticed some muck stuck in a corner. Folks with the cleanliness OCD would know that feeling! Luckily, dismantling the bench is easy and I decided to remove it and take it to my apartment so I can clean it at my pace over a weekend.  Armed with some microfiber towels, a discarded toothbrush and a diluted solution of Sonus AIO (all-in-one) in a spray bottle, I gave it a thorough clean. The Sonus AIO is an amazing degreaser and can get rid of the toughest muck from most places! Let the snaps speak:    I’ll perhaps do this activity maybe once in a year or so just to keep the upholstery and overall interiors look clean. The road tax refund saga: Quote:
Despite sending them an RTI and a follow-on inquiry, nothing yielded out of it. I requested Krishnamoorthy (some of you may recall him from my DIY experiences; we did a lot of DIYs together!) to visit the RTO and meet the concerned personnel. Turns out they were expecting the Palakkad RTO to send them a proof of road tax payment with a letter. But they did not communicate this part to me! Since I was at Chennai around that time, my dad met the Palakkad RTO officer and he requested that a letter be drafted and a copy of the proof of payment be attached with it. We sent it to Surat RTO through registered post. They received it a few days later, Krishnamoorthy went there a second time and met the person who handed him a slip of paper – Form “ET”. He was asked to hand it over to a counter at one of the SBI branches (SBI Nanpura branch). Well, good news and bad news! Good news - they refunded the entire amount I had paid (minus the tax)! = Bad news - they messed up the amount indicated in the words! Sigh! 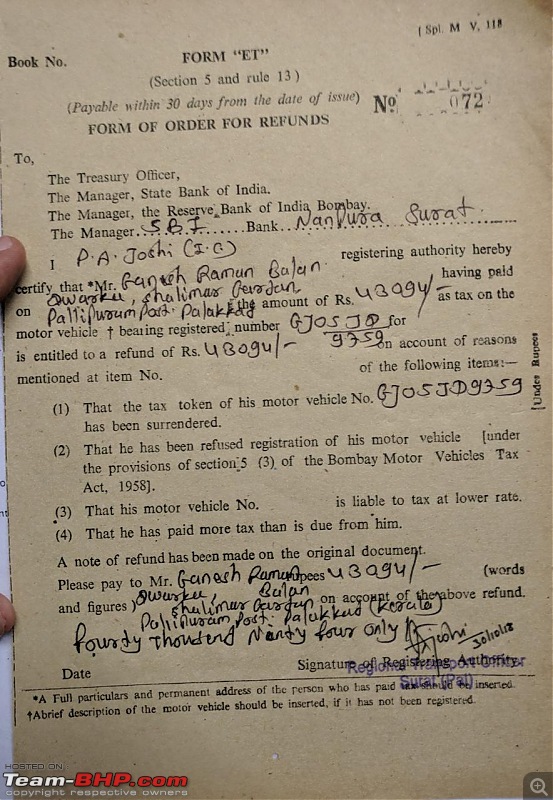 (Don’t miss the difference in the amount indicated in numbers and in words!) I spoke to the chap from the RTO and he requested Moorthy to go there with the slip. I must admit, Moorthy had tons of patience. If it were for somebody else, they would have given up by this time. Moorthy goes to the RTO after taking a break from work, the person hasn’t returned after lunch. Of course, how did we miss, this is a government organisation! He waits for over an hour and the wait is excruciating – this dude is nowhere to be seen! I give him a call and he says, his bike has been punctured and it is being attended to. Finally, he shows up. Moorthy hands him the slip and he writes a ‘three’ with an inverted caret. Moorthy promptly takes the form to the SBI branch with the cancelled cheque. The amount was deposited to my account within minutes. Insurance renewal: The insurance was renewed with United India Insurance at a premium of Rs. 17,898 along with a 50% NCB. I’ve stuck with United Insurance for the third time now after hearing reasonably good feedbacks from existing customers. As far as insurance claims goes, I guess it’s a case of choosing the lesser of the evils. Instrument illumination adjuster DIY: After a long time, I managed to fix that elusive instrument illumination adjuster which controls the brightness of the interior backlighting.  I had sourced the replacement adjuster unit circa March 2015 but never managed to install it all this while because I couldn’t figure out which were the relevant cables to be sliced and which one to be crimped from the connector to the fuse box. The wiring diagram was different from the car's harness. I did not pursue it further. This is the new switch: 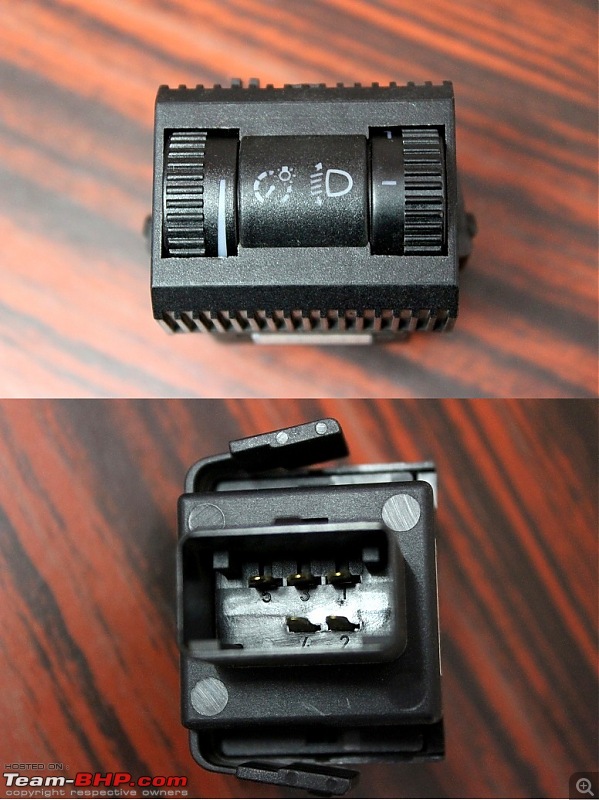 And this is the rear of the stock unit with the connector: 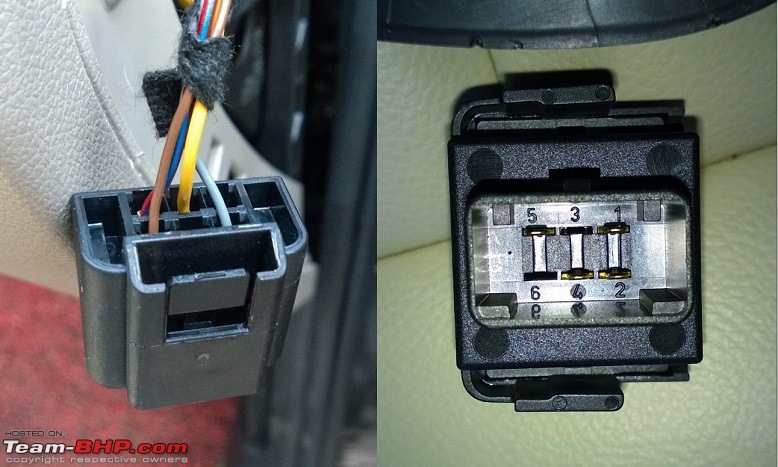 Much later, a member who goes by the ID patil in the uk-polos forum did it with the help of the ubiquitous ciclo and he had shared the detailed steps on that forum along with the snaps – here’s the link. In addition to a new adjuster unit, you’ll need either a repair wire (part no. 000 979 133) or a pin (part no. N 906 844 05) to connect the wire to the socket and the fuse box (SB7b).  Here’s a short clip that demonstrates its purpose: Very useful during the night drives to keep the interior illumination at the lowest brightness. The cluster throw’s a bright glare on the face. This one made a great deal of difference! Part number: 6Q0 941 333 Price: 15 USD Source: Aliexpress Another clean-up job: Had to do some odd clean-up jobs in the car like tidying up some loose cables and one of them was to replace a bunch of GND terminals (from the DIY jobs) screwed to the steering column which was looking very odd and ungainly (although this area was covered with the plastic trim):  Prepared a GND cable from a thick 10 AWG cable and crimped a ring terminal at one end and a butt crimp on the other:  Crimped the other end with the rest of the GND cables:  Haynes service manual: Ordered a copy of the Haynes owners workshop manual for the Polo 6R from eBay:  Man, this is just too detailed and gives a step-by-step account with illustrative pics of stripping down nearly the whole car! It is however limited to the Polo 6R models and the 1.2 MPI, 1.4 MPI, 1.2 TDI and 1.6 TDI engines. The 1.2 TSI, 1.4 TSI used in the previous gen. GTI and bi-fuel models aren’t covered and they’ve mentioned it on the front page explicitly. This might come in handy in the future. Luckily, I didn’t have to pay any duties and the book turned out to be cheaper compared to Amazon! Price: 14.95 GBP Source: eBay Replacement pedal set: The current set of pedals with the steel inserts have shown signs of wear and tear. The protruded rubber bits on the throttle has nearly flattened and the metal insert on the clutch pedal had come off. 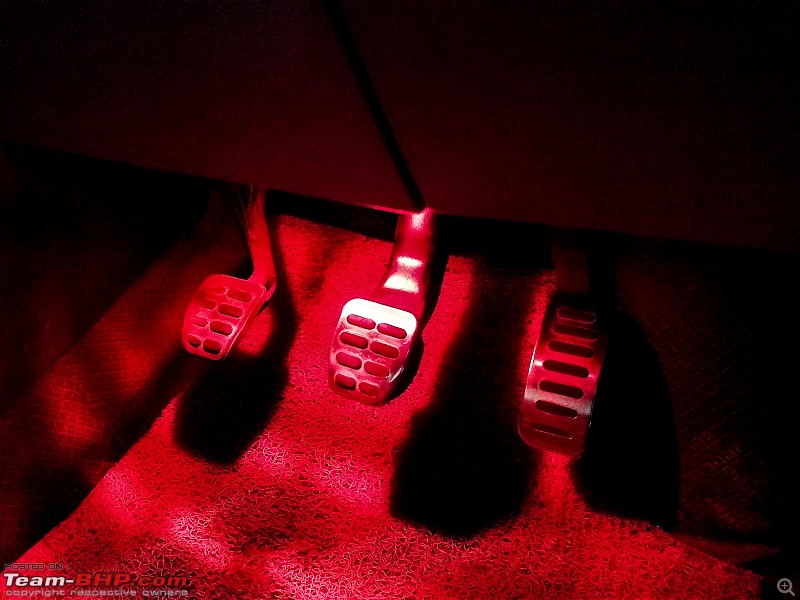 I really didn’t want to spend 35 Euros on the original OEM pedals so ended up ordering a set of replica 6C pedals from Alibhai for 1/6th of that price:  Based on the reviews shared on the product link, it isn’t a perfect fit but owners have managed to solve it using various fixes. I’ll give it a try and report back. Price: 6.88 USD Source: Aliexpress Front bumper lip: Sourced a roll of rubber lip for the front bumper some time back:  Also got the self-tapping screws and washers for fixing it to the bumper. Now if I can just find one thing – TIME! Price: 9.47 USD Source: Aliexpress Big brake upgrade kit: So I have an ex-colleague and a good friend Midhun who’s currently doing his post grad. in Belgium. And being in Europe is definitely a good thing for us enthusiasts! And he wanted to do a flying visit to attend a relative’s wedding at his hometown. He knew of my interests and was keen to carry along anything I wanted to order. Like quite literally, ANYTHING! I thought why not go for a big brake upgrade kit for the front wheels then? For a couple of days when the interests had piqued, I scoured through various sites that would deal with the parts for the Polo 6R and would ship to Belgium. Most European sites do and I even made a spreadsheet listing down all the things needed for the upgrade including the links. But wait-a-minute, I don’t go beyond 120 kmph on the 4 and 6 laned highways anyway nor is this car taken to the tracks. Then why am I exactly needing this upgrade?! I thought to myself and eventually dropped the plan. For anyone else planning to import a BBU kit, do have a look at this sheet – Front BBU Kit.xlsx. I have indicated the links as well. Works out cheaper than eBay – guaranteed!  Meeting a new ally: Over the last few years, Faizal – a friend with whom I’d only interacted on WhatsApp and calls, have been trying to arrange a meet with our rides whenever I was at Palakkad. He belongs to Pattambi (approx. an hour from Palakkad) and works in the UAE. During my last visit, he drove down to my place in his GT TSI with his son (unfortunately I didn’t have my car with me). He has driven to a lot of places in the GT including Ladakh all the way from Palakkad! It was a short and sweet meet and we spoke about the cars, some modifications, the life in Dubai, getting a license there etc. In the end, I took the baby TSI for a spin in the 4-laned Palakkad-Coimbatore highway. Amazing guy and amazing car! A Polo TDI with the DSG will be a match made in heaven I thought. A snap before he departed:  Stock BCM finds a new home! I have amassed a whole lot of spares when the stock parts were replaced with the upgraded variants. They are all neatly stored in a cupboard back at my home in Palakkad. A BHPian sadnabrina pinged me some time back when his 1.6 MPI Polo was behaving erratically – when he turns off the ignition with the headlight switch in ON position, the wipers start working! Even after removing the key and locking the car. This was very strange! The VW service center suspected an issue with the BCM and I shipped my stock BCM to him so he can swap and check if it resolves the issue. The swap worked! I am glad it worked for him and for a change, the VW technicians were right about the diagnosis! For those who’re wondering, nope, the BCM wasn’t a giveaway! Unfortunately, the Mangalore trip didn’t work out as planned. The ship wasn’t available at the New Mangalore port as it had to tend to the rescue ops after the Kerala floods’ at Cochin. The monsoons were in full swing and the roads were also getting patched up around that time with landslides being a frequent occurrence. So the trip had to be called off. Maybe another day! So that’s all for this update. The odo is a wee bit short of 1,45,000 km as of today. Until next time… Last edited by Gannu_1 : 14th March 2019 at 12:27. Reason: Grammar. | |
| |  (43)
Thanks (43)
Thanks
|
| The following 43 BHPians Thank Gannu_1 for this useful post: | anshumandun, benbsb29, BigBrad, coolmind, dailydriver, Dr.Naren, DrANTO, driving_smartly, E = mc˛, GTO, Highway_Nation, hmansari, InControl, JoseVijay, Keynote, ksameer1234, Leoshashi, naveenroy, paragsachania, planet_rocker, PM - B, PraNeel, R2D2, Rahulkool, rakesh_r, Red Liner, sainyamk95, Skyline_GT, Sophomore, sri2012, sukiwa, Surprise, Thad E Ginathom, Thermodynamics, The_Outsider!, Torque_Curve, V.Narayan, VaibhaoT, Varun_HexaGuy, Vik0728, vishy76, VivekCherian, VTec_KickedInYo |
| | #1099 |
| Distinguished - BHPian  Join Date: Aug 2014 Location: Delhi-NCR
Posts: 4,326
Thanked: 72,261 Times
| re: VW Polo GT TDI ownership log EDIT: 9 years and 178,000 km later... ^^^^^ Gannu_1, that you dearly love your car is apparent in every post. Congratulations on your ownership and first love. I hope your second love is coping well with your first one.  I just loved that photo of the left side where your bungalow's tiles etc are reflecting so realistically on the car door. By the way if that is your father doing the puja then you need to know he is a lot younger than me. Its Uncle-ji from now on mate.  |
| |  (12)
Thanks (12)
Thanks
|
| The following 12 BHPians Thank V.Narayan for this useful post: | anshumandun, DrANTO, Gannu_1, Highh5, JoseVijay, Leoshashi, Mukund, rahulskumar, Thad E Ginathom, The_Outsider!, Turbohead, Varun_HexaGuy |
| | #1100 |
| Senior - BHPian Join Date: Jul 2015 Location: Chennai
Posts: 1,421
Thanked: 6,097 Times
| re: VW Polo GT TDI ownership log EDIT: 9 years and 178,000 km later... Amazing stuff Gannu! You're one passionate owner!  I wanted to know how the Bilstein B6 are holding on. Since they are stiffer than stock, do you feel they're a pain to drive in the city? I'm looking forward to install something stiffer in order to reduce the bobbing on highway trips but wanted to know how it feels after the honeymoon period. Looking at Sachs, Monroe and TRW mostly as Bilstein's are quite expensive! |
| |  (1)
Thanks (1)
Thanks
|
| The following BHPian Thanks Turbohead for this useful post: | Gannu_1 |
| | #1101 | |
| BHPian Join Date: Jul 2013 Location: MH 04
Posts: 433
Thanked: 1,346 Times
| re: VW Polo GT TDI ownership log EDIT: 9 years and 178,000 km later... Quote:
Hope this helps. | |
| |  (1)
Thanks (1)
Thanks
|
| The following BHPian Thanks TheLizardKing for this useful post: | The Flash |
| | #1102 |
| Distinguished - BHPian  Join Date: Jun 2007 Location: Chennai
Posts: 11,431
Thanked: 29,962 Times
| re: VW Polo GT TDI ownership log EDIT: 9 years and 178,000 km later... At one time, anybody buying a second-hand car of anything more than a few years of age, in GB, would next buy the Haynes manual for that car. Haynes is my father's family name: sadly, I am not related to the company. |
| |  (3)
Thanks (3)
Thanks
|
| The following 3 BHPians Thank Thad E Ginathom for this useful post: | Gannu_1, samaspire, VivekCherian |
| | #1103 | |
| BHPian Join Date: Sep 2018 Location: Namma Bengaluru
Posts: 34
Thanked: 35 Times
| re: VW Polo GT TDI ownership log EDIT: 9 years and 178,000 km later... Quote:
May be the units are different. Mine makes a beep sound when trying to mod. Doesn't flash indicator lights as mentioned in the PDF. | |
| |  ()
Thanks ()
Thanks
|
| | #1104 |
| BHPian Join Date: Jul 2013 Location: MH 04
Posts: 433
Thanked: 1,346 Times
| re: VW Polo GT TDI ownership log EDIT: 9 years and 178,000 km later...
I am pretty sure that is the case. That unit is available from a number of sellers, and I am sure the configuration options are not the same. Have you tried reaching out to the seller on AliExpress? Most of them are quite responsive and cooperative. Good luck. |
| |  ()
Thanks ()
Thanks
|
| | #1105 |
| Newbie Join Date: Mar 2018 Location: Kolkata
Posts: 22
Thanked: 51 Times
| re: VW Polo GT TDI ownership log EDIT: 9 years and 178,000 km later... Congratulations. Wish you many more happy miles in your polo. I have recently upgraded to Michelin Xm2 195/60 R15 in my ameo tdi(polo gt tdi with a boot, atleast i love to believe so) at 21500 kms from stock good years for better ride, handling and reliability. I'm confused with the tyre pressure, since you too have the same specs, how much do you maintain in your car? |
| |  (1)
Thanks (1)
Thanks
|
| The following BHPian Thanks Highway_Nation for this useful post: | Gannu_1 |
| | #1106 | |
| Distinguished - BHPian  Join Date: Jun 2007 Location: Chennai
Posts: 11,431
Thanked: 29,962 Times
| re: VW Polo GT TDI ownership log EDIT: 9 years and 178,000 km later... If I may contribute an answer... Quote:
Because I remember the number, I've forgotten where the sticker is! I seem to remember most cars having this in the driver's-door frame --- but I think it is inside the fuel-filler flap. Last edited by Thad E Ginathom : 6th February 2019 at 00:17. | |
| |  (3)
Thanks (3)
Thanks
|
| The following 3 BHPians Thank Thad E Ginathom for this useful post: | Gannu_1, hemanth.anand, Highway_Nation |
| |
| | #1107 | |
| BHPian Join Date: Feb 2018 Location: Hyderabad
Posts: 260
Thanked: 311 Times
| re: VW Polo GT TDI ownership log EDIT: 9 years and 178,000 km later... Quote:
Congrats on getting the resolution of road tax issue. I need a help. I was searching for such manual for Grand I10 on ebay but failed to. Can you please help me with that?  | |
| |  ()
Thanks ()
Thanks
|
| | #1108 | ||||||||
| Team-BHP Support  Join Date: Apr 2013 Location: Madras
Posts: 7,335
Thanked: 20,671 Times
| re: VW Polo GT TDI ownership log EDIT: 9 years and 178,000 km later... Quote:
The rubber based brake lines and clutch lines will have to be replaced once they start becoming brittle due to the intense heat inside the engine bay and age. A small kink in these lines would give way to a bad rupture! More than the mileage, I think you should get them checked from a good garage and replace them once they start becoming brittle and you start noticing several tiny lines like these:  (Pic source: MVS) Braided lines are a good alternative although I am not sure how expensive they are compared to the stock replacements. You can get them crimped at the ends based on whatever lengths you want. The shops have a tool to get this done. Check these out. Have a couple of friends who have leads with the local service centers. I get the parts through them. Quote:
I showed the response to my wife and she had an evil grin! I wonder what that meant. Nevermind.  Quote:
 Quote:
Quote:
It's indeed inside the fuel-filler flap. Quote:
 You can ask your service advisor for Hyundai's own service manual for the Grand i10. There will be a part number associated with it. | ||||||||
| |  (5)
Thanks (5)
Thanks
|
| The following 5 BHPians Thank Gannu_1 for this useful post: | coolmind, JoseVijay, Leoshashi, The_Outsider!, Turbohead |
| | #1109 |
| Senior - BHPian Join Date: Feb 2005 Location: Chennai
Posts: 2,529
Thanked: 462 Times
| re: VW Polo GT TDI ownership log EDIT: 9 years and 178,000 km later...
How much did they charged for transporting through cargo? I guess the weight would be somewhere around 20 kgs |
| |  ()
Thanks ()
Thanks
|
| | #1110 |
| Team-BHP Support  Join Date: Apr 2013 Location: Madras
Posts: 7,335
Thanked: 20,671 Times
| re: VW Polo GT TDI ownership log EDIT: 9 years and 178,000 km later... No news is good news. Crossed 150,000 km during our return drive from Palakkad to Madras yesterday:  (In case you're wondering, nope, the CEL isn't on! The car was in ACC mode when the snap was clicked.) Completed the routine oil change service at home during the weekend. Not much to report otherwise. I'll post an update shortly. Last edited by Gannu_1 : 12th May 2019 at 17:31. |
| |  (16)
Thanks (16)
Thanks
|
| The following 16 BHPians Thank Gannu_1 for this useful post: | anb, arun_josie, DrANTO, ike, JoseVijay, ksameer1234, Leoshashi, paragsachania, rakesh_r, rejeen, samaspire, Sheel, Thad E Ginathom, The_Outsider!, Varun_HexaGuy, Vik0728 |
 |


