| |||||||

| Search Forums |
| Advanced Search |
| Go to Page... |
 |
| Search this Thread |  19,929 views |
 31st May 2023, 16:15
| #1 |
| BHPian Join Date: Mar 2017 Location: Kolkata
Posts: 556
Thanked: 2,004 Times
| Cheap but effective DIY WiFi Mesh Setup for my home Cheap but effective DIY WiFi Mesh Setup for my home Before I start, I need to write few basics about this term Mesh. Most of us are already familiar with this term "mesh". But those who aren't, for them is this first paragraph. Others can skip it to the next one. What is Mesh in simple terms? WiFi routers have limited range. If you live in a single floor apartment with less than 1200-1500sqft floor area, placing any WiFi router in middle of the house will get you covered. You will have proper signal and internet all around. However, those who have larger home or multi storied house, no matter where you place your router, there will always be some spots where signal is too weak for a stable / workable connection or completely absent. So obviously you need to place a second WiFi Router or a device called range extender to boost the signal and make sure that area is cover too. But with traditional range extender / repeater or another router, you get a separate WiFi SSID (Name). Certainly, you can manually edit that or in many range extender or repeater use the same SSID as the main router but technically your phone or laptop or any WiFi client will treat that as a separate WiFi and connection will drop or you may manually need to switch between them. Basically, there will be an interruption so video calls, downloads, streams, VoWiFi calls and such will drop when this switching happens  Here comes this Mesh thing. Where, these mesh range extender or repeaters will not only use same WiFi name and Password but also allow your client device to roam between multiple WiFi Access Points without dropping the connection. Just like what happens with Mobile Phone networks.  Why DIY Route, when easy to use mesh products are available widely? Technically speaking, Mesh is 802.11s protocol. Any router or access point with this hardware feature is capable of Mesh Networking but (most) Network Product manufacturers are playing a dirty game with their software (firmware) where they limit their product from getting mesh networked with other company products. Things have turned so ugly that at present, even same company manufactured two devices can't mesh with each other. Even though their hardware fully supports it but software won't allow that. You must purchase same product line up for your mesh to work. A blatant attempt to force create an Eco System out of open to use protocol. So the first reason is ideological. And second is cost. Ready to use mesh products are costly and their future is uncertain since companies are discontinuing support for older hardware at a rapid pace. Even though the hardware is capable of meshing with their newer stuff but from software, its made useless. Mesh vs Roaming - 802.11s vs 802.11r Technically speaking, mesh is roaming but roaming itself has other protocols with better advantage too. 802.11s, which is widely called mesh works in this below mentioned way, Primary Router -> (Backhaul WiFi) -> Mesh Point AP -> (WiFi) Client. Connection between Primary router and your range extender or secondary access points are wireless. It gives you a huge advantage since you can place those range extenders anywhere within the coverage of the previous access point and get the signal extended. But this advantage turns into a big drawback with our present Fiber to Home high speed connections. Since the backhaul between router and extender is WiFi, inherently it is unstable and heavily depends on the placement location & other networks occupying the channels (interference). Cheaper mesh products use the same 5GHz and even falls back to 2.4Ghz when distance between two nodes are too far for their backhaul connection. So in this case, although your client device has a strong WiFi signal but actual network speed becomes slow since that extender to primary router connection is slow and unstable. More expensive ready to use mesh products use a separate 3rd WiFi (6Ghz or higher) channel for their backhaul but the inherit issue of radio wave interruption stays. Here comes even more costly and super expensive enterprise grade solutions. They use 802.11r / 802.11k or 802.11v type protocols. Here the nodes (access points) are connected to each other with LAN cable. So the backhaul connection between primary router and extender is super stable and gigabit or higher speed (depending on model). Practical application is same like mesh, where client devices are freely roaming between multiple access points (like your range extender and router) without dropping the running connection but technically it is called "Fast Roaming" So this "Fast Roaming" thing is enterprise grade, way more stable and much faster than "Mesh" but it is super expensive when you look at the ready to use, off the counter products. OpenWRT / DD-WRT As you can see by now both these fast roaming or mesh is combination of hardware and software ability of the router and extender or access points. The underlying hardware technology or protocols are open and free to use by all but the trick these manufactures are playing is with their software. This where OpenWRT or DD-WRT comes into the picture. Both are Linux based software. In simple terms, operating system for your routers. Just like you can install a Linux OS in your Windows based computer, you can also do similar with your routers. The catch is minimum system requirements. Not all routers or network hardware is having the needed RAM or internal storage for OpenWRT or DD-WRT installation. Secondly, not all installation is simply click and done type job, you may need to run few lines of commands to flash the firmware. Lastly, this flashing stuff will definitely void your product warranty. But once a device is running one of these two firmware, you can use the full capabilities, no more restrictions. Two different brand or even generation of products can mesh with each other and so on. Finding the right deal for the right hardware Both OpenWRT and DD-WRT community maintains a comprehensive list of products that are supported with their firmware and if any limitation or such with a certain product. So it is not that difficult to find the right product. Both expensive and lower tier models are there. It's completely on individual to plan and select as per his or her need and network setup. WiFi 6 or WiFi 6E isn't yet a thing in India so those products are very costly at present. Although prices are coming down but since I am in need of multiple routers for this mesh setup and looking at my Internet speed (250mbps) and client devices, WiFi 5 feels the sweet spot. TP-Link C6 or A6 is something I see OpenWRT community is using widely at this price point. However, while I was searching, one deal in our mega online sale events caught my eye. Xiaomi Mi Router 4A Gigabit Edition with exchange offer on any old router. I had bunch of old single antenna (some with issues too) routers lying around. So ordered 4 of them at Rs. 799/- each with exchange. 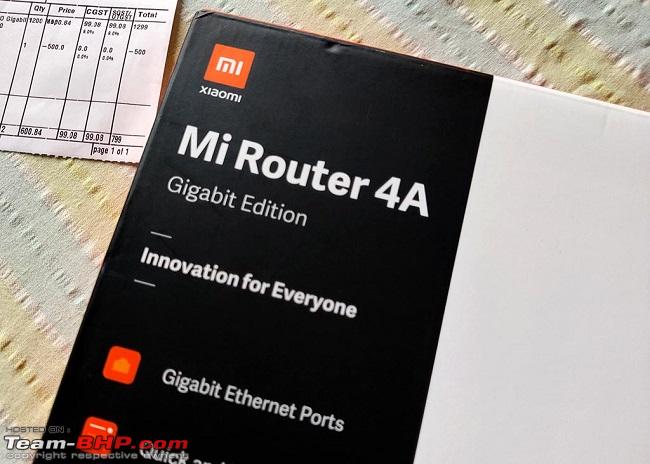 WiFi 5 / Mu-MiMo / Gigabit WAN and LAN / 4 (5dBi) Antenna / Slick Look however missing out on few things, like only 2 LAN ports, no wall hanging hooks and crucially, no out of the box Mesh or such support mentioned by the company. However, what I could see from the product hardware choice, it does have hardware supporting above mentioned protocols and the Xiaomi default firmware itself is based on OpenWRT code with their own UI (Skin) on top. OpenWRT website have their ready to use firmware and mentions full compatibility with the given hardware. Scary part -> The flashing process It sounds scary, looks scary and is actually very scary thing to do. I had not one but 4 devices which I needed to flash. First one was indeed scary thing to do but once I was done with that, rest felt so easy. Fear was only on the first attempt of screwing things up but process is well documented so didn't face any trouble. Basically, you need following things,
 Not to bore you with things, but its just copy pasting few commands to first install python on that VM then using GitHub project OpenWRT invasion for getting root access and finally using FileZilla to upload the firmware into the router storage then running a command from router root user to flash the firmware.  Setting up the Mesh or why not that Fast Roaming? All these command and scary stuff is only for the flashing process, once the routers have OpenWRT installed, you get a nice and easy to use Web UI control panel. OpenWRT is a highly modular software. Routers have very limited onboard storage so you can't have a full blown firmware in that. So by default, the firmware comes with the bare minimum stuff. You can use their package manager from their web UI to install or remove needed packages. At this point, I had everything ready for mesh setup but while searching in the package manager, I saw the "wpad" full package was supported & available for this router. Installed that and saw 802.11R / K and V support was there.  Now I planned above placement for my setup. Its not to the scale. Actual distance between this edge to edge placement is bit too far along with multiple walls in between. Lastly, Fast Roaming is in anyway far better and robust than Consumer grade WiFi backhaul based Mesh network. So I decided to proceed with Fast Roaming setup. Bought a roll of CAT-6A cable and hired an electrician to pull it out from Router room and then run the cable via outside of the house all the way to both the AP location and then get it inside for termination. I also had to buy a pack of RJ45 jacks & a punching tool (both are dead cheap) for those cable termination. Software Setup OpenWRT has nice Web base GUI control panel called LUCI. Just like you would see in any other router. But its full of options and terms that consumer grade router software eliminates. Thankfully, default values are good enough, one doesn't need to touch anything except what is needed for the job. In my case, first are the routers which I plan to use as Access Point only. Many consumer grade routers allow you to change their operational mode from router to access point with single click, here it is the same but you need to do it manually. List of tasks,
Three routers are now dumb Access Point, further, instead of 2 LAN Ports, all the back ports are now LAN switch Port. For the primary router,
Above is just as easy as with any other router, now for the roaming stuff, under each WiFi configuration settings advance tab, following extra needed to be done, 802.11r Fast Transition -> Enable Mobility Domain -> Any 4 character hexadecimal value FT Protocol -> Over the Air Generate PKM Locally -> Enable  For the other Access Points, same exact WiFi settings. Just duplication of what I have done for the primary router WiFi. Same exact SSIDs / Password and that hexa key. One can keep the auto channel section mode to allow the access point or router to select the best available channel, it works but I have gone manual here and selected different channels for each AP and router. I feel this way performance is better and roaming is smoother. Performance? All though I purchased 4 routers but ended up using only 3 as that felt sufficient to cover the entire house. Solid 300+ mbits WiFi 5 speed all around as tested with iPerf  Seamless roaming is achieved as connection will go little slow when approaching another AP signal zone and speed picks up again without dropping a single ping or iPerf hope once it roams into that new AP. All the smart home wireless devices can easily move anywhere without needing any configuration change. All APs are also a managed Gigabit switch now so I am using them for wired Gigabit LAN usage at those rooms where APs are placed. 2 usable LAN ports are available in each. Setup is extremely stable. Never needed a reboot (unless some unfortunate incident of power failure or accidental turn offs)  OpenWRT gives that enterprise level router features (given the hardware supports that off course). Name something, think of something and there is a package available for that. Updates are easy to install via the web GUI. It's safe and secure, arguably more than OEM manufacturer since rarely they release updates for their cheap consumer routers. 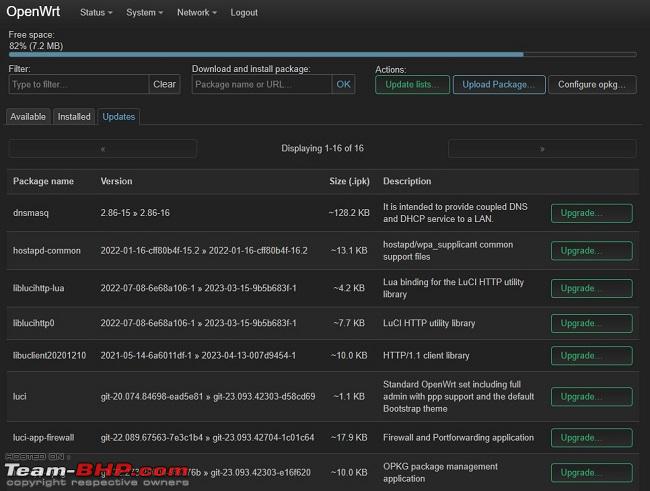 Can't have everything - Challanges and Negatives First is the initial setup. TP-Link seemed easy, simple click to upload the flashing file and flash into OpenWRT, whereas here, initial setup was complicated. Then those overwhelming options presented in front of you. Thankfully most default values are good to go. You don't need to tinker too much for a home network. Just like this use case, only needed to remove few packages and install one to get the job done. Lastly the storage. Consumer grade router hardware comes with really low storage space so for people like me, who wants to go further into more advance stuff, storage becomes the major issue for installing packages. Cost? 4 Router @ Rs. 799/- each -> Rs. 3200/- CAT-6A Roll -> Rs. 1600/- Punching Tool + RJ45 Jacks -> Rs. 600/- Labour (Electrician) -> Rs. 300/- Total spent Rs. 5700/-. In actual, I have plenty of cable and RJ45 jack left for future use and only 3 routers are used. 1 is kept as backup since getting warranty is now questionable. If I had settled with mesh only network with WiFi backhaul, then would have achieved the network at Rs. 2400/- only. No extra wiring was needed. But in any case, it is way cheaper than ready to use products. Especially compared to my wired backbone enterprise grade setup. Future plan / upgrade path and possibilities Possibilities are endless. But it is flexible and modular so individuals can proceed towards their desired direction. I have a wired backbone now and since I also run a selfhosted cloud server at home, so in near future, I am planning to virtualize a NVR (Network Video Recorder) software and add few Wireless IP based CCTV cameras. Further, all APs are having 2 extra switch port with Gigabit LAN connection available for expansion. Thanks. |

|  (85)
Thanks (85)
Thanks
 |
| The following 85 BHPians Thank NaXal for this useful post: | aadya, ampere, arnieshwartz, AROO7, atulsian, blackwasp, Blackwing, bobbyblr, BRV, BRZRKR, buntee90, catchjyoti, Chhanda Das, ComboCutter, concorde24, CosmicWizard, deep_bang, denzdm, digitalnirvana, Everlearner, frewper, gb97ce6, GeeTee TSI, GLAD73, grazd, GTO, GutsyGibbon, HammerHead, HappyWheels, hok kolorob, hothatchaway, INJAXN, JellyBean0868, JoshuaM, KA18, kadanaJ, KANNURAN, kutts, Lalvaz, libranof1987, lxskllr, mukeshgoel, Mundkaite, MysticMind, nagarjun_s, neerajdan, NetfreakBombay, NewUser123, Nrulz, ph03n!x, planet_rocker, professortarzan, Puneet.S, rahi, Rajeevraj, rajvardhanraje, raptor_diwan, Rehaan, RiGOD, Rohit_Quad, Roy.S, ruchiragrawal, sainyamk95, sarathlal, satan's_valet, sdp1975, shivraj737, SmartCat, somspaple, spdfreak, SupMeteorStorme, swe.desi, Tpsdhiraj, Turbanator, unbeknown_guy, varkey, Venky03, vignesh207, VijayAnand1, vijaysrk, Voodooblaster, whitewing, windrider, WorkingGuru, yogiii |
| |
|
2nd June 2023, 07:20
| #2 |
| Team-BHP Support  | Re: Cheap but effective DIY WiFi Mesh Setup for my home Thanks for sharing, NaXal! Moving your post out to a new thread. A new thread means 100X the views & 100X the visibility in search engines, including Google. @ BHPians, if you should spot any good post in an existing thread that deserves its own new thread, please report the post and we'll move it out for greater visibility. Thank you! |
|
| (2)
Thanks
|
| The following 2 BHPians Thank GTO for this useful post: | digitalnirvana, NaXal |
|
2nd June 2023, 10:34
| #3 |
| BHPian Join Date: Nov 2022 Location: Chennai
Posts: 36
Thanked: 71 Times
| Re: Cheap but effective DIY WiFi Mesh Setup for my home Enterprise-grade network at home! Dude, ur the man! I have flashed other devices (Wii, etc), but never tried routers for enhanced functionality. Am sure your extremely descriptive post will help many and me too in the future (don’t have a big enough house yet). But loved seeing real networking hacks on T-BHP. Keep them coming. Thanks a ton. Last edited by ampere : 2nd June 2023 at 10:38. Reason: removed non-forum emojis |
|
| (2)
Thanks
|
| The following 2 BHPians Thank NewUser123 for this useful post: | NaXal, Voodooblaster |
|
2nd June 2023, 12:50
| #4 |
| BHPian Join Date: May 2019 Location: KL-40 | KA-03
Posts: 242
Thanked: 788 Times
| Re: Cheap but effective DIY WiFi Mesh Setup for my home The Mi Route 4A is an exceptionally value for money device for what it offers. I had recently purchased it for Rs 1499 (even that felt VFM to me), but at Rs 799 post exchange it's a no brainer. (Currently its on sale for Rs 1299 @ Flipkart) I was previously running a similar setup with 2-3 Mi Router 3G units which worked great with fast roaming. I later moved to the TP-Link EAP access points, the primary reason being the management is made easier with the Omada controller (which is run on a mini PC). The only pain point with this setup is tweaking any parameters, which would need to be done on each device manually. I wish there was a central management system for OpenWRT. |
|
| (3)
Thanks
|
| The following 3 BHPians Thank varkey for this useful post: | digitalnirvana, lxskllr, NaXal |
|
2nd June 2023, 14:33
| #5 |
| BHPian Join Date: Aug 2019 Location: Gurugram
Posts: 218
Thanked: 845 Times
| Re: Cheap but effective DIY WiFi Mesh Setup for my home Ohh wow.. This is ridiculously cheap and efficient set up. Last year I spent almost 25K on Netgear ORBI Mesh Setup. While I have zero complaint interms of setup and performance, bookmarking this for future setup |
|
| (3)
Thanks
|
| The following 3 BHPians Thank vellatechie for this useful post: | digitalnirvana, NaXal, varkey |
|
2nd June 2023, 14:49
| #6 | |
| Newbie Join Date: Aug 2015 Location: Bangalore
Posts: 12
Thanked: 41 Times
| Re: Cheap but effective DIY WiFi Mesh Setup for my home Thanks for sharing an overview of the tech and your network topology NaXal! Being an enterprise wireless guy myself, I found this project quite intriguing and exciting! I mostly use an enterprise-grade cloud-managed access point for my (small) apartment but that's primarily for testing new features and tech. Your project got me thinking that I should dust off those old consumer-grade routers lying around and flash them with OpenWRT (provided they have a compatible OpenWRT OS), if I manage to set up a lab that would be fun! A question about 'LAN bridge' of Mi 4A routers, are those ports full duplex gig ports (essentially an umnanaged gig switch)? Did you happen to test FT roaming 'Over DS' instead of 'Over the Air'? I don't suppose it will work efficiently without a central controller in picture. Quote:
I haven't personally used OpenWRT so far but I see a central controller OpenWISP built on OpenWRT. The page has some demo videos as well and it seems to have some really interesting enterprise-grade features (pushing configuration templates to multiple devices, onboarding new APs, and network monitoring to name a few). I am not sure about the complexity to set it up though. Seems like I know what will be my next project! | |
|
| (5)
Thanks
|

| The following 5 BHPians Thank unbeknown_guy for this useful post: | digitalnirvana, MysticMind, NaXal, varkey, vignesh207 |
|
2nd June 2023, 15:35
| #7 | |
| Newbie Join Date: Aug 2015 Location: Bangalore
Posts: 12
Thanked: 41 Times
| Re: Cheap but effective DIY WiFi Mesh Setup for my home Quote:
I forgot to include the link for OpenWISP | |
|
| (3)
Thanks
|
| The following 3 BHPians Thank unbeknown_guy for this useful post: | digitalnirvana, NaXal, varkey |
|
2nd June 2023, 15:37
| #8 |
| Newbie Join Date: Mar 2023 Location: Bengaluru
Posts: 24
Thanked: 43 Times
| Re: Cheap but effective DIY WiFi Mesh Setup for my home Excellent timing. My network setup at home using two routers has become a pain in the rear with ill-timed disconnections. I contemplated switching to a complex, expensive mesh system but backed out after reading mixed reviews despite huge costs. Your setup has me excited now and am looking forward to replicate the same. Since I have cat 5 cables wired to all rooms in my house, I would only need to concern myself about the routers. Looking for recommendations on the router from the networking gurus here. Is the MI 4a best suited for this setup or are there other better routers? If needed, I can spend a little more and get a better router that supports faster speeds. Please advise. |
|
| (3)
Thanks
|
| The following 3 BHPians Thank MysticMind for this useful post: | digitalnirvana, lxskllr, NaXal |
|
2nd June 2023, 19:31
| #9 |
| BHPian Join Date: Sep 2009 Location: Bombay
Posts: 864
Thanked: 1,292 Times
| Re: Cheap but effective DIY WiFi Mesh Setup for my home I had set up a mesh network during the lockdown so I can use my terrace. Never going back. Got the TP Link M4 system - cost about 8k with discounts. Totally worth it. |
|
| (2)
Thanks
|
| The following 2 BHPians Thank invidious for this useful post: | digitalnirvana, NaXal |
|
2nd June 2023, 19:51
| #10 |
| BHPian Join Date: Jan 2019 Location: TN-11, AP-03
Posts: 949
Thanked: 2,467 Times
| Re: Cheap but effective DIY WiFi Mesh Setup for my home I have two routers with the same SSID and the password connected for a seamless connection between two floors. My Ground floor has the main router and one of the LAN output is given as input to the router in the second floor. This second router helps me get Internet access in my terrace too. It costed me Rs 450/- for the 50 Mtr LAN cable and a old Airtel Broadband router to get this working. |
|
| (3)
Thanks
|
| The following 3 BHPians Thank saisree for this useful post: | digitalnirvana, NaXal, Tpsdhiraj |
|
2nd June 2023, 20:46
| #11 | ||
| BHPian Join Date: May 2019 Location: KL-40 | KA-03
Posts: 242
Thanked: 788 Times
| Re: Cheap but effective DIY WiFi Mesh Setup for my home Quote:
If you want WiFi 6, say for internet speeds above 400-500 Mbps or above, then the cheapest OpenWRT capable device available locally seem to be the TP-Link AX23 for around 4.5-5k. However even this unit uses the exact same CPU/RAM/Flash as the Mi Router 4A, there is difference only in the wireless system. Once you reach this price range, perhaps going for the TP-Link Deco series or equivalent might be better, considering you have wired backhaul already and want a plug and play setup. Quote:
 Last edited by varkey : 2nd June 2023 at 20:47. | ||
|
| (3)
Thanks
|
| The following 3 BHPians Thank varkey for this useful post: | digitalnirvana, MysticMind, NaXal |
| |
|
2nd June 2023, 21:50
| #12 |
| BHPian Join Date: Apr 2020 Location: New Delhi
Posts: 117
Thanked: 271 Times
| Re: Cheap but effective DIY WiFi Mesh Setup for my home Thank you for documenting this. Will be super useful for a lot of folks out there! Would also recommend enabling QoS in the settings. This will improve the overall experience. Speed is not everything, bufferbloat can hurt gaming or video conferencing where there is need to send small packets. Here's my bufferbloat score, since i live in an apartment. I run AC86U with Merlin, adguard home and basic QoS!  Cheers again!  |
|
| (2)
Thanks
|
| The following 2 BHPians Thank lxskllr for this useful post: | digitalnirvana, NaXal |
|
3rd June 2023, 00:21
| #13 | |||
| BHPian Join Date: Mar 2017 Location: Kolkata
Posts: 556
Thanked: 2,004 Times
| Re: Cheap but effective DIY WiFi Mesh Setup for my home Hello, Quote:
However, Local Network and Internet are two different things to consider. My first goal is to setup the fastest possible local network (Wired or Wireless). Internet is a different network. It is out of my hand. Performance of it is dependent on my ISP and their network setup. Quote:
Quote:
At this present 802.11R setup, it's the client who makes the call and decision about roaming. When to roam and where to roam is upto the client. Activating those K n V protocols require more advance configuration and settings tweaking. I don't see any benefit in my home network. I guess it is useful for high density networks like for example a hotel lobby or stadium or concert or conference hall or may be a college campus. There a single AP may not be sufficient for too many clients so overlapping APs are needed and there these protocols are useful to distribute the load. So I didn't bother trying that for my simple home network. Adding few more details to my original post, Example of a Roaming Using "WiFi Man" Application of Ubiquiti. Ubiquiti is a very well know high end & complex network gear manufacturing company. WiFiMan is their smart phone application for various testing and network planning purpose. But it works with other routers also. I am testing with a smart phone in 5Ghz. In this bellow screenshot, you can see the client (my phone) is connected to an Access Point (AP) but it also sees another AP nearby. The connected AP has the strongest signal and the nearby AP has comparatively weaker signal.  Now as I start walking towards that second AP, signal of the connected AP starts to drop, and at a certain point, the second AP signal is much stronger than the presently connected AP. At this point, client roams into that stronger signal emitting AP. WiFiMan application detects that switch over and informs via pop-up message. 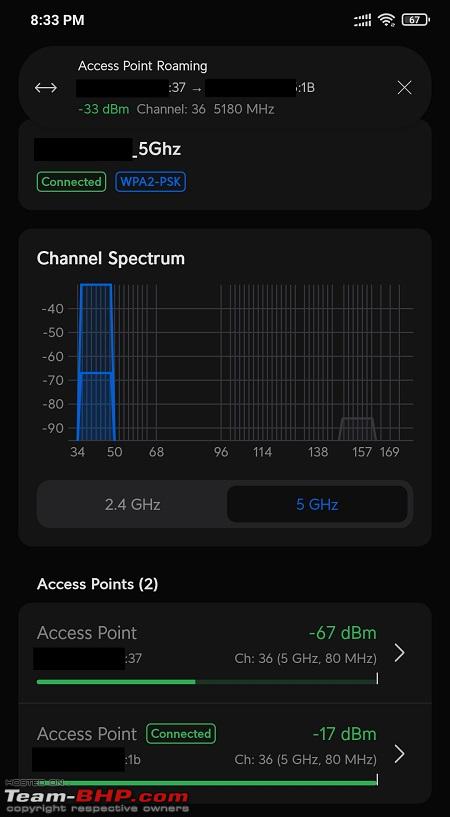 Pretty seamless experience. No drop in any running & active network task like Ping or iPerf tests or video calls / download and such. Thanks. Last edited by NaXal : 3rd June 2023 at 00:29. | |||
|
| (4)
Thanks
|
| The following 4 BHPians Thank NaXal for this useful post: | blackwasp, digitalnirvana, lxskllr, unbeknown_guy |
|
3rd June 2023, 01:14
| #14 | |
| BHPian Join Date: Apr 2020 Location: New Delhi
Posts: 117
Thanked: 271 Times
| Re: Cheap but effective DIY WiFi Mesh Setup for my home Quote:
On the same internet connection, by enabling SqM the experience gets better:  | |
|
| (1)
Thanks
|
| The following BHPian Thanks lxskllr for this useful post: | NaXal |
|
3rd June 2023, 03:36
| #15 | ||
| Newbie Join Date: Aug 2015 Location: Bangalore
Posts: 12
Thanked: 41 Times
| Re: Cheap but effective DIY WiFi Mesh Setup for my home Quote:
Generally, home networks with high uplink bandwidth that we have today from ISPs, QoS isn't needed unless required in specific use cases. Quote:
I asked out of curiosity to understand how would over DS work without a controller. 802.11k and 802.11v are different protocols that do not have any bearing on 802.11r (Fast Transition), without going in-depth: 802.11k - Allows 11k capable clients to request neighbor reports consisting of neighboring APs that could be potential candidates for roaming. 802.11v - This amendment aimed to bring several features majority of which were never implemented. The ones that were implemented were related to improved power saving and introducing capability in AP/Controller to send messages to associated clients about possible better (least loaded) APs As you correctly mentioned, regardless of what protocol, AP, or controller is being used, roaming is ultimately a wireless client decision (i.e., wireless adapter vendor's algorithm). It can use the info provided to it by using 802.11k and 802.11v to make an informed decision. I wish I had a multi-story dwelling like yours to geek out on wireless networks, there's only so much I can do in my humble 2bhk apartment!  | ||
|
| (3)
Thanks
|
| The following 3 BHPians Thank unbeknown_guy for this useful post: | lxskllr, NaXal, varkey |
|