Team-BHP > Shifting gears > Gadgets, Computers & Software
Register New Topics New Posts Top Thanked Team-BHP FAQ


Reply
  Search this Thread
17,648 views
Old 28th August 2020, 13:07   #1
Distinguished - BHPian
 
saket77's Avatar
 
Join Date: Dec 2012
Location: India
Posts: 4,835
Thanked: 14,716 Times
DIY: Upgrading the Storage / SSD of a Macbook Air!

DIY: Upgrading the Storage / SSD of a Macbook Air!-mba.jpg

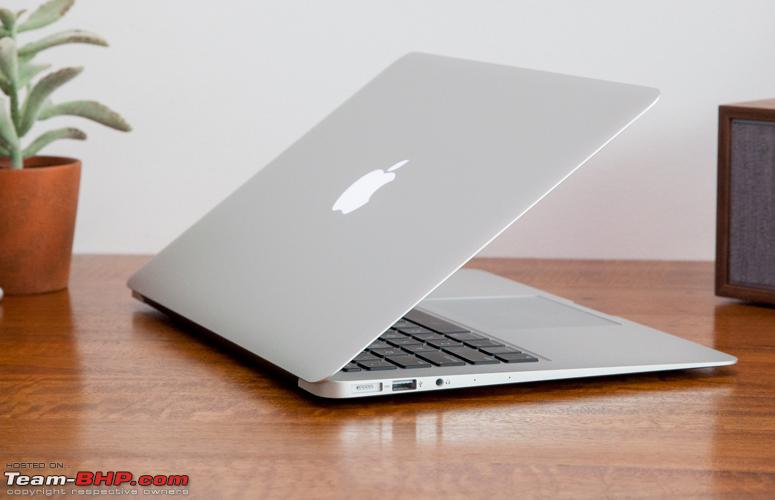
Those who are aware of the Apple laptop scene would know that the Mid 2017 Macbook Air, which was supposedly the latest model to be sold in the Air lineup until some 10-15 days ago when the 2020 model was launched here, has a suffocating 128 GB of SSD. We will see how to upgrade the SSD on a Mid-2017 MBA which is still relevant because it is being sold side by side with the 2020 model.

Apple has been known to sell compromising specs on almost all its devices, especially the entry level ones like the small storage and lower MP cameras on expensive iPhones, smaller RAMs on most devices, and now little SSD storages in the Macbook Air. However, I must add that the performance despite all the above of all the devices is generally very good.

However, I decided that enough is enough and I need to get out of this claustrophobic 128 GB prison on this supposedly premium device. Now, many would say what's the big deal? Just unscrew the panels and replace the SSD...isn't it? It would have been this straightforward if this wasn't an Apple. But Apple being Apple, you simply cannot swap SSDs like that because the SSD interface on the motherboard is different from normal SSDs that is sold in market and accepted by all other manufacturers. To upgrade or not, if you are stuck in this dilemma, please read on:

First things first- If you use the system only for browsing and checking mails, 128GB of storage just might cut through your need, but for anything else, you WILL need a larger storage. I am not a 'cloud' person except for notes, contacts and calendars, so I don't sync any multimedia to the iCloud.

Options to expand storage:

1. If you are comfortable with iCloud, this can be a good option but this in my opinion is over-reliance on internet.


2. The MBA till 2017 had an MMC Card reader slot. One might exploit this piece of hardware to expand the storage. This option is least invasive procedure, will not affect your warranty and good for storing small files. The cons will be that the card adapter will keep poking out from the otherwise compact and slim form factor of your MBA and be an eye-sore. It may also be prone to damage as it will be sticking out quite a bit. Chances of theft of card will be high as it will catch eyes almost immediately and it is easy to pull it out. Also, the transfer speed will be low even on the best of the cards when compared to SSD or even an HDD. However, if you decide to go by the this route, consider Transcend Jetlite SD cards which is especially made for MBA's & MBP's. These are relatively compact and sit almost flush with your Macbook's body. Essentially these are short SD cards. I was seriously contemplating this option before going for SSD upgrade itself but this was priced exorbitantly back then. There are also some short card adapters that might be a good option if you are willing to compromise on other cons associated with using SD card as permanent storage.

3. Just replace the SSD. And we shall discuss how.


Upgrading the SSD:


Coming straight to the point, the interface port for the SSD on the macbook air is different than normal SSD slots (AHCI Blade). So an M.2 NVMe SSD will not fit straightaway into the slot. For the purpose, we need an SSD adapter- 12+16 Pin which will fit between the SSD and the motherboard port. This way any M.2 NVMe SSD will do the trick; except a few known not to work with MBA. Also, your new SSD will require firmware support and OS support, so ensure you are running anything above Sierra. Back in the days, when AliExpress was available, this adapter could have been had for a pittance, but the same is not an option currently. So, if you are in a tier 1 city, you can scout your local market for this adapter and you may get it cheap. This wasn't available in my city. Most of the computer vendors didn't even know about it. So I had to order from Amazon knowing that I am being royally fleeced. Damages- Rs. 2100/-

Also, some SSDs are known NOT to work with MBA, so better to choose from tried and tested ones. Here's a list of SSD's which work with MBA:

Adata NVMe SSD : SX6000, SX7000, SX8200, SX8200 Pro.
Corsair NVMe SSD : MP500, MP510
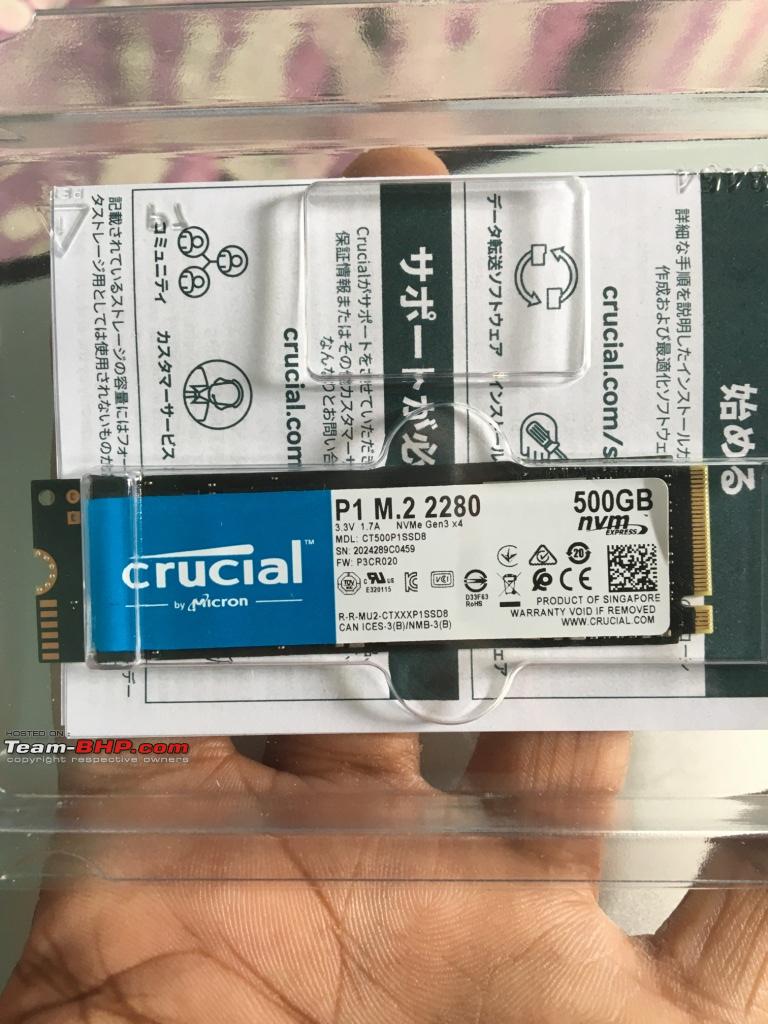
Crucial NVMe SSD : P1
HP NVMe SSD : ex900, ex920, ex950
Intel NVMe SSD : 600p, 660p, 760p
Kingston NVMe SSD : A1000, A2000, KC1000
Samsung NVMe SSD : 960 Evo, 960 Pro, 970 Evo, 970 Pro, 970 Evo plus (with latest firmware)
WD Black NVMe SSD v1, v2 and v3, WD Blue SN550


NVMe SSD known not to work on MacBook Pro / Air.
Samsung PM981
Samsung 950 Pro

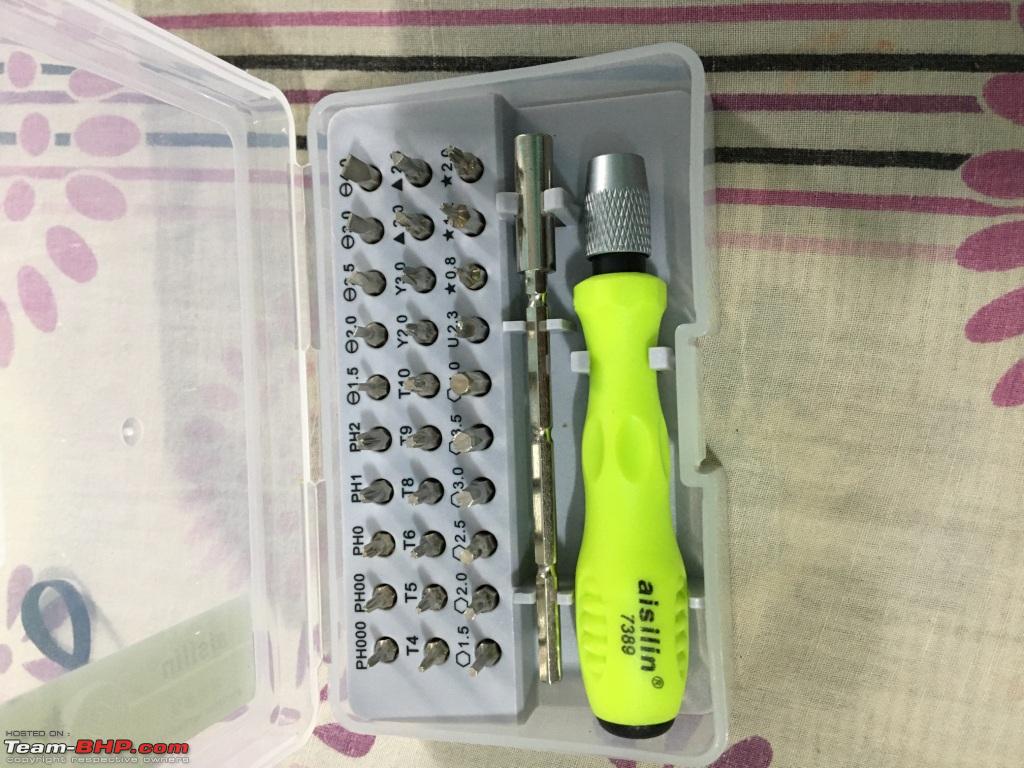
NVMe SSDs are cheaper than Apple's AHCI and will also be faster. I chose Crucial P1-500 GB for the upgrade. Cost- Rs. 6.2K from Amazon. And not to miss, probably your existing precision screwdriver will not have a bit to open the Macbook Air's pentalobe screws. You will need a P5 (TS4) 1.2mm screwdriver. I got one from MMOBIEL for around Rs. 400/-. A lot of other options are also available.

So, stuff required for the upgrade:

1. 12+16 Pin SSD adapter compatible for A1466 (Macbook Air)
2. A compatible M.2 NVMe SSD
3. P5 screwdriver- TS4; 1.2mm
4. An stable and fast internet connection or a bootable USB stick with Mac OS anything equal to or above High Sierra.


DIY: Upgrading the Storage / SSD of a Macbook Air!-adapter-1.jpg
DIY: Upgrading the Storage / SSD of a Macbook Air!-adapter-2.jpg

DIY: Upgrading the Storage / SSD of a Macbook Air!-crucial-pack.jpg
DIY: Upgrading the Storage / SSD of a Macbook Air!-ssd-sticker-price.jpg
DIY: Upgrading the Storage / SSD of a Macbook Air!-ssd-make.jpg
DIY: Upgrading the Storage / SSD of a Macbook Air!-ssd1.jpg

DIY: Upgrading the Storage / SSD of a Macbook Air!-mmobiel.jpg


Replacing the SSD:

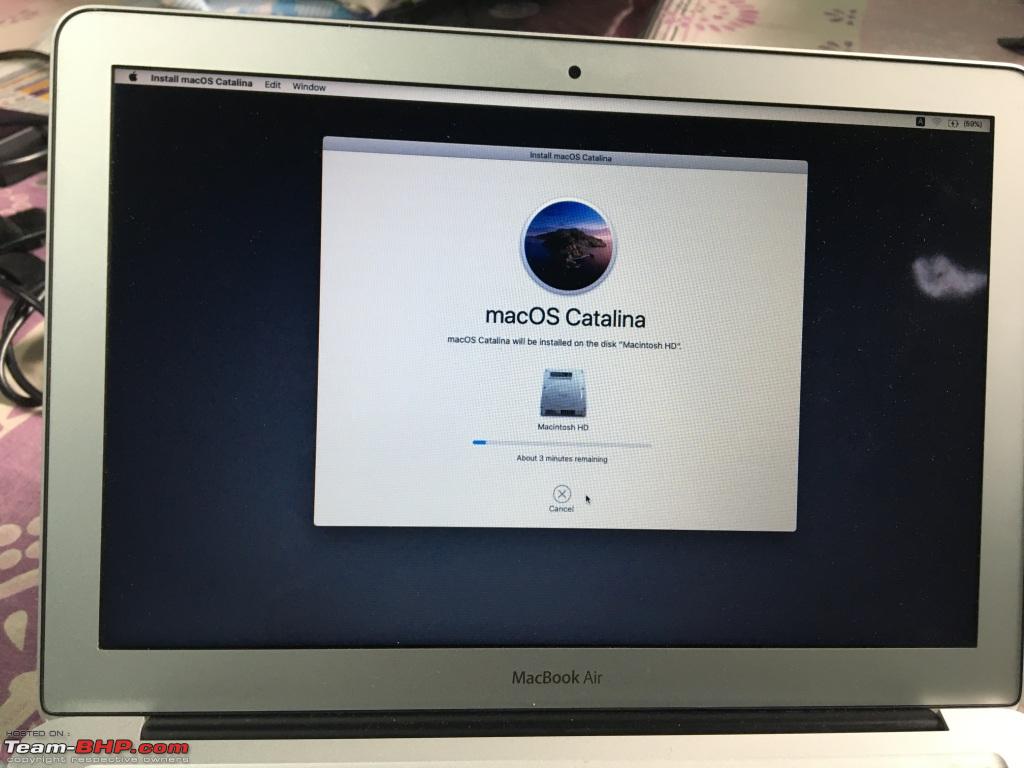
Download the Mac OS from Apple website. I downloaded Catalina which is about 8.25 GB. Create a bootable USB stick by using any 100s of app available for free for the purpose. OR if you have a good internet connection, you can skip it all and download it after replacing the SSD.

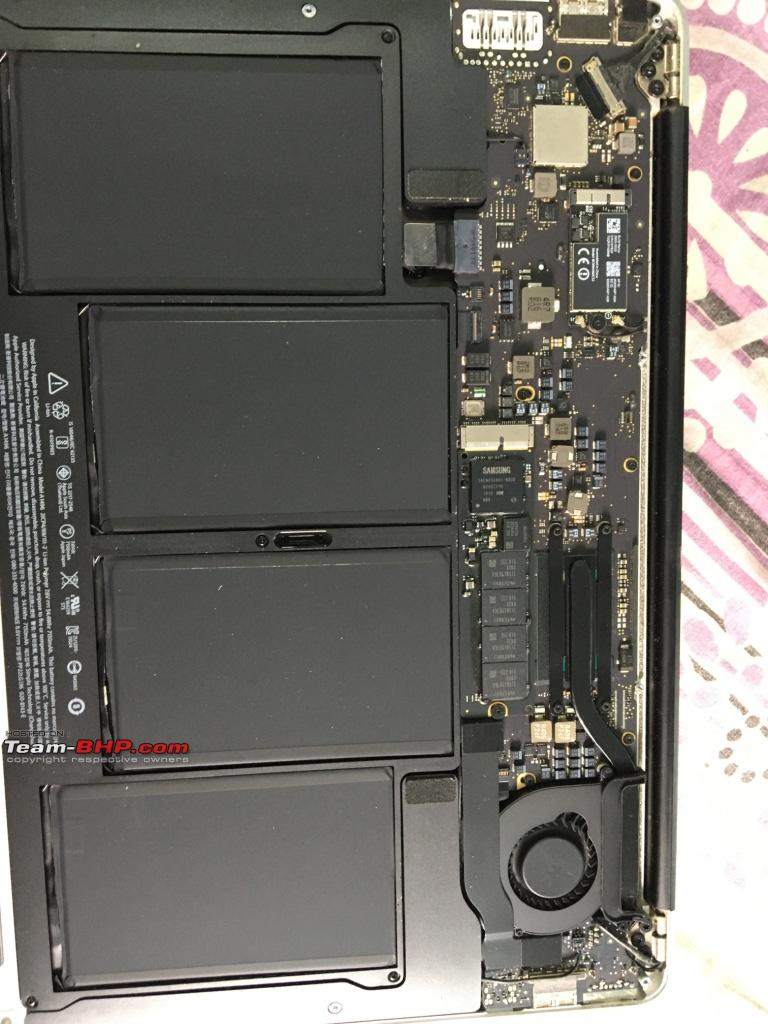
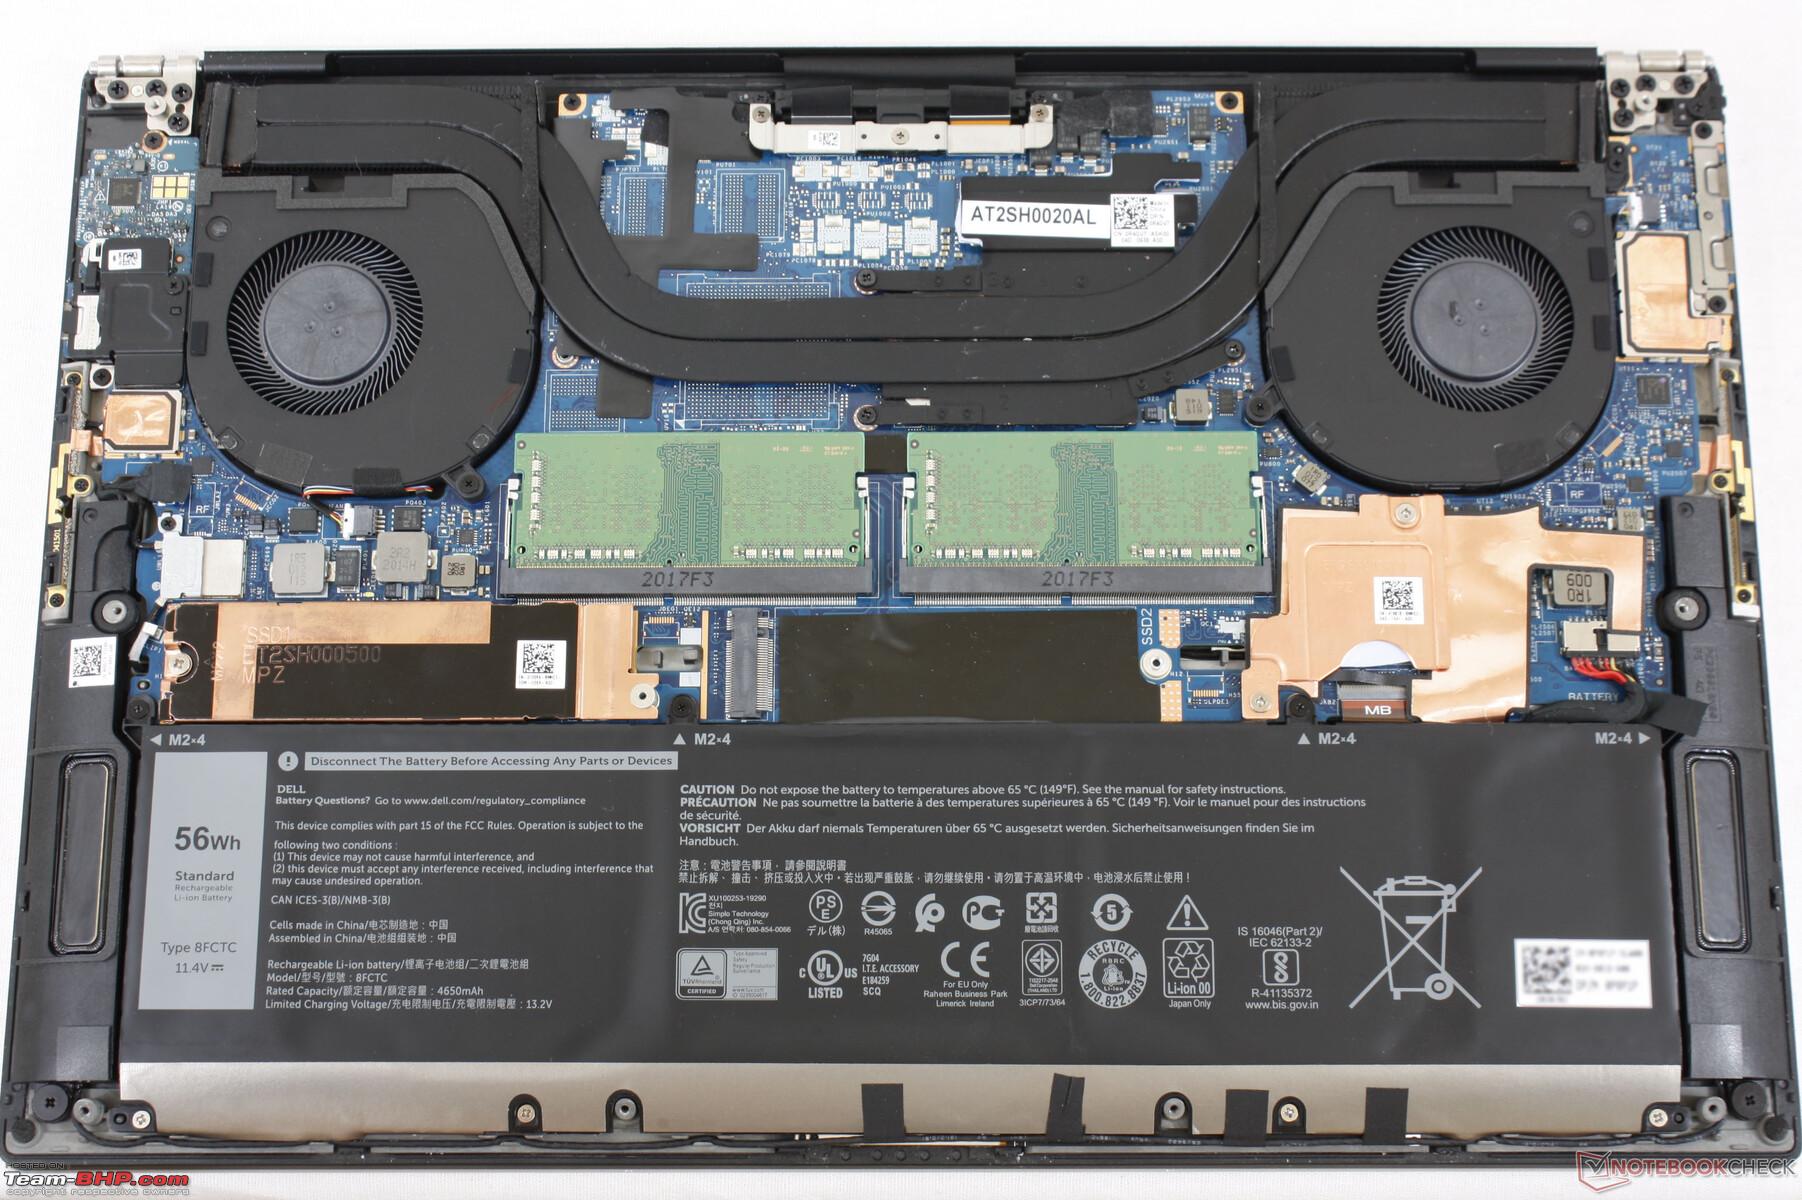
Armed with all these stuff and short with Rs. 8700 in my bank account, I removed the 10 pentalobe screws from the base of the MBA after flipping it on a soft surface to avoid any scratches on the display lid. There are 2 screws just under the display which are longer than the rest; so make note of which screws go where. Once all screws are out, pry open the back panel. This will reveal the internals of your system.

DIY: Upgrading the Storage / SSD of a Macbook Air!-rear-open.jpg


As a precaution, I decided to disconnect the battery from the motherboard. To do this, just make use of the pull tab on the socket. You need to pull it towards the front of the macbook and not upwards. Carefully slide out the connector fully.

DIY: Upgrading the Storage / SSD of a Macbook Air!-battery-open.jpg

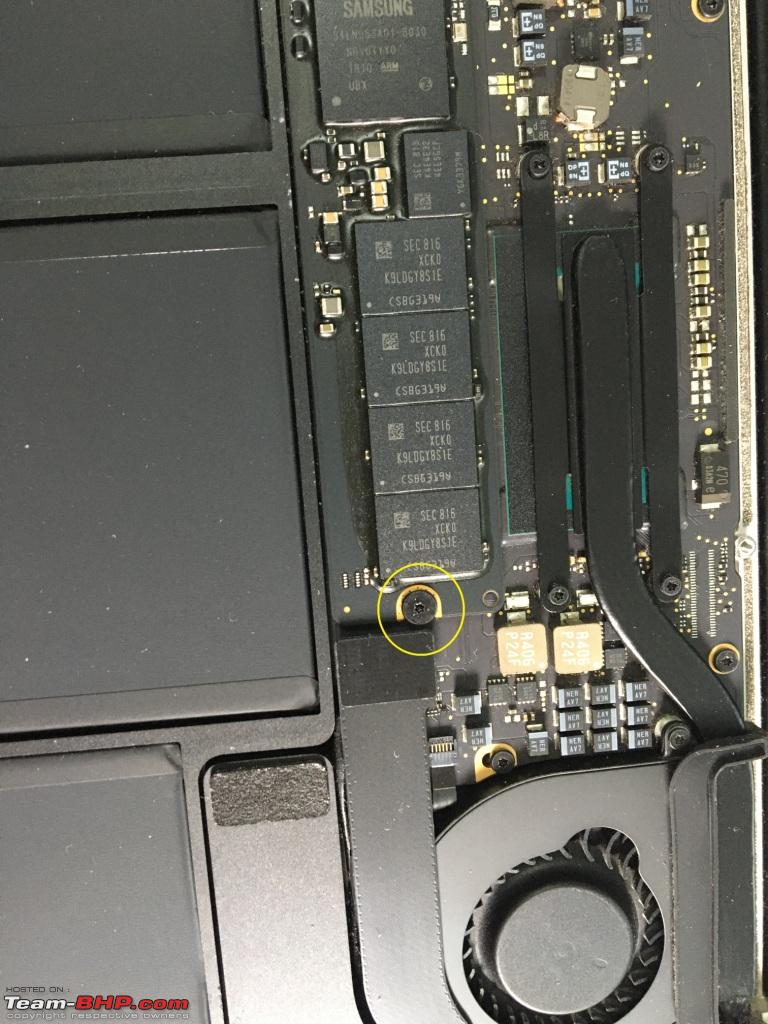
Locate the SSD installed. This is secured by one T-5 screw.
DIY: Upgrading the Storage / SSD of a Macbook Air!-ssd-screw.jpg

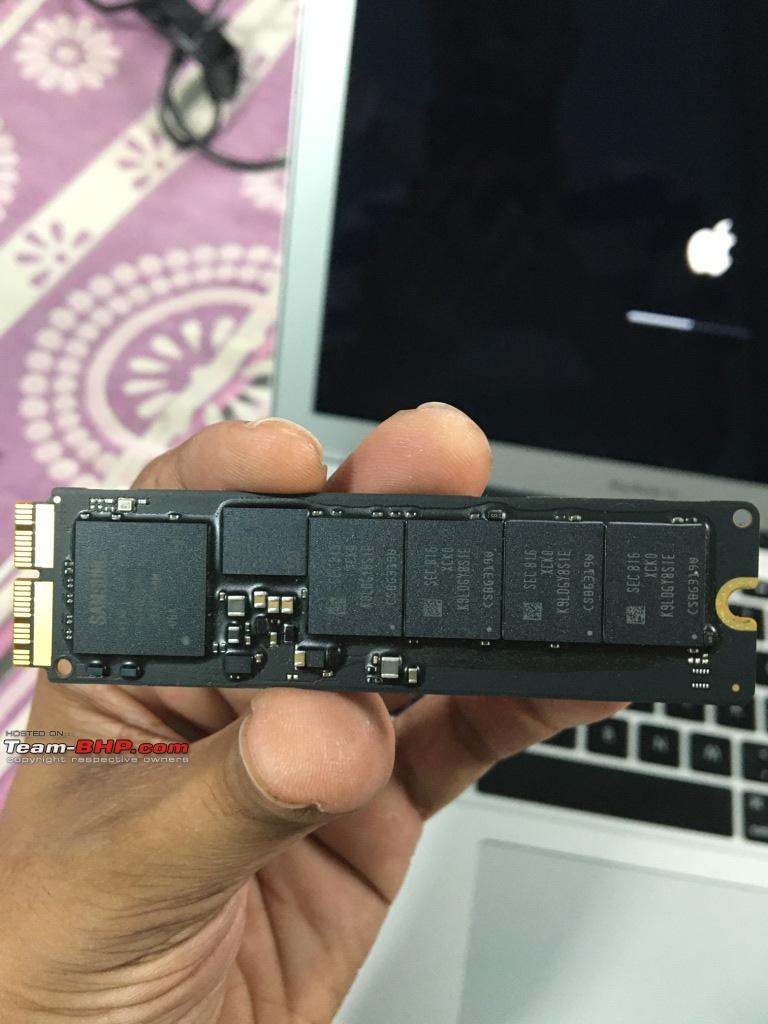
Unscrew it and gently lift the SSD from the outer edge by just a centimetre or two. Just lift is as little as you can enough to slide it out from the slot. Notice that it is made by Samsung.

DIY: Upgrading the Storage / SSD of a Macbook Air!-old-ssd.jpg

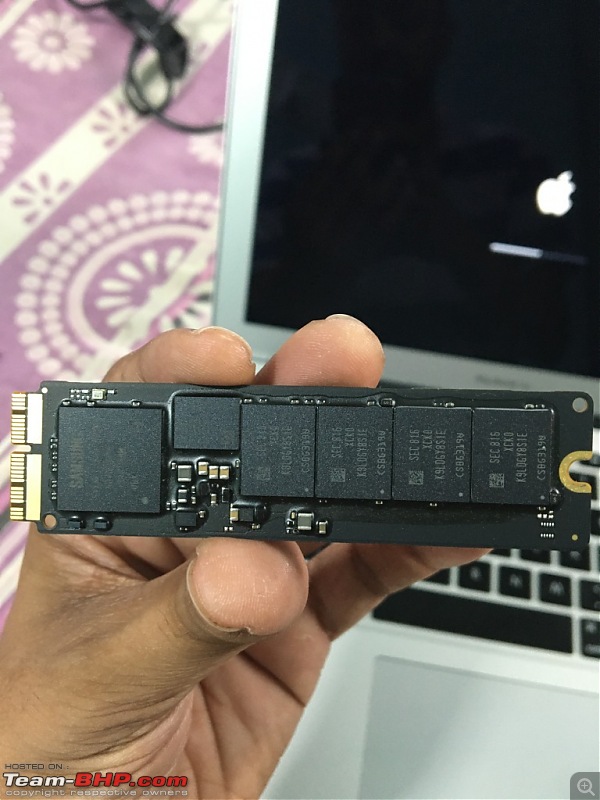
And you will not be able to ever use it again due to it's proprietary interface, so it is essentially worthless now. Thank you Apple.

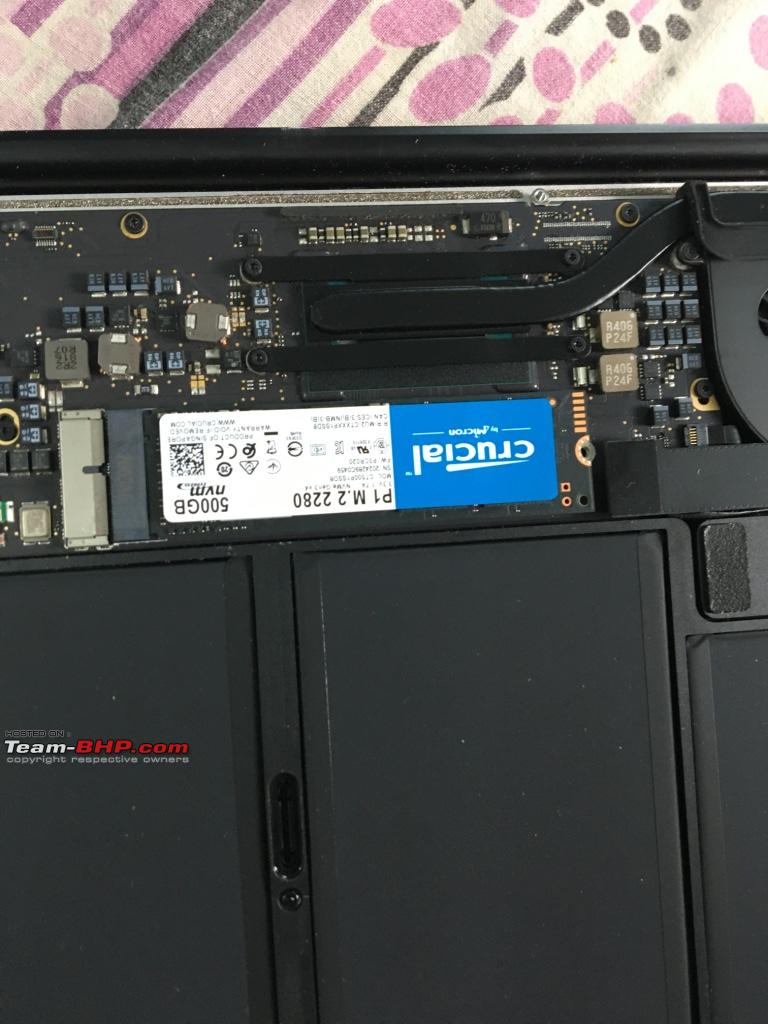
Now, Plug your new SSD in the SSD adapter you purchased. Once securely slotted, slot the set (Adapter+SSD in it) in the motherboard. This will take a little effort but don't force it much. You will know when it gets properly seated by the looks of it. Secure the SSD with the T5 screw that you opened.

DIY: Upgrading the Storage / SSD of a Macbook Air!-ssd2.jpg
DIY: Upgrading the Storage / SSD of a Macbook Air!-ssd-install.jpg

Connect back the battery and screw back the rear panel. Take care of the longer screws which go just under the display. Don't tighten them too much as it is easy to strip the heads of these delicate screws.

Preparing the system:

Plug in the Bootable USB and switch on the system. Press Option key and it should identify the bootable the USB with the OS in it. Click on Install. But don't proceed by clicking continue. Because you need to prepare your new SSD first. The installation will give you an option to use the disk utility. Click and open disk utility. The new SSD should be recognized here with capacity.
DIY: Upgrading the Storage / SSD of a Macbook Air!-disk-utility.jpg

Format the new SSD by choosing erase option and file system as Mac OS journaled Extended. This should be done within a minute. Once done, exit the disk utility and continue with the installation. One good thing about Mac is that you can create or delete partitions without needing to format or lose any data through the OS level interface; so do not worry of not making any partitions if you needed one.

DIY: Upgrading the Storage / SSD of a Macbook Air!-os-installation.jpg

The installation will complete in some time. One VERY IMPORTANT STEP is to enable trim support for the new SSD. Else you may lose speed once the drive starts to fill up. It may also shorten the life span of the SSD. Please read more on the internet about trim support. On any windows machine, trim support is enabled by default but this may not be the case with Mac OS. Most of the SSDs will need trim support to be enabled by the terminal command as Mac disables it by default for most of the third party SSDs. To check the status of trim support Go To> Apple logo> About this Mac> System report> NVME or Sata Express Menu. On the details section for the menu, check for Trim support. Enabled= Yes, else it will show No.

DIY: Upgrading the Storage / SSD of a Macbook Air!-trim-support.jpg

If it shows no, enable this by using this command through the Terminal:

sudo trimforce enable

It will ask for system password; provide the same and press enter. Y for confirm

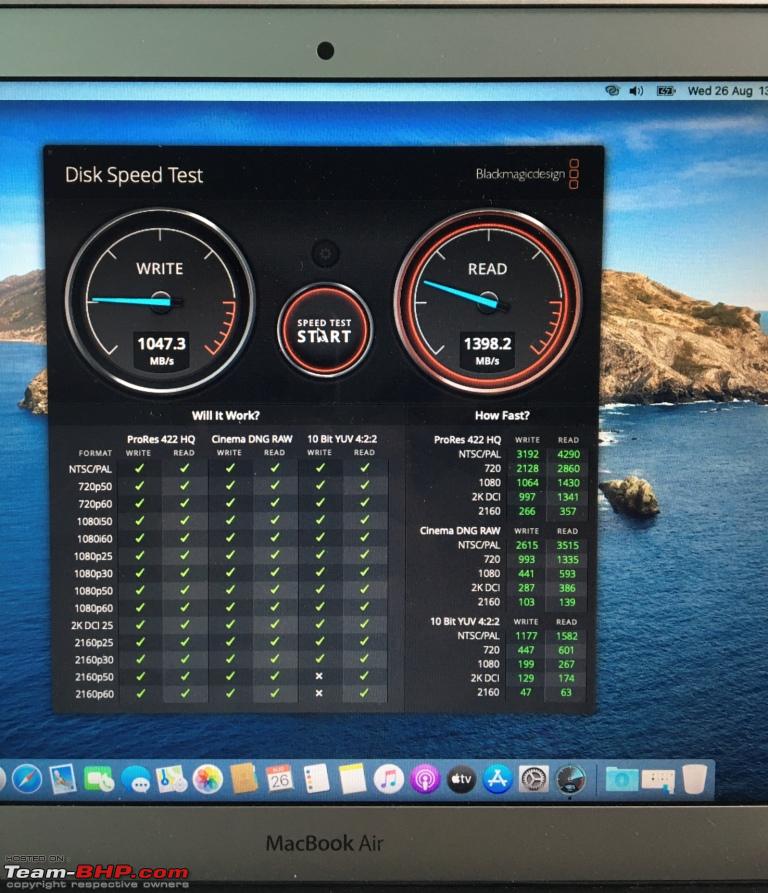
Now configure your system. Hopefully, you will feel a lot better with much more space at your disposal. I upgraded from 128GB to 500GB and only then I could accommodate the old files from my older Macbook. Sharing a screen shot with a casual disk speed tests with both SSDs. Though not making any point with it, I am much happier with the upgraded storage.

Old SSD Speed Test:

DIY: Upgrading the Storage / SSD of a Macbook Air!-diskpeedold.jpg


New SSD Speed Test:

DIY: Upgrading the Storage / SSD of a Macbook Air!-img_e1977.jpg
Attached Thumbnails
DIY: Upgrading the Storage / SSD of a Macbook Air!-final-storage.jpg  


Last edited by saket77 : 28th August 2020 at 15:24.
saket77 is offline   (39) Thanks
Old 29th August 2020, 05:36   #2
Team-BHP Support
 
Join Date: Feb 2004
Location: Mumbai
Posts: 20,015
Thanked: 86,393 Times
re: DIY: Upgrading the Storage / SSD of a Macbook Air!

Thread moved out from the Assembly Line. Thanks for sharing!
Aditya is online now   (3) Thanks
Old 29th August 2020, 08:32   #3
Senior - BHPian
 
ruzbehxyz's Avatar
 
Join Date: Oct 2014
Location: MH02 to MH46
Posts: 1,666
Thanked: 6,900 Times
Re: DIY: Upgrading the Storage / SSD of a Macbook Air!

Thanks for sharing.
I recently bought a Dell XPS 9500 from the US and it has a 512GB SSD. Can I add another SSD to increase the memory?
ruzbehxyz is offline   (1) Thanks
Old 29th August 2020, 08:51   #4
BHPian
 
Justin's Avatar
 
Join Date: May 2020
Location: Calicut/Dubai
Posts: 27
Thanked: 156 Times
Re: DIY: Upgrading the Storage / SSD of a Macbook Air!

Quote:
Originally Posted by ruzbehxyz View Post
Thanks for sharing.
I recently bought a Dell XPS 9500 from the US and it has a 512GB SSD. Can I add another SSD to increase the memory?
Yes, it has 2x M.2 NVMe slots.
Justin is offline   (2) Thanks
Old 29th August 2020, 08:55   #5
Team-BHP Support
 
Gannu_1's Avatar
 
Join Date: Apr 2013
Location: Madras
Posts: 7,335
Thanked: 20,670 Times
Re: DIY: Upgrading the Storage / SSD of a Macbook Air!

/OT

Quote:
Originally Posted by ruzbehxyz View Post
Thanks for sharing.
I recently bought a Dell XPS 9500 from the US and it has a 512GB SSD. Can I add another SSD to increase the memory?
Can see an empty M.2 slot marked SSD2 in the motherboard next to the factory equipped SSD:

DIY: Upgrading the Storage / SSD of a Macbook Air!-csm_mg_9356_c639103cab.jpg

Image from Notebookcheck reviews.
Gannu_1 is offline   (5) Thanks
Old 29th August 2020, 09:59   #6
BHPian
 
Join Date: Apr 2014
Location: Austin, BLR
Posts: 89
Thanked: 124 Times
Re: DIY: Upgrading the Storage / SSD of a Macbook Air!

Nice DIY. Although the point should be made that this is a highly model-specific upgrade. Check if the hard drive/SSD in your laptop is soldered or not. If it is, you're out of luck. Most thin-and-lights have their primary and secondary memory soldered to the board, rendering upgrades essentially impossible. This includes newer macs.

Last edited by Ruchitya : 29th August 2020 at 10:06.
Ruchitya is offline   (2) Thanks
Old 29th August 2020, 10:02   #7
BHPian
 
Join Date: Nov 2019
Location: Oxford, U. K.
Posts: 93
Thanked: 185 Times
Re: DIY: Upgrading the Storage / SSD of a Macbook Air!

I have all the necessary items. But my MBA is stuck on Filevault encryption stage showing estimated time more than one day. What should I do now? I am thinking to make a bootable usb and then change the ssd. Is it a proper process or it won't allow the same till the end of encryption? I do not have any important file so backup is not needed.
indrasis_gun is offline   (1) Thanks
Old 29th August 2020, 10:05   #8
BHPian
 
Join Date: Apr 2014
Location: Austin, BLR
Posts: 89
Thanked: 124 Times
Re: DIY: Upgrading the Storage / SSD of a Macbook Air!

Quote:
Originally Posted by ruzbehxyz View Post
Thanks for sharing.
I recently bought a Dell XPS 9500 from the US and it has a 512GB SSD. Can I add another SSD to increase the memory?
As others mentioned, the 9500 has two m.2 slots, so you can simply add another drive, or swap out your current drive as well. Make sure you create a copy of the OS+drivers if you're going to swap the current drive.

On an unrelated note, I bought the 9500 as well. I'm facing a hardware issue where the closed laptop opens about 1/2 an inch when held vertically, with the trackpad side facing up. Are you seeing this as well? I've asked Dell for a replacement.
Ruchitya is offline   (2) Thanks
Old 29th August 2020, 11:07   #9
Distinguished - BHPian
 
saket77's Avatar
 
Join Date: Dec 2012
Location: India
Posts: 4,835
Thanked: 14,716 Times
Re: DIY: Upgrading the Storage / SSD of a Macbook Air!

Quote:
Originally Posted by indrasis_gun View Post
I have all the necessary items. But my MBA is stuck on Filevault encryption stage showing estimated time more than one day. What should I do now? I am thinking to make a bootable usb and then change the ssd. Is it a proper process or it won't allow the same till the end of encryption? I do not have any important file so backup is not needed.
Make a bootable flash drive and you should be good to go. If you have any files to back up, get it on another external storage and iCloud. A good internet connection with at least 9-10 gb limit for a day can also see you through.

Regards.
saket77 is offline   (1) Thanks
Old 29th August 2020, 12:23   #10
BHPian
 
coolmind's Avatar
 
Join Date: Feb 2018
Location: Hyderabad
Posts: 260
Thanked: 311 Times
Re: DIY: Upgrading the Storage / SSD of a Macbook Air!

I have HP Notebook of 5 years old with I5 processor. Its with regular hard disc.
Can I upgrade to SSD hard disc with it?
coolmind is offline   (1) Thanks
Old 29th August 2020, 12:23   #11
Senior - BHPian
 
blackwasp's Avatar
 
Join Date: Apr 2015
Location: Pune
Posts: 3,042
Thanked: 27,188 Times
Re: DIY: Upgrading the Storage / SSD of a Macbook Air!

Quote:
Originally Posted by saket77 View Post
We will see how to upgrade the SSD on a Mid-2017 MBA which is still relevant because it is being sold side by side with the 2020 model.
Thanks for sharing this DIY. Earlier this year, I picked up a Macbook Air for mom. It was a pre-owned piece, but barely used. Only downer was a 128 GB SSD. She found the space sufficient, but now due to making online videos (she's a teacher), the files are eating up space quite fast. I might be looking to upgrade the SSD as per your post.

Thanks for sharing.

Last edited by blackwasp : 29th August 2020 at 12:29.
blackwasp is offline   (1) Thanks
Old 29th August 2020, 12:35   #12
Newbie
 
jagira's Avatar
 
Join Date: Jul 2012
Location: India
Posts: 4
Thanked: 11 Times
Re: DIY: Upgrading the Storage / SSD of a Macbook Air!

Quote:
Originally Posted by saket77 View Post
Make a bootable flash drive and you should be good to go. If you have any files to back up, get it on another external storage and iCloud. A good internet connection with at least 9-10 gb limit for a day can also see you through.

Regards.
You can also take a Time Machine backup and restore your present OS state on new drive or a new mac.
jagira is offline   (1) Thanks
Old 29th August 2020, 12:38   #13
Distinguished - BHPian
 
saket77's Avatar
 
Join Date: Dec 2012
Location: India
Posts: 4,835
Thanked: 14,716 Times
Re: DIY: Upgrading the Storage / SSD of a Macbook Air!

Quote:
Originally Posted by coolmind View Post
I have HP Notebook of 5 years old with I5 processor. Its with regular hard disc.
Can I upgrade to SSD hard disc with it?
Yes, it should be possible. Share the exact model and people here should be able to help.

Regards.
saket77 is offline   (1) Thanks
Old 29th August 2020, 13:29   #14
Newbie
 
Join Date: Aug 2020
Location: Chennai
Posts: 14
Thanked: 21 Times
Re: DIY: Upgrading the Storage / SSD of a Macbook Air!

Hi saket77. A detailed and useful post. I transitioned to OSX from Windows Vista. I found the experience of using a OSX in an Mac Book Pro hassle-free. Yet, when my MBP tanked after about 6 years of usage, I returned to Windows (Win 10 on an asus ux system) as Apples were becoming prohibitively expensive for me and Apple's service centers in India were not keen on repairing vintage products (>5 years old). Though 10 was a vast improvement over vista, I was uncomfortable while using it. Don't exactly know what the reason is - Windows’s interface or the way updates are installed/handled.

I quickly turned to Linux as I wanted a OSX like experience. While the Linux distro Elementary OS promised a OSX like experience, it was buggy. Linux Mint was much better. However, I have had the best experience so far with Kubuntu (Ubuntu with Kde) - easy to install, easy to use and updates are routinely provided. Of course, as with all things new, there is small learning curve.

In fact, for someone who works independently Kubuntu would work fine. It is also for someone who likes the robustness and features of an OSX and isn’t keen on spending on an Apple. Indeed, you will miss Windows if you collaborate with others. I use the obvious work around of running Windows 10 in a Virtual Box software. This arrangement gives me the best of both worlds: a fine OS running on an affordable and decently spec’d machine.

@Mods, this is my first post. Kindly delete if the entire post if off topic!

Last edited by Grand Vitesse : 29th August 2020 at 13:58. Reason: typo
Grand Vitesse is offline   (2) Thanks
Old 29th August 2020, 13:58   #15
BHPian
 
Join Date: Jun 2020
Location: Mirzapur(U.P.)
Posts: 61
Thanked: 131 Times
Re: DIY: Upgrading the Storage / SSD of a Macbook Air!

Quote:
Originally Posted by coolmind View Post
I have HP Notebook of 5 years old with I5 processor. Its with regular hard disc.
Can I upgrade to SSD hard disc with it?
Yes, upgrade is possible. Most likely you will need to buy a 2.5 inch SATA SSD which would get plugged directly in old hard disk slot.
100Rabh is offline   (2) Thanks
Reply

Most Viewed


Copyright ©2000 - 2025, Team-BHP.com
Proudly powered by E2E Networks