Team-BHP > Shifting gears > Et Cetera
Register New Topics New Posts Top Thanked Team-BHP FAQ


Reply
  Search this Thread
1,393,470 views
Old 2nd July 2008, 22:11   #886
Senior - BHPian
 
islero's Avatar
 
Join Date: Dec 2004
Location: Chennai
Posts: 1,574
Thanked: 13 Times

Nice work SRK..... played it safe with design, I can see..... very neat job, except the ground clearance looks a little weird in the front..... otherwise, great work.
islero is offline  
Old 3rd July 2008, 02:07   #887
BHPian
 
amitverma's Avatar
 
Join Date: Nov 2004
Location: New Delhi
Posts: 433
Thanked: 165 Times

i hope non-auto is allowed too.
sony ericsson xperia x1. 100% photoshop.
Attached Thumbnails
Photoshop/Digital Art thread-xperiax1_1440.jpg  

amitverma is offline  
Old 3rd July 2008, 17:03   #888
BHPian
 
revvedup's Avatar
 
Join Date: Sep 2006
Location: Delhi
Posts: 269
Thanked: 24 Times

Quote:
Originally Posted by islero View Post
Nice work SRK..... played it safe with design, I can see..... very neat job, except the ground clearance looks a little weird in the front..... otherwise, great work.
Beacuse he has forgotten about the rear bumper skirting . And Islero, SRK no comments about the BMW posted earlier !
revvedup is offline  
Old 3rd July 2008, 17:22   #889
Team-BHP Support
 
benbsb29's Avatar
 
Join Date: Nov 2006
Location: Brisbane
Posts: 10,052
Thanked: 13,858 Times

Shoeb, nice work on the Lancer.
However, is it just me, or do the size of the rims not match?
benbsb29 is online now  
Old 4th July 2008, 11:30   #890
SRK
Senior - BHPian
 
SRK's Avatar
 
Join Date: Sep 2005
Location: Mumbai
Posts: 1,205
Thanked: 536 Times

Quote:
Originally Posted by islero View Post
Nice work SRK..... played it safe with design, I can see..... very neat job, except the ground clearance looks a little weird in the front..... otherwise, great work.
Yes I wanted a simple body kit.
Something wierd about the ground clearance?? I didn't get it,can you help me out?

Quote:
Originally Posted by revvedup View Post
Beacuse he has forgotten about the rear bumper skirting . And Islero, SRK no comments about the BMW posted earlier !
The rear bumper skirt is present there. Its is too dark out there, so you dont see it.

Quote:
Originally Posted by benbsb29 View Post
Shoeb, nice work on the Lancer.
However, is it just me, or do the size of the rims not match?
I tried to make the rims exactly the same size, may be its because of the gap between the wheel wells, which looks bigger than it is, simply because its too dark out there.


By the way I will try and make a "Step-By-Step" guide to how I made this one,It was really fun brushing the whole car from scratch.
SRK is offline  
Old 5th July 2008, 11:34   #891
Senior - BHPian
 
badboyscad's Avatar
 
Join Date: Feb 2007
Location: TN
Posts: 1,511
Thanked: 480 Times

@SRK: The lancer looks awesome

Quote:
Originally Posted by SRK View Post

By the way I will try and make a "Step-By-Step" guide to how I made this one
You please do that (i wish there was a Worship smiley in tbhp).
badboyscad is offline  
Old 6th July 2008, 18:27   #892
SRK
Senior - BHPian
 
SRK's Avatar
 
Join Date: Sep 2005
Location: Mumbai
Posts: 1,205
Thanked: 536 Times

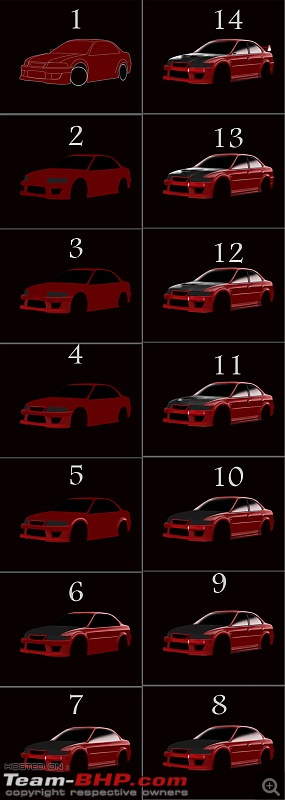
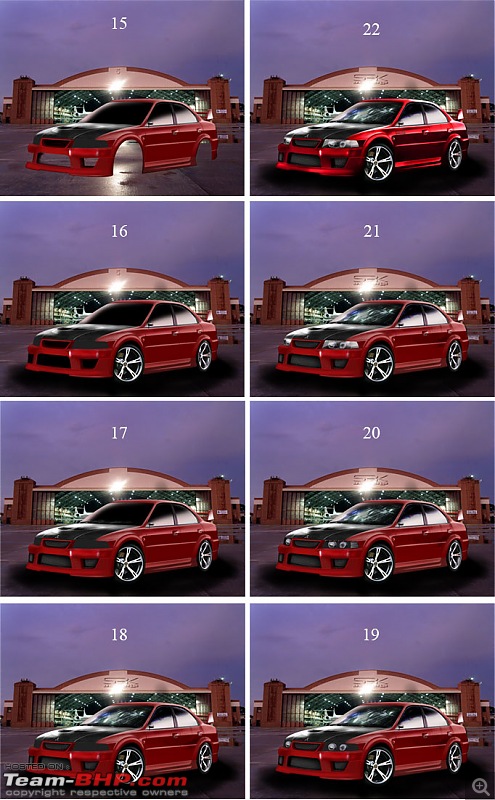
Here you can see how I brushed everything,Some details may not be visible due to the small size.

Tried making the Step-By-Step guide as small as possible but still its of 22 steps.

Hope it helps:

Level 1:

Photoshop/Digital Art thread-lancersteps.jpg

Level 2:
Photoshop/Digital Art thread-lancersteps2.jpg

So this is the way I designed the lancer,Hope it helps you too.
SRK is offline  
Old 7th July 2008, 00:19   #893
BHPian
 
Torqueguru's Avatar
 
Join Date: Nov 2007
Location: Seattle
Posts: 277
Thanked: 165 Times

Awsome Workflow. Vectoring At Its Best! Hats Off Buddy!
Torqueguru is offline  
Old 7th July 2008, 01:59   #894
 
Cyrus43's Avatar
 
Join Date: Nov 2006
Location: London
Posts: 5,019
Thanked: 225 Times

This is Our very own team BHP Mr.Bean. Ravi a.k.a. Super Select.


This is what I designed for him!!

Cyrus43 is offline  
Old 7th July 2008, 04:54   #895
BANNED
 
Join Date: Jul 2006
Location: gurgaon/delhi
Posts: 331
Thanked: Once

guys, want to know how to create the fast moving car effect to a still car image in Adobe photoshop CS3. i want the complete step by step instructions as i dont know much about how to use photoshop. thanks
sanchits is offline  
Old 7th July 2008, 10:13   #896
Senior - BHPian
 
badboyscad's Avatar
 
Join Date: Feb 2007
Location: TN
Posts: 1,511
Thanked: 480 Times

@SRK: superb work. but still, please tell how do you draw the outline shown in step1. please add captions to each step if possible pleaseee.
badboyscad is offline  
Old 7th July 2008, 11:37   #897
SRK
Senior - BHPian
 
SRK's Avatar
 
Join Date: Sep 2005
Location: Mumbai
Posts: 1,205
Thanked: 536 Times

Quote:
Originally Posted by badboyscad View Post
@SRK: superb work. but still, please tell how do you draw the outline shown in step1. please add captions to each step if possible pleaseee.
OK,may be next time.
Making this one was too time consuming.

I use the pen tool for outline (or skecthing as I call it).
Do you know how to use it?

Quote:
Originally Posted by sanchits View Post
guys, want to know how to create the fast moving car effect to a still car image in Adobe photoshop CS3. i want the complete step by step instructions as i dont know much about how to use photoshop. thanks
Step1: Select the whole car using the lasso tool (I prefer the pen tool).
Step2: Copy your car onto another layer.
Step3: Inverse your selection and copy the background on seperate layer.
Step4: Select the new background layer and apply Motion Blur to it (You'll find it in Filter tab).
Step5: Select the wheels of the car and apply Radial Blur to it.

Hope this helps.

Last edited by SRK : 7th July 2008 at 11:41.
SRK is offline  
Old 7th July 2008, 12:54   #898
Senior - BHPian
 
badboyscad's Avatar
 
Join Date: Feb 2007
Location: TN
Posts: 1,511
Thanked: 480 Times

Quote:
Originally Posted by SRK View Post
OK,may be next time.

I use the pen tool for outline (or skecthing as I call it).
Do you know how to use it?
i ve never used the pen tool. please tell how to use it and which pen tool to use from the below pic.please do a pictorial of how to use the pen tool to sketch the outline of a car (if possible)

Photoshop/Digital Art thread-untitled.jpg
badboyscad is offline  
Old 7th July 2008, 20:10   #899
SRK
Senior - BHPian
 
SRK's Avatar
 
Join Date: Sep 2005
Location: Mumbai
Posts: 1,205
Thanked: 536 Times

I use the 1st pen tool.
Since I may not be a great tutor, I'll try and find a link which will help you.
Hope thats fine?


Found something: Vector Tutorial

Last edited by SRK : 7th July 2008 at 20:20.
SRK is offline  
Old 8th July 2008, 11:54   #900
Team-BHP Support
 
Rehaan's Avatar
 
Join Date: Feb 2004
Location: Bombay
Posts: 24,347
Thanked: 35,690 Times

Quote:
Originally Posted by SRK View Post
...Tried making the Step-By-Step guide as small as possible but still its of 22 steps....
Awesome stuff SRK!! Great job documenting the process!

(though next time try to put the workflow thumbs like :
1 2
3 4
5 6
... as i think that will help the viewing a bit.

cheers,
R

EDIT : Amit, im guessing you followed a similar process for your work too?
Rehaan is offline  
Reply

Most Viewed


Copyright ©2000 - 2024, Team-BHP.com
Proudly powered by E2E Networks