Team-BHP > Technical Stuff > DIY - Do it yourself
Register New Topics New Posts Top Thanked Team-BHP FAQ


Reply
  Search this Thread
1,117,897 views
Old 22nd June 2021, 08:20   #2506
Team-BHP Support
 
Gannu_1's Avatar
 
Join Date: Apr 2013
Location: Madras
Posts: 7,291
Thanked: 20,461 Times
Re: Tools for a DIYer

What a coincidence! When I had replaced the brake pads on my car sometime back, I had posted this on the ownership thread:

Quote:
Originally Posted by Gannu_1 View Post
That also reminds me to get a large pipe which I can use as a cheater bar to extend the lug wrench. Makes loosening the wheel's lug nuts way easier!
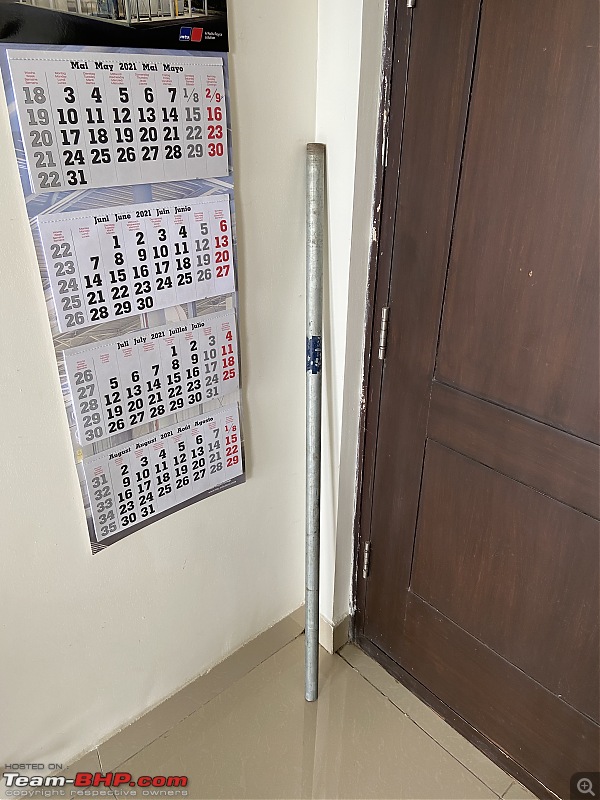
I got myself this GI pipe from a local hardware shop a couple of weeks back - 1 m length, 32 mm outer dia. for Rs. 280:

Tools for a DIYer-63f7108bc1bf4875adf2c3a891f71402.jpeg

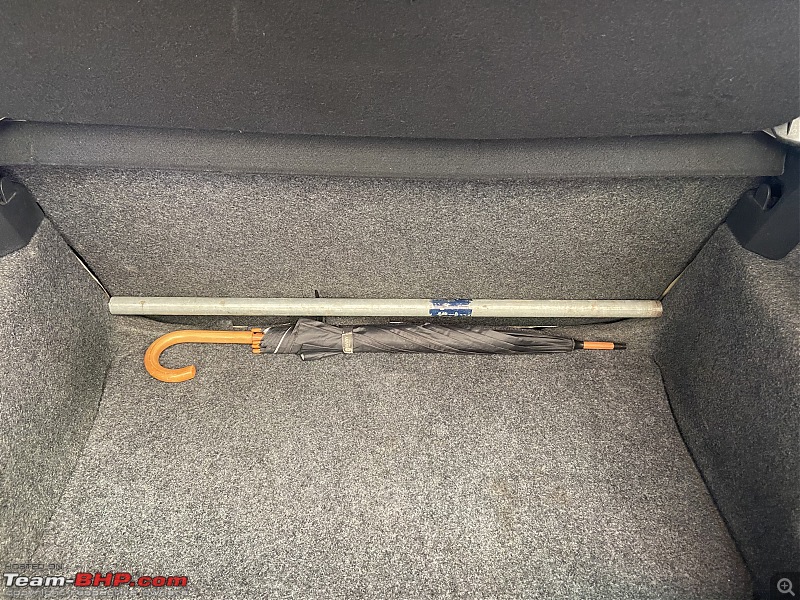
I had to trim the length a bit so it fits perfectly in the boot at the back of the rear seat:

Tools for a DIYer-27c4b4c06b7c47218f11c694199fa1f9.jpeg

Man, this thing turned out to be a godsend! Last Sunday, I had to change the tubing of the front windshield washing system and had to access the reservoir which is located in front of the driver-side wheel, hidden by the wheel well lining. Had to remove the wheel to access the lining thus.

The pipe was immensely helpful and I barely had to put any effort to loosen the bolts which were tightened at the wheel balancing/alignment centre. Usually I would have to stand on the lug wrench that came with the car and push/press a couple of times to loosen the bolts. With this pipe inserted over the lug wrench, I just had to push with the hand with almost no effort.

Tightening was easy too although one has to be careful not to strip the threads by over-tightening the bolt/nut as a long pipe exerts a great amount of torque compared to a shorter lug wrench.

This lug wrench extension pipe IMO, is a must-have in any car. Barely takes any space in the boot. Just have it secured using some Velcro belt or something. Easily the best 300 Rs I had spent in recent times.
Gannu_1 is offline   (10) Thanks
Old 23rd June 2021, 04:09   #2507
BHPian
 
Indian2003's Avatar
 
Join Date: Apr 2021
Location: Sarpsborg
Posts: 431
Thanked: 3,657 Times
Re: Tools for a DIYer

Quote:
Originally Posted by Jaguar View Post
That rules out 99.99% of the shops in India. The only place where I have personally seen a torque wrench being used for fitting wheels was at the Toyota service center in Srinagar.
I dont mean a torque wrench but a torque stick. This is fitted between the impact wrench and socket and the wheel bolt tightened. These are colour coded for different torques. I have one of 140 Nm for my car.

Tools for a DIYer-torquesticks.jpg

Quote:
Originally Posted by SB08121980 View Post
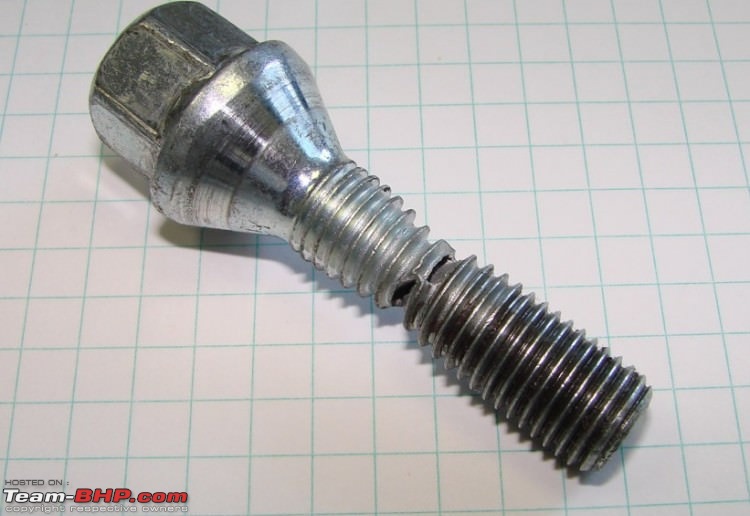
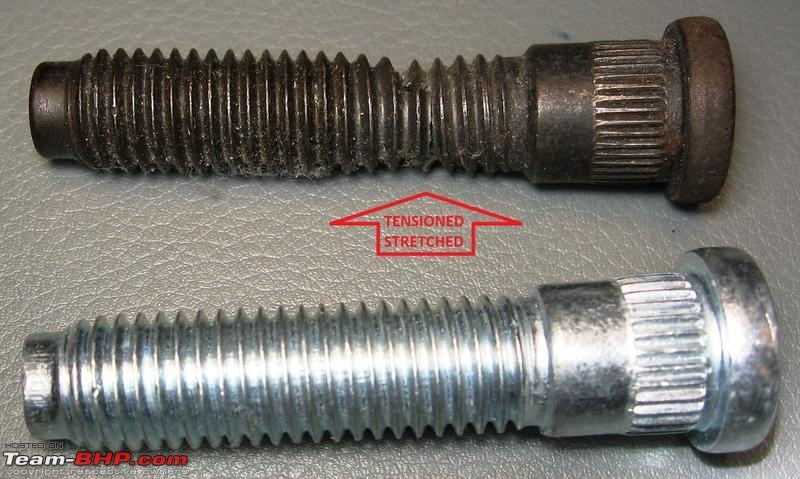
Those pneumatic impact wrenches not only make it hell difficult to unscrew those lug nuts when you have a flat tyre; I have seen threads get damaged and some cases, even the bolt shears off due those impact wrenches .
Here are 2 stretched bolts and lugs damaged by over tightening. No harm using a torque stick for tightening.

Tools for a DIYer-stretched.jpg

Tools for a DIYer-stretched1.jpg

I use an impact wrench to tighten my wheel bolts to 140 Nm. After a 100 kilometers, I go over with the same torque using the impact wrench. Never had problems.
Indian2003 is offline   (5) Thanks
Old 23rd June 2021, 10:30   #2508
Distinguished - BHPian
 
Join Date: Oct 2012
Location: Delhi
Posts: 8,628
Thanked: 57,268 Times
Re: Tools for a DIYer

Quote:
Originally Posted by Indian2003 View Post
I use an impact wrench to tighten my wheel bolts to 140 Nm. After a 100 kilometers, I go over with the same torque using the impact wrench. Never had problems.
The accuracy of torque wrenches depends to some extend on impact wrench as well. Rule of thumb, the higher the torque the more accuracy. There can a be noticeable difference using the very same torque stick when using two different impact wrench (e.g. say a pneumatic and an electric)

This guy does an interesting video on it:


Some very good comments on torque sticks too:

Quote:
First, a word about how torque sticks in general work. You'll note each stick is thinner as you go to lower torque specs. This makes each stick have less "torsional stiffness." Think of a graph with the torque on one axis and the rotation (in degrees angle) on the other. Each torque stick will have a different trace of torque vs angular displacement. The smaller ones have more angular deflection for a given amount of torque. Keep this in mind.


When you have no impact mechanism, this reduced torsional stiffness is irrelevant because the force is constantly applied. Thus, all the torque applied is passed along to the end of the torque stick. And the time associated with force application is irrelevant because it's essentially zero.


Now what happens with the impact mechanism? Starting with no or very low torque, the mechanism doesn’t actuate, you have no hammering action, just a steady/smooth. It takes a certain minimum amount of torque to cause the hammering action, which occurs when the torque (reaction torque, here) overcomes the dog/pin static torque, causing relative motion between hammer and anvil.

Since we have enough reaction torque to activate the mechanism, the tool behaves differently. Now, it delivers torque in discrete “chunks.” The torque delivered is much higher, but is short in time duration—an impulse. This is how a regular hammer works in striking a nail—the mass of the hammer and its velocity determine that energy it will be able to deliver to the nail.


But what if that carpenter’s hammer hits a nail covered with several thick layers of rubber? In this case, that impact energy is diverted into compressing the rubber instead of driving the nail. The same amount of energy is present, but less is delivered to the nail because more went into compressing the rubber matting over the nail.

The torsional stiffness of the torque sticks creates the same effect—the discrete impulse of the hammer mechanism is diverted into twisting the torque stick, causing each impulse to be changed into a longer time but lower peak event. The less stiffness, the more time and the less twist. The more stiffness, the less time and the more peak force.


That time component is absolutely key. There is a time parameter associated with each combination of torsional stiffness and impact force. The more torque or the less stiffness, the more time is consumed by each event. After each blow, some time must pass when the energy absorbed (stored) by the torque stick is returned to the system. Engineers would definite a “torsional modal frequency” to capture that time.

If the impact tool can apply another hammer blow before the torque stick has dissipated the energy it stored, then not all the energy from the torsional deflection will have been returned to the system yet; so the energy “accumulates” and the applied torque will increase. It’s as if before we had a swimming pool being filled at the same rate it was leaking out, causing the water level to remain constant, then suddenly someone plugs the pool’s leak and the water starts to rise.


Because the deep socket is less stiff in torsion than the short socket, it mimics some of the effect of the torque stick and it makes that time factor longer. This makes it more likely that energy will “pile up.” More specifically, it lowers the natural torsional resonant frequency of the system.

The shallow sockets have slightly higher torsional frequency, make the additional energy “pile up” at a much lower rate.

All that to say this: the “medium torque” cordless has much higher rate of hammer blows, and that frequency being higher than the natural torsional resonance of the system, it will allow the energy to “pile up” a bit, causing the delivered torque to the exceed the rating of the torque stick.


Torque stick manufacturers would do well to publish a maximum blows per minute “BPM” for each torque stick corresponding to its torsional modal frequency. But since they don’t know what sockets you’re using or anything, they can’t publish anything meaningful.

The takeaway here is not that the torque sticks need to be “calibrated”—it’s that they need to be used with a tool that has a low enough BPM rate to fall beneath their natural frequency.


PS: If you tried the highest torque rated sticks with the medium torque gun, you’d find this problem almost entirely disappears. WHY? The higher rated sticks are stiffer, have a higher frequency, and this frequency is almost certainly higher than the BPM rating of even the medium torque cordless gun.
Solution to all of this confusion: Get yourself a decent torque wrench!!

And even then, you need to be conscious that over time your torque wrench might go off. Mine went pretty wonky recently and I bought two very nice Proxxon torque wrenches.

Scroll down a bit here:

https://www.team-bhp.com/forum/diy-d...ml#post5067650


Jeroen
Jeroen is offline   (4) Thanks
Old 25th June 2021, 21:31   #2509
BANNED
 
Join Date: Oct 2011
Location: Hyderabad
Posts: 12,350
Thanked: 21,429 Times
Re: Tools for a DIYer

Torque Wrench: Mac Master TW50
Drive Size: 1/2 inch
Torque Range: 12-68Nm

Shall be getting another one in the range of 50-200Nm for the rest jobs on the car. Awaiting delivery of JCB Tools 1/2 inch flex handle.

Last edited by a4anurag : 25th June 2021 at 21:39.
a4anurag is offline   (1) Thanks
Old 25th June 2021, 22:57   #2510
BHPian
 
GutsyGibbon's Avatar
 
Join Date: Mar 2008
Location: Southern Calif.
Posts: 788
Thanked: 4,782 Times
Re: Tools for a DIYer

Quote:
Originally Posted by Gannu_1 View Post
The pipe was immensely helpful and I barely had to put any effort to loosen the bolts which were tightened at the wheel balancing/alignment centre. Usually I would have to stand on the lug wrench that came with the car and push/press a couple of times to loosen the bolts.
The pipe would work, and as you mentioned it may work too well. I recommend a extendable torque wrench with a quick release. I have something like this, it's a lot more easy to store, and I use it all the time.
https://www.amazon.com/CASAR-Extenda.../dp/B08G44TMQY
Ideally auto shops should be using torque gauge to apply specific torque as per specifications. But most people end up over tightening, and make removing of the lug nuts a pain.
GutsyGibbon is offline   (1) Thanks
Old 27th June 2021, 06:27   #2511
BHPian
 
Join Date: Nov 2012
Location: Hyderabad
Posts: 114
Thanked: 213 Times
Re: Tools for a DIYer

Thanks for all the replies and suggestions!

I also had change tires a month ago, and I had real difficulty opening the wheel lugs as the wheel alignment shops use an insane amount of torque, and that is not really good for the wheel assembly..

My car is a Honda Civic and the proper torque for tightening the wheels is 80 ft-lb

After much research I got the following torque wrench . The decision to get this model was simply driven by the large number of +ve reviews in Amazon

Tools for a DIYer-61a33gwf3ul._sl1500_.jpg

For opening over-tightened wheel lug nuts and after much research and suggestions from this site and others, I narrowed down on the below cost effective solution
  1. Taparia 2733 T-handle - this is a 3/4" square drive solid T-Handle with a 500mm handle length

2. I have also bought a 19 mm 3/4" square drive deep hexagonal socket along with a 1 meter pipe for added leverage.

This should now work flawlessly for my DIY work of setting the wheel lug nut torque to the proper torque setting

Plan on doing that today

Last edited by Rudra Sen : 15th August 2021 at 08:44. Reason: pic size edited
ssenhyd is offline  
Old 27th June 2021, 13:37   #2512
BHPian
 
Join Date: Nov 2012
Location: Hyderabad
Posts: 114
Thanked: 213 Times
Re: Tools for a DIYer

Finished torquing up the lug nuts of the four wheels on my Civic to the manufacturer recommended 80 ft-lb torque!

Hearing the click-click of the torque wrench (Tekton 24335) when the nuts reached the proper torque was very satisfying.

Feel pretty happy!

The Taparia 2733 500 mm 3/4" T-Handle was perfect for loosening the over tightened lug nuts initially. I did not even need the 1 meter pipe I had purchased to provide additional leverage while opening the lug nuts. This T-handle is really solidly built and inspires confidence with it's heft and weight.

I would strongly recommend this one to everyone

Costs around Rs 800 odd bucks with GST and worth the price
ssenhyd is offline   (1) Thanks
Old 26th July 2021, 17:27   #2513
Distinguished - BHPian
 
sagarpadaki's Avatar
 
Join Date: May 2010
Location: Bengaluru
Posts: 4,359
Thanked: 6,468 Times
Re: Tools for a DIYer

I need to cut a 5mm thick iron rod. But the catch is it is in a very hard to reach place with little clearance to move a hand saw. I tried with a Dremel and it goes into the tight space just perfect. I now want a attachment to Dremel which can cut this iron rod. I could not find any proper leads on Amazon or other online stores. Any guidance would be appreciated.
sagarpadaki is offline  
Old 26th July 2021, 18:52   #2514
BHPian
 
carthick1000's Avatar
 
Join Date: Nov 2006
Location: CJB-Driel
Posts: 694
Thanked: 2,880 Times
Re: Tools for a DIYer

Quote:
Originally Posted by sagarpadaki View Post
I now want a attachment to Dremel which can cut this iron rod. I could not find any proper leads on Amazon or other online stores. Any guidance would be appreciated.
I think you need a speedclic / EZ lock accessory with the right blades for your material type. On Amazon, I could find the following:

https://www.amazon.in/Dremel-SC456B-...dp/B001DH7X22/

https://www.amazon.in/Dremel-EZ456B-...dp/B000FBLRVU/

If you don't have a chuck / the blade holder, you can get something like this:

https://www.amazon.in/DIY-Crafts-Uni...dp/B07CVDWTNV/

Choose based on what type of accessory (Speedclic / EZ lock / chuck) you already have for Dremel.
carthick1000 is offline  
Old 26th July 2021, 19:16   #2515
Distinguished - BHPian
 
Thad E Ginathom's Avatar
 
Join Date: Jun 2007
Location: Chennai
Posts: 11,258
Thanked: 28,596 Times
Re: Tools for a DIYer

Cut-off discs. This is the low-cost alternative: Amazon Link

I've seen these praised by a guy on youtube recently, but he is a skilled machinist, and even he says they break if you even look at them wrong. That's my small experience. Very fragile, which means dangerous. Eye protection essential, full-face would be good.
Thad E Ginathom is offline   (1) Thanks
Old 26th July 2021, 19:27   #2516
BHPian
 
Amrik Singh's Avatar
 
Join Date: Aug 2010
Location: New Delhi
Posts: 685
Thanked: 3,591 Times
Re: Tools for a DIYer

Quote:
Originally Posted by sagarpadaki View Post
I need to cut a 5mm thick iron rod. But the catch is it is in a very hard to reach place Any guidance would be appreciated.
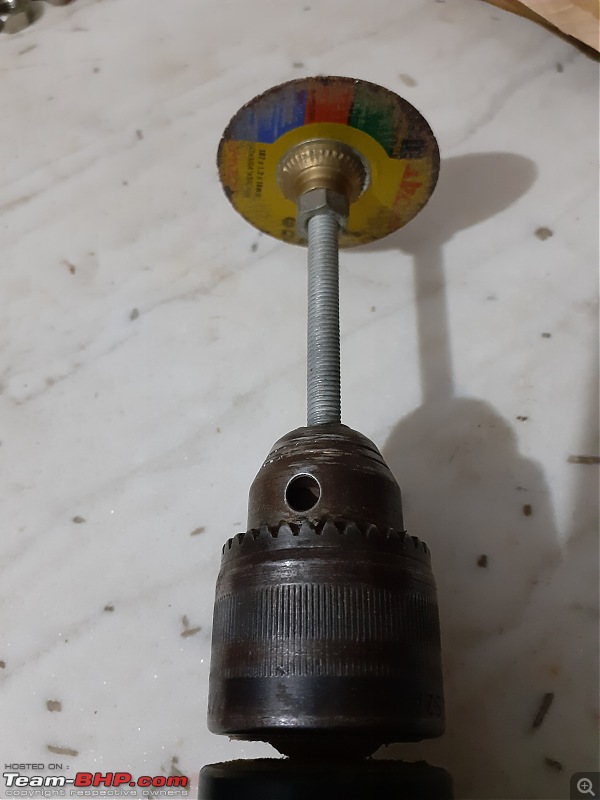
If at least a drill machine can reach the intended cut, take a worn out cutting disc, sandwich between bolt head and a Nut, fix the bolt in drill machine chuck and you can manage cutting it.
Amrik Singh is offline   (1) Thanks
Old 26th July 2021, 20:24   #2517
Distinguished - BHPian
 
sagarpadaki's Avatar
 
Join Date: May 2010
Location: Bengaluru
Posts: 4,359
Thanked: 6,468 Times
Re: Tools for a DIYer

Quote:
Originally Posted by carthick1000 View Post
I think you need a speedclic / EZ lock accessory with the right blades for your material type. On Amazon, I could find the following:

https://www.amazon.in/Dremel-SC456B-...dp/B001DH7X22/

https://www.amazon.in/Dremel-EZ456B-...dp/B000FBLRVU/

If you don't have a chuck / the blade holder, you can get something like this:

https://www.amazon.in/DIY-Crafts-Uni...dp/B07CVDWTNV/

Choose based on what type of accessory (Speedclic / EZ lock / chuck) you already have for Dremel.

Thanks. I have the stock chuck which came with Dremel.

The metal cutting wheels are perfect but they are not locally available and pretty expensive to import.


Quote:
Originally Posted by Thad E Ginathom View Post
Cut-off discs. This is the low-cost alternative: Amazon Link

I've seen these praised by a guy on Youtube recently, but he is a skilled machinist, and even he says they break if you even look at them wrong. That's my small experience. Very fragile, which means dangerous. Eye protection essential, full-face would be good.
Thanks, These sound dangerous. But I guess with necessary precaution, I can make it work. The blades are affordable

Quote:
Originally Posted by Amrik Singh View Post
If at least a drill machine can reach the intended cut, take a worn out cutting disc, sandwich between bolt head and a Nut, fix the bolt in drill machine chuck and you can manage cutting it.

Good idea. I will check if there is clearance for a drill machine in the confined space.
sagarpadaki is offline   (3) Thanks
Old 26th July 2021, 21:43   #2518
BHPian
 
Amrik Singh's Avatar
 
Join Date: Aug 2010
Location: New Delhi
Posts: 685
Thanked: 3,591 Times
Re: Tools for a DIYer

This is how I mean.


Tools for a DIYer-20210726_213946.jpg


Tools for a DIYer-20210726_213926.jpg

Please exercise caution. This is a Jugaad
Amrik Singh is offline   (4) Thanks
Old 27th July 2021, 01:56   #2519
Distinguished - BHPian
 
Thad E Ginathom's Avatar
 
Join Date: Jun 2007
Location: Chennai
Posts: 11,258
Thanked: 28,596 Times
Re: Tools for a DIYer

Quote:
Originally Posted by sagarpadaki View Post
Thanks. I have the stock chuck which came with Dremel.
The adjustable chuck is a great upgrade, especially if you use the Dremel as a drill.
Thad E Ginathom is offline  
Old 29th July 2021, 11:57   #2520
Distinguished - BHPian
 
sagarpadaki's Avatar
 
Join Date: May 2010
Location: Bengaluru
Posts: 4,359
Thanked: 6,468 Times
Re: Tools for a DIYer

Quote:
Originally Posted by Thad E Ginathom View Post
The adjustable chuck is a great upgrade, especially if you use the Dremel as a drill.
I do not intend to use dremel as a drill. Will put this on my shopping list for later

Quote:
Originally Posted by Amrik Singh View Post
This is how I mean.

Please exercise caution. This is a Jugaad
Just checked, the drill I have is barely able to enter the confined opening inside which there is the rod that I need to cut. I do not think it would be feasible to do this with a drill. Thanks though. Will keep this in mind next time I need to cut something that is accessible
sagarpadaki is offline   (1) Thanks
Reply

Most Viewed


Copyright ©2000 - 2024, Team-BHP.com
Proudly powered by E2E Networks