Team-BHP > Technical Stuff > DIY - Do it yourself


Reply
  Search this Thread
122,682 views
Old 4th December 2008, 15:23   #31
Senior - BHPian
 
getsurya's Avatar
 
Join Date: Aug 2008
Location: Hyderabad
Posts: 1,647
Thanked: 1,950 Times

Hi Soni,

On behalf of BBS, the following link will tell you which capacity resistor to use

Current limiting Resistor calculator for leds

( i too learnt all this recently so )
getsurya is offline  
Old 4th December 2008, 15:29   #32
Senior - BHPian
 
Join Date: Feb 2006
Location: BLR
Posts: 2,222
Thanked: 26 Times

Gotta love DIY!!! Even though these things are available its a nice feelng when you see the end result of of your efforts na

A tip for those working with LED's : To get rid of that spotlight type effect you can shave/sandpaper the head of the LED to make it flat. This reduces intensity a bit but gives a nice uniform glow instead.

Will post some pics when I get the time.
s0uljah is offline  
Old 5th December 2008, 16:25   #33
BHPian
 
shyamhegde's Avatar
 
Join Date: Dec 2006
Location: Bangalore
Posts: 284
Thanked: 5 Times

LED DIY are becoming popular !
Good one here, badboy

Are they affected by heat in the headlight assembly by any chance?
You can chose slightly higher resistor value to limit the current than optimal rating, just to increase the life of LEDs in that hostile location. Anyways, now you the know art of suffing more LEDs on to the holder, which will compensate to loss of brightness..
shyamhegde is offline  
Old 5th December 2008, 17:40   #34
Senior - BHPian
 
Technocrat's Avatar
 
Join Date: Feb 2004
Location: GTA
Posts: 14,815
Thanked: 2,703 Times

Thats a good DIY.

My only concern is with such bright parking light will there be an impact on headlight?
Technocrat is offline  
Old 5th December 2008, 18:21   #35
Senior - BHPian
 
badboyscad's Avatar
 
Join Date: Feb 2007
Location: TN
Posts: 1,511
Thanked: 480 Times

Quote:
Originally Posted by shyamhegde View Post
Are they affected by heat in the headlight assembly by any chance?
You can chose slightly higher resistor value to limit the current than optimal rating, just to increase the life of LEDs in that hostile location.
until now there is no adverse effect caused by the headlight heat. 470 ohms 1/4 watt (i ve used 1/2 watt) is the optimum rating, anything more prevents the LED from glowing.

Quote:
Originally Posted by Technocrat View Post
My only concern is with such bright parking light will there be an impact on headlight?
No impact on headlight, infact the blue color is almost invisible when headlamps are turned on.

Last edited by badboyscad : 5th December 2008 at 18:25.
badboyscad is offline  
Old 6th December 2008, 00:04   #36
Senior - BHPian
 
badboyscad's Avatar
 
Join Date: Feb 2007
Location: TN
Posts: 1,511
Thanked: 480 Times

i couldnt get sleep so i went ahead with the speedometer blue lighting diy.moreover, night is the best time to check the illumination. so here goes :

Many thanks to souljah for giving the idea of flattening and sanding down the LEDs to get uniform glow.

Components:
6 5mm blue LEDs.
2 47Ohms 1/4 watt resistors.
plastic sheath of some wire (used as sleeves)
tape

tools:
soldering iron.
file & blade (used instead of sandpaper).
cutter.

3 LEDs filed until their gloss is lost:
DIY-Blue LED Parking Lamp & Speedo Meter+Wire Mesh Grille & Underbody Neons for Alto-05122008374.jpg
DIY-Blue LED Parking Lamp & Speedo Meter+Wire Mesh Grille & Underbody Neons for Alto-h.jpg

The LEDs soldered in a series with the 47ohms resistor(at the +ve lead)
DIY-Blue LED Parking Lamp & Speedo Meter+Wire Mesh Grille & Underbody Neons for Alto-05122008379.jpg

The LEDs temporarily taped to the speedometer unit to check the illumination and to adjust the angle of focus.
DIY-Blue LED Parking Lamp & Speedo Meter+Wire Mesh Grille & Underbody Neons for Alto-s.jpg

Behold, a blue speedometer.(just testing with one side alone)
DIY-Blue LED Parking Lamp & Speedo Meter+Wire Mesh Grille & Underbody Neons for Alto-05122008382.jpg
DIY-Blue LED Parking Lamp & Speedo Meter+Wire Mesh Grille & Underbody Neons for Alto-05122008384.jpg

@ Mods: Please change the thread's title to - "DIY - Blue LED parking lamp & speedometer lighting for Alto"

Last edited by badboyscad : 6th December 2008 at 00:12.
badboyscad is offline   (1) Thanks
Old 6th December 2008, 00:19   #37
 
Cyrus43's Avatar
 
Join Date: Nov 2006
Location: London
Posts: 5,019
Thanked: 223 Times

Waah Waah!!! Lookin Good!! I did something similar to my girlfriend's Dio recently.

@Ramie, How can i fit the LEDs into the usual 12V socket? it is the small socket i am talking about.
Cyrus43 is offline  
Old 6th December 2008, 01:38   #38
Senior - BHPian
 
badboyscad's Avatar
 
Join Date: Feb 2007
Location: TN
Posts: 1,511
Thanked: 480 Times

Finally, finished making another LED strip for the second lamp and tested:

DIY-Blue LED Parking Lamp & Speedo Meter+Wire Mesh Grille & Underbody Neons for Alto-06122008387.jpg

Now i ll try to get some sleep.

Last edited by badboyscad : 6th December 2008 at 01:45.
badboyscad is offline  
Old 6th December 2008, 11:20   #39
BHPian
 
smokin's Avatar
 
Join Date: May 2008
Location: delhi/gurgaon
Posts: 281
Thanked: 15 Times

that's a bling on man !!great DIY!

but as i know LED's and t he work i do with them ,led's emmit light in particular angles only
it can be 15 or 30 0r 60 degree ,by seeing your work i can say that it's a 45 one (just assumption) ,so the light in some areas will be a bright where in some areas will be decent .

I would suggest you to change the angle of led's (side ones a little bit towards outer point ) so that the spread of light will be much more ..

I hope you got my point
smokin is offline  
Old 6th December 2008, 13:53   #40
BHPian
 
eagle_f1's Avatar
 
Join Date: Dec 2004
Location: Bangalore
Posts: 142
Thanked: 13 Times

AWESOME DIY job buddy.

Can it be done on the old ZEN ?????????

Please post step by step pics of the procedure.
eagle_f1 is offline  
Old 6th December 2008, 14:03   #41
Senior - BHPian
 
badboyscad's Avatar
 
Join Date: Feb 2007
Location: TN
Posts: 1,511
Thanked: 480 Times

Finished tweaking the angle of the LEDs and soldered them to the terminals.

LEDs soldered and insulated using tape:
DIY-Blue LED Parking Lamp & Speedo Meter+Wire Mesh Grille & Underbody Neons for Alto-06122008389.jpg

End result:
DIY-Blue LED Parking Lamp & Speedo Meter+Wire Mesh Grille & Underbody Neons for Alto-06122008391.jpg

Will post night shots tonight.
badboyscad is offline  
Old 6th December 2008, 14:18   #42
BHPian
 
shyamhegde's Avatar
 
Join Date: Dec 2006
Location: Bangalore
Posts: 284
Thanked: 5 Times

Excellent effort and result ! You the DIY man now
I guess s0uljah's suggestion suited well for this application !
shyamhegde is offline  
Old 6th December 2008, 15:41   #43
BHPian
 
sonirohit's Avatar
 
Join Date: Nov 2008
Location: Chandigarh
Posts: 321
Thanked: 15 Times
Amazing Result

The Blue Backlit dials look really cool - it's high time you create a selectable color backlit DIY - have a selector knob connected to different colored LEDs, turn a knob and the backlight color changes. That would be the coolest DIY.
sonirohit is offline  
Old 6th December 2008, 20:18   #44
BANNED
 
Join Date: Oct 2007
Location: Ludhiana
Posts: 706
Thanked: 42 Times

its already dark.. no pics yet!!!
monty9991 is offline  
Old 7th December 2008, 18:33   #45
Senior - BHPian
 
badboyscad's Avatar
 
Join Date: Feb 2007
Location: TN
Posts: 1,511
Thanked: 480 Times

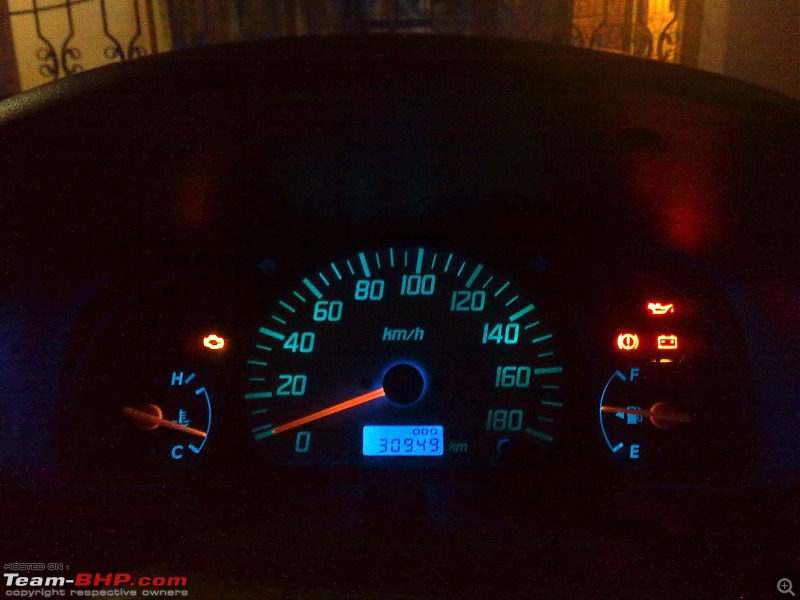
Here are the night shots:

DIY-Blue LED Parking Lamp & Speedo Meter+Wire Mesh Grille & Underbody Neons for Alto-07122008394.jpg
DIY-Blue LED Parking Lamp & Speedo Meter+Wire Mesh Grille & Underbody Neons for Alto-07122008396.jpg

Last edited by badboyscad : 7th December 2008 at 18:37.
badboyscad is offline  
Reply

Most Viewed
Thread Tools Search this Thread
Search this Thread:

Advanced Search

Copyright ©2000 - 2024, Team-BHP.com
Proudly powered by E2E Networks