DIY – AT oil replacement for Innova 2.8 - AC60
As most of them who owns a Innova / Fortuner / Hilux or any AT car for that matter, the service centers are not happy to replace the AT oil stating its sealed for life.
I had the similar experience and after requesting a lot they agreed to replace the oil but not to flush and replace the filter. Basically they were just ready to drain the oil from the oil pan and fill back in, which is not the correct procedure.
I wasn’t convinced and started going through various forums and videos to understand how it is done properly. Let me not waste your time with too much of write up and lets straight away go into details.
Odo at the time of Oil change was 1,11,800 kms
Parts Required
• 8 Ltrs of Toyota WS oil (each can is 4 ltrs) – Part No 0888681855 – Approx. 4800rs each tin
• AT oil filter – Part No – 3533071010 – Approx. 3600rs
https://boodmo.com/catalog/part-oil_strainer-7279382/
• Oil Pan Gasket (optional)
• Brake cleaner / Carburetor cleaner (any make)
 Tools Required
• Hose clip remover / nose plier
• 10 & 12 size ratchet / Tubular spanner
• 24mm Socket / Spanner
• Bucket & Jug with measuring scale
• 12v pump (funnel and pipe could be used in absence of pump)
• Allen key – M8
• IR thermometer
• Waste Rags
• Plastic prying tool (screw driver tip can be used carefully)
• Paint brush / Soft brush
• Jack stands

Note : Here I borrowed a mechanics space with a work pit which I could go under the car when the workshop was closed.
Step 1 – Loosen the filler bolt (24mm) on the GB (passenger side), this is to allow air in for the oil to flow out. Then drain the oil from the pan by loosening the drain plug with an Allen Key (m8 or equivalent in the ratchet set) . Make sure to drain the oil into the bucket which has measuring scale.
In my case I did a jugaad of marking the white bucket with 1 ltrs scales.
 Step 2
 – Unscrew the pan protector held with five – 12 size bolts. Once the protector shield is off, unscrew eight – 10 size bolts around the oil pan. Use prying tool / flat head screw driver to pry out the pan slowly.
 Step 3
 – Once the pan is off, let the oil drip out. Clean the oil pan and the 3 magnets with the brake cleaner and let it dry. My suggestion is to use thick paper towels to clean them up.
In this step you could notice how much wear & tear the GB has gone through by seeing the thickness of sludge on the magnets.

 Step 4
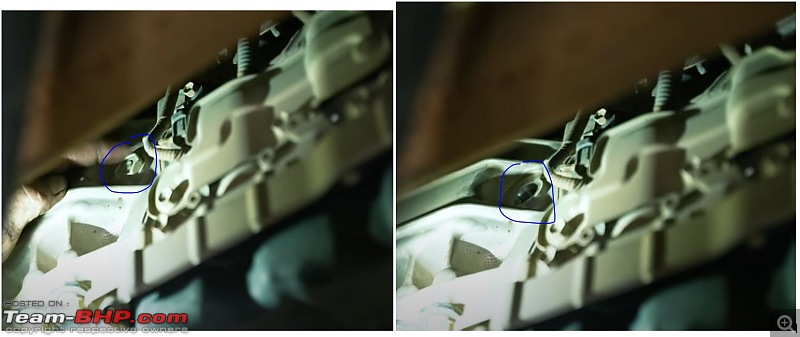
 – Time to remove the filter. Unscrew three- 10 size bolts holding the filter. Make sure you place the bucket before you pull the filter out. Slowly full the filter downwards, its just held by the O ring on the neck.
Once the filter is out, soak the paper towel /rag with brake cleaner and clean the surface including the pan mating surface.
 Step 5
 – Just apply a thin coat of new oil on to the new AT filters O ring and push it back into place and put back the 3 screws holding it. Make sure not to over tighten them as they’re held on to aluminum valve body. Be careful around the filter as there are electronic valves / wires around them.

 Step 6
 – Check for any cracks or cuts in the oil pan gasket, if none put back the cleaned pan using 8 -10mm bolts. Tighten the bolts in cross pattern. Clean any oil drips around the pan or GB post installation of the Pan.
 Step 7
 – Fill in 3.5 liters of AT oil through the filler plug (24mm bolt). Put back the filler bolt. Hand tighten the bolt for now.
(Make sure Pan drain plug and leveler plug is tightened before filling in Oil)
Had missed to take a pic of the filler plug, the one above is from internet.


 Step 8
 – Here we 2 people to perform this step.
Since this car doesn’t come with a separate AT oil cooler, it is embedded into the radiator itself.
Move to the front section of the car, at the bottom of the radiator there are 3/4th inch pipes, remove the pipe towards passenger side frame. (2 pipes – 1 pipe brings in the oil and the other exits, we are removing the exit pipe from the radiator so that we flush the oil though the valve body, torque convertor, radiator (AT Cooler) ).
Insert an extension pipe into the radiator outlet and ask the other person to start the car, within 30-40 seconds you could notice slight bubbling in the oil outlet, that means we are are running out of oil in the pan, turn off the engine. Fill in the pan with another 3.5 ltrs of oil as mentioned in step 7.
Repeat the same, start the engine and this time as the person sitting in the car to move the gear across R N D so it goes through all the gear valves (he needs to be quick, approx. 5 seconds each gear).
The person below the car to keep noticing the color of the oil. As you see fresh oil coming out of the radiator outlet switch off the engine and plug back the hose.
So in this step we have completed the flush step.
Go back to step 7 again, but this time unscrew the leveler plug from the Pan and fill in the remain oil and as you see oil dripping out of the leveler stop filling in and put back the leveler plug.

 Step 9
 – Start the car slowly move the gear in to R N D for 15 secs in each so that if there are any air gaps it would be cleared. Slowly take it for a test drive and slot into every gear possible.
Once the engine is at operating temperature (approx. 5-6kms drive), get below the car and check for the Oil pan temperature it should range anywhere between 40-46 Deg Celsius (make sure to check at multiple points across the pan for average temperate). Once you average the temperature unscrew the leveler plug oil should drip out in the thin line, wait until the oil stops draining out with a thin streak.
Note : At 40-46 deg C if the oil doesn’t drain from the leveler, which in my case happened, you need to add oil through the filler until you see the oil dripping out of the leveler plug.
Note : If you have access to professional scanning tool, you could use the same to measure the AT oil temperature instead of the IR thermometer which I used.
 Step 10
 – Tighten the filler bolt (24mm), clean all the hoses, surfaces and check for any leakages.
If there are none, you’re done with the job and you could enjoy smooth & quick shifts.
On a precautionary note I drove the car for a week and checked the oil through the leveler plug and it was fine so no oil top up was required.
I could fill in approx. 7.8 ltrs into the system. I have driven approx 5k post this change and its worth the time and money I spent on this.
I was very lazy to type this one until I saw some members were charged for 2 cans and filling in only one can from TASS. Also they did not do the flush. Hence I taught this would help many.
This procedure is similar for all AT Gearboxes without dipstick
Some more pictures
Bad oil which came out of the system.

Comparison of the Old and Fresh Oil

I dropped off the used oil at Shell Fuel Station so that it goes through proper recycling channel.
Happy to answer any questions.


 25th August 2024, 14:36

 (81)
Thanks
(81)
Thanks


