Team-BHP > Technical Stuff > DIY - Do it yourself
Register New Topics New Posts Top Thanked Team-BHP FAQ


Reply
  Search this Thread
4,274 views
Old 22nd June 2024, 10:40   #1
BHPian
 
Join Date: Jul 2023
Location: Hubli-Dharwad
Posts: 49
Thanked: 295 Times
Detailed DIY | Electrically-adjustable ORVMs in my Maruti Alto

Hey Everyone,

I was having an urge to control my left mirror while sitting at comfort on my right seat, but Alto didn't have one. So I took this way to convert my existing Internally Adjustable Manual ORVMS to electrically actuated ones.

Materials:

  1. Internally/Dome-feather touch type Adjustable ORVM (Ignore if you already have them). For BS-2 to BS-3/4 till 2011 Alto Owners, check first gen alto K10 mirrors.
  2. I20 Actuators (LHS and RHS):
    https://boodmo.com/catalog/part-actu...r_lh-25454104/
    https://boodmo.com/catalog/part-actu...r_rh-25454105/
  3. Mirror adjustment joystick (Maruti Suzuki):
    https://boodmo.com/catalog/part-swit...rror-38161865/
  4. 18/20 AWG wires.
  5. Couplers with pins.
    https://amzn.in/d/3aNjp5N


Tools/Consumables:

  • Hot Glue gun
  • Soldering Gun
  • Hot air Gun
  • 12V supply
  • Crimping tool


Personally most of my tools are from Ingco since they are cordless and all share same battery.


Some Questions before we proceed:


Why I chose i20 actuators?
The dimensions looked quite promising for Alto's mirror dome, though I was not sure about mounting, earlier I had though that I will 3D print an adapter to fit the actuator to mounting points inside mirror cover. But that was not required as two screw points just mount easily.

Why use Maruti's switch?
Again no such particular requirements, except the I found it cheaper than others, and Boodmo's free delivery sale.

Do you need to buy any additional auxiliary for this project?
No, but I did buy a fuse box and silicon wires since they are flexible and better. So this is completely based on one's preference.

What is the risk factor/wastage and precautions?
Mirror's are extremely fragile and you might have to be careful while pulling them out of their brackets. You might also have to delete the frame that holds mirror.


Other than that, if you are using Internally adjustable ORVMs, you have to remove cable adjusted setup, which might be irreversible in case you would like to abandon the project, so proceed with dexterity and patience.Since we have no wiring harness (or would really need one) and their couplers, insert the pins carefully in actuators and switch so as not to short one another. Check with multi meter if all pins are seated correctly without shorts then proceed to fill in glue.

Hazard of electric shock while working with 12V bench supply, ensure you have proper ground, and your bench supply has all safety facilities.

Glue from hot gun nozzle can be very hot, ensure not to touch hot nozzle or take care of hot glue not dropping/touching your skin.


Let's get into the project now:

Preparations:


The Mirror Joystick switch:


Start with figuring out pins of the switch if you are using any other switch than mine. You can use continuity check on your multimeter which tell you what pin leads to what circuit behind certain button. Then you need to devise the logic based on that behaviour. Here is what mine looks like:

Detailed DIY | Electrically-adjustable ORVMs in my Maruti Alto-img_0968.jpeg


Actuators:


Once you are done with the switch, attach wires (I assume you might not be having or needing wiring harness that has appropriate coupler), time for adding wires to the actuator(s) you bought for mirrors.

I have added wires by individually connecting each pin with female pin we normally use, added hot glue on top like this for both actuators and switch:

Detailed DIY | Electrically-adjustable ORVMs in my Maruti Alto-img_0848.jpeg

And this is how mirror switch looks like:
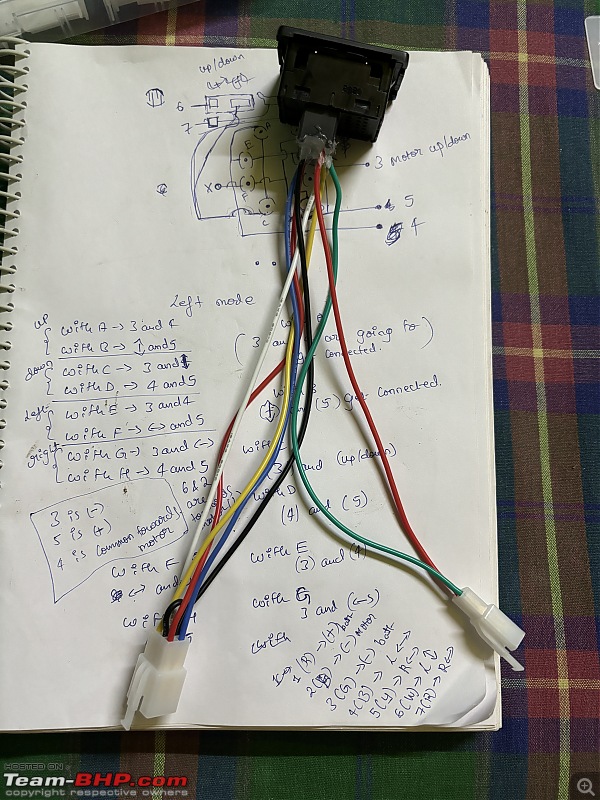
Detailed DIY | Electrically-adjustable ORVMs in my Maruti Alto-img_0856.jpeg

Test the wires as per pin (for i20 specifically/or in retrospective applicable to 3 PIN actuators).Pin arrangement looks something like this:

Name:  Screenshot 20240622 at 10.27.008239AM.png
Views: 193
Size:  8.3 KB

Connect actuator wires to the switch, hookup power supply and start testing how the actuator moves. You might get confused easily so ensure you are looking at the actuator in correct angle so that up-down left-right motors are aligned correctly. Here is a demo on identifying how to orient.


Once you are done with above prep and testing, time to move to the car.


Fixing actuators inside car mirrors:


Couple points to keep in mind:


Though your suggestions are most welcome, but here my approach is little destructive towards some mirror parts, and is mostly irreversible so please plan accordingly.

Remove the mirrors from car: To avoid scratches on the mirror outer shell (especially if it is painted), setup your workbench accordingly by using soft foam/cloth to protect the finish.

Start by grabbing mirror holder out of the adapter.

Once the mirror is out, remove all components from inside which include 3 mechanical cables that run towards knob (if internally adjustable ORVM). Be careful not to put excess pressure on the mirror while trying to pry it up from its holder. These parts are now removed from the mirror:

Detailed DIY | Electrically-adjustable ORVMs in my Maruti Alto-img_1117.jpeg


You might also need to shave off some extra plastic part that protrude out hindering the movement of actuator with soldering gun.

Detailed DIY | Electrically-adjustable ORVMs in my Maruti Alto-img_0979.jpeg

Make sure to align the actuator and fit the actuator inside ORVM seated on two screw mount points. Note that you will only be able to use only two screw mountings as third one falls outside and should be left.

Pass the wires through the cylinder that holds the dome cover, run them inside just same way as mechanical cables.

Detailed DIY | Electrically-adjustable ORVMs in my Maruti Alto-img_0924.jpeg

Assuming you have checked and see that the actuator turns its face corresponding to Joystick buttons, you will now need to attach mirror on the actuator.

Remove the plastic adapter that is wrapped around the mirror glass, carefully by cutting small bits on its border while ensuring not to penetrate deep till mirror.

Once taken out, clean the glass and actuator surface perhaps with alcohol

I suggest you to stick some tape behind the mirror that is outside of the mating surface area on which the actuator should be struck. Reason is in an event of collision the mirror should not shatter and debris flying towards people's face.

Then apply Glue covering mostly central parts on actuator, wait for 1 min and just let the mirror sit on the glued surface. If you want make corrections possibly within first 5 mins.
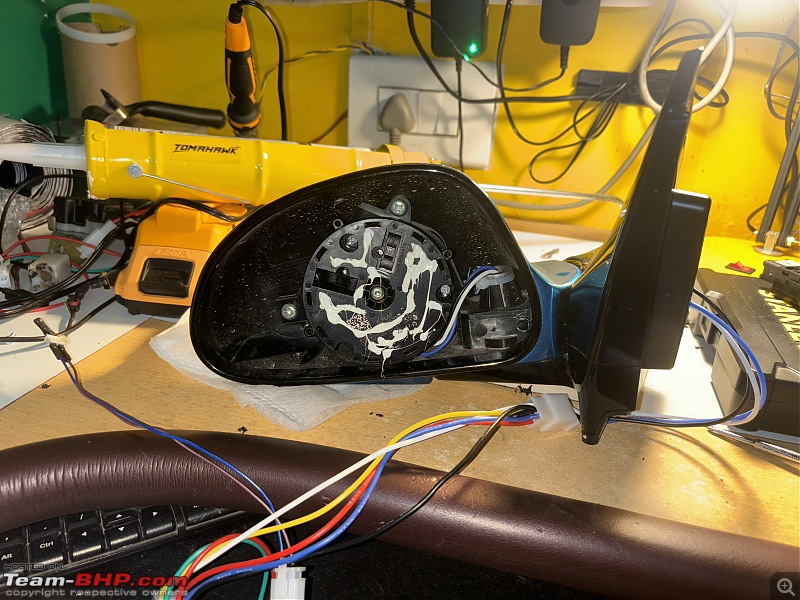
Detailed DIY | Electrically-adjustable ORVMs in my Maruti Alto-img_0930.jpeg

Leave it at least overnight before returning "ears" back to car.

Once mirror is attached properly, just add the coupler to those 3 wires. This should be done at last because once you add couplers, it might be difficult to remove them again in case something goes wrong.


Wiring:

I usually build complete wiring harness because that can be more maintenance friendly requiring no cutting wires in case you have to take them out.


[H4]Legend:[/H4] } -> male ,{ -> female

Detailed DIY | Electrically-adjustable ORVMs in my Maruti Alto-screenshot-20240622-10.17.118239am.png


You can hook up the power wire (+) to accessories or ignition (personally I would do it to ignition) with a fuse in between for added safety.

This is how mine looks like:

Detailed DIY | Electrically-adjustable ORVMs in my Maruti Alto-screenshot-20240622-10.13.008239am.png

This is LH and RH door harness that I custom built, includes, power mirrors, power windows and central lock actuator together.

The Mirror wiring harness inside dashboard:

Detailed DIY | Electrically-adjustable ORVMs in my Maruti Alto-img_0933.jpeg

Side DIY in case you are unable to source any one of the actuator, as mine. I was unable to get Right side actuator for i20 so I modified left to work as right actuator by swapping one of motor's polarity:
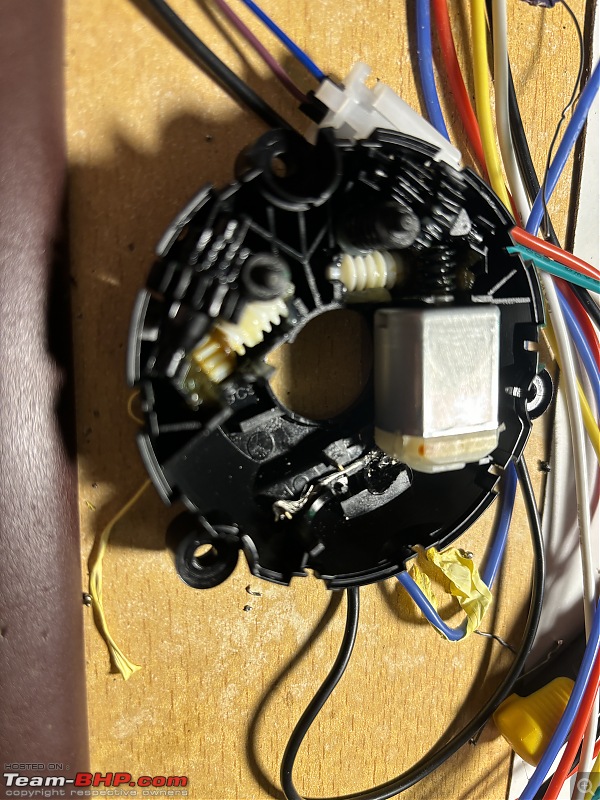
Detailed DIY | Electrically-adjustable ORVMs in my Maruti Alto-img_0867.jpeg

Working (I am not sure how to upload a video, however providing YouTube link for demo):

Attached Thumbnails
Detailed DIY | Electrically-adjustable ORVMs in my Maruti Alto-img_0863.jpeg  

Pannag is offline   (42) Thanks
Old 22nd June 2024, 11:05   #2
Distinguished - BHPian
 
BoneCollector's Avatar
 
Join Date: Apr 2011
Location: BIHAR
Posts: 3,228
Thanked: 10,893 Times
re: Detailed DIY | Electrically-adjustable ORVMs in my Maruti Alto

This is a neat job. It does involve a lot of wiring after understanding it and many people may not venture into this DIY. But those who love DIYs, this is for them.

I wonder why companies do not provide these basic adjustment things on all the cars. They should also provide automatic folding ORVMs too.

Can you also share the left side adjustment video?
BoneCollector is offline   (2) Thanks
Old 22nd June 2024, 11:59   #3
BHPian
 
Join Date: Jul 2023
Location: Hubli-Dharwad
Posts: 49
Thanked: 295 Times
re: Detailed DIY | Electrically-adjustable ORVMs in my Maruti Alto

Quote:
Originally Posted by BoneCollector View Post
This is a neat job. It does involve a lot of wiring after understanding it and many people may not venture into this DIY. But those who love DIYs, this is for them.

I wonder why companies do not provide these basic adjustment things on all the cars. They should also provide automatic folding ORVMs too.

Can you also share the left side adjustment video?
Here it is:
https://share.icloud.com/photos/04eh...1iJzcIoVGzORbg
Pannag is offline   (1) Thanks
Old 22nd June 2024, 12:52   #4
BHPian
 
Ripper's Avatar
 
Join Date: Jul 2007
Location: Mumbai
Posts: 261
Thanked: 36 Times
re: Detailed DIY | Electrically-adjustable ORVMs in my Maruti Alto

Thanks so much for this DIY. This is something I was about to look for as I am working on a Palio S10. Have sourced the Mirrors and switch but wiring is something i was unable to get hold of.
Ripper is offline   (1) Thanks
Old 22nd June 2024, 13:28   #5
BHPian
 
rmonie's Avatar
 
Join Date: Jul 2007
Location: Gurgaon
Posts: 232
Thanked: 61 Times
re: Detailed DIY | Electrically-adjustable ORVMs in my Maruti Alto

Super! Although all current cars have motor adjustable mirrors, really liked the precise instructions & attention to detail!
rmonie is offline   (1) Thanks
Old 22nd June 2024, 17:28   #6
BHPian
 
Join Date: Jul 2023
Location: Hubli-Dharwad
Posts: 49
Thanked: 295 Times
re: Detailed DIY | Electrically-adjustable ORVMs in my Maruti Alto

Quote:
Originally Posted by BoneCollector View Post
This is a neat job. It does involve a lot of wiring after understanding it and many people may not venture into this DIY. But those who love DIYs, this is for them.

I wonder why companies do not provide these basic adjustment things on all the cars. They should also provide automatic folding ORVMs too.

Can you also share the left side adjustment video?
Thank you so much, and I actually have plans to add retraction functionality but need to proceed with greater care as mirrors are painted and are very costly. I will add atleast heated mirrors (defogger) soon because that is must during rainy/winter season.
Pannag is offline  
Old 22nd June 2024, 20:33   #7
Senior - BHPian
 
greenhorn's Avatar
 
Join Date: Apr 2007
Location: KL-01
Posts: 7,783
Thanked: 4,557 Times
re: Detailed DIY | Electrically-adjustable ORVMs in my Maruti Alto

Quote:
Originally Posted by Ripper View Post
Thanks so much for this DIY. This is something I was about to look for as I am working on a Palio S10. Have sourced the Mirrors and switch but wiring is something i was unable to get hold of.
Start with a multimeter in continuity mode, and find the pins which are shorted when the switch is in each of the positions. Once you have that, and know that the mirror needs 3 connections with one being a common, one being horizontal, and the other vertical, you have the connection figured out. Then all that's left is to create a diy harness
greenhorn is offline   (2) Thanks
Old 23rd June 2024, 20:56   #8
BHPian
 
SaiSW's Avatar
 
Join Date: Dec 2018
Location: Good Blue Earth
Posts: 693
Thanked: 1,599 Times
Re: Detailed DIY | Electrically-adjustable ORVMs in my Maruti Alto

Very nice DIY. Kudos, @Pannag!

Quick question, if you're already invested in doing all the electricals required, wouldn't adding electric fold functionality as well make sense?

Cheers,

Sai.
SaiSW is online now   (1) Thanks
Old 24th June 2024, 00:18   #9
BHPian
 
Join Date: Jul 2023
Location: Hubli-Dharwad
Posts: 49
Thanked: 295 Times
Re: Detailed DIY | Electrically-adjustable ORVMs in my Maruti Alto

Quote:
Originally Posted by SaiSW View Post
Very nice DIY. Kudos, @Pannag!

Quick question, if you're already invested in doing all the electricals required, wouldn't adding electric fold functionality as well make sense?

Cheers,

Sai.
Thank you soo much Sai, yes the retractable mirror on the list but its a very daunting task because space near that pivot point seems not very accommodating to anything, let alone (a high torque gear set) motor. But I will try best to get some idea on it and work it out soon.

In case here BHPIans are wondering why I am using that inner side garnish with hole still in it, I will put a small speaker to get good treble or play some chimes/warning!

Last edited by Pannag : 24th June 2024 at 00:22.
Pannag is offline   (3) Thanks
Old 24th June 2024, 14:19   #10
BHPian
 
Join Date: Jul 2022
Location: Jamnagar
Posts: 111
Thanked: 394 Times
Re: Detailed DIY | Electrically-adjustable ORVMs in my Maruti Alto

That is one superb DIY! congratulations on the success!
vaibhavyagnik is online now   (1) Thanks
Old 25th June 2024, 23:59   #11
BHPian
 
Join Date: Jul 2023
Location: Hubli-Dharwad
Posts: 49
Thanked: 295 Times
Re: Detailed DIY | Electrically-adjustable ORVMs in my Maruti Alto

I admit I missed some of important information, I will add them here:

The orientation of the Actuator can be identified by these two grooves on its face:
Detailed DIY | Electrically-adjustable ORVMs in my Maruti Alto-img_0924.jpeg
One is horizontal and another is for vertical movement.

Try to make best to arrange them such that " |_ " (should form L). But this can change if you have used same actuator on both sides with their motor polarity switched, just like I have done due to unavailability of RH actuator. This point brings me to discuss about next change I did,

The motor for which I changed polarity of, was horizontal movement (sideways). You can imagine this because RH will be mirror of LH.


The mirror was attached to actuator using Sika's automotive body adhesive(white), I got it from amazon. I think it's also fine if primer less automotive windshield polyurethane based adhesive is also used. At least with adhesive I used, Mirror can be pried up without damaging by heating it and using plastic prying tool.

The tape that you can attach on backside of free surface of the mirror, can be threaded as they are durable, even though surface of the actuator is large, this ensures if the mirror shatters it will not send out "shrapnels" in an event of collision to mirror.
Pannag is offline  
Reply

Most Viewed


Copyright ©2000 - 2024, Team-BHP.com
Proudly powered by E2E Networks