| |||||||

| Search Forums |
| Advanced Search |
| Go to Page... |
 |
| Search this Thread |  27,728 views |
 28th April 2023, 20:37
| #1 |
| Distinguished - BHPian  | DIY: Installing an Under-Seat Subwoofer in a Tata Nexon DIY - Installing an Under-Seat SubWoofer in Tata Nexon XZ+ Background - I've always had a subwoofer in my car. Had it in the Vista since 2011. The same one was moved to the AltoK10 when I let the Vista go (the detailed project is already documented here - AltoK10 ICE upgrade and subwoofer install DIY Project thread. (DIY - ICE ICE Baby! Audio System Revamp in my Alto K10) Have recently let the AltoK10 go, replaced by an Ignis (more on that some other time). The JBL Amplifier & large subwoofer - are now in the Polo GT TSI, coupled to an Android head unit. Maybe a thread for that project some other time. The Ignis Zeta (2019) I acquired, came with an Android head unit installed by the 1st owner. Back then, Zeta didn't get the SmartPlay. Which is good, as I like these Androids as well - most importantly because they also have amplifier pre-outs! But I wanted the boot of the Ignis to be usable as the in-laws also will be using the car once in a while to travel to native place, with luggage. And thus - took a chance of trying out an active under-seat subwoofer in the Ignis. The result - was way better than what I was expecting. And so - I got the one final push I needed. So far I had restrained myself for good 3 years - to save the boot of the Nexon. Did all possible projects on this car (all documented in DIY subforum) but didn't install a subwoofer so far. (The inventory of all the DIY threads can be found here in the ownership thread - Ironhide - Nexon Ownership & DIY Threads. (Story of Ironhide - My Tata Nexon XZ+ Diesel)Not anymore. The under-seat install in Ignis was a good POC. The little unit is very good & hence - here is finally the project in the Nexon, to get those missing bass filled well into the cabin. To be honest, there is no count to how many threads and posts we have of excellent DIY implementations of adding subwoofers / multi-channel amplifiers and high end audio setups in cars. But then I realized there seem to be none or not many of them, for one of the highest selling hatchbacks of the country, the Tata Nexon. So, thought of making one as I work on the project. The project should be useful reference for Nexon (and other Tata cars) XM onwards, which get stock ICE (Harman) unit. In case your car has an Android - most of the things are easier since you have pre-outs in place. In this thread - we'll once again do an install with 0 wire cuts. Not even a single splice or T-tap in fact! The key point to cover here will be sourcing the audio signal & amplifier signal from existing harness of the Harman ICE silver-box in a way as clean as possible. So let's dive in!  Lets break-down the thread into sections - Last edited by Reinhard : 8th May 2023 at 18:14. |

|  (18)
Thanks (18)
Thanks
 |
| The following 18 BHPians Thank Reinhard for this useful post: | Aquitej, CEF_Beasts, dailydriver, digitalnirvana, GaryTSI, gb97ce6, GTO, PaddleShifter, paragsachania, PM - B, ryzen7@5800u, Samfromindia, Sebring, sudeepg, Sudeep_Kimster, Transmission, Traveller17, vigsom |
| |
|
8th May 2023, 11:54
| #2 |
| Distinguished - BHPian | Re: DIY - Tata Nexon - Adding Under-Seat Sub-Woofer Product OverviewWe'll have a look at the general list of products used for this project & specifically look at some details of the 2 key products to be installed. Have provided links for some of the key items. Products & Tools -
Now - there are readily available "subwoofer wiring kits" with accessory stores / Amazon etc, that include a visibly thick power wire, RCA cables and an inline fuse. But then - somehow I don't trust these Chinese wiring kits over guaranteed good quality copper cores and fire-proof shields of our good trustworthy Polycab. Personal choice, the thick outer shields of those kits have good reason too - so you may want to use those kits ready-made, rather than fiddling around like me. Coup de grace -
Last edited by Reinhard : 9th May 2023 at 06:29. |
|
| (14)
Thanks
|


| The following 14 BHPians Thank Reinhard for this useful post: | CEF_Beasts, dailydriver, digitalnirvana, GaryTSI, GTO, kabir14__, keroo1099, paragsachania, PM - B, ryzen7@5800u, Sebring, sudeepg, sukiwa, vigsom |
|
8th May 2023, 11:57
| #3 |
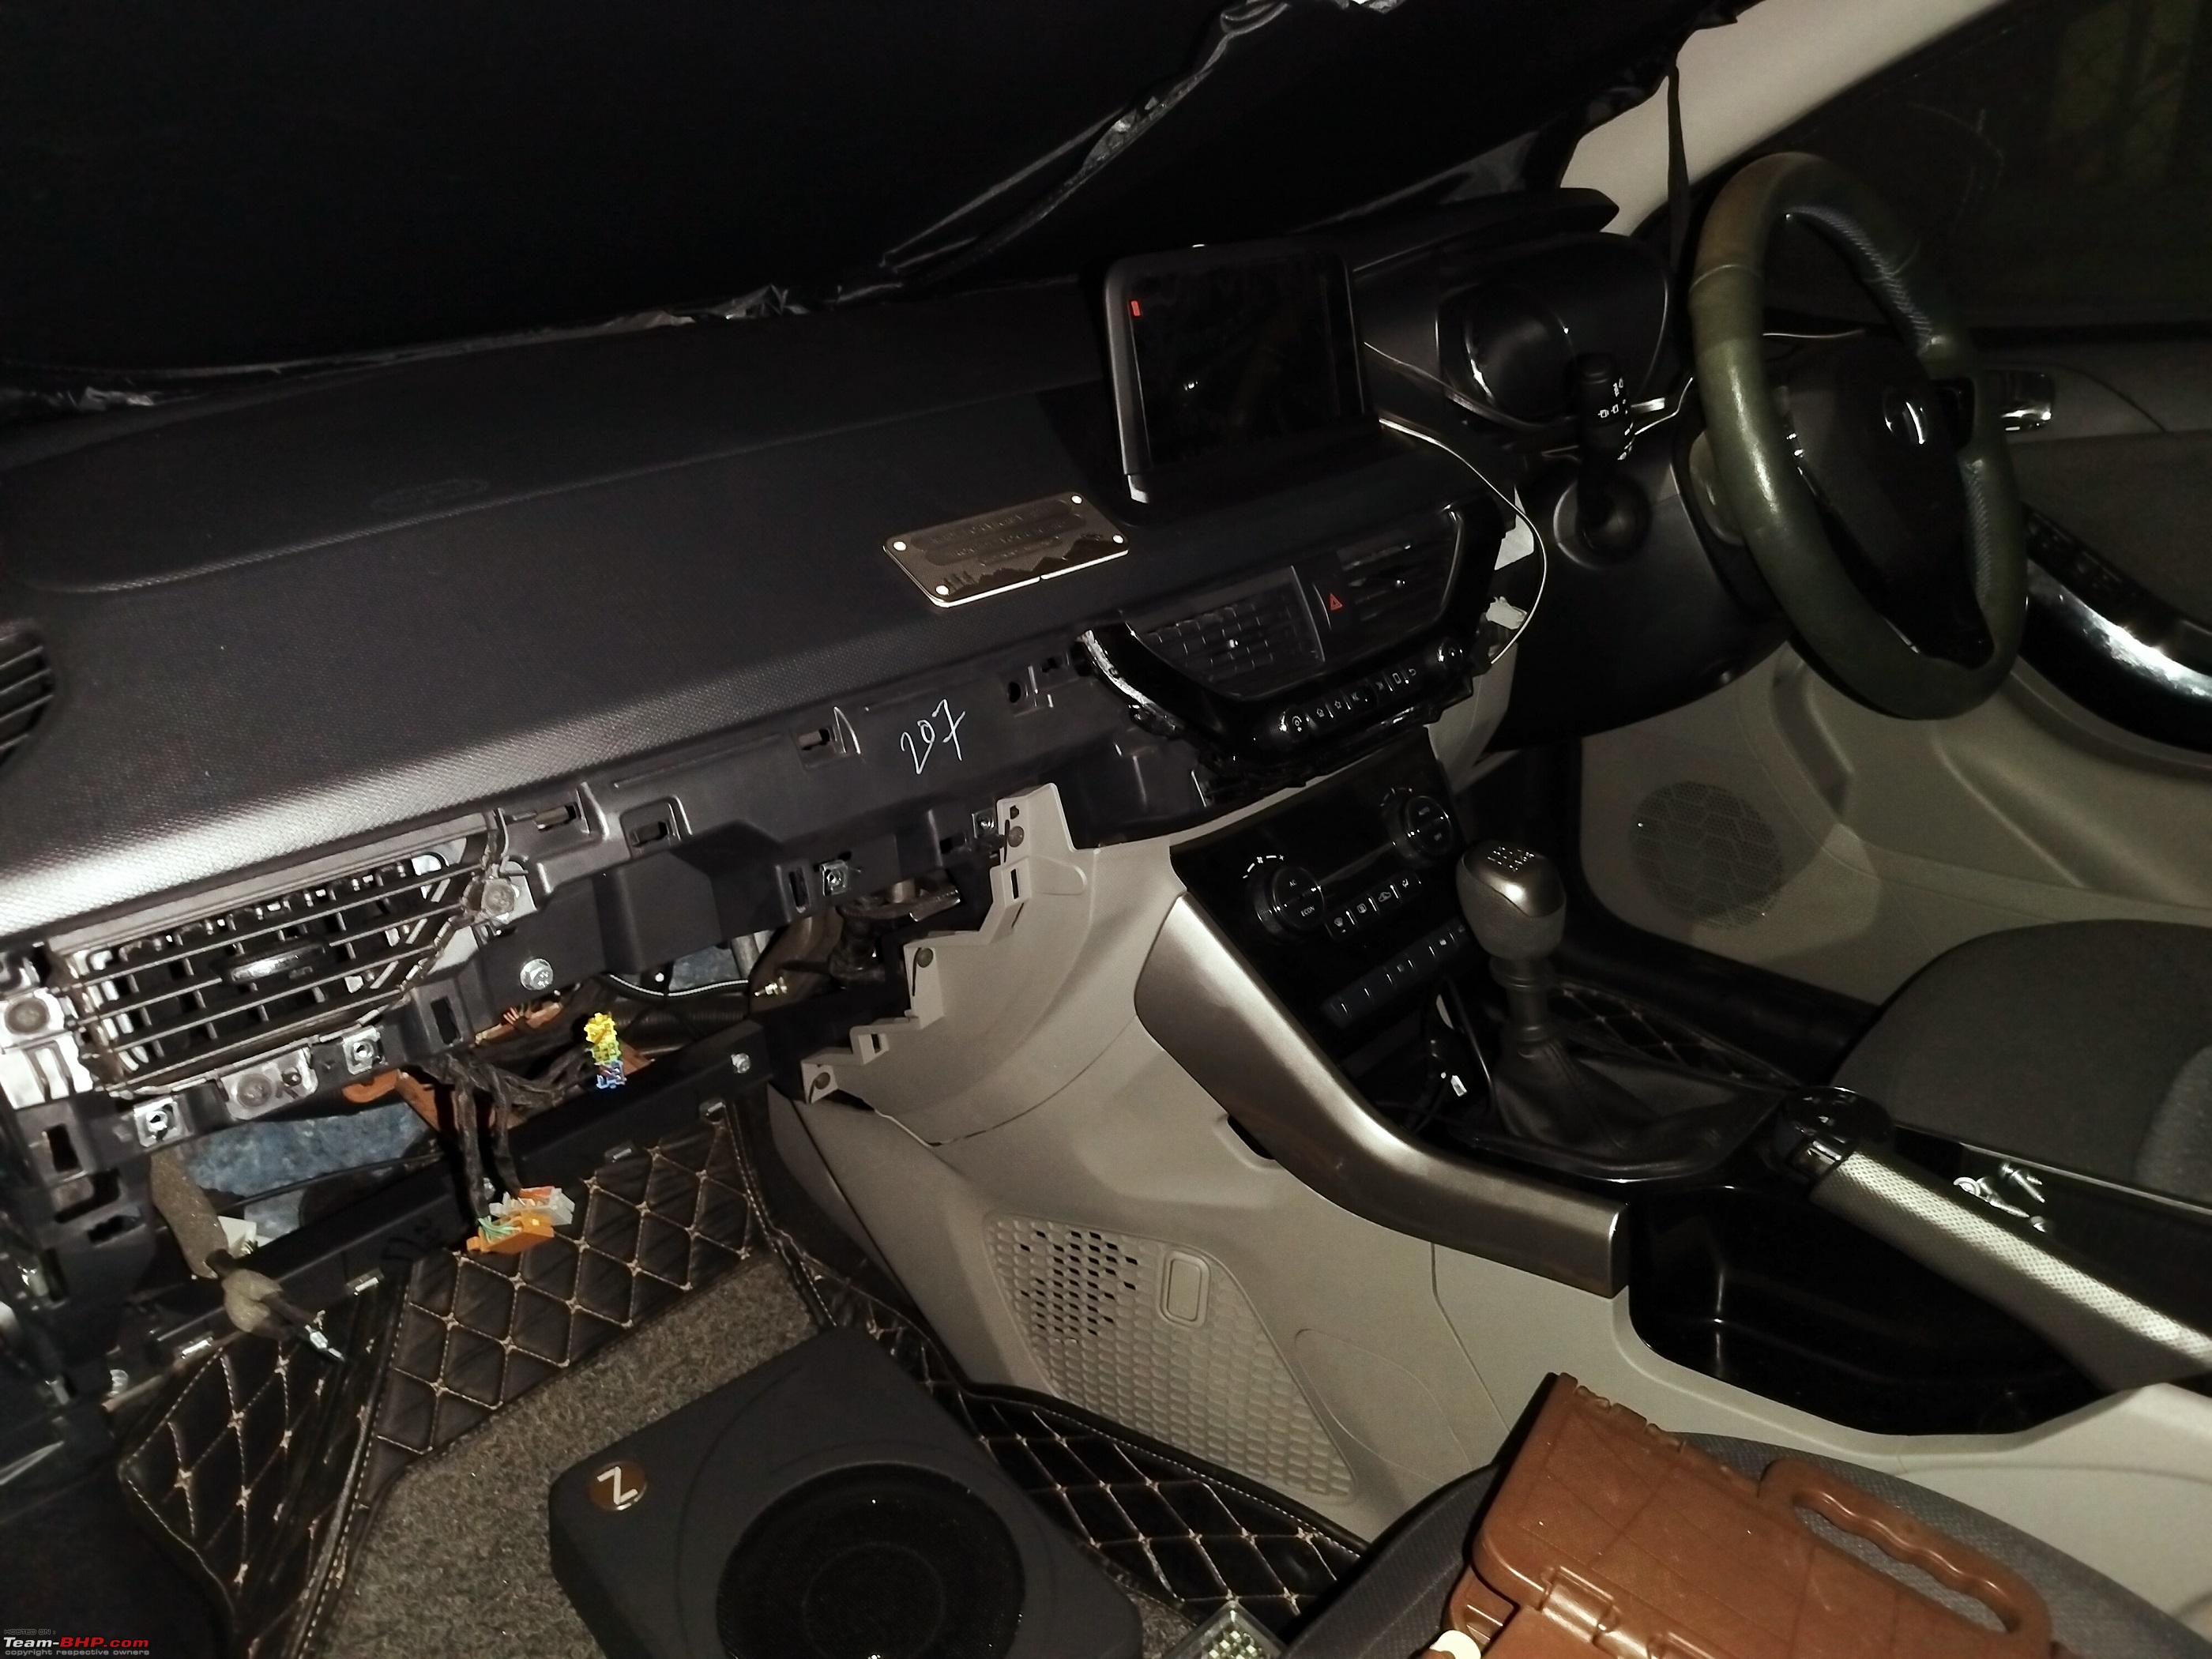
| Distinguished - BHPian | Re: DIY - Tata Nexon - Adding Under-Seat Sub-Woofer Opening The Car UpIn this section, we'll look at the steps to safely remove body panels, glove-box etc, to reach the heart of the Harman ICE unit. The so called "Silver Box". (The name is so lame!) Start working on the Nexon's interiors and the first thing you notice, is how far ahead TaMo has come, in general design & putting things together. Its a pleasant surprise to see how intricately things are designed. The presence of high quality insulation, damping materials in most places, very strong and long lasting clips, perfectly interlocking parts. First thought I had was - "These guys have pulled apart a VW Polo, and studied how VW has done things. Then copied!". Not bad! Having worked in similar areas of my Polo just a couple of months ago - it was glaringly visible & similarities were quite in-my-face.
Last edited by Reinhard : 8th May 2023 at 18:16. |
|
| (16)
Thanks
|


| The following 16 BHPians Thank Reinhard for this useful post: | Aquitej, ashpalio, Avikbrio, CEF_Beasts, digitalnirvana, GTO, InControl, kosjam, paragsachania, PM - B, ryzen7@5800u, Sebring, somspaple, sudeepg, sukiwa, vigsom |
|
8th May 2023, 12:20
| #4 |
| Distinguished - BHPian | Re: DIY - Tata Nexon - Adding Under-Seat Sub-Woofer The Wiring & TestNow with the panels opened up, and the head-unit accessible - we'll first take RCA outputs from the front speaker connector, then do a quick test of the wiring setup, to see the subwoofer works. Afterwards we can put things back together properly. The test with temporary wiring is usually important. Its always painful if you install everything fully, only to learn something isn't working. Opening everything up again, gives near suicidal thoughts. In this section - we'll also find the right source wiring for power, remote signal & speaker inputs - without a single splice/cut. Thats really the key purpose of this thread. Rest is routine for most of you. Usually accessory installers simply splice the subwoofer input wires from the speaker wires that run into the car's front doors. I simply HATE removing any door panels or splicing into wires. So - this little trick that we'll see shortly. Nothing too spectacular. Just basics.
Since all works - now we just have to route the wires safely & put things back together as they were! Last edited by Reinhard : 8th May 2023 at 18:28. |
|
| (15)
Thanks
|


| The following 15 BHPians Thank Reinhard for this useful post: | 2himanshu, Aquitej, Avikbrio, CEF_Beasts, digitalnirvana, GTO, paragsachania, PM - B, Romins, ryzen7@5800u, somspaple, sridhar-v, sudeepg, sukiwa, vigsom |
|
8th May 2023, 12:34
| #5 |
| Distinguished - BHPian | Re: DIY - Tata Nexon - Adding Under-Seat Sub-Woofer Putting It All Back TogetherSo now, the tests are successful. Its time to carefully route the wires, secure them for a long term & put all the removed bits back together.
 . .Last edited by Reinhard : 8th May 2023 at 18:25. |
|
| (24)
Thanks
|


| The following 24 BHPians Thank Reinhard for this useful post: | Aquitej, ashpalio, Avikbrio, CEF_Beasts, digitalnirvana, Divya Sharan, Geo_Ipe, GoBlue, GTO, matchvan, mugen_pinaki27, paragsachania, PM - B, Romins, ryzen7@5800u, Sebring, somspaple, Strider24, sudeepg, sukiwa, supertinu, Traveller17, vigsom, X-Saint |
|
8th May 2023, 12:47
| #6 |
| Distinguished - BHPian | Re: DIY - Tata Nexon - Adding Under-Seat Sub-Woofer Summary & Closing CommentsHere are my thoughts after about a week of usage -
So there it is. Hope you find it useful. Happy to help as always in case anyone needs tips. Last edited by Reinhard : 8th May 2023 at 17:38. |
|
| (36)
Thanks
|
| The following 36 BHPians Thank Reinhard for this useful post: | 2himanshu, Aquitej, Avikbrio, Blue Vitriol, Car Stalker, CEF_Beasts, Cool-Shine, dailydriver, digitalnirvana, ferrarirules, gb97ce6, Geo_Ipe, GTO, jalsa777, keroo1099, kosjam, K_Drive, marszeus, Omkar, paragsachania, pugram, ryzen7@5800u, Sebring, SH1N1G4MI, SlowRider, somspaple, sudeepg, sukiwa, sunnsood, supertinu, Tgo, TheVegabond, Traveller17, vaasu, vamsi_k_b, vigsom |
|
9th May 2023, 06:57
| #7 |
| Team-BHP Support  | Re: DIY - Tata Nexon - Adding Under-Seat Sub-Woofer Thread moved out from the Assembly Line. Thanks for sharing! |
|
| (3)
Thanks
|
| The following 3 BHPians Thank Aditya for this useful post: | digitalnirvana, GTO, Reinhard |
|
9th May 2023, 07:33
| #8 | |
| Distinguished - BHPian Join Date: Feb 2006 Location: NSEW
Posts: 3,879
Thanked: 27,659 Times
| Re: DIY - Tata Nexon - Adding Under-Seat Sub-Woofer Well executed DIY! I particularly loved your attention to detail around small things like points 2, 3, 4, 6. Quote:
 Last edited by vigsom : 9th May 2023 at 07:38. | |
|
| (5)
Thanks
|

| The following 5 BHPians Thank vigsom for this useful post: | digitalnirvana, ike, Reinhard, ryzen7@5800u, sunnsood |
|
9th May 2023, 14:52
| #9 |
| BHPian Join Date: Oct 2022 Location: Pune
Posts: 232
Thanked: 390 Times
| Re: DIY - Tata Nexon - Adding Under-Seat Sub-Woofer Very useful post for those looking for DIY subwoofer. Any recording with and without sub woofer for better understanding of how much difference it makes? https://play.google.com/store/apps/d...dolby.dolby234 This is a free app from Dolby and produces good quality recordings. |
|
| (2)
Thanks
|
| The following 2 BHPians Thank sagsaw for this useful post: | digitalnirvana, Reinhard |
|
9th May 2023, 21:44
| #10 | |
| BHPian Join Date: Sep 2022 Location: Nagpur
Posts: 65
Thanked: 127 Times
| Re: DIY: Installing an Under-Seat Subwoofer in a Tata Nexon Quote:
 I'm curious, how does this positioning of the sub to one side impact the sound? Would it be better to place two subs, one under each seat? Do you feel any excess vibrations in the passenger seat - or was some damping done? I'm especially curious, as my current in car entertainment (Nexon XE) consists of a BT speaker in the glovebox, and I've noticed that some notes from AR Rahman basslines seem to hit a resonant frequency of the plastic of the dash and seat mounts, causing a very uncomfortable buzzing. In the boot, I've noticed two niches - one on each side - that seem perfect for a subwoofer install - is it feasible? | |
|
| (2)
Thanks
|
| The following 2 BHPians Thank ryzen7@5800u for this useful post: | digitalnirvana, Reinhard |
|
11th May 2023, 19:26
| #11 |
| BHPian Join Date: Sep 2021 Location: Bangalore
Posts: 187
Thanked: 407 Times
| Re: DIY: Installing an Under-Seat Subwoofer in a Tata Nexon Thanks for the very detailed post! Just one question in my head - how is the subwoofer secured to the car? The amazon product and review images suggest that there are no hooks/attachment points available in the body of the device to help hold it securely in place (over our pothole ridden roads) |
|
| (1)
Thanks
|
| The following BHPian Thanks Transmission for this useful post: | Reinhard |
| |
|
15th May 2023, 12:43
| #12 | ||||
| Distinguished - BHPian | Re: DIY: Installing an Under-Seat Subwoofer in a Tata Nexon Quote:
Interesting thing I noted also - the grommet in the Nexon, seemed to be dual layer, with some soft sealant paste filled in it. Which meant - when I inserted the new wire in, basically the new hole was auto-sealed anyway from the inside. Quote:
Quote:
No - the Nexon seats are sufficiently thick. No extra damping needed at all. There is no excess vibrations for regular music (and I do play heavy beats, no less). Its fine for the passenger too, as I have tested it for a long drive now. I think 2 units will give an awesome output - but then will also be an overkill of sorts. Pretty costly too. Honestly - I don't think its needed. The one subwoofer on one side - is enough. And no - it does not generate skewed output that you notice to be coming from only one side. It spreads pretty well. No worry. Yes - I had in fact thought about making a custom enclosure for the niches in the boot to put a subwoofer there. But they are a bit too small and angular. The enclosure would be small too, thereby impacting the output. Securing them in-place would also be tricky. So I dropped the plan. There are some folks who have made such enclosures in other cars like Seltos/Creta I think. Quote:
No its not "secured" in any way. Generally no sub-woofers (even the boxes in boot) is secured to the car-body. Their own weight ensures they don't move around, unless you literally fly the car, or end up in a collision. This one is no exception. Its quite heavy and doesn't move even slightly even under fast driving on rough roads. Have tested. So don't worry. Also - it fits snug under the seat, which has horizontal frame members on front as well as back generally, and seat on top. So - there is no way its going to pop-out from anywhere easily. I wouldn't worry about it much. | ||||
|
| (4)
Thanks
|
| The following 4 BHPians Thank Reinhard for this useful post: | digitalnirvana, ryzen7@5800u, Transmission, vigsom |
|
15th May 2023, 13:25
| #13 | |
| BHPian Join Date: Oct 2022 Location: Pune
Posts: 232
Thanked: 390 Times
| Re: DIY: Installing an Under-Seat Subwoofer in a Tata Nexon Quote:
App name is Dolby on https://play.google.com/store/apps/d...34&hl=en&gl=US | |
|
| (1)
Thanks
|
| The following BHPian Thanks sagsaw for this useful post: | Reinhard |
|
16th May 2023, 10:38
| #14 | |
| Senior - BHPian Join Date: Feb 2011 Location: On-board JWST
Posts: 1,377
Thanked: 4,134 Times
| Re: DIY - Tata Nexon - Adding Under-Seat Sub-Woofer That's really good DIY.  I wanted to do same in my vehicle, but couldn't find time for the install. Moreover, doors were to be damped. So, took services of a professional installer. Quote:
  Image Source | |
|
| (3)
Thanks
|
| The following 3 BHPians Thank AutoNoob for this useful post: | digitalnirvana, Divya Sharan, Reinhard |
|
16th May 2023, 13:19
| #15 |
| BHPian Join Date: Oct 2021 Location: New Delhi
Posts: 81
Thanked: 227 Times
| Re: DIY: Installing an Under-Seat Subwoofer in a Tata Nexon Wow what a clean DYI, if I agree to pay million bucks to my local shop then also, he will not agree to do this clean installation, no idea why they are always in hurry and do things in most Juggad way!! |
|
| (1)
Thanks
|
| The following BHPian Thanks Sach_511 for this useful post: | Reinhard |
|