Team-BHP > Technical Stuff > DIY - Do it yourself
Register New Topics New Posts Top Thanked Team-BHP FAQ


Reply
  Search this Thread
46,230 views
Old 16th March 2022, 21:14   #1
BHPian
 
Join Date: Jul 2021
Location: Gurgaon
Posts: 51
Thanked: 332 Times
DIY Install: Hardwired Front and Rear Dash Cam

DIY Install: Hardwired Front and Rear Dash Camera


I usually commute in Gurgaon and Delhi where roads are rough and people drive rougher. So, just to be safe in such cases, I installed a dash camera in my car Wagon R. And it was easy and you can do it too using this guide.

So, the first part of installing a dashcam is to get a dash cam. After researching and keeping the budget in my mind, I bought 70Mai A800 dash cam. It’s cost was about INR 14,000 and I ordered it from www.70mai.in
I hardwired my dashcam so it can record videos in case something bumps into my car while it is parked. You can buy this as a combo or buy the hardwiring kit separately. Some people worry that hardwiring a dashcam will drain its battery but I have had this dashcam for the last four months and I haven't faced this issue even once. 70Mai claims that the module that they attach to their hardwiring is smart and it will not let your battery drain below the voltage 11.4 V. Moreover, when it is parked, it is not constantly recording video, it only does so when it senses someone bumping into the car preserving the battery.

Tools required


1. Dashcam
2. Pry tools (One was already included in the dashcam box)
3. Tissue paper

In case you are someone who understands better from watching video or you get stuck somewhere, use these videos.


Procedure


1. Ideally you should put the front dashcam on the top of the windshield behind your IRVM so that it covers the road and the bonnet of car. Clean the area well with tissue and make sure there is no dust on the glass.
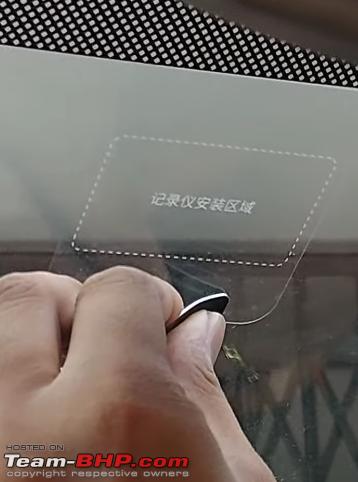
2. Carefully take an electrostatic sticker and stick it on the glass. Make sure that there is no bubble left. Use a sturdy flat-surface object to remove any bubble.
Name:  bhp sticker.png
Views: 5730
Size:  218.8 KB
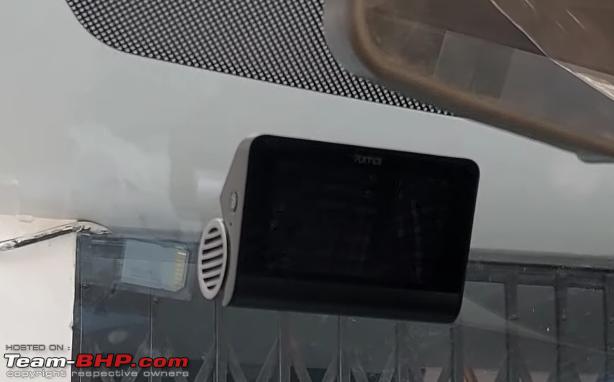
3. Stick the dashcam mount on the sticker using double sided tape. Now put the dashcam on the mount. (Note: Make sure it is perfectly aligned and not skewed.)
Name:  bhp front cam.png
Views: 5824
Size:  260.1 KB
4. Connect the hardwiring’s kit’s cable to the dashcam. Use pry tool to slightly remove the roof inner lining near the windshield and push the wire under it from the dashcam to the right A pillar.
DIY Install: Hardwired Front and Rear Dash Cam-bhp-front-wire.png
5. Open the panel on A pillar and push the wire through the hole in it to the bottom. (Note: Make sure the wire is not stretched too tight. Keep it a little loose.)
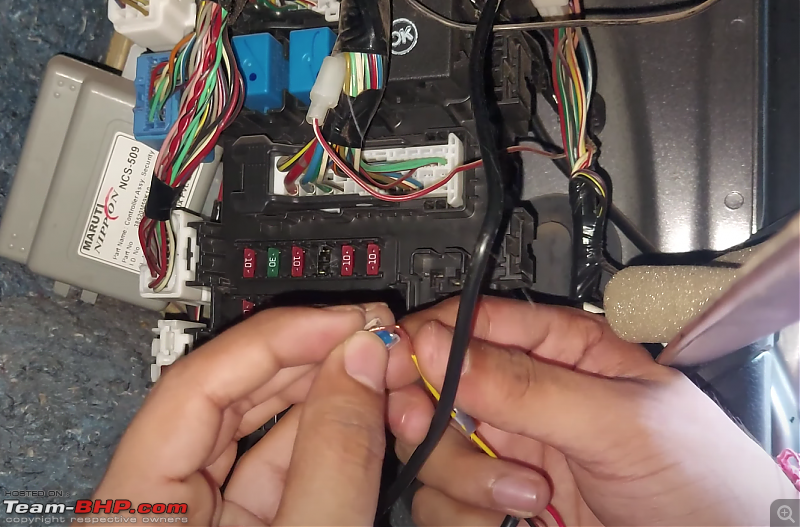
6. Now, we need to hardwire the dash cam, so we need to connect it to a circuit which has current even while the car is off for example, horn. Open the fuse box and use labeling to find the horn hazard and accessory fuse. (Note: You can also find the diagram in the car’s manual)
7. Connect the wires to ACC (accessory) fuse and VCC (Voltage Common Collector) fuse. You can connect the ground wire anywhere on the body. (Note: Connect wire with only one side of fuse otherwise current will bypass the fuse.)
DIY Install: Hardwired Front and Rear Dash Cam-bhp-hardwire.png
8. Similarly for rear dash camera, clean the windshield with tissue and make sure there is no dust.
9. Apply the electrostatic sticker where you want to install your camera, preferably on the top center to cover rear view properly. Make sure there is no bubble left.
10. Stick the dashcam on the sticker using a double sided tape.
DIY Install: Hardwired Front and Rear Dash Cam-bhp-rear-cam.png
11. Same as earlier, use pry tool to slightly remove the roof inner lining and push the wire inside it. Take the wire from the camera to A pilar under the roof inner lining. (Note: You might need to slightly remove panels on B and C pillars)
DIY Install: Hardwired Front and Rear Dash Cam-bhp-rear-cam-wire.png
12. Connect the wire to the front dashcam. Push this wire from dashcam under the roof inner lining too like we did for the front camera and take it to to the A pillar. If you have remaining middle part of wire, make a bundle, tie a zip tie and put it under A pillar panel. Being organised right now will help your future self.
DIY Install: Hardwired Front and Rear Dash Cam-bhp-cam.png

Now just insert a memory card to record the recording, and your dash cam is ready to go.
KarDIY is offline   (38) Thanks
Old 17th March 2022, 11:04   #2
BHPian
 
Join Date: Nov 2020
Location: Bangalore
Posts: 128
Thanked: 597 Times
Re: DIY Install: Hardwired Front and Rear Dash Cam

Good one, KarDIY. However, those who have cars with curtain airbags should route the rear cam wires BEHIND the airbag modules or along the floor in order for the airbags to function properly in any unforeseen event. Also, you need to give some slack cable for the rear cam if you are attaching the rear cam to the boot windshield so that you can open and close the boot without damaging the cable/connector.
Goandiaries is offline   (9) Thanks
Old 17th March 2022, 11:41   #3
BHPian
 
Join Date: Aug 2021
Location: Mysuru
Posts: 93
Thanked: 489 Times
Re: DIY Install: Hardwired Front and Rear Dash Cam

Thanks for sharing the DIY. Fuse tap is always much better than direct wiring for the sake of safety. You get fuse taps of different sizes and for your case, I'm sure you will be able to use micro or mini. A bit costly but much more failsafe.


https://www.nexdigitron.com/collecti...roducts/up02ft


Cheers!
Swarup5 is offline   (2) Thanks
Old 17th March 2022, 15:41   #4
nvn
BHPian
 
Join Date: Feb 2022
Location: Bengaluru
Posts: 30
Thanked: 42 Times
Re: DIY Install: Hardwired Front and Rear Dash Cam

Thanks for the detailed instructions. A newbie question: Will there be any issues with the car warranty if we install this?
nvn is offline   (1) Thanks
Old 17th March 2022, 17:10   #5
BHPian
 
Join Date: Jul 2021
Location: Gurgaon
Posts: 51
Thanked: 332 Times
Re: DIY Install: Hardwired Front and Rear Dash Cam

Quote:
Originally Posted by nvn View Post
Thanks for the detailed instructions. A newbie question: Will there be any issues with the car warranty if we install this?
You're welcome. There will not be any issue as we are not cutting/slicing any wire in this installation process. Although dealership keep customers deterred from installing any aftermarket accessory.
KarDIY is offline   (4) Thanks
Old 17th March 2022, 18:13   #6
BHPian
 
Join Date: Jul 2021
Location: Gurgaon
Posts: 51
Thanked: 332 Times
Re: DIY Install: Hardwired Front and Rear Dash Cam

Quote:
Originally Posted by Goandiaries View Post
Good one, KarDIY. However, those who have cars with curtain airbags should route the rear cam wires BEHIND the airbag modules or along the floor in order for the airbags to function properly in any unforeseen event.
To be true this problem was commented on my video few days back before that I never thought of this issue. Soon I will update you what to do in case cars have side/curtain airbag after doing some research.

Quote:
Originally Posted by Goandiaries View Post
Also, you need to give some slack cable for the rear cam if you are attaching the rear cam to the boot windshield so that you can open and close the boot without damaging the cable/connector.
True. We need to leave some buffer wire for smooth operation of boot otherwise tension will damage wire/connector.
KarDIY is offline   (2) Thanks
Old 17th March 2022, 20:24   #7
BHPian
 
Join Date: Jul 2021
Location: Ghaziabad
Posts: 36
Thanked: 57 Times
Re: DIY Install: Hardwired Front and Rear Dash Cam

Quote:
Originally Posted by KarDIY View Post
[h3][b]

Now just insert a memory card to record the recording, and your dash cam is ready to go.
Great DIY. Can you pls let us know how (in terms of hours) much footage can be recorded in the memory card before it gets full. Thanks.
KuvamBansal is offline  
Old 18th March 2022, 02:03   #8
BHPian
 
jithin23's Avatar
 
Join Date: Mar 2019
Location: Globetrotter
Posts: 821
Thanked: 3,033 Times
Re: DIY Install: Hardwired Front and Rear Dash Cam

I have routed it on the upper portion beside the curtain airbags and there is enough gap between the wires and the airbag, so that in case of an unforseen event, the airbags will pop up and the wire will not be a hindrance.

A needed DIY though. Thanks for sharing
jithin23 is offline   (3) Thanks
Old 18th March 2022, 11:49   #9
BHPian
 
dipdawiz's Avatar
 
Join Date: Oct 2010
Location: Bangalore
Posts: 244
Thanked: 1,057 Times
Re: DIY Install: Hardwired Front and Rear Dash Cam

Quote:
Originally Posted by Goandiaries View Post
Good one, KarDIY. However, those who have cars with curtain airbags should route the rear cam wires BEHIND the airbag modules or along the floor in order for the airbags to function properly in any unforeseen event.
...
Quote:
Originally Posted by KarDIY View Post
To be true this problem was commented on my video few days back before that I never thought of this issue. Soon I will update you what to do in case cars have side/curtain airbag after doing some research.
...
Faced same problem, and routed the wire from behind the IRVM front roof lining to passenger side A pillar, bring it down through weather seal till passenger side scuff plate, then through b pillar floor (amp/speaker wiring also runs through this) to C pillar base, then through weather seal route it up near to roof (curtain airbag ends by now), then route to back through headliner.

70Mai dashcam rear camera comes with 5.5 meters of wire, sufficient for midsized sedan/suv/crossovers.

Image from my installation (wire goes along green line)
https://www.team-bhp.com/forum/attac..._131653_li.jpg

Last edited by dipdawiz : 18th March 2022 at 12:03.
dipdawiz is offline   (3) Thanks
Old 18th March 2022, 19:27   #10
BHPian
 
Join Date: Nov 2020
Location: Bangalore
Posts: 128
Thanked: 597 Times
Re: DIY Install: Hardwired Front and Rear Dash Cam

Quote:
Originally Posted by KarDIY View Post
To be true this problem was commented on my video few days back before that I never thought of this issue. Soon I will update you what to do in case cars have side/curtain airbag after doing some research.

True. We need to leave some buffer wire for smooth operation of boot otherwise tension will damage wire/connector.
This video is what I referred to install my camera. It's the best way to hide wires for the rear cam that I've come across.

Quote:
Originally Posted by jithin23 View Post
I have routed it on the upper portion beside the curtain airbags and there is enough gap between the wires and the airbag, so that in case of an unforseen event, the airbags will pop up and the wire will not be a hindrance.

A needed DIY though. Thanks for sharing
DIY Install: Hardwired Front and Rear Dash Cam-p3181404.jpg
Pulling down this rubber beading gives enough space to insert the wire behind the airbag modules - similar to the video above. Just to be on the safer side, I've used a few double sided tape to stick the wire to the metal frame. I also made sure there's no slack in the airbag section.

DIY Install: Hardwired Front and Rear Dash Cam-p3181403.jpg
A zoomed in section of the rear door roof, I inserted the wire inside through here. Everything is snug fit and looks neat.

Quote:
Originally Posted by dipdawiz View Post
Faced same problem, and routed the wire from behind the IRVM front roof lining to passenger side A pillar, bring it down through weather seal till passenger side scuff plate, then through b pillar floor (amp/speaker wiring also runs through this) to C pillar base, then through weather seal route it up near to roof (curtain airbag ends by now), then route to back through headliner.

70Mai dashcam rear camera comes with 5.5 meters of wire, sufficient for midsized sedan/suv/crossovers.
My earlier dashcam install (Mahindra XUV300 : Official Review)was similar to yours, which had plenty of wiring which was left near the spare tire. However, I had wired the Vantrue N4 last week like in following pictures.

DIY Install: Hardwired Front and Rear Dash Cam-wiring.jpg
I pulled down the rubber sleeves to insert wires. Blue line is wiring. I couldn't open the C pillar panel, so I sent the wire into the boot and pulled it up from along the boot frame.

DIY Install: Hardwired Front and Rear Dash Cam-wiring-rear.jpg
Once near the top center, I pushed the wire into the roof liner and pulled it out of the rubber grommet. The rear wire is almost completely hidden I had cushioned with a foam at all sharp edges to avoid the wire from getting with time. Had to remove that panel which is held by clips.
Goandiaries is offline   (3) Thanks
Old 18th March 2022, 21:31   #11
BHPian
 
Join Date: Jul 2021
Location: Gurgaon
Posts: 51
Thanked: 332 Times
Re: DIY Install: Hardwired Front and Rear Dash Cam

Quote:
Originally Posted by Swarup5 View Post
Thanks for sharing the DIY. Fuse tap is always much better than direct wiring for the sake of safety. You get fuse taps of different sizes and for your case, I'm sure you will be able to use micro or mini. A bit costly but much more failsafe.


https://www.nexdigitron.com/collecti...roducts/up02ft


Cheers!
You are right fuse taps are better, safe and professional. But unfortunately wagonr have very congested fuse box and after popping out the fuse I tried to use fuse tap but there was not enough space hence I directly wrapped the wire on fuse and put it back.
KarDIY is offline  
Old 19th March 2022, 13:35   #12
BHPian
 
Join Date: Jul 2021
Location: Gurgaon
Posts: 51
Thanked: 332 Times
Re: DIY Install: Hardwired Front and Rear Dash Cam

Quote:
Originally Posted by KuvamBansal View Post
Great DIY. Can you pls let us know how (in terms of hours) much footage can be recorded in the memory card before it gets full. Thanks.
I'm using 128GB memory card.

Recording time actually depend on 2 things,
1. Video Quality ( There are 3 modes you can choose from 3840x2160 ; 2844x1600 ; 1920x1080)
Note: In dual channel mode i.e. Front+ rear, dash cam can record max at 2844x1600.

2. No. of non over-writeable video (Events - These are the emergency videos recorded by dash cam during the ride + Parking videos - Parking videos are recorded when dash cam feels any movement in parked vehicle)
Hence more events+parking video, less space will be available for normal videos eventually less recording time.

I'm using dash cam in dual mode and getting recording time of 1700-1800 mins in 2844x1600 format. (I keep deleting events + parking video so that there is no space blockage)
KarDIY is offline  
Old 20th March 2022, 09:17   #13
BHPian
 
Join Date: Jan 2020
Location: Pune
Posts: 33
Thanked: 95 Times
Re: DIY Install: Hardwired Front and Rear Dash Cam

I had got this from amazon, about a year ago. After a full installation on both front and rear, I switched them on and it didn't work. Such faith I had laid on technology . It switched on but kept getting restarted on loop. I returned it the other day.

Later I bought a single cam from 70mai for my dad's car, it works well.
satyabrata.dash is offline   (1) Thanks
Old 20th March 2022, 14:34   #14
BHPian
 
Join Date: Jul 2021
Location: Gurgaon
Posts: 51
Thanked: 332 Times
Re: DIY Install: Hardwired Front and Rear Dash Cam

Quote:
Originally Posted by satyabrata.dash View Post
I had got this from amazon, about a year ago. After a full installation on both front and rear, I switched them on and it didn't work. Such faith I had laid on technology . It switched on but kept getting restarted on loop. I returned it the other day.
From last few days, I'm also facing an issue. Sometimes dash cam skips recording i.e. one fine day I was going to office and on the way, my front vehicle met with an accident so I thought I will see the footage to analyse the accident. But to my surprise when I checked there was no recorded video. There was only a single (1 min) video of the whole trip and that was when I started the car.

That day I got to know about this issue. I tried to find possible reasons for this error on internet but it was all in vain. Even I tried to change some dash cam settings to rectify this issue but till it is happening sometimes.
KarDIY is offline  
Old 20th May 2024, 14:38   #15
Newbie
 
Join Date: Jul 2022
Location: Gurgaon
Posts: 4
Thanked: Once
Re: DIY Install: Hardwired Front and Rear Dash Cam

Hi,
Thank you for your detailed explanation.
I had a strange situation when trying to install.
The installation process went on smotthely and I have used the dashcam for 2 years on my old skoda slavia 1.0 MT.

However I recently upgraded to 1.5 AT Slavia and I am trying to install the same dashcam and hardwire kit directly into my fuse box. I have put the vcc wire in the horn fuse and the Acc wire in another fuse which has power on only when there is ignition like left window/air conditioner and other options but still my dashcam won't go into parking surveillance mode once ignition is turned off.
The moment I remove the Acc wire from the fuse slot it goes into parking surveillance mode. I am guessing there is some issue in the hardwire kit or is it a problem with the recent fuse box that there is always power in all fuse ports when ignition is turned off?
Please help me with this and how to solve the issue.

Last edited by Skodaslavs : 20th May 2024 at 14:44.
Skodaslavs is offline   (1) Thanks
Reply

Most Viewed


Copyright ©2000 - 2024, Team-BHP.com
Proudly powered by E2E Networks