| |||||||

| Search Forums |
| Advanced Search |
| Go to Page... |
 |
| Search this Thread |  84,320 views |
 21st February 2022, 12:19
| #1 |
| Team-BHP Support  Join Date: Apr 2013 Location: Madras
Posts: 7,335
Thanked: 20,669 Times
| DIY: How to recharge your car's AC refrigerant I recharged the refrigerant in my Polo’s AC system some time back. The AC’s cooling effect in my car had noticeably reduced and I could feel it during my daily drives. I began hearing a strange hissing noise from the vents which wasn’t there before. I decided to read up more on this, how the refrigerant on car’s AC systems are recharged and figured out that if the system is running low on refrigerant and there are no other issues with the other components of the system, topping it up is pretty simple and restores the cooling performance. Putting up a dedicated, detailed DIY thread to our repository for reference. Disclaimer: I am not an HVAC expert and whatever I did was purely for the learning and experience. Background: When the issue cropped up, I did a quick check on all the related components of the HVAC system:
The last thing left to check was the refrigerant in the system. The lack of refrigerant in the system can result in ineffective cooling. Despite being completely sealed systems, refrigerant levels drop over time as the rubber seals/o-rings in the connectors of the rubber hoses and metal tubes wear out and causes the refrigerant to gradually leak out over time. If there is a puncture in the metal tubes or hoses, or the condenser coil due to a nasty stone hit, the refrigerant would again leak out. Sometimes, gas leaks out from the schrader valves present in the charging ports of the car in extremely minor quantities. But if the car is over 6-8 years old and the AC’s cooling effect has reduced over time, there’s a good chance this is due to the lack of refrigerant in the system; as it turned out to be in my case. Over all these years, I have never had an AC refrigerant recharge. But at this stage, I do not know if there are any leaks in the system. Tools required:
Consumables required:
PPE required:
The AC manifold setup: The AC manifold setup is used to recharge or evacuate the refrigerant from the system and measure the pressures at the low-pressure (LP) and high-pressure (HP) lines. It has a brass manifold with 2 pressure gauges - one for the low pressure side marked in blue (marked from 0 - 220 psi) and the other for the high pressure side marked in red (marked from 0 - 500 psi).  There is a valve mounted on either side which controls the flow of refrigerant through the 3 threaded ports on the manifold. While charging the refrigerant, the valve next to the LP side is opened and the refrigerant flows from the refrigerant can (stored under high pressure just like your LPG cylinder) to the system (low pressure side) in the liquid phase. The manifold has a gauge glass at the centre which shows the flow of refrigerant while charging the setup. 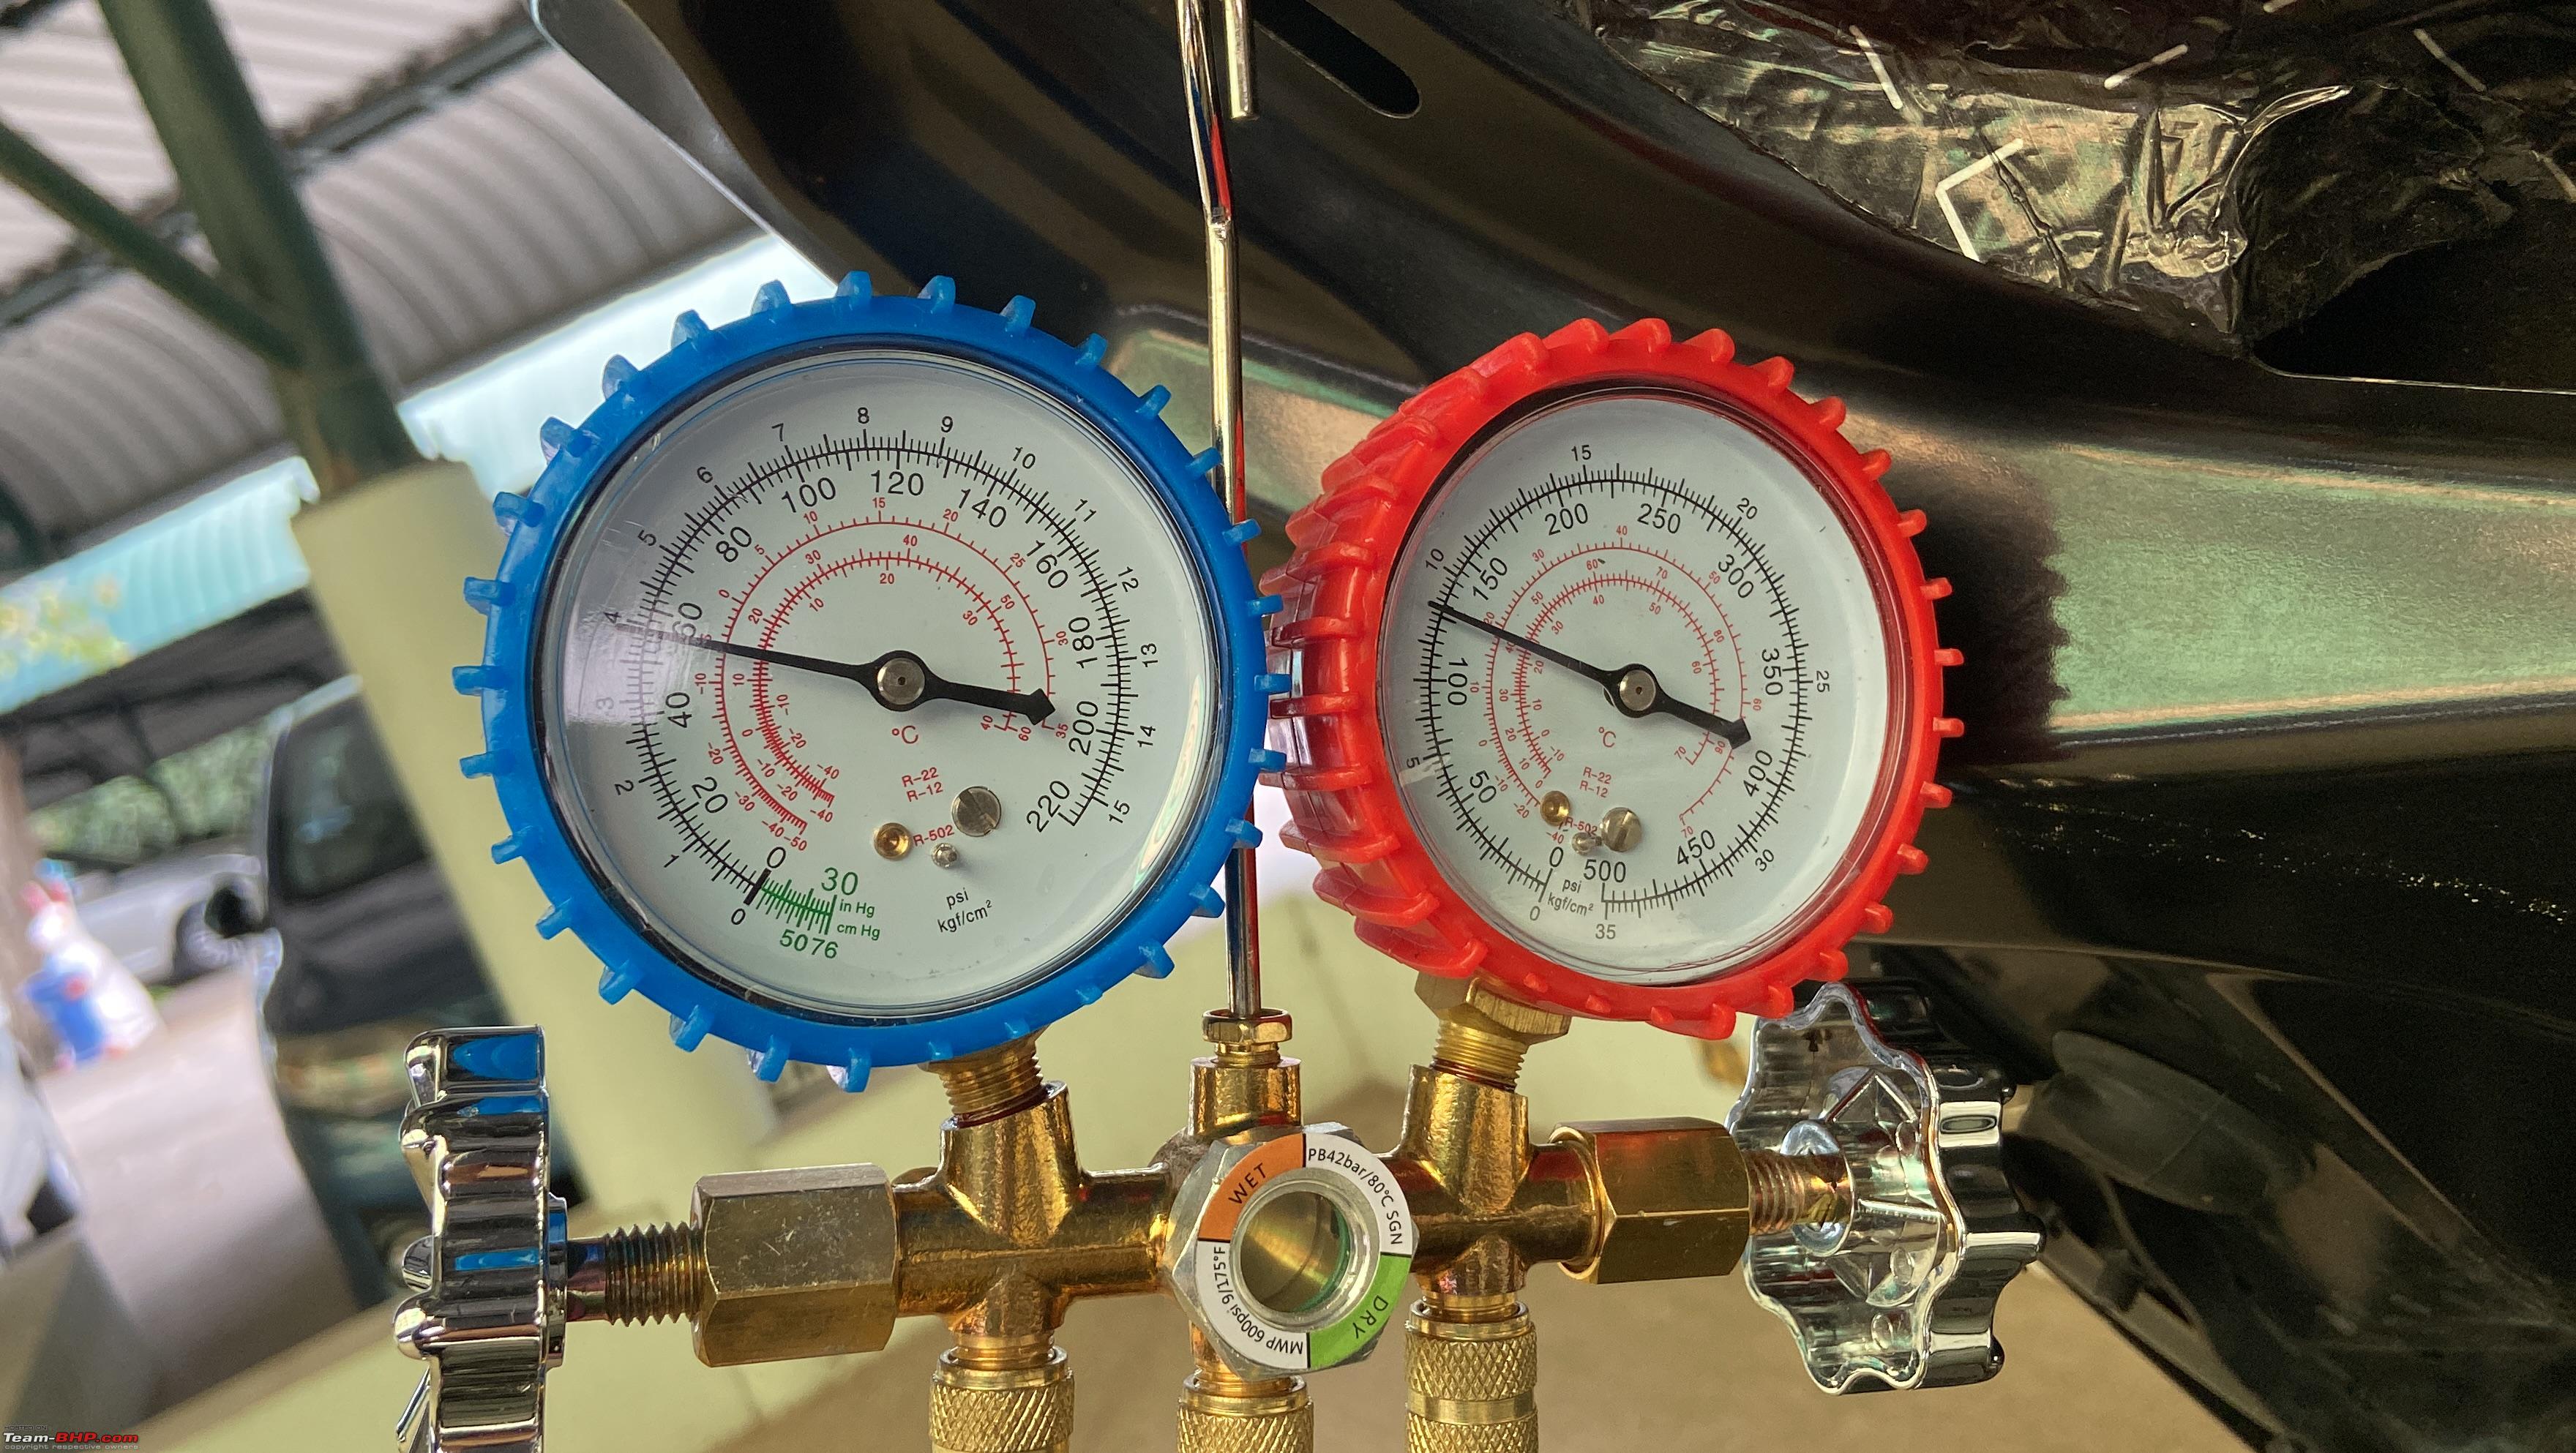 Color coded hoses are used to connect the manifold to the system. Just like the pressure gauges, blue for the LP side, red for the HP side and yellow for charging or evacuating. Color codes are for easy identification - otherwise the hoses are identical in terms of connectors and size. 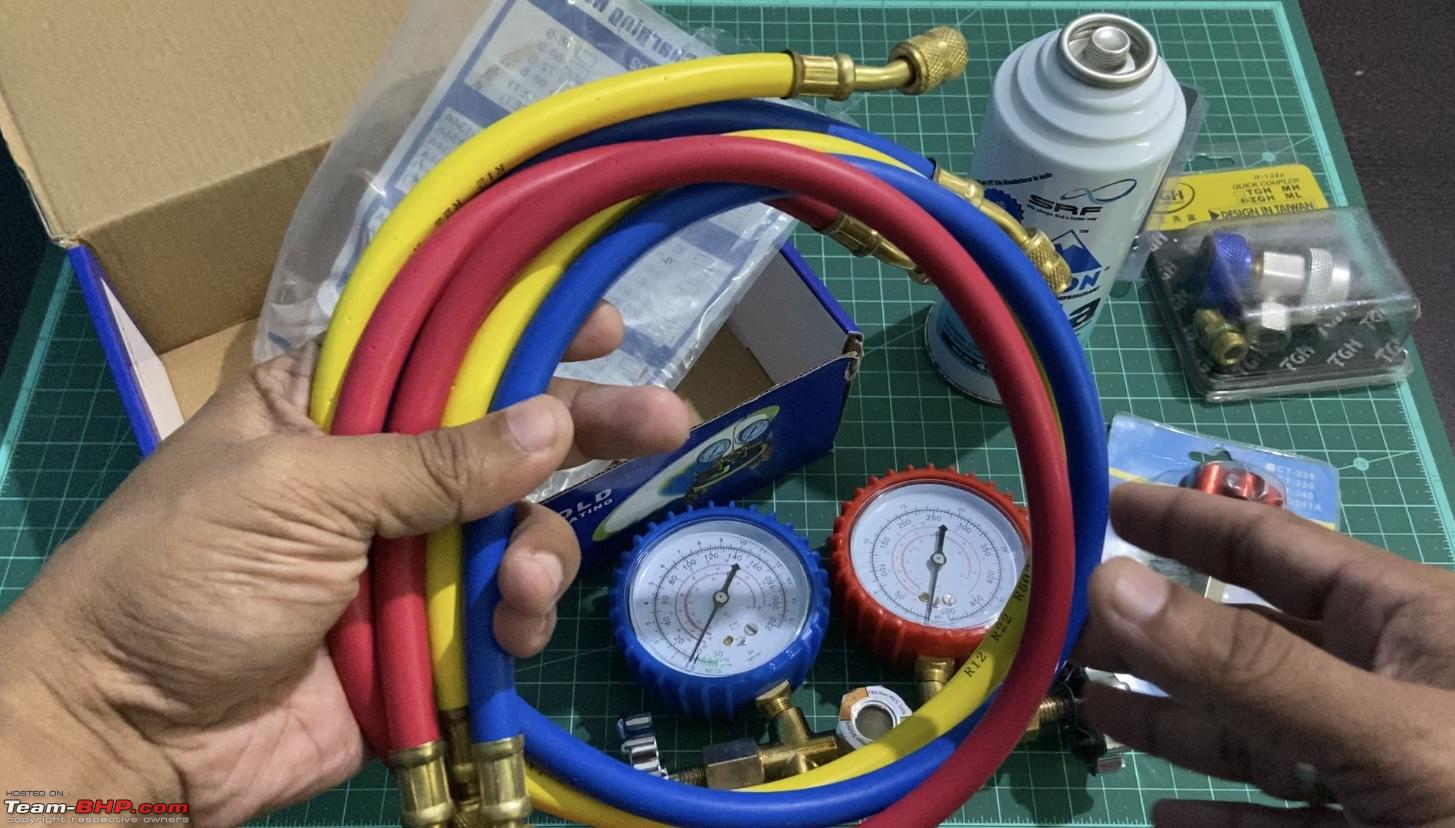 These hoses have threaded schrader valves at the ends just like the ones in the tyres. Press the central pin and the gas escapes.  To connect the hoses to the car’s LP and HP ports, quick coupler fittings are provided. These are also color coded - blue for the LP side and red for the HP side. 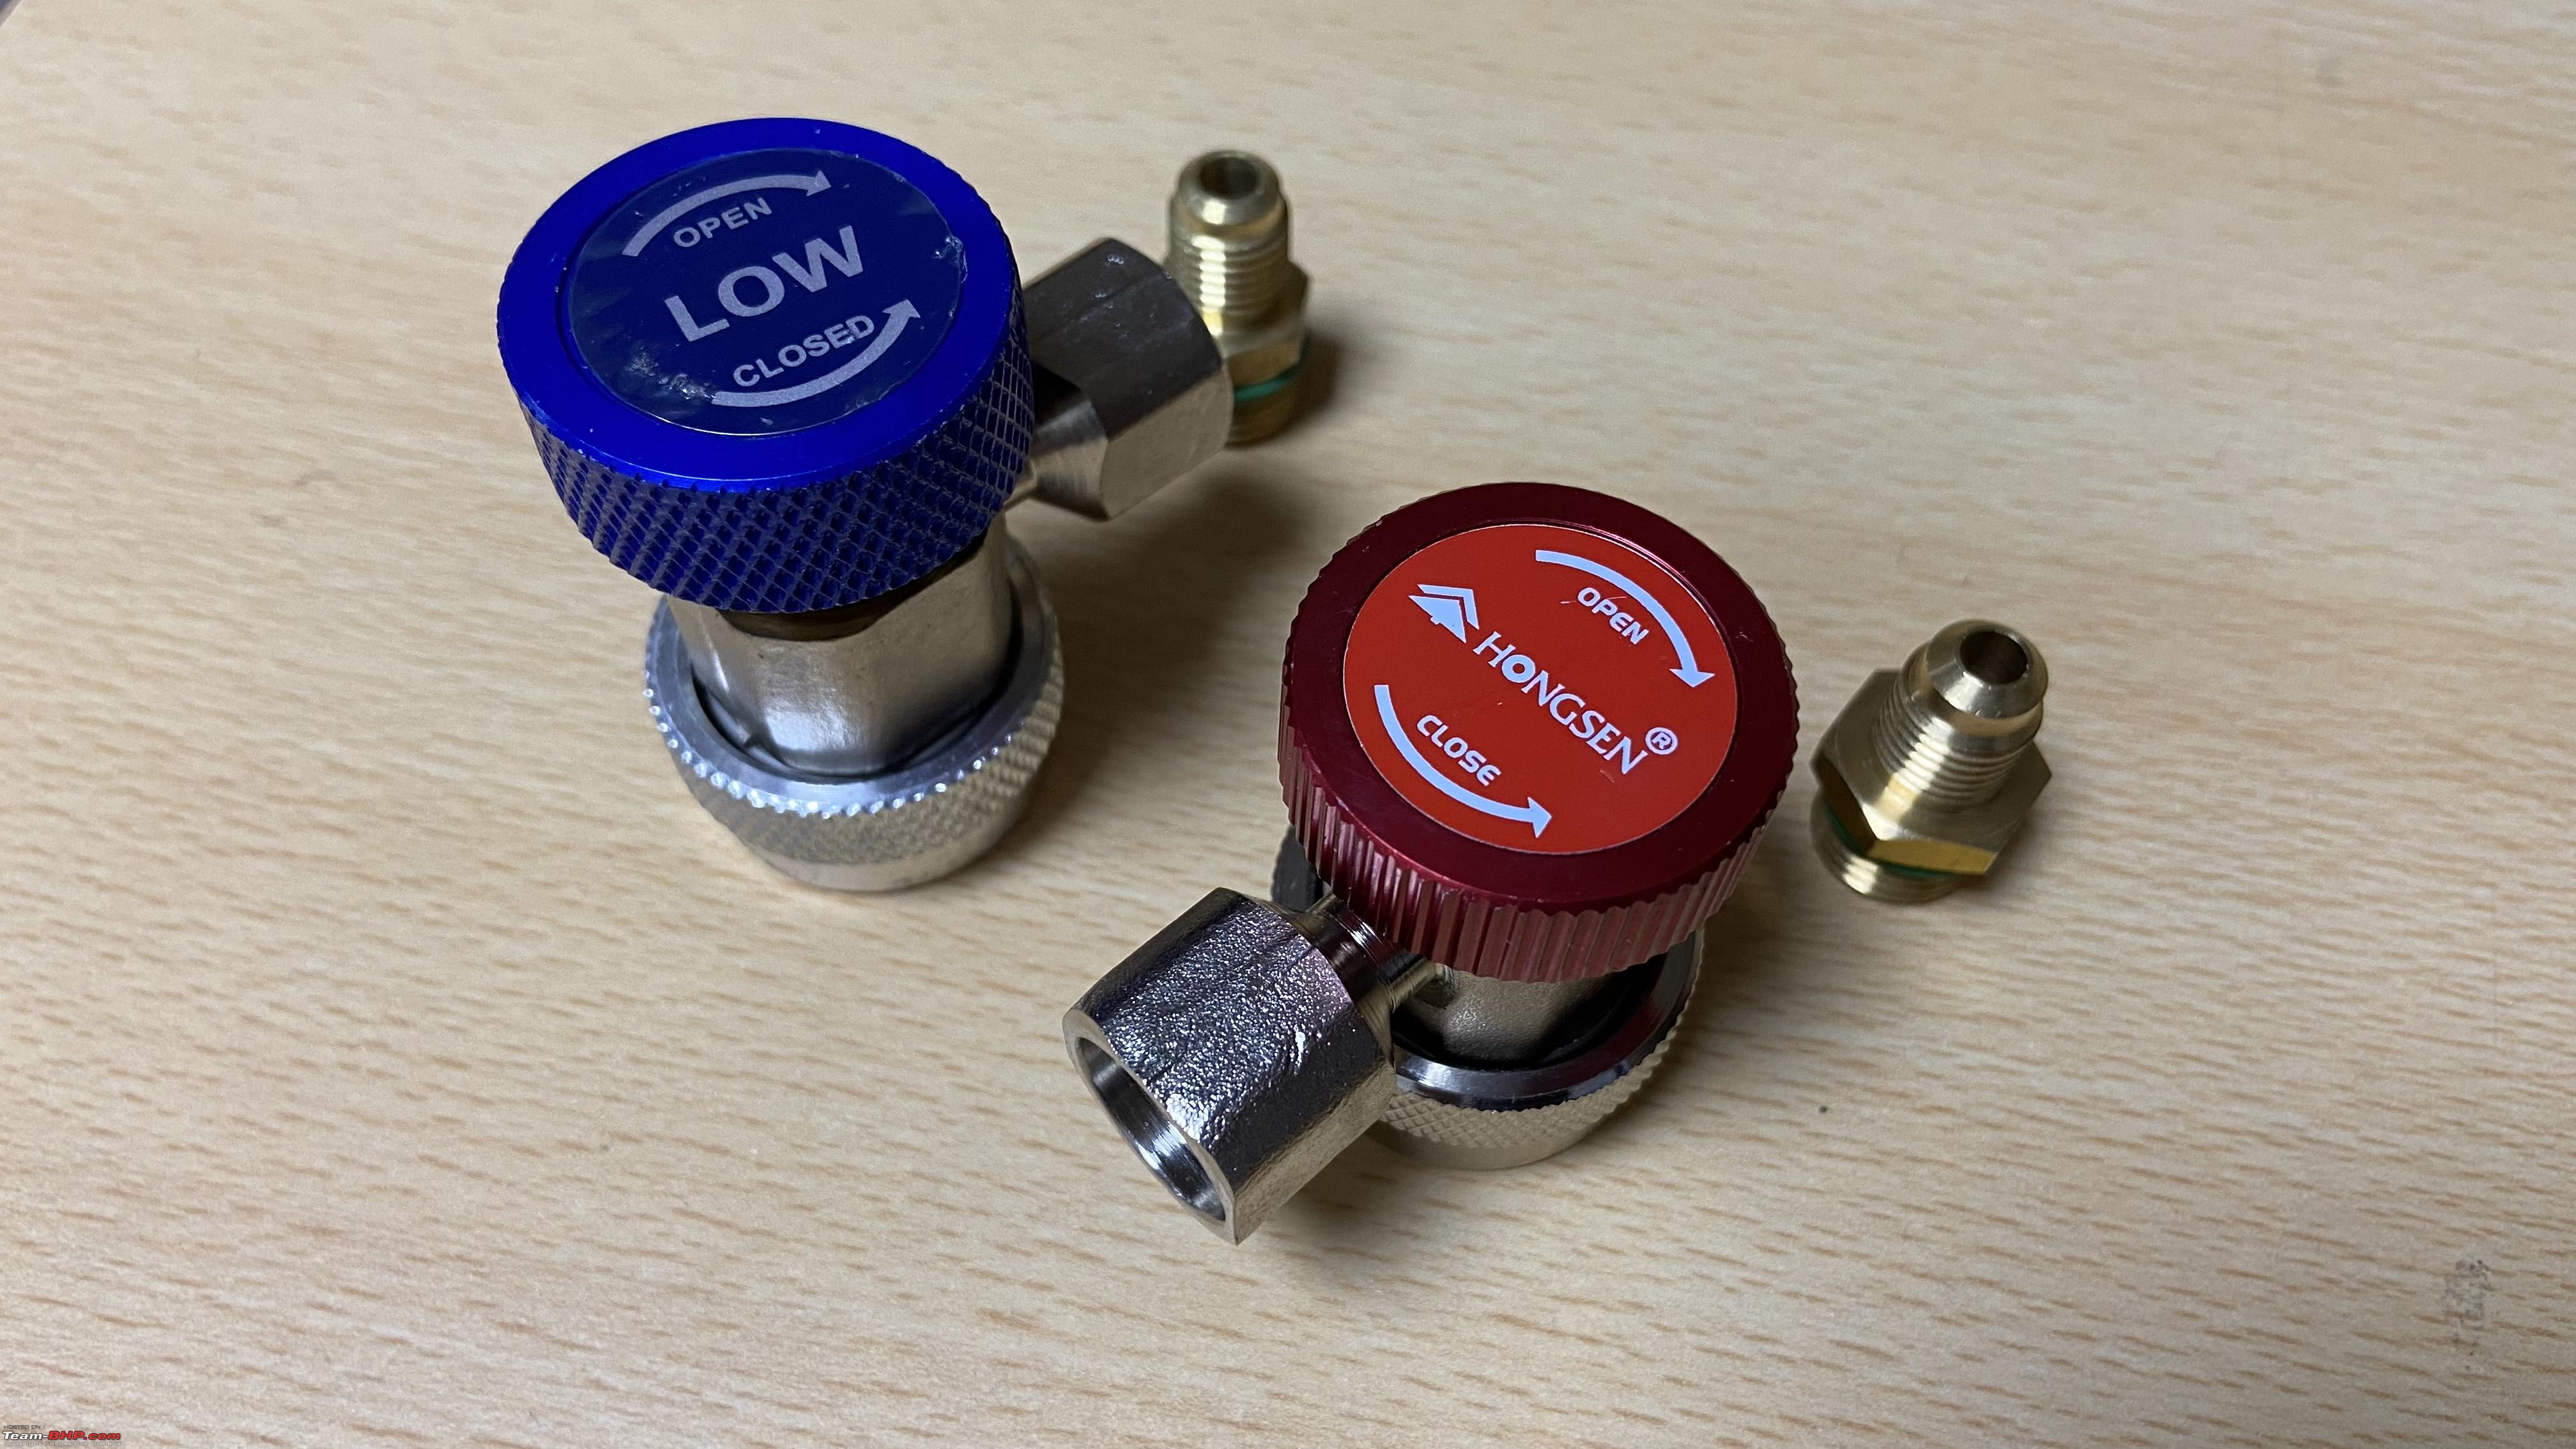 The quick couplers are foolproof because the openings are different. The LP quick coupler has a smaller opening while the HP one has a larger opening. One cannot fit the wrong fitting to the port. 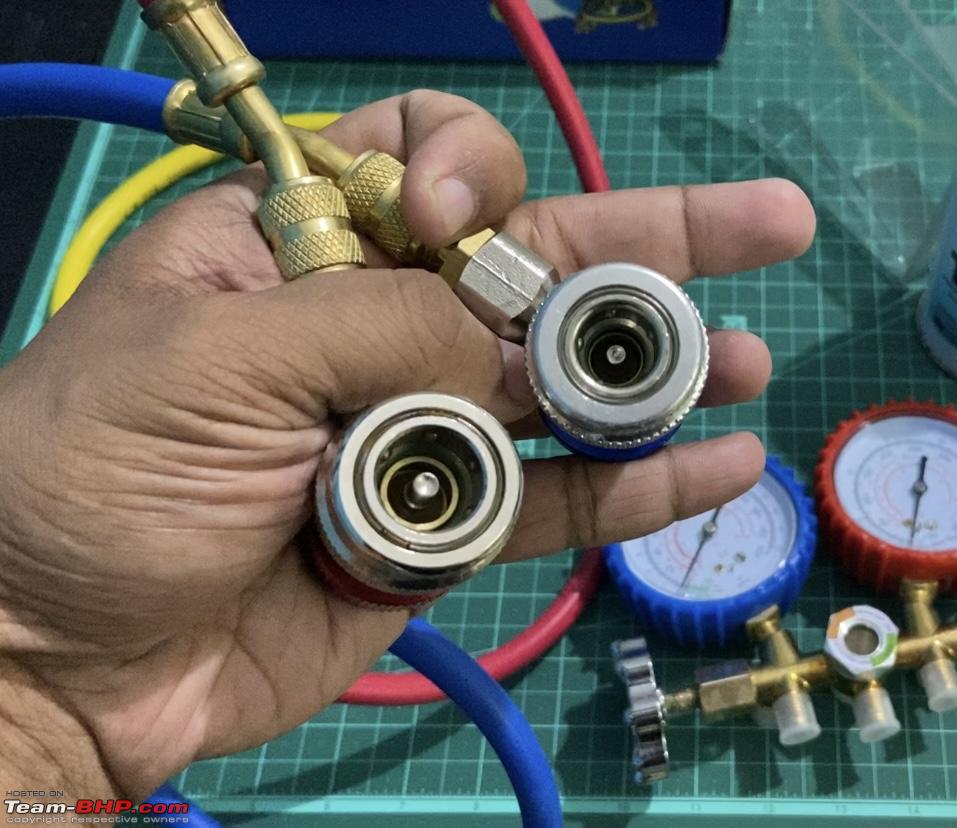 These quick couplers snap onto the charging ports in the car, just like the LPG gas cylinder regulators we have at home.  While charging the system, the yellow hose connects to the refrigerant can using a threaded valve. The valve has a pointy end: 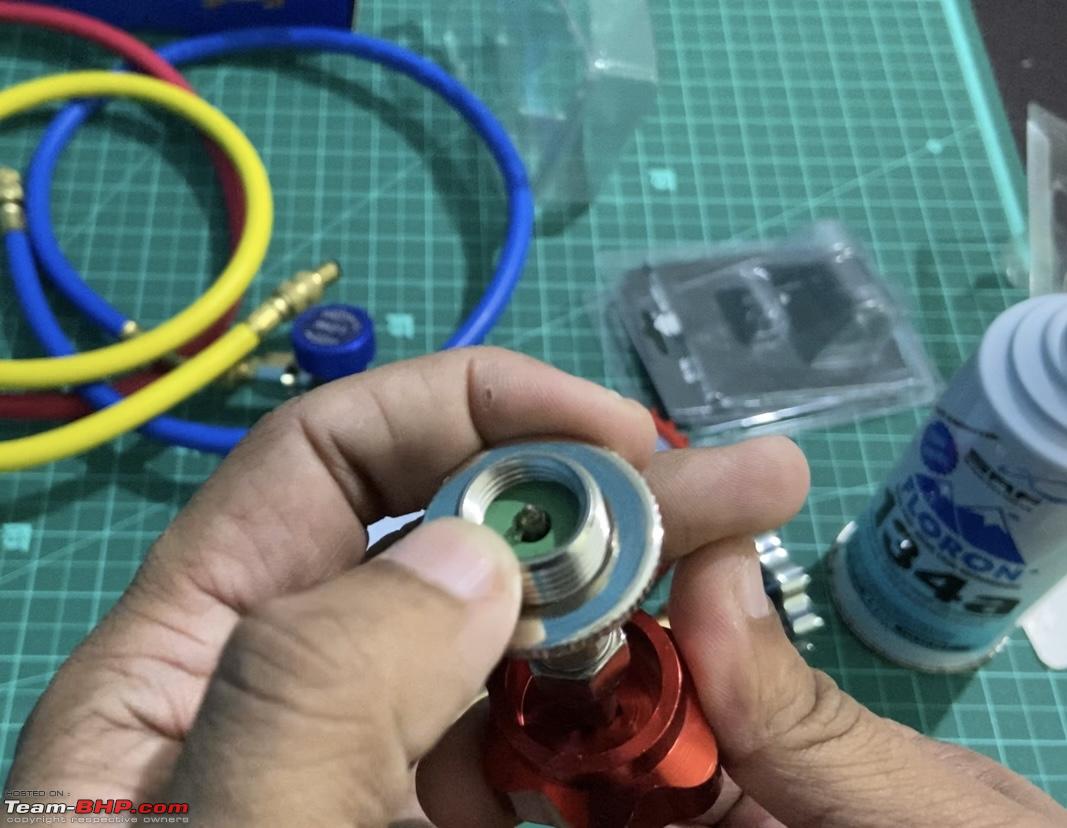 Screw the valve in the clockwise direction and it pierces the can, open the valve in the counterclockwise direction and the refrigerant escapes out. Take extra care to ensure the valve is opened before screwing it to the can; otherwise, it’ll pierce the can and refrigerant would leak out! While recovering the refrigerant or pulling a vacuum on the system, the yellow hose is connected to a recovery unit or vacuum pump respectively. Changing the compressor/condenser coil/evaporator coil/leaking hoses or tubes demands evacuating the refrigerant from the system. 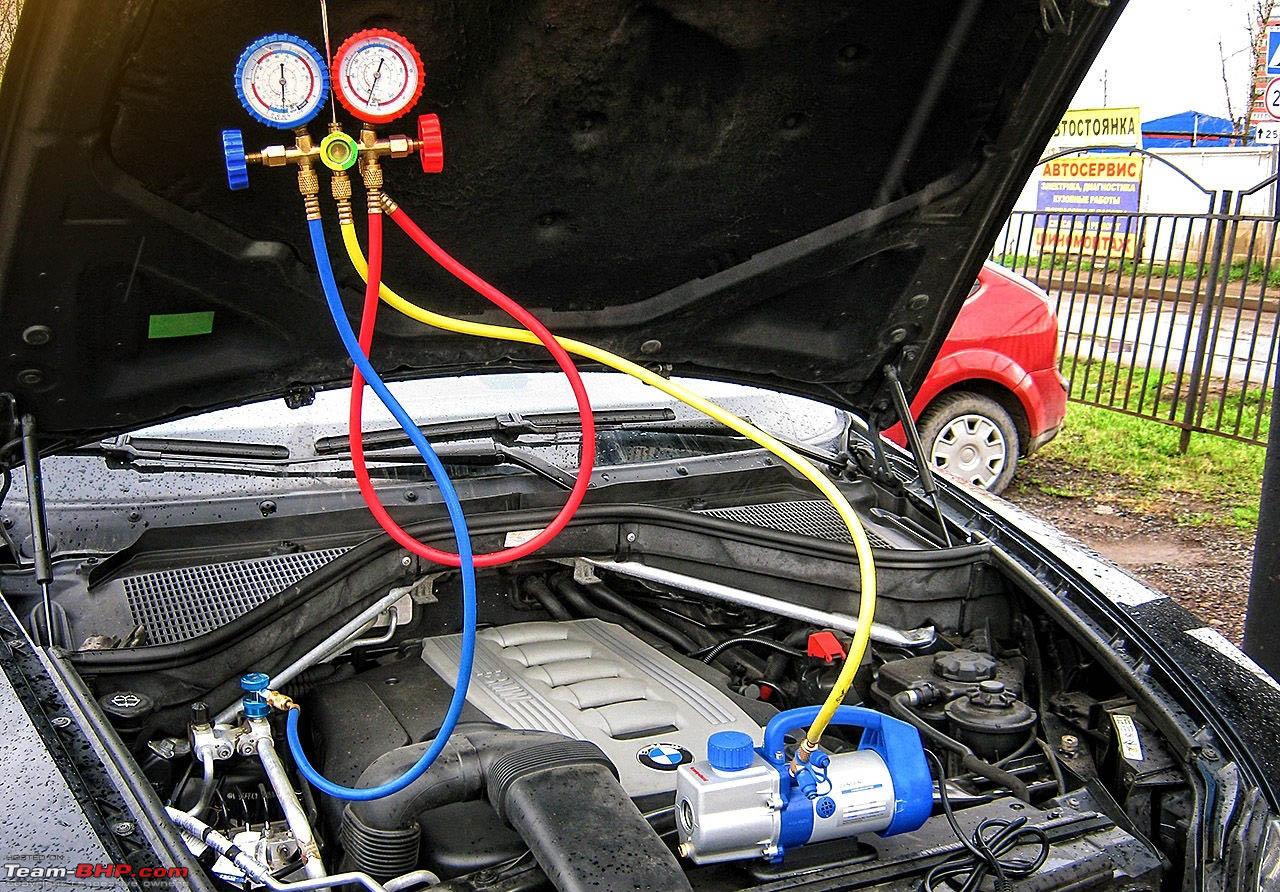 (Source: Google Images) The manifold has dummy threaded ports at the back...:  ...to park the hoses when not being used. This will prevent dirt and dust from entering into the hoses.  I sourced the complete manifold kit with the hoses and quick connectors from a neighbourhood car AC parts store and cost me Rs. 2300. The good thing was unlike buying online, I could physically check the parts and their quality. Plus, the shop also agreed to replace a part if there was any leak but no other guarantee otherwise. Plus, the same setup can be used to charge the refrigerant in a home AC unit with the right refrigerant; not that I intend to for now but good to know this can be done with the same kit. Procedure: • Start the engine, set the temperature to the lowest setting, blower to the highest speed and measure the temperature of the air from the vents using the probe thermometer for reference. I’ve used the one on my DMM.   As you can see, the air is not chilled enough. • Pop up the hood and hang the AC manifold setup. Ensure that both the valves are closed. Hang the ref. can and screw the valve to the can (ensure the valve is open!). 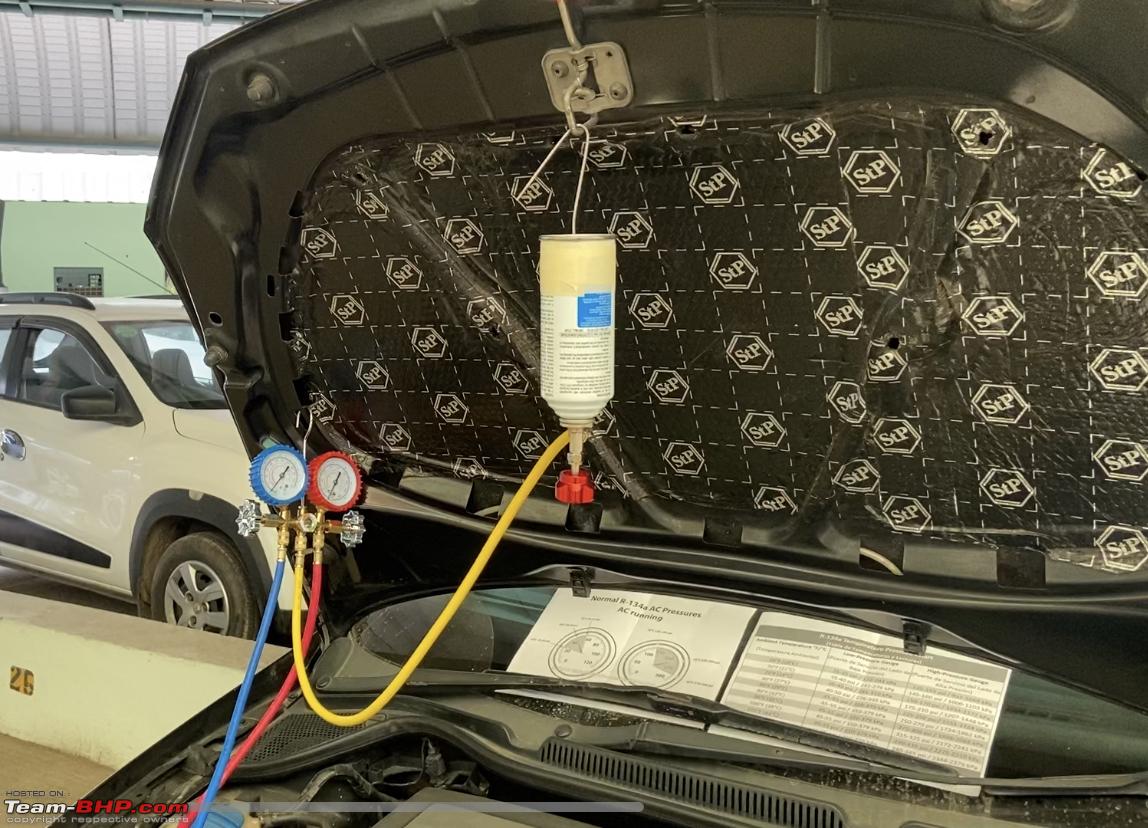 • Find the LP and HP service ports from the AC system in your car. LP port - smaller port on a larger pipe HP port - larger port on a smaller pipe. 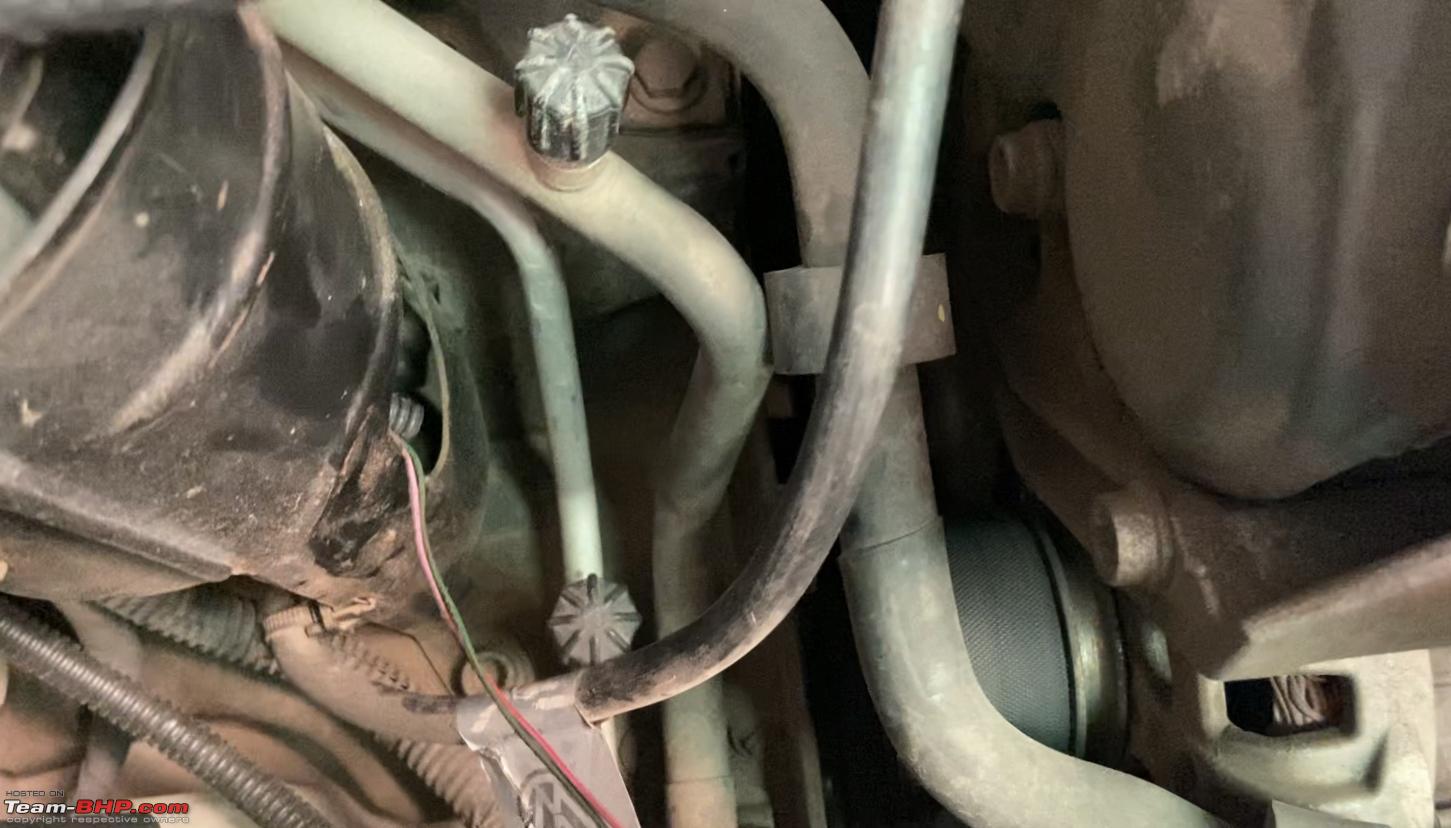 Remove the dust caps from the ports. Keep the dust caps secure.  • Connect the LP/blue quick coupler fitting to the LP port and the HP/red quick coupler fitting to the HP port. Take care to ensure that the quick couplers are closed while connecting them.  • Gently open the valves on the quick couplers and the reading would show up on both the pressure gauges. There is no need to open the valves on the quick couplers completely. Once the gauges show the reading, that’s sufficient.  On that note, even if the valves on the manifold unit are closed, the readings will show up on the gauges as these valves control the flow of refrigerant from the centre port to the LP or HP ports. • Have a partner start the engine, rev it to 1500 rpm and check the pressure readings on both the gauges. At higher engine speeds (like in real life situations when the car is in motion), the compressor's pulley would be spinning properly and this would give a proper reading on the gauges. Measure the ambient temperature and compare the reading with the pressure-temperature chart of R134a below: 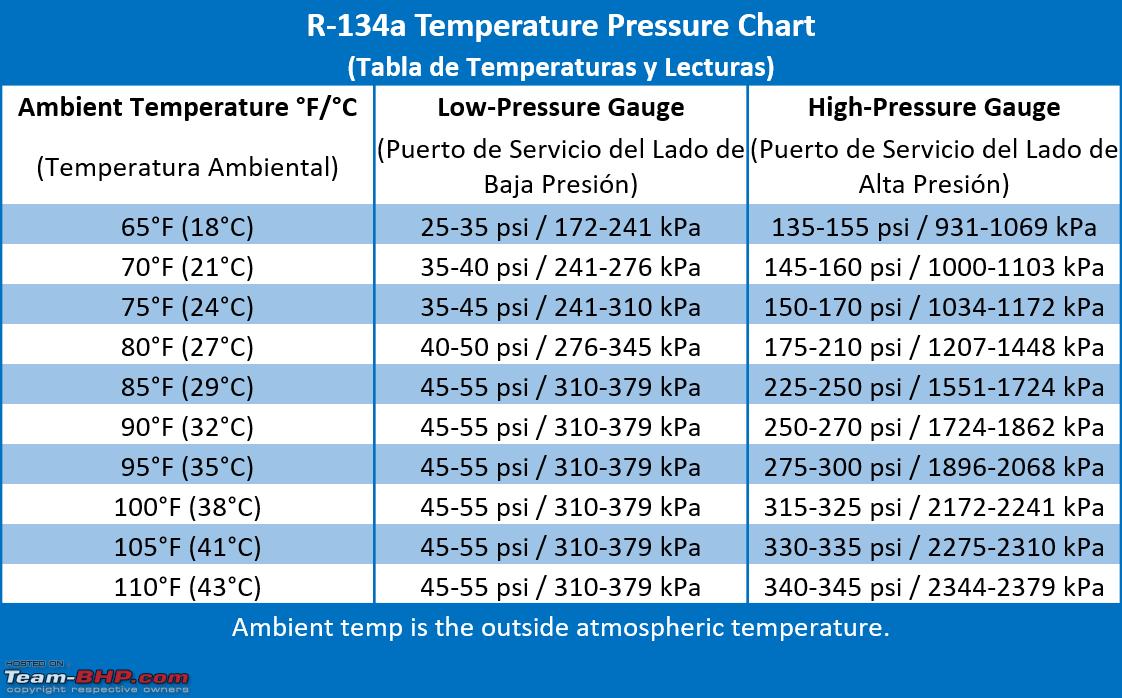 In my case, the ambient temperature was around 28°C.  Corresponding to this temperature, the LP gauge should read between 45 - 50 psi and the HP gauge should read between 190 - 230 psi from the reference chart. The LP gauge reading is okay but as evident from the HP gauge, the reading is 135 psi which is low and indicates the HP/discharge side does not have sufficient refrigerant flow. • Wear the safety googles and a pair of nitrile gloves before working on the ref. can as direct contact with the refrigerant can result in frostbite. 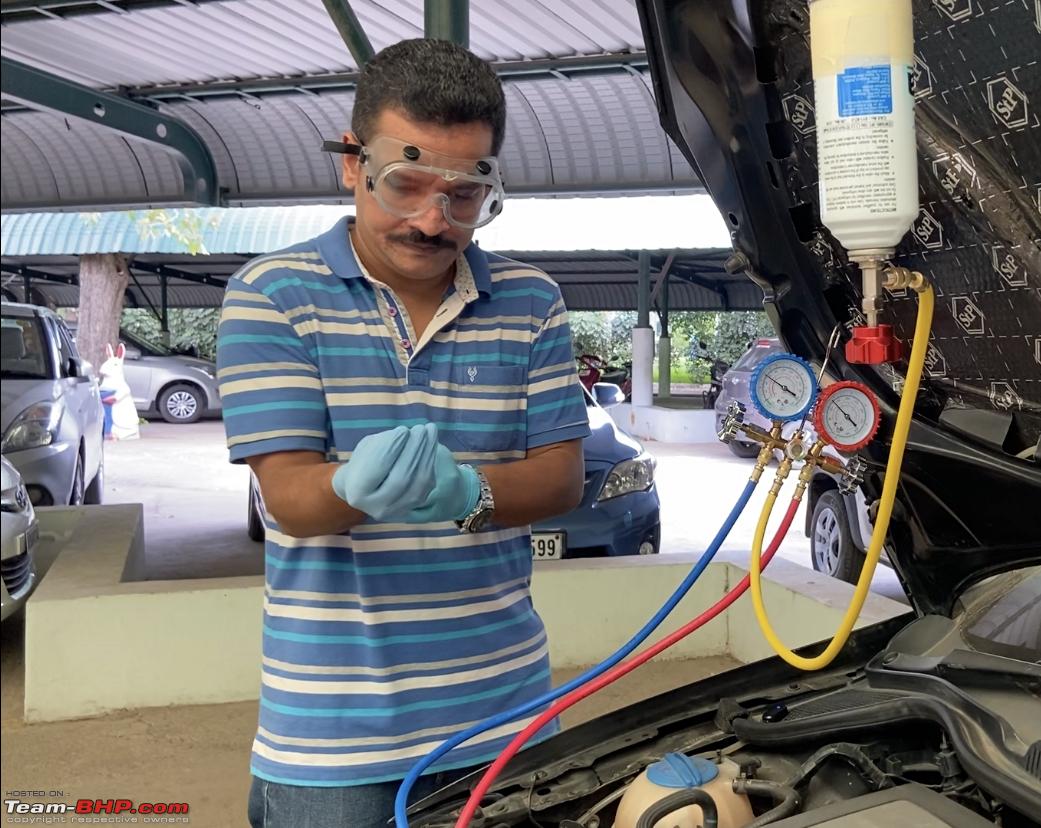 • Screw down the valve on the ref. can completely to puncture it and turn it back in the opposite direction to let the refrigerant flow through the yellow hose to the manifold unit. 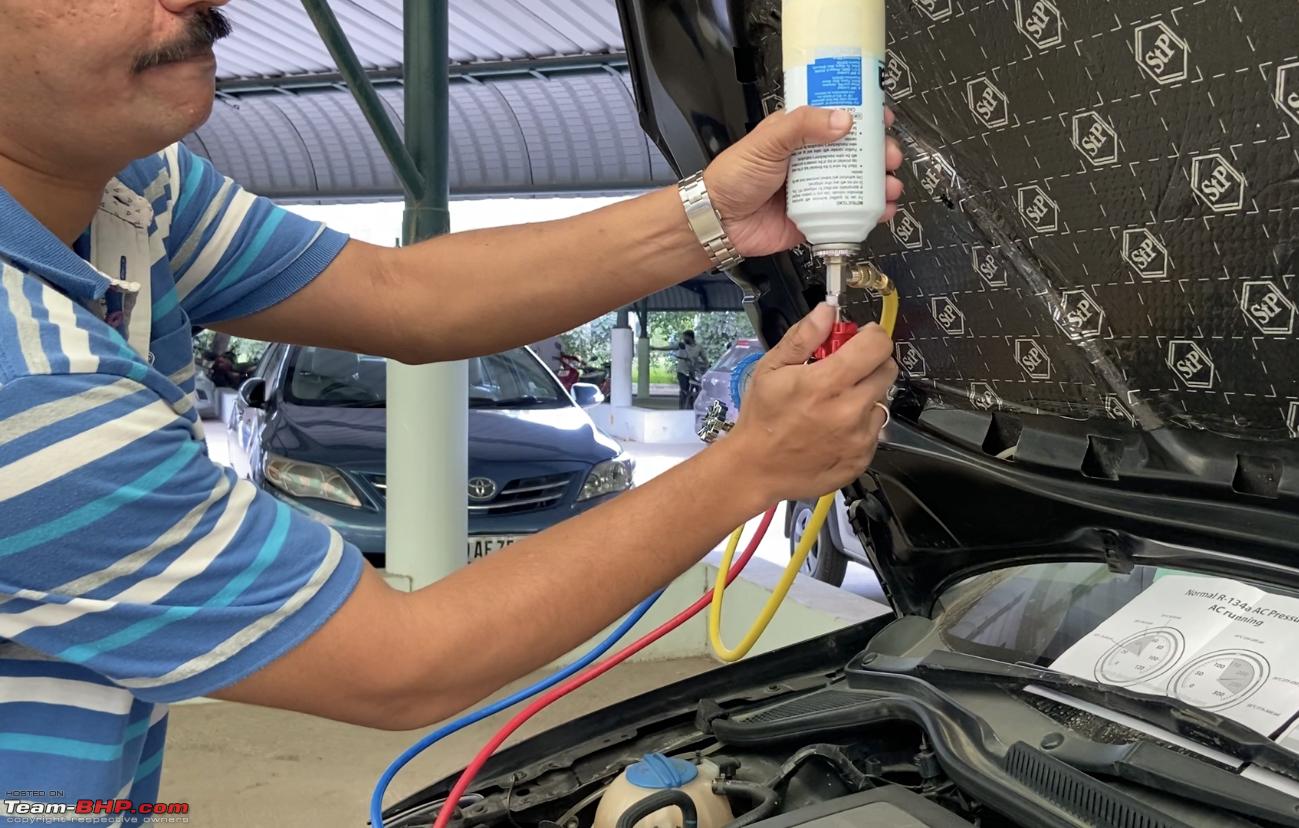 The yellow tube now has a combination of ambient air + refrigerant. Air/moisture is not good for the system and must be purged from the line before charging. Gently unscrew the connector of the yellow hose at the manifold end to purge the air from the hose until some refrigerant comes out.  Screw the connector back firmly. • Gently open the LP side valve on the manifold unit to charge the system with the refrigerant. 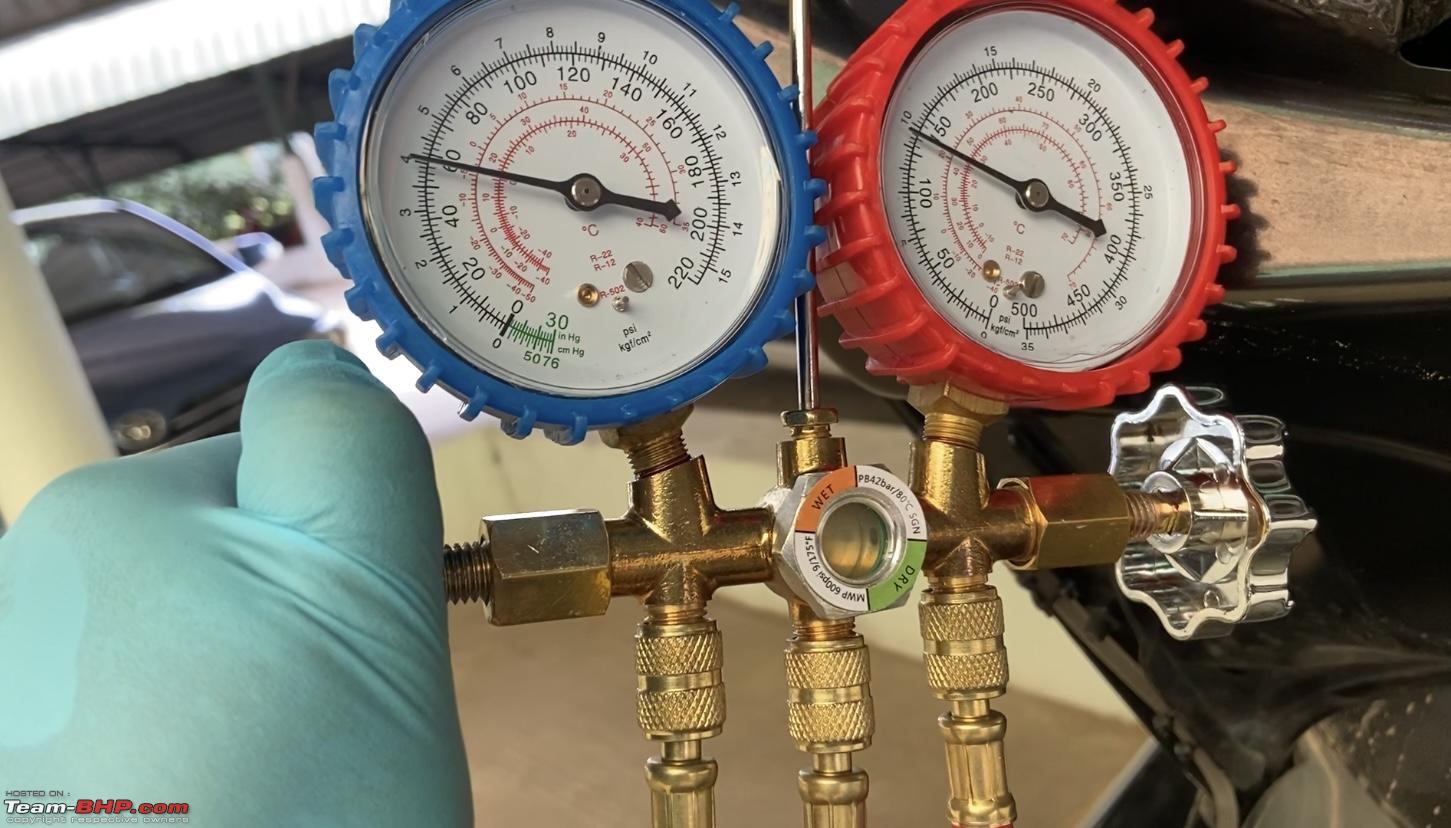 You will notice the flow of refrigerant in the liquid phase through the gauge glass on the manifold:  Close the valve. All the refrigerant from the can should not be charged into the system at once! • Notice the reading on both the gauges. The reading on the HP gauge (discharge side) should begin rising gradually as the refrigerant is being charged into the system.  • For the measured ambient temperature (28°C), find out till what value should the HP gauge needle should climb from the R134a temperature pressure reference chart. It should be between 190 - 230 psi. Open the LP valve to charge the refrigerant in short intervals so the HP gauge needle climbs up to this value and stop. 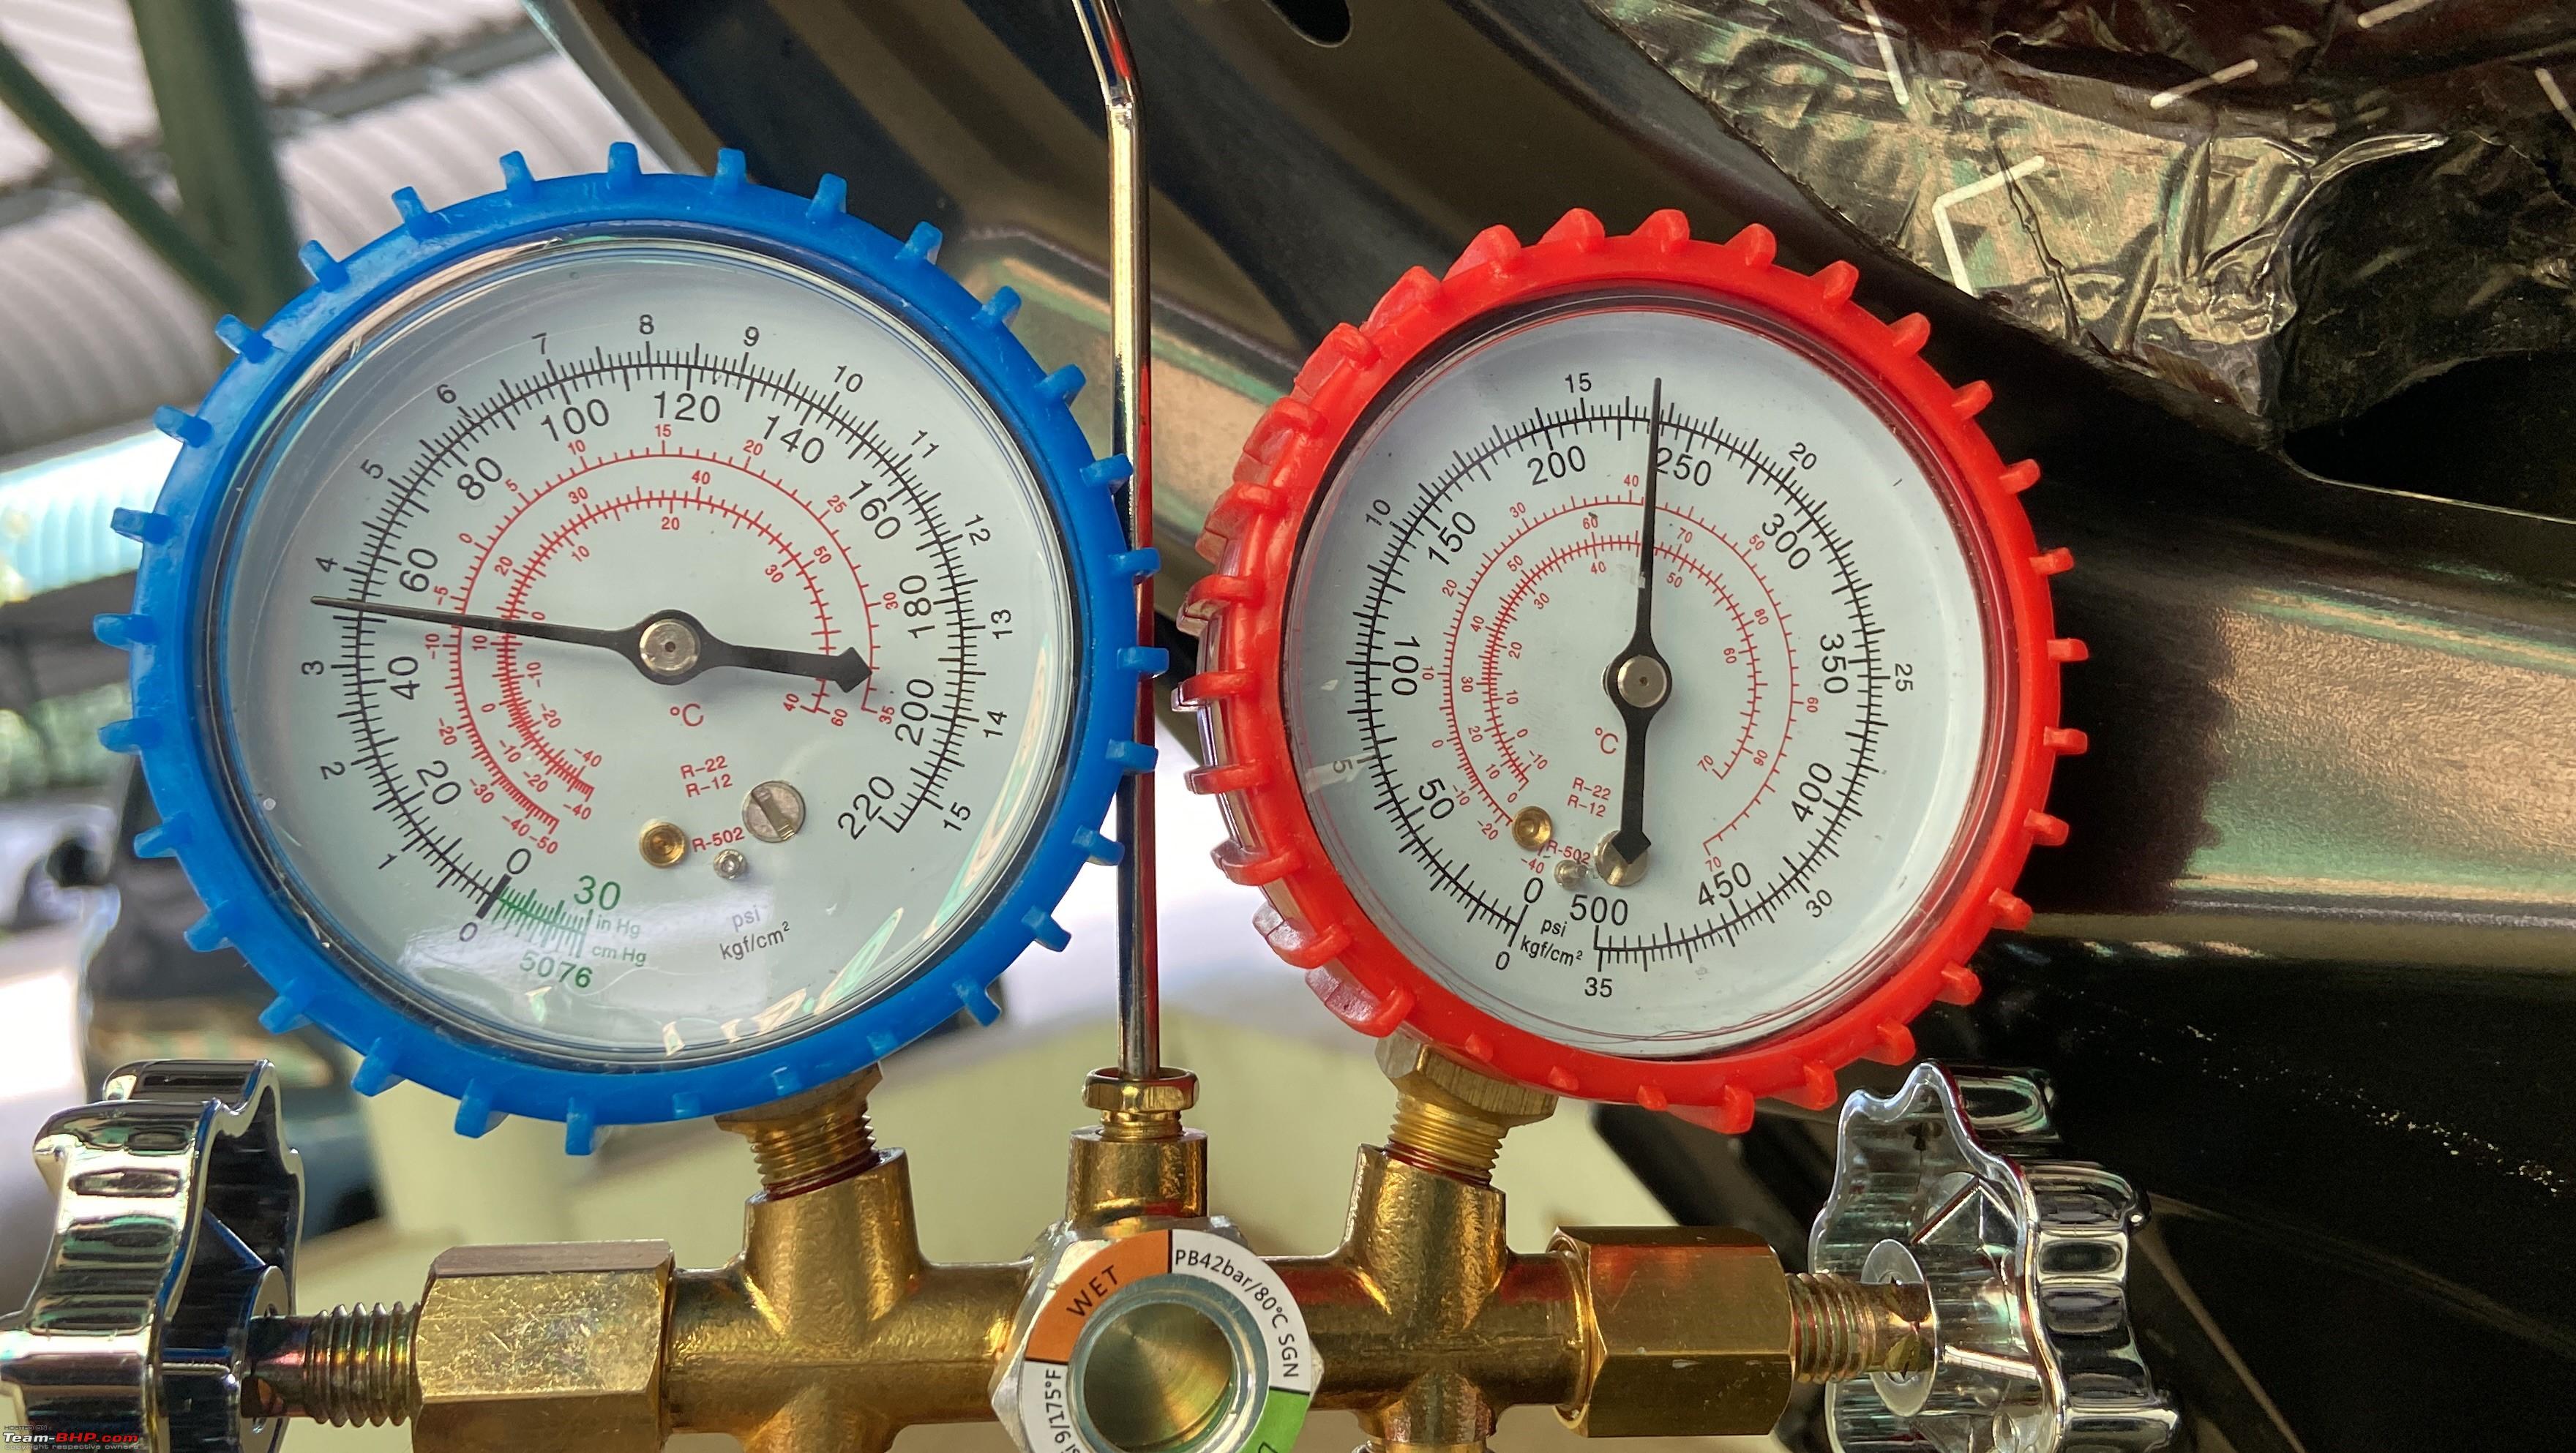 Additional refrigerant does more harm than good - affects cooling performance, can damage the compressor, valves and the seals. Please be careful not to open the LP valve completely in one go! • Check the temperature from the probe thermometer inside the cabin. It should now read a lower temperature suggesting that the charging process went properly.  If you still have issues, you may want to visit a good car AC service garage/technician - unlike other car garages, these guys can quickly diagnose an issue related to the AC system and suggest a proper course of action for a shorter turnaround time and expense. I could have done this too but preferred to do this on my own just to know the process and learn from it. • For those who prefer a video tutorial, here it is: Thanks for reading guys. Trust this was useful. Let me know if you have any comments or feedback or if I've erred in my assessment somewhere. PS: If you're interested, there's a very handy training manual that I got off the internet about car AC systems which is attached below. Last edited by Gannu_1 : 21st February 2022 at 23:26. |

|  (103)
Thanks (103)
Thanks
|


| The following 103 BHPians Thank Gannu_1 for this useful post: | 2himanshu, AdityaDeane, adwaith, aeroamit, anilp, arnieshwartz, AROO7, ashishsGT, Ashtoncastelino, AtheK, audioholic, batish, BeingHuman, bejoy, Bibendum90949, BlackPearl, BLACNWYTE, brownkaiser, br_, chaksjr, Chhanda Das, classiccurves, dailydriver, debuda, deepfusion, Digital Vampire, Doonite, DRIV3R, Electromotive, fluidicjoy, gjnnbagal, govigov, GTO, Herschey, HP-BHP, iamswift, InControl, indivic, Ithaca, Jaggu, JMaruru, johy, jomson13, Keeleri_Achu, keroo1099, lapis_lazuli, lemedico, Leoshashi, libranof1987, manjubp, matchvan, Maverick_4662, motorpsycho, Mr. Nobody, mygodbole, Nari01, neel@makrand, nettooran, NewUser123, NiInJa, NirmalK, NPV, PapaBravo, parsh, pkulkarni.2106, PM - B, Potenza, Prowler, Pulse500, Ravi Parwan, ravishanker_jbp, recshenoy, Reinhard, Researcher, RGK, roby.thomas, Route66, saisree, saket77, samm, sandeepmohan, shipnil, silverado, Siva Prakash, SlowRider, SnS_12, SPIKE ARRESTOR, SS-Traveller, sukarsan, sukhbirST, summerisland, Taha Mir, Tgo, thanixravindran, vaasu, VaibhaoT, Vasuki, venkyhere, vigsom, VijayAnand1, vredesbyrd, Wanderers, WhiteSierra |
| |
|
22nd February 2022, 06:53
| #2 |
| Team-BHP Support | Re: DIY: How to recharge your car's AC refrigerant Thread moved from the Assembly Line to the DIY section. Thanks for sharing! Going to our homepage today  . Good to have Gannu back in the DIY section . Good to have Gannu back in the DIY section  . . |
|
| (9)
Thanks
|
| The following 9 BHPians Thank GTO for this useful post: | AdityaDeane, BlackPearl, CrAzY dRiVeR, Gannu_1, Reinhard, Researcher, SnS_12, Swarup5, vishy76 |
|
22nd February 2022, 09:04
| #3 |
| Senior - BHPian Join Date: Sep 2014 Location: Chennai
Posts: 5,072
Thanked: 9,318 Times
| Re: DIY: How to recharge your car's AC refrigerant Nice diy but don't be surprised if the AC gas level goes down again within the next few weeks. The aircon is a sealed system and gas will not escape in a well functioning AC. Check the car's evaporator / cooling coil for dust clogging, then check your AC filter which I hope you are cleaning if not replacing every 5k (if you clean replace it at the 10k mark, regardless of what your car's manual says). |
|
| (5)
Thanks
|
| The following 5 BHPians Thank hserus for this useful post: | adwaith, Ashtoncastelino, Leoshashi, Reinhard, Turbohead |
|
22nd February 2022, 11:29
| #4 | |
| Distinguished - BHPian  Join Date: May 2010 Location: Bengaluru
Posts: 4,453
Thanked: 6,792 Times
| Re: DIY: How to recharge your car's AC refrigerant Quote:
| |
|
| (6)
Thanks
|

| The following 6 BHPians Thank sagarpadaki for this useful post: | adwaith, Mr. Nobody, ravishanker_jbp, Taha Mir, Turbohead, WhiteSierra |
|
22nd February 2022, 12:50
| #5 | |
| BHPian Join Date: Jul 2019 Location: Navi Mumbai
Posts: 134
Thanked: 492 Times
| Re: DIY: How to recharge your car's AC refrigerant Quote:
Once there was a damaged hose connecting the AC condenser that leaked out the refrigerant within a few seconds. This needed replacement of hose, gaskets/seals etc, fresh compressor oil and refrigerant through a trained professional at a workshop. Second time, slow leakage was suspected due to defective AC evaporator (took 8-9 months for refrigerant to leak out). Even after replacing the evaporator, hoses, gaskets etc and keeping vacuum for ~3 days that suggested no leakage, some refrigerant still used to escape especially driving on rough roads. The evaporator assembly replacement was done at Mahindra authorized service center. Driving on rough roads still results in slow leakage of refrigerant. There are no compressor oil traces visible anywhere even after the refrigerant leaks, which surprised me. I have used DIY method twice to top up the refrigerant, first time in summer 2016 (consumed nearly one full 400gm can, the total capacity of the XUV system is mentioned as ~800gm), and once in Oct'21 (used nearly 350 gm). I also did DIY on my Accent Viva CRDi, which had cooling performance degradation after nearly 10 years of use. In all the cases, I did ensure prior cleaning/replacement of cabin AC filters, inspection to find traces of oil, clean external condenser (water spray using garden hose) before attempting DIY topping up refrigerant. So I conclude that due to possible design issues (especially newly launched cars), inappropriate handling of parts during assembly or repairs of vehicle, worn out gaskets, defective parts or for some other reasons, the AC system, even if is fully sealed, still may have some minor slow leaks. | |
|
| (6)
Thanks
|
| The following 6 BHPians Thank Pulse500 for this useful post: | adwaith, banana, Bibendum90949, Gannu_1, rajathv8, sagarpadaki |
|
22nd February 2022, 14:27
| #6 |
| Newbie Join Date: Sep 2010 Location: MEL
Posts: 10
Thanked: 12 Times
| Re: DIY: How to recharge your car's AC refrigerant Depending on the amount of gas that needed charging, it may need a bit of oil in there. Sometimes loss of cooling can also be a faulty expansion valve or clogged receiver dryer. Good to see the tutorial of how its done. |
|
| (2)
Thanks
|
| The following 2 BHPians Thank ynot for this useful post: | Gannu_1, WhiteSierra |
|
22nd February 2022, 17:16
| #7 |
| BHPian Join Date: Oct 2015 Location: Chennai
Posts: 110
Thanked: 275 Times
| Re: DIY: How to recharge your car's AC refrigerant I had posted (Understanding Car Air-Conditioners) a query couple of years ago on what should be the pressure for AC gas verification. I was thinking 350 psi/25 bar was a high value and was of the opinion that maybe the AC mechanic was intentionally creating a damaged coil. But now i see that its a legit value. Great post.. Thanks for clearing my query! |
|
| (1)
Thanks
|
| The following BHPian Thanks sukarsan for this useful post: | Gannu_1 |
|
22nd February 2022, 17:54
| #8 | |
| Senior - BHPian Join Date: Sep 2014 Location: Chennai
Posts: 5,072
Thanked: 9,318 Times
| Re: DIY: How to recharge your car's AC refrigerant At least with Mahindra I've experienced slow leaks caused by slightly damaged cooling coils (you can see spots of an oil leak in the coil as the damage increases and cooling power gradually drops off), sometime around the 5 year mark, in two scorpios so far. Filling gas and checking how long it takes to leak out is certainly a way to go, as any AC repair will involve disassembling the dashboard for most cars. But audible clues to a leak exist as well, such as a slight hissing noise from the aircon vent, a gradual decrease in AC throw and maybe also a stuffy smell in the car caused by the refrigerant gas also coming in along with the air from the ac vents. If you see unexplained slow leaks a test where some dye is mixed in with the ac gas and injected in, then you check for the presence of the dye outside the ac system is a good one to do. Check this video for example (and the comments are, for once in a youtube video, insightful). Quote:
Last edited by hserus : 22nd February 2022 at 17:56. | |
|
| ()
Thanks
|
|
23rd February 2022, 05:05
| #9 |
| Senior - BHPian Join Date: Feb 2010 Location: Wellington
Posts: 3,283
Thanked: 6,045 Times
| Re: DIY: How to recharge your car's AC refrigerant Thanks. I want to add that this isn't a DIY for everyone. The equipment used here is pretty much what any aircon technician uses so you need to be clear and know what it is for before you venture into this. If you are okay with some trial and error, then all good. Any air conditioning system is complex. If there is a leak or technical glitch anywhere, you'll likely be pulling your hair out. A system leak is easier to diagnose for a home aircon system versus a car where much of the plumbing is out of sight or hard to reach. I had attempted this a couple of times for my Blue Star home aircon when I had to relocate twice and once for my wife's Mercedes A170. The process I followed for the car was easier and simpler. I'd say some luck played in my favor too as the system was low on refrigerant. Had there been a leak, a need to evacuate the system, I doubt if I would have ever attempted to fix it by myself. I also had a refrigerant top up solution like this CRC, which made the process a lot simpler. For my home aircon, I had my uncle on hand for help, who is well versed with this stuff (Quite like you Gannu). He installed his brand new Samsung aircon as he wanted a perfect installation, meaning correct evacuation of the system before charging the system or releasing gas from the outdoor unit (They come pre charged these days). As a result, I got to learn a lot about the process. The car was a simple and interesting process. Now that you've shared the ideal pressure values chart, it does look like I charged the system to the right level based on ambient temperature. We bought this car used and from the day we took delivery, I noticed the aircon was not quite up to it. When summer arrived, it was not blowing cold air unless the fan level was on 1, which was too low for effective cooling of the cabin. Once more air started passing through the evaporator (higher fan speed), the system did not have enough refrigerant to cool the exchanged air passing through. It was cool air, not cold. The car had a warranty and we needed to drive almost 15km back to the dealer to have them attend to it. I thought, why not attempt a DIY and if that did not work, we go to the dealer. I bought a CRC Refrigerant (link above) top up can and refill apparatus for $70. The refill can and gauge/apparatus are sold separate. The refill apparatus is a little trigger gun that releases refrigerant.
Its over 2 years now since the refill and the system has held up. I have not checked the level again as the system is cooling as it should. In the end, was pleased that I took the DIY route before heading to the dealer. Saved a lot of time in the process. On a side note, for some cars, reaching the low and high pressures lines are easy. For some, they are not. You'll need to look around or pull a schematic for your car to find the lines. Cars with smaller engines tend to have more working room too. My previous car, a Fiat Linea had the low pressure line deep behind the engine and close to the compressor which was near the firewall. Had to bend deep down to reach the nozzle. The high pressure access location was right in front, beside the headlamp. 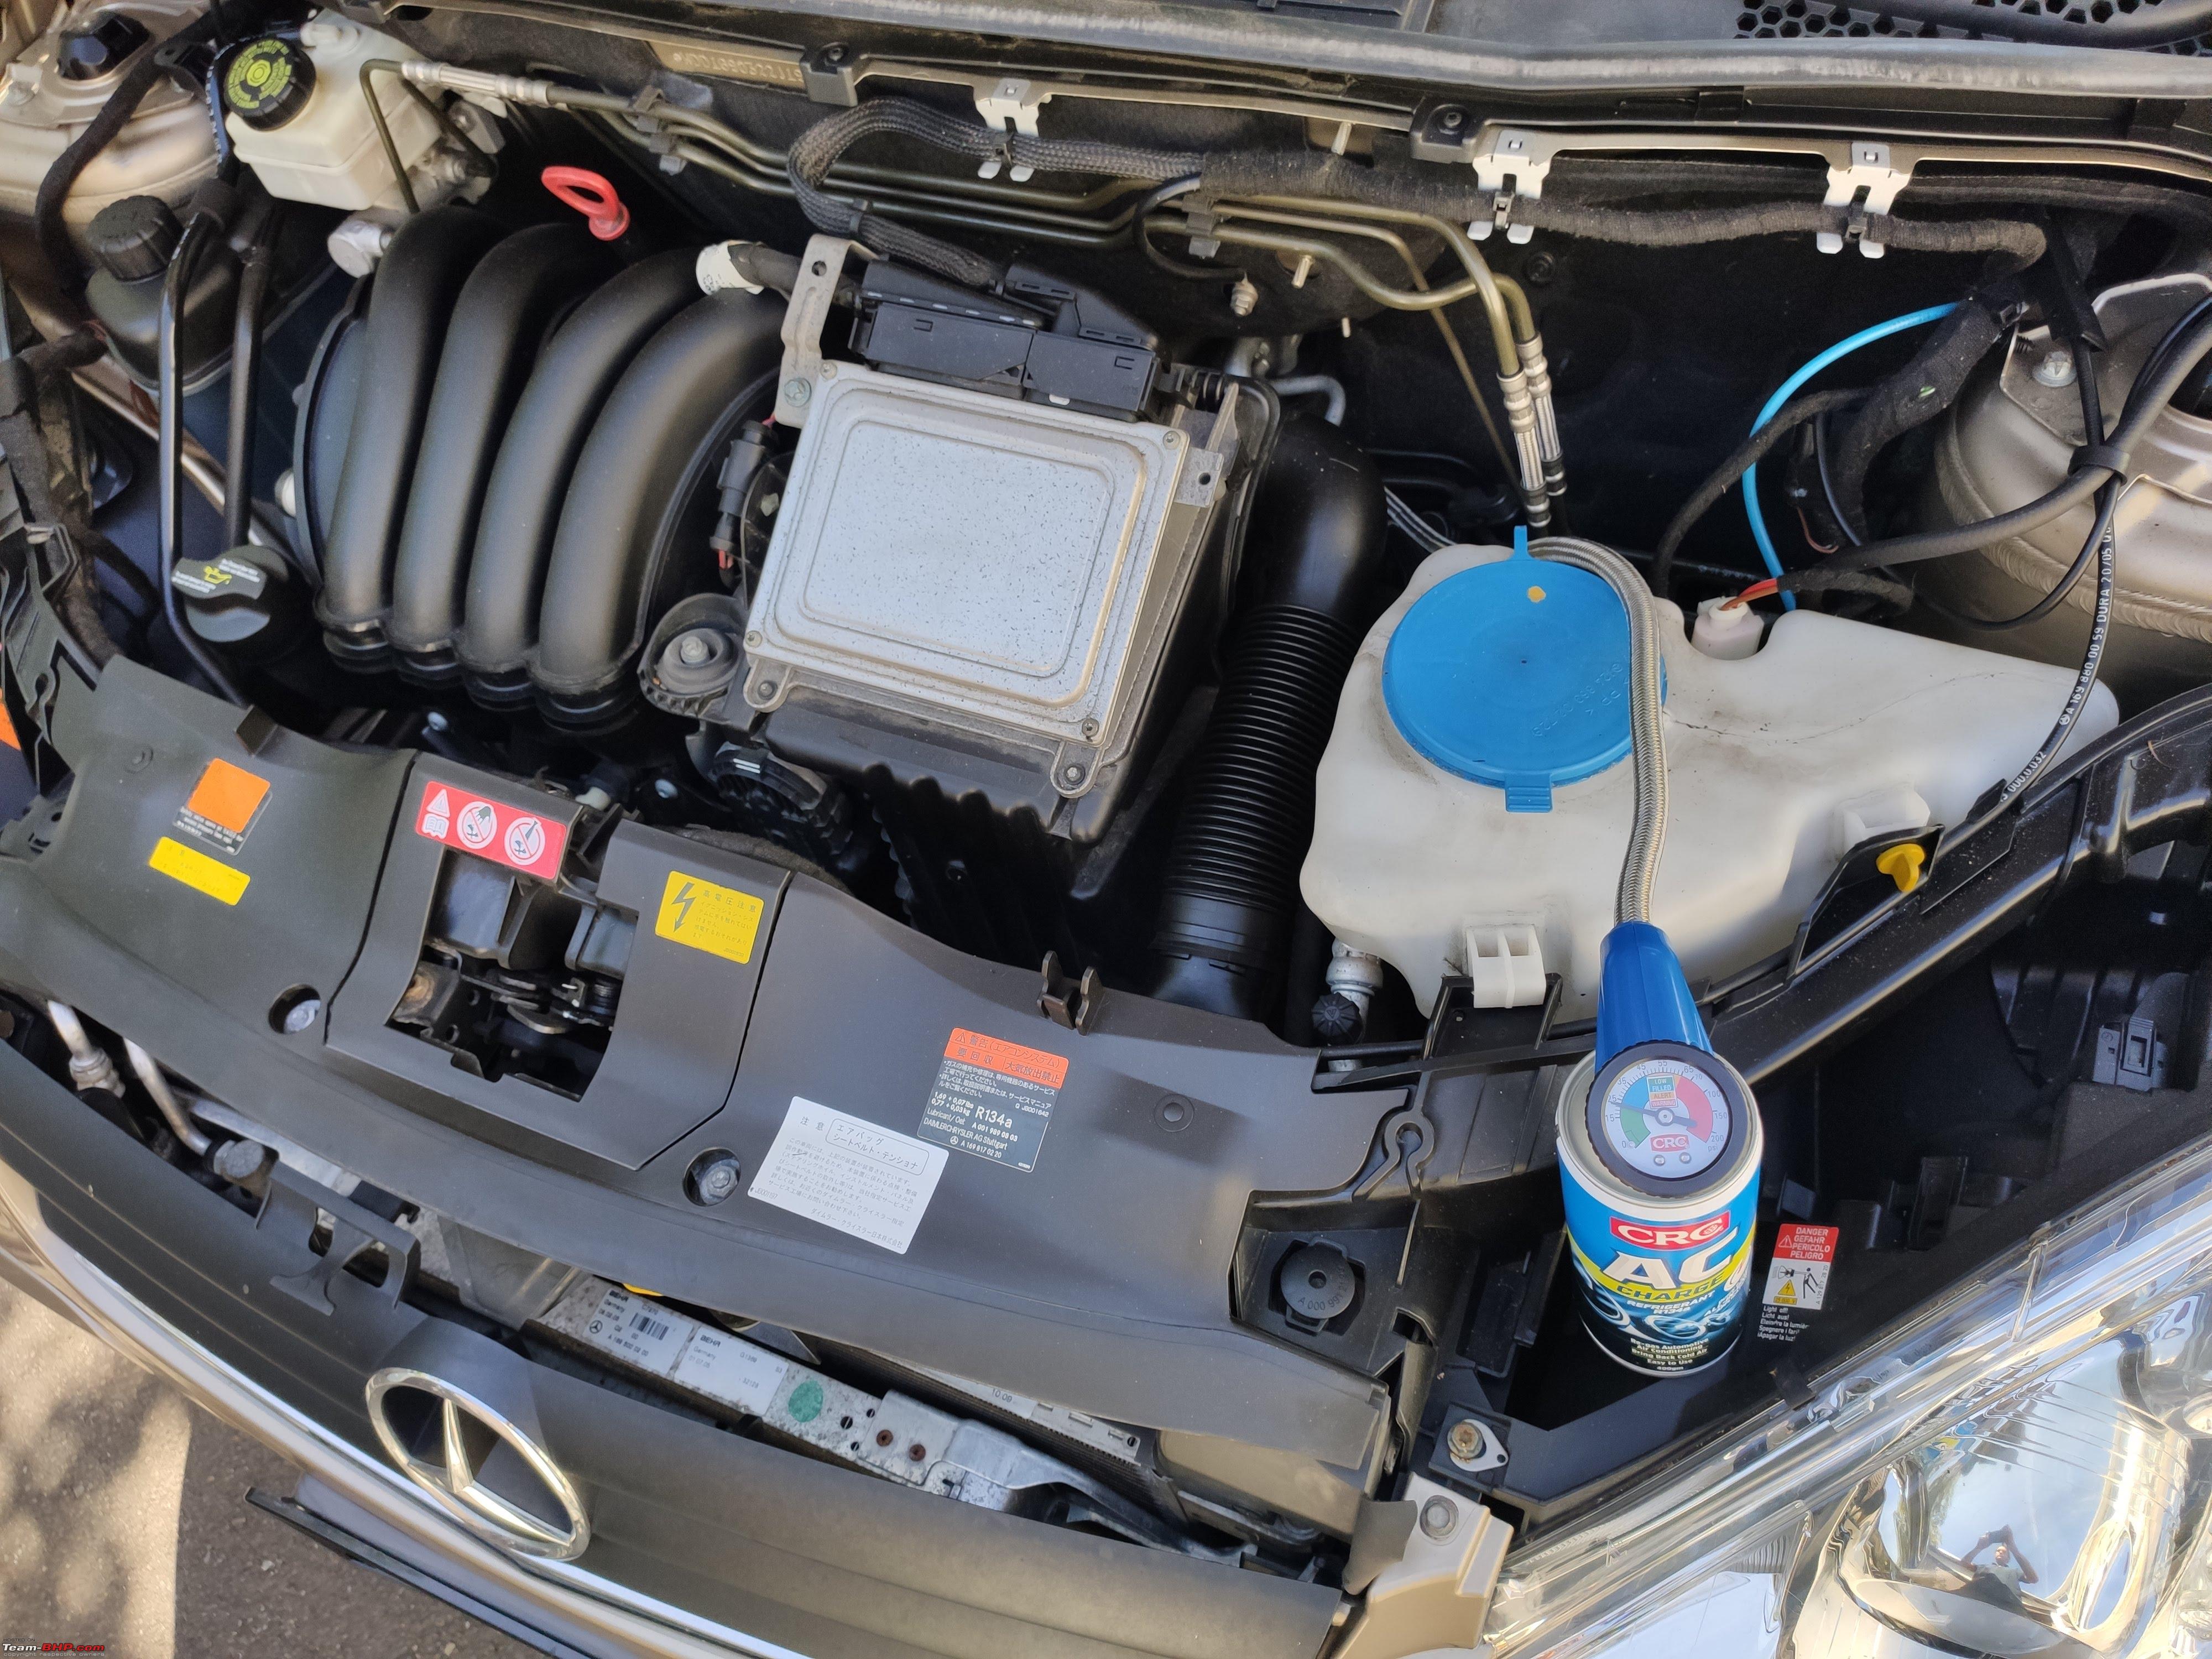 Last edited by sandeepmohan : 23rd February 2022 at 05:15. |
|
| (7)
Thanks
|
| The following 7 BHPians Thank sandeepmohan for this useful post: | arnieshwartz, Bibendum90949, CrAzY dRiVeR, dailydriver, Gannu_1, RGK, shipnil |
|
23rd February 2022, 18:37
| #10 | |
| Senior - BHPian Join Date: Sep 2014 Location: Chennai
Posts: 5,072
Thanked: 9,318 Times
| Re: DIY: How to recharge your car's AC refrigerant One of those machines that evacuates all refrigerant from the system, pumps it back and then tops up the exact amount is ideal for this work. You don't deal in approximations that way, and all the air that may have bled into the system due to low pressure is also pumped out. Quote:
| |
|
| ()
Thanks
|
|
24th February 2022, 08:04
| #11 | |
| Senior - BHPian Join Date: Feb 2010 Location: DPM and CHN
Posts: 1,935
Thanked: 1,367 Times
| Re: DIY: How to recharge your car's AC refrigerant Quote:
What was the final temperature shown by the gauge after the refill?. There is one highly skilled AC technician (Guru) in East CIT Nagar (Backside of the Nexa Showroom, Nandanam, Chennai) who does service for all cars. He diagnoses the AC performance by holding the aluminium pipe and recommends if the refill is required or not. His recommendation is to use the AC daily and clean the filter periodically for better performance. Last edited by RGK : 24th February 2022 at 08:09. | |

| ()
Thanks
|
| |
|
24th February 2022, 08:15
| #12 | ||
| Team-BHP Support Join Date: Apr 2013 Location: Madras
Posts: 7,335
Thanked: 20,669 Times
| Re: DIY: How to recharge your car's AC refrigerant Quote:
Quote:
 | ||
|
| (1)
Thanks
|
| The following BHPian Thanks Gannu_1 for this useful post: | arnieshwartz |
|
24th February 2022, 08:46
| #13 | |
| Senior - BHPian Join Date: Feb 2010 Location: DPM and CHN
Posts: 1,935
Thanked: 1,367 Times
| Re: DIY: How to recharge your car's AC refrigerant Quote:
 . The AC technician in the Ford ASC told that the temperature should be a maximum of 7°C at the lowest fan speed. . The AC technician in the Ford ASC told that the temperature should be a maximum of 7°C at the lowest fan speed.The gas level goes down when there is a tube leak or the oil seals/o rings are worn out without much AC usage. | |
|
| ()
Thanks
|
|
24th February 2022, 11:03
| #14 | |
| Senior - BHPian Join Date: Sep 2014 Location: Chennai
Posts: 5,072
Thanked: 9,318 Times
| Re: DIY: How to recharge your car's AC refrigerant Quote:
| |
|
| ()
Thanks
|
|
24th February 2022, 11:13
| #15 | |
| Team-BHP Support Join Date: Apr 2013 Location: Madras
Posts: 7,335
Thanked: 20,669 Times
| Re: DIY: How to recharge your car's AC refrigerant Quote:
I change the cabin filter every 6-8 months now since they are dirt cheap. Have to remove the blower and do a proper cleaning now; have never done this activity so far. | |
|
| ()
Thanks
|
|