| |||||||

| Search Forums |
| Advanced Search |
| Go to Page... |
 |
| Search this Thread |  59,517 views |
 12th October 2020, 10:56
| #1 |
| Distinguished - BHPian  Join Date: Nov 2007 Location: Belur/Bangalore
Posts: 7,147
Thanked: 27,204 Times
| DIY: Steering-Mounted Audio & Bluetooth Controls (1st-Gen Ertiga)
|

|  (46)
Thanks (46)
Thanks
|
| The following 46 BHPians Thank paragsachania for this useful post: | aargee, Abhinav V, AdityaDeane, arjithin, arun1100, arun_josie, ashis89, Ashtoncastelino, audioholic, BoneCollector, bongSENse, dailydriver, digitalnirvana, Dr.AD, echo77, funkykar, Gannu_1, gauravanekar, GrammarNazi, GTO, InControl, krishnaprasadgg, landcruiser123, Leoshashi, neil.jericho, Ponbaarathi, pritanshchandra, rajvardhanraje, RaviK, Researcher, rkhare, samaspire, Sheel, Simat, speedsatya, techspark, Thermodynamics, The_Outsider!, vaasu, varun560061, Varun_HexaGuy, vigsom, Vihari, vishy76, YD14, Zinda |
| |
|
12th October 2020, 11:10
| #2 |
| Distinguished - BHPian Join Date: Nov 2007 Location: Belur/Bangalore
Posts: 7,147
Thanked: 27,204 Times
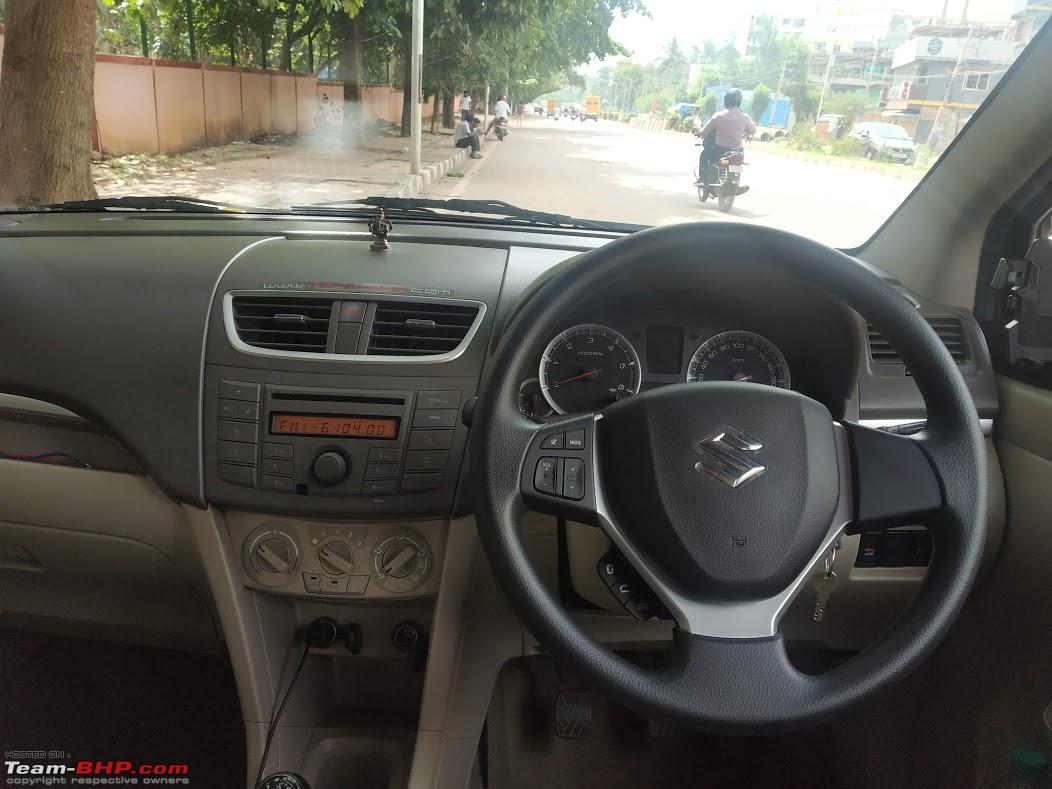
| re: DIY: Steering-Mounted Audio & Bluetooth Controls (1st-Gen Ertiga) Step 1- Homework:There was a lot of thought process and time that went into this. The more I thought it was simple, a lot started to reveal and it made me realize that a detailed and a careful assessment was absolutely necessary to first ensure that this DIY was possible at all. I spent hours on Boodmo, glancing through the images of couple of steering wheels of other Maruti cars, including Ertiga to figure out the design, construction and other elements like wiring inside and the dimensions. There were many moments where I thought I should abandon (the thought) and forget about it but somehow after further studying the images and watching few videos on YouTube, I started to convince myself that this seemed tryable. Mind you, there were a lot of installers from NCR region who have videos on YouTube where they have successfully installed steering mounted controls for almost all the models of Maruti. Plethora of videos are evidence to it. But one thing became very clear when I fully watched one of the videos where one such installer reiterates the fact that they can only install the steering controls on all Maruti cars that have Airbags and they don’t do it for cars without Airbags. Of course, the videos themselves end abruptly with not much information. Also, it made sense when they said that Airbags are must because my 2013 VDi then never had Airbag and that means there was no “Contact Coil”. I then stumbled upon a video where a gentleman replaces a bad contact coil in the first Generation Ertiga. I would watch that in slow-motion and even take screenshots to understand the similarities and differences between a Steering of the Ertiga with no Airbags (mine) and the one with the Airbags (in the video).
 Last edited by paragsachania : 12th October 2020 at 14:05. |
|
| (33)
Thanks
|
| The following 33 BHPians Thank paragsachania for this useful post: | Abhinav V, AdityaDeane, aeroamit, arun1100, arun_josie, ashis89, audioholic, dailydriver, digitalnirvana, Dr.AD, echo77, funkykar, Gannu_1, GrammarNazi, GTO, InControl, landcruiser123, Leoshashi, Mr.Boss, pritanshchandra, RaviK, Reinhard, Researcher, samabhi, samaspire, Sheel, speedsatya, techspark, Thermodynamics, The_Outsider!, vaasu, Varun_HexaGuy, vigsom |
|
12th October 2020, 11:22
| #3 |
| Distinguished - BHPian Join Date: Nov 2007 Location: Belur/Bangalore
Posts: 7,147
Thanked: 27,204 Times
| re: DIY: Steering-Mounted Audio & Bluetooth Controls (1st-Gen Ertiga)
|
|
| (35)
Thanks
|


| The following 35 BHPians Thank paragsachania for this useful post: | Abhinav V, AdityaDeane, arun1100, arun_josie, ashis89, audioholic, ButterRider 7, dailydriver, digitalnirvana, Dr.AD, echo77, funkykar, Gannu_1, GrammarNazi, GTO, Haroon, InControl, landcruiser123, Leoshashi, Mr.Boss, PaddleShifter, pritanshchandra, RaviK, Reinhard, Researcher, rkhare, samabhi, samaspire, Sheel, speedsatya, techspark, Thermodynamics, Tucker48, Varun_HexaGuy, Vihari |
|
12th October 2020, 11:35
| #4 |
| Distinguished - BHPian Join Date: Nov 2007 Location: Belur/Bangalore
Posts: 7,147
Thanked: 27,204 Times
| re: DIY: Steering-Mounted Audio & Bluetooth Controls (1st-Gen Ertiga)
|
|
| (30)
Thanks
|


| The following 30 BHPians Thank paragsachania for this useful post: | Abhinav V, AdityaDeane, arun_josie, ashis89, audioholic, dailydriver, digitalnirvana, Dr.AD, funkykar, Gannu_1, GrammarNazi, GTO, InControl, landcruiser123, Leoshashi, Mr.Boss, pritanshchandra, RaviK, Reinhard, samabhi, samaspire, Sheel, speedsatya, techspark, Thermodynamics, The_Outsider!, Tucker48, vaasu, Varun_HexaGuy, whitewing |
|
12th October 2020, 11:49
| #5 |
| Distinguished - BHPian Join Date: Nov 2007 Location: Belur/Bangalore
Posts: 7,147
Thanked: 27,204 Times
| re: DIY: Steering-Mounted Audio & Bluetooth Controls (1st-Gen Ertiga) Choosing the right Horn pad:For the airbag equipped steering, the horn pad also has the airbag inflator module as part of it. That means, it is an expensive affair to order a horn pad of an airbag equipped steering merely to make the steering buttons function. I had already decided that, by taking the fabrication and aluminum welding route, I would somehow customize a horn pad clamp to place the horn pad onto it. So I ordered the horn pad in BLACK of the lower variant Celerio without much wait.  Choosing the right steering:At least with the information that I had gathered, I was sure that the Ertiga and Celerio had similar steering wheels. Also, in 2013 till around 2016 IIRC, the Ertiga Z variants had only stereo controls on the steering and BT/calling function buttons were missing. Post 2016 or so, Ertiga started to have both Stereo and BT controls on the steering. So I placed an order for a BEIGE steering wheel for 2016 model through Boodmo. The part never arrived and it was an endless wait for 2 weeks when I decided to change my plans. I kept this order open and placed a parallel order, this time for the BLACK steering wheel of the Celerio Z variants that comes with both stereo and BT controls. I was perhaps OK to experiment between black and beige only to see things work. The steering wheel of the Celerio arrived In 10 days. The following image helps you understand the major difference between the steering wheels, especially on what is below the horn pad. As you can notice, the major difference is indeed the frame to mount the horn pad in the new steering which is absent here as the horn pad for this steering comes with airbag module.  |
|
| (29)
Thanks
|
| The following 29 BHPians Thank paragsachania for this useful post: | Abhinav V, AdityaDeane, aeroamit, arun1100, arun_josie, ashis89, audioholic, dailydriver, digitalnirvana, Dr.AD, Gannu_1, GrammarNazi, GTO, InControl, landcruiser123, Leoshashi, Mr.Boss, pritanshchandra, RaviK, samabhi, samaspire, Sheel, speedsatya, Tgo, Thermodynamics, The_Outsider!, Tucker48, vaasu, Varun_HexaGuy |
|
12th October 2020, 11:51
| #6 |
| Distinguished - BHPian Join Date: Nov 2007 Location: Belur/Bangalore
Posts: 7,147
Thanked: 27,204 Times
| re: DIY: Steering-Mounted Audio & Bluetooth Controls (1st-Gen Ertiga) Checking if the steering wheel fits well:This was a crucial step too and if this failed, the DIY would probably be abandoned midway. I was confident since I had researched so much that it will fit and I wasn’t disappointed. The steering was a precise fit on top of the contact coil (you can see the coupler in the top center), from every angle and in every direction:   Interestingly, the OE steering without airbags has some extra construction below it which otherwise is occupied by a contact coil in higher variants:  |
|
| (30)
Thanks
|
| The following 30 BHPians Thank paragsachania for this useful post: | Abhinav V, AdityaDeane, aeroamit, arun_josie, ashis89, audioholic, classiccurves, dailydriver, digitalnirvana, Dr.AD, Gannu_1, gauravanekar, GrammarNazi, GTO, InControl, landcruiser123, Leoshashi, Mr.Boss, pritanshchandra, Reinhard, Researcher, samabhi, samaspire, Sheel, speedsatya, Tgo, Thermodynamics, The_Outsider!, Tucker48, vaasu |
|
12th October 2020, 11:56
| #7 |
| Distinguished - BHPian Join Date: Nov 2007 Location: Belur/Bangalore
Posts: 7,147
Thanked: 27,204 Times
| re: DIY: Steering-Mounted Audio & Bluetooth Controls (1st-Gen Ertiga) Fitment of horn pad onto the steering wheel:The horn pad mount/frame is made of metal and has 4 contact points on top. When the horn pad is pressed, the contact points touch the main body of this frame which is actually bolted onto the chassis of the steering wheel which again is connected to the steering column. Hence pressing the horn pad completes the circuit by grounding the negative and the honk is heard. Here is an image that shows the horn pad from my current steering from various angles. As you can see, it has 4 legs that are directly in contact with the steering wheel skeleton metal where it is bolted to.  The Celerio horn pad was tested onto the mount of my car and it was a direct fit without much ado:  While I was more than sure that the horn pad mounted onto the frame is anyway going to be an odd fit onto the new steering, I simply placed it over the steering wheel. Realised that there is a lot of “Height reduction” that would be required.   Also, in its present state, the horn pad mount/frame’s position of legs were nowhere closer to any of the existing holes in the steering wheel skeleton:  Fabricate the frame or try out something? While I was ready to fabricate the base of this mounting frame keeping the top same, I really wanted to try once to bend the legs of the mount and see if I can somehow bring the mount to the desired position and height. There were 4 holes on the steering wheel that I could leverage to fit the mount but I could do so only if I bent the legs in different directions and angles. I first bent the legs on the upper side and secured them with screws so it gives me a good grip to then bend the other 2 legs. After a couple of attempts, I could manage to bend the remaining 2 and secure them with bolt & nut for one of them as there was no thread for holes in the bottom while the other hole was secured along with the screw that was holding the BT buttons. To align the horn pad at the right position, I carefully bended all the 4 legs to get that desired positioning. This is how twisty the mount looked after locking it in its final position. 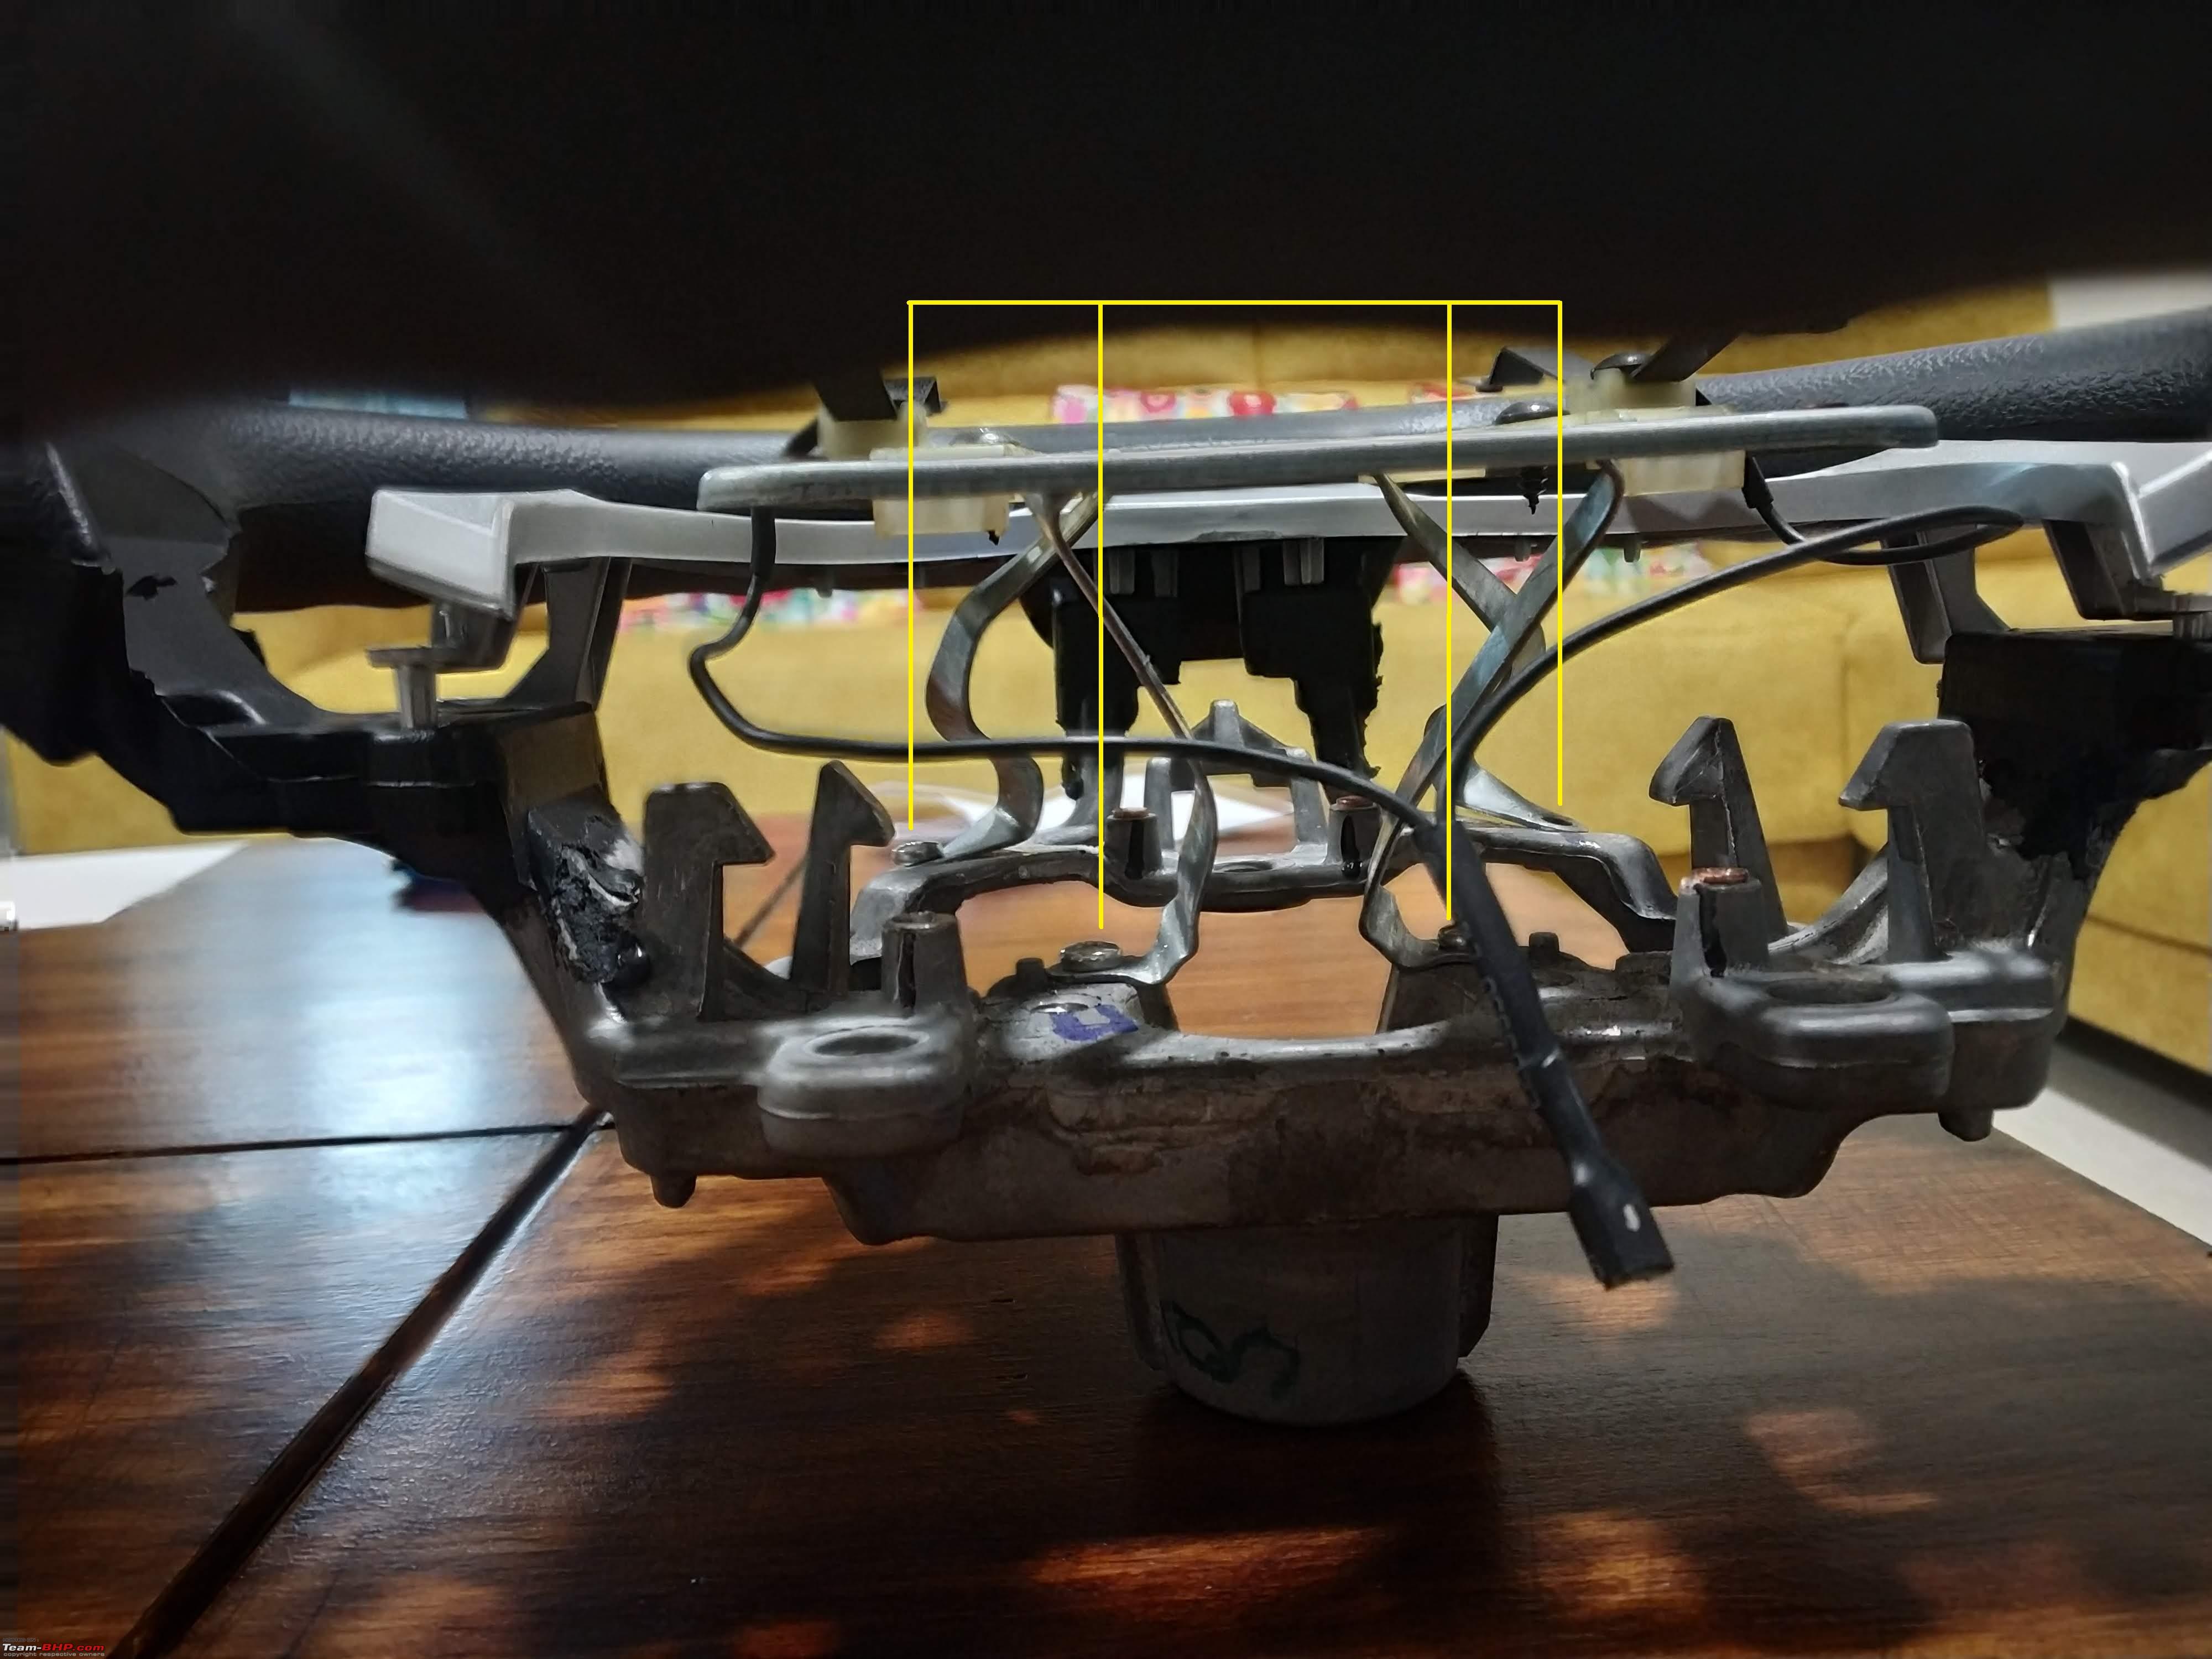 Mind you, the material is not delicate and required quite some effort to bend using a proper cutting plier and this had to be done by securing it on the steering wheel only and not independently on a vice. The mount in this position felt very much secure and strong as I removed and refitted the horn pad multiple times after this. The below image shows the final fitment of the horn pad mount/frame in the desired position. Circled areas represent where and how it was secured:  The horn pad fitted onto the steering:  Finally, a comparison between the 2 steering wheels, where I removed the horn pad mount/frame from the OE steering and fitted that onto the new steering.  Last edited by paragsachania : 12th October 2020 at 12:03. |
|
| (35)
Thanks
|
| The following 35 BHPians Thank paragsachania for this useful post: | --gKrish--, Abhinav V, AdityaDeane, aeroamit, arun1100, arun_josie, ashis89, audioholic, blackwasp, ChrisTJ, dailydriver, digitalnirvana, Dr.AD, funkykar, Gannu_1, Godzilla, GrammarNazi, GTO, InControl, landcruiser123, Leoshashi, Mr.Boss, pritanshchandra, Rajiv0909, Reinhard, Researcher, samabhi, samaspire, Sheel, speedsatya, Thermodynamics, The_Outsider!, vaasu, Varun_HexaGuy, Xaos636 |
|
12th October 2020, 12:08
| #8 |
| Distinguished - BHPian Join Date: Nov 2007 Location: Belur/Bangalore
Posts: 7,147
Thanked: 27,204 Times
| re: DIY: Steering-Mounted Audio & Bluetooth Controls (1st-Gen Ertiga) Wiring of switches for signals and illumination: |
|
| (28)
Thanks
|


| The following 28 BHPians Thank paragsachania for this useful post: | Abhinav V, AdityaDeane, aeroamit, arun1100, arun_josie, ashis89, dailydriver, digitalnirvana, Dr.AD, Gannu_1, GrammarNazi, GTO, krishnaprasadgg, landcruiser123, Mr.Boss, pritanshchandra, Rajiv0909, Ravi Parwan, Reinhard, Researcher, samabhi, samaspire, Sheel, speedsatya, Thermodynamics, The_Outsider!, Tucker48, vaasu |
|
12th October 2020, 12:18
| #9 |
| Distinguished - BHPian Join Date: Nov 2007 Location: Belur/Bangalore
Posts: 7,147
Thanked: 27,204 Times
| re: DIY: Steering-Mounted Audio & Bluetooth Controls (1st-Gen Ertiga) Wiring the interface:The new steering had to be wired and connected to the right sources/destinations and they included:
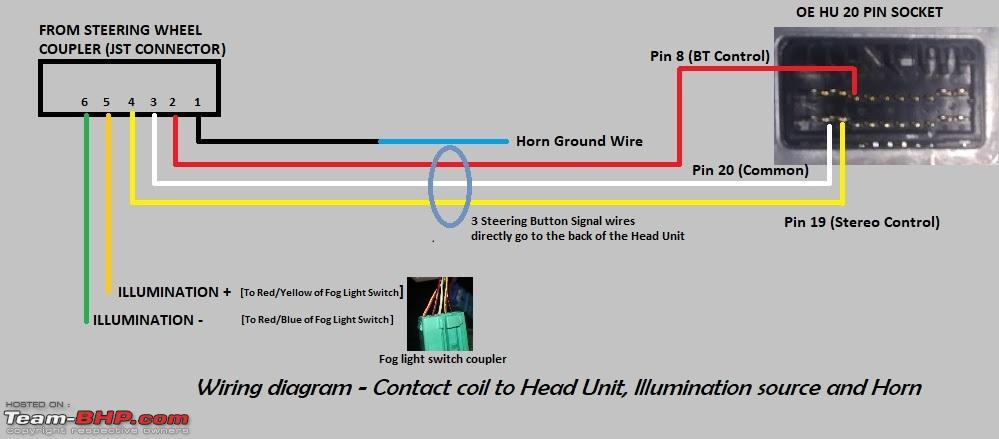 Extending and tagging of the wires: While the coupler inside the steering had set of color codes for the wires, the color of wires on the JST connector on the other side of the contact coil were different. I had to hence keep this in mind, especially the difference in colors and draw it on a piece of paper how various colored wires would interface with each other and where each of these will connect to. The set of wires originating from the JST connector that has to connect to different sources – Head Unit, Horn, Illumination etc.  To begin with, the horn wire was connected to the horn pad mount:  Further, the length of the wires on the JST connector had to be extended since it was less than a foot long. The extension would enable the wires to reach their sources/destinations. Skinning the ends, twisting, soldering and then insulating them with heat shrink tubes was the method adopted. The remaining 5 wires were extended. I also ensured to secure these wires properly, by using flexible nylon sleeves.    After extending all the wires, securing and segregating signal and illumination wires seperately:  Tagged the end of these wires according to their functions so there was no confusion while completing the final set-up when I get to the car:  Last edited by paragsachania : 12th October 2020 at 14:22. |
|
| (27)
Thanks
|
| The following 27 BHPians Thank paragsachania for this useful post: | Abhinav V, AdityaDeane, arun1100, arun_josie, ashis89, dailydriver, digitalnirvana, Dr.AD, Gannu_1, GrammarNazi, GTO, InControl, krishnaprasadgg, landcruiser123, Leoshashi, Mr.Boss, pritanshchandra, Rajiv0909, Reinhard, Researcher, samabhi, samaspire, Sheel, speedsatya, Thermodynamics, The_Outsider!, vaasu |
|
12th October 2020, 12:26
| #10 |
| Distinguished - BHPian Join Date: Nov 2007 Location: Belur/Bangalore
Posts: 7,147
Thanked: 27,204 Times
| re: DIY: Steering-Mounted Audio & Bluetooth Controls (1st-Gen Ertiga) Testing steering mounted buttons with the right Head Unit: |
|
| (31)
Thanks
|


| The following 31 BHPians Thank paragsachania for this useful post: | Abhinav V, AdityaDeane, aeroamit, arun1100, arun_josie, ashis89, audioholic, blackwasp, dailydriver, digitalnirvana, Dr.AD, Gannu_1, GrammarNazi, GTO, InControl, landcruiser123, Leoshashi, Mr.Boss, Pannag, pritanshchandra, Rajiv0909, Researcher, Sheel, speedsatya, Tgo, Thermodynamics, The_Outsider!, Tucker48, vaasu, Varun_HexaGuy, vishy76 |
|
12th October 2020, 12:32
| #11 |
| Distinguished - BHPian Join Date: Nov 2007 Location: Belur/Bangalore
Posts: 7,147
Thanked: 27,204 Times
| re: DIY: Steering-Mounted Audio & Bluetooth Controls (1st-Gen Ertiga) Final touch-up:The rest of tasks were quite straightforward. I tapped the wires from the fog lamp switch as suggested by audioholic though there were wires to tap from that were closer to the ignition key area too. The contact coil had a lock in place (in Blue) that had to be removed after setting the steering to center position.  The cables originating from the contact coil were secured using zip ties and routed properly to their sources/destinations  The contact coil had a cable for airbag inflator module, something that would be of no use in my car and may also rattle when let to hang inside. Knowing that these wires weren’t connected on the other side or exposed, I simply cut them. 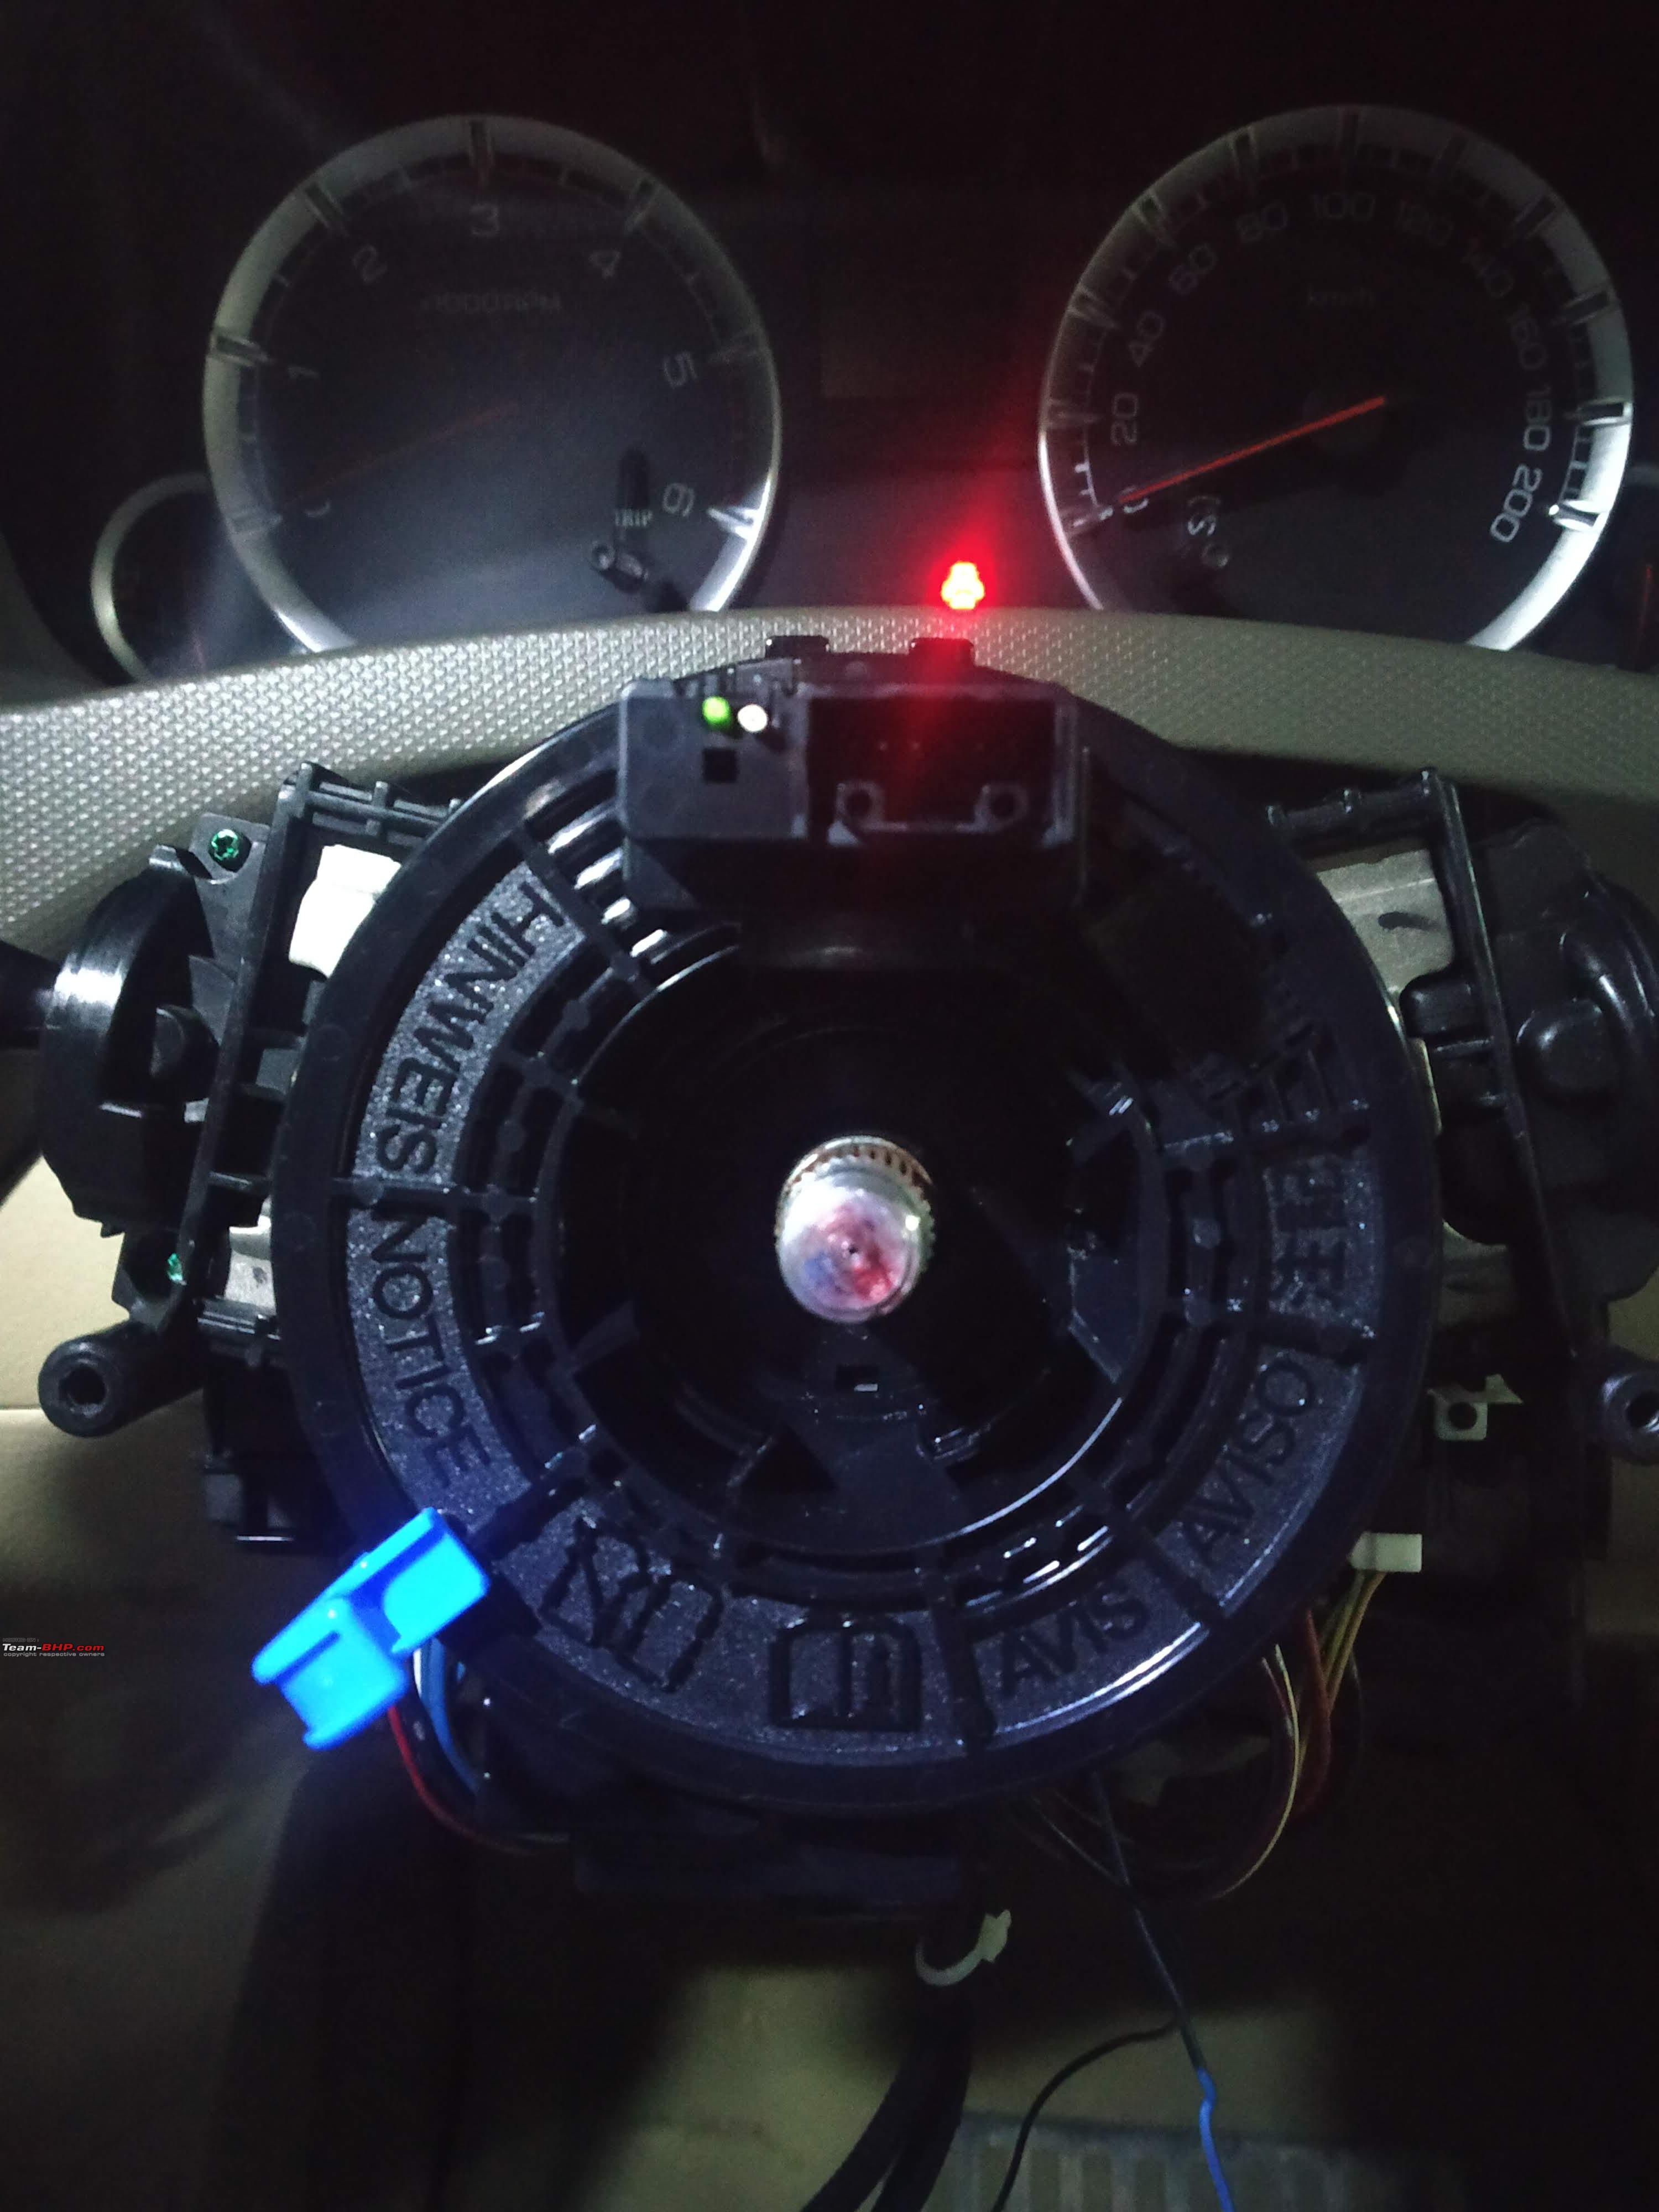 The steering was fitted in place (final center positioning was still due) and horn pad fitted on top    Steering Centering: Basement was perhaps the wrong choice to assess the center position of the steering and hence I ventured out along with the rachet and 17mm socket onto a proper road. I drove the car on straight levelled road for over a kilometer carefully observing the steering position. I realized that it was fitted few notches to the right and that it had to be removed and fixed back 2 notches towards the left to the final position.  For now, I have fitted back my OE stereo, which only has stereo (No BT) and will soon place an order for a touchscreen head unit, and this time with android auto. The new head unit will be a fitting compliment to the buttons too!! This was the image taken after fitting back the OE stereo and while checking how the illuminated set-up looks:  Black and Beige: I wasn’t sure how everything would gel, especially since my car had all beige interiors. But changing the gear lever knob, the gear lever boot and the steering to black has added some character to an acceptable level I believe:  Last edited by paragsachania : 12th October 2020 at 14:29. |
|
| (33)
Thanks
|
| The following 33 BHPians Thank paragsachania for this useful post: | Abhinav V, AdityaDeane, aeroamit, arjithin, arun1100, arun_josie, ashis89, dailydriver, digitalnirvana, Dr.AD, funkykar, Gannu_1, GrammarNazi, GTO, InControl, krishnaprasadgg, landcruiser123, Leoshashi, Mr.Boss, pritanshchandra, Rajiv0909, Reinhard, Researcher, samaspire, Sheel, Shreyas, speedsatya, techspark, Thermodynamics, The_Outsider!, Tucker48, vaasu, Zinda |
| |
|
12th October 2020, 12:38
| #12 |
| Distinguished - BHPian Join Date: Nov 2007 Location: Belur/Bangalore
Posts: 7,147
Thanked: 27,204 Times
| re: DIY: Steering-Mounted Audio & Bluetooth Controls (1st-Gen Ertiga) Steering mounted audio control buttons in action:Last edited by paragsachania : 12th October 2020 at 16:49. |
|
| (34)
Thanks
|


| The following 34 BHPians Thank paragsachania for this useful post: | aargee, Abhinav V, AdityaDeane, aeroamit, arun1100, arun_josie, ashis89, blackwasp, dailydriver, digitalnirvana, Dr.AD, Gannu_1, GrammarNazi, GTO, InControl, landcruiser123, Leoshashi, Mr.Boss, Nandan_96, pritanshchandra, PVS, Researcher, sai_ace, samaspire, Sheel, Shome, Shreyas, speedsatya, Thermodynamics, The_Outsider!, toothless, vigsom, whitewing, xsrahul |
|
12th October 2020, 13:06
| #13 | |
| Distinguished - BHPian Join Date: Nov 2007 Location: Belur/Bangalore
Posts: 7,147
Thanked: 27,204 Times
| re: DIY: Steering-Mounted Audio & Bluetooth Controls (1st-Gen Ertiga) How expensive was this DIY?
Parts and Tools for the Job:
Acknowledgements:My Dad: because he was present all the times holding like a literal torch bearer while I performed this DIY in the parking lot. He would also sit and watch while I experimented with the parts at home. He has been a great companion as a co-passenger and with all my DIYs so far that I realised I had seldom referred him during my earlier posts! He was as excited as I was the moment things worked. Audioholic for being generous enough to pass me the Head unit so I could test both the Phone and BT buttons due to the the limitations with my Head unit. Also for sharing the wiring diagrams from the Celerio workshop manual. Needless to say, you were getting updates/images at every stage too as I couldn't hold my excitement each time I was crossing a stage with this not so easy DIY  . .By the way, remember our discussion on my ownership thread, 4 years back? Quote:
Next Plan : The hunt for a decent budget Head Unit with Android Auto begins. But I have almost made up my mind with the Blaupunkt range and will soon order the same. Thank you for reading......!! Last edited by paragsachania : 12th October 2020 at 17:28. | |
|
| (60)
Thanks
|

 (Now anyone can understand what kind of a joke I just made)
 | The following 60 BHPians Thank paragsachania for this useful post: | --gKrish--, aargee, Abhinav V, AdityaDeane, aeroamit, akash_v12, arun1100, arun_josie, ash22, ashis89, audioholic, AZT, balenoed_, blackwasp, BLACNWYTE, BoneCollector, CEF_Beasts, dailydriver, digitalnirvana, Dr.AD, echo77, Ertigiat, funkykar, Gannu_1, GrammarNazi, GTO, Highh5, InControl, jithin23, KaranP, Kpzonwheels, krishnaprasadgg, K_Drive, landcruiser123, Leoshashi, Mr.Boss, Naveen_0181, PraNeel, pritanshchandra, rajvardhanraje, Reinhard, Researcher, Sahilrai166, samaspire, Sheel, Shreyas, silversteed, speedsatya, techspark, Tgo, thepilgrim1424, Thermodynamics, The_Outsider!, toothless, Tucker48, vaasu, Varun_HexaGuy, Vignesh Vee, vigsom, xsrahul |
|
12th October 2020, 19:28
| #14 |
| Team-BHP Support  | re: DIY: Steering-Mounted Audio & Bluetooth Controls (1st-Gen Ertiga) Thread moved out from the Assembly Line. Thanks for sharing! |
|
| (4)
Thanks
|
| The following 4 BHPians Thank Sheel for this useful post: | digitalnirvana, GTO, paragsachania, Researcher |
|
12th October 2020, 20:47
| #15 |
| Distinguished - BHPian Join Date: Jun 2012 Location: BengaLuru
Posts: 5,954
Thanked: 21,219 Times
| re: DIY: Steering-Mounted Audio & Bluetooth Controls (1st-Gen Ertiga) Having seen all the efforts behind this one, this definitely was not a part swap as I had thought earlier and is a lot more of careful research, procurement of the right stuff and finally some workmanship to mount the horn switch onto the steering. Let me convey my formal appreciation here even though we have already discussed for days  Lets try cruise control next. As the previous time, I wish and you dispose Lets try cruise control next. As the previous time, I wish and you dispose  Last edited by audioholic : 12th October 2020 at 20:48. |
|
| (15)
Thanks
|
| The following 15 BHPians Thank audioholic for this useful post: | akash_v12, arun1100, arun_josie, AZT, digitalnirvana, Godzilla, jithin23, K_Drive, paragsachania, pritanshchandra, Reinhard, Researcher, samaspire, speedsatya, Thermodynamics |
|