| |||||||

| Search Forums |
| Advanced Search |
| Go to Page... |
 |
| Search this Thread |  65,639 views |
 18th August 2020, 22:00
| #1 |
| Newbie Join Date: May 2020 Location: Hosur
Posts: 13
Thanked: 271 Times
| DIY: Upgrading the Indian EcoSport Titanium to the Global ST-Line Variant 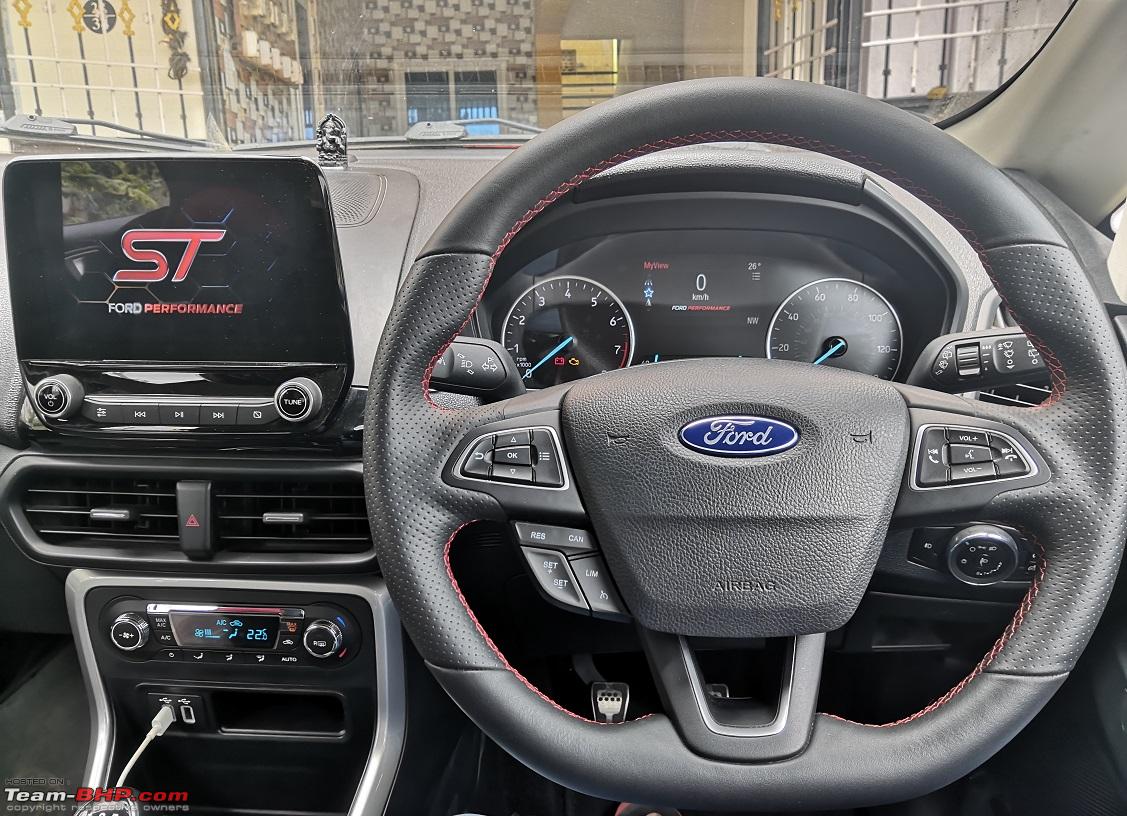 Team BHP DIY posts were the true inspiration for all my DIY stuff. It all started when I had a 2011 Figo Titanium which had a USB port, but the cable had to be purchased from the dealer. It was so expensive, but I found a DIY post here and it worked for me. Then I installed reverse parking camera myself with a small display fixed on the dashboard. My Figo had crossed 1.15 lakh km and it became expensive to maintain. So I decided to sell it and buy a new Figo Sport in 2018. Took a test drive and the dealer was offering a 50k discount. One evening I went to book the Figo Sport, but I ended up booking an EcoSport Red Titanium. I thought let's test drive the Ecosport before booking and that blew my mind with its awesome driving dynamics and best in class full black interior. Without a second though I booked the EcoSport Titanium diesel which was the last batch that had Sync 3, but without a reverse camera. So I did my research and enabled the reverse camera view using Forscan. Here is how I did it. It’s just a prototype and I will come up soon with actual OEM camera with guidelines. How to add reverse camera to Ford Ecosport 2018 Titanium_3.pdf But this was not the end to it. It made me understand Ford cars better and gave me a lot of insight to add features which are not available in the Titanium variant. This post is about adding the features mentioned below 1. TFT 4-inch display instrument cluster (Most anticipated DIY among Ecosport 2016-2019 owners). 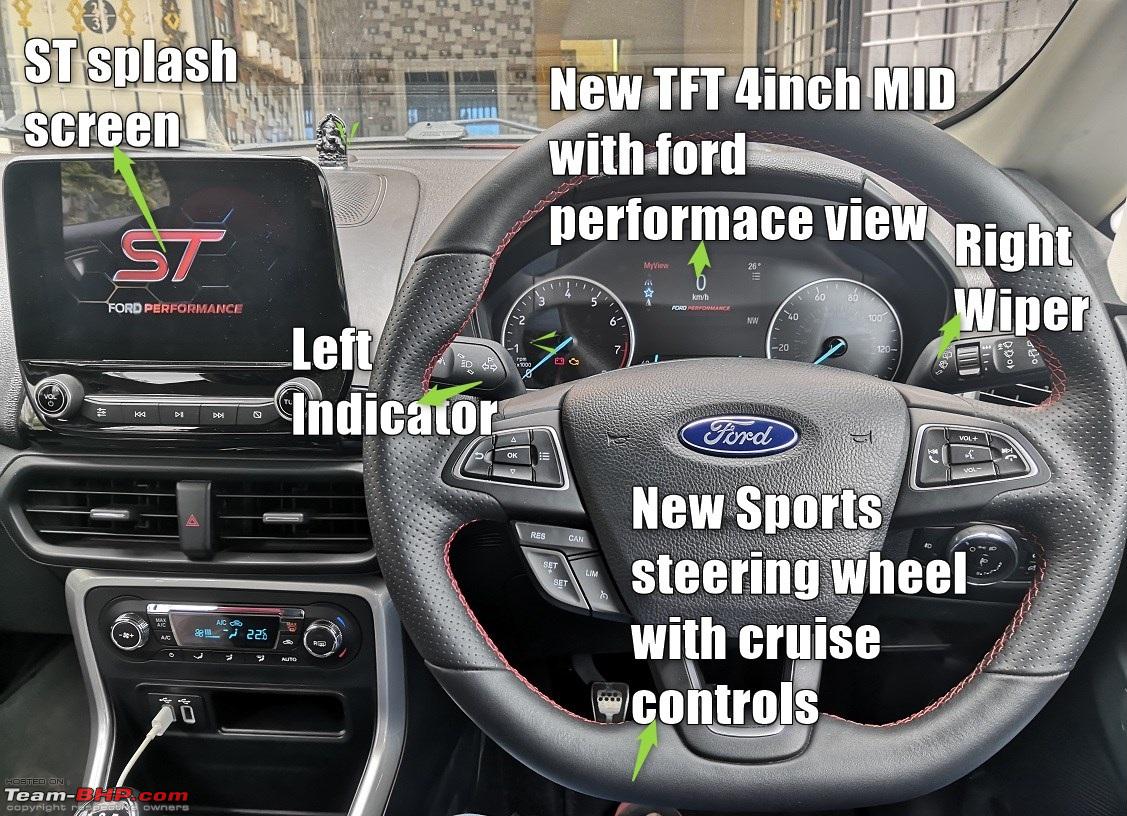 Tools, parts and software required.   I brought all the parts from eBay UK (www.ebay.co.uk). Of course the spare parts were used and taken from the scrapped cars which had very less mileage on them. Initially, I was skeptical about buying from eBay. But, later on I found it’s really awesome to buy parts when we have lot of innovation in mind. The cost of the new parts is too expensive. That pulls me down each time when I think of implementing / adding some features. Another reason for using eBay is that after buying new parts from OEM, the result should not be a repercussion. The part number for the instrument cluster is GN1Z-10849-CFM and I got it for 54 GBP. The keyword to search on eBay is “GN1Z-10849” or “Ecosport 2017 Speedometer”. The part number for the cluster which comes in the current India-made Ecosport is GN1Z-10849-S and it costs 26k. The part number for the Housing Assembly - Steering Column is H1BT-14B522-BE and I got it for 30 GBP. It is not available in India, The keyword to search in eBay is “Ecosport stalk 2017” The part number for sports steering wheel is GN1Z-3600-RB and I got it for 80 GPB. The key word to search is “Ecosport Steering 2017” Thanks to my friends Ganesh and Bala who carried all the way from UK to Bangalore. These were awesome deals compared to purchasing the same parts new for a lot more money and for a DIY, this would be the best way. We can always contact the seller for the best price and shipment option to India. I prefer a friend or relative coming from UK to carry it, or use Aramex shipping DHL is fast but it’s very expensive with regards to both - the shipment charges and custom duty. OBDLink EX ScanTool OBDLink EX USB - Compatible with Forscan - Diagnostic Case for Auto Pro Various Brands - Professional Diagnostic Tool https://www.amazon.de/gp/product/B08...?ie=UTF8&psc=1 Locally purchased tools 1. Impact wrench https://www.amazon.in/gp/product/B07...?ie=UTF8&psc=1 2. Socket box https://www.amazon.in/FAB-Innovation...t%2C274&sr=1-4 3. Torx bit https://www.amazon.in/Force-4081-Squ...t%2C276&sr=1-1 Forscan A short introduction to Forscan: In simple terms, Forscan is a Windows based application which helps to change the manufacture module configuration. Now what is Module configuration? Module configuration Each module in the car e.g. Information Panel control (IPC), Body Control module (BCM), Powertrain Control Module(PCM), Anti-lock Brake (ABS), has a set of configurations. When the ignition is turned ON, each module will read the configuration and starts to function based on it e.g. the rear view camera is a features which comes only on higher variants – Titanium +. The Body Control module uses the same hardware in all the variants, but it is disabled in configuration. The manufacturer uses these configuration to enable / disable features based on the variants. In addition, these configurations will help the module to choose which protocols are used to communicate with other modules. Most of the protocols used are HS and MS can. The main features of Forscan: Detect vehicle on-board network configuration Read and reset Diagnostic Trouble Codes from all modules Reading of modules' sensors' data Run test diagnostic procedures Run service procedures  DIY Steps. Configuration /Calibration Data backup First I need to take a backup of the module configurations, as I’m going to replace IPC (Instrument Cluster) and SCCM (Housing Assembly - Steering Column) module. To do it, connect the OBDlink Ex connector to the OBD port which is located below the right side of the steering.  Open Forscan in a windows 10 PC and connect it using OBDlink Ex.  Click on the connect button on the bottom left. This will connect the car to the Forscan. Now I need to take the back up of IPC module configuration data. Click on the Chip icon on the left panel, 3rd from last.  Select IPC Module Configuration (As Built Format) and then click play button on the bottom left side. Note: If you notice there are two IPCs 1) Module Configuration (As Built Format) 2) Module Configuration. The differences are the As Built is Hexadecimal based configuration, the other one is a simple direct configuration enable/disable option where the Forscan will convert the selected option to hexadecimal.  Once the module configuration is opened, click the save all button and save the stock configuration. Now I needed to take the backup of SCCM module.  Open SCCM Module configuration as built and save the backup. It is very important to take a backup. If we screw it up we can always replace it with the backup. Incase we forget to take a backup and messed around with it, we can always download it from https://www.motorcraftservice.com/asbuilt by providing the VIN number. Now I had taken the configuration backup and I needed to install the spare parts. Hardware Installation It’s always good practice to make enough space for the parts which we are working with. So, I needed to the pull out the steering as much as possible and lower it. Installing New instrument cluster MID. The main reason to do this upgrade is that though car looked bigger and the interiors looked premium, the instrument panel was looking outdated and its look didn’t give a motivation to drive the car. This was the standard instrument cluster on all EcoSports until 2019. Later, Ford started to provide a 4-inch instrument cluster which looked great. First thing - the cluster panel has to be removed.  The panel can be pulled out gently using your hands.  The panel has been removed and the four small bolts have to be removed.  Once the cluster blots are removed, the cluster can be easily pulled out and then the cluster connector should be disconnected.  Once the old cluster is removed. The new cluster can be connected in the same way as it was before being removed. 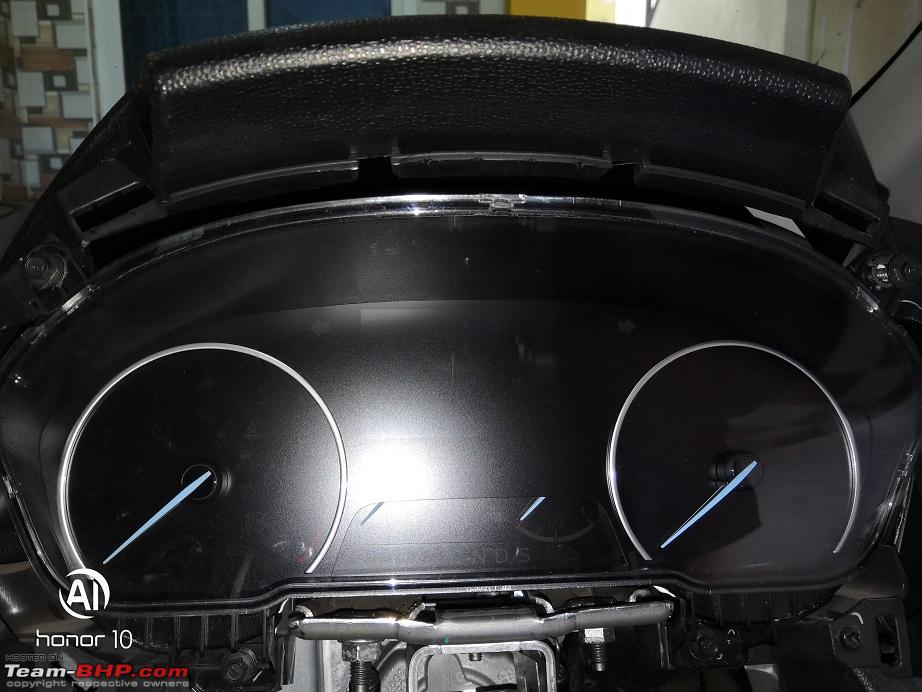 Installing the Housing Assembly - Steering Column. The main reason for this upgrade is that after using a Ford for 5 years with indicator switch on left, wiper on right, suddenly using the new EcoSport stalks was a major challenge as the wiper stalk moved to left and indicator stalk moved to right.Also I do a lot of European road trips. Last time when I rented a car in Germany, I had hard time in managing the indicators and wipers. Once I was stopped by cops in Switzerland border for a routine check. I needed to pull over. Instead of switching on the indicator, I turned on the wipers and it was a moment of panic as the cops started to pull their guns out. So, then I decided I will keep the system in my car as it is in global products. To remove the Housing Assembly, the airbag and the steering wheel need to be removed. Before working with the airbag, it’s always advisable to disconnect the battery to avoid sudden airbag deployment. Here is the video I followed: Disconnect the battery terminal.  Then remove the two torx screws found on the lower panel on the steering. 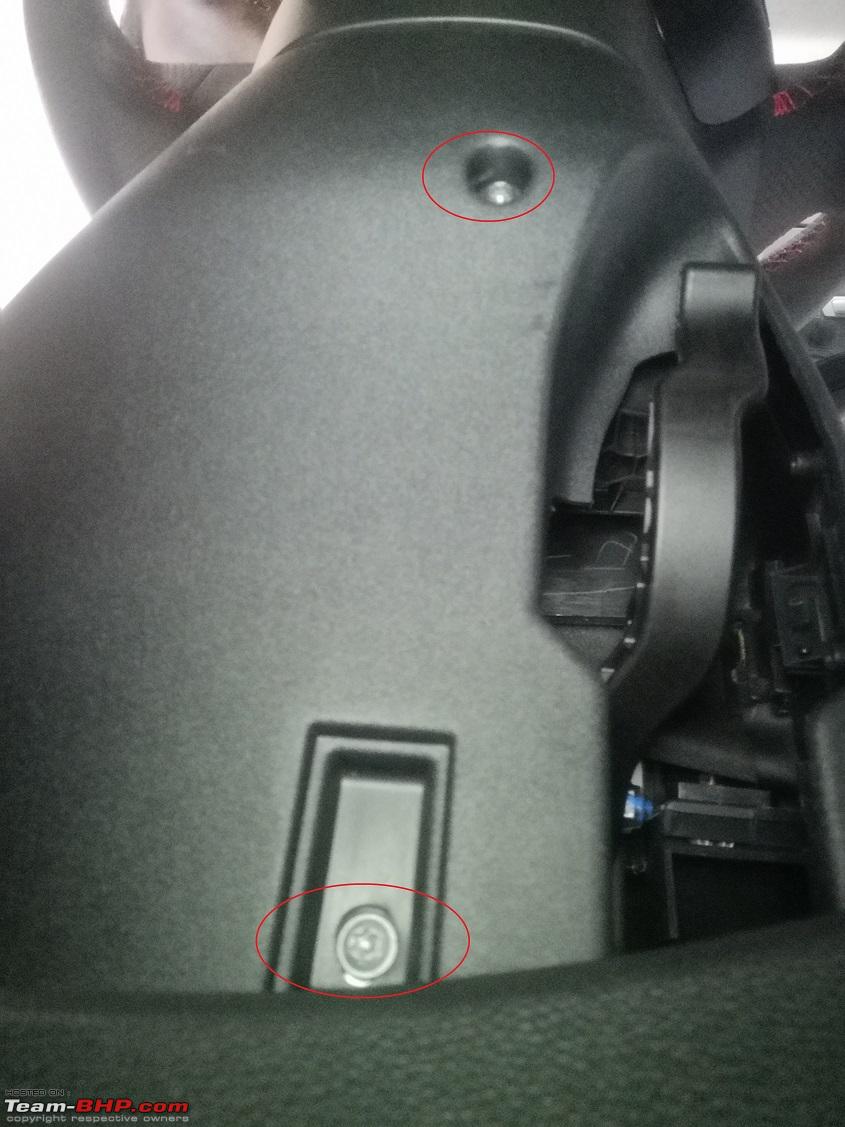 Rotate the steering wheel as shown in the image below to remove the airbag.  Behind the steering wheel there will be two holes. We need to insert a flat screw driver to disengage the airbag connectors.  Insert with patience once a click sound is heard. This means the airbag has been disengaged. The operation should be done on the bottom side hole as well. Then the airbag will pop out.   Disconnect the airbag and horn terminals using a flat screw driver. 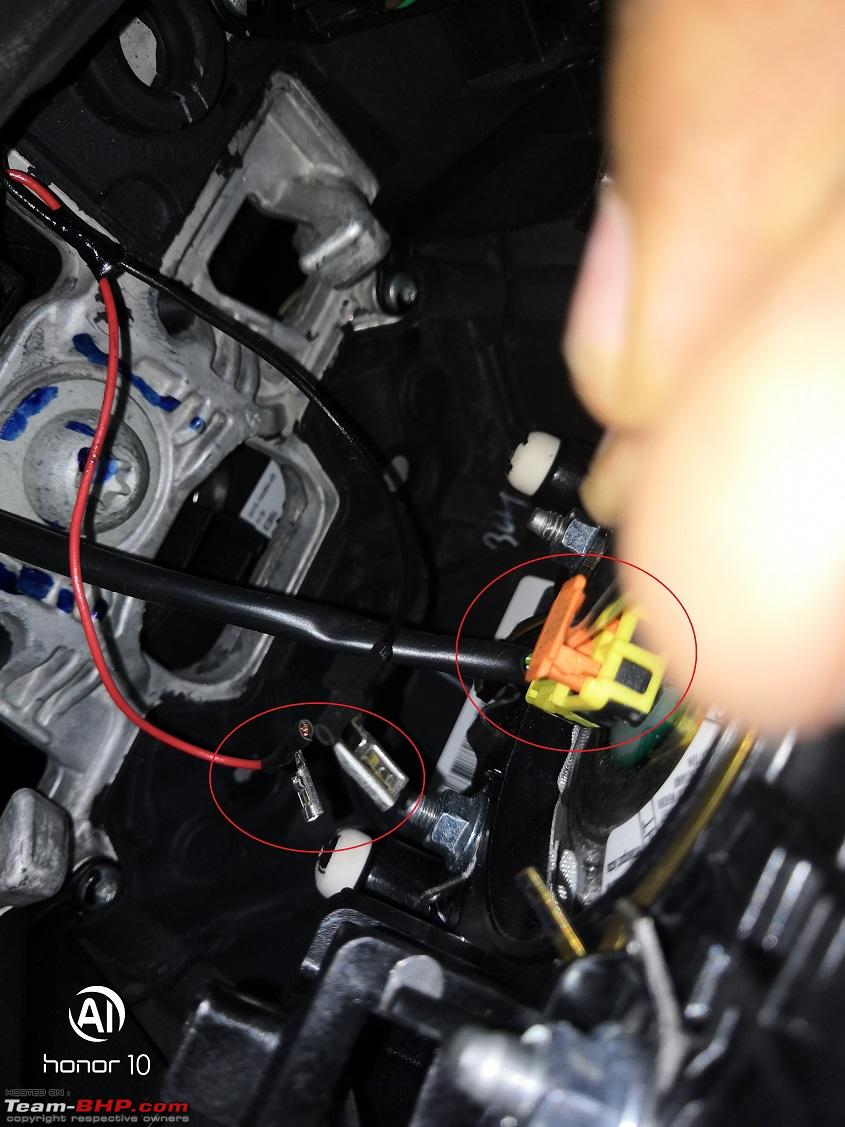 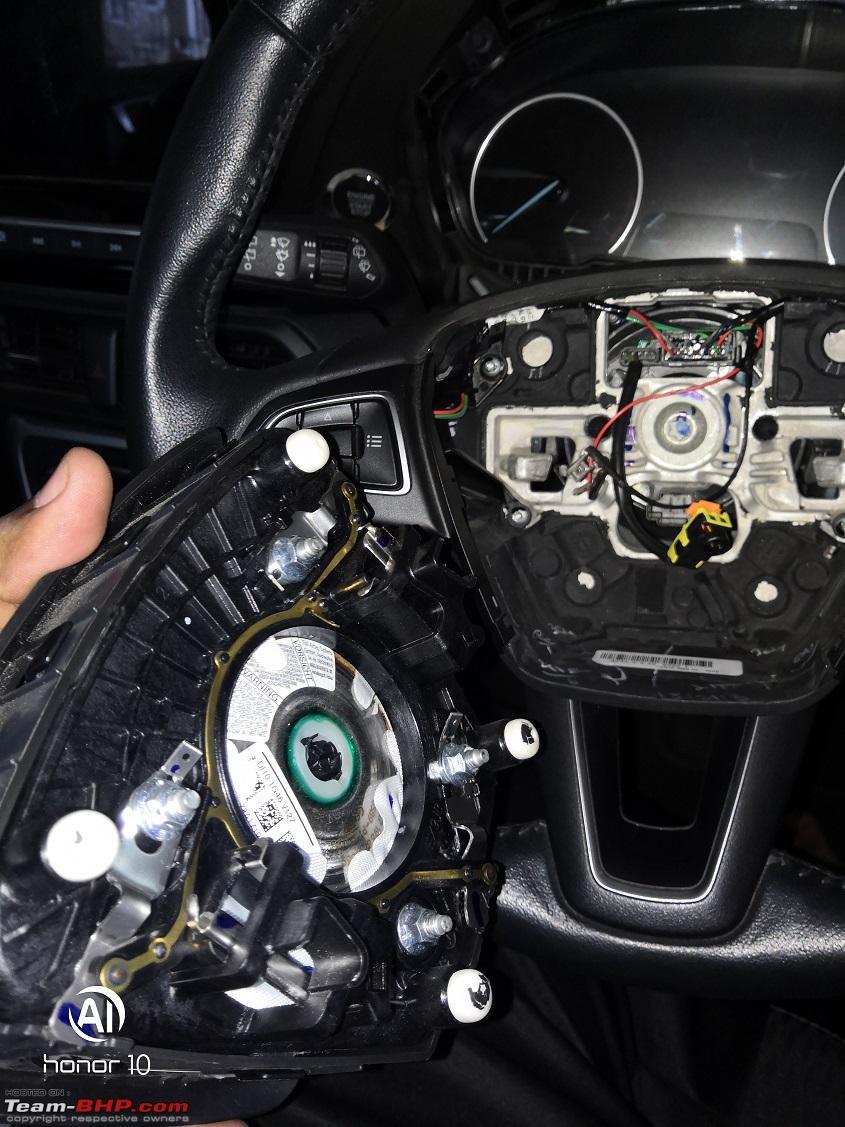 Now the steering wheel needs to be removed using T50 Torx and impact wrench.  Disconnect the multifunction switch connector. 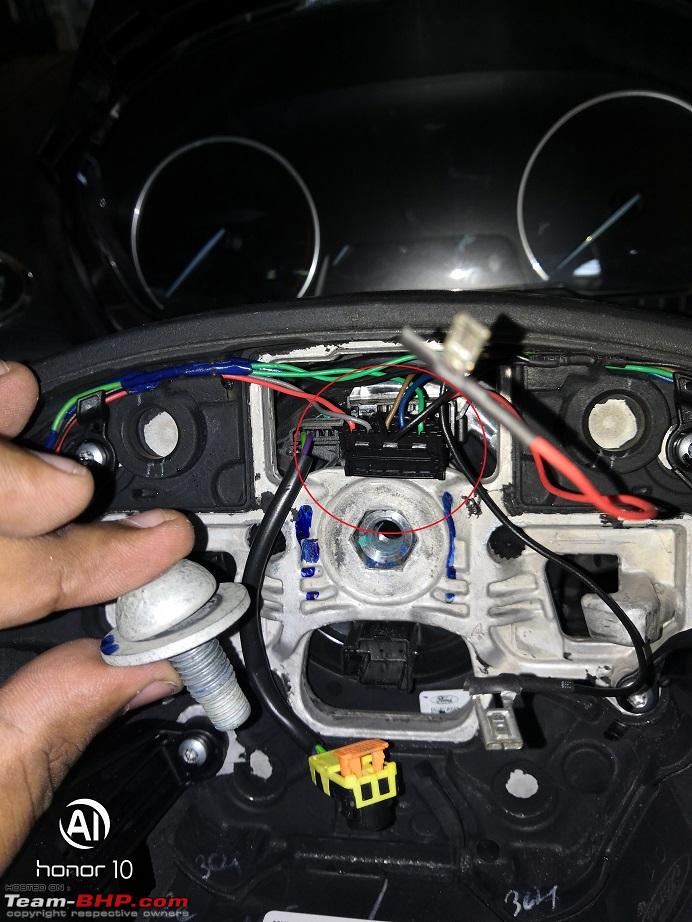 This is current Housing Assembly - Steering Column.  Behind the Housing Assembly - Steering Column, there is metal clamp that has to be removed.  Once the metal clamp is removed. Disconnect the connector and gently pull the Housing Assembly - Steering Column out.  Once the Housing Assembly - Steering Column is removed, use a plastic tag to tie the clock spring as it tends to move freely and it has a thin wire inside that will carry the steering switch and airbag signals to the SCCM module. The stock Housing Assembly has a plastic circular support which fits on the steering column. But the new Housing Assembly did not have it.  So I decided to use the stock Housing Assembly frame with the new Housing Assembly components. I removed the components and installed it on the old frame itself. To be continued on next reply section. Last edited by Aditya : 20th August 2020 at 12:04. Reason: Grammar |

|  (74)
Thanks (74)
Thanks
|
| The following 74 BHPians Thank nkdev89 for this useful post: | AdityaDeane, akshye, AttyBhai, audioholic, Avikbrio, AYP, AZT, bharatbs, Bhupesh_2628, brownkaiser, bwildrd#1, car love, CarManMotorcycl, CEF_Beasts, Col Mehta, CrAzY dRiVeR, daytona, DevilzzzzOwn, digitalnirvana, Ertigiat, fiat_tarun, Fordlover88, Gannu_1, GTB, GTO, gururajrv, hemant.kamat, hserus, InControl, Jeroen, jithin23, Karthik Chandra, keroo1099, Klub Class, KPR, krishnaprasadgg, lemedico, libranof1987, mh09ad5578, N33raj, navad29, neelkumar, neil.jericho, Night_Fury, OverKill, paragsachania, PraNeel, prasathlr, Punatic, Rehaan, Reinhard, Researcher, Sahilrai166, Samfromindia, sarathlal, sdeepak29, ShortShifter, Simat, spdfreak, SS4, Subroto, Tassem, tazmaan, tharian, The Rationalist, theexperthand, The_Outsider!, Torino, vaish9925, Varun_HexaGuy, Vik0728, Vishnu Shaji, VivekCherian, wheelguy |
| |
|
19th August 2020, 10:36
| #2 |
| Newbie Join Date: May 2020 Location: Hosur
Posts: 13
Thanked: 271 Times
| re: DIY: Upgrading the Indian EcoSport Titanium to the Global ST-Line Variant Continuation  The clock spring was removed first and then the PCB board. But the board was a kind of plastic molded fit. So I had a hard time removing it using a wire cutter.    I removed the board from both the Housing Assemblies. These looked identical except for the two connectors. That will mount the indicator and wiper switch. The frame of the Housing Assembly - Steering Column. 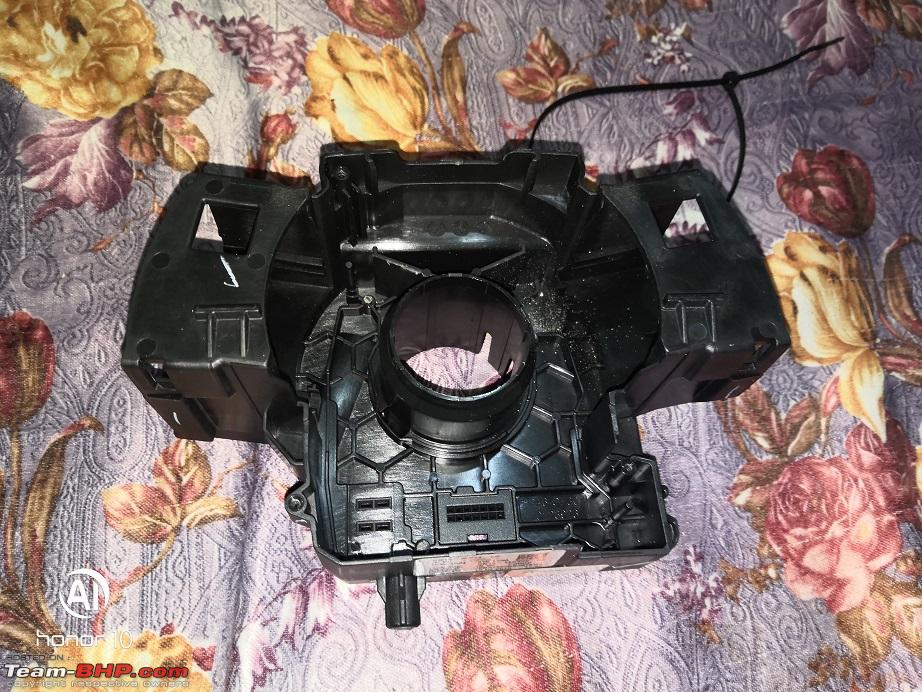 The new component was ready and after great efforts it fitted perfectly fine. The indicator switch on the left and wiper on the right .  Then fitted it.  Now the new Housing Assembly - Steering Column was installed and then the steering wheel need to be fitted.  Then connect the multifunction, horn and airbag connectors.   So now everything was fitted fine. But when the ignition was turned on, the RPM meter was not working and the odometer showed a different mileage. This cleared my doubt that the driven mileage will be stored in the cluster module, but not on the engine ECU. The cluster had lot of STline variant features like lane departure warning, TPMS, Engine oil life, Traffic sign recognition, Blind spot detection and more. So I thought this is a complete mess I made. But later I found out that each module had to be configured. The manufacturer uses configuration programming to enable/disable features in the same hardware module which is shared in all variants e.g. Ambiente (Lower variant) and Titanium (Higher variant) have the same hardware modules like Body Control module. But the features of Titanium are just disabled using configuration programing. So I’m done with installing the new Instrument cluster (MID), Steering wheel and Housing Assembly - Steering Column. Now I need to load the stock configuration to the new modules. First I need to load the stock configuration to IPC module. To do that, open the IPC module configuration. Load the saved configuration and click on the Write all button at the bottom.  The write all operation will write the configuration to the module memory. Similarly, load the stock configuration for the SCCM module and write it.  After loading the stock configuration, the instrument cluster and stalk started to function as expected, but the total driven mileage was different and the cruise control switch was not working.  Actual km driven in my car during the installation: 49075 According to the new instrument cluster: 5794 To fix the mileage driven, I need to update the odometer. To do so, open IPC odometer Write function in Forscan . And enter the actual km driven.  Note this feature helps only to increase the mileage, it will not allow you to decrease it. This below image is just to show you clearly, as the previous image was not clear.  After this, the actual total km driven came back.  Now I need to fix the steering cruise control switch. So open the SCCM module. Change the steering wheel switch with the part number (the part number is present below the switch) and write it.  That’s all. The configuration programming is completed. All the expected things have started to work as expected. This was an amazing moment, as all my dreams came true and made my EcoSport as in European markets. But somehow, I was still not happy and something was missing. So I looked into the APIM module to check whether the Splash screen on the Sync 3 could be updated and yes it did worked. Just needed to select the splash screen we need and write it to APIM module configuration.   Then I was looking into the IPC module for extra functionalities. I found the Ford Performance view. Changed it and wrote the configuration to module memory .   I have updated my Ford Sync to 3.4 as Jithin's post on Facebook EcoSquads - The GANG of Ford EcoSports group. That should bring the turn by turn direction to the MID when using google maps. But it did not work as the Gateway module needed to be configured to send the direction signal to the MID. As of now, it is only showing Android Auto and CarPlay but not the direction. I’m still working on it and will update once it is fixed.  Now I was done with the DIY and Testing started. After testing, all the module upgrades worked as expected. I have driven the car for 2,000 km post the upgrade. So far no issues. Now, each time I drive my car I feel like driving a premium car with international driving style, more a information loaded cluster and sporty red stitched steering wheel.  My next series of DIY will have TPMS, Cruise control with speed limit, Front parking sensor, Auto Rain sensing wiper, Automatic headlamp and Electrochromic mirror. I also have a Blind spot detection DIY in my mind, but it needs lot of money. So I have kept it on hold. But I will surely do it one day. I hope you enjoyed reading my DIY. Thank you for reading  Thanks a lot TEAM-BHP for adding me and posting my First post. Last edited by Aditya : 20th August 2020 at 12:40. Reason: Grammar |
|
| (168)
Thanks
|
| The following 168 BHPians Thank nkdev89 for this useful post: | A.M., aarnav_b, Abhinav_2502, abhi_tjet, ADI7YAK, AdityaDeane, advenk999, aeroamit, Aish_4761, akash_v12, akshye, amey_tade, AnAvgJoe, AnkitAnimesh, Arun Venugopal, ash22, AtheK, AttyBhai, audioholic, Auto Enthusiast, Avikbrio, AYP, AZT, Batfreak, batladanny, bblost, benvsben, Bhupesh_2628, Bibendum90949, BigBrad, blackasta, BLACNWYTE, blueeyed, BoneCollector, BopsKA12, brownkaiser, bwildrd#1, car love, CarManMotorcycl, catchjyoti, CEF_Beasts, Chillout, Col Mehta, COMMUTER, DevilzzzzOwn, dhruvritzed, DicKy, digitalnirvana, DrANTO, Dry Ice, ego4evr, Ertigiat, fiat_tarun, Fordlover88, Gannu_1, Goku_YNWA, govigov, Grand Vitesse, GTB, GTO, gururajrv, hiren.mistry, hserus, InControl, jayakumarkp, Jeroen, jithin23, jkaushik, John316_WRC, Karthik Chandra, Keeleri_Achu, keroo1099, Kingston, kkstile, Klub Class, krishnaprasadgg, Laxman9192, lemedico, Leoshashi, libranof1987, lionell, Living2Drive, ManasN95, McLaren Roxx, moralfibre, motorpsycho, Mr.Boss, Musa, N33raj, naveen.raju, NaXal, na_agrawal, neelkumar, neil.jericho, Night_Fury, nishsingh, one-77, OrangeCar, OverKill, PapaKiloSierra9, paragsachania, powershift, PraNeel, prasathlr, psispace, psmenon, Punatic, puneetakhouri, r0nit7, RaceHorse, Rakshith220, Rambo-RS, Rehaan, Reinhard, Researcher, riturajsharma19, Rocketscience77, Rocky_Balboa, Sahilrai166, saikishor, sainyamk95, sai_ace, samaspire, Samfromindia, SamitMukherjee, sandx, sarathlal, Sayan, sdeepak29, Shanksta, sharktale, ShortShifter, Shrayus_shirali, Shreyans_Jain, spdfreak, SS4, starke, Subroto, suhaas307, tanaysn, Tassem, tharian, Thatautoguy46, The Rationalist, theexperthand, theflyingguy, The_Outsider!, TorqueTwist, tp_dominator, Turbo Diesel, TusharK, vaasu, VaibhaoT, vaish9925, varun560061, Varun_HexaGuy, vennarbank, VijayAnand1, Vik0728, Vishnu Shaji, VivekCherian, W.A.G.7, Wanderers, wheelguy, WhiteSierra, Xaos636, yesyeswe, ZedMae |
|
19th August 2020, 12:37
| #3 |
| Team-BHP Support  Join Date: Dec 2004 Location: MH-12
Posts: 8,560
Thanked: 14,440 Times
| re: DIY: Upgrading the Indian EcoSport Titanium to the Global ST-Line Variant Thread moved from the Assembly Line to the DIY Section. Thanks for sharing! |
|
| (5)
Thanks
|
| The following 5 BHPians Thank moralfibre for this useful post: | benvsben, digitalnirvana, GTO, nkdev89, TorqueAddict |
|
19th August 2020, 14:07
| #4 |
| BHPian | re: DIY: Upgrading the Indian EcoSport Titanium to the Global ST-Line Variant  Thanks a ton for this post Naveen! Well explained and documented. This will certainly help most of us who want to change the speedometer and add cruise control in our cars! Thanks a ton for this post Naveen! Well explained and documented. This will certainly help most of us who want to change the speedometer and add cruise control in our cars!One connection is that even I got the last batch car with sync 3 from the same dealer and apparently both of us had booked for the same blue color Last edited by jithin23 : 19th August 2020 at 14:14. |
|
| (3)
Thanks
|
| The following 3 BHPians Thank jithin23 for this useful post: | COMMUTER, nkdev89, Samfromindia |
|
19th August 2020, 14:26
| #5 |
| BHPian Join Date: Mar 2019 Location: Bangalore
Posts: 37
Thanked: 80 Times
| re: DIY: Upgrading the Indian EcoSport Titanium to the Global ST-Line Variant That's a nice detailed DIY thread there, Naveen. Thanks a lot for sharing. I really liked the color MID. |
|
| (1)
Thanks
|
| The following BHPian Thanks BikerSuz for this useful post: | nkdev89 |
|
19th August 2020, 15:04
| #6 |
| Senior - BHPian Join Date: Apr 2020 Location: Pune | Mumbai
Posts: 1,145
Thanked: 3,030 Times
| re: DIY: Upgrading the Indian EcoSport Titanium to the Global ST-Line Variant Super neat DIY nkdev89! The interior has been completely transformed by updating the Sync3 system and the addition of the STLine instrument cluster. Looks so much more premium  . .P.S - Is there any way in which you could change the needles to red? Will complement the red stitching on the steering wheel very well. |
|
| (3)
Thanks
|
| The following 3 BHPians Thank akash_v12 for this useful post: | nkdev89, sainyamk95, VaibhaoT |
|
19th August 2020, 16:13
| #7 | ||
| Newbie Join Date: May 2020 Location: Hosur
Posts: 13
Thanked: 271 Times
| Quote:
Quote:
Last edited by Aditya : 19th August 2020 at 22:44. Reason: Back to back posts merged | ||
|
| (2)
Thanks
|

| The following 2 BHPians Thank nkdev89 for this useful post: | digitalnirvana, jithin23 |
|
19th August 2020, 20:38
| #8 |
| BHPian Join Date: Jul 2009 Location: Hubli
Posts: 491
Thanked: 463 Times
| re: DIY: Upgrading the Indian EcoSport Titanium to the Global ST-Line Variant Excellent post, rated it 5 Stars. Is the Forscan Software good for Fiesta Classic? I see the Lite Android Version, want to see if I can use it to tinker around or just read some values? |
|
| (3)
Thanks
|
| The following 3 BHPians Thank motorpsycho for this useful post: | jithin23, nkdev89, Samfromindia |
|
20th August 2020, 10:00
| #9 | |
| Newbie Join Date: May 2020 Location: Hosur
Posts: 13
Thanked: 271 Times
| Re: DIY: Upgrading the Indian EcoSport Titanium to the Global ST-Line Variant Quote:
https://www.amazon.de/bbflyOBD-VINT-...7897659&sr=8-1 Or ScanTool OBDLink EX USB https://www.amazon.de/gp/product/B08...?ie=UTF8&psc=1 To update the module configuration. I would suggest you to buy a USB wired odb than Bluetooth or wifi as it might brick your module and connection are not reliable. | |
|
| (2)
Thanks
|
| The following 2 BHPians Thank nkdev89 for this useful post: | digitalnirvana, motorpsycho |
|
20th August 2020, 10:25
| #10 |
| BHPian Join Date: Dec 2019 Location: Coimbatore
Posts: 102
Thanked: 473 Times
| Re: DIY: Upgrading the Indian EcoSport Titanium to the Global ST-Line Variant Job well done man .It really looks cool and making the cabin looks much more upmarket! I believe you will be contacted by many more FORD owners when this post moves to our (Team-bhp) FB page  |
|
| (2)
Thanks
|
| The following 2 BHPians Thank ₹itzylove for this useful post: | jithin23, nkdev89 |
|
20th August 2020, 10:26
| #11 |
| Distinguished - BHPian  | Re: DIY: Upgrading the Indian EcoSport Titanium to the Global ST-Line Variant Welcome to TBHP & what a way to announce your arrival. Fantastic project & nicely detailed implementation too. Thanks for sharing. Its a boon when customization of parameters / BCM are available via software like VCDS / Forscan. Us lesser mortals with Tata/Suzuki/Mahindra etc cars have to live with the answer "it can't be done" by the ASC folk. One query out of curiosity - why did you change the LH/RH stalks to reverse the wiper & lighting controls? Is it just to make it align visually with the international spec or you prefer this orientation as a user? It was a good thing that Ford corrected the orientation for our market, I really appreciated it when they did it. The reversed orientation means - you cannot quickly work the indicator when your left hand is on the gear stick & you have to move hand to the steering. With the indicator stalk on RH, you can always have access to it with right hand which is on the steering at all times. This in fact has always been an important & safety aspect in my car decision making & I have never shortlisted cars that do not respect our RHD orientation & keep their EU/US spec stalk orientation. |
|
| (10)
Thanks
|
| The following 10 BHPians Thank Reinhard for this useful post: | 2himanshu, Aish_4761, digitalnirvana, jithin23, nkdev89, procrj, Punatic, Ravi Parwan, SS4, vaish9925 |
| |
|
20th August 2020, 11:10
| #12 | |
| BHPian Join Date: May 2010 Location: KA51/KL66
Posts: 383
Thanked: 226 Times
| Re: DIY: Upgrading the Indian EcoSport Titanium to the Global ST-Line Variant Quote:
But I do agree with your safety aspect of left hand engaged controlling the gear lever. For me, it's not a big deal, as I don't drive with one hand on the steering and other on the gear lever. Last edited by Repsol : 20th August 2020 at 11:12. | |
|
| ()
Thanks
|
|
20th August 2020, 11:48
| #13 | |
| Newbie Join Date: May 2020 Location: Hosur
Posts: 13
Thanked: 271 Times
| Re: DIY: Upgrading the Indian EcoSport Titanium to the Global ST-Line Variant Quote:
| |
|
| (4)
Thanks
|
| The following 4 BHPians Thank nkdev89 for this useful post: | digitalnirvana, jithin23, Punatic, viXit |
|
20th August 2020, 12:08
| #14 |
| BHPian Join Date: Feb 2017 Location: Bangalore
Posts: 157
Thanked: 584 Times
| Re: DIY: Upgrading the Indian EcoSport Titanium to the Global ST-Line Variant Wow! Excellent post! Really mind boggling that people are so innovative in DIY threads!  Do we need to have some kind of knowledge related automobiles or can it be done by any layman?  Sorry if this question is obvious, will the warranty void if we do modifications like this? In the past, I had read instances where some company failed to honor extended warranty because the owner used synthetic oil in place of the recommended oil by the manufacturer. |
|
| (3)
Thanks
|
| The following 3 BHPians Thank prasathlr for this useful post: | jithin23, nkdev89, viXit |
|
20th August 2020, 12:12
| #15 |
| BHPian Join Date: Aug 2013 Location: Chennai
Posts: 57
Thanked: 146 Times
| Re: DIY: Upgrading the Indian EcoSport Titanium to the Global ST-Line Variant If there was a poll for the best DIY on TBHP, your would be right on top! I wouldn't mind the left hand drive stalk orientation one bit. IMHO, the right placement for India (right stalk for indicators) is a bit overrated. I, for one, enjoy fiddling around the switches – read as hate auto wipers, headlight etc., and don't mind talking my hand off the armrest and or the gear lever for a lane change tap, turning on the indicator before downshifting to make a U, or a downshift -> flash -> pass -> indicate for merge -> upshift. Off topic, but with some relevance, F1 drivers have to flip the brake bias and diff corrections mid corner! I'll take this little pleasure of moving my hands around the cockpit in a day when dull autos (CVTs), driver aids and self-drive are taking away from true driving pleasure! |
|
| (3)
Thanks
|
| The following 3 BHPians Thank Kingston for this useful post: | digitalnirvana, nkdev89, ShortShifter |
|