Team-BHP > Technical Stuff > DIY - Do it yourself
Register New Topics New Posts Top Thanked Team-BHP FAQ


Reply
  Search this Thread
90,732 views
Old 14th July 2020, 14:50   #1
Distinguished - BHPian
 
Join Date: Oct 2012
Location: Delhi
Posts: 8,700
Thanked: 58,077 Times
DIY: Metal model engine building UPDATE: build complete (page 16)!

Some of you might have been following my thread on fiddling with my cars.

https://www.team-bhp.com/forum/diy-d...eo-spider.html

I have been maintaining and adding to this thread for the better part of four years along the lines what I consider “fiddling” with cars. Which for me is a very broad definition. Anything I do with my cars, from fixing them, visiting car shows or technical club meetings, touring around the Netherlands/Europe gets shown. Along the way it also shows how my garage/workshop has got better equipped with more and more tools over the years.

Earlier this year I got myself a little Lathe for my birthday: (Well, technically it was a present from my wife)

DIY: Metal model engine building UPDATE: build complete (page 16)!-p3130004.jpg


I have some experience from my merchant navy years in metal working. But it has been well over 30 years since I worked on a lathe. So a lot of catching up to do.

The Internet is full of all kinds of tutorials. I found Blondihacks channel extremely useful, well made and full of valuable detailled information, suggestions and tips.

https://www.youtube.com/channel/UC7J...4e74O53dL6arSw

(She has just started a new project, building a steam engine using a kit with casted parts)

I found the best and most enjoyable way of learning is to find a little project and produce something tangible. I made the odd tool, but I needed something a bit better; To this effect I decided to build a little Oscillating Steam Engine. Also, known as a Wobbler engine.

I found it on the internet. Detailled plans and a step by step description:

http://www.steves-workshop.co.uk/ste...impleoscil.htm

I finished the Wobbler a few weeks ago and made this little video:


My little Wobbler also made it to Steve’s Gallery:

http://www.steves-workshop.co.uk/ste...ersengines.htm (scroll all the way to the bottom)

It is fair to say, building this little engine gave me enormous satisfaction and I learned a lot. Many thanks to Thad, Sutripta and other members for their continuous encouragement and advise along the way

After completing the Wobbler, I decided I have a taste for more. I really enjoyed building up my metal working skills once again. So I have chosen a second project. I also decided to give it its own dedicated thread, which I hope will work for everybody.

It took me some time to choose my next project. It had to be a little more complex than the Wobbler. It should still be possible to produce it on my little lathe and mini mill. Also, I have very strict requirements on the technical drawings. I have some cognitive problems these days, which also means that reading technical drawings is becoming a bit of a challenge now and then.

So I need preferably 1:1 drawings, everything needs to be in metric (having to work conversion is just to confusing). I must admit I do like steam engines and there are a lot of them about.

In the end I decided on something a bit different. I have also joint a few (Dutch) model building forums and I became a member of the Dutch Model Building Association.

I got a lot of information and tips on these forums too. One of the guru’s in the Dutch model engine building world is Jan Ridders. Have a look at all these different models he designed and build himself!

http://ridders.nu/index.htm

In the end I decided to go for one of his models; Debbie a small, simple two stroke engine!

DIY: Metal model engine building UPDATE: build complete (page 16)!-img2927.jpg

DIY: Metal model engine building UPDATE: build complete (page 16)!-img2928.jpg

DIY: Metal model engine building UPDATE: build complete (page 16)!-img2929.jpg

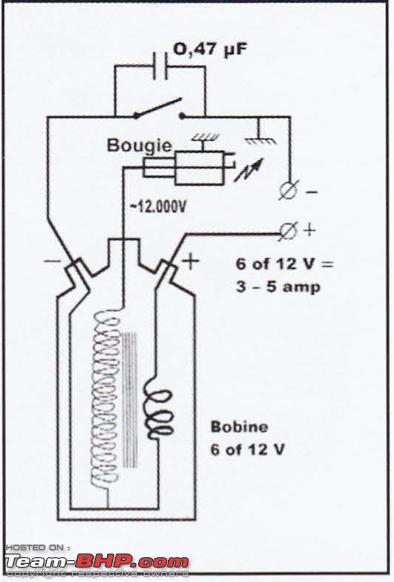
The original design is from 2006. Jan did a very nice article in the NVM club magazine (Dutch model build association). I managed to get hold of that original article. Since he has amended the design a bit, noticeably the cylinder and the support.

DIY: Metal model engine building UPDATE: build complete (page 16)!-screenshot-20200714-10.23.05-am.png

Name:  Screenshot 20200714 at 10.23.20 AM.png
Views: 5793
Size:  247.9 KB

At present I am busy trying to figure out what materials I need to get. I have some stock myself, but I need quite a few more bits and pieces. So I have made a very simple Excel sheet. I went through the drawings one by one and wrote down the details of every single part. Checked whether I have the respective materials in stock, checking dimension, if not what to order.

Debbie Two Stroke.xlsx

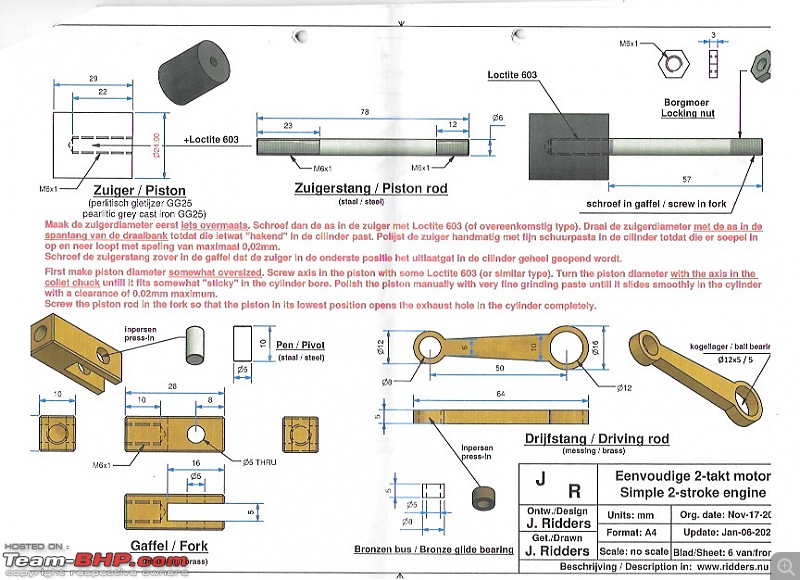
I am also trying to figure out on how to go about producing the different parts. This one has at least two major challenges compared to the Wobbler. The piston and cylinder have very narrow margins, I need to machine them very precisely. Also, the cylinder is 24mm in diameter, which means I need to bore, which is something I have not done yet! I probably need to get some boring bars as well.

DIY: Metal model engine building UPDATE: build complete (page 16)!-cylinder-sheet-3.jpeg

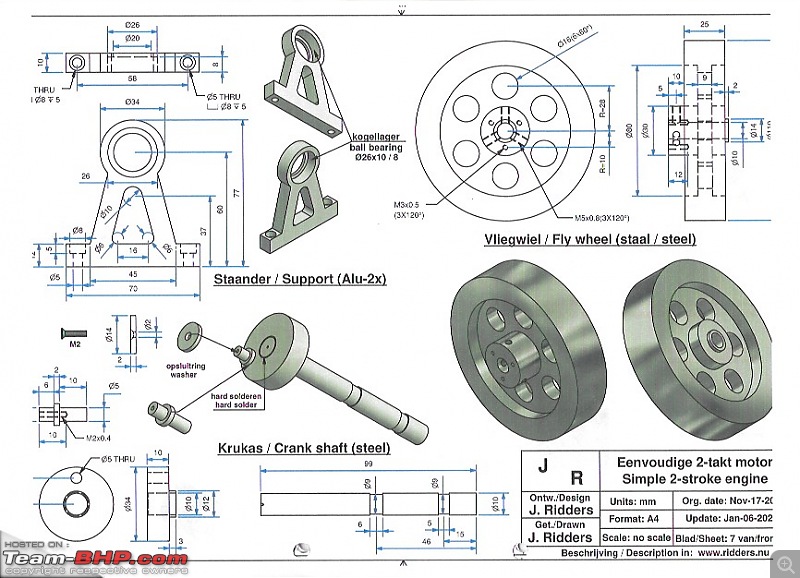
Also, the frame or support in which the flywheel will rotate is going to need some thinking on how to approach. I think I can manage to outside shape ok-ish. But the trick is that the inside that holds the bearing, need to be pretty precise and of course perfectly aligned between the two support as well.
DIY: Metal model engine building UPDATE: build complete (page 16)!-support-crankshaft-fly-wheel-sheet-7.jpeg

More to come!

Jeroen

Last edited by Jeroen : 14th July 2020 at 14:53.
Jeroen is online now   (39) Thanks
Old 15th July 2020, 07:54   #2
GTO
Team-BHP Support
 
GTO's Avatar
 
Join Date: Feb 2004
Location: Bombay
Posts: 72,336
Thanked: 316,024 Times
re: DIY: Metal model engine building UPDATE: build complete (page 16)!

Thread moved from the Assembly Line to the DIY forum. Thanks for sharing!

Last edited by GTO : 16th July 2020 at 08:32.
GTO is offline   (1) Thanks
Old 15th July 2020, 12:10   #3
Distinguished - BHPian
 
Join Date: Oct 2012
Location: Delhi
Posts: 8,700
Thanked: 58,077 Times
re: DIY: Metal model engine building UPDATE: build complete (page 16)!

I have always been interested in these little model engines. Nowadays, as I have started building them myself even more so.

Somebody must be tracking my internet surfing, as I am getting more and more suggestion to look at video’s and websites relating to model engine building.

This one showed up this morning:


I am looking at getting some boring accessoires to bore the cylinder. There are a few challenges. There are not that many shops that sell these kind of tools. Most cater for professional machine shops, making everything phenomanlly expensive. My favourite tool shop HBM is running low on stock and I suspect most other shops do to, due to Corona. Just about all tools are produced in China. So either I wait or get something like this:

https://www.hbm-machines.com/product...t-met-spanhuls

https://www.hbm-machines.com/product...m-wisselplaten

I am still waiting for confirmation on my big material order. So not much I can do, but I can start on some steel parts as I have most of the material in stock myself.

Jeroen
Jeroen is online now   (6) Thanks
Old 15th July 2020, 14:26   #4
BHPian
 
bikertillidie's Avatar
 
Join Date: Jan 2011
Location: Calcutta/Pune
Posts: 483
Thanked: 1,039 Times
re: DIY: Metal model engine building UPDATE: build complete (page 16)!

Looking forward to updates.

I have the same mini lathe myself, but am short on cutting tools.

As most need to be imported from China, this has put me in a quandary (recent geo political situation between China and its neighbours are probably at their lowest ebb right now).

Last edited by suhaas307 : 24th August 2020 at 02:58. Reason: minor spacing
bikertillidie is offline   (1) Thanks
Old 15th July 2020, 15:45   #5
Distinguished - BHPian
 
Join Date: Oct 2012
Location: Delhi
Posts: 8,700
Thanked: 58,077 Times
re: DIY: Metal model engine building UPDATE: build complete (page 16)!

Quote:
Originally Posted by bikertillidie View Post
Looking forward to updates.
I have the same mini lathe myself, but am short on cutting tools.
As most need to be imported from China, this has put me in a quandary (recent geo political situation between China and its neighbours are probably at their lowest ebb right now).
Good to know you have the same Lathe. I am still getting used to mine. Look forward to your comments / suggestion to come.

Yeah, the situation with China is not likely to improve very quickly. I am hopeful that on most stuff, at least here in the West, the supply chains to regular shops are returning back to normal soon. Of course, one of the ways HBM keeps their prices low is buying and shipping in bulk and the ship literally “the slowest boat from China” because it is cheap. Once you have a steady supply running it doesn’t matter if it is in transit for a few months.

I can get professional cutting tools but we are talking Euro 200 - 250 per tool easily. And I think I will need at least 2-3 for the cilinder so that would be ridiculous.

I am probably going ahead and get me one of the HBM sets. I want to get started!

Jeroen
Jeroen is online now   (5) Thanks
Old 15th July 2020, 19:44   #6
Senior - BHPian
 
Join Date: Jul 2009
Location: Calcutta
Posts: 4,668
Thanked: 6,229 Times
re: DIY: Metal model engine building UPDATE: build complete (page 16)!

IIRC the lathe came with a lot of cutting tools. There should be some boring bars in that lot.

What tolerance and finish have they specified for the flywheel shaft, and the bearing bores? What is the bearing number?

Sutripta
Sutripta is offline   (1) Thanks
Old 15th July 2020, 21:16   #7
Distinguished - BHPian
 
Thad E Ginathom's Avatar
 
Join Date: Jun 2007
Location: Chennai
Posts: 11,316
Thanked: 29,088 Times
re: DIY: Metal model engine building UPDATE: build complete (page 16)!

This entire project seems orders of magnitude more complex than your first wobbler!

To begin at the beginning... Would it be feasible to make the boring bar?
Thad E Ginathom is offline   (1) Thanks
Old 15th July 2020, 22:25   #8
BHPian
 
bikertillidie's Avatar
 
Join Date: Jan 2011
Location: Calcutta/Pune
Posts: 483
Thanked: 1,039 Times

Quote:
Originally Posted by Jeroen View Post
I can get professional cutting tools but we are talking Euro 200 - 250 per tool easily. And I think I will need at least 2-3 for the cilinder so that would be ridiculous.
At this rate, the price of tools will soon exceed the cost of the lathe itself..

Quote:
Originally Posted by Sutripta View Post
IIRC the lathe came with a lot of cutting tools. There should be some boring bars in that lot.

Sutripta
No boring bars were included, I'm afraid..

Last edited by Gannu_1 : 16th July 2020 at 13:30. Reason: Back to back posts merged.
bikertillidie is offline   (1) Thanks
Old 16th July 2020, 13:27   #9
Distinguished - BHPian
 
Join Date: Oct 2012
Location: Delhi
Posts: 8,700
Thanked: 58,077 Times
re: DIY: Metal model engine building UPDATE: build complete (page 16)!

Quote:
Originally Posted by bikertillidie View Post
No boring bars were included, I'm afraid..
None came with mine as standard, but I did order some.

I ordered the lathe from a tiny, one man band, online shop. This guys specialises in selling a limited range of lathes and welding machines. Nothing fancy, he doesn’t sell the accessories except for just a few bits, essentially just the basic machines at a really good price.

He did have these on offer, which I bought with the lathe

DIY: Metal model engine building UPDATE: build complete (page 16)!-img3062.jpg

These are very simple, carbide bits.

I went round to my little local machine shop yesterday. I wanted to see if they could help me out on the stock for the flywheel and aluminium for the cilinder support. Left my drawings with them, I will see what they have got for me later today.

I have a call later today with one of the gents from the model forum that helped me out before. He has been giving me lots of practical advise. So lets see what he says about this.

I am also a bit concerned on the capabilities of my lathe. It did not come with a proper carriage lock. You can off course stop the lead screw and engage the half nut. But I find there is still a lot of play.

For this very precise drilling, boring in much larger diameter than I have done before, making sure you don’t get any chatter is crucial. It will help in parting too.

There are some video’s on youtube, showing modification to this very lathe:


Quote:
This entire project seems orders of magnitude more complex than your first wobbler!
Well, you need to push the enveloppe all the time Thad, or there is no learning!

Quote:
What tolerance and finish have they specified for the flywheel shaft, and the bearing bores? What is the bearing number?
I will be posting those drawings when I get back home.

Jeroen
Jeroen is online now   (6) Thanks
Old 16th July 2020, 16:14   #10
Distinguished - BHPian
 
Thad E Ginathom's Avatar
 
Join Date: Jun 2007
Location: Chennai
Posts: 11,316
Thanked: 29,088 Times
re: DIY: Metal model engine building UPDATE: build complete (page 16)!

Quote:
Well, you need to push the enveloppe all the time Thad, or there is no learning!
True. I used to do that with jewellery, and it regularly resulted in failure, after which I would have to return to something basic to regain confidence.

The soldering adventure I mentioned was when making a box snap. This is the principle is like you saw in the bangle you repaired.

Customer wanted a heavy silver-chain bracelet. Normally, one would just buy the fastenings as well as the chain, but I was in it to make stuff, and I did not fancy just buying some bits and assembling them. Especially as my customer was himself a not-then-working seriously-pro jeweller who had helped and encouraged me --- and was indeed impressed with my hand-made clasp.

It was well worth the time and the trouble. The envelope got pushed, and it worked out.
Thad E Ginathom is offline   (1) Thanks
Old 16th July 2020, 19:43   #11
Senior - BHPian
 
Join Date: Jul 2009
Location: Calcutta
Posts: 4,668
Thanked: 6,229 Times
re: DIY: Metal model engine building UPDATE: build complete (page 16)!

Quote:
Originally Posted by Jeroen View Post
He did have these on offer, which I bought with the lathe

Attachment 2031021

These are very simple, carbide bits.

I went round to my little local machine shop yesterday.
The two really long ones are for boring. There should be one for boring, and one for internal threading. Maybe it is because of the picture, but I don't an internal threading one. Take the set to your FNMachine Shop and they'll tell you which to use for what.

The biggest problem with hobby lathes when it comes to boring is the toolpost. The boring tool tends to get pushed out of the toolpost.

I hope you know how to grind bits when they become dull.

Sutripta
Sutripta is offline   (1) Thanks
Old 16th July 2020, 21:49   #12
Distinguished - BHPian
 
Thad E Ginathom's Avatar
 
Join Date: Jun 2007
Location: Chennai
Posts: 11,316
Thanked: 29,088 Times
re: DIY: Metal model engine building UPDATE: build complete (page 16)!

Quote:
Originally Posted by Sutripta View Post
I hope you know how to grind bits when they become dull.
IIRC, he has a bench grinder. But these are (braised-on) carbide bits, right? Which would require a diamond wheel? And the dust is poisonous?
Thad E Ginathom is offline  
Old 16th July 2020, 22:42   #13
Senior - BHPian
 
Join Date: Jul 2009
Location: Calcutta
Posts: 4,668
Thanked: 6,229 Times
re: DIY: Metal model engine building UPDATE: build complete (page 16)!

Quote:
Originally Posted by Thad E Ginathom View Post
IIRC, he has a bench grinder. But these are (braised-on) carbide bits, right? Which would require a diamond wheel? And the dust is poisonous?
Will require a diamond wheel.
Ultimately he will go to HSS. Has already bought the stock! My experience is that for hobbyists who do a lot of work on brass, HSS is the preferred material.

Sutripta

Last edited by Sutripta : 16th July 2020 at 22:44.
Sutripta is offline   (1) Thanks
Old 17th July 2020, 12:43   #14
Distinguished - BHPian
 
Join Date: Oct 2012
Location: Delhi
Posts: 8,700
Thanked: 58,077 Times
re: DIY: Metal model engine building UPDATE: build complete (page 16)!

A few more drawings:

When it comes to specification of the diameter of cylinder and piston: On these little model engines, they tend to specify this by pointing out what the cylinder needs to be and subsequently the clearance, which in this case is 0.03mm. See the comments in red on the piston drawing

DIY: Metal model engine building UPDATE: build complete (page 16)!-piston-rod-sheet-6.jpeg

The drawings don’t mention anything specific about the ball bearing other than the outer and inner diameter. ( Ø26 x 8).

Jan Ridders has made this little video of Debbie. (Note this is still his original MK1 design. The current design I am building is improved and more simple.

Getting everything to run really smoothly is hugely important on this engine. So I will go for any ball bearing this size, with the least resistance. I am not to worried about anything else. It’s not as if Debbie will be doing a lot of running. Probably 30 seconds to show my wife and another 30 seconds to make a little video.

Any suggestion which ball bearing to go for in this size?


I have also had a good call with my new friend Henry. We discussed, mainly the cylinder and support. (see below). As we were discussing the cylinder I also realised that my spindle bore is only 20mm. As the cylinder is going to 24mm, I need to cater for some room between the cylinder material and the chuck. I have already some ideas on how to do so.

Henry suggested to get some real good cutting bits, (carbide) and just drill and subsequently bore and make sure the last passes are very very light ones. Next do a bit of honing.

As an alternative he suggested to buy very smooth tube to the correct inner diameter and just make a simple cilinder liner! I like this idea. Henry has an address in Germany where I can get it. But I will attempt the boring first.

We also discussed the supports a bit. See this drawing:

DIY: Metal model engine building UPDATE: build complete (page 16)!-fly-wheel-crank-support-sheet-7.jpeg

I think I can get that bearing hole made on the lathe, but I would need to get a different end plate to fit it to me lathe.

Picked up some stuff. My local machine pals gave me the material for the fly wheel and the cilinder support. We had a little chat. Turns out he is a (model) steam engine enthusiast as well! Good to know.

The piece for the flywheel is massive. Initially it won’t fit in my lathe. I will make an arbor and turn it down so part of it will fit in the regular chuck. Similar to how I made the flywheel on the Wobbler.

Picked up some cool looking boring bars, three different size. Look and feel pretty solid. And a simple honing tool. Haven’t used one of these in decades. Any car part shop will sell you these, but this one came from HBM. They did not have honing liquid. I need to check what to use.

DIY: Metal model engine building UPDATE: build complete (page 16)!-img3063.jpg

I have not heard anything yet on my main material order. Just left a voicemail with the very nice lady who runs this shop. I hope she will call me back today.

If anything I have got plenty of materials to get going now.

Jan has made many cool video’s of most of his designs and builds. Something to drool over:

https://www.youtube.com/user/HEETGAS/videos

Also came across a very simple modification for my lathe to fixate the carriage. That is definitely a little job that does need doing as well. Plenty to do!

Jeroen

Last edited by Jeroen : 17th July 2020 at 12:48.
Jeroen is online now   (6) Thanks
Old 17th July 2020, 18:47   #15
Distinguished - BHPian
 
Thad E Ginathom's Avatar
 
Join Date: Jun 2007
Location: Chennai
Posts: 11,316
Thanked: 29,088 Times
re: DIY: Metal model engine building UPDATE: build complete (page 16)!

If I bought such a lathe, I would want two things...

--- A set of ready-made tools so I could get started right away.
--- A few HSS tool blanks so that I could also learn tool grinding.
--- Especially if I was going to cut brass, I would want to experiment with the rake to do that best. I'm thinking that this is going to matter more where surface finish is important to you.

I'm sure you have the experience of grinding tools, and it will come back to you easily, You will be able to recover a dull, or even damaged tool bit quickly. well, I guess that you could also remove and re-braze new inserts, but you have to buy them every time.

You can also get boring bars that take a small square HSS bit.

How is buying from China for you these days? From India it has become impossible as they can no longer effectively use ordinary post, so AliExpress is off our screens

Last edited by Thad E Ginathom : 17th July 2020 at 18:53.
Thad E Ginathom is offline  
Reply

Most Viewed


Copyright ©2000 - 2025, Team-BHP.com
Proudly powered by E2E Networks