| |||||||

| Search Forums |
| Advanced Search |
| Go to Page... |
 |
| Search this Thread |  102,382 views |
 20th March 2017, 19:11
| #1 |
| Team-BHP Support  Join Date: Nov 2013 Location: Coimbatore
Posts: 3,711
Thanked: 25,620 Times
| Polo GT TSi Install: OEM Bi-Xenons with BCM Max Upgrade EDIT: 6C RLS + Auto-dimming IRVM installed! 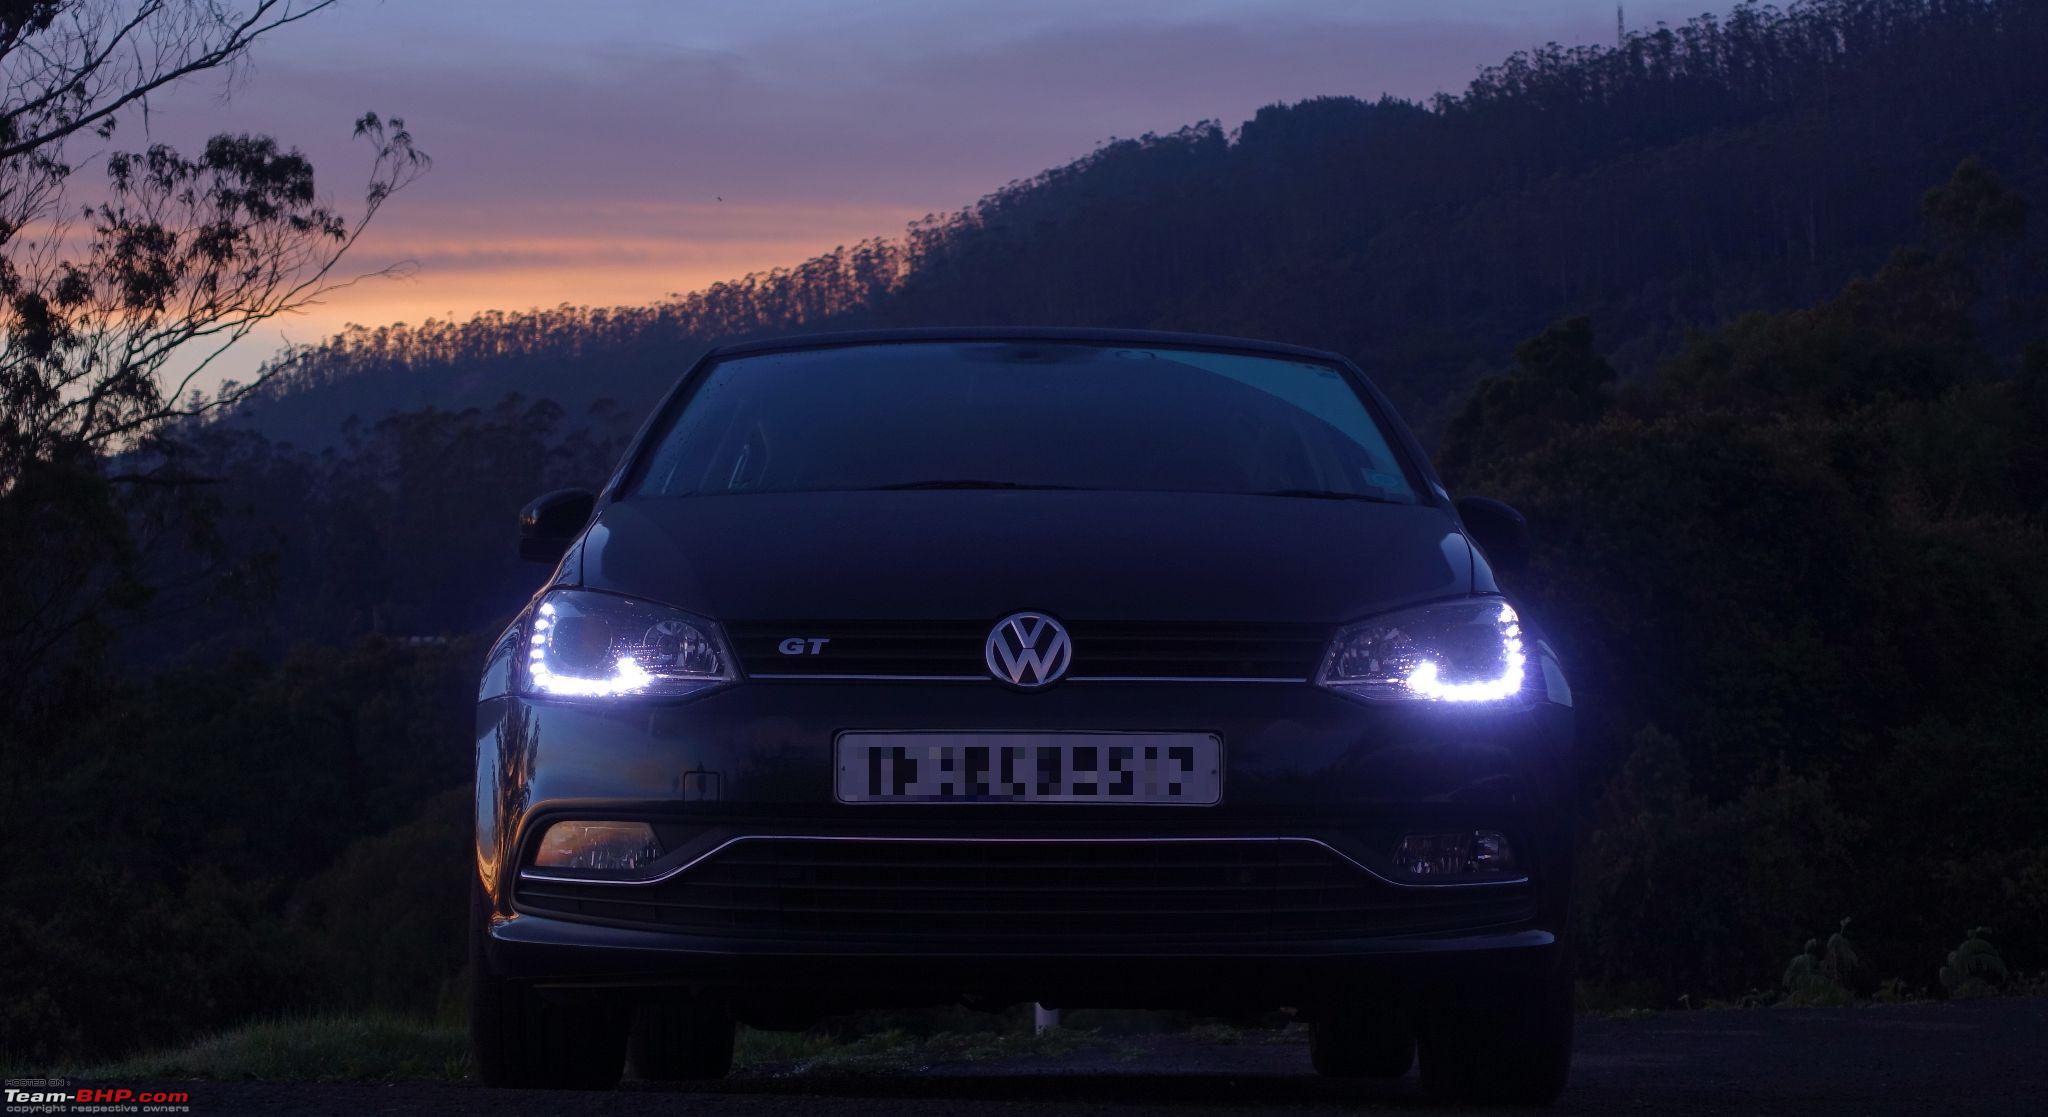 Installed OEM Valeos BiXenons in my Polo GT TSi and also upgraded the stock BCM to BCM Max that supports original BiXenon operation and also various other features. This is by far, the toughest DIY I have done on the GT. The intent of this thread is to provide all the information necessary for a OEM BiXenon upgrade, and also to share the mistakes I made and the learnings I got from these mistakes which can be useful to others who plan this upgrade. Owing to the complexity and the amount of work involved in the DIY, it is not possible for me to provide a step by step procedure for everything. Instead what I have tried to do is provide all high level information like components required, major tasks needed to complete the install, VCDS coding, results and some learnings. I have also provided links to various threads I referred during the installation. If any information is missing, feel free to ask and I will do my best to provide this information. Credits: I would like to thank the following people without whom this installation would not have been possible:
References: Gannu’s BCM upgrade thread Gannus’s instrument cluster upgrade thread Gannu's IRVM installation thread Various threads on BiXenon upgrade in UK Polos forum Decision to Upgrade: It would be difficult to believe, the decision to upgrade to OE BiXenons was in part triggered when I heard the pricing of the Polo GTi. There was a small wish inside me to upgrade to Polo GTi if the initial rumors of the price of 20 Lakhs were to be believed. Then they dropped the bomb with a pricing of 35 Lakhs. As this was way too expensive and out of my reach, I decided to spruce up the GT and make it GT 2.0 and keep it for a very long time. The upgrade to KW Street Comfort coilovers was the first move in this decision. I had already upgraded the original halogen headlights to projectors (documented here). However, I had many issues with this installation
With all the above issues with the retrofit, and my decision to spruce up the GT, I decided to upgrade the headlights to OEM BiXenons. Initial Research and decision between LED headlights vs. BiXenons, BCM upgrade etc. Once I decided to upgrade to OEM BiXenons, I spent lot of time in various forums reading about OEM BiXenons. That is when I came across various threads in uk-polos.net a forum dedicated for Polo owners in Europe. I saw many discussions on upgrading OE halogen headlights to BiXenons or LED headlights. All of these discussions pointed out to the requirement to upgrade the BCM to BCM Max to get the most out of the BiXenons. It is possible to just upgrade the headlights using a 10 pin to 14 pin adapter wiring which would be the easiest, but this will not support full DRL and cornering lights. Also, many Polo owners had also upgraded to the LED headlights found in the Polo GTi and the now special edition in Vento. So, I had the following decisions to make: LED headlights or BiXenons: Though LED headlights have that Wow factor, I found that the LED headlights for the Polo GTi were very basic with reflector based design and with only leveling control. I also read that LEDs may not be that effective in rain. On the other hand, the BiXenons have excellent lighting pattern and coverage, and have the static cornering lights which are very useful while driving through winding roads. Also, I love the DRL design that is similar to Passat and Jetta. So, this decision was simple – I decided to go with BiXenons. Simple headlight upgrade or full blown upgrade with BCM Max: The BCM that comes in Indian Polo is 6R0 937 087. This does not natively support BiXenons or LED headlights. In fact in our Indian Polo the BCM does not control the headlights at all. The high beam, low beam and the parking lights are controlled directly by the headlight switch. On the other hand a BiXenon requires direct control from the BCM to control various special features like powering the low beam during flashing, controlling brightness of DRLs, controlling the cornering lamp etc., which the 087 BCM does not support. The advantage of doing a simple install with the 10 pin to 14 pin adapter harness was that I could finish the install in a couple of hours. However, following are the disadvantages with this approach:
The advantage of doing a full upgrade to BCM Max is that all the functions from the OE BiXenons can be implemented. But the biggest disadvantage is that this will require a total wiring change and out goes warranty. Till this point, all the upgrades I did were plug and play with no wires being cut. In case of warranty requirement, I could put back the original components in no time. But a BCM upgrade would be a point of no return. But then:  I decided to take the risk and go for the full blown upgrade with BCM Max, with Automatic Headlights and Rain Sensing Wipers. I fervently hope that I don’t have to go for any warranty support to VW. The only warranty that I am interested is in the DSG and hope VW would support me on that. Index: Procuring Components Headlight Install and RLS/IRVM Install Wiring concept explained Wiring DIY VCDS Coding Results, Important Learnings, Pending Issues and Future Plan I will add new links to the index on key future updates to the installation Last edited by graaja : 21st March 2017 at 08:00. |

|  (39)
Thanks (39)
Thanks
|
| The following 39 BHPians Thank graaja for this useful post: | anToNIcHeN, Arun.K, arunphilip, Avikbrio, batterylow, BigBrad, CarguyNish, Dani7766, deetjohn, Digital Vampire, ecenandu, fluidicjoy, frankmehta, FreeZaX, Gannu_1, GaryTSI, GTO, h14, harsh79, InControl, Jaggu, kat, keeru, mallumowgli, Mr.Boss, NBpolo, Nicky, PraNeel, R-Six, R2D2, ragh_bhushan, Rehaan, somjith_nair, swissknife, theexperthand, Turbanator, v1kram, Vik0728, VivekCherian |
| |
|
20th March 2017, 20:18
| #2 |
| Team-BHP Support Join Date: Nov 2013 Location: Coimbatore
Posts: 3,711
Thanked: 25,620 Times
| Procuring Components Procuring Components: Once I decided to go with BiXenons and BCM upgrade in the last week of November, the painful process of collecting all the components started. Putting together all the components took close to 10 weeks. There were some unnecessary delays due to bad planning from my side as well. BiXenon headlights – 6R2 941 039D and 6R2 941 040D TheSaint helped me with the part numbers for the BiXenons and he also gave me the link to an online store where I could get this. The cost was 1200 Euros including shipping. Link to CarSystems store However, this was out of stock in their website for close to three weeks. I then searched other websites and found another website www.allcarpartsfast.co.uk with the headlights in stock. The price listed for the headlights was 300 British Pounds each. Links to the store for both the headlights below: 6R2 941 039D 6R2 941 040D Including shipping, it cost 760 pounds for both the headlights. As the value of the pound was down due to Brexit, this worked out to 64K INR. I thought this was a good deal compared to the carsystems.pl price and placed the order. The lights arrived in a week and I had to pay a customs duty of about 18K. 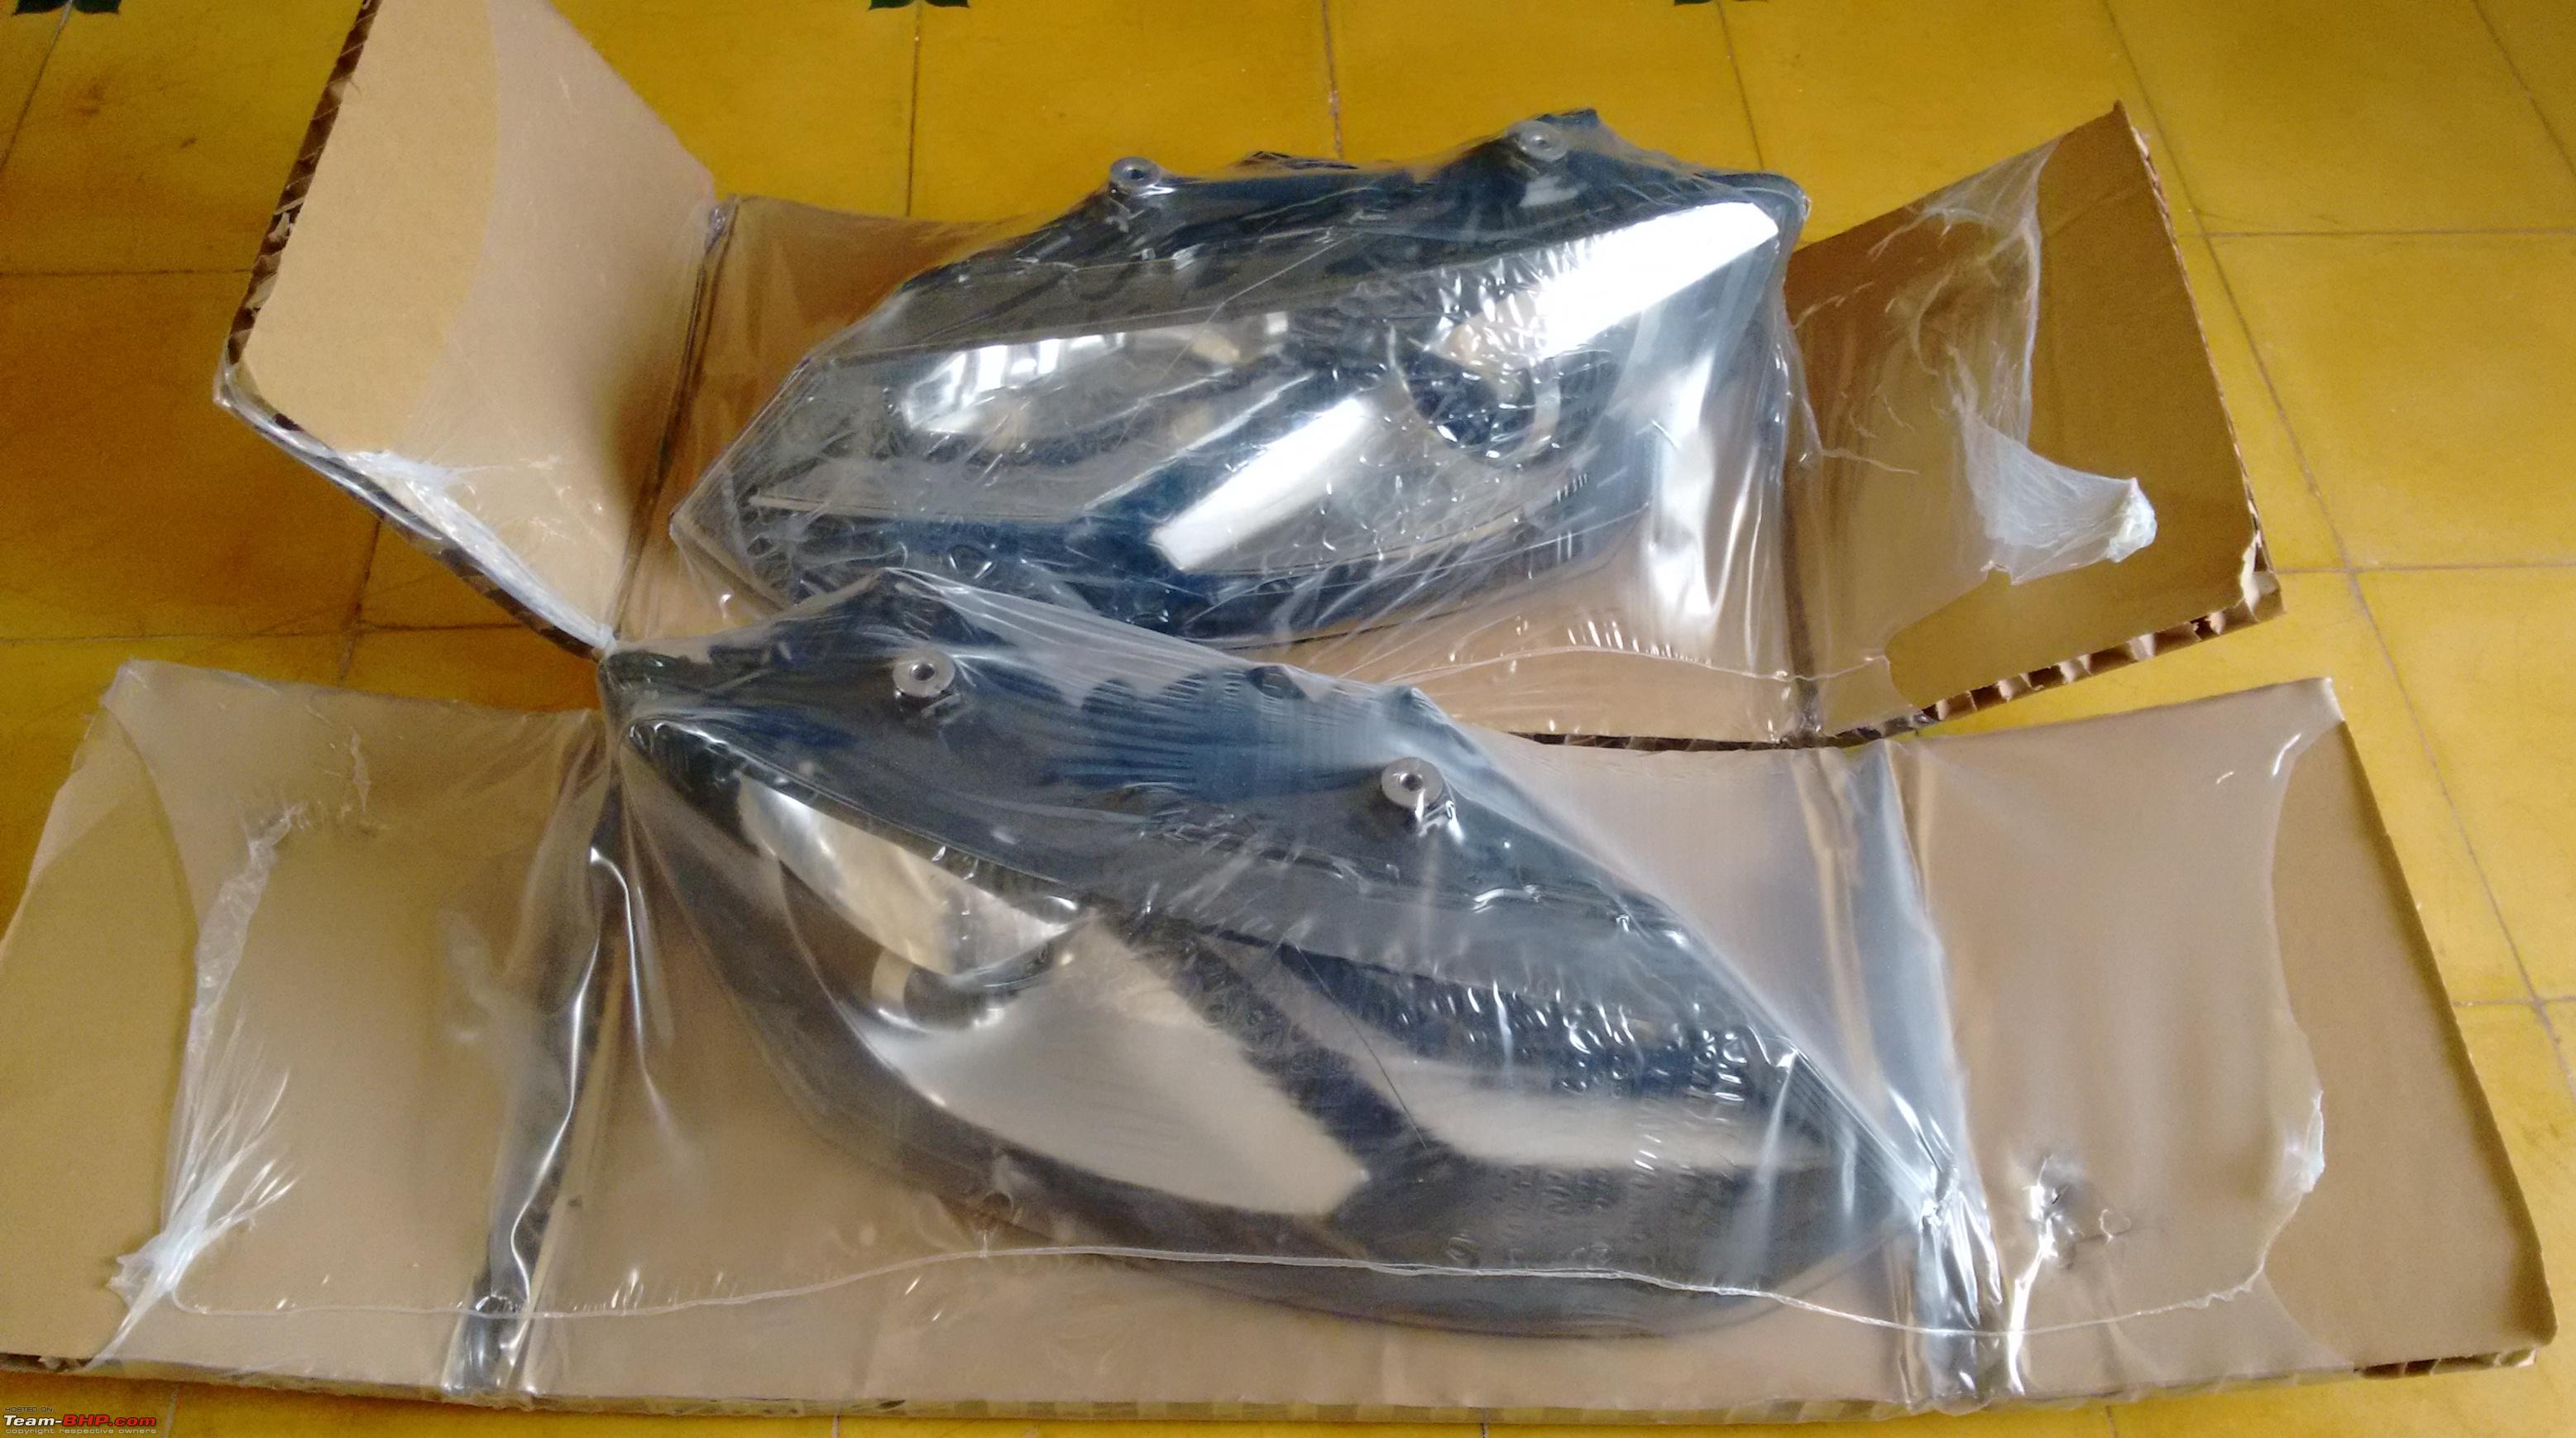 When I opened up the lights, I was in for a rude shock. These were just the headlight housings. They did not have the ballasts, HIDs, H7 lamps for cornering and indicator lamps. I used the H7 lamps from the original headlights. I had to order all other parts separately from the following links. Ballasts from carsystems.pl Philips Extreme Vision 4800K D3S HID bulbs from powerbulbs Indicator lamps from AliExpress In the end, I paid about 10K more than what I would have paid for the full set from carsystems.pl. BCM Max - 7E0 937 090 The next most important part required for the upgrade is the BCM Max. From the discussions I had with ciclo, for the Indian Polo I had to go for the 7E0 series (7E0 937 090B). But unfortunately, this was very rare and I could not find it in any online stores. Many stores had the 7H0 series of BCM, but ciclo made it clear that 7H0 will not work with Indian Polo. I found a couple of used 7E0 BCMs in eBay, but he said there is no guarantee that a used BCM that has been configured for a different car would work in the Polo. I searched for this BCM for almost 3 weeks and was frustrated to the level that I even questioned my decision to go with such a complex upgrade. That is when another user from the UK Polos forum “Firegrafik” came to my rescue. He said that one of the local dealers in Russia has stock of 7E0 and he had procured this for his own upgrade. He was very kind to source this locally and ship it to me. The BCM arrived in 3 weeks from Russia. Below is the picture of the BCM Max  Below picture is the comparison between the existing BCM and the new BCM. Note the several new pins present in the new BCM.  10 pin to 14 pin adapter wiring harness  The OE BiXenon headlight has a 14 pin connector, whereas our Polo has a 10 pin connector. This adapter connects the high beam, low beam and turn signals from the 10 pin connector to the 14 pin connector. It also has three wires for DRL, Parking and Cornering lamps that need to be connected to the BCM. I got this from eBay. This is also available in carsystems website. If ordered along with the full set of headlights this will save some shipping cost. Link to 10 pin - 14 pin adapter Rain light sensor, IRVM and auto light switch I ordered the rain light sensor, IRVM, RLS wiring and Auto light switch from AliExpress. This arrived in 20 days. AliExpress link to IRVM, RLS and Auto Light Switch  I made a big blunder in ordering this particular set. More about this later. Wiring harness for the fog lamps 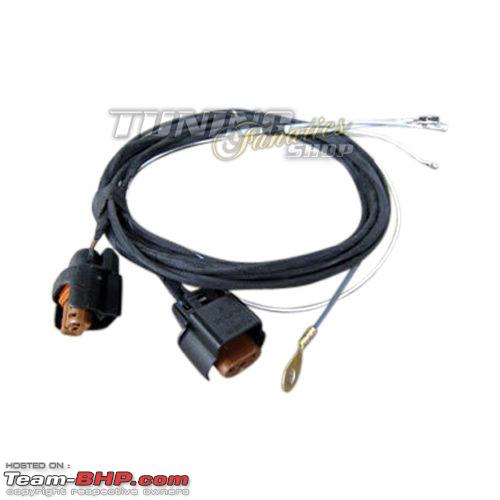 The Indian Polo has the fog lamps working as cornering lamps and are controlled by the BCM. In the new installation, the cornering lamp function will be shifted to the H7 bulbs in the BiXenon headlights and the fog lights will be disconnected from the BCM. A new wiring harness will be required to drive the fog lamps directly from the switch through a fuse circuit. I ordered this from eBay. eBay Link to Fog Light Wiring Harness Dimmer switch 6Q0941334  As the headlight leveling will be non-functional once the BiXenons are installed (this requires an AFS controller for auto leveling which is another project for the future), I decided to change the headlight leveling switch with the dimmer control switch. This can be used to adjust the brightness of the instrument cluster and the brightness of the lights on various buttons (steering mounted controls, window control switches etc). ciclo got this for me and shipped it along with the wiring harness. Wiring harness for the BCM Max This is the another very important piece to complete the installation. As I had mentioned earlier, ciclo from the UK forum makes these wiring harnesses as a hobby. As there are several variants in the electrical wiring of the Polo 6R platform, he asked me to provide him with many details like a VCDS Autoscan of the car, various pictures of the headlight connector, headlight leveling switch connector, relay carrier and the fuse box. He also asked me to perform tests by removing various fuses in the fuse box and the effect that particular fuse had on the headlight function. Once I provided him with all the details, he prepared the wiring and sent it to me from Spain. It took 3 weeks for this to arrive.  Everything was neatly packed. There were totally four cable assemblies, various fuses, and a tool to remove pins from existing connectors. He also sent me a surprise gift of LED license plate lights that is supported by BCM Max. He also sent me a 11 page PDF document with meticulous instructions on where each wire has to be connected (more on these later). The package also had the adapter plate for the VW flip camera. He told me that he designed this adapter when he installed the reverse camera on his Polo, and this is being sold on various online stores now including carsystems.pl. I have made an AutoCAD drawing of this and have shared this in my VW flip camera thread. Finally, after almost 10 weeks, all the components required for the installation:  Ross Tech VCDS Cable I also got the original Ross-Tech VCDS cable. I had three versions of AliExpress cables earlier. All of them failed to identify the ABS/Brake controller in my GT. As this was a major upgrade, I did not want to be stuck at a stage where the VCDS cable did not recognize the new BCM. So, I played it safe and got the original cable. Ross-Tech also came up with a new enthusiast version which was limited to 3 VIN numbers and they priced it $200 compared to $350 earlier. Paid $80 for shipping and 2.5K as customs duty. Considering the results I got from this DIY, I feel this was a worthy investment. 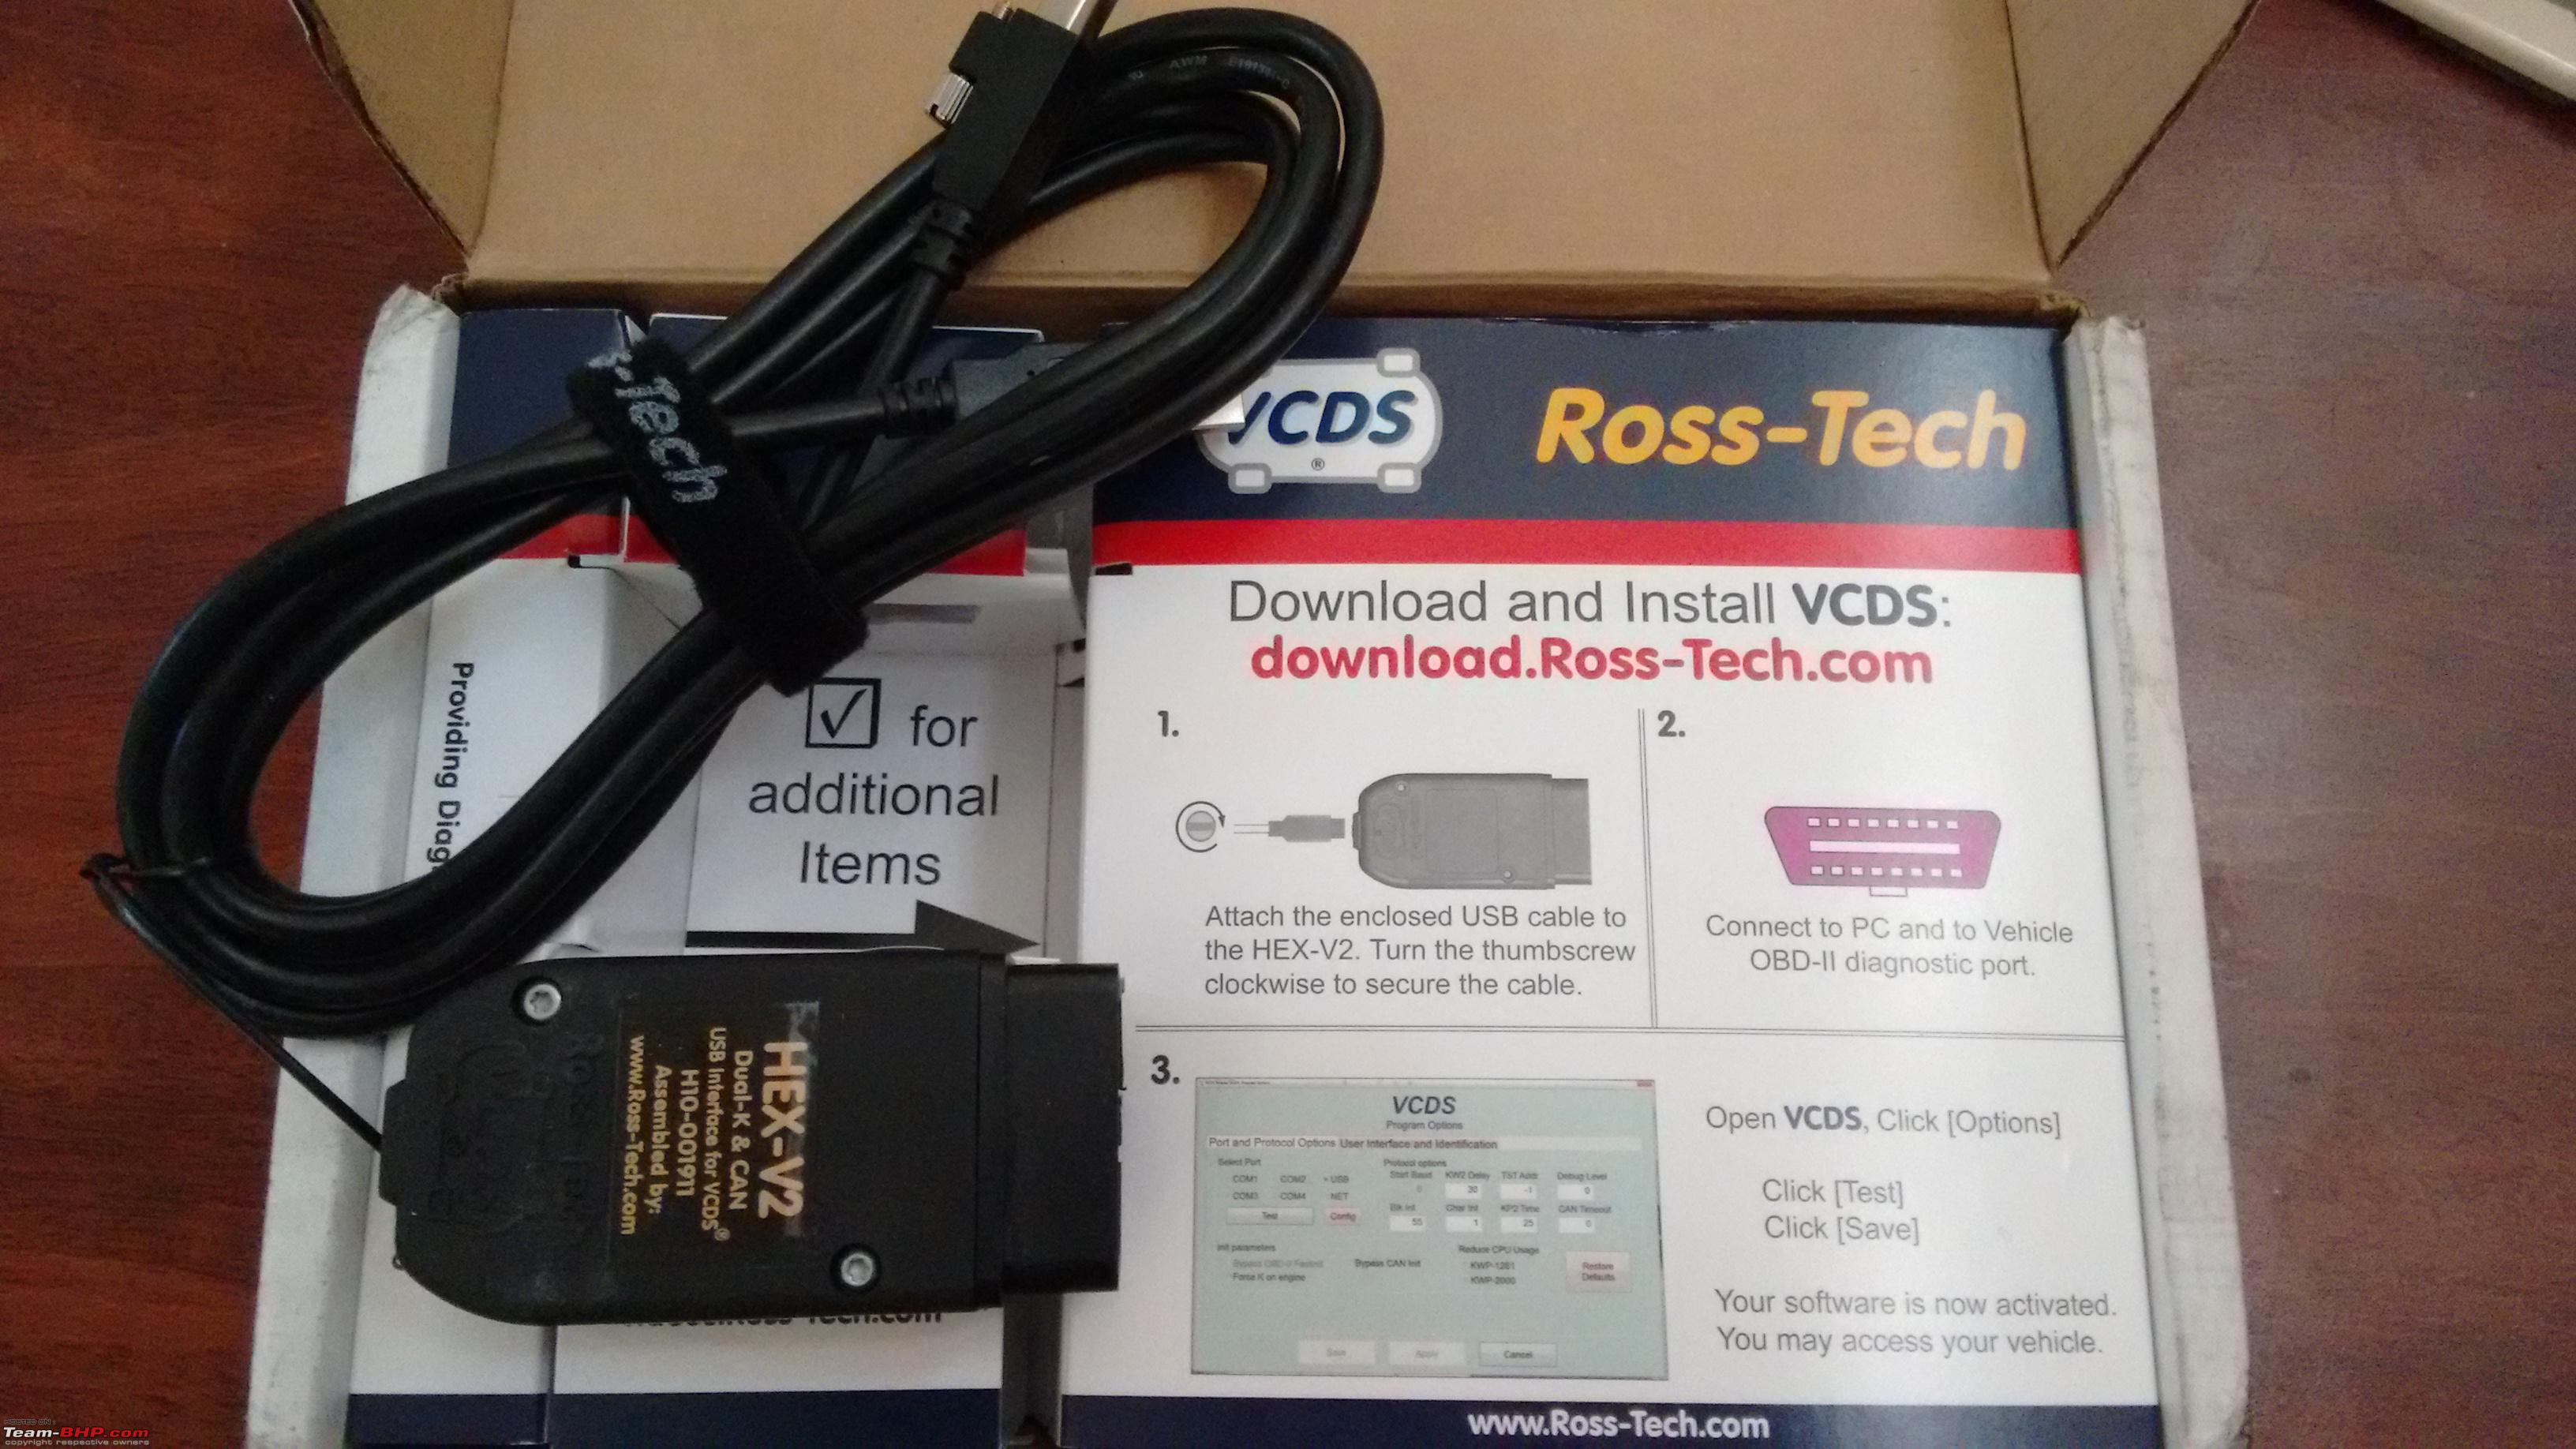 Cost of components: 1. Headlights - 760 British Pounds 2. Ballasts - 245 Euros 3. D3S HID Bulbs - 160 British Pounds 4. Turn signal lamps - 17 USD 5. 10 pin to 14 pin adapter harness - 50 Euros 6. Fog light wiring harness - 40 Euros 7. BCM Max - 125 USD 8. BCM Max wiring - 160 Euros 9. IRVM, RLS and Auto switch - 150 USD 10. Dimmer switch - 40 Euros 11. Ross Tech Cable - 280 USD 12. Customs duties - 31K INR Last edited by graaja : 21st March 2017 at 06:39. |
|
| (30)
Thanks
|
| The following 30 BHPians Thank graaja for this useful post: | Arun.K, audioholic, Avikbrio, batterylow, CarguyNish, carrazy, deetjohn, Divya Sharan, Dr.Naren, ecenandu, fluidicjoy, FreeZaX, Gannu_1, GaryTSI, GTO, Jaggu, kat, keeru, Mr.Boss, NBpolo, PraNeel, R2D2, Rehaan, rshanker, suhaas307, theexperthand, vaasu, Vik0728, VivekCherian, Whiplash7 |
|
20th March 2017, 20:30
| #3 |
| Team-BHP Support Join Date: Nov 2013 Location: Coimbatore
Posts: 3,711
Thanked: 25,620 Times
| Installation of Headlights and RLS/IRVM As this was going to be a complex install, I decided to break it up into three parts
Installation of Headlights: This was the simplest task. All I had to do was remove the existing projector setup, install the new headlights, connect the headlights to the existing wiring using the 10 pin to 14 pin adapter and route the DRL, parking light and cornering lamp cables to the driver’s footwell. A small digression. One great advantage with the OEM BiXenon headlights is the clean install. This is because the ballast, ignitor and the necessary cabling are included as part of the headlight assembly. The only connection required is the 14 pin connector. The ballast fixed to the bottom of the headlights.  The D3S bulb has in built ignitor and fits inside the headlight assembly.  Existing headlights removed. All those cables were inside the engine bay. 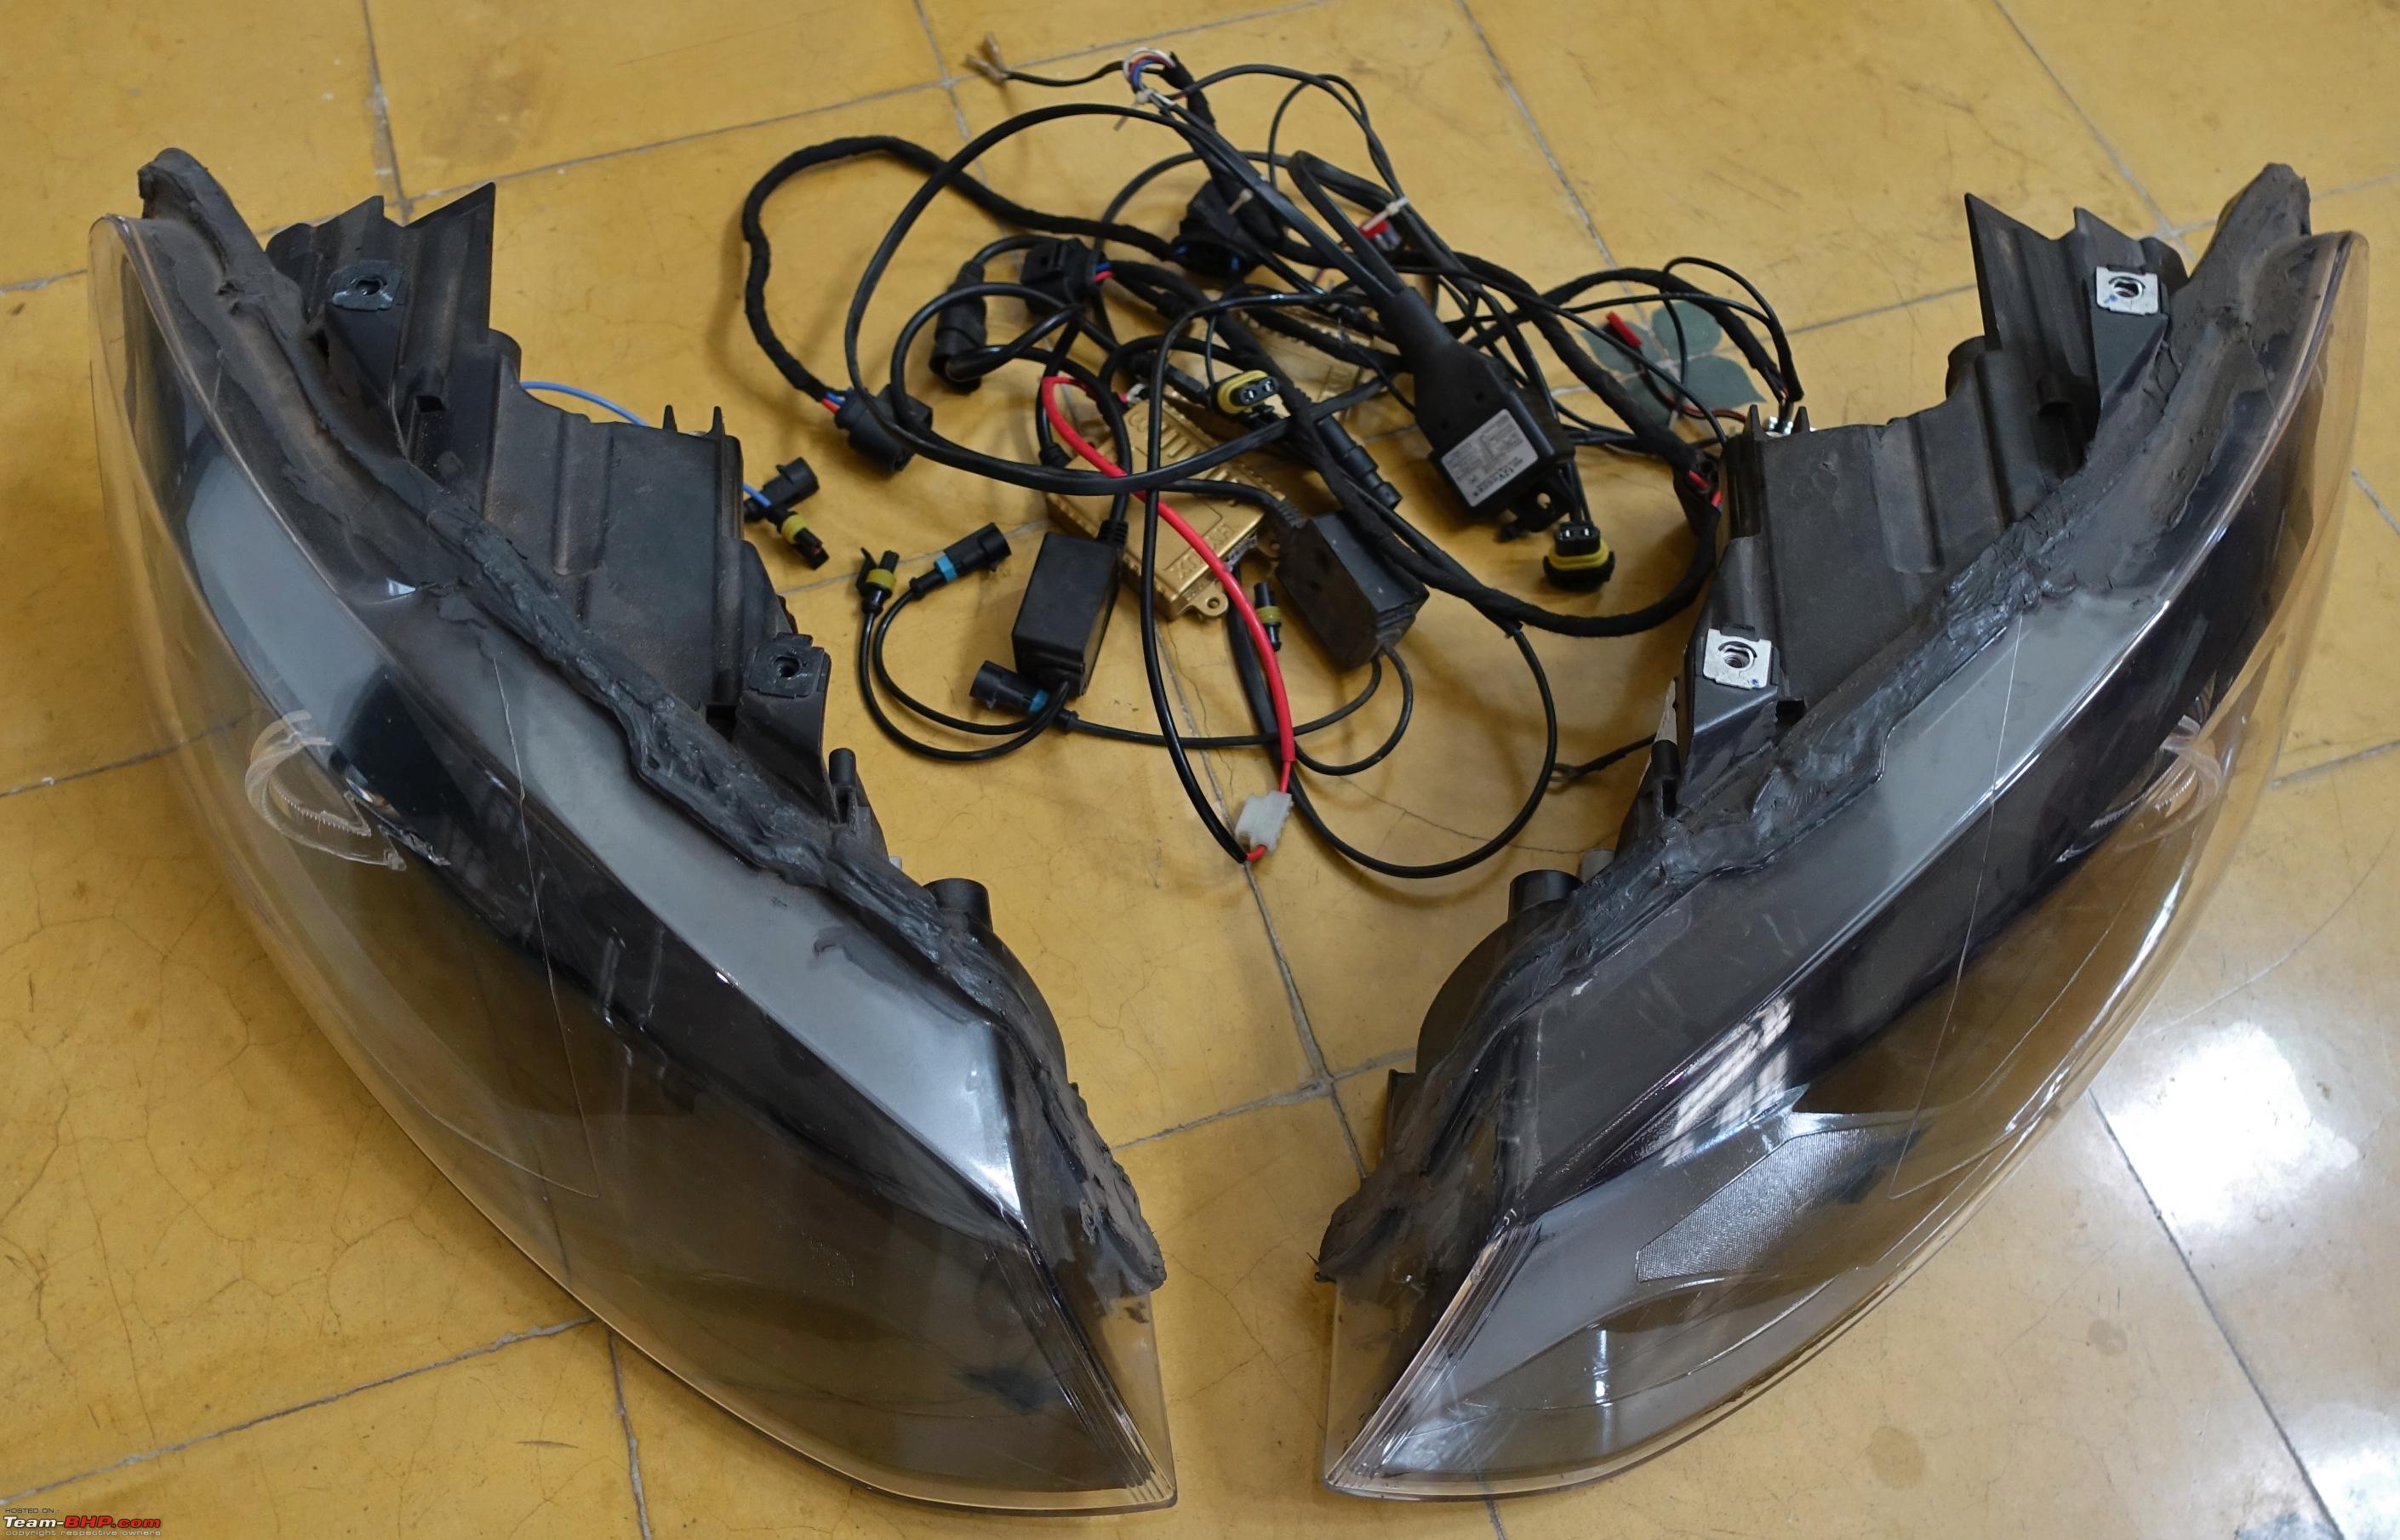 The 10 pin to 14 pin adapter connected to the existing 10 pin connector. This is the only extra cable that goes in the engine bay.  New headlight fixed. 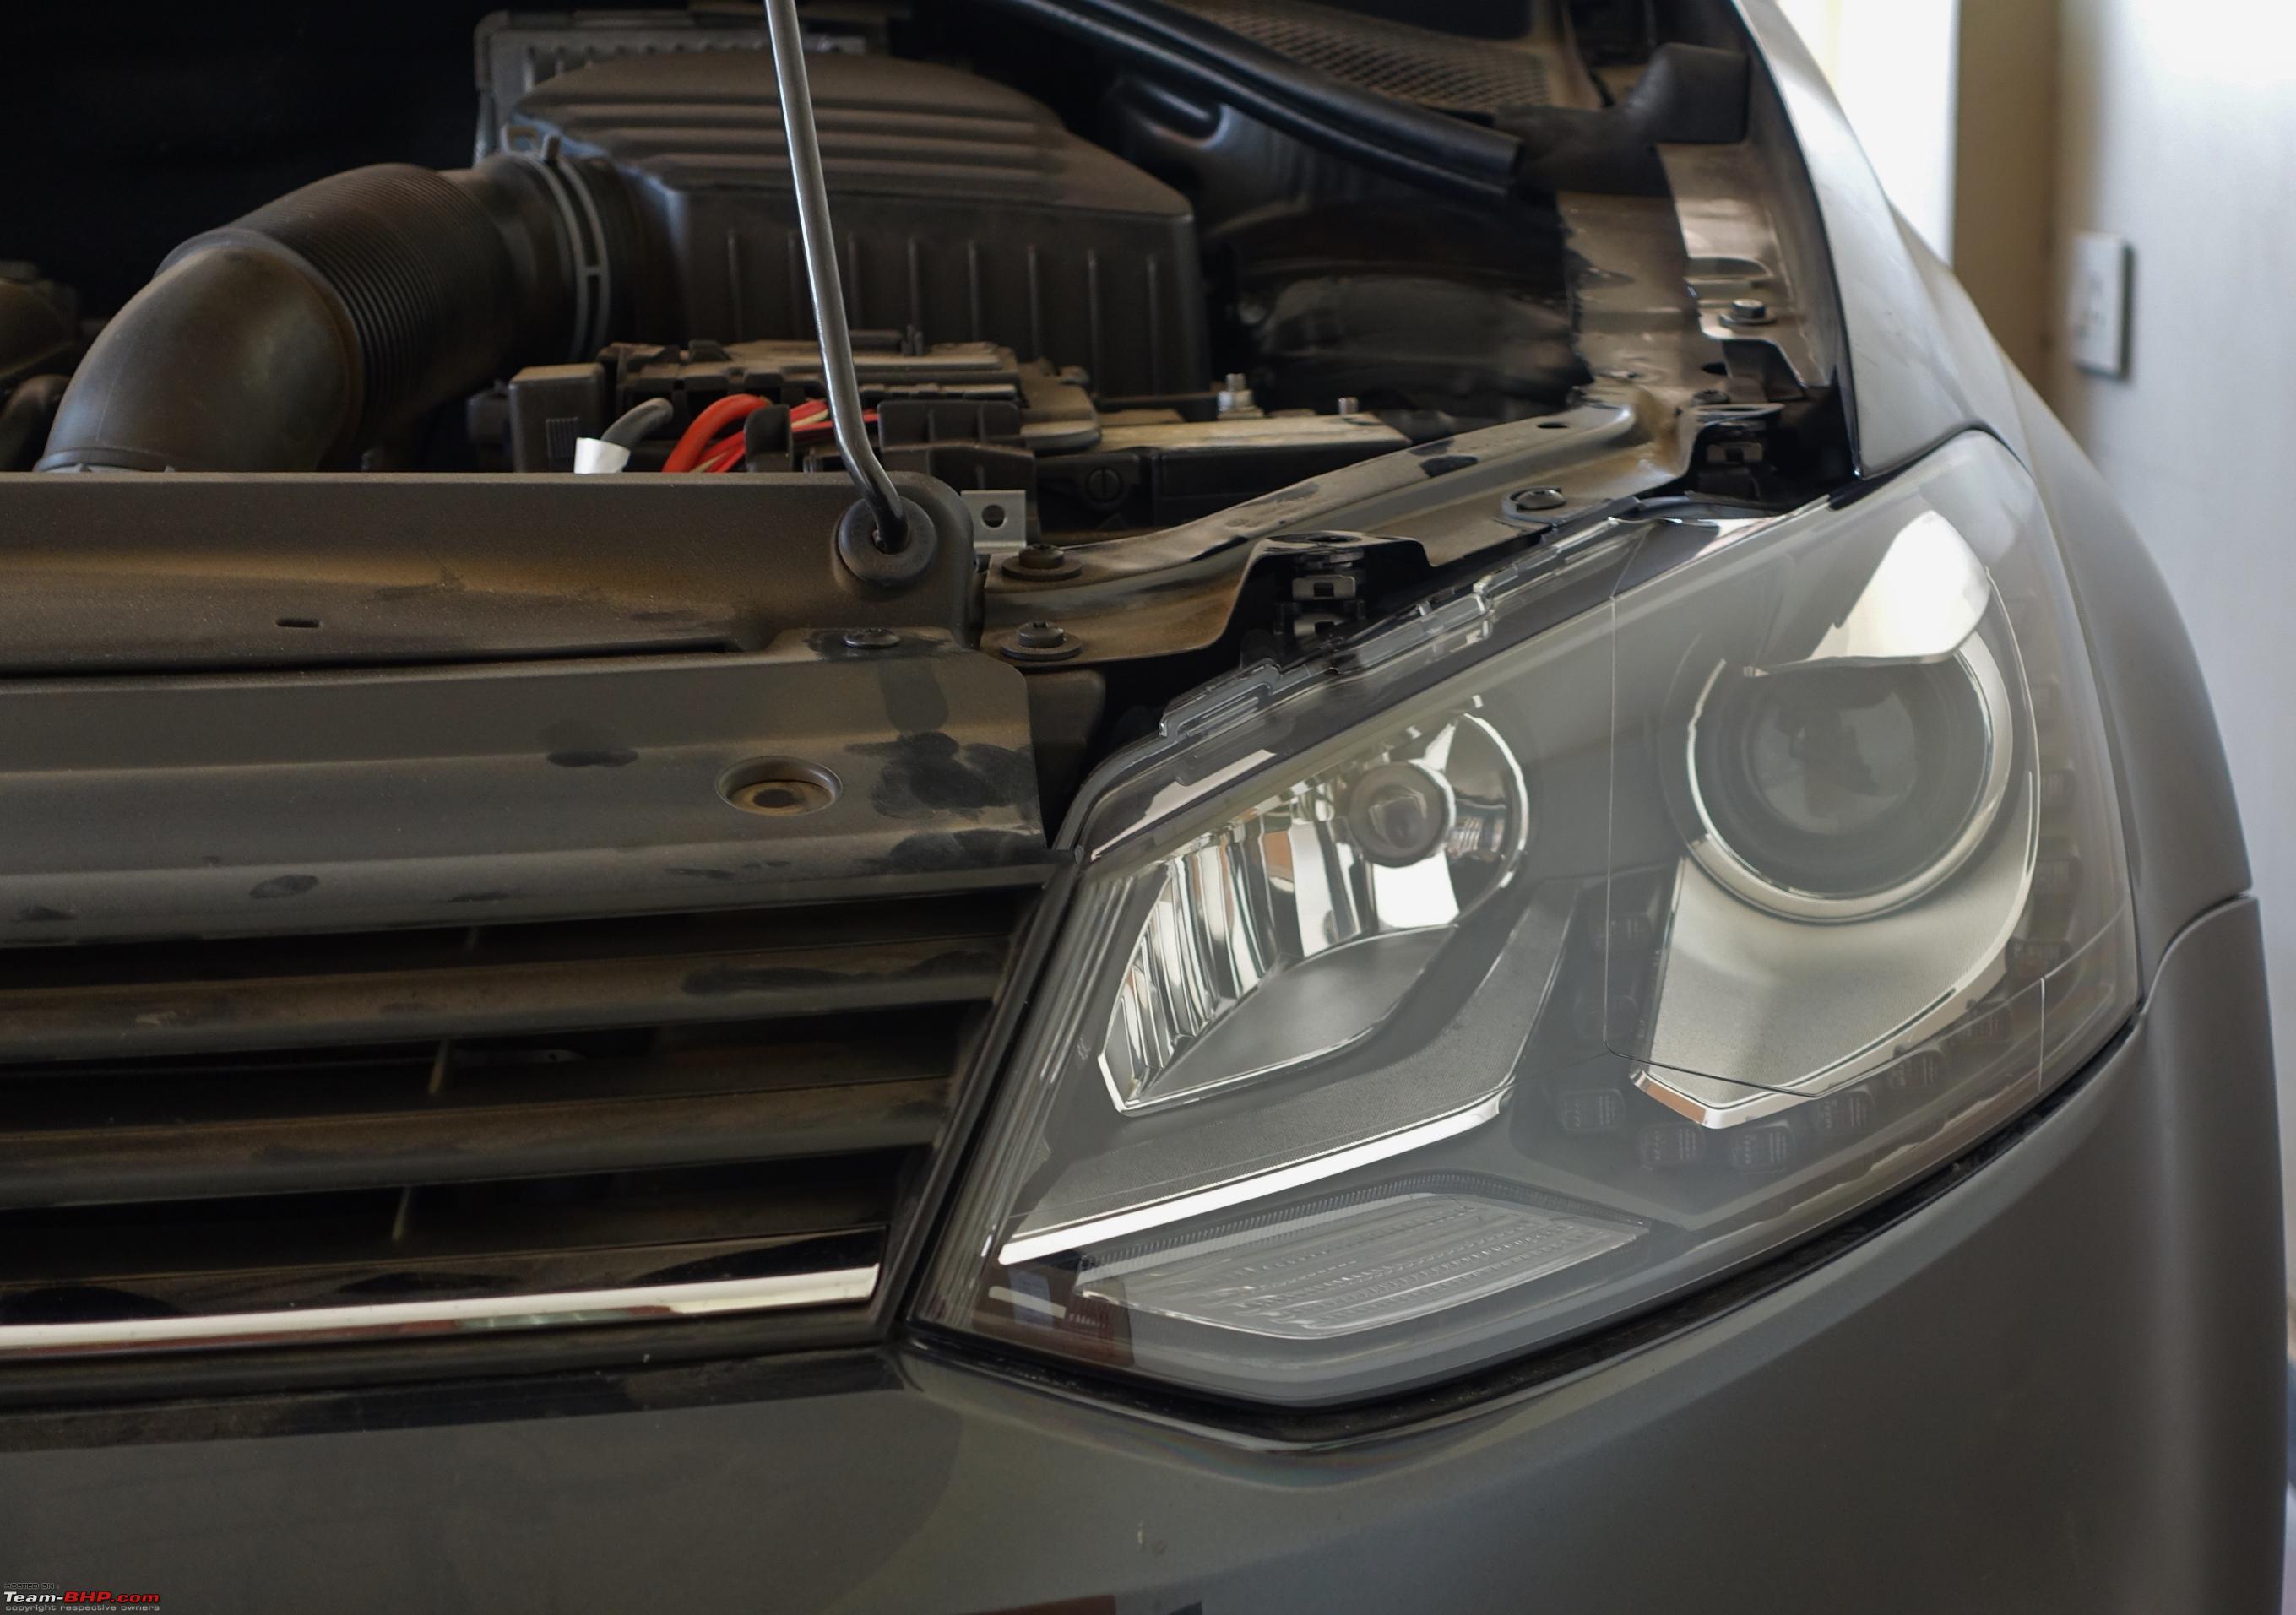 Compared to the clutter of wires in the engine bay with the previous retrofitted projectors, this installation is very clean. 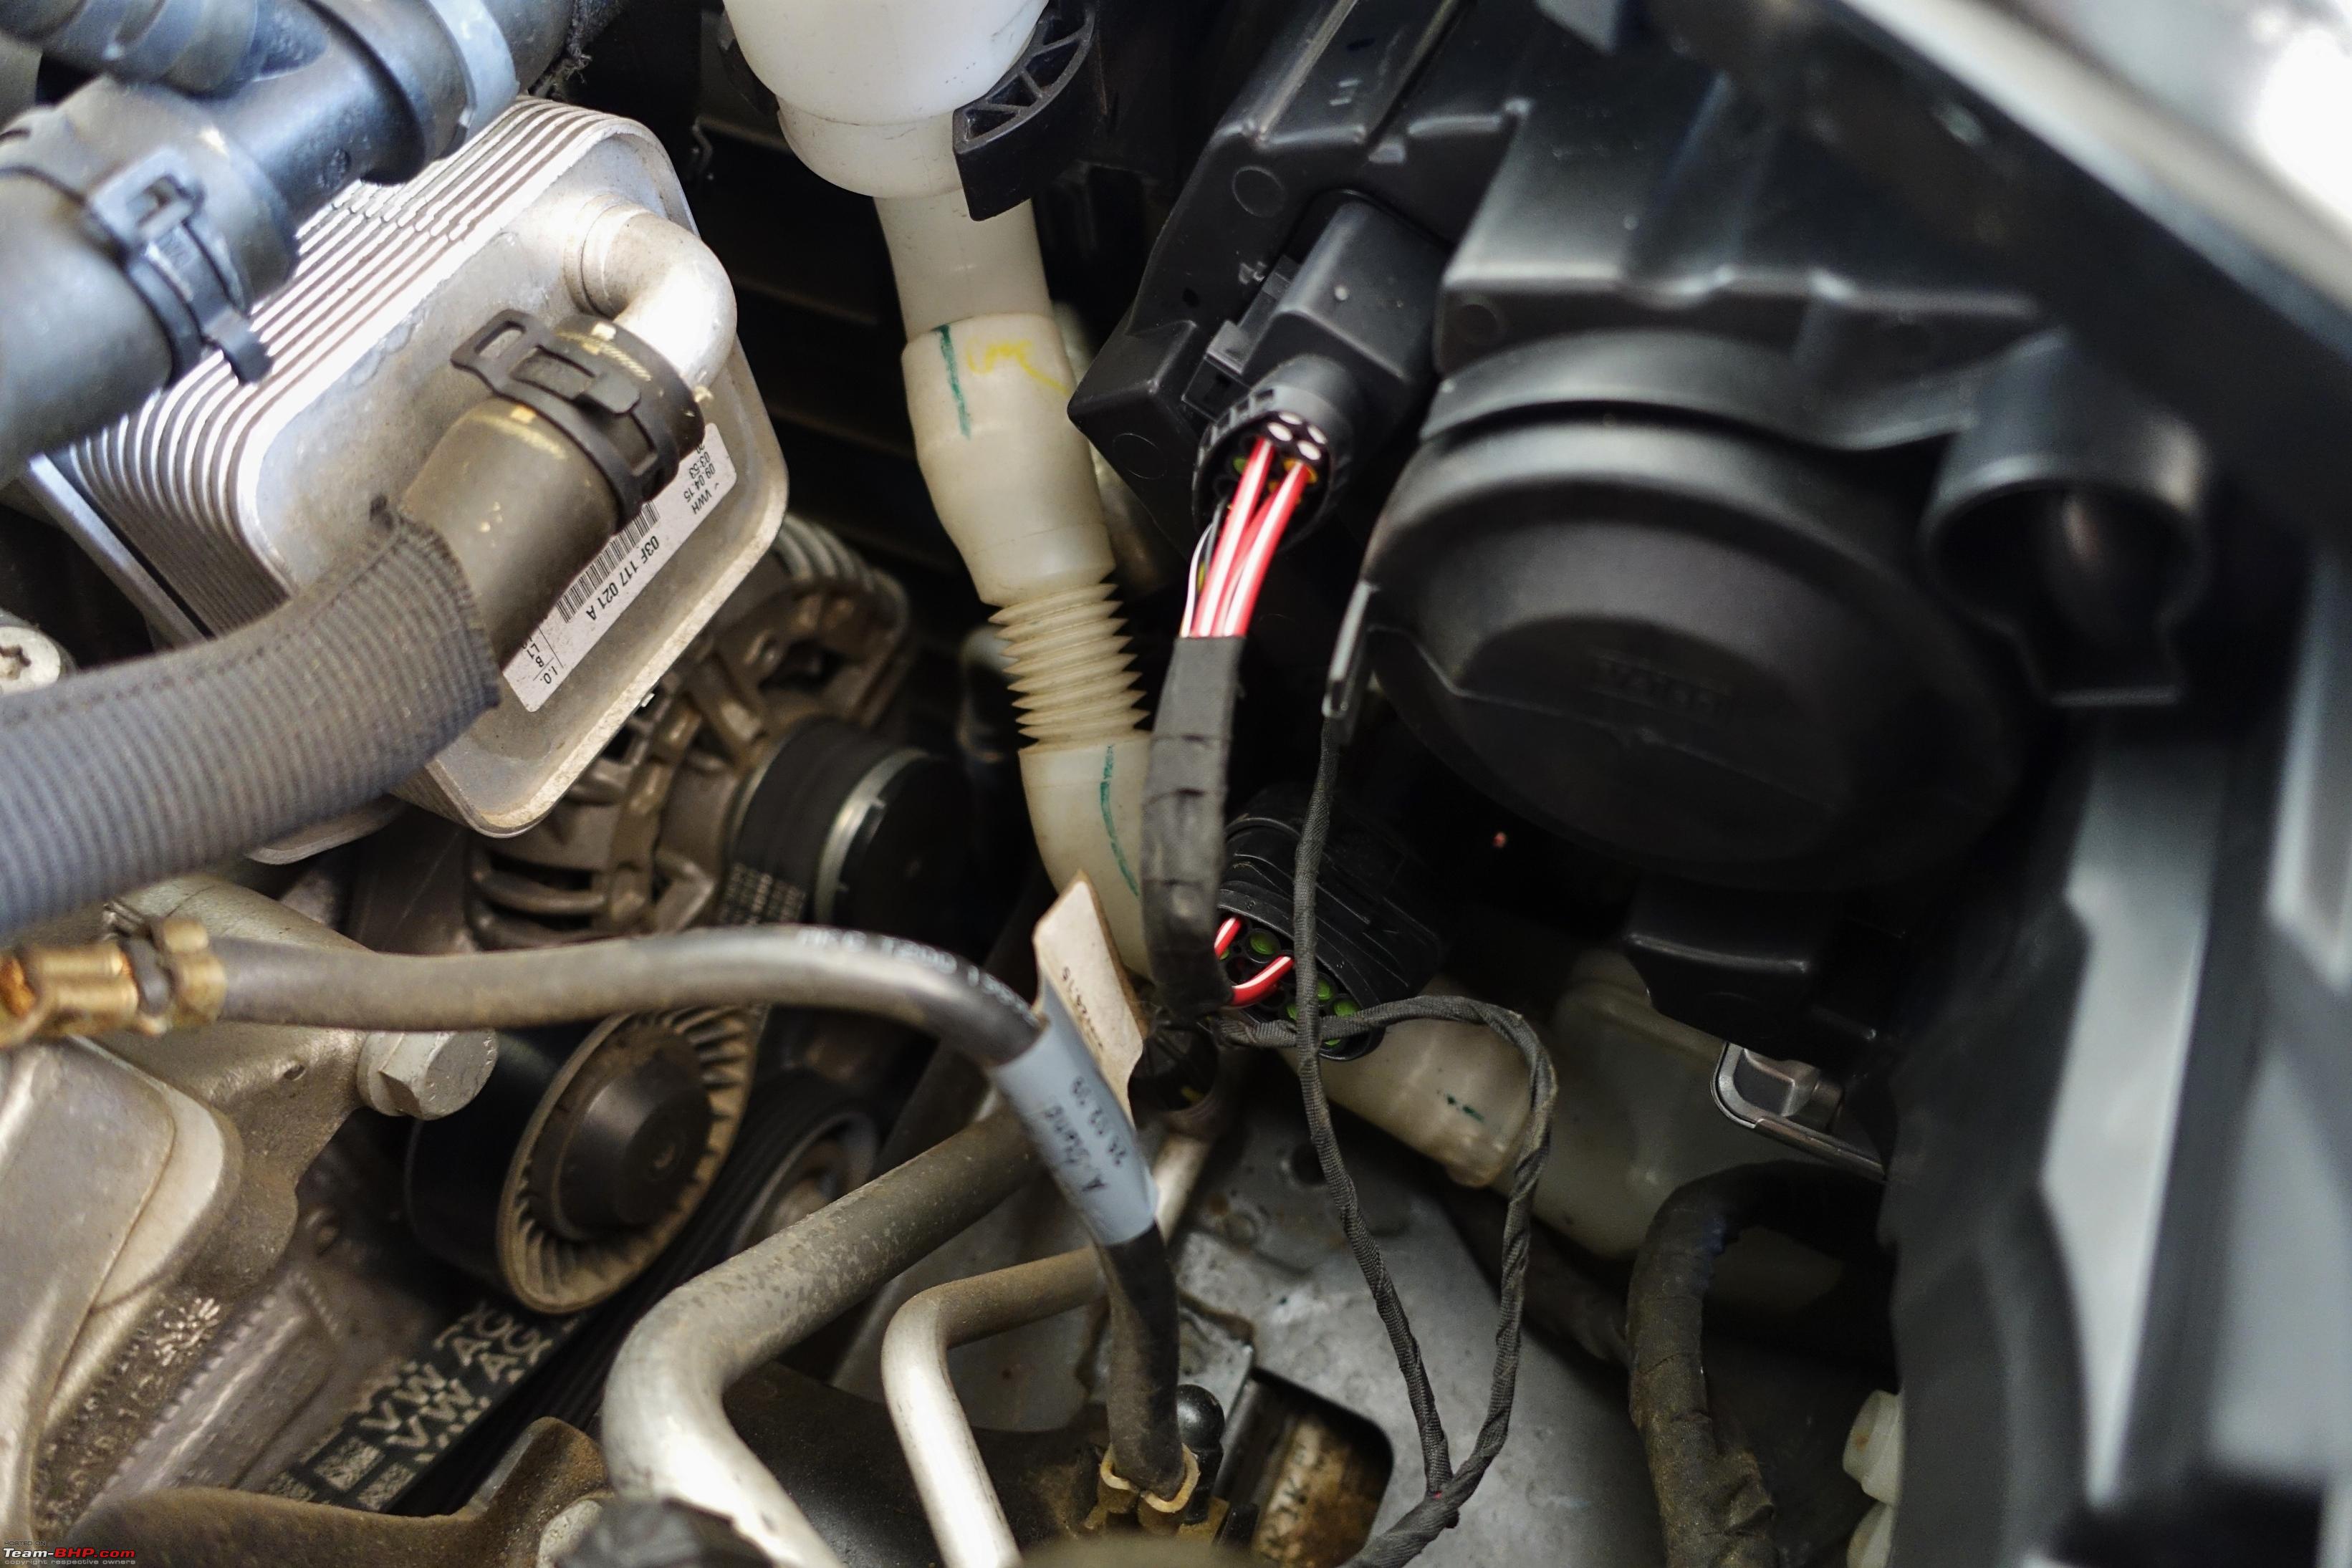 I used this keyhole shaped rubber stopper to route the DRL, parking and cornering lamp wires into the driver side footwell.  Cut a small hole in this piece using a knife. 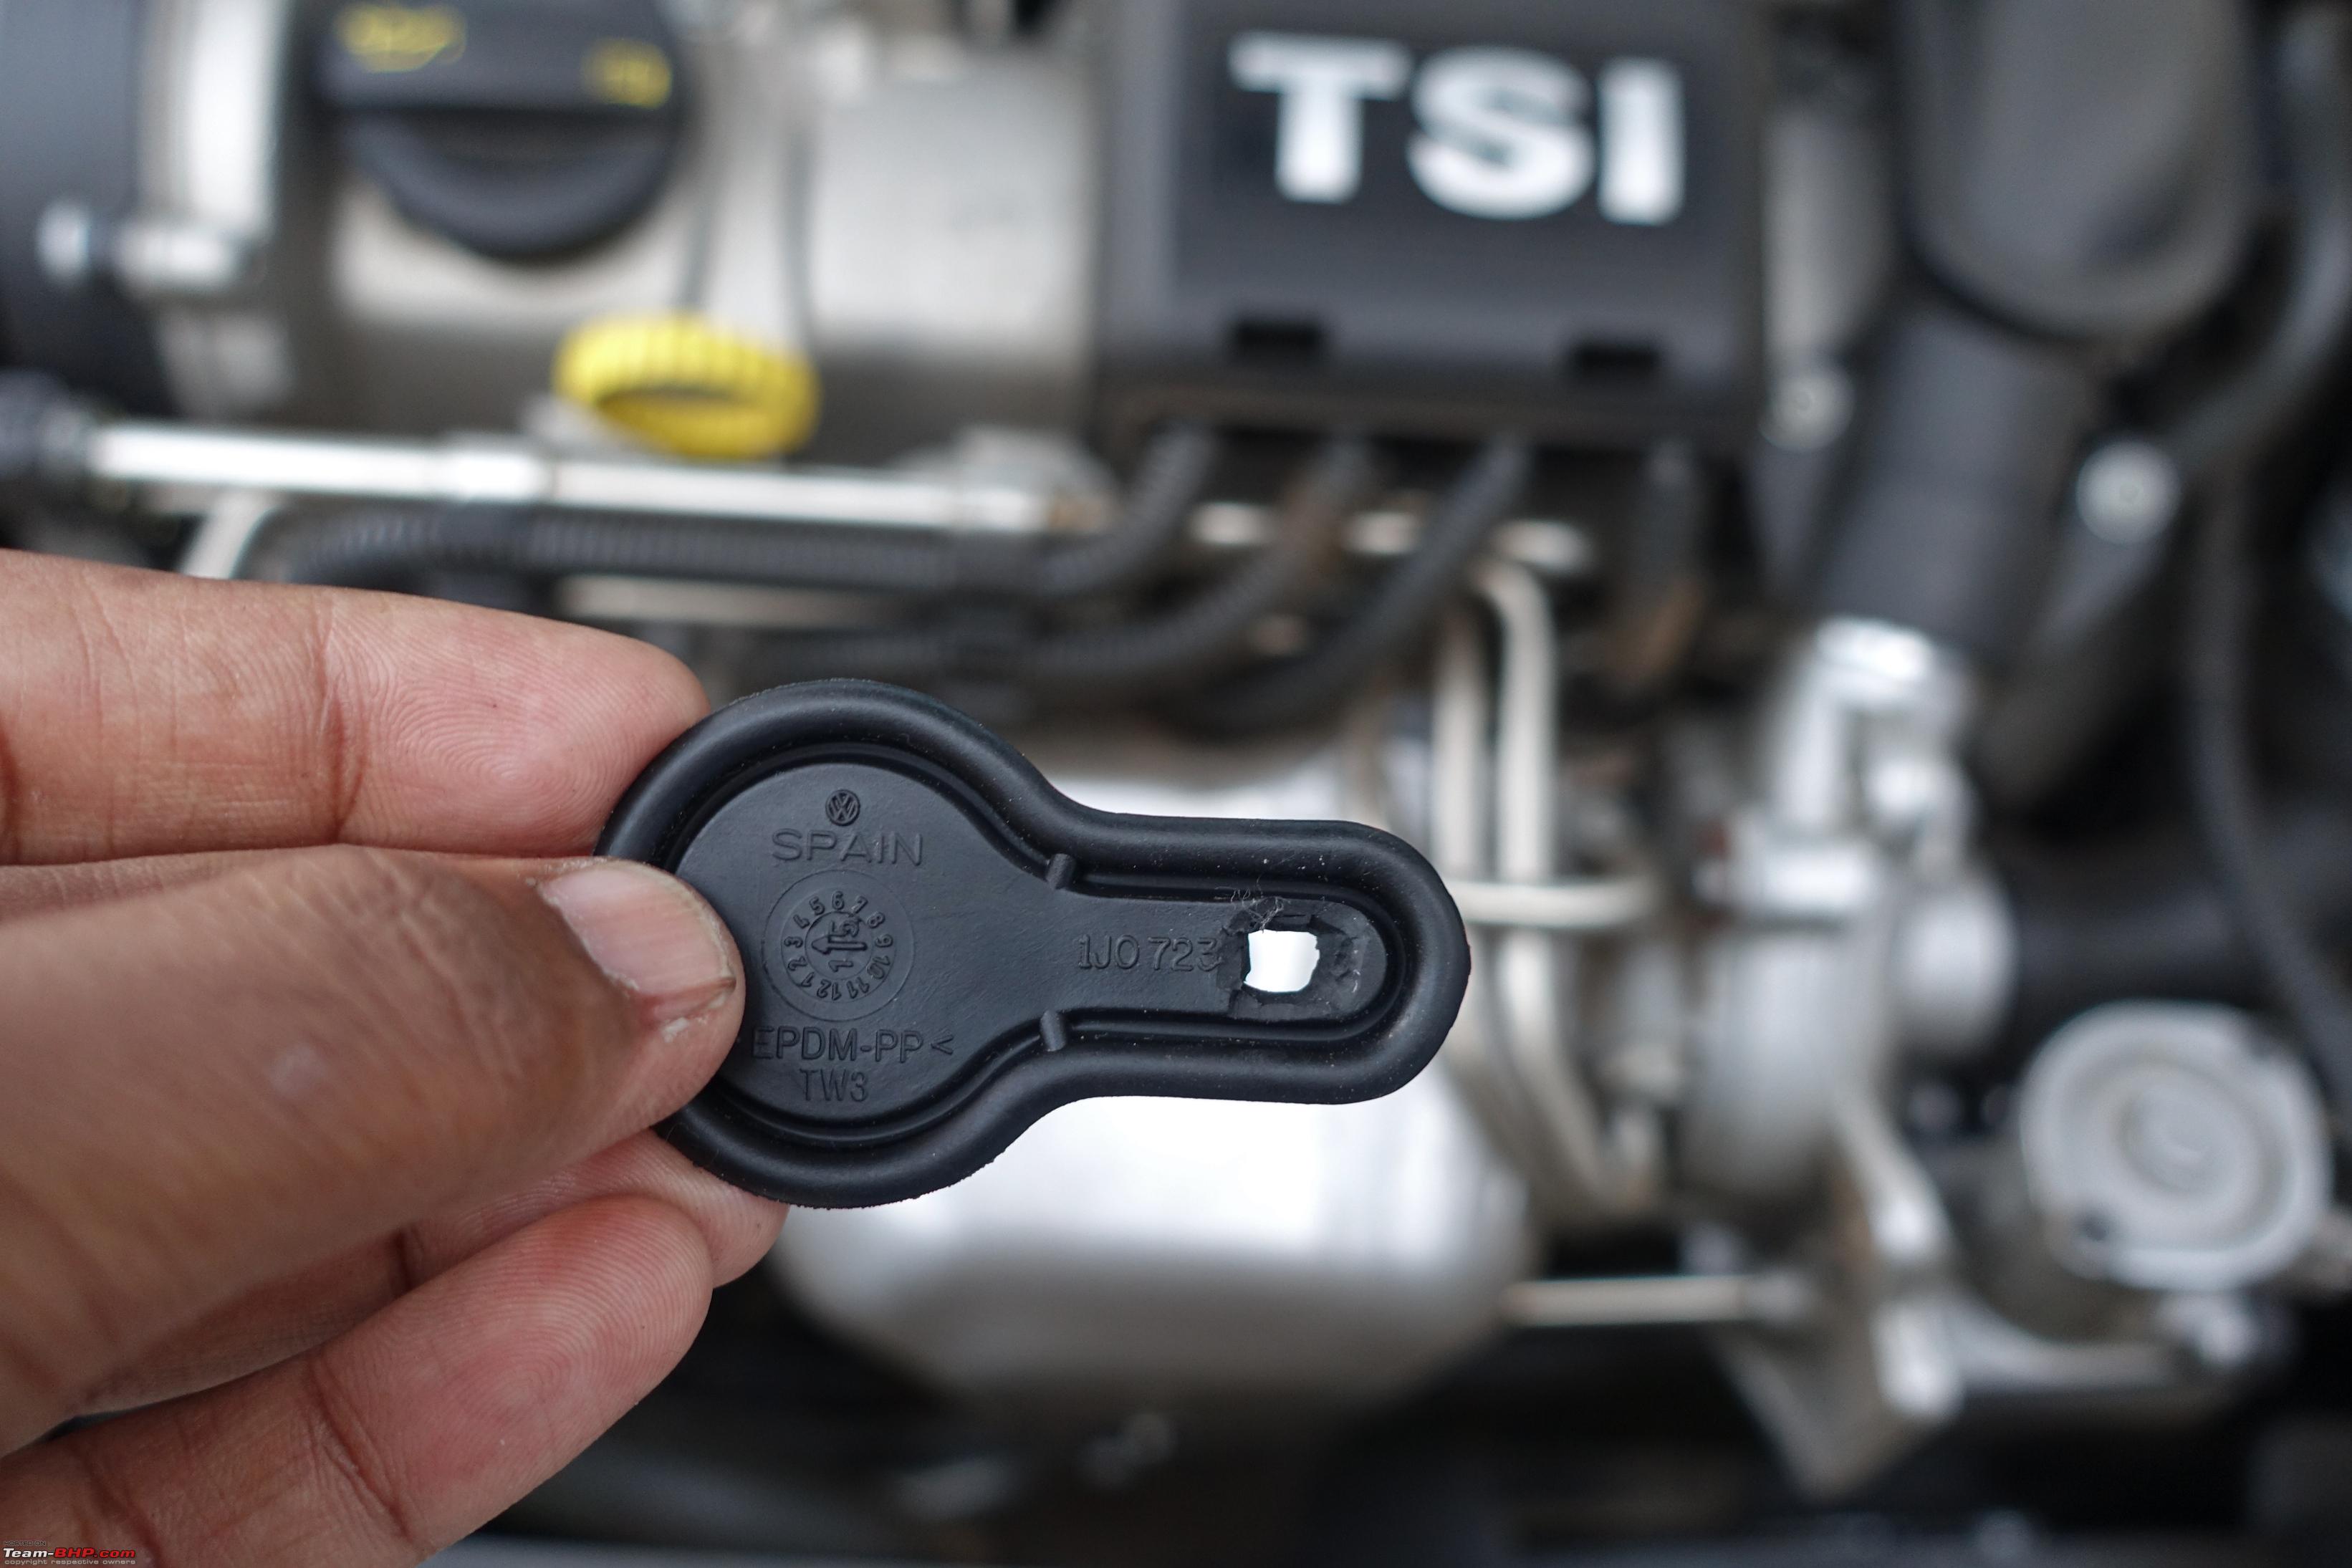 Route the wires through the plug and bunch and tie them inside the driver side foot well.  With this, I had the low beam, high beam and the turn signals working. The cornering lights and DRLs were not functional. Also, as I had explained earlier, when the headlight is off, flashing does not work. Important Notes:
Installation of RLS and IRVM This part was a total disaster, and is not yet complete as I write this thread. I did not take many pictures during this step as well as I was more into disaster management  As I had mentioned in the previous post, I had procured the rain light sensor and IRVM meant for Jetta from AliExpress. The first problem I faced was how to position the sensor and the mirror. In the OE installation, the sensor is integrated into the mirror base like the picture below which shows the sensor integrated into the mirror base of my Jetta. 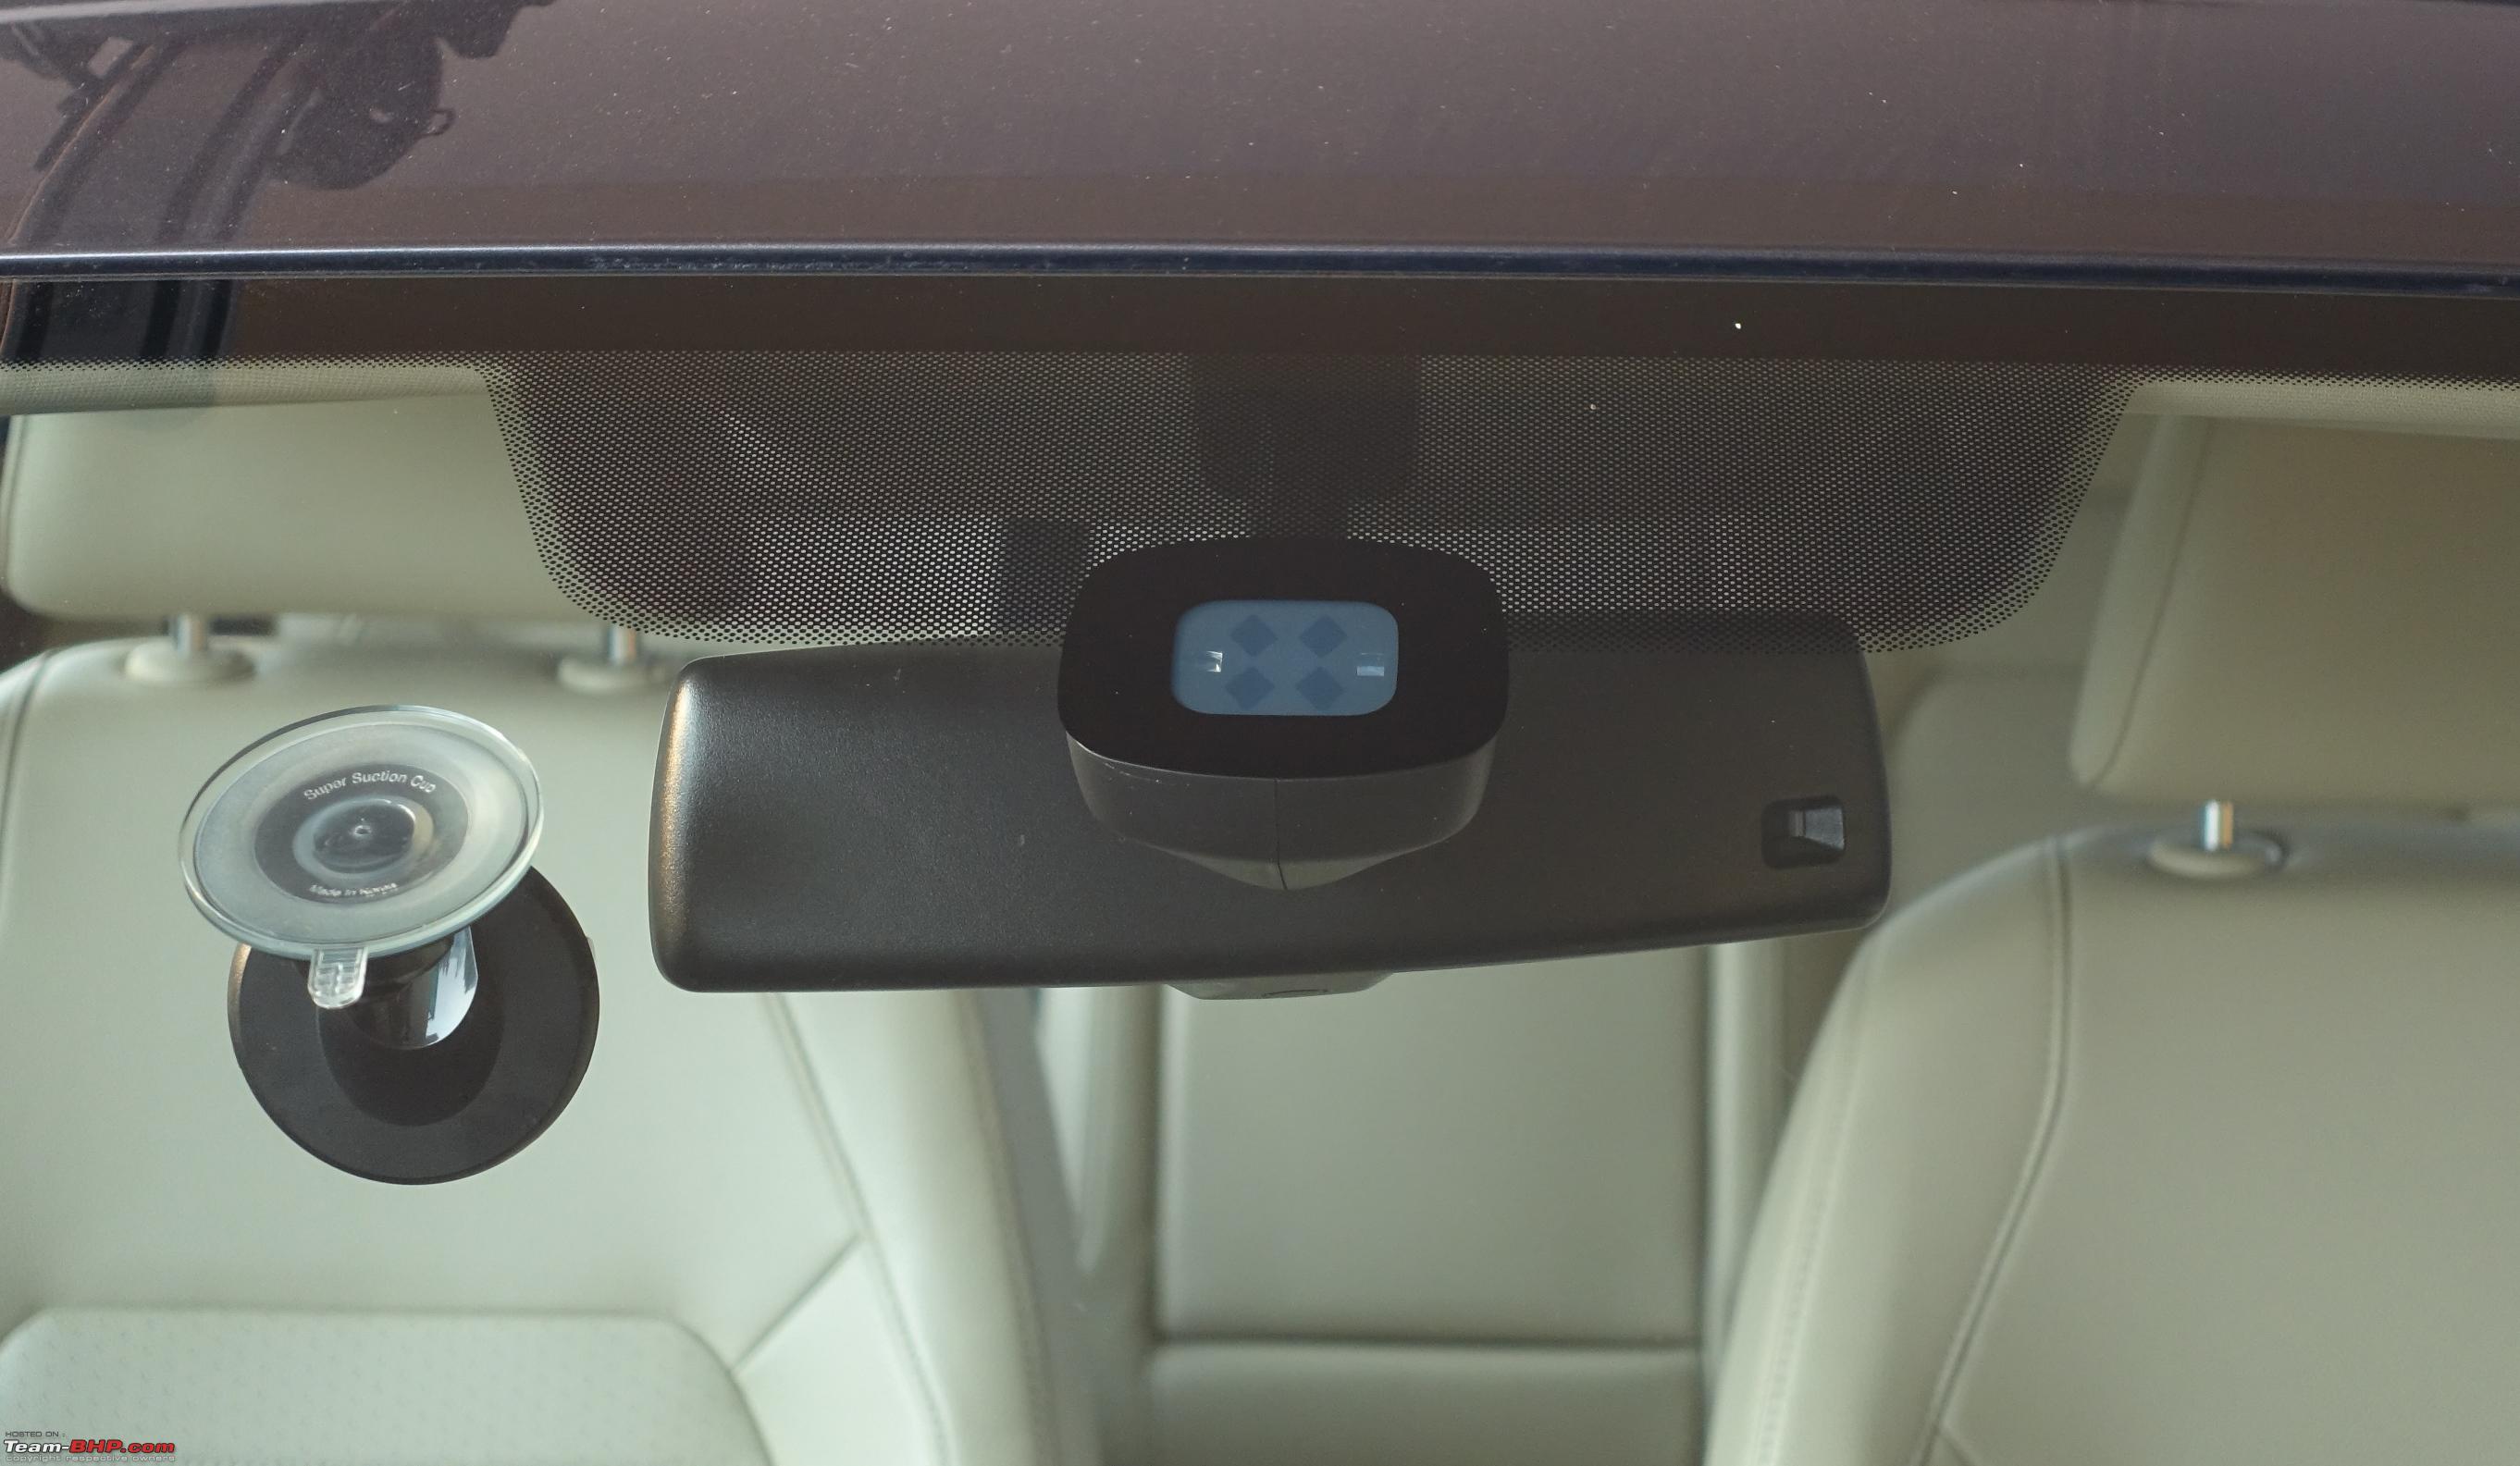 This requires the windshield to be designed for the particular base and sensor. As you can see in the above picture, the black hatch pattern printed on the windshield has an opening for the rain light sensor. And the area where the base attaches with the windshield is painted with black primer. In case of the Polo, the black hatch pattern does not have an opening for the sensor. 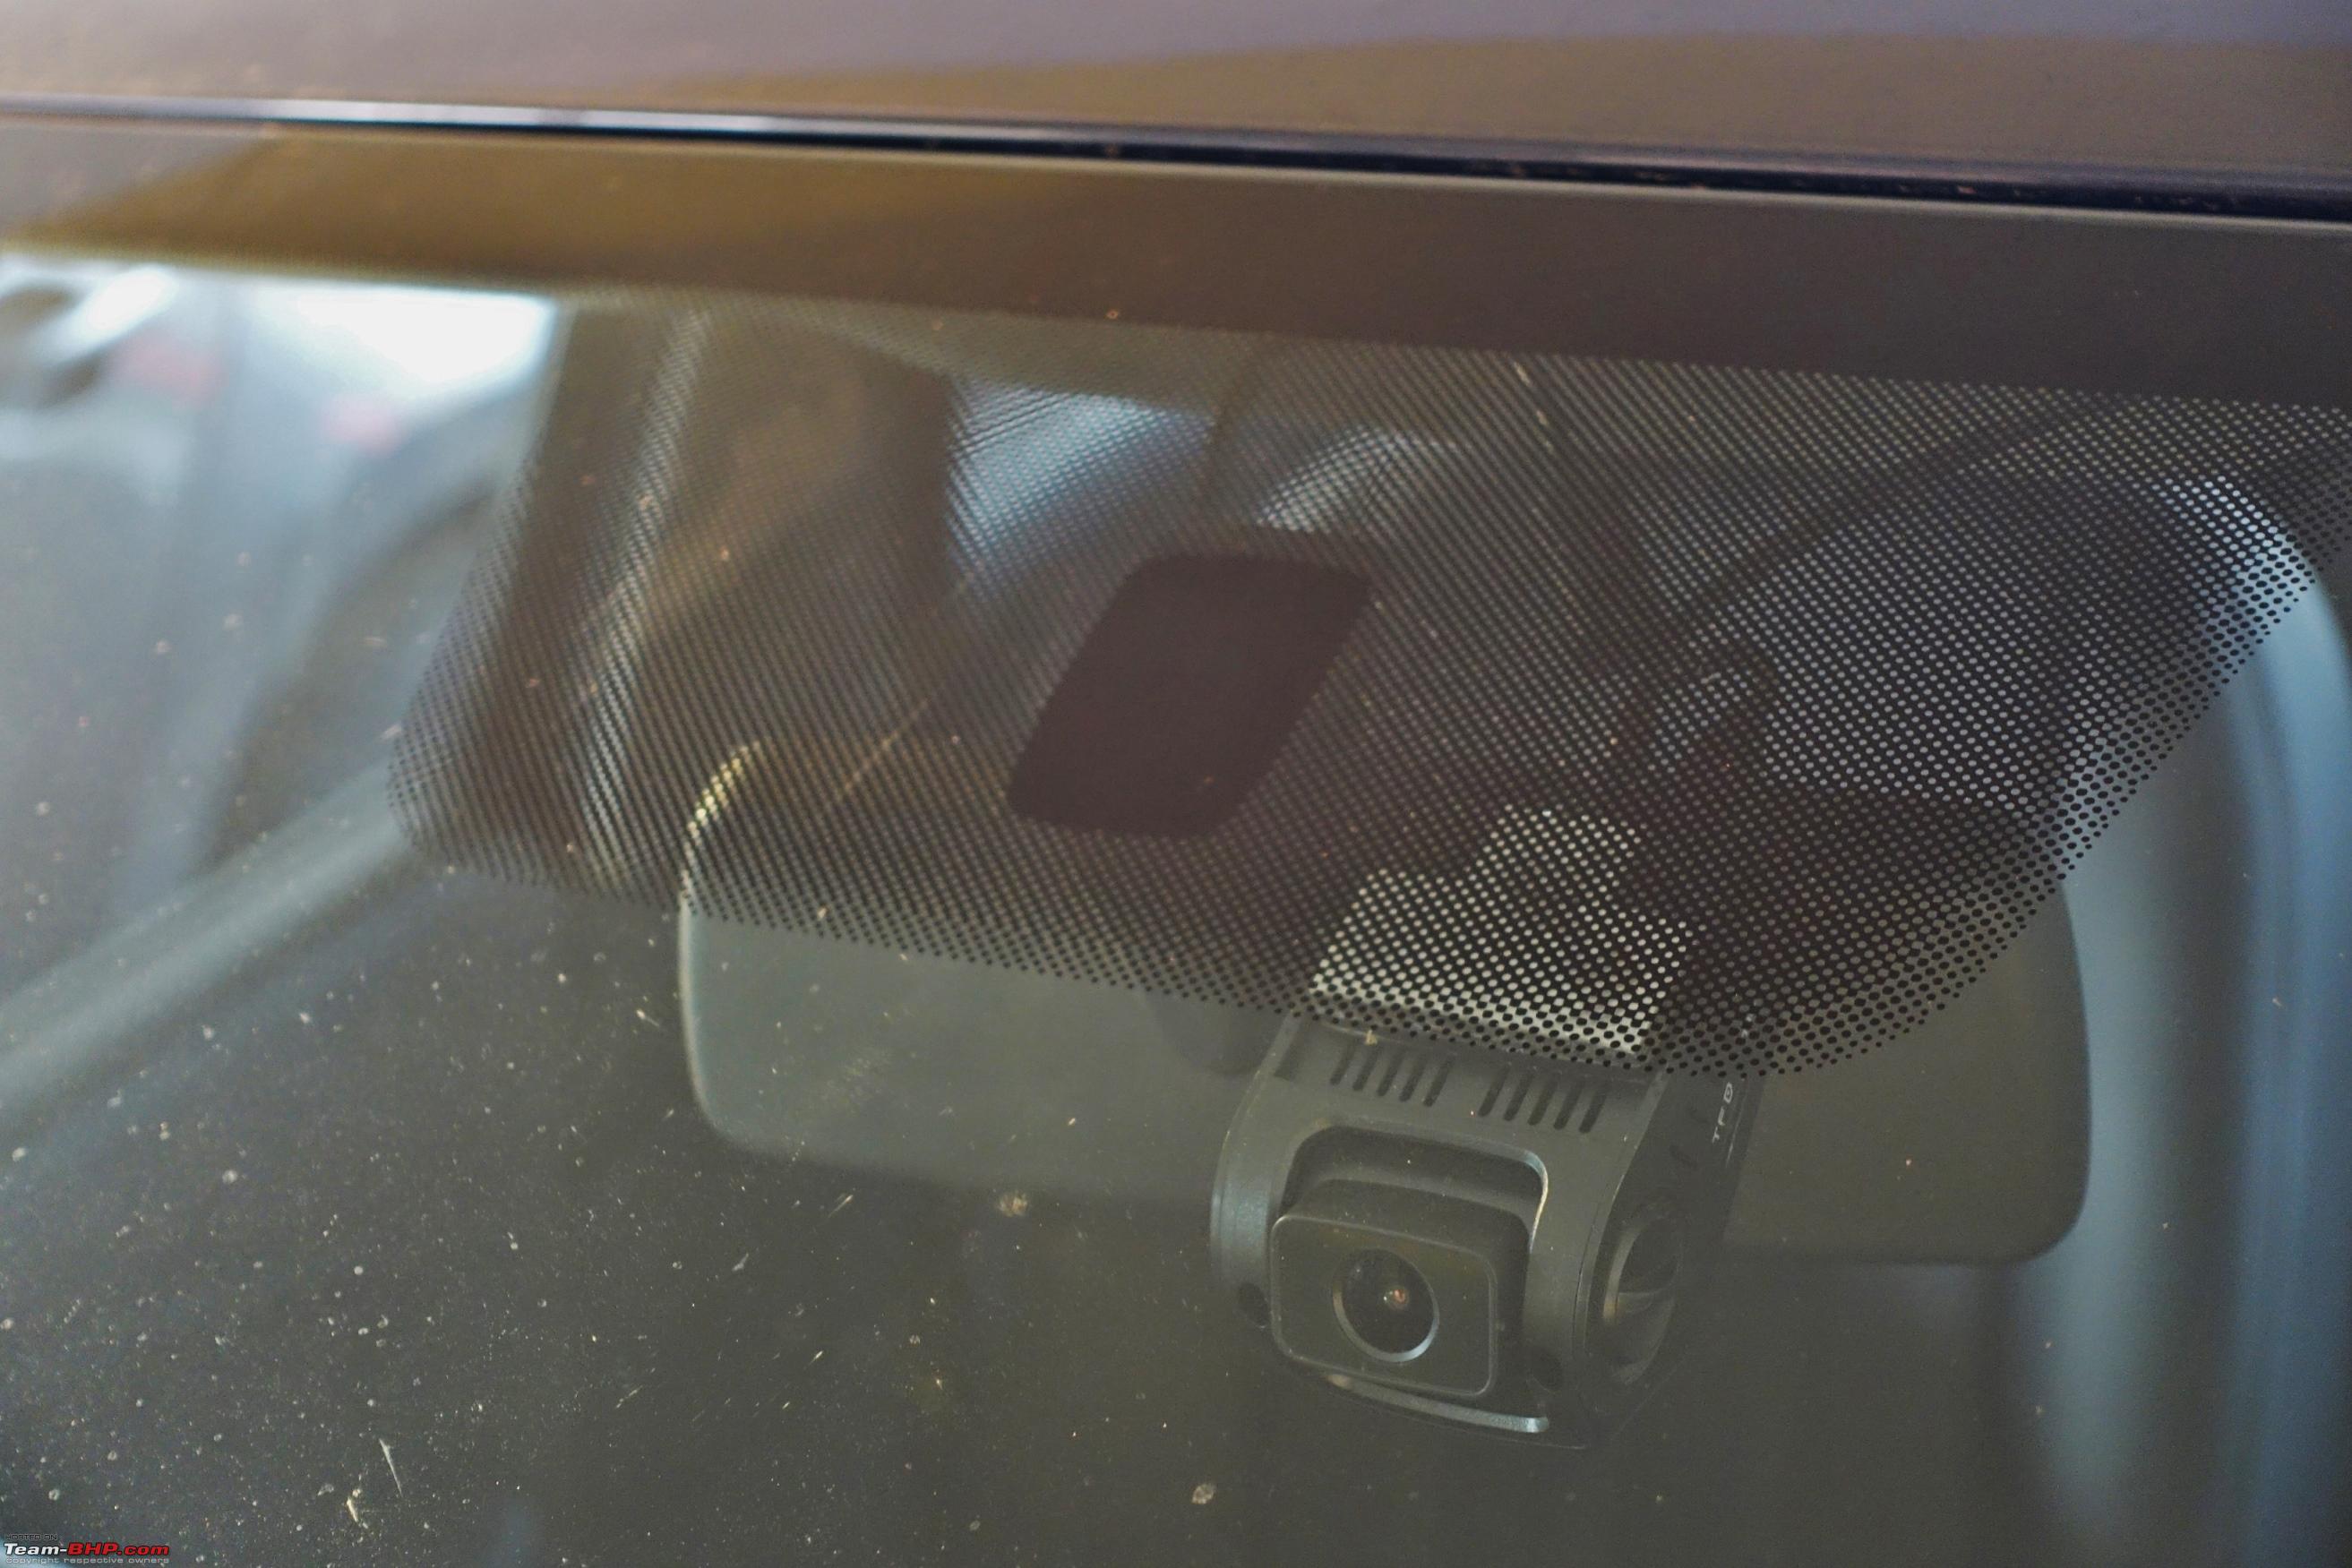 So, I will have to mount the base well below the pattern. But this will make the IRVM too low and will block visibility. The other solution is to fix the new mirror base around the existing mirror base and fix the sensor separately. I chose to fix the sensor on the passenger side. As there were two bases in the set I got from AliExpress, I fixed one base around the existing mirror base and another base on the passenger side. However, I made some mistake in the application of the glue that when I tried to mount the new IRVM, the new base came off the windshield. I then fixed the OE manual dimming mirror to the existing base. And this is how the windshield looked - a total disaster! 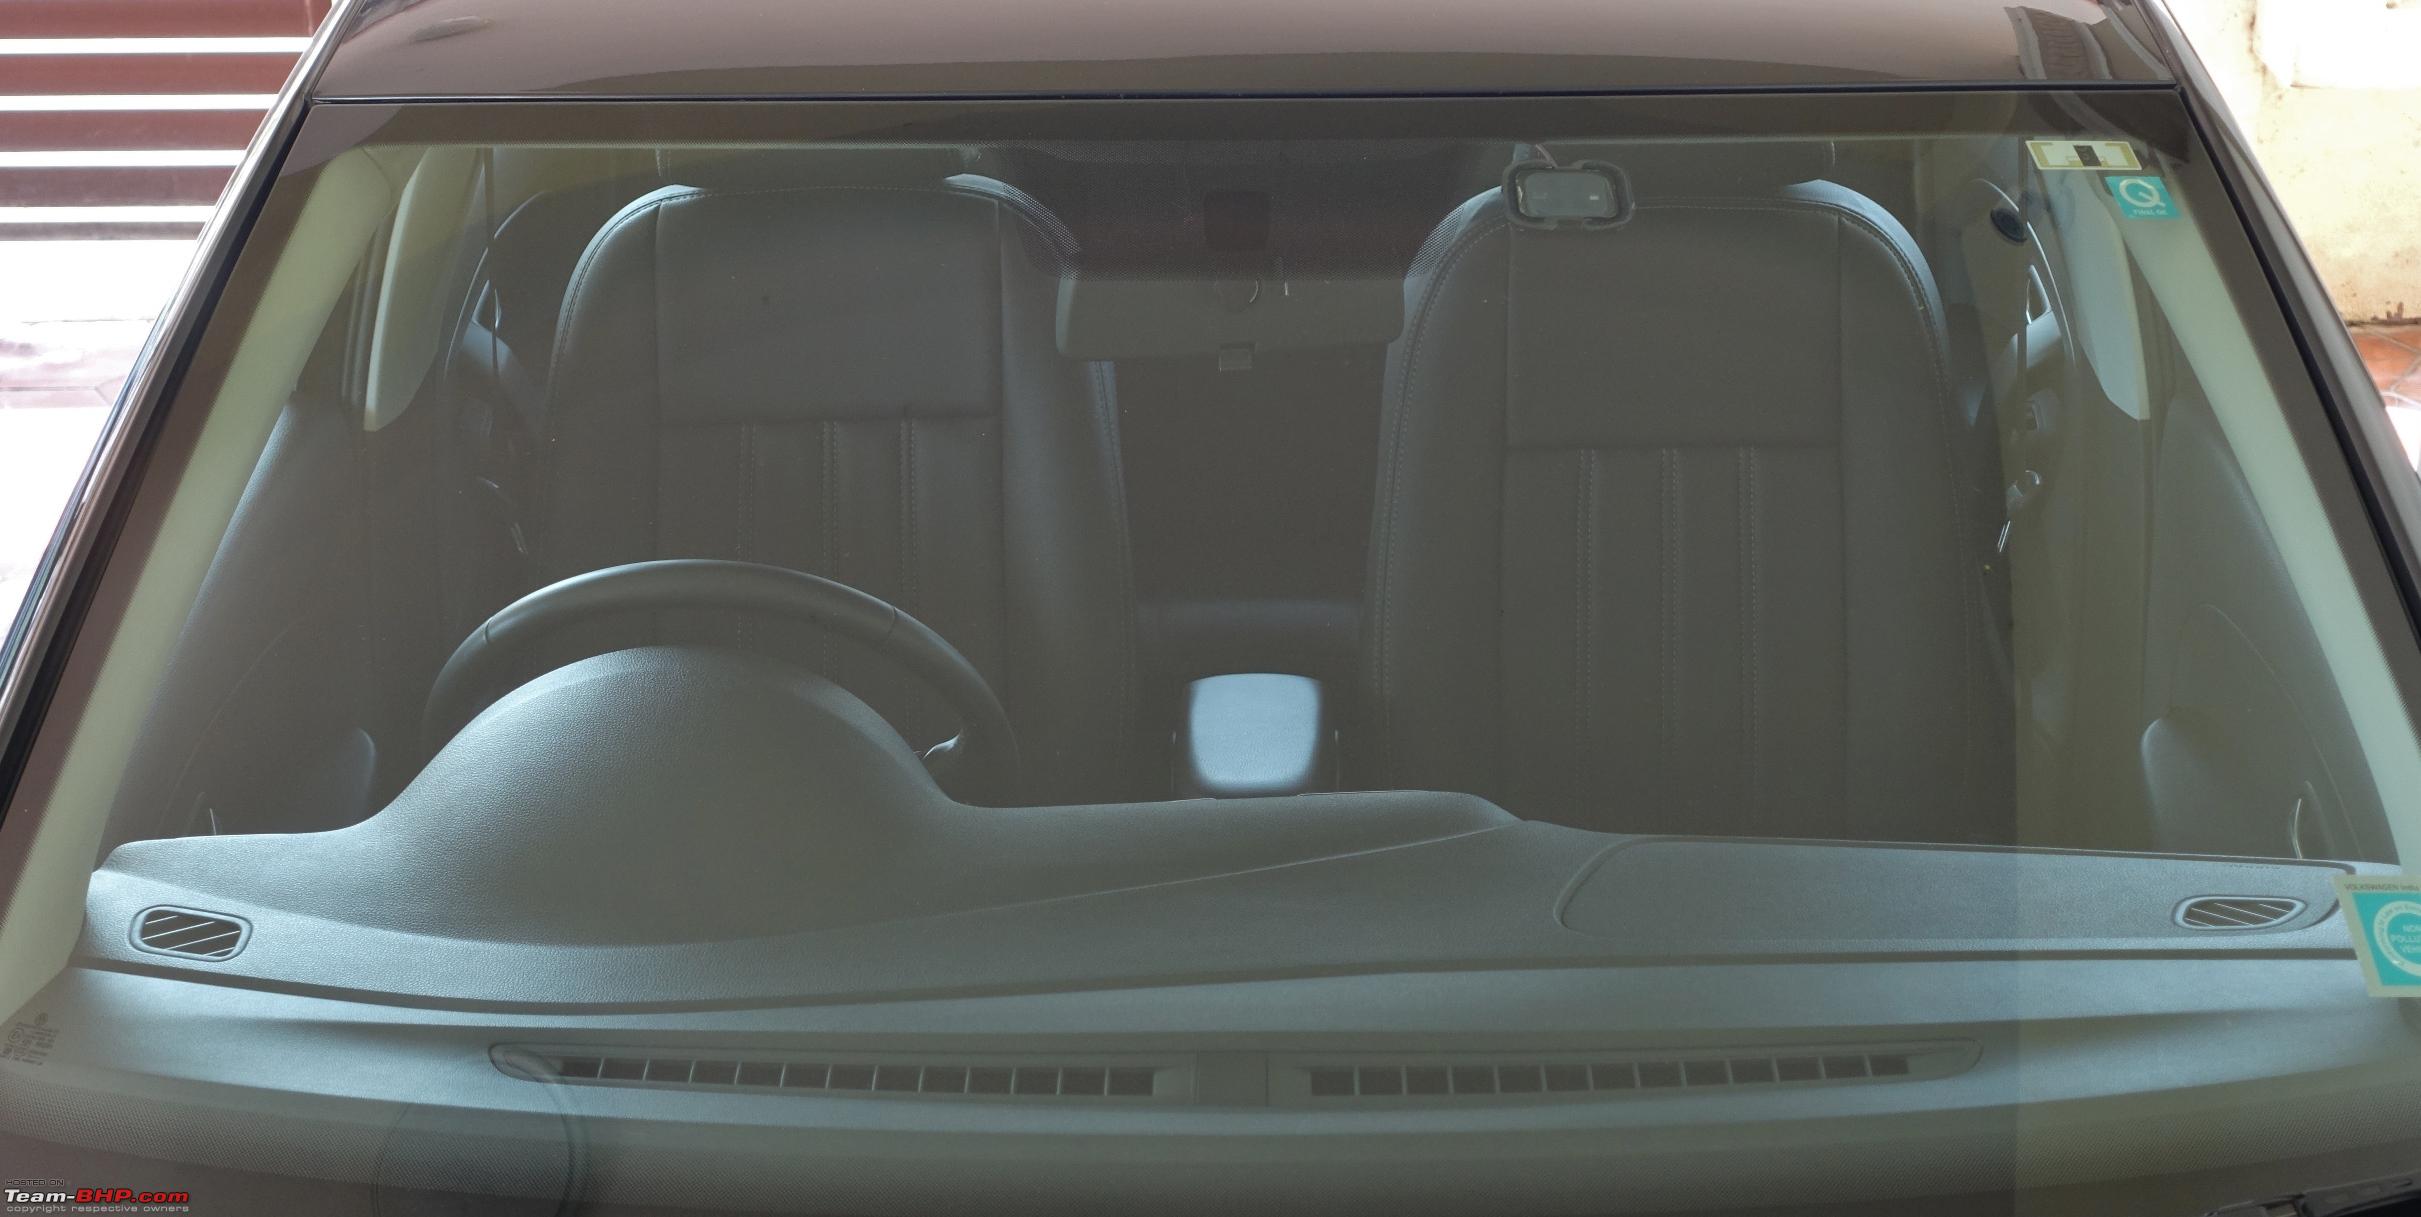 The passenger side location of the rain light sensor is also not correct. The sensor should be located completely inside the area of the wipers. In my case, half of the sensor was outside the wiper’s range. I am now getting the rain light sensor and IRVM that comes in the latest Polo. I plan to change the windshield as well with the latest one so that the rain sensor is integrated into the mirror base. I will update the thread once I complete this. Here is the list of components that I plan to get. 3G0 857 511E SMA - mirror 6C0 868 438 9B9 – mirror cover upper 6C0 858 548A 9B9 – mirror cover bottom 6C0 868 168A 9B9 – mirror cover 5K7 955 559C - rain-light sensor 8K0 971 833 connector 000 979 034 E repair wires 2 pieces The complete set is also available in AliExpress in the following link. AliExpress Link to RLS/IRVM for Polo A funny story: It took me a couple of weeks to source BondTite which Gannu had recommended in his IRVM DIY thread. I could not get BondTite locally in Coimbatore. The order I placed in Amazon got canceled as the vendor did not ship in time. I placed another order with another vendor, but that too did not ship for a few days. Meanwhile, friend, colleague and fellow TBHPian srinivasnvns also searched in Bangalore and was trying to get me a couple of packs. I was also in contact with Gannu discussing the problems of the IRVM install and he was kind to have his friend from Gujarat ship a couple of packs to him. Then all of a sudden from nowhere, the package from Amazon arrived. There were 24 packets of BondTite. And srinivasnvns was successful in getting two packs, and Gannu had two packs. From no BondTite, I was now in a position to open a shop. My local TBHP gang even named me “Gum Vyapari graaja” (gum merchant graaja)  Last edited by graaja : 21st March 2017 at 00:17. |
|
| (33)
Thanks
|
| The following 33 BHPians Thank graaja for this useful post: | Arun.K, Asta_la_vista, audioholic, Avikbrio, batterylow, BLACKBLADE, blackwasp, BODHI25, CarguyNish, carrazy, deetjohn, Divya Sharan, Dr.Naren, ecenandu, fluidicjoy, Gannu_1, GaryTSI, GTO, h14, InControl, Jaggu, kat, lemedico, Mr.Boss, PraNeel, pritanshchandra, R2D2, rshanker, suhaas307, theexperthand, vaasu, vishy76, VivekCherian |
|
20th March 2017, 20:33
| #4 |
| Team-BHP Support Join Date: Nov 2013 Location: Coimbatore
Posts: 3,711
Thanked: 25,620 Times
| Wiring Concept Explained The last and most important part (and the toughest part as well) of the DIY is the BCM upgrade and changing the wiring harness. I will try to provide as much information as possible. But as there are so many things to explain, I may fall short on some points or pictures. Wiring Changes Let’s now get into the wiring details. I do not have access to detailed schematic diagrams. I just followed the instructions given by ciclo to the ‘t’. So, I will just provide high level details from what I understood (I may be wrong on some assumptions) In the Indian Polo, the headlight switch directly controls the low beam, high beam and parking signals. In addition, the high beam is also controlled by the indicator stalk for flashing. With this new installation, the BCM will take input from the Auto light switch and the rain light sensor and control all the signals in the headlights – low beam, high beam, DRLs, and the cornering lamps. This is achieved by a combination of various wiring harnesses. Let's take a look at connection details of each wiring harness Below picture shows the 10 pin to 14 pin connector details. 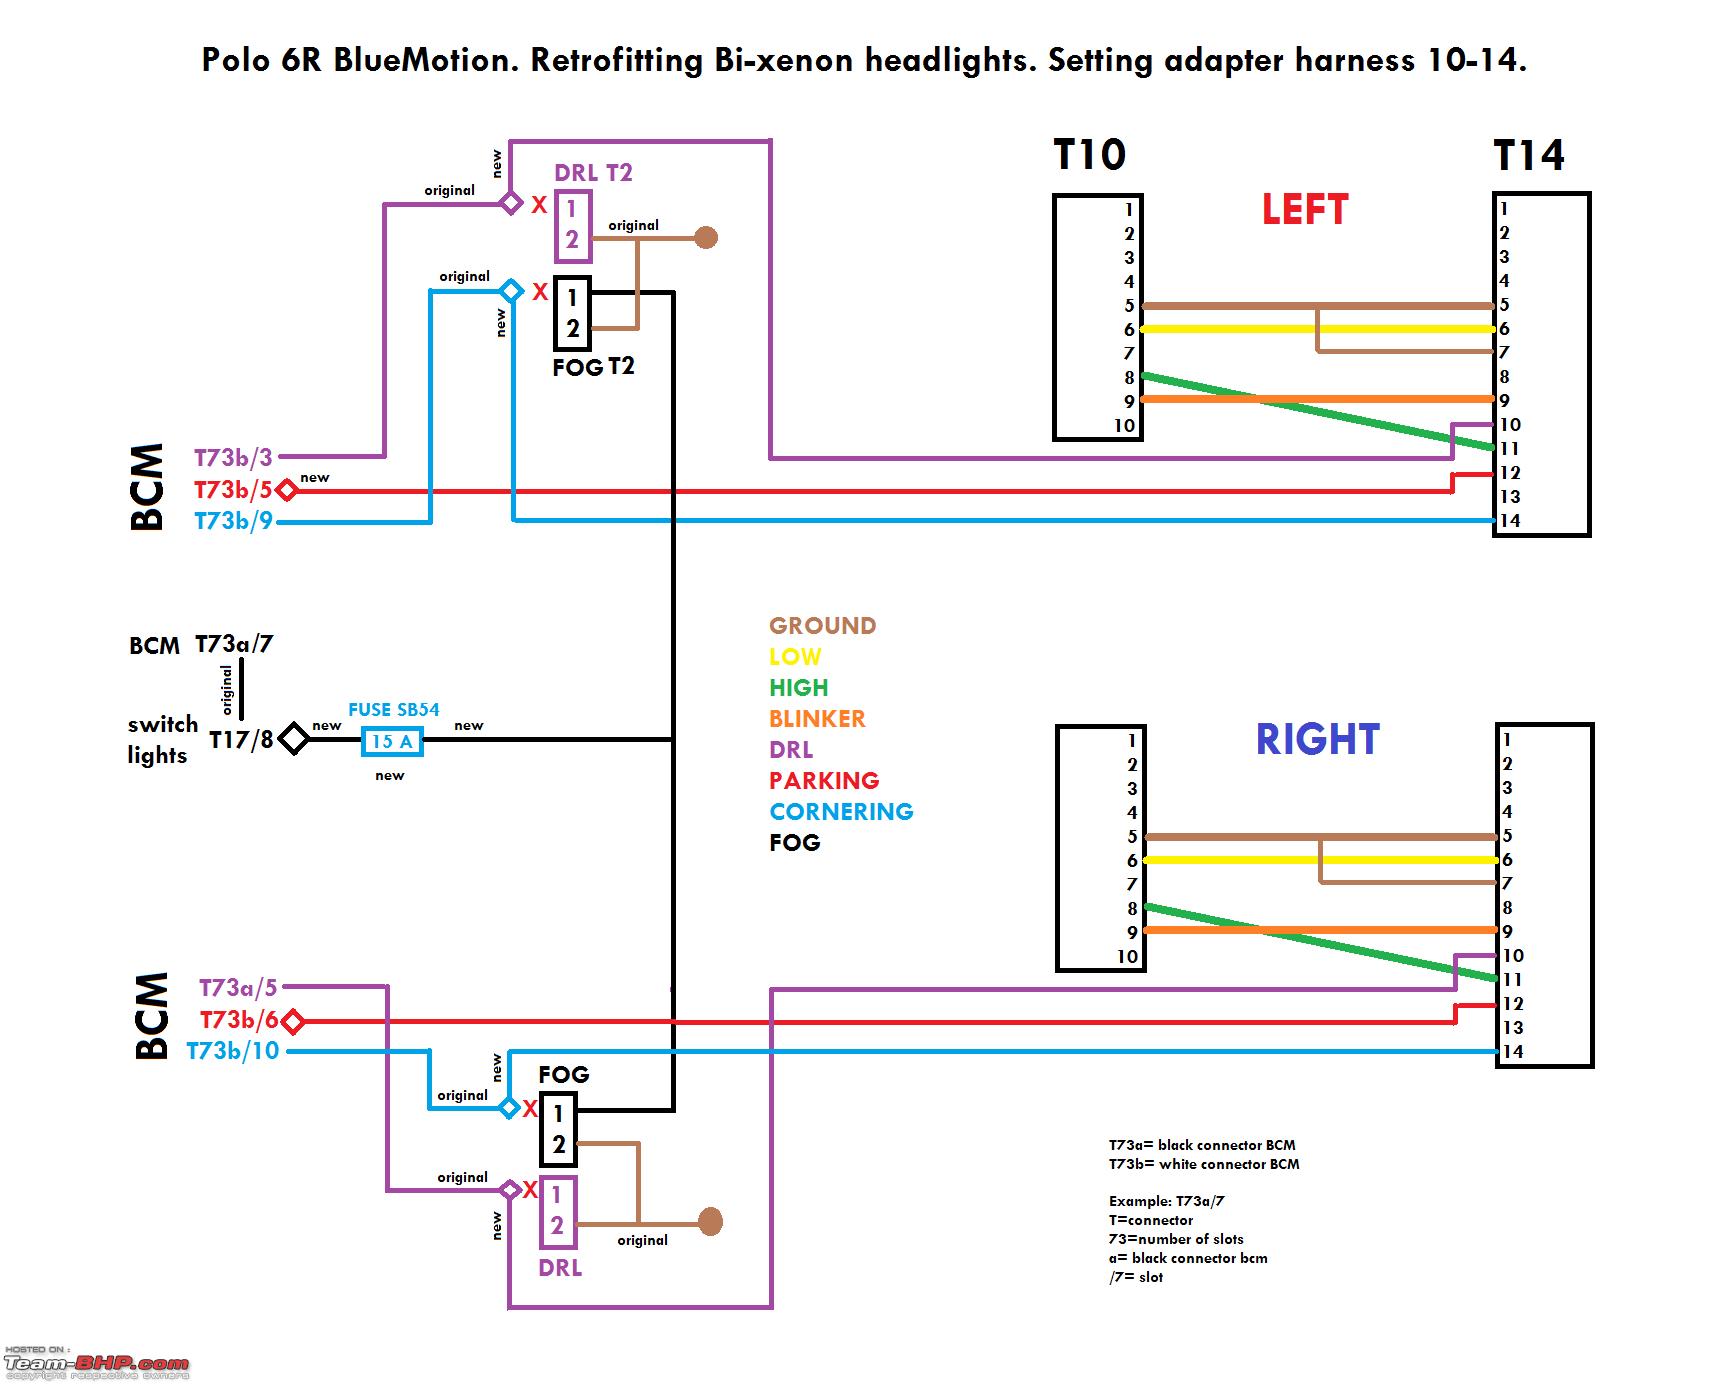 The low beam, high beam and the turn signals are taken from the existing 10 pin connector. The DRL, parking and cornering lamp signals are directly connected to the BCM. Earlier the fog lights used to be driven by the BCM. This has to be isolated and the fogs now are driven by the headlight switch through a fuse. The picture shows Pin #8 as fog light connection. This is in the headlight switch connector that comes with the car. In the new wiring, this has to connect to Pin#3 of the red connector. Following are the pictures from ciclo’s detailed instruction document. There were 4 assemblies in his wire set. Below picture shows the CAN signals that need to be connected from the BCM to the instrument cluster connector.  Below picture shows the connections from BCM to fuse box. One of the relays had to be removed and shorted with a bridge. 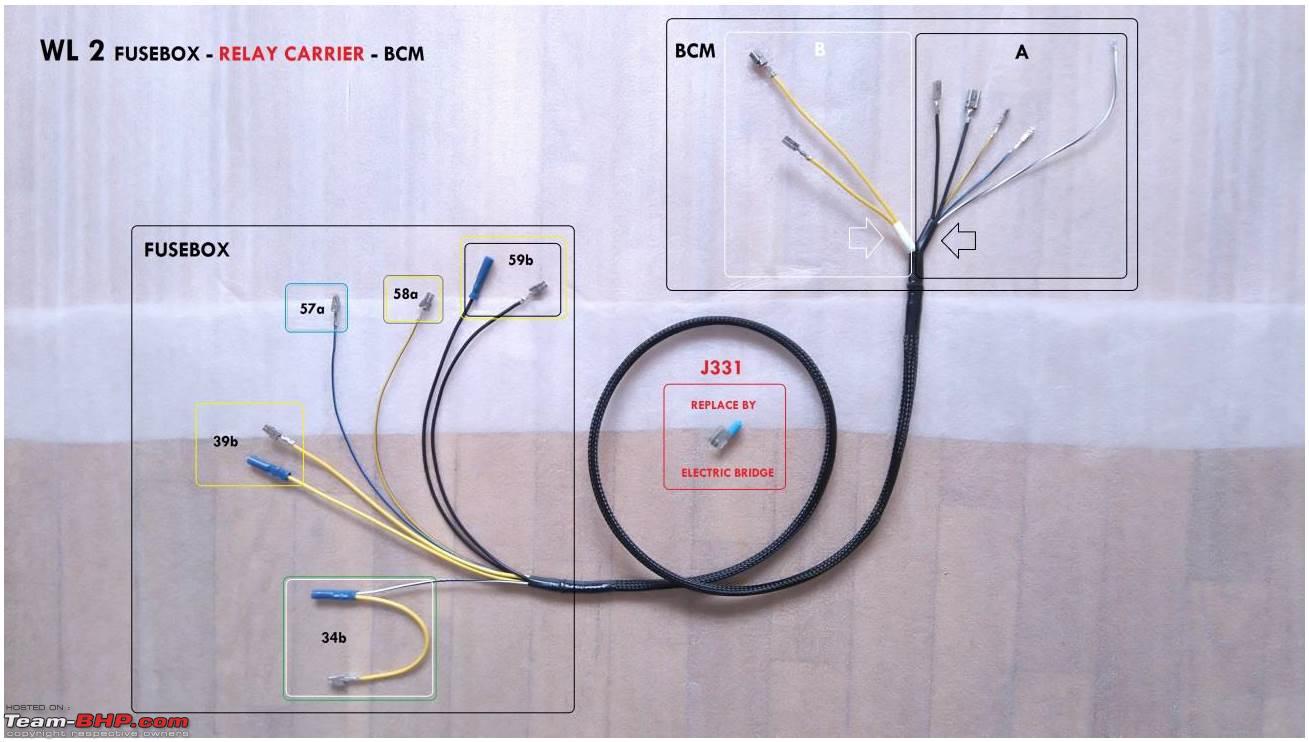 Below picture shows the connections from the light switch to the BCM. The wires from the existing headlight connector had to be removed and transferred to the new red connector. 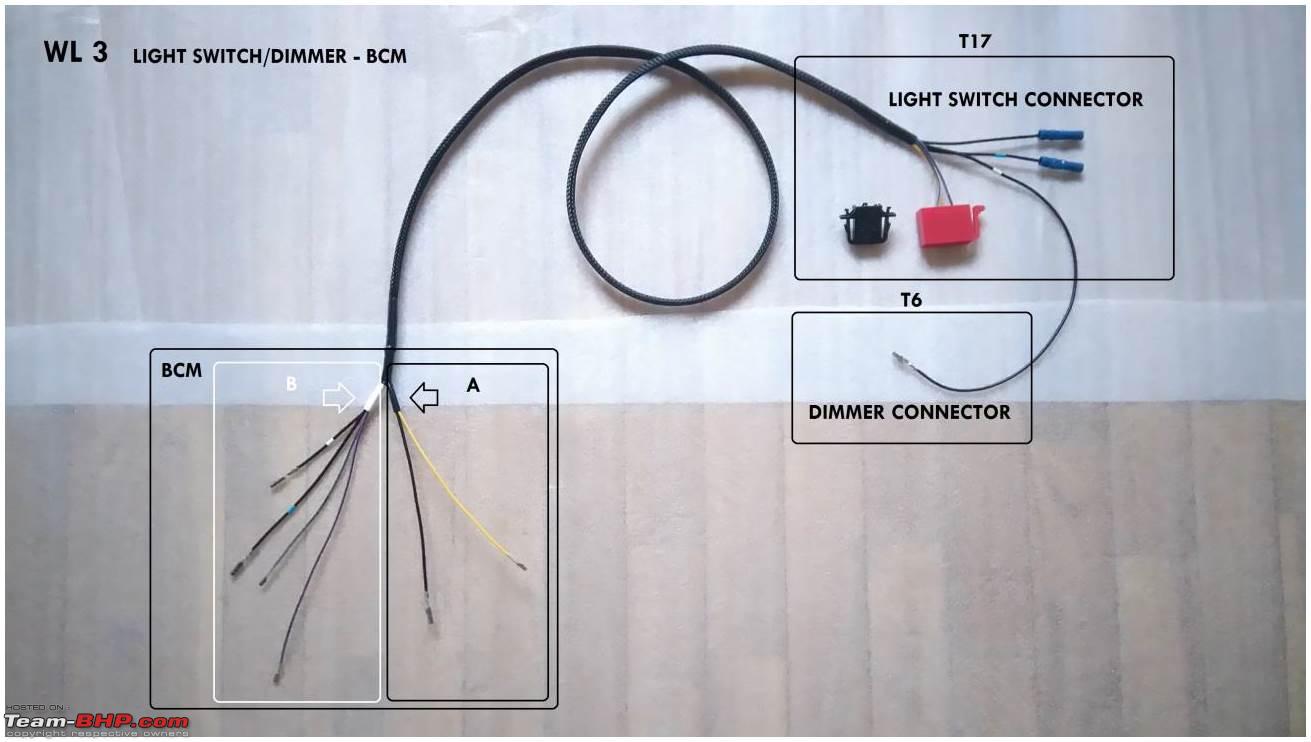 This wiring is also part of the headlight switch wiring. This had two relays. I had to plug these relays in a blank slot in the relay carrier. 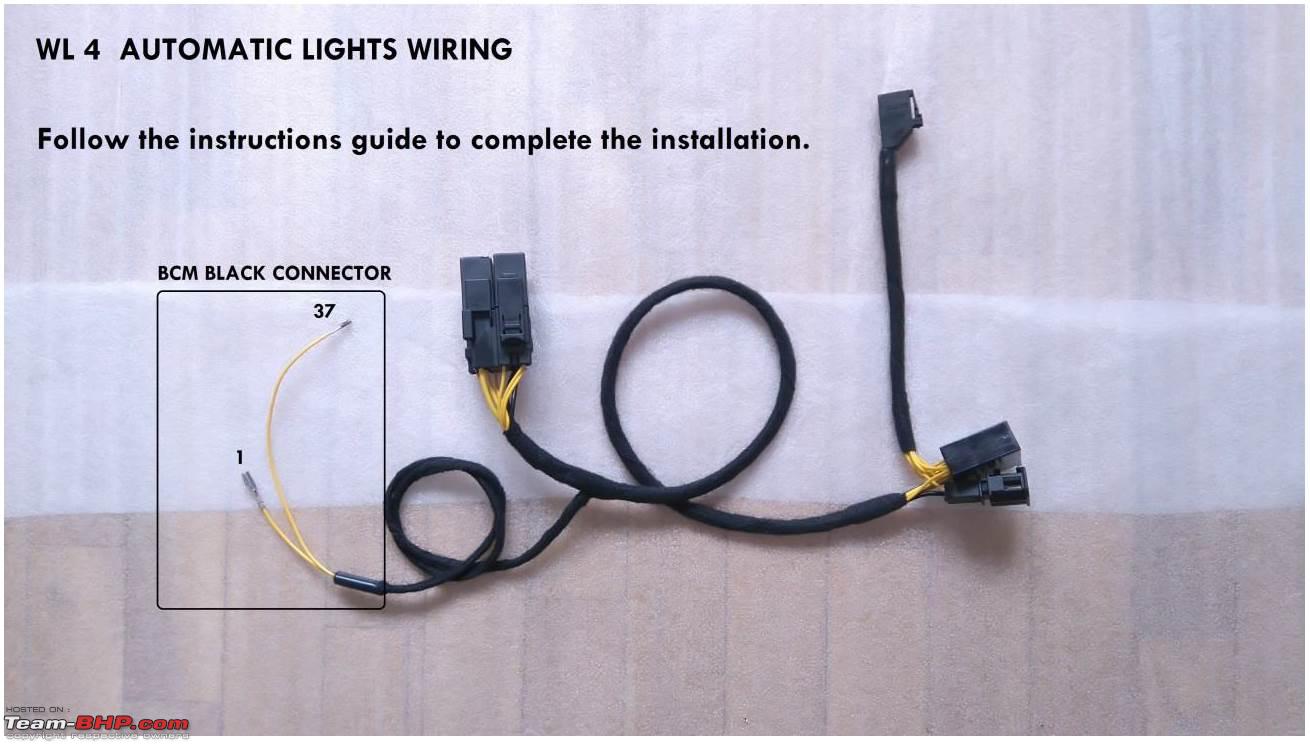 Finally, the fog lamp wiring scheme. As the existing fog lamp wiring has to be isolated. A new wire has to be connected from Pin#3 of red connector to a spare fuse in the fuse carrier and from there to the fog lamps. 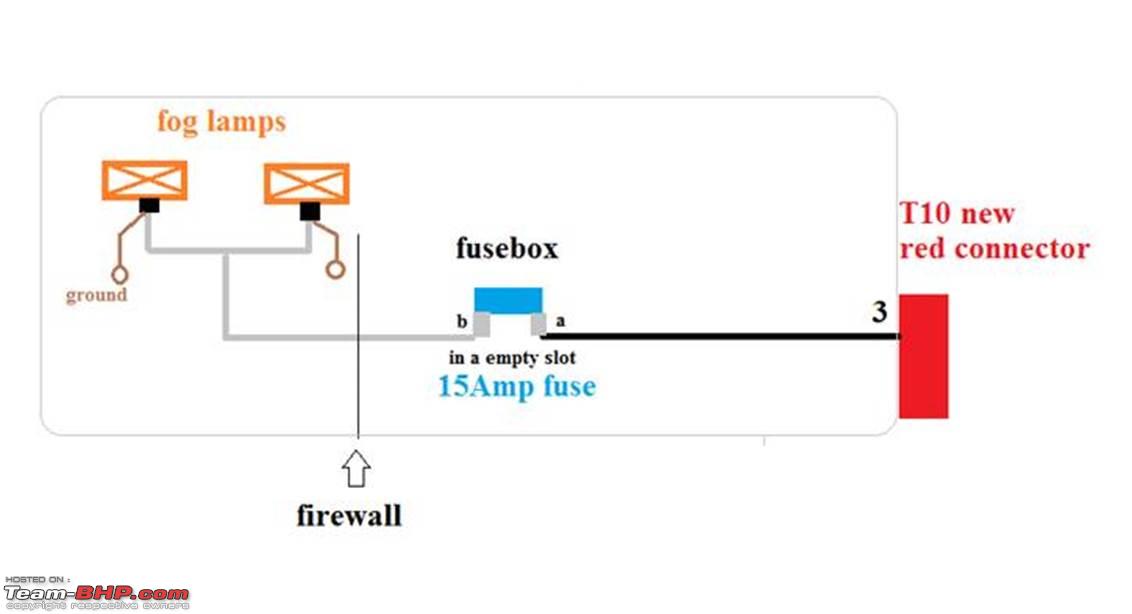 Last edited by graaja : 21st March 2017 at 00:20. |
|
| (22)
Thanks
|
| The following 22 BHPians Thank graaja for this useful post: | Arun.K, Avikbrio, batterylow, CarguyNish, deetjohn, Dr.Naren, ecenandu, Gannu_1, GaryTSI, GTO, h14, Jaggu, Mr.Boss, Nicky, PraNeel, R2D2, Rehaan, rshanker, suhaas307, theexperthand, VivekCherian, Whiplash7 |
|
20th March 2017, 20:51
| #5 |
| Team-BHP Support Join Date: Nov 2013 Location: Coimbatore
Posts: 3,711
Thanked: 25,620 Times
| Wiring DIY The wiring DIY Before we go into the wiring, following are the tools required. Spline bit set to remove the driver seat. I will greatly recommend removing the driver seat for better access to the BCM area. 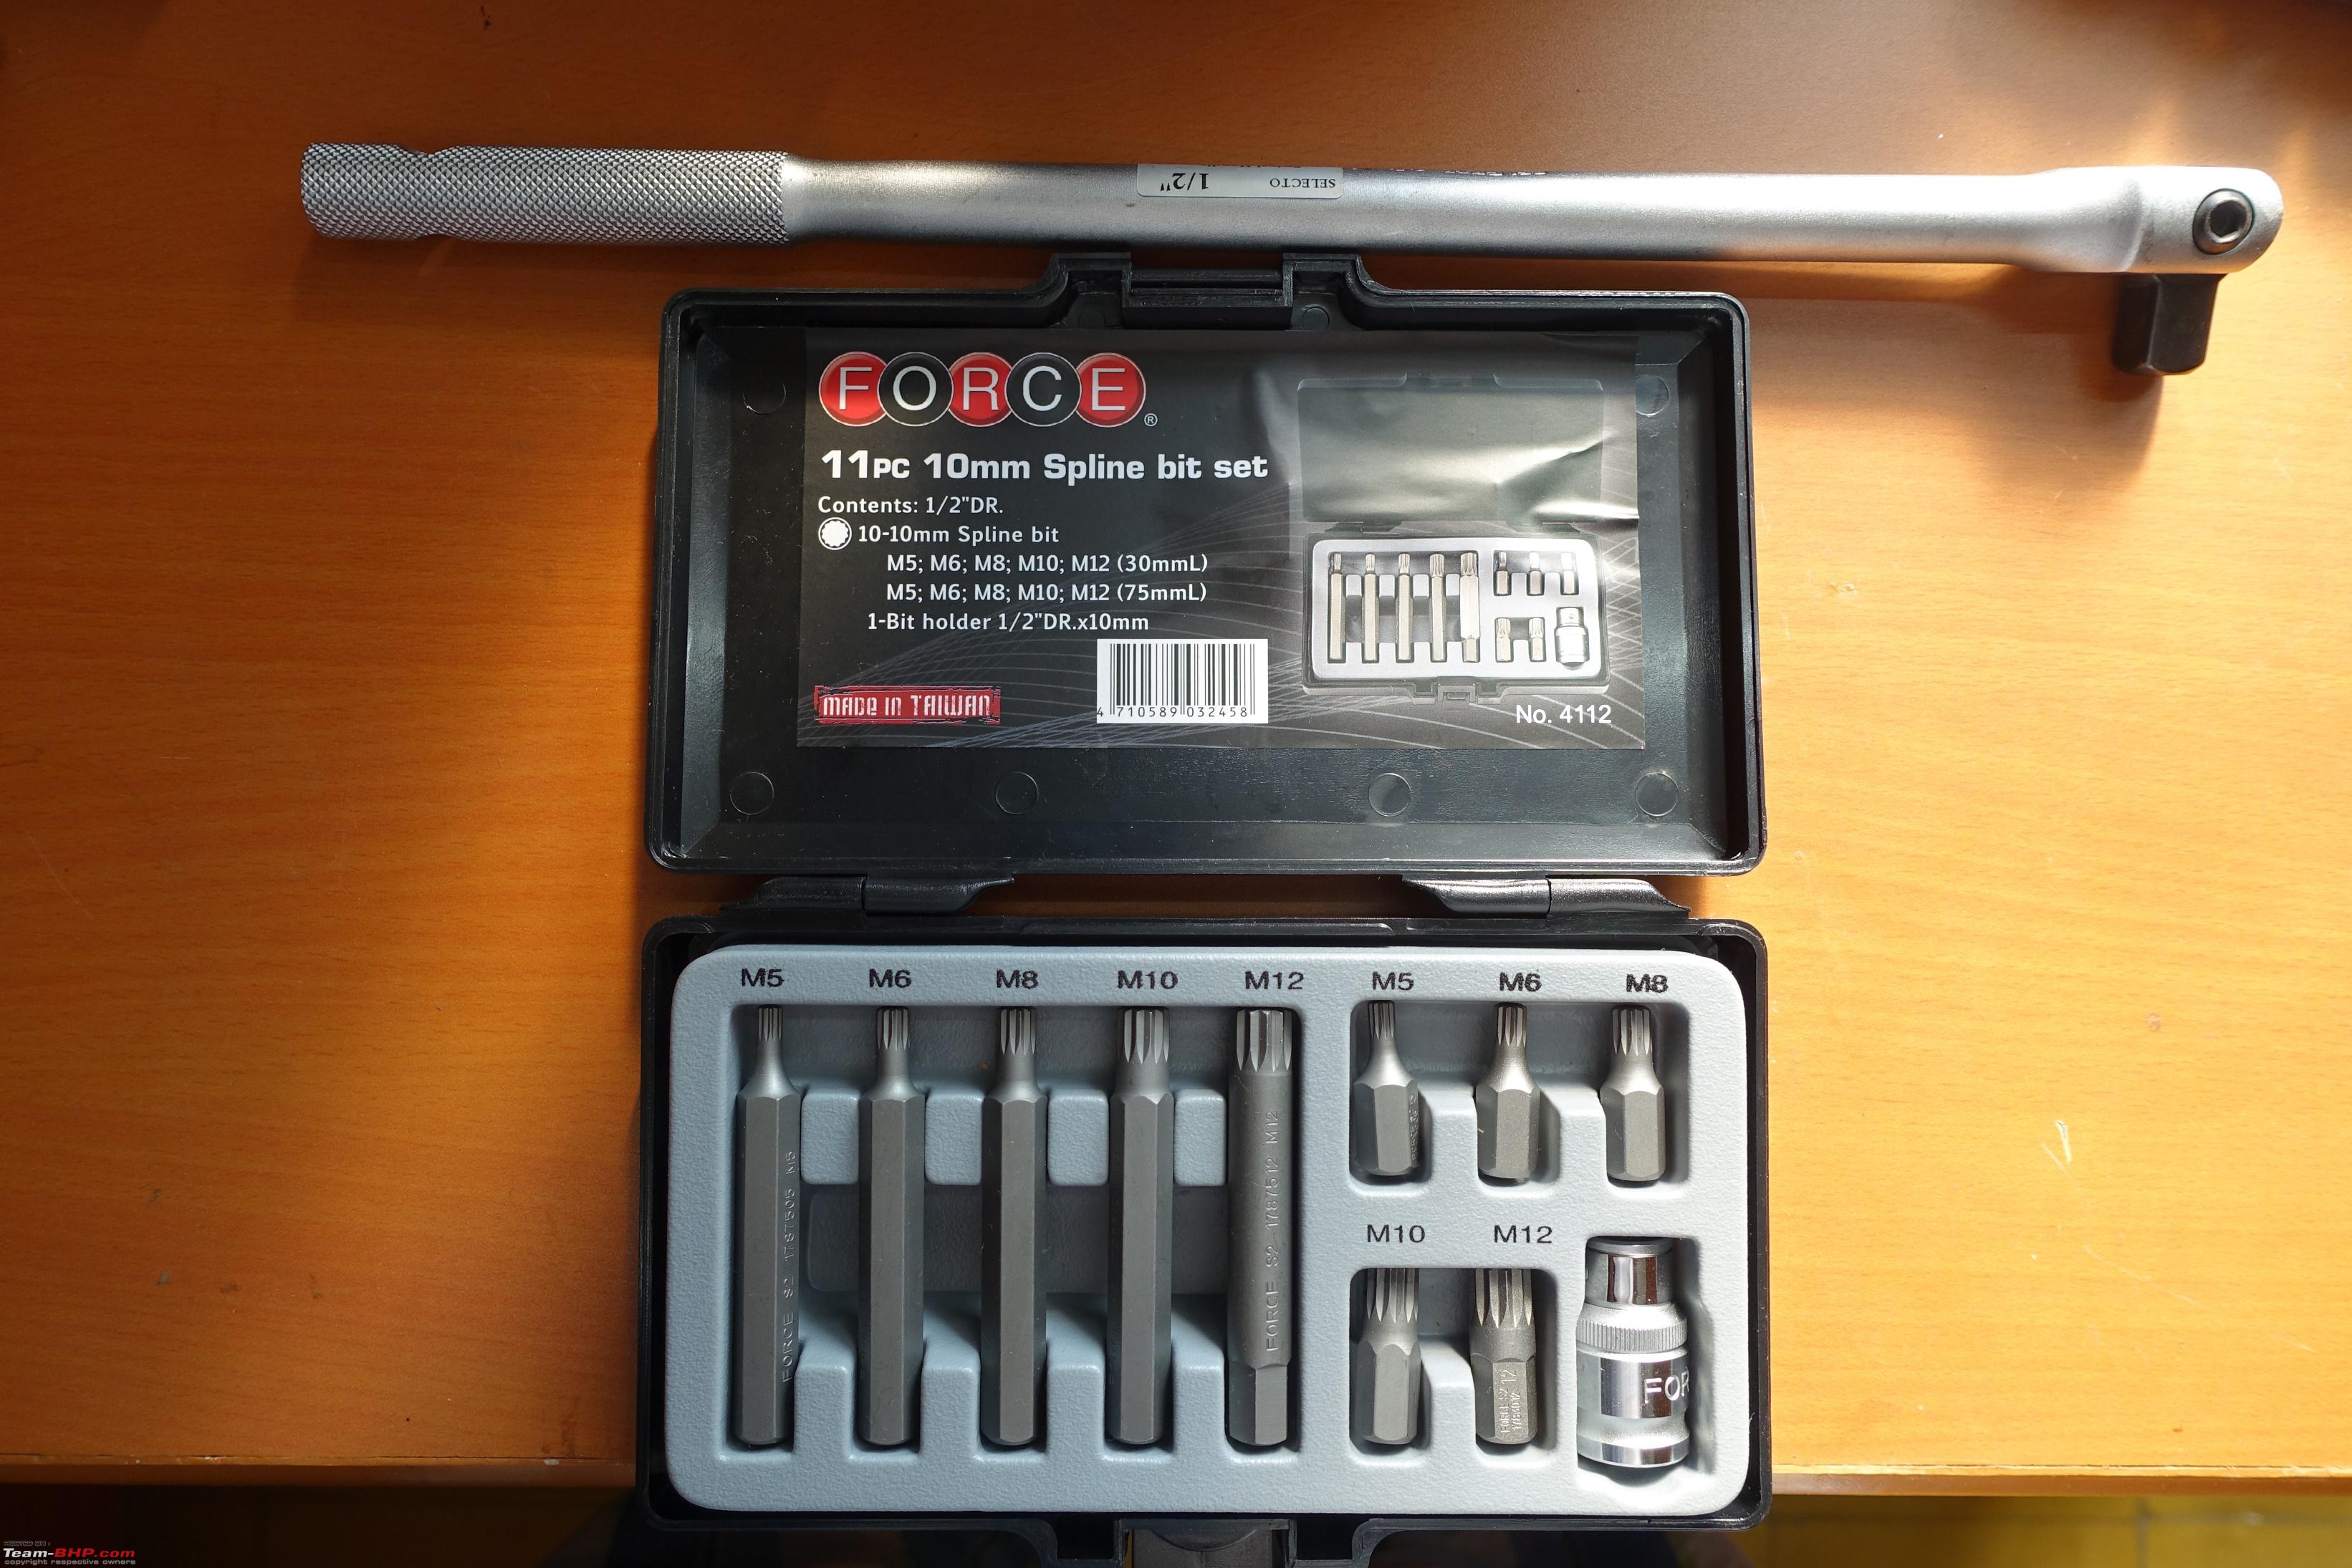 General tools. Terminal removal tool for removing terminals from connectors, knife, stripper for cutting and stripping wires and pliers. 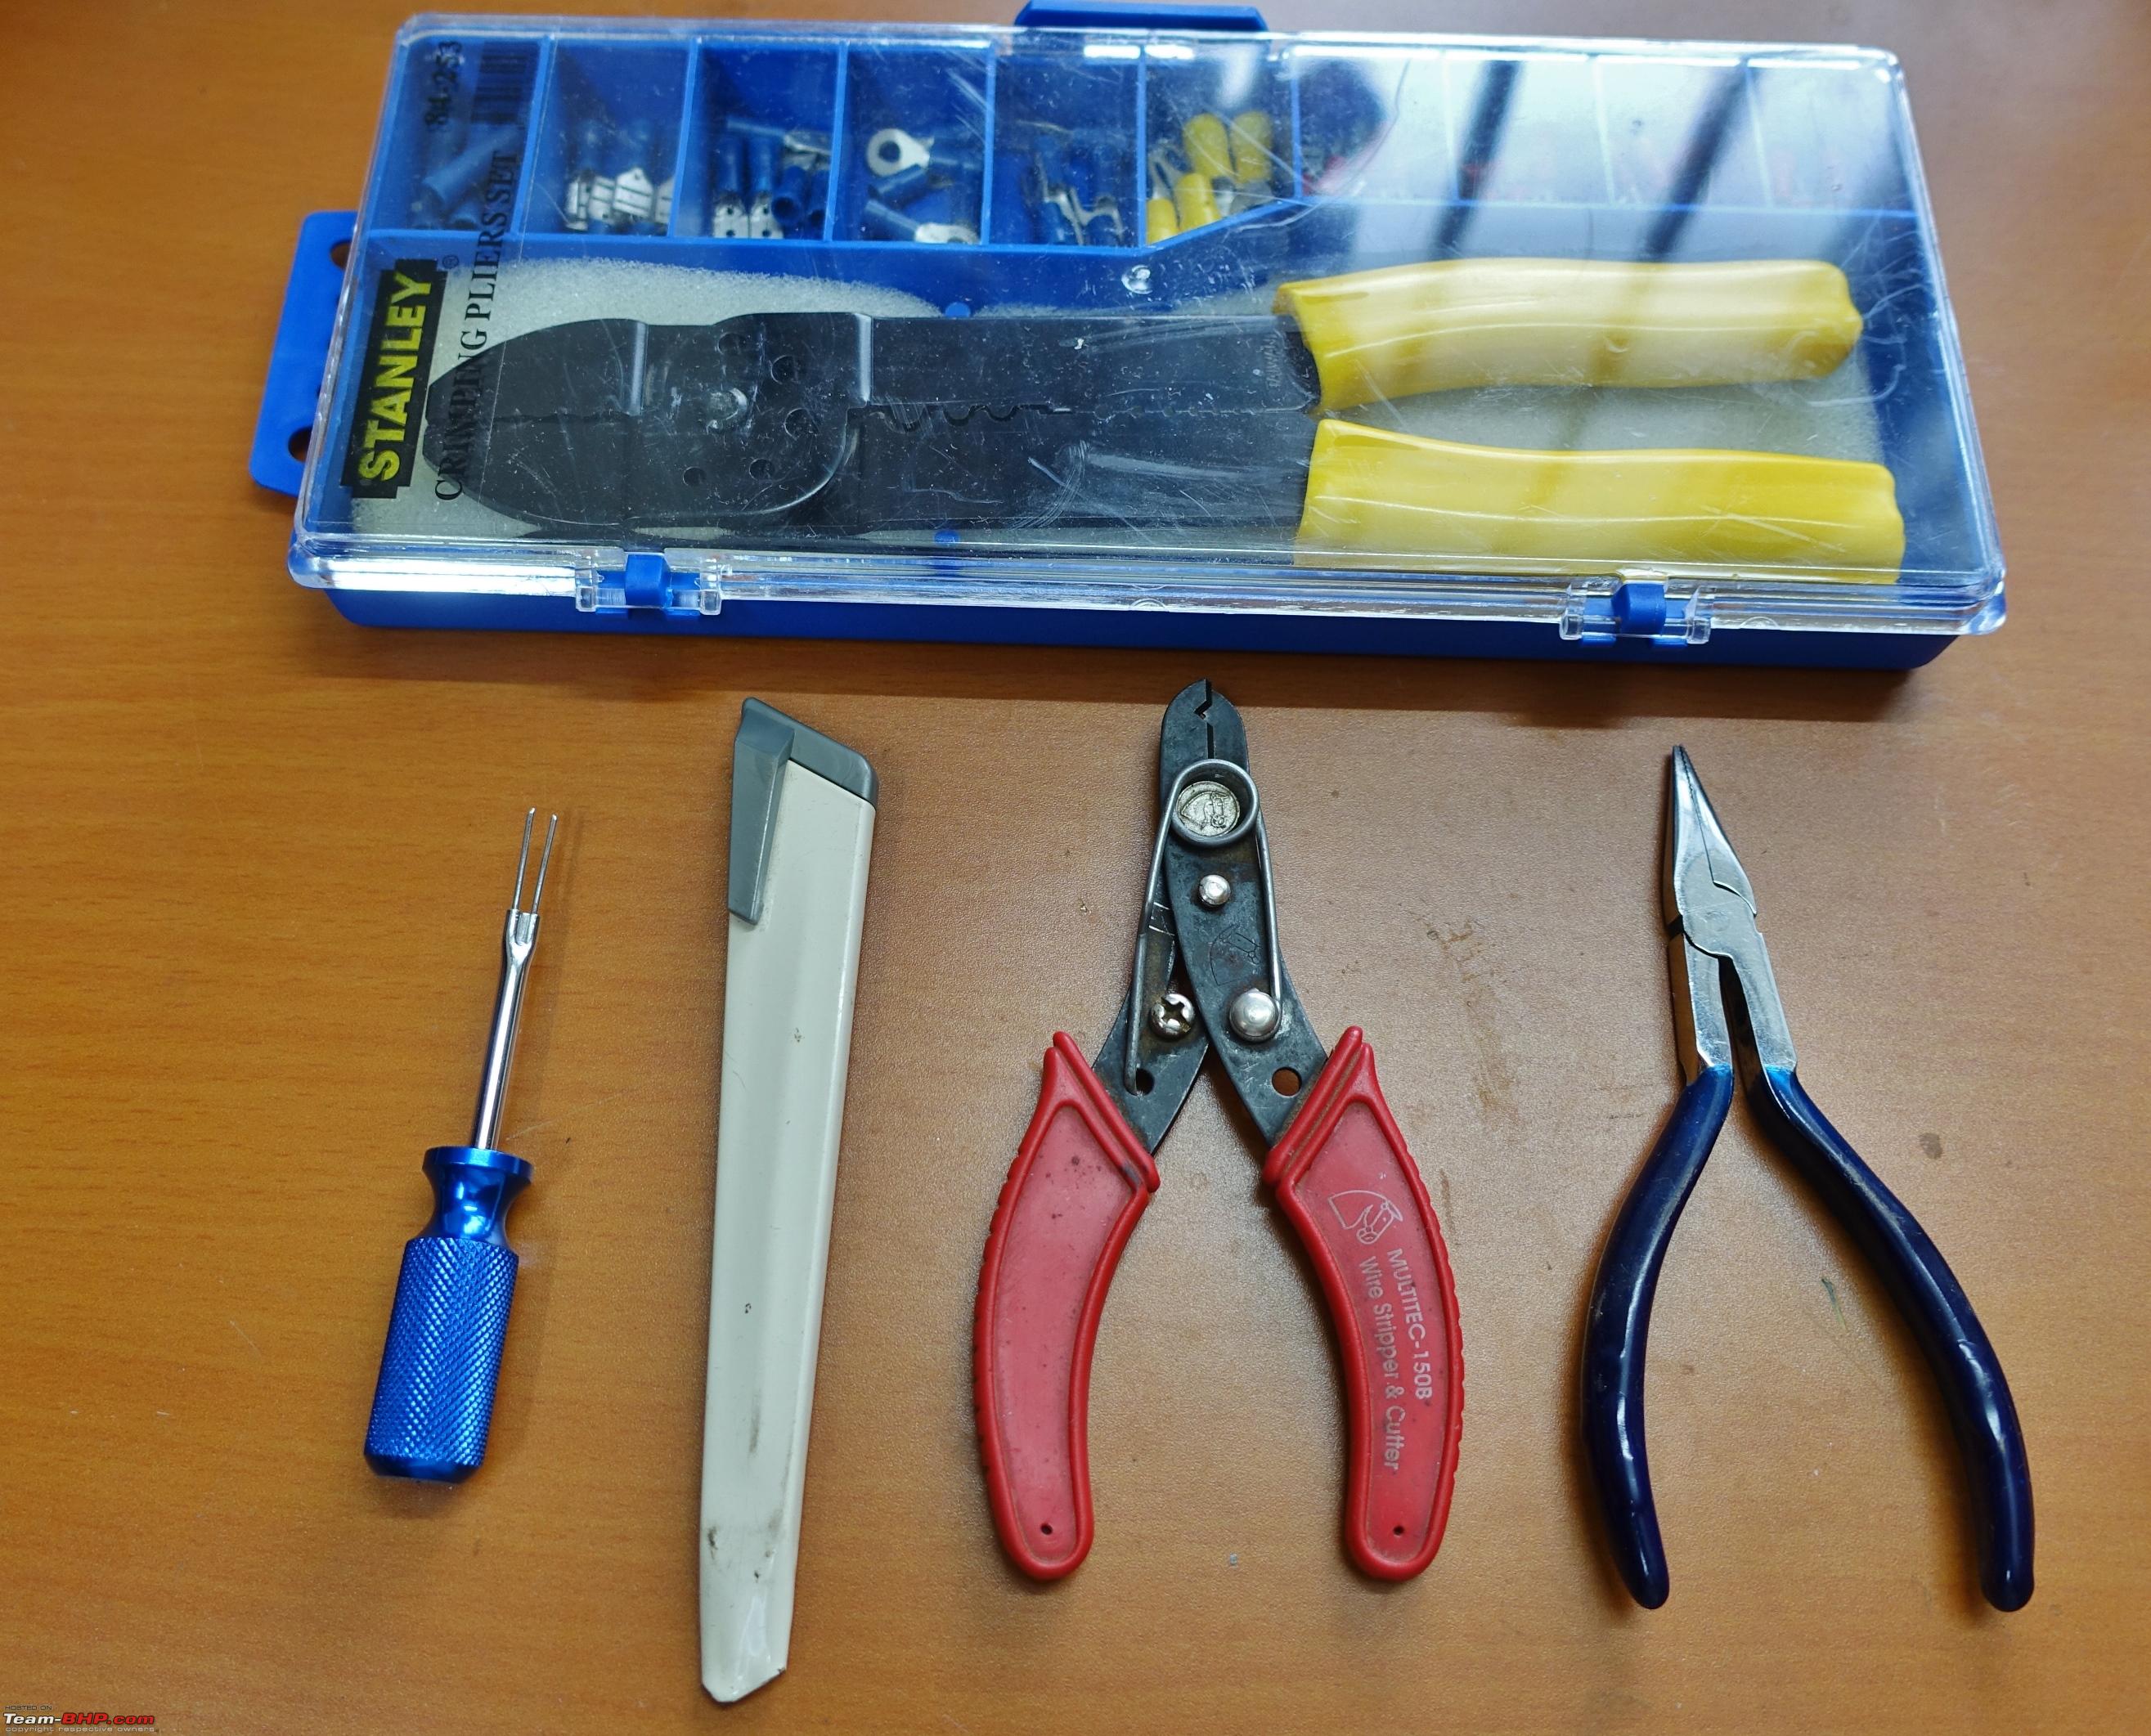 Custom made terminal remover. Though I had got a terminal remover tool shown in the previous picture, for one terminal in the BCM connector, the terminal removal tool was too thick. That is when my friend Pandiyan came up with this brilliant idea of fabricating a tool from a small safety pin. Genius indeed! 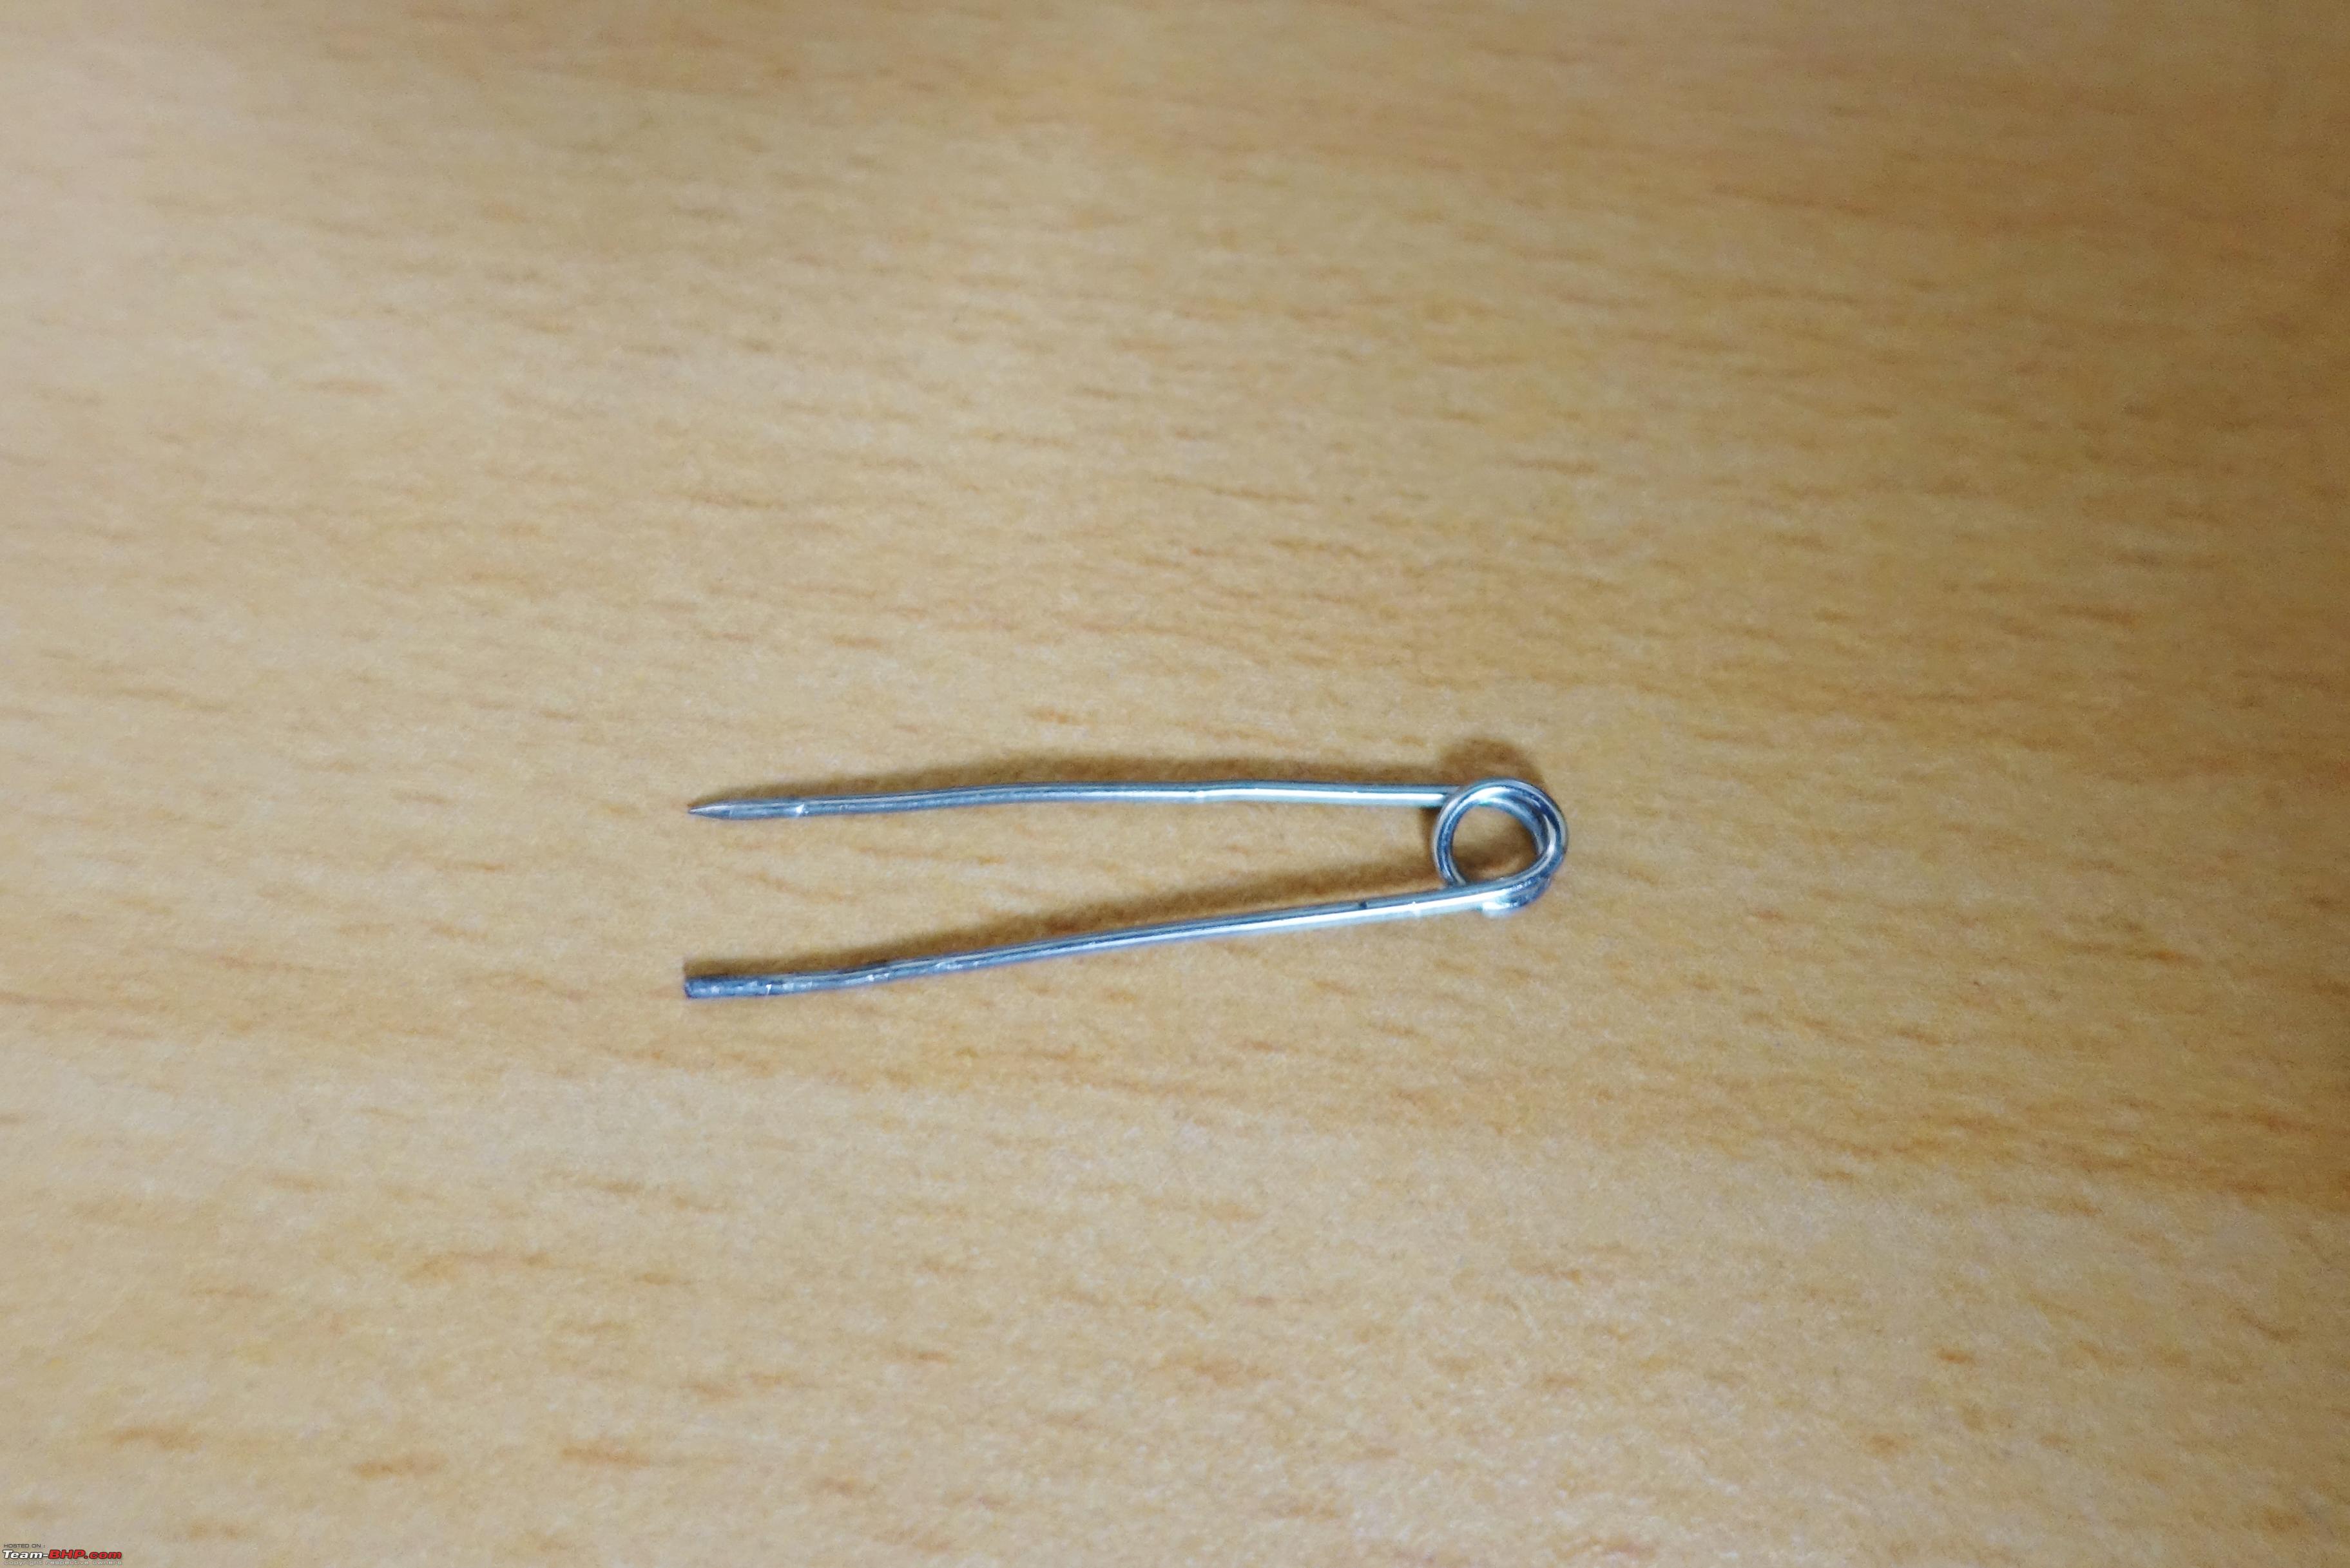 A small multimeter for checking continuity between wires, continuity in fuses etc. Ideally, there should be no soldering involved. However for some connections, I had to do some soldering. For this I used a soldering iron, heat shrinking tubes and a hot air blower to shrink the tubes. A simple hand held soldering iron should be enough. If at all you do soldering, make sure that you use heat shrinking tube to seal the joint and add another layer of TESA tape. 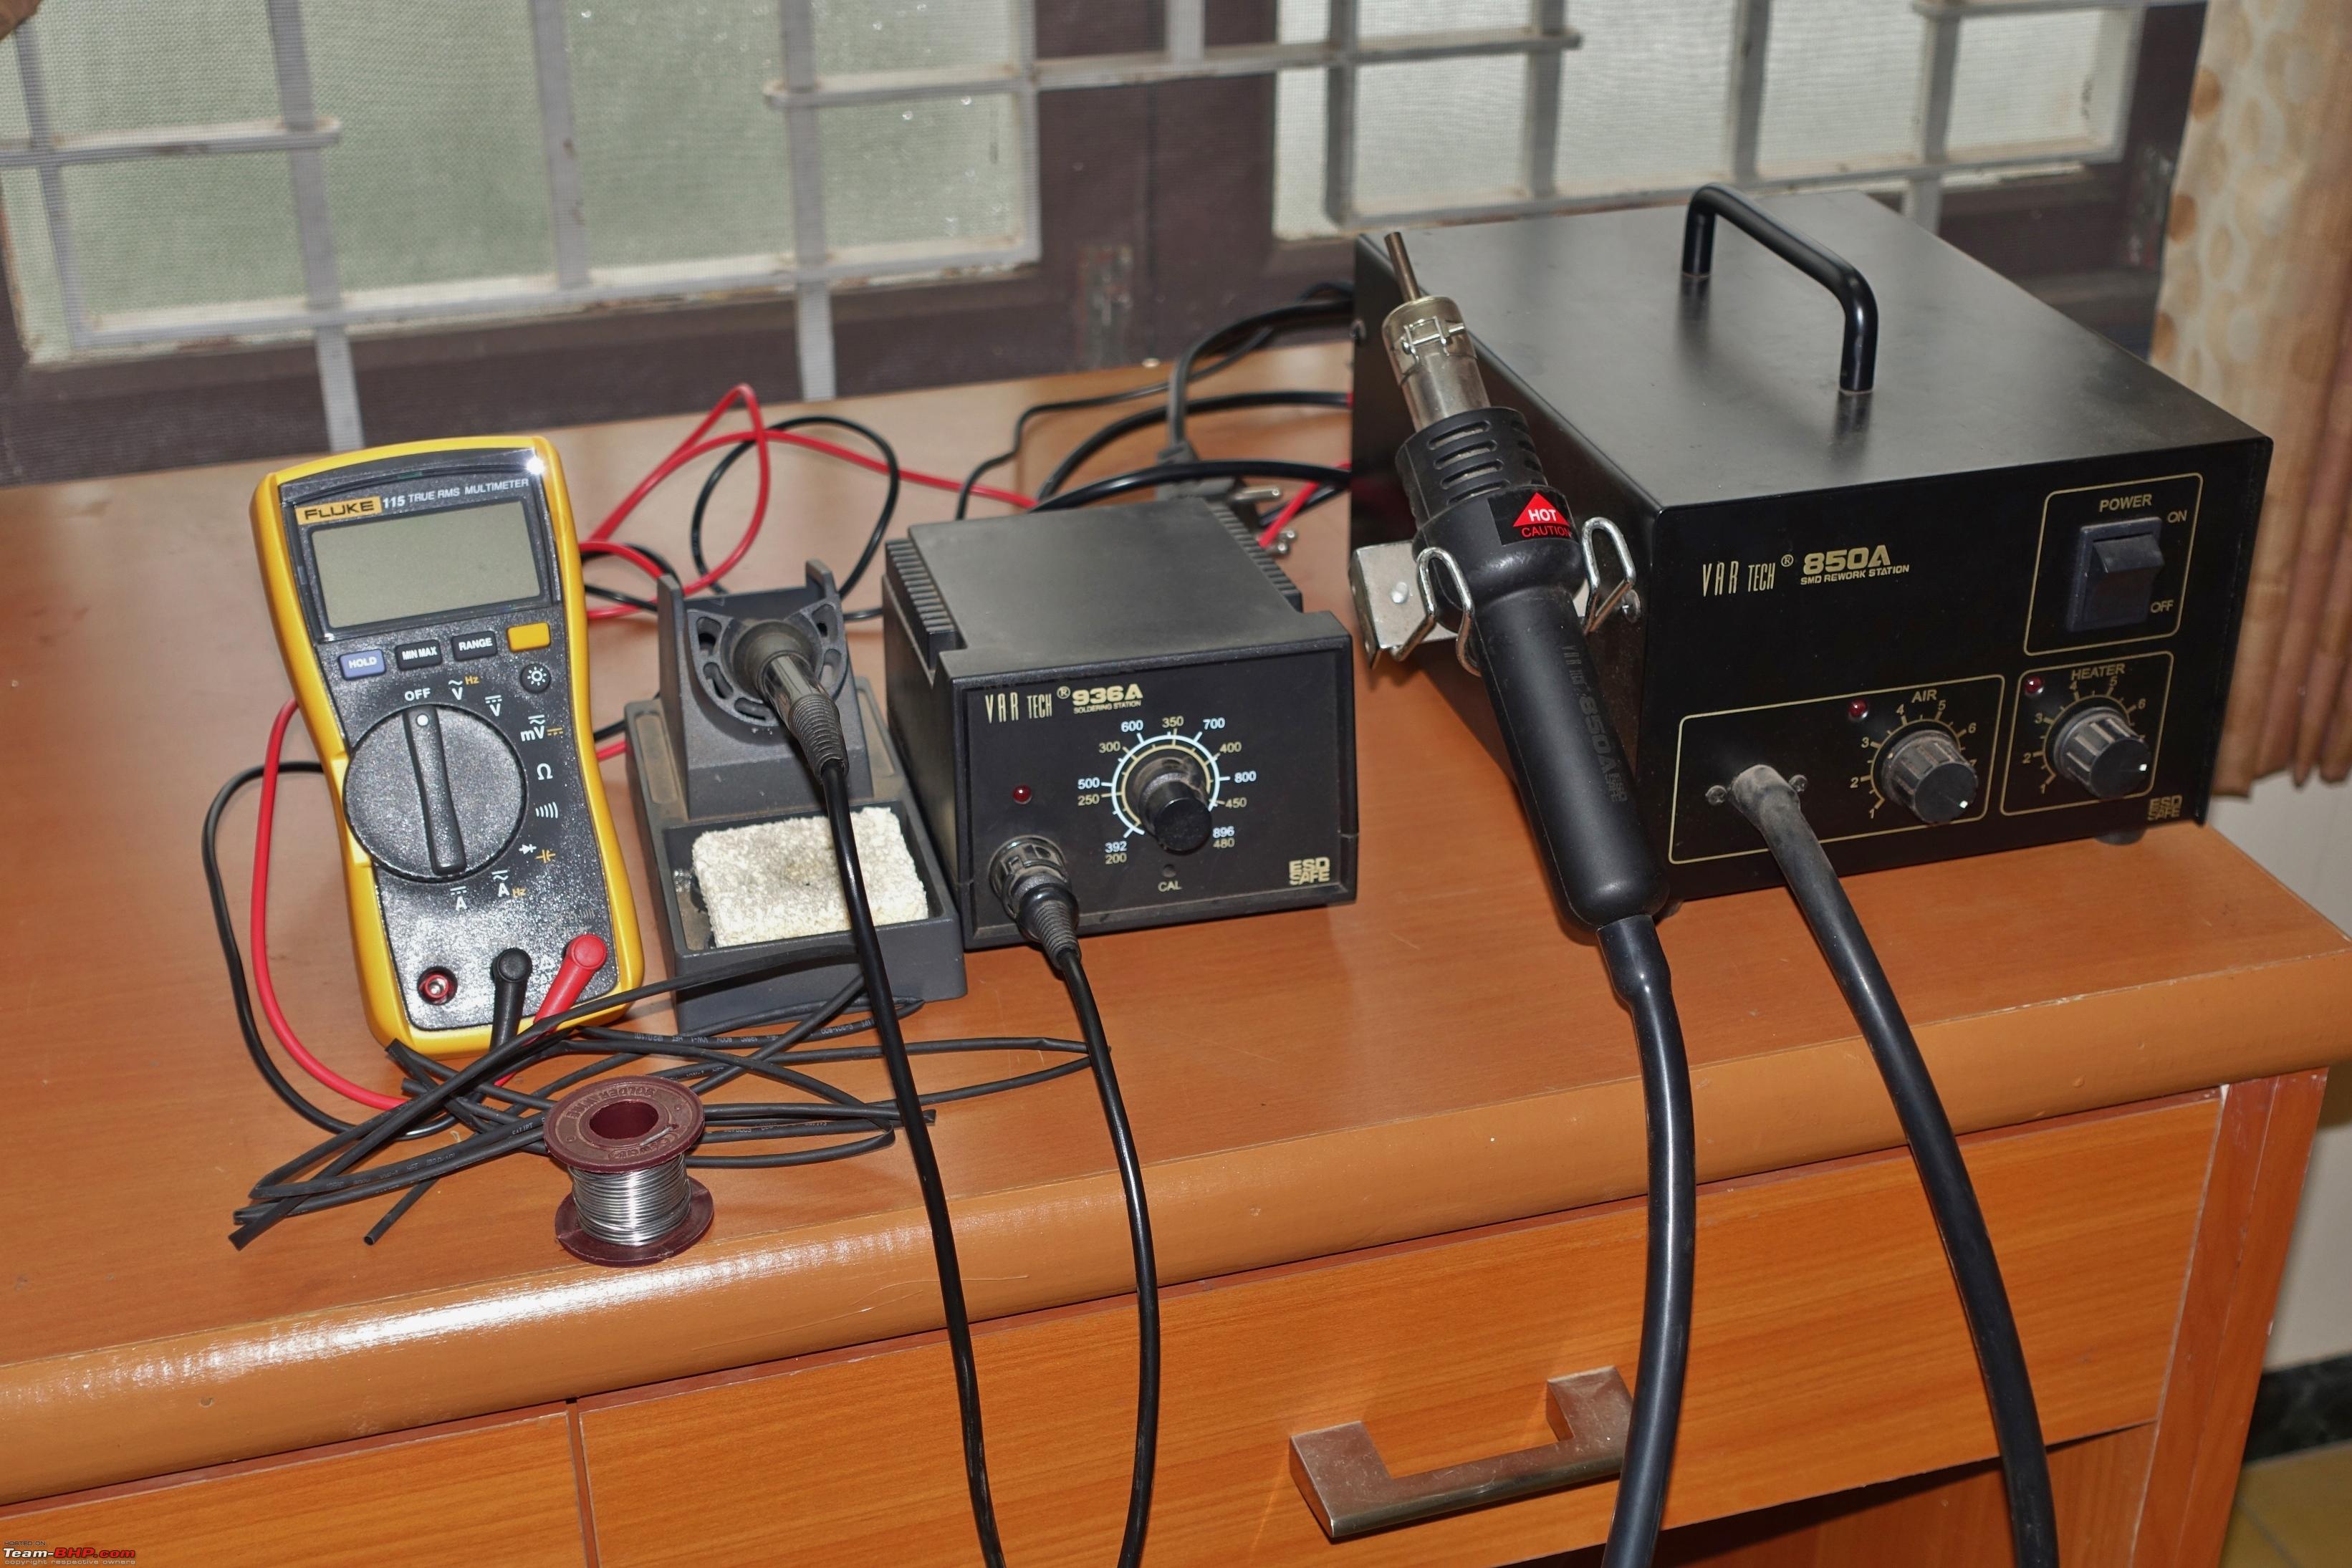 TESA cotton tape and lots of wire ties. This is very important to isolate existing wires and insulating them. Do not use regular insulation tape. Also, once wiring is done, tie up all the wires in the BCM area neatly, so that they do not in anyway come in the way of the accelerator or brake pedals. 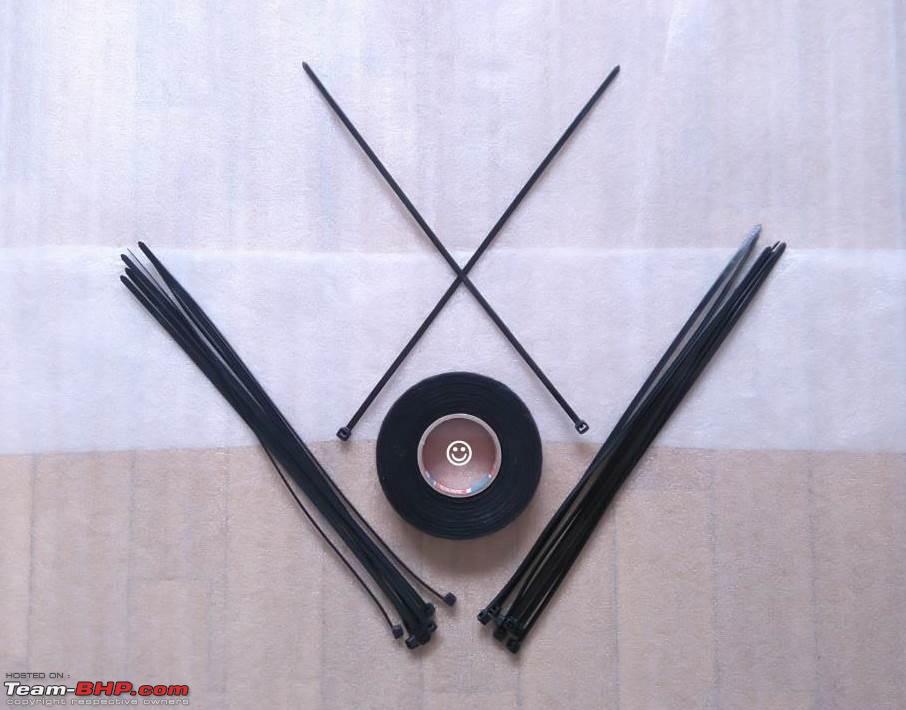 A head torch. I consider this a very important tool for this installation. While managing the tough wiring job, light is something you should not have to worry about. 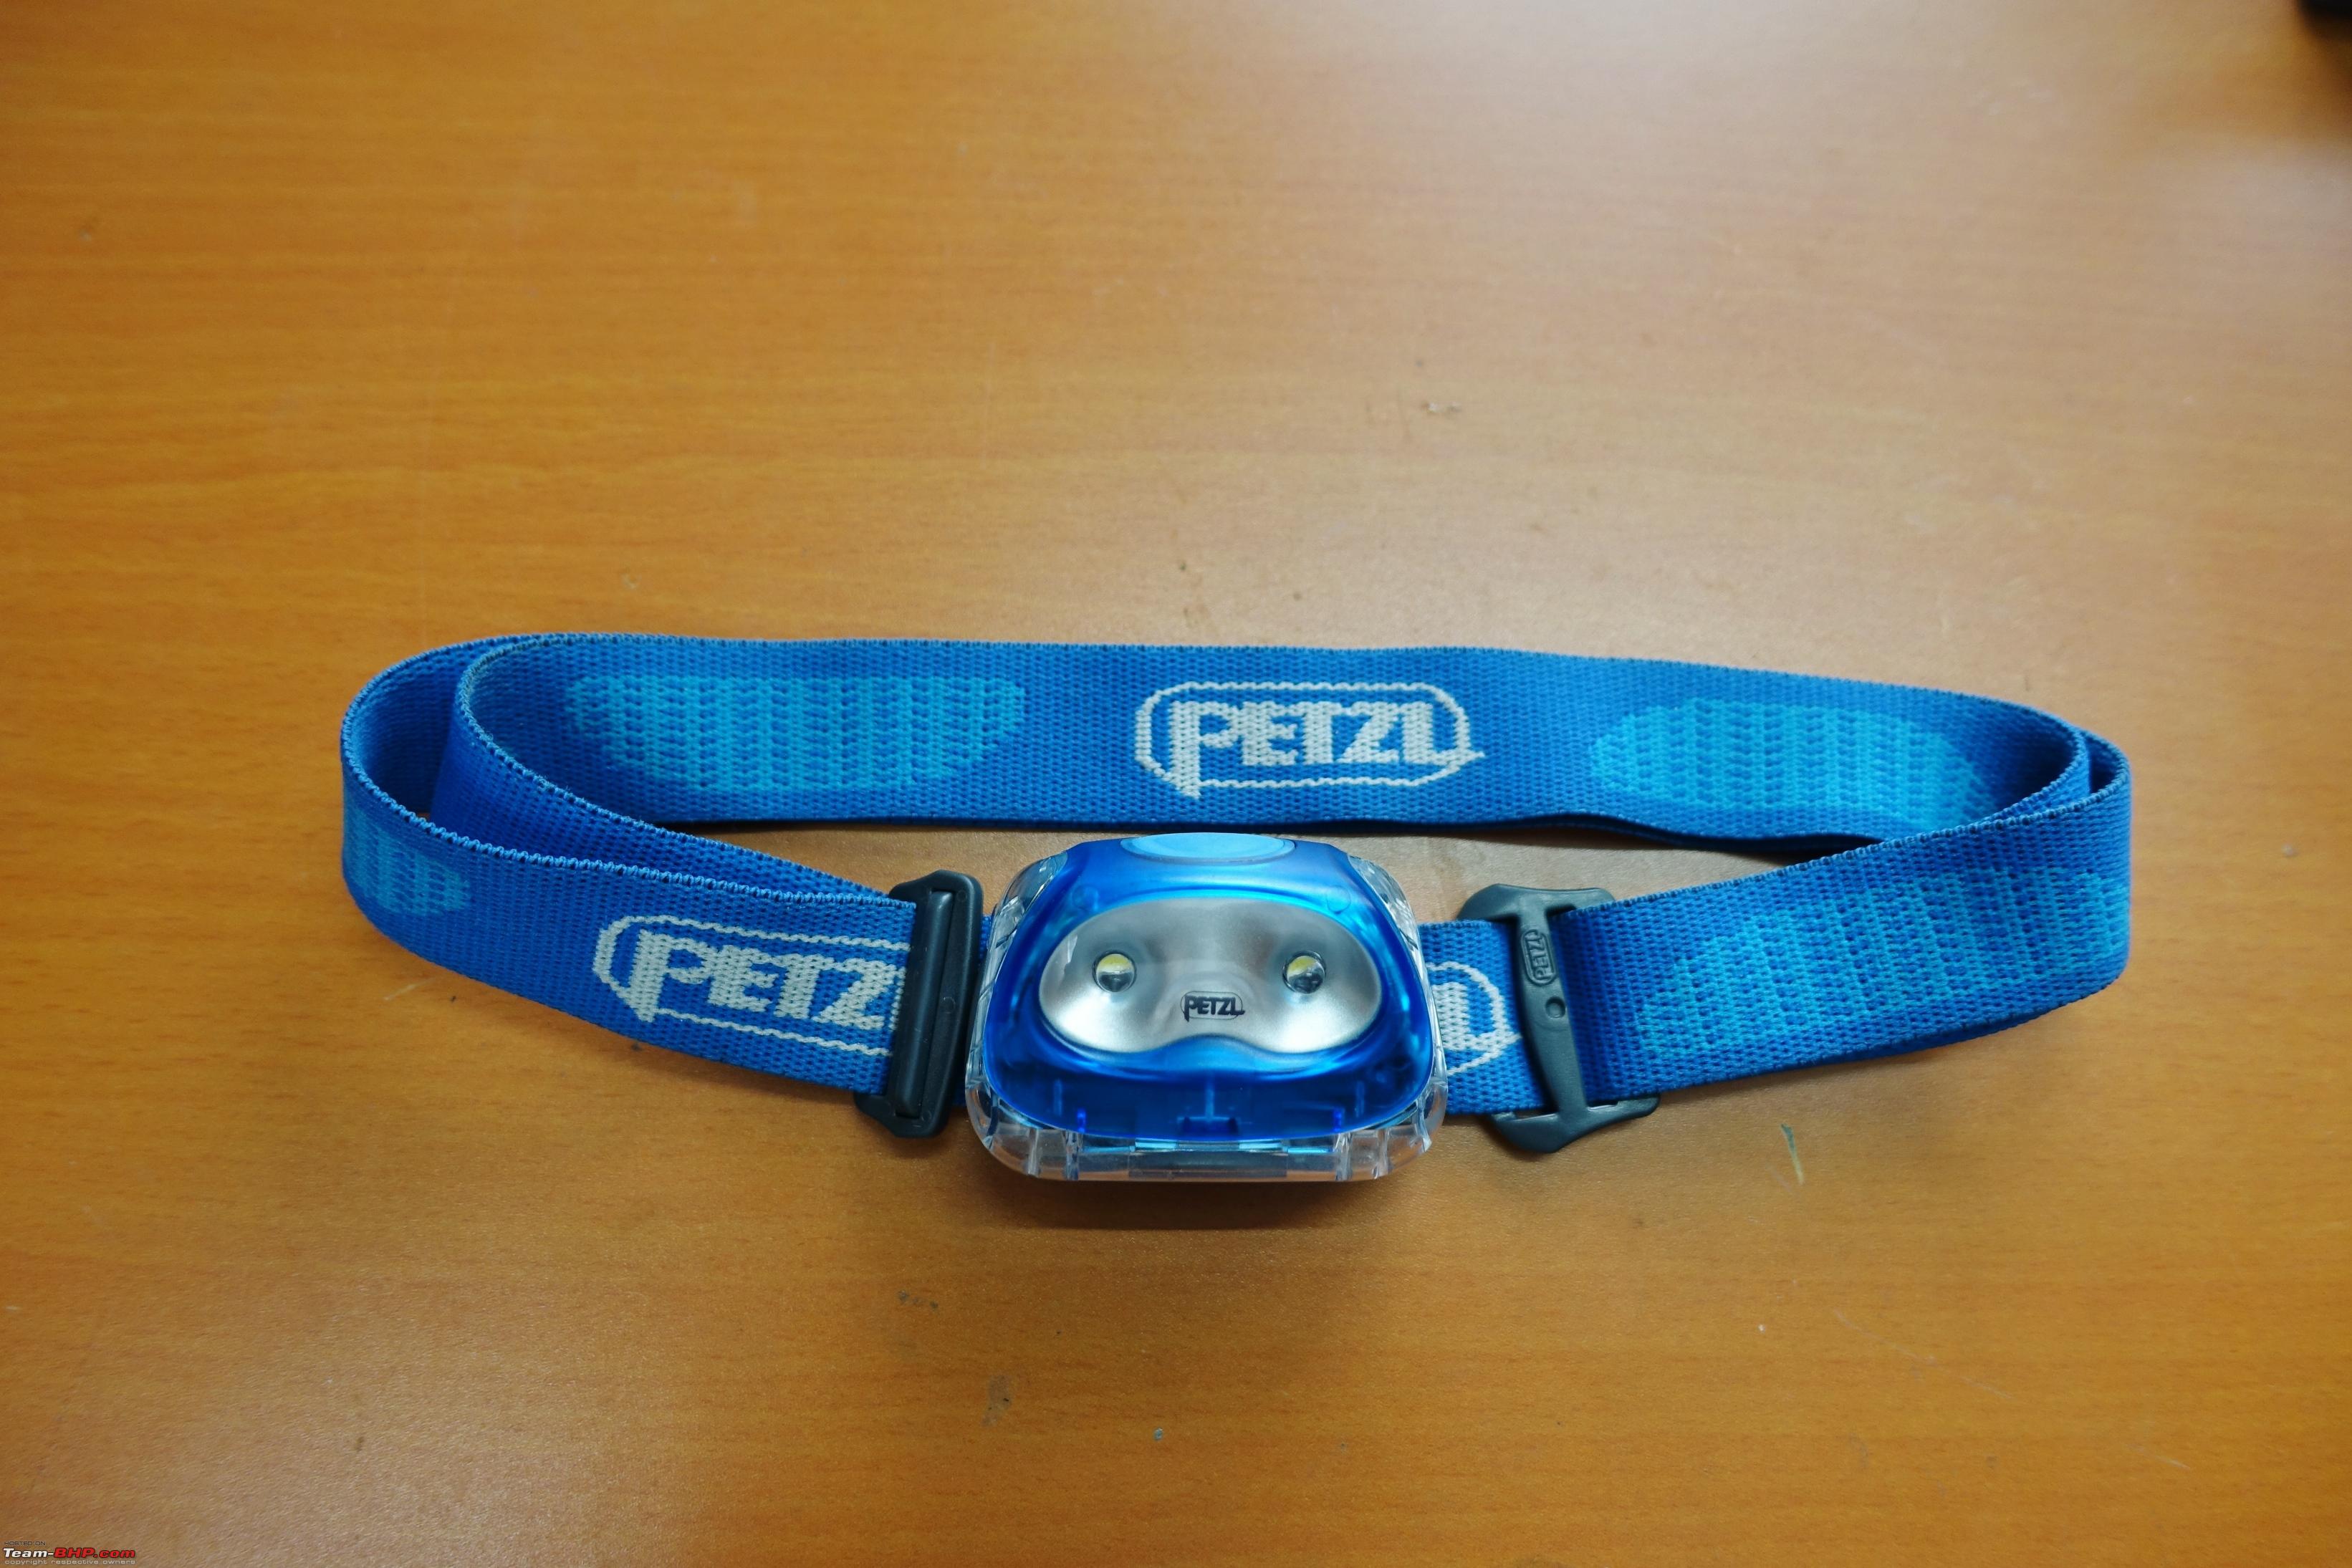 Below are the key areas the wiring has to be done.
I could not take many pictures of the wiring process, as I was completely occupied with the complex wiring job. Below are some pictures I managed to click. VERY VERY IMPORTANT, A THOUSAND TIMES OVER - FIRST REMOVE BATTERY NEGATIVE TERMINAL 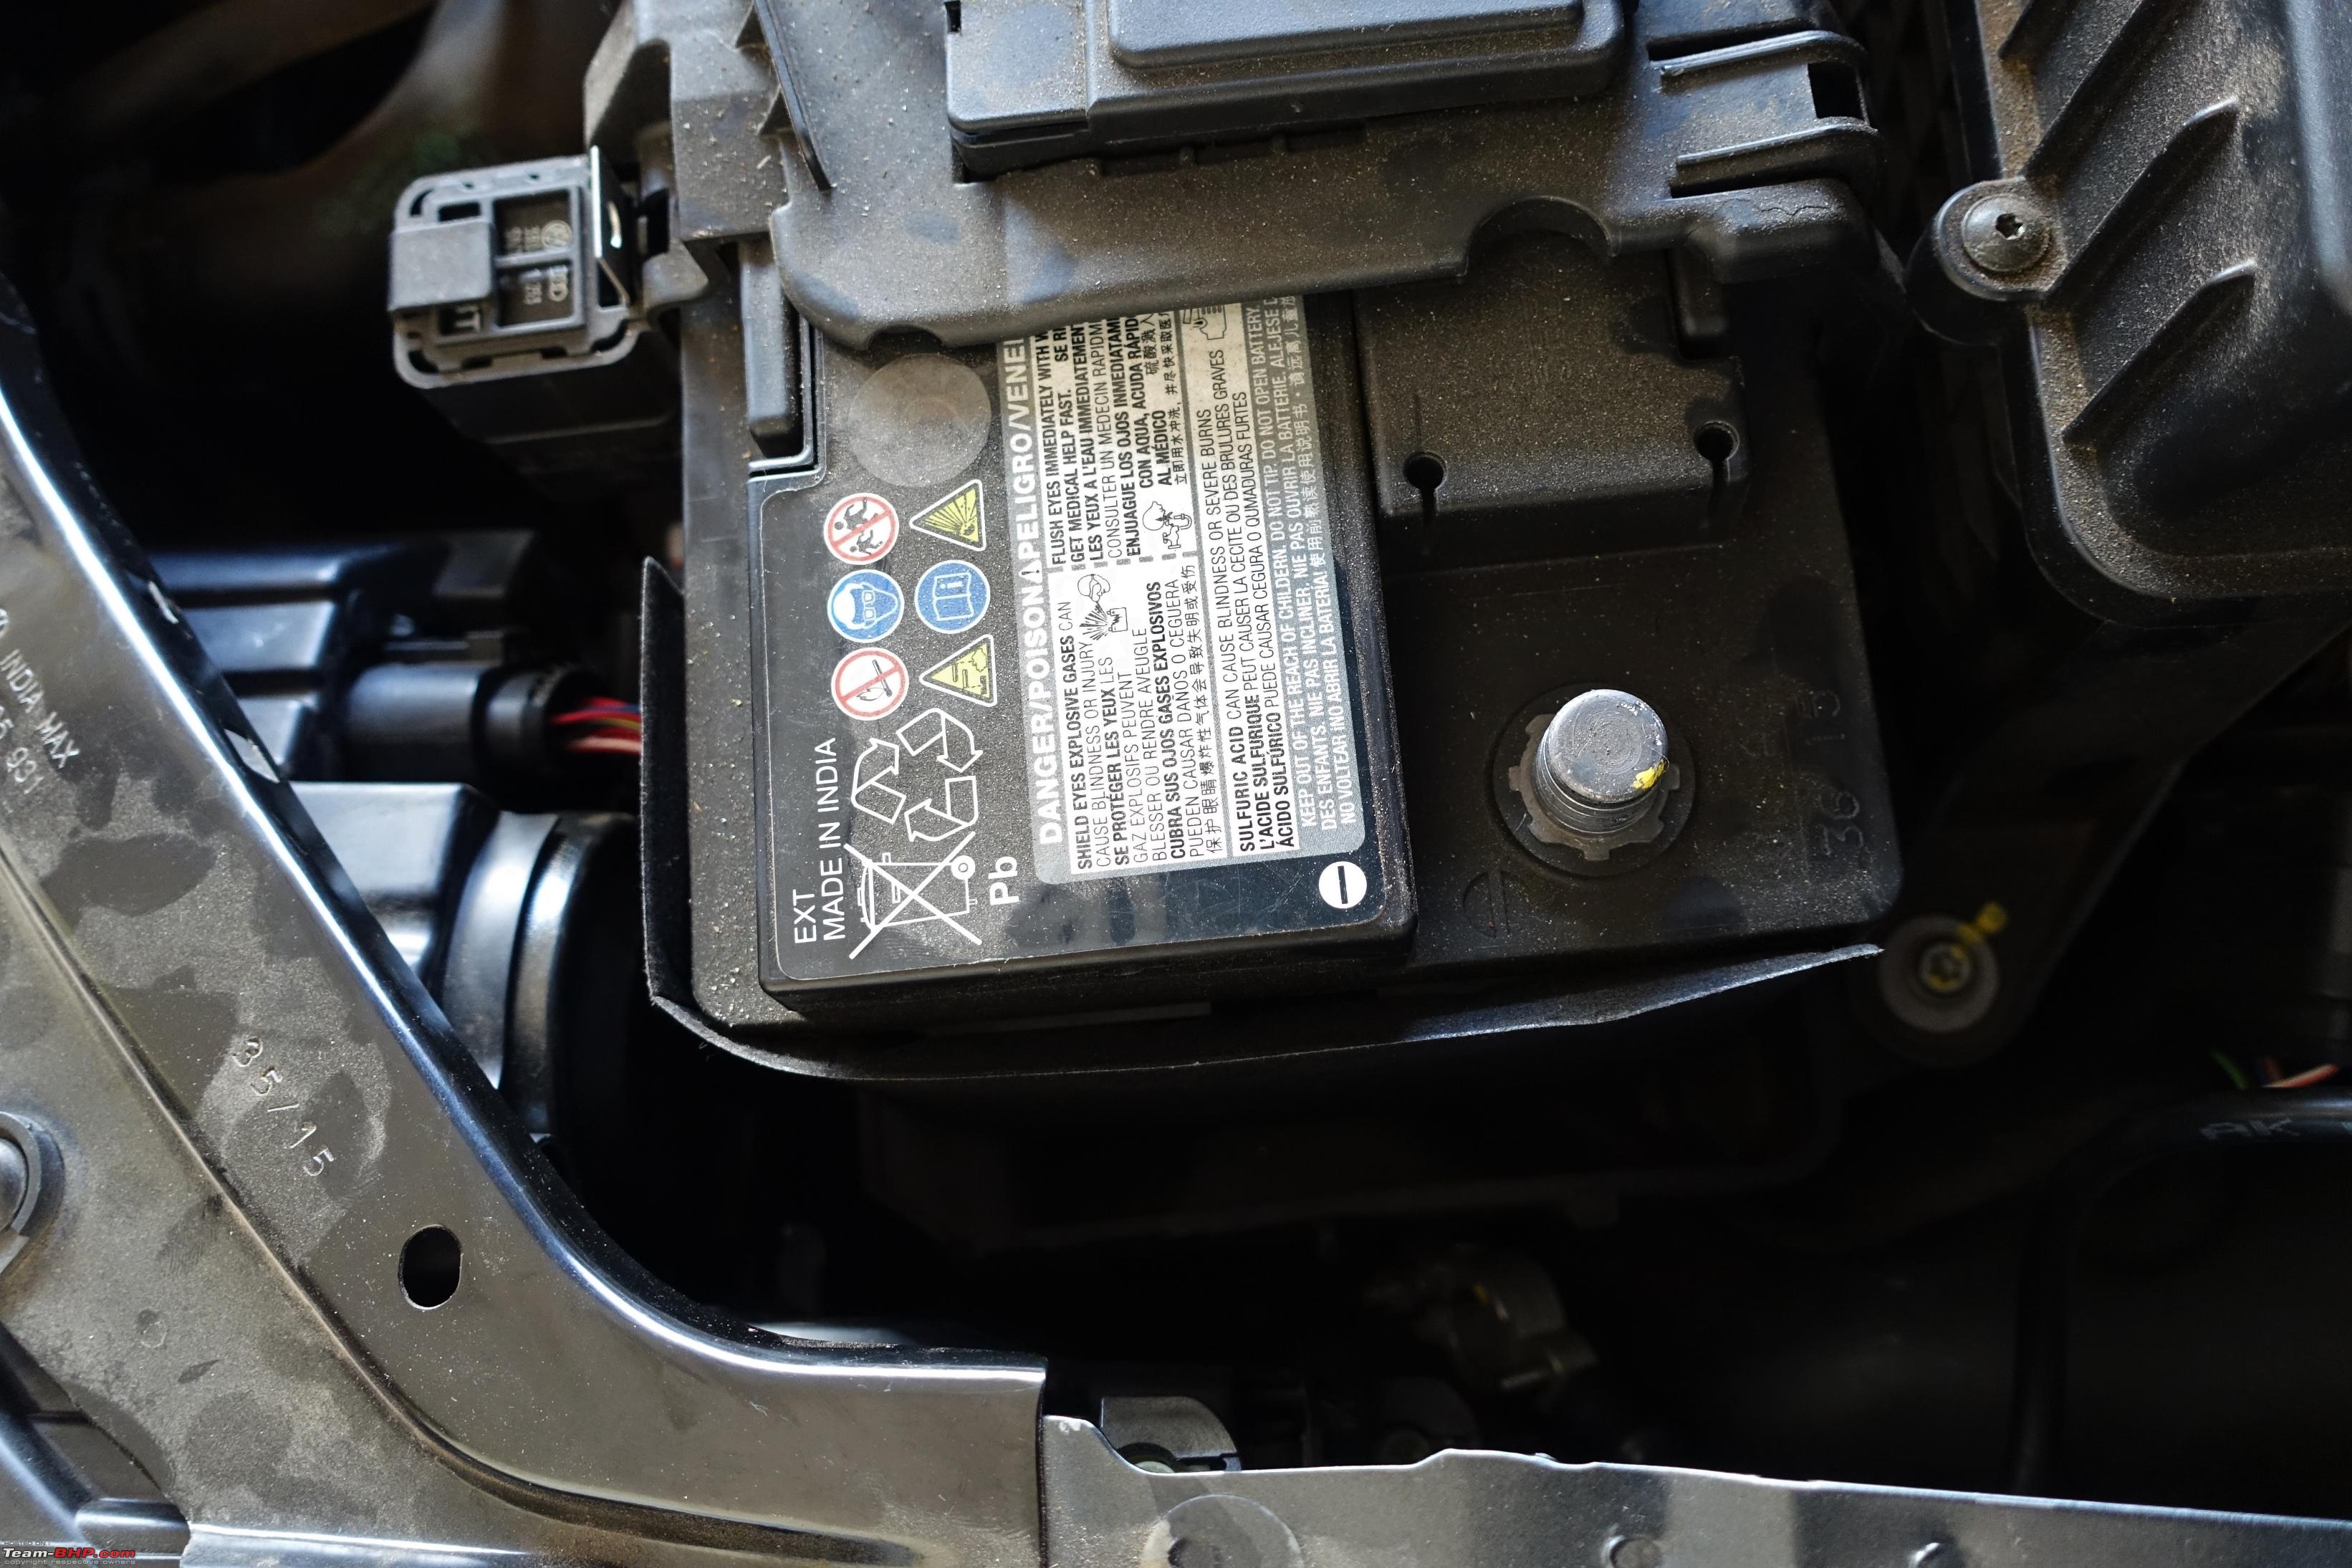 Fuse carrier out 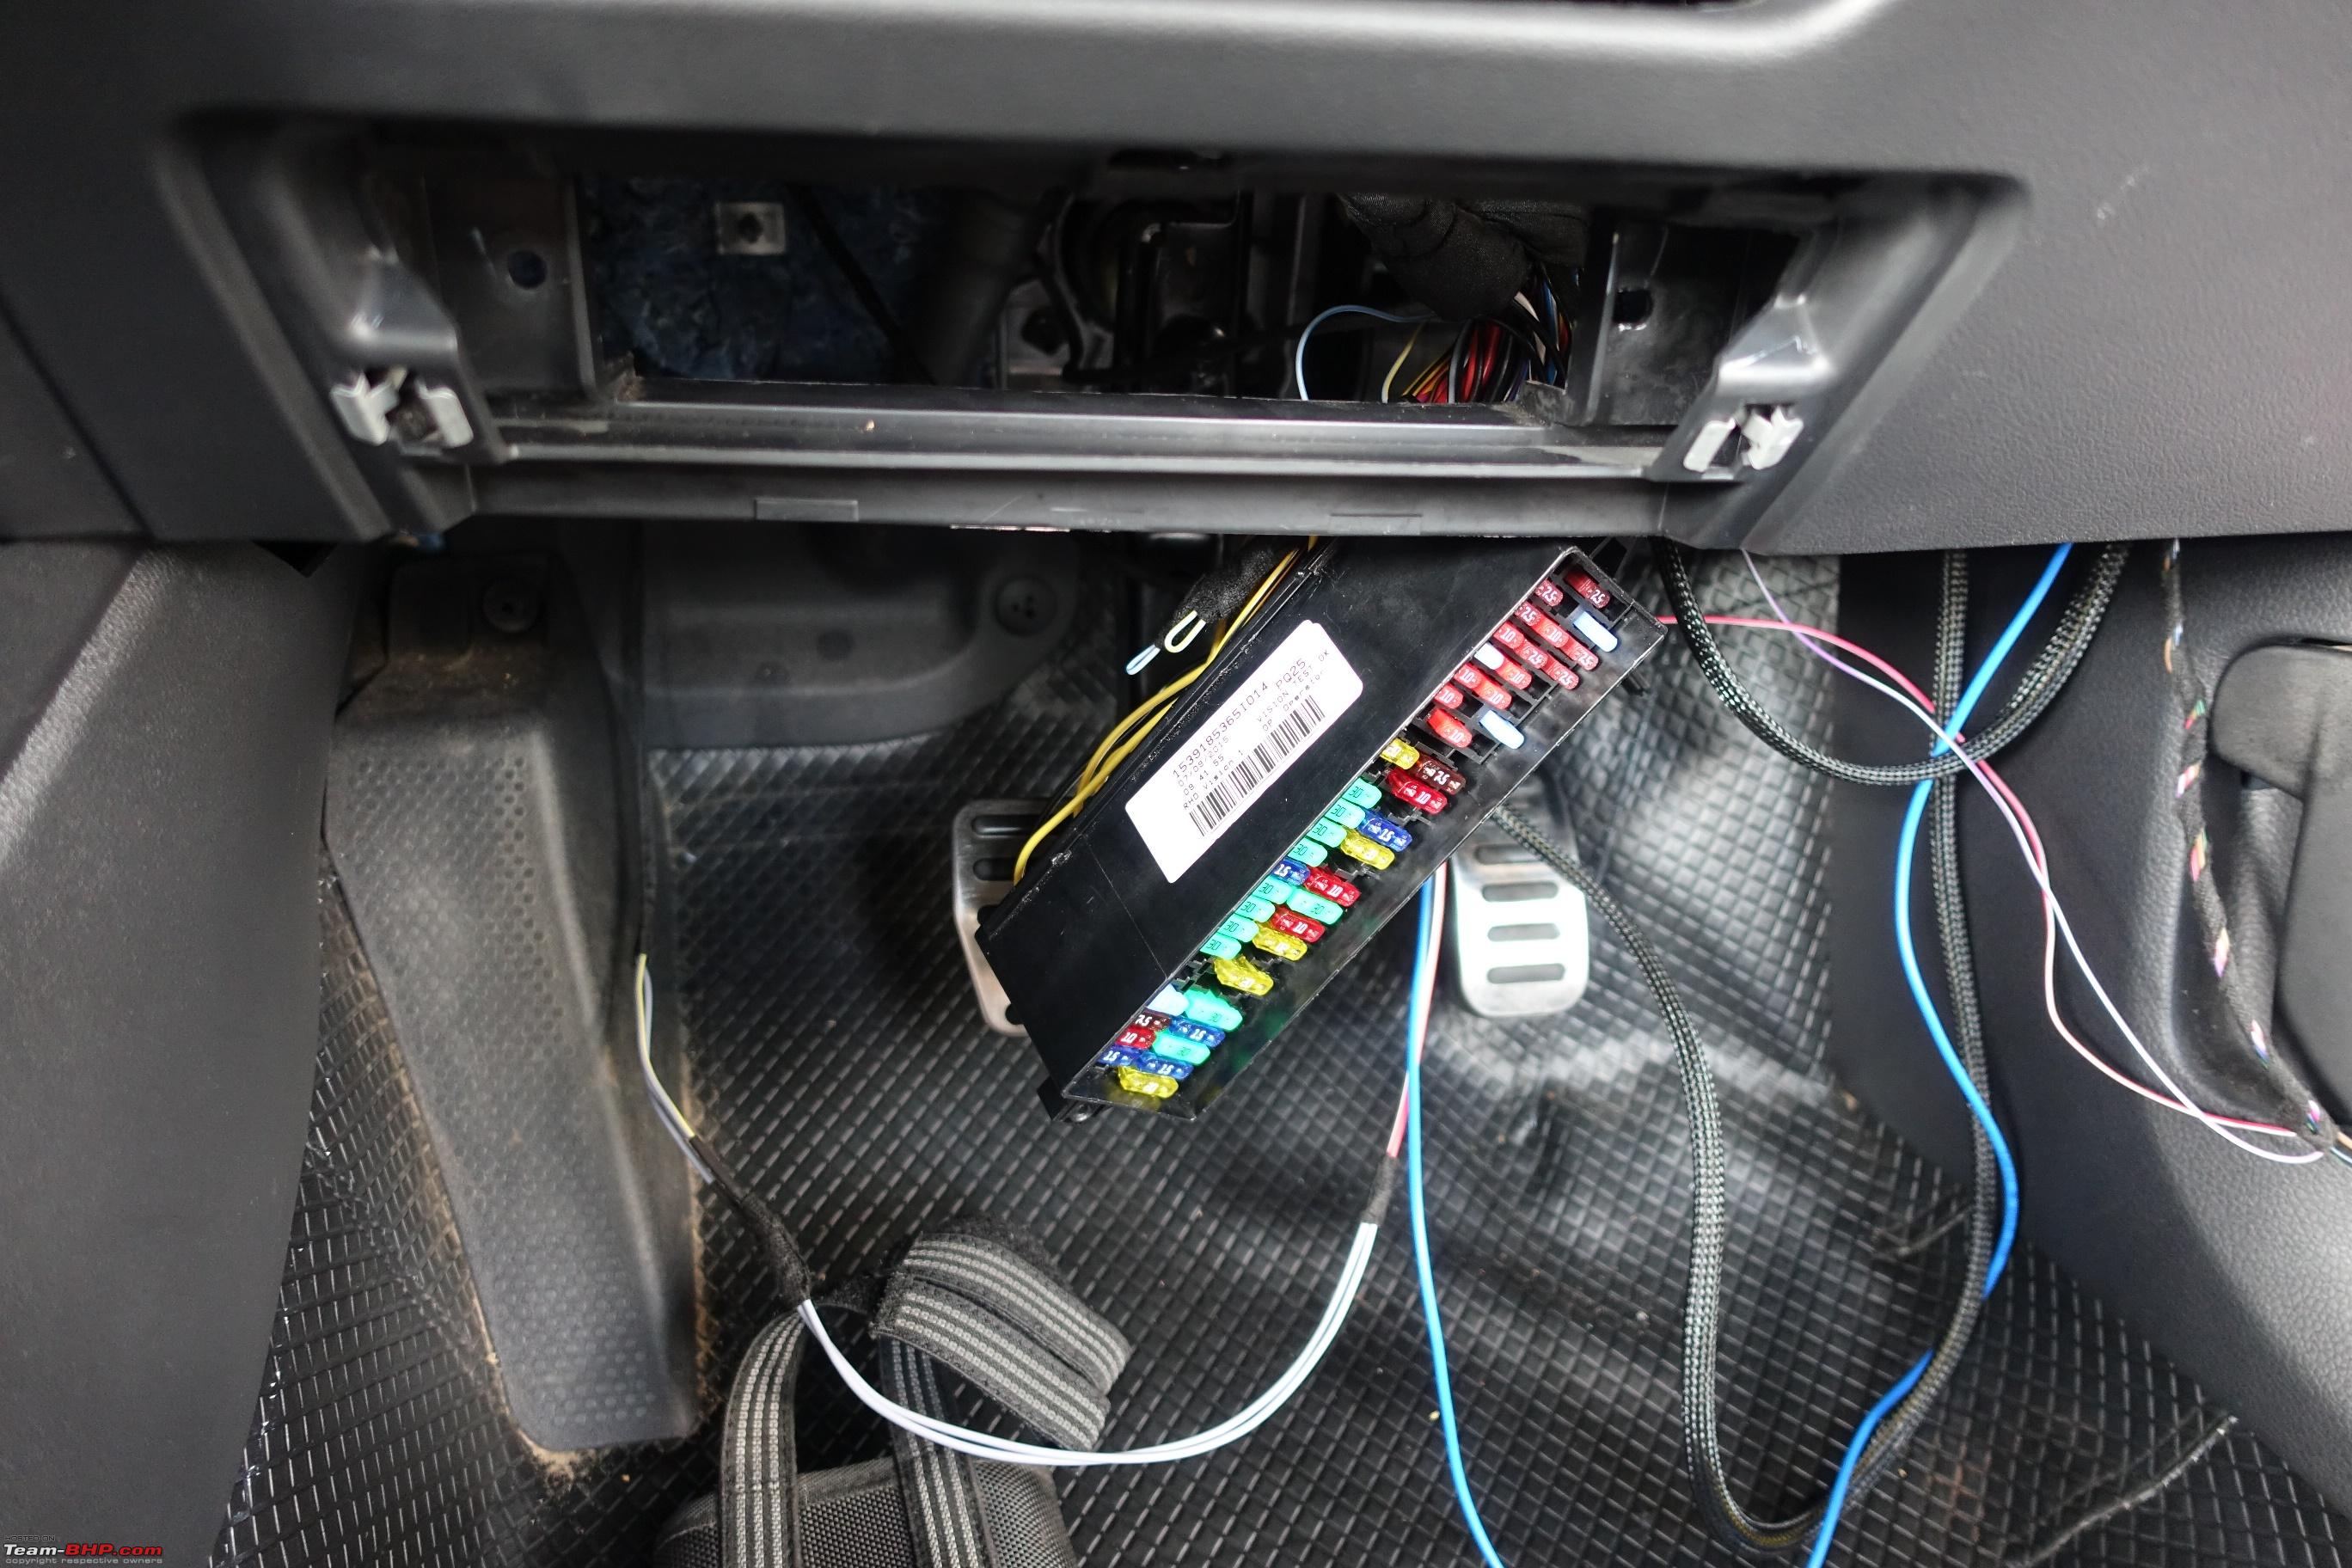 Instrument cluster out 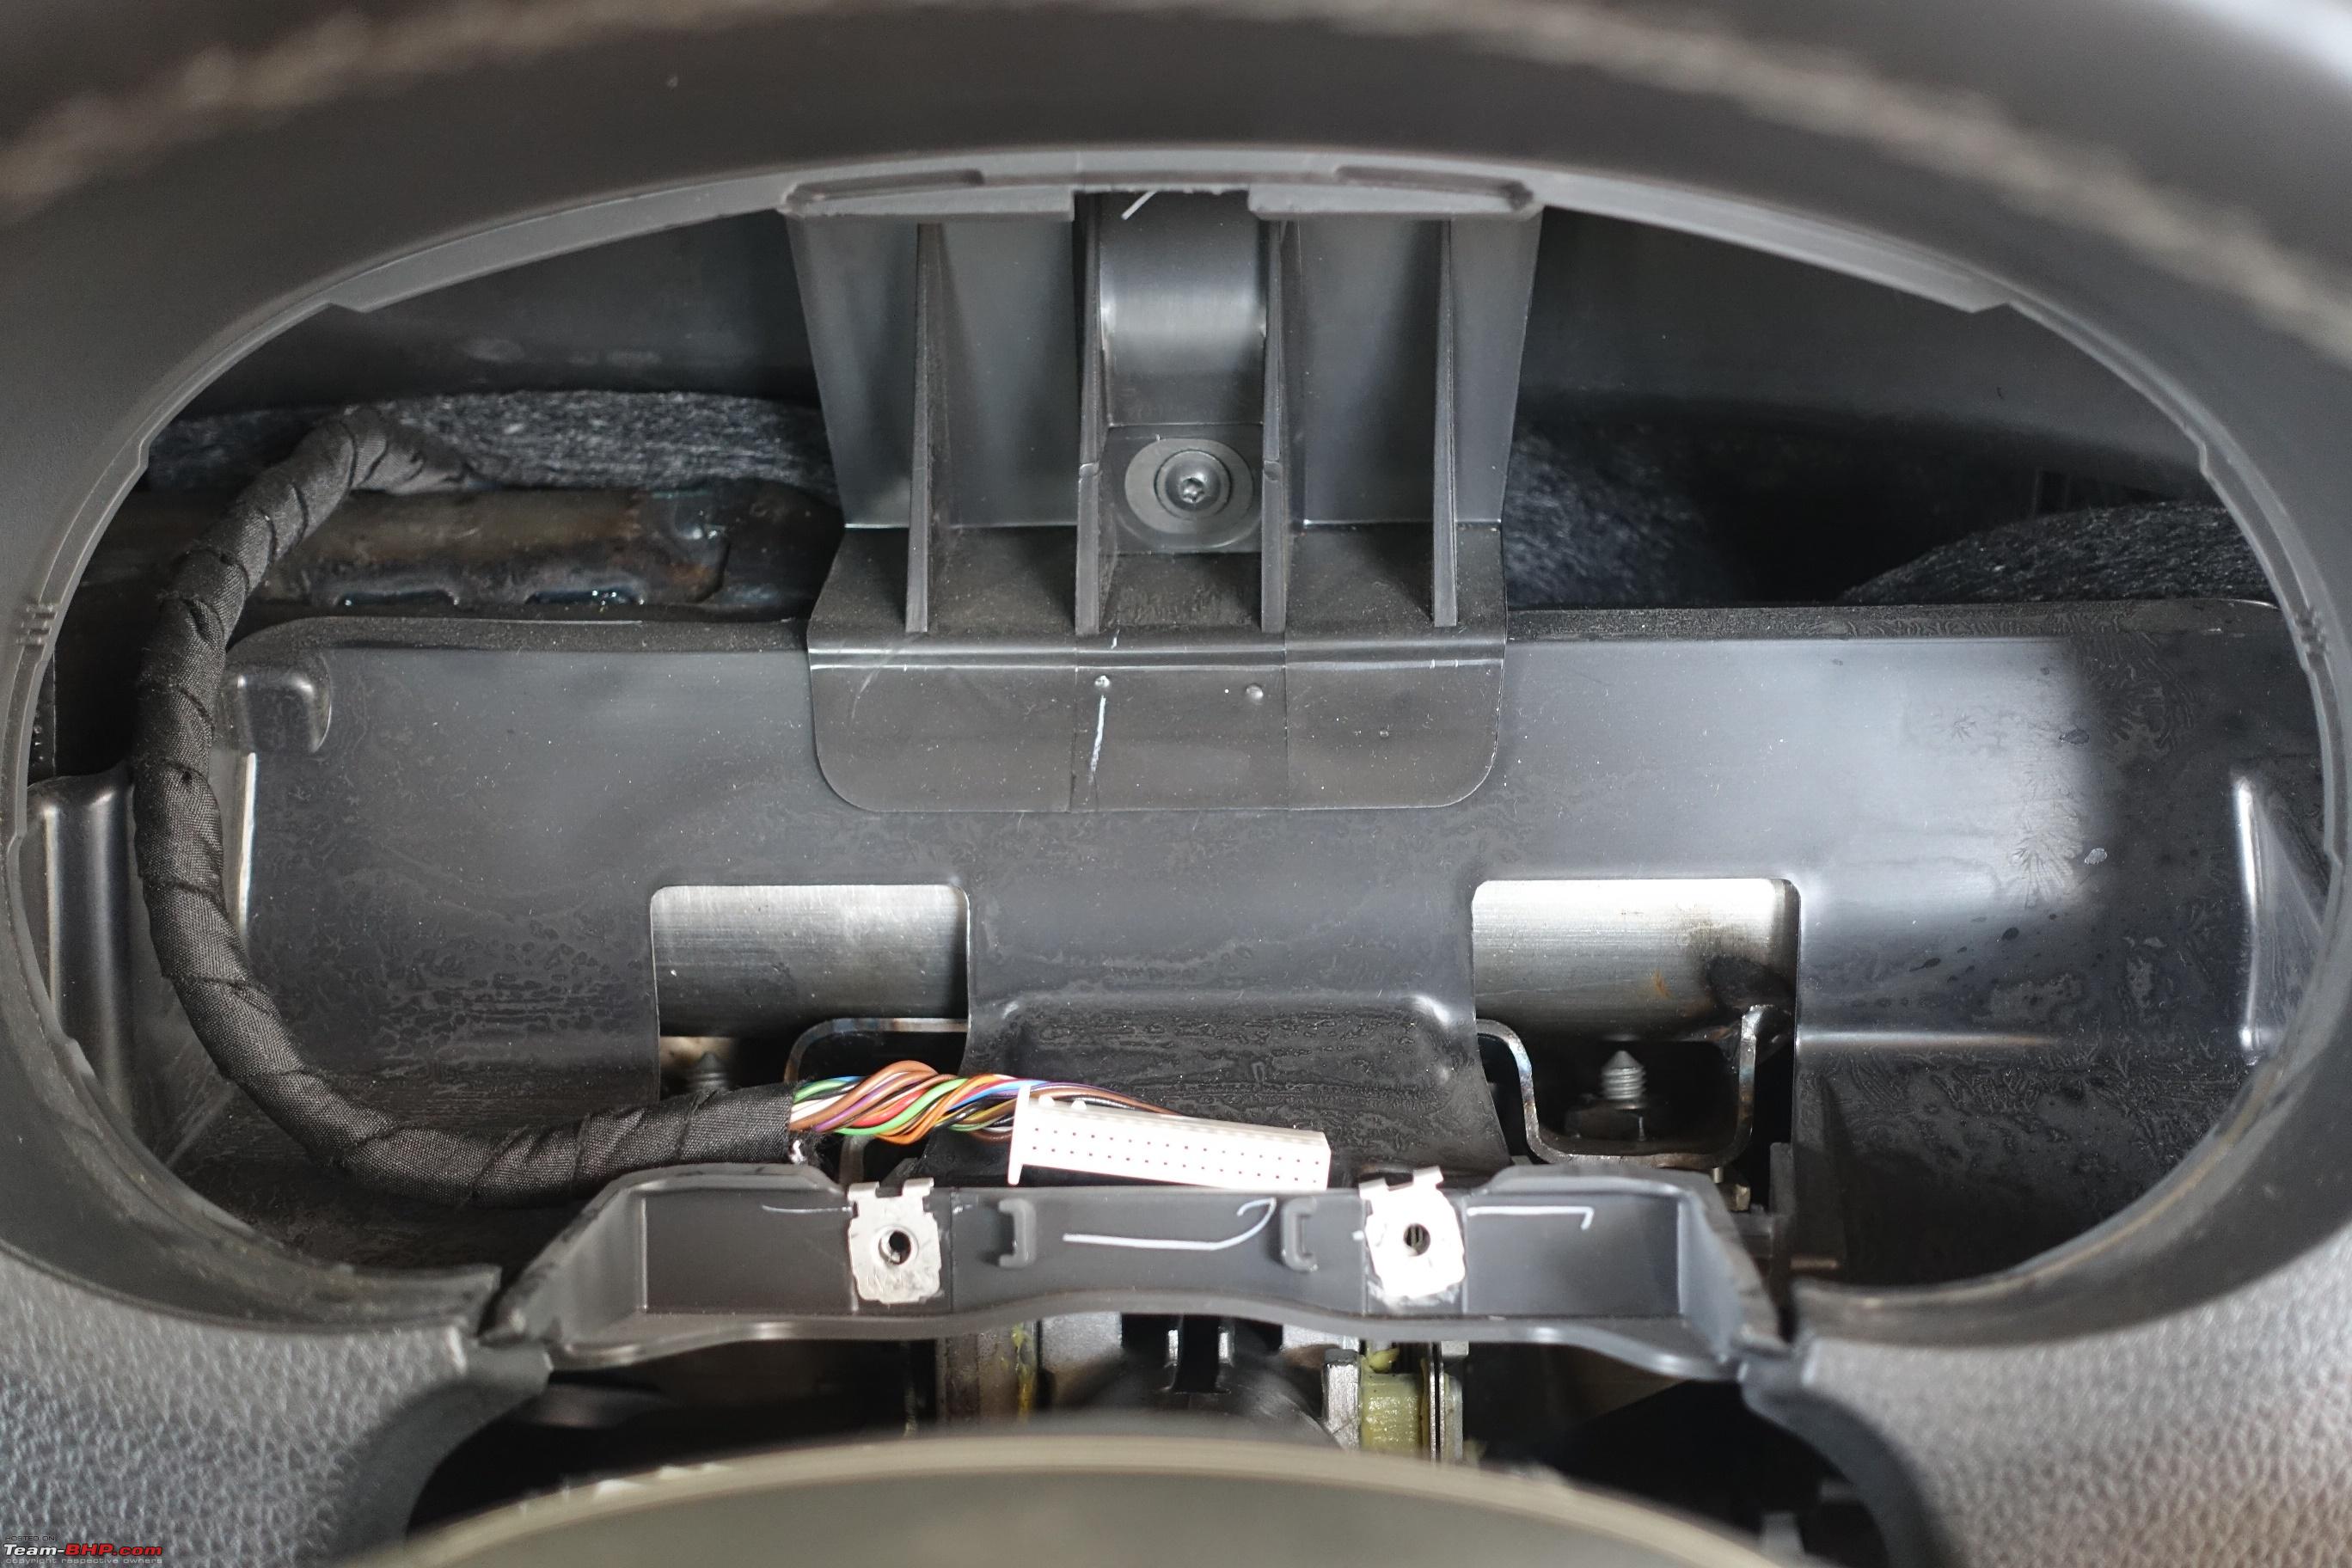 New CAN bus wires inserted in instrument cluster connector 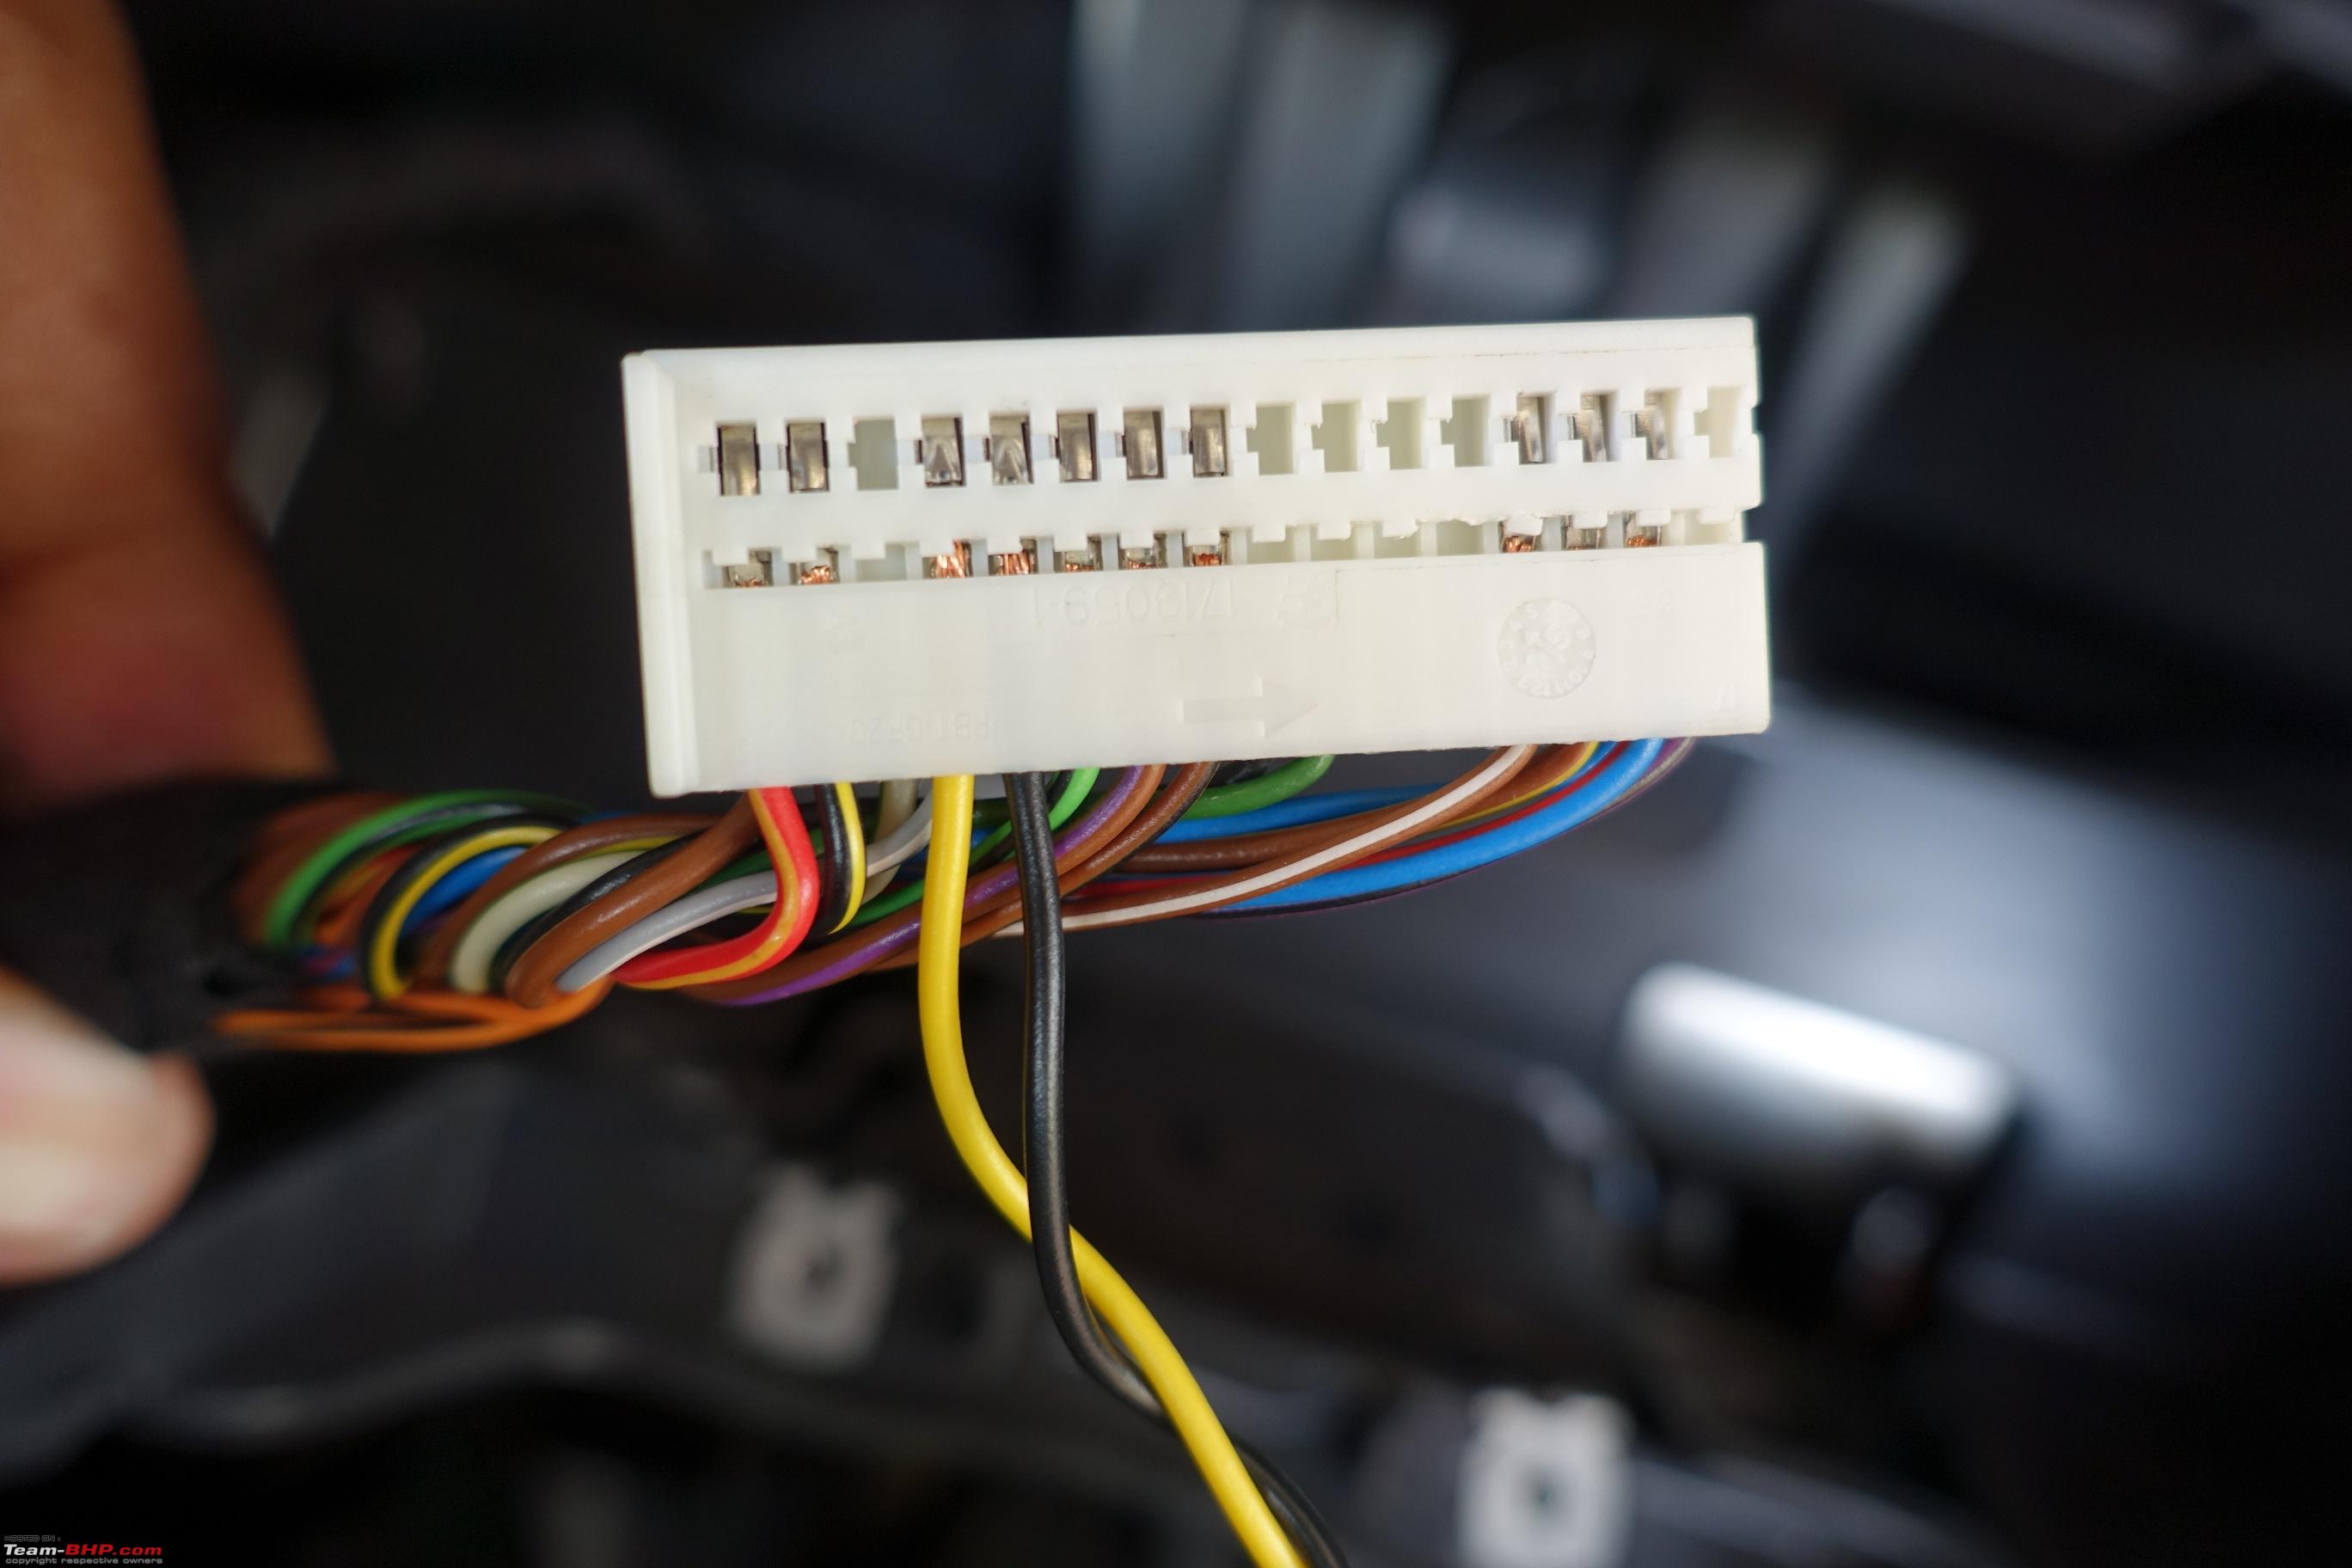 How to remove terminals from headlight switch. Insert the terminal removal tool, lift the tab with a small screw driver and pull out the wire. 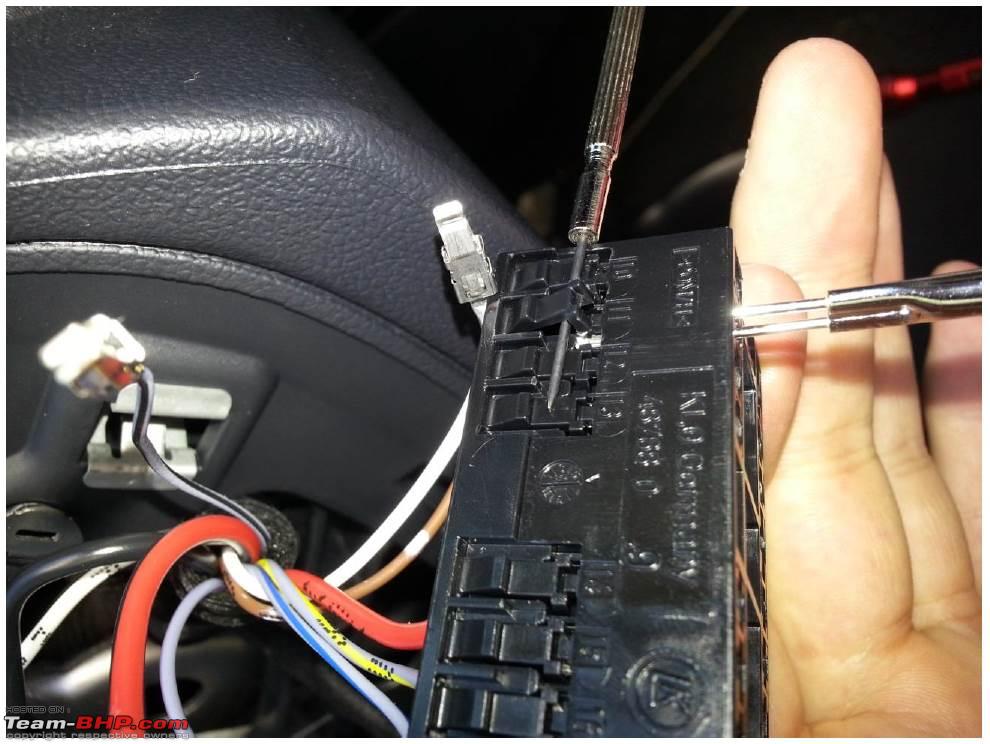 Picture Source: Ciclo's instruction document Headlight switch removed and terminals from headlight switch connector removed. 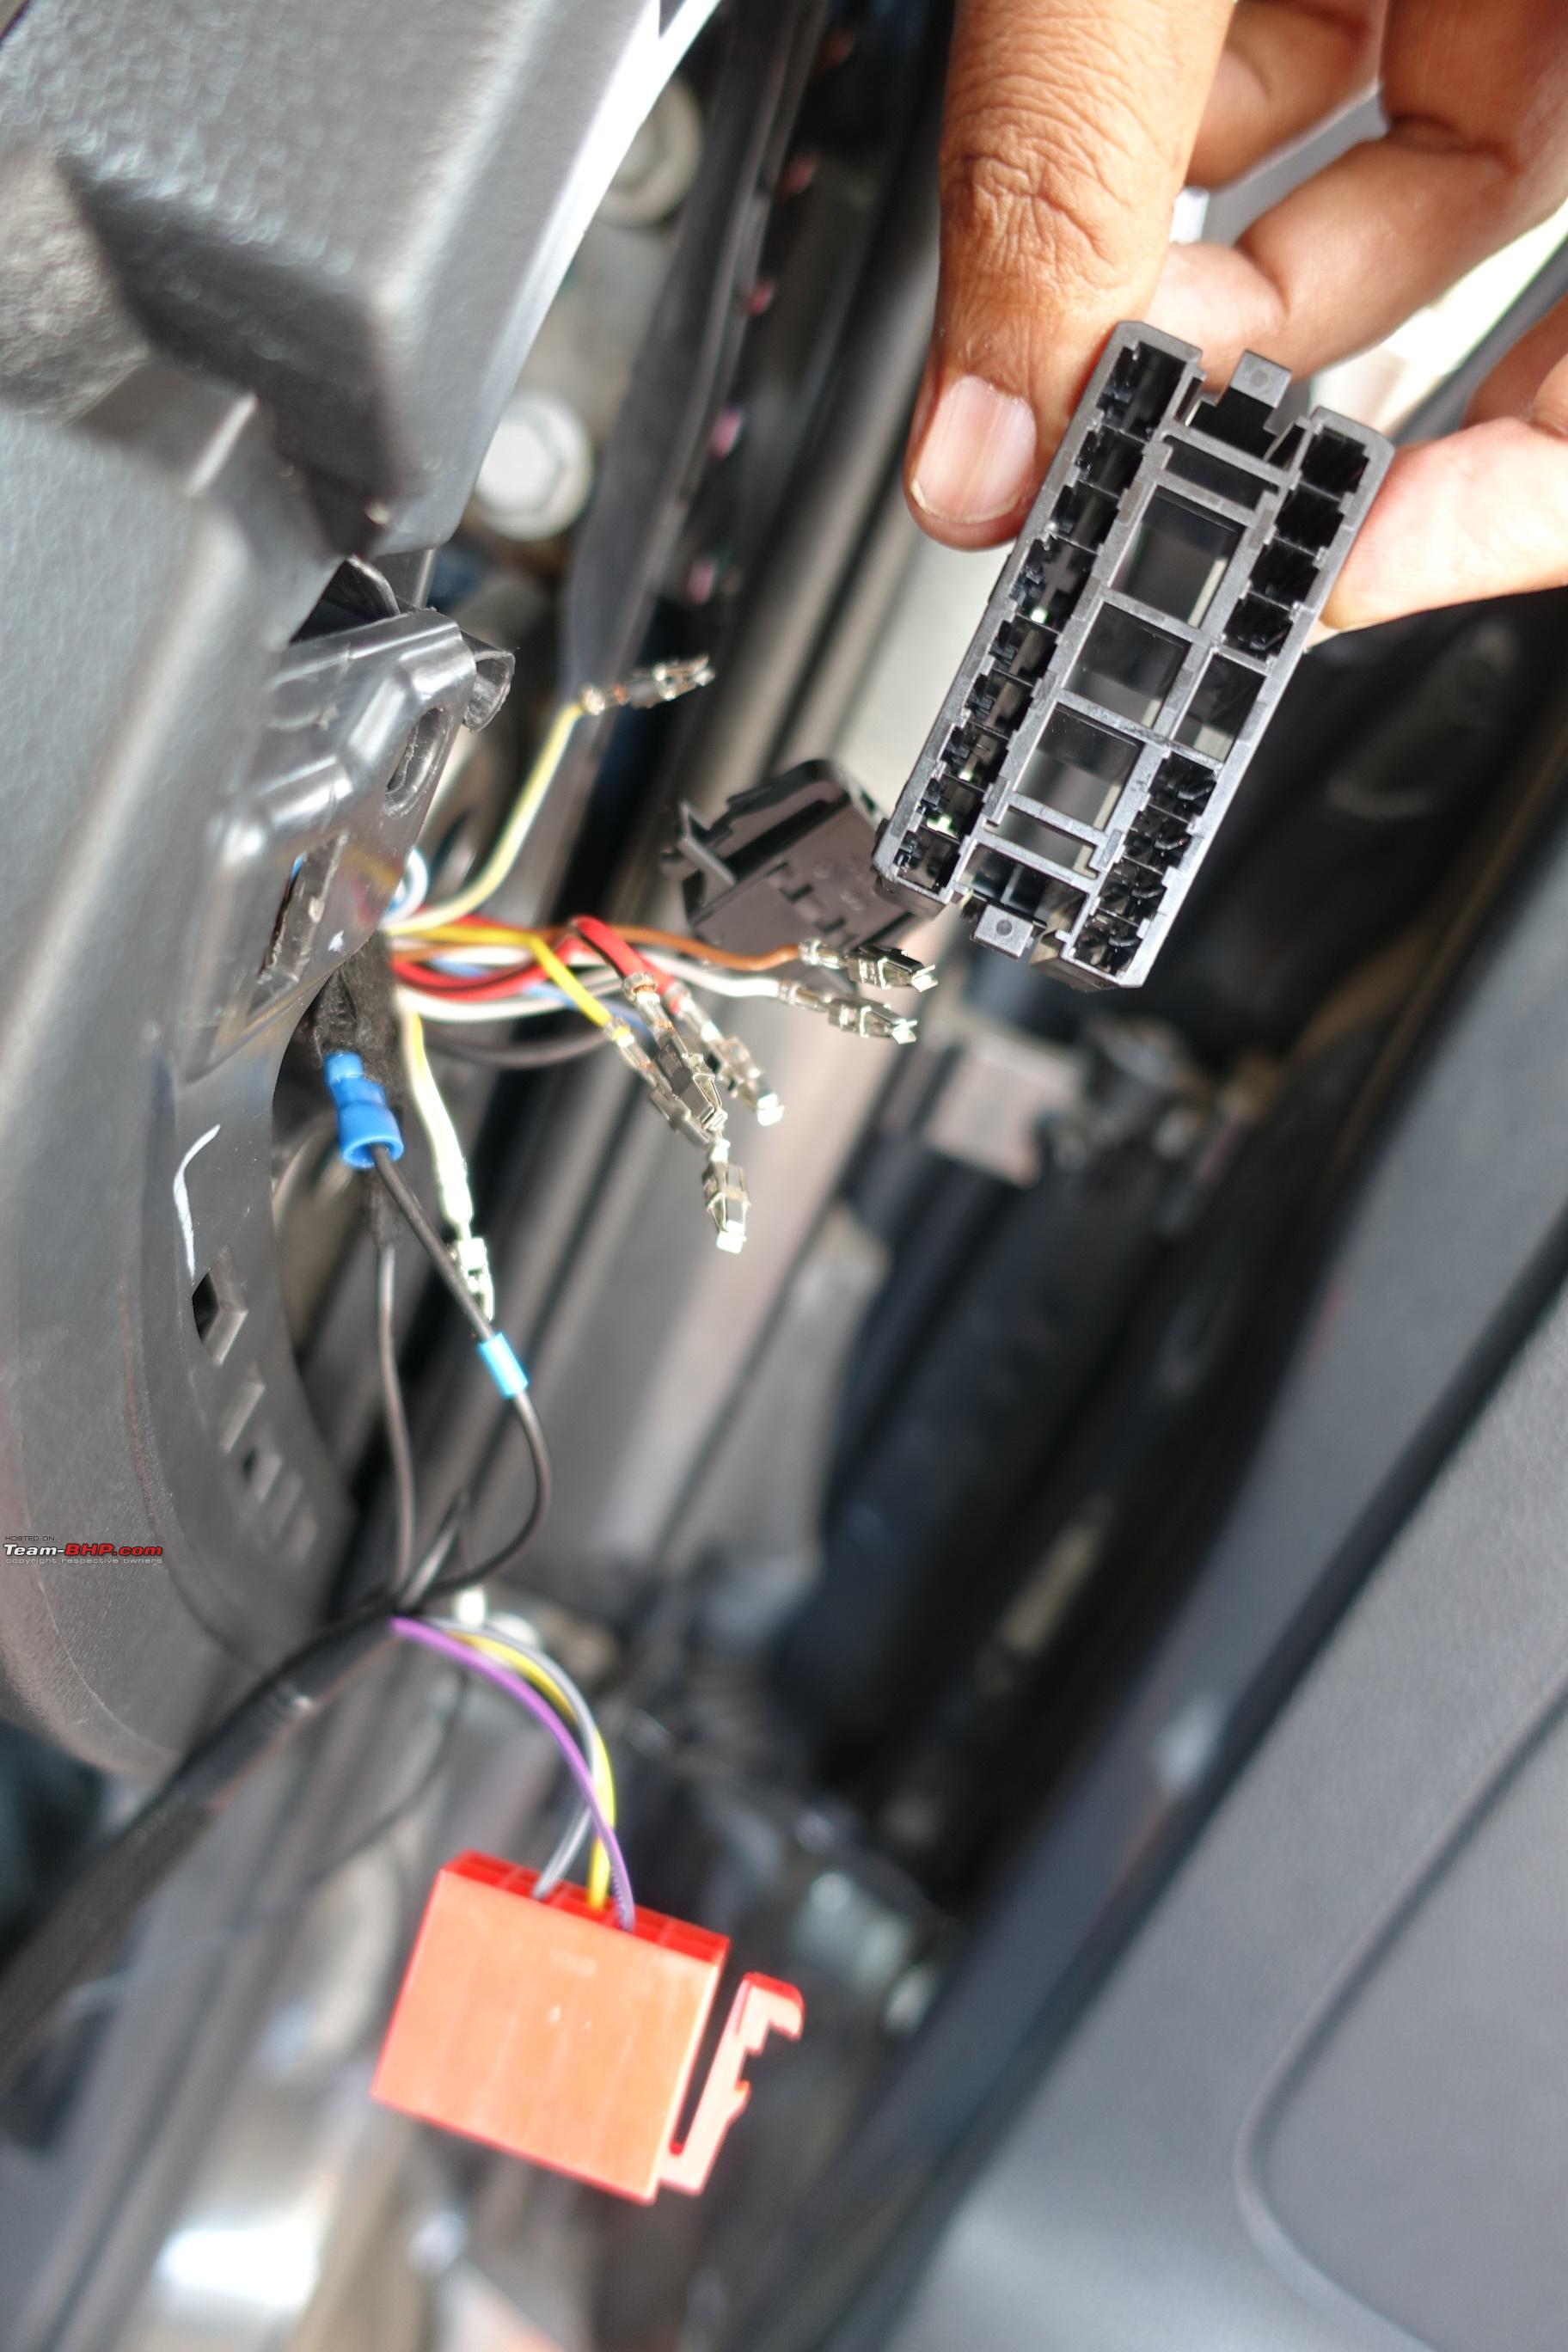 Wires from headlight switch connector transferred to the red connector in the new wiring harness. 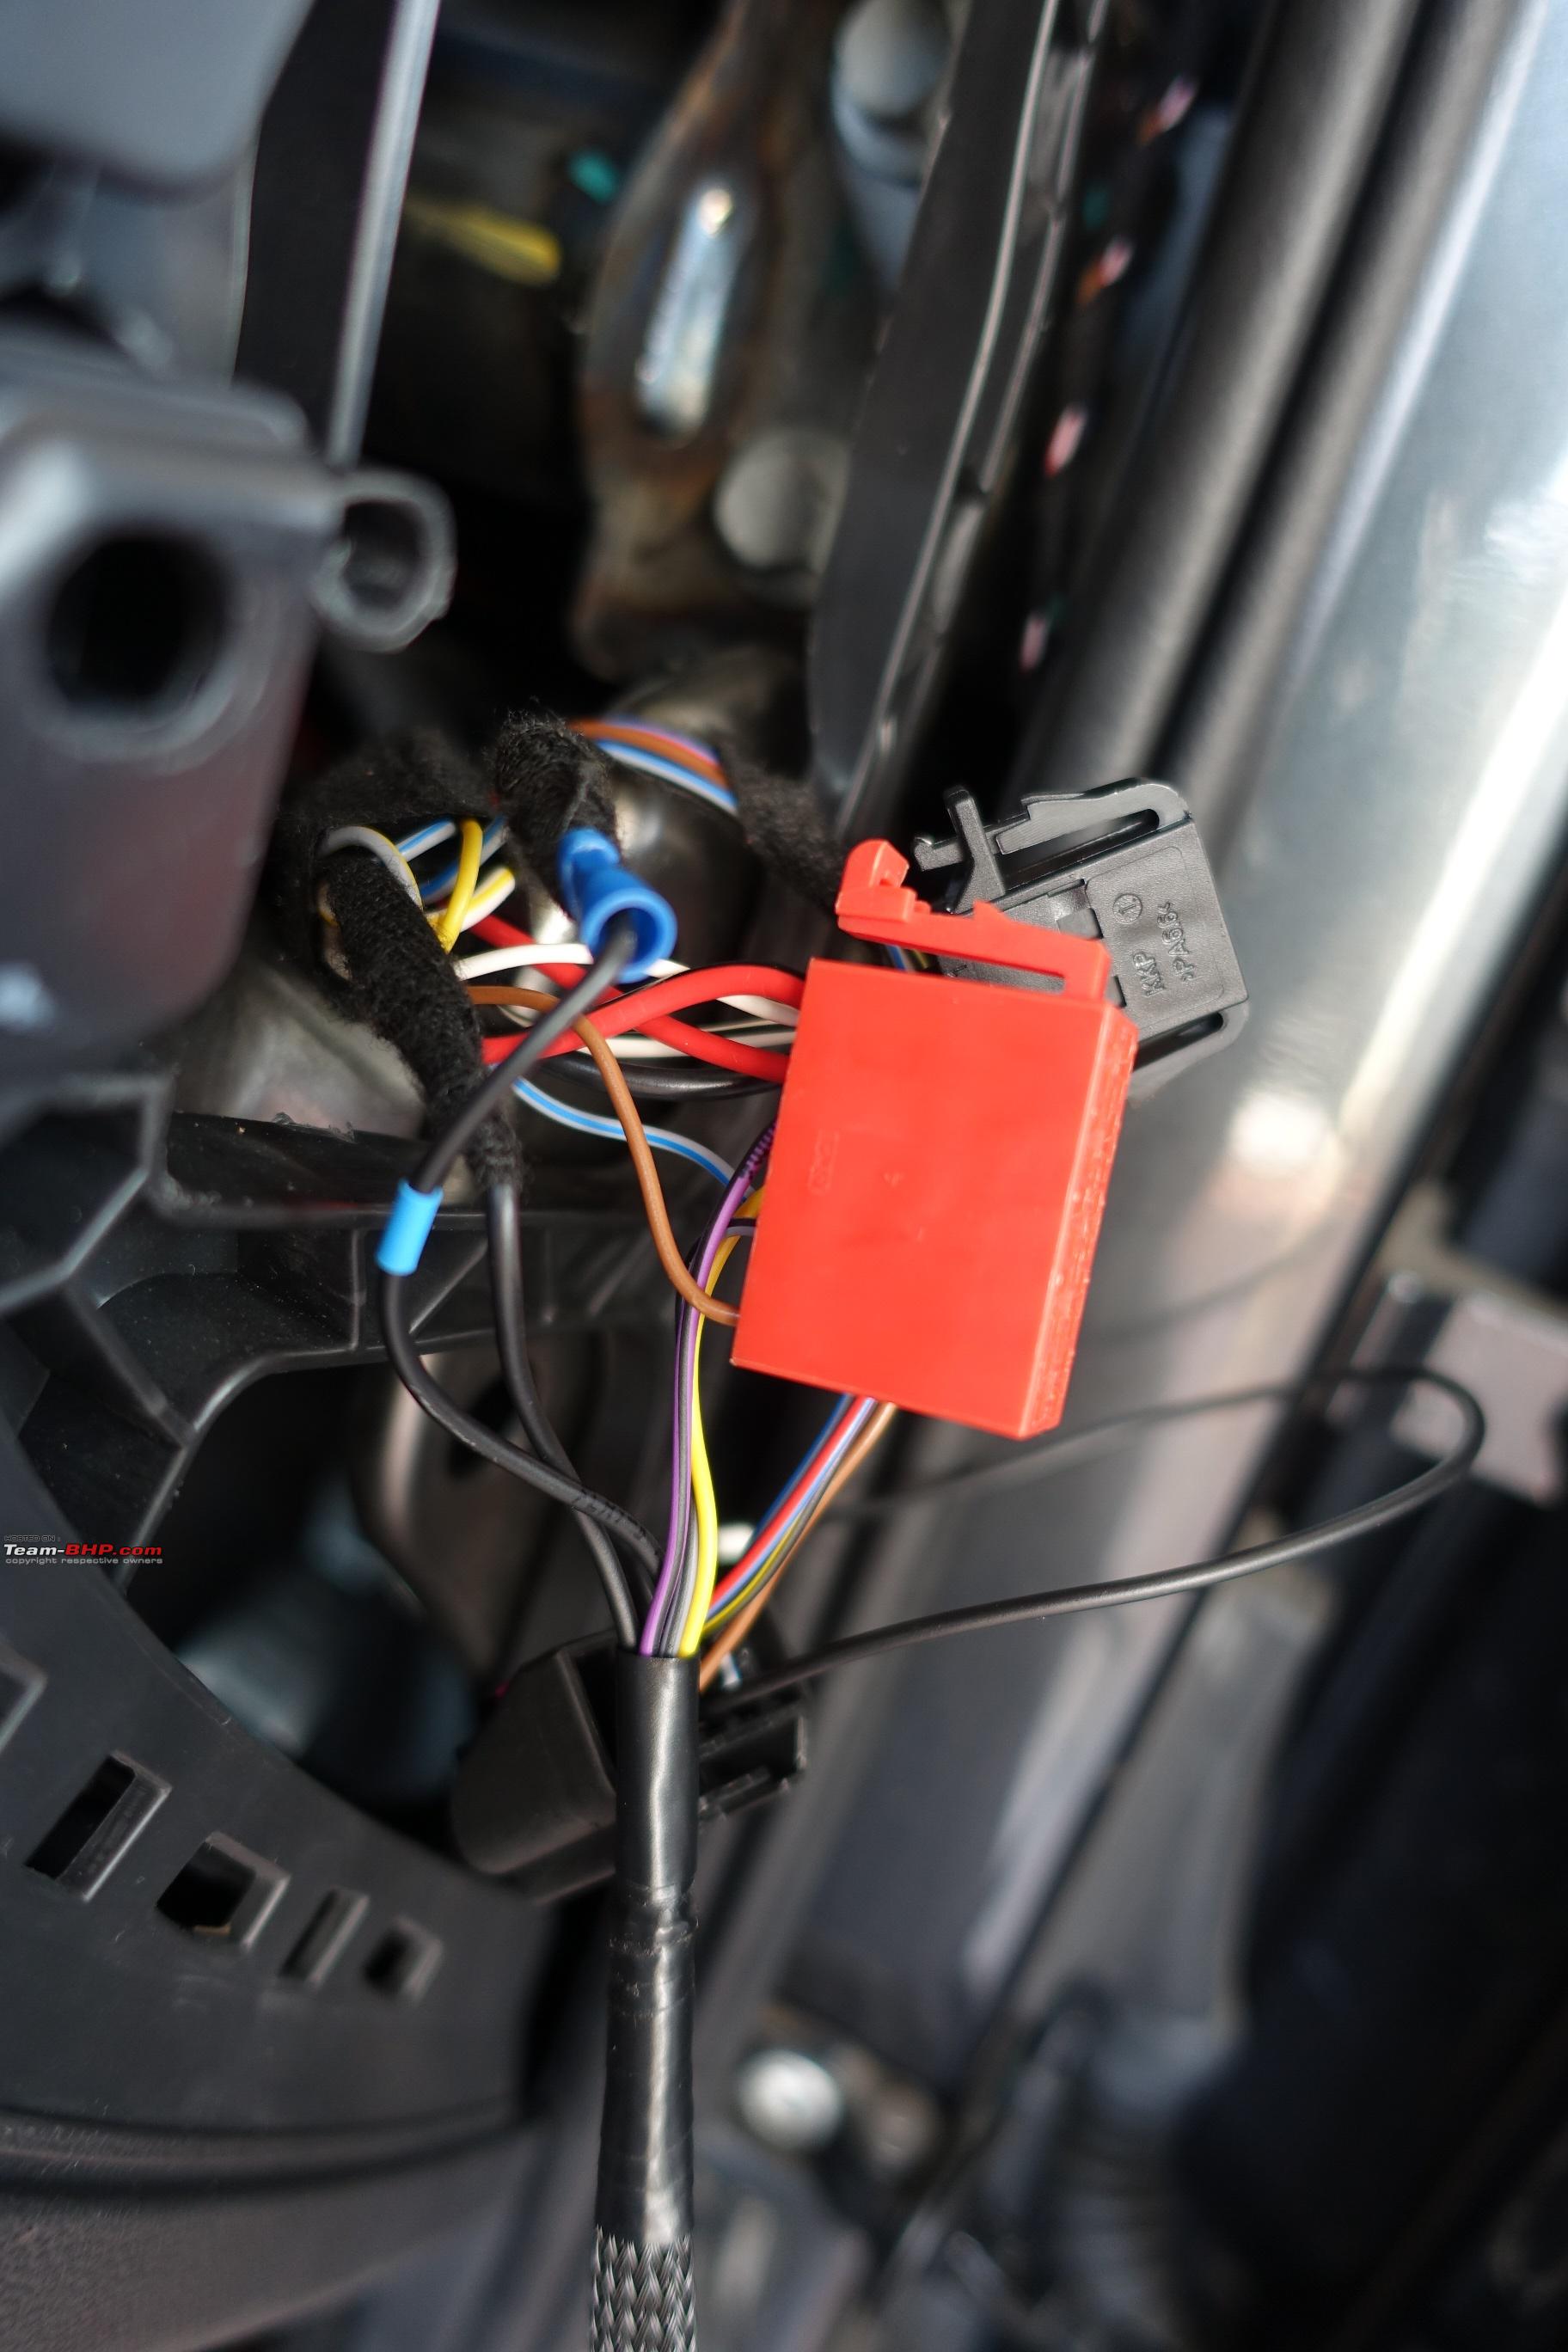 Headlight switch wiring completed 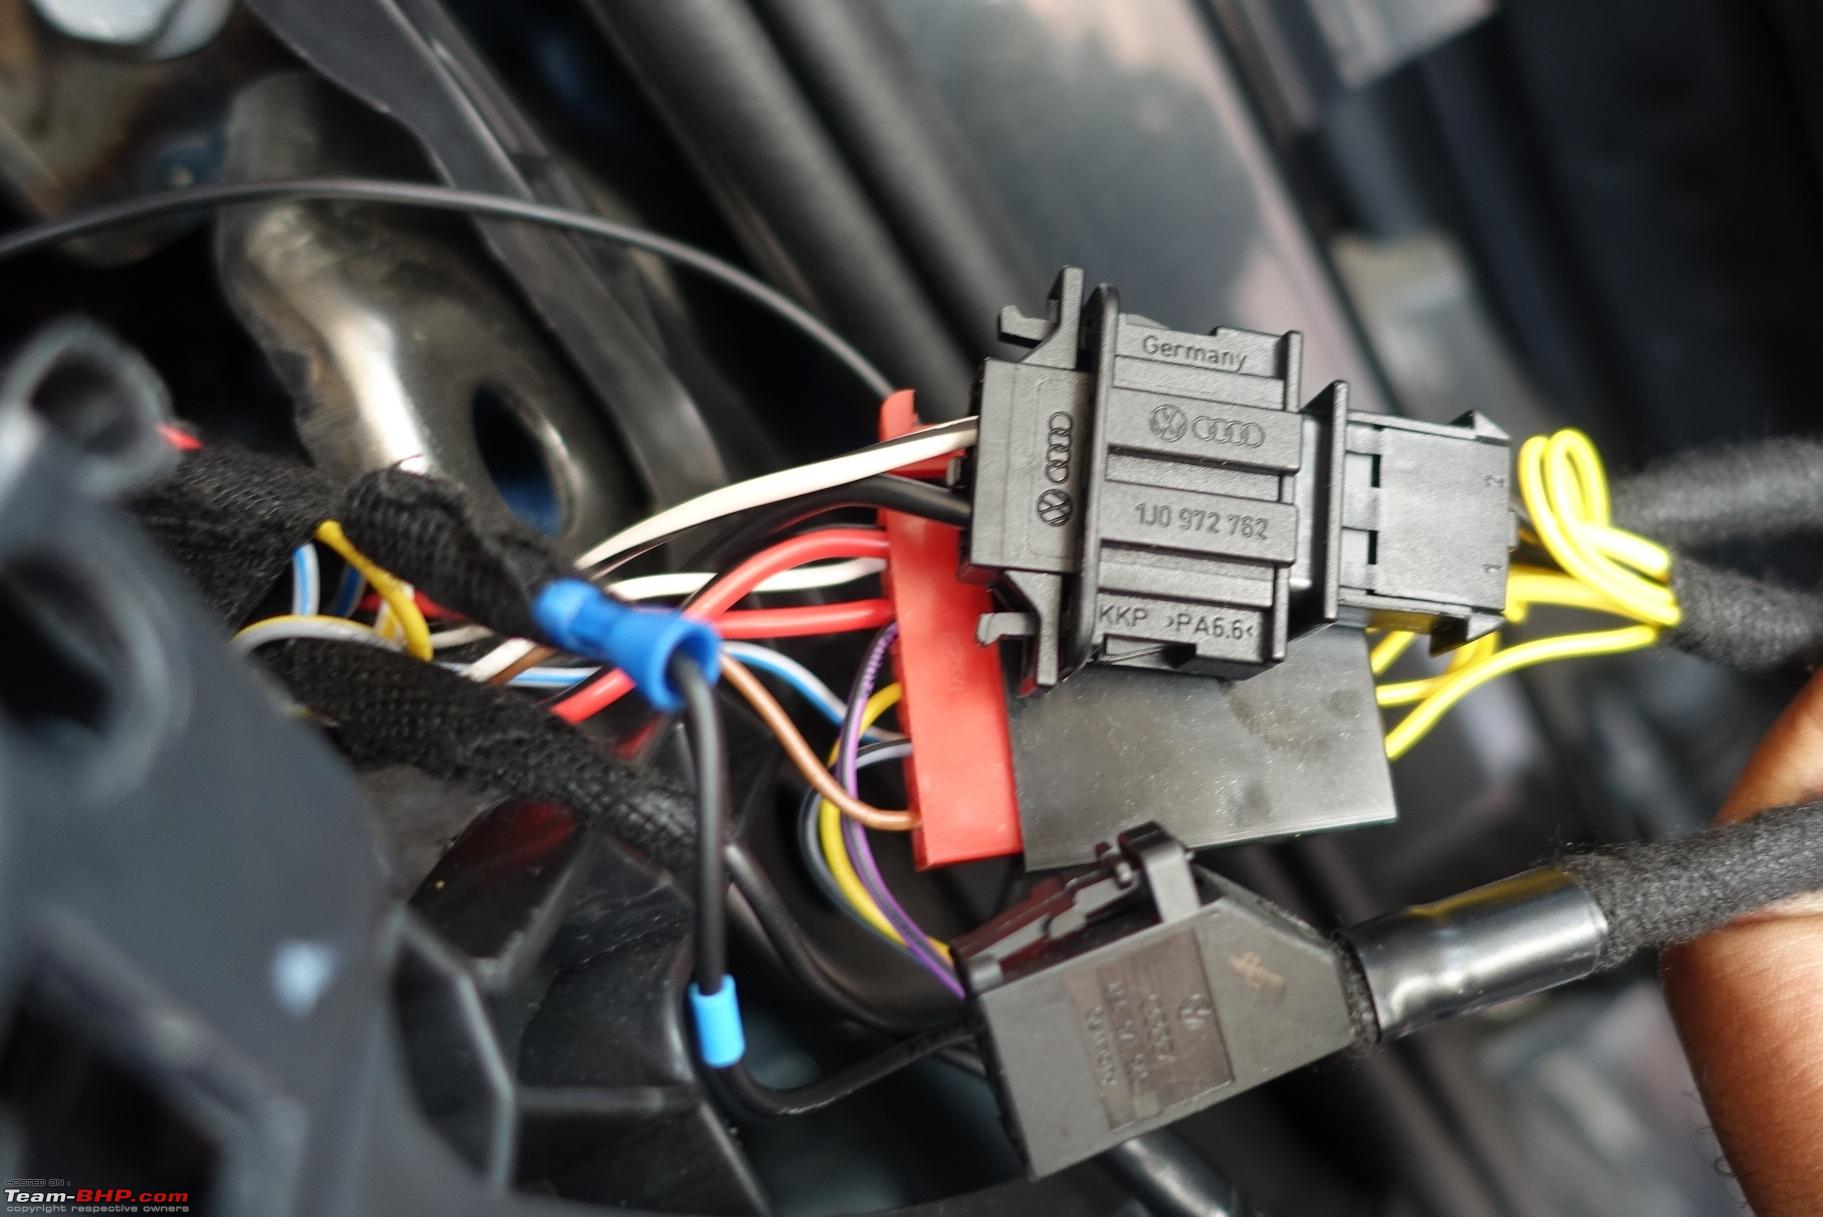 Relay carrier with the new relays and bridge 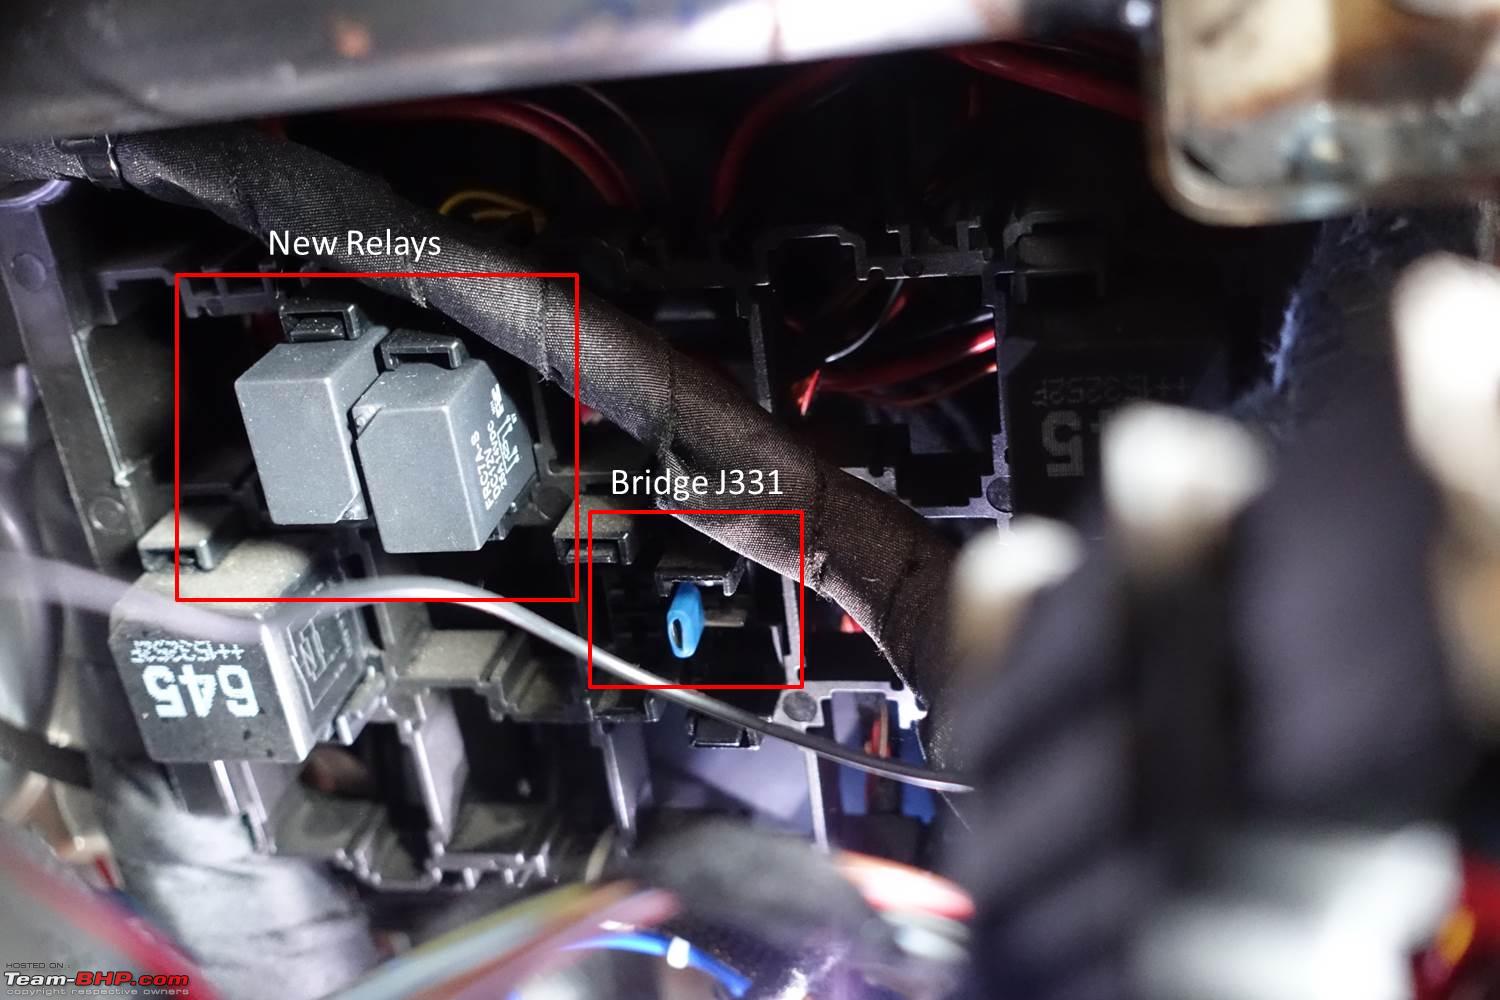 BCM connectors wired 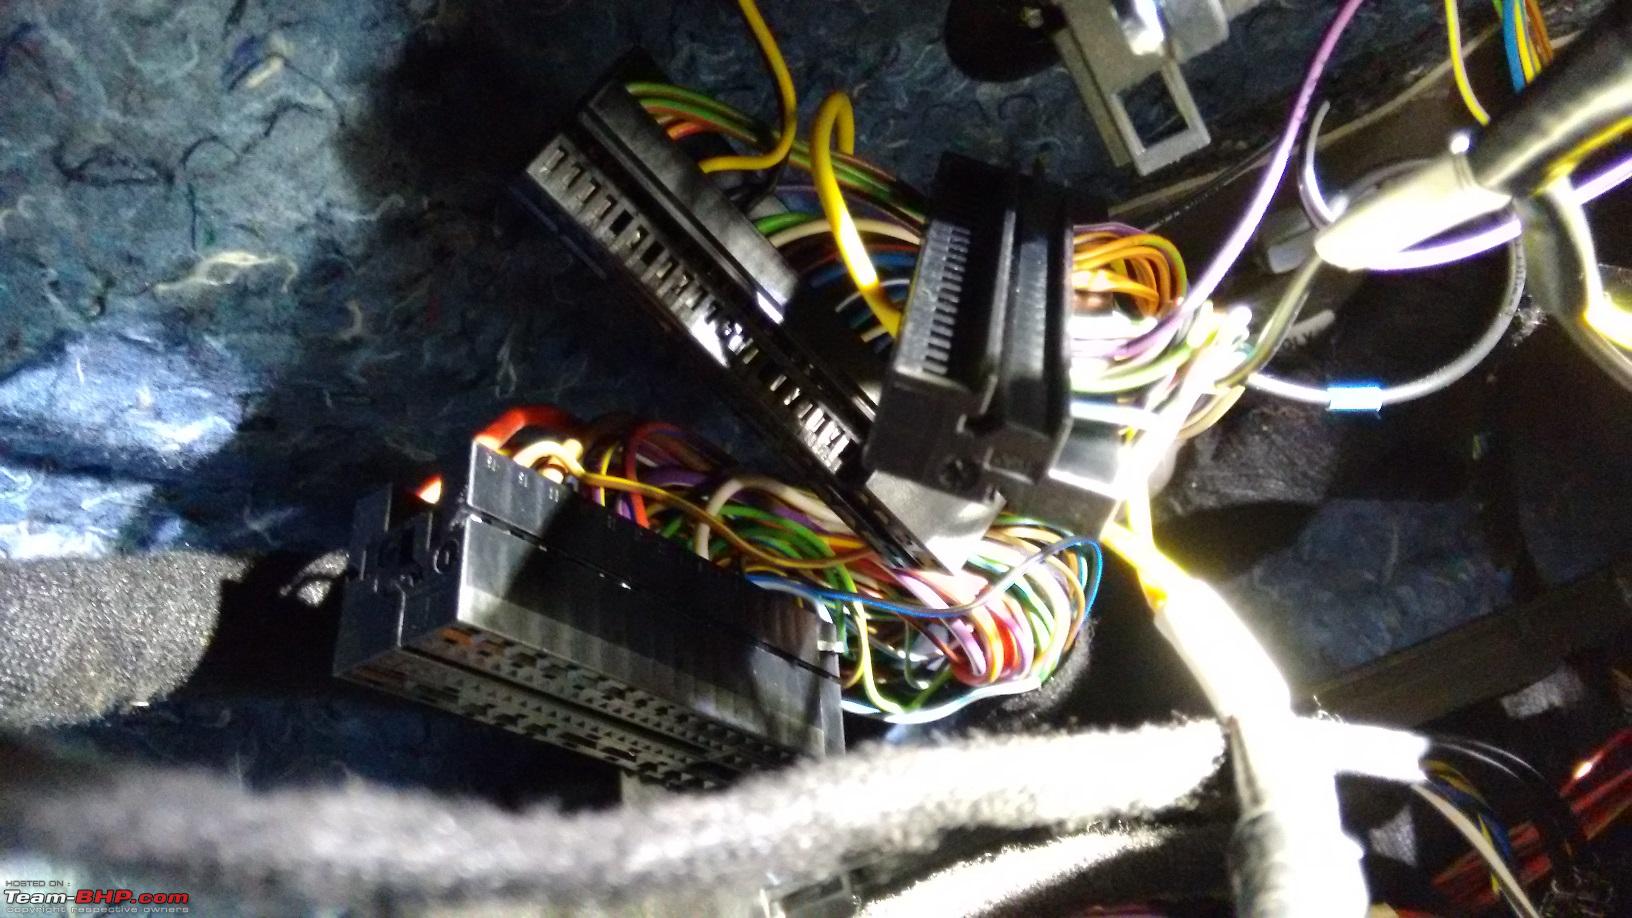 Fuse carrier wired  Almost 80% of the work was done in this position. 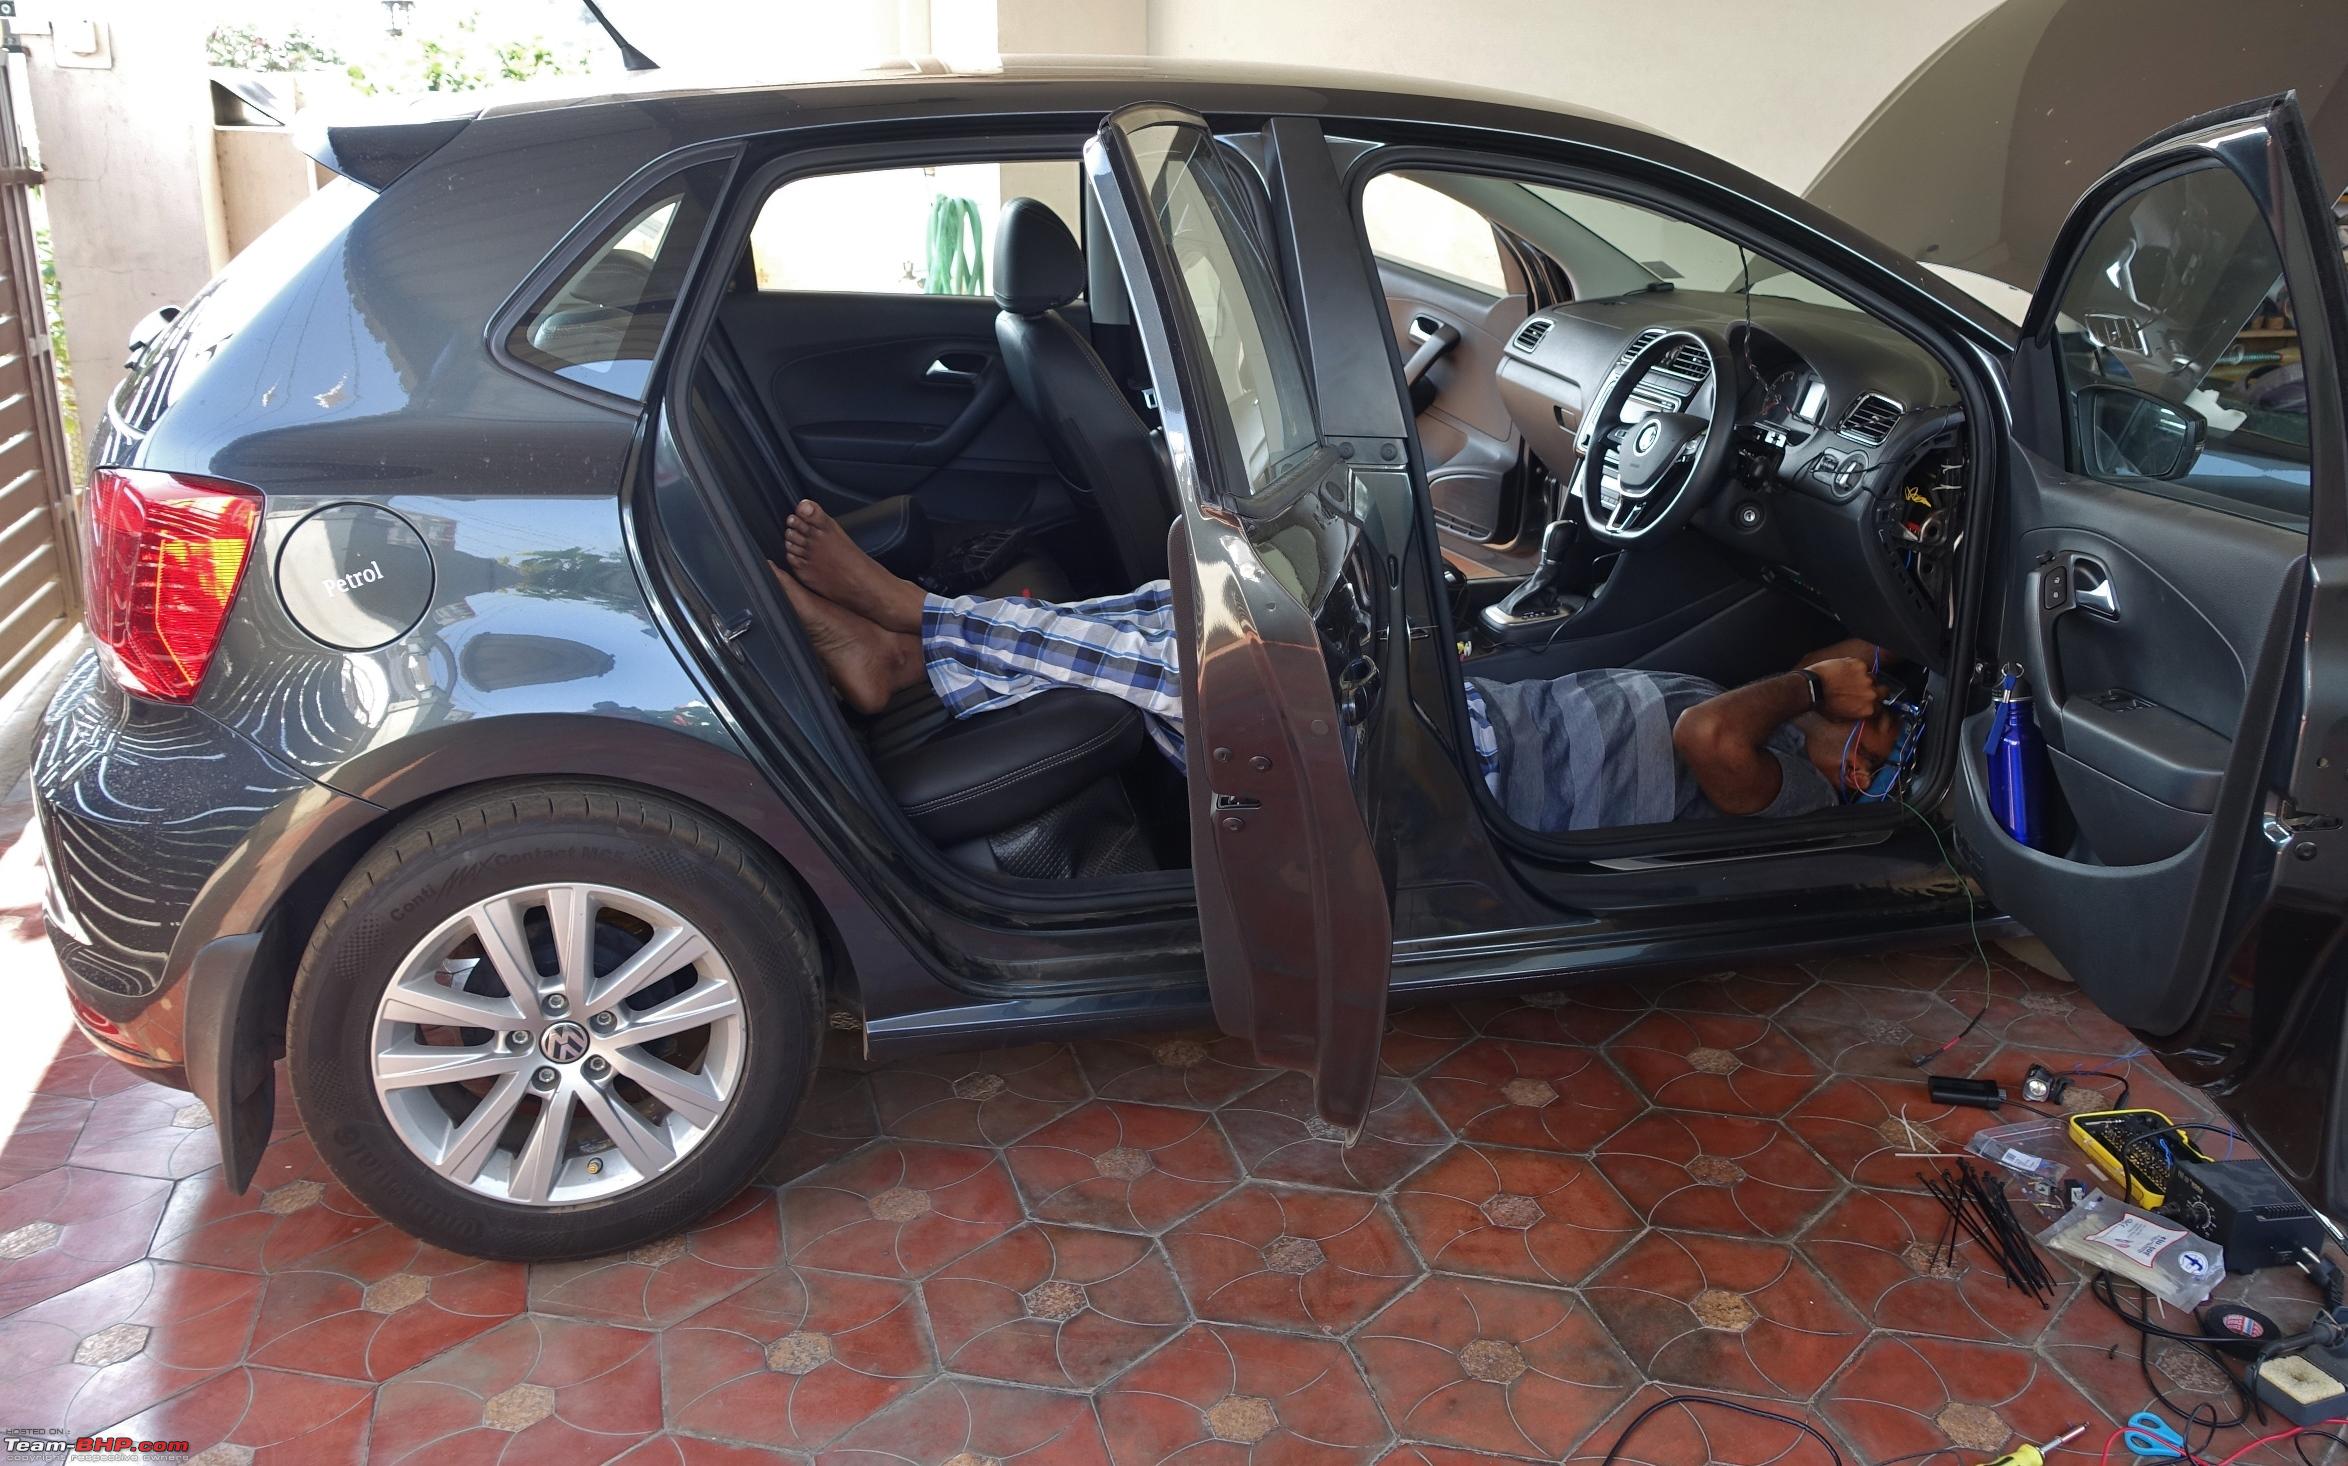 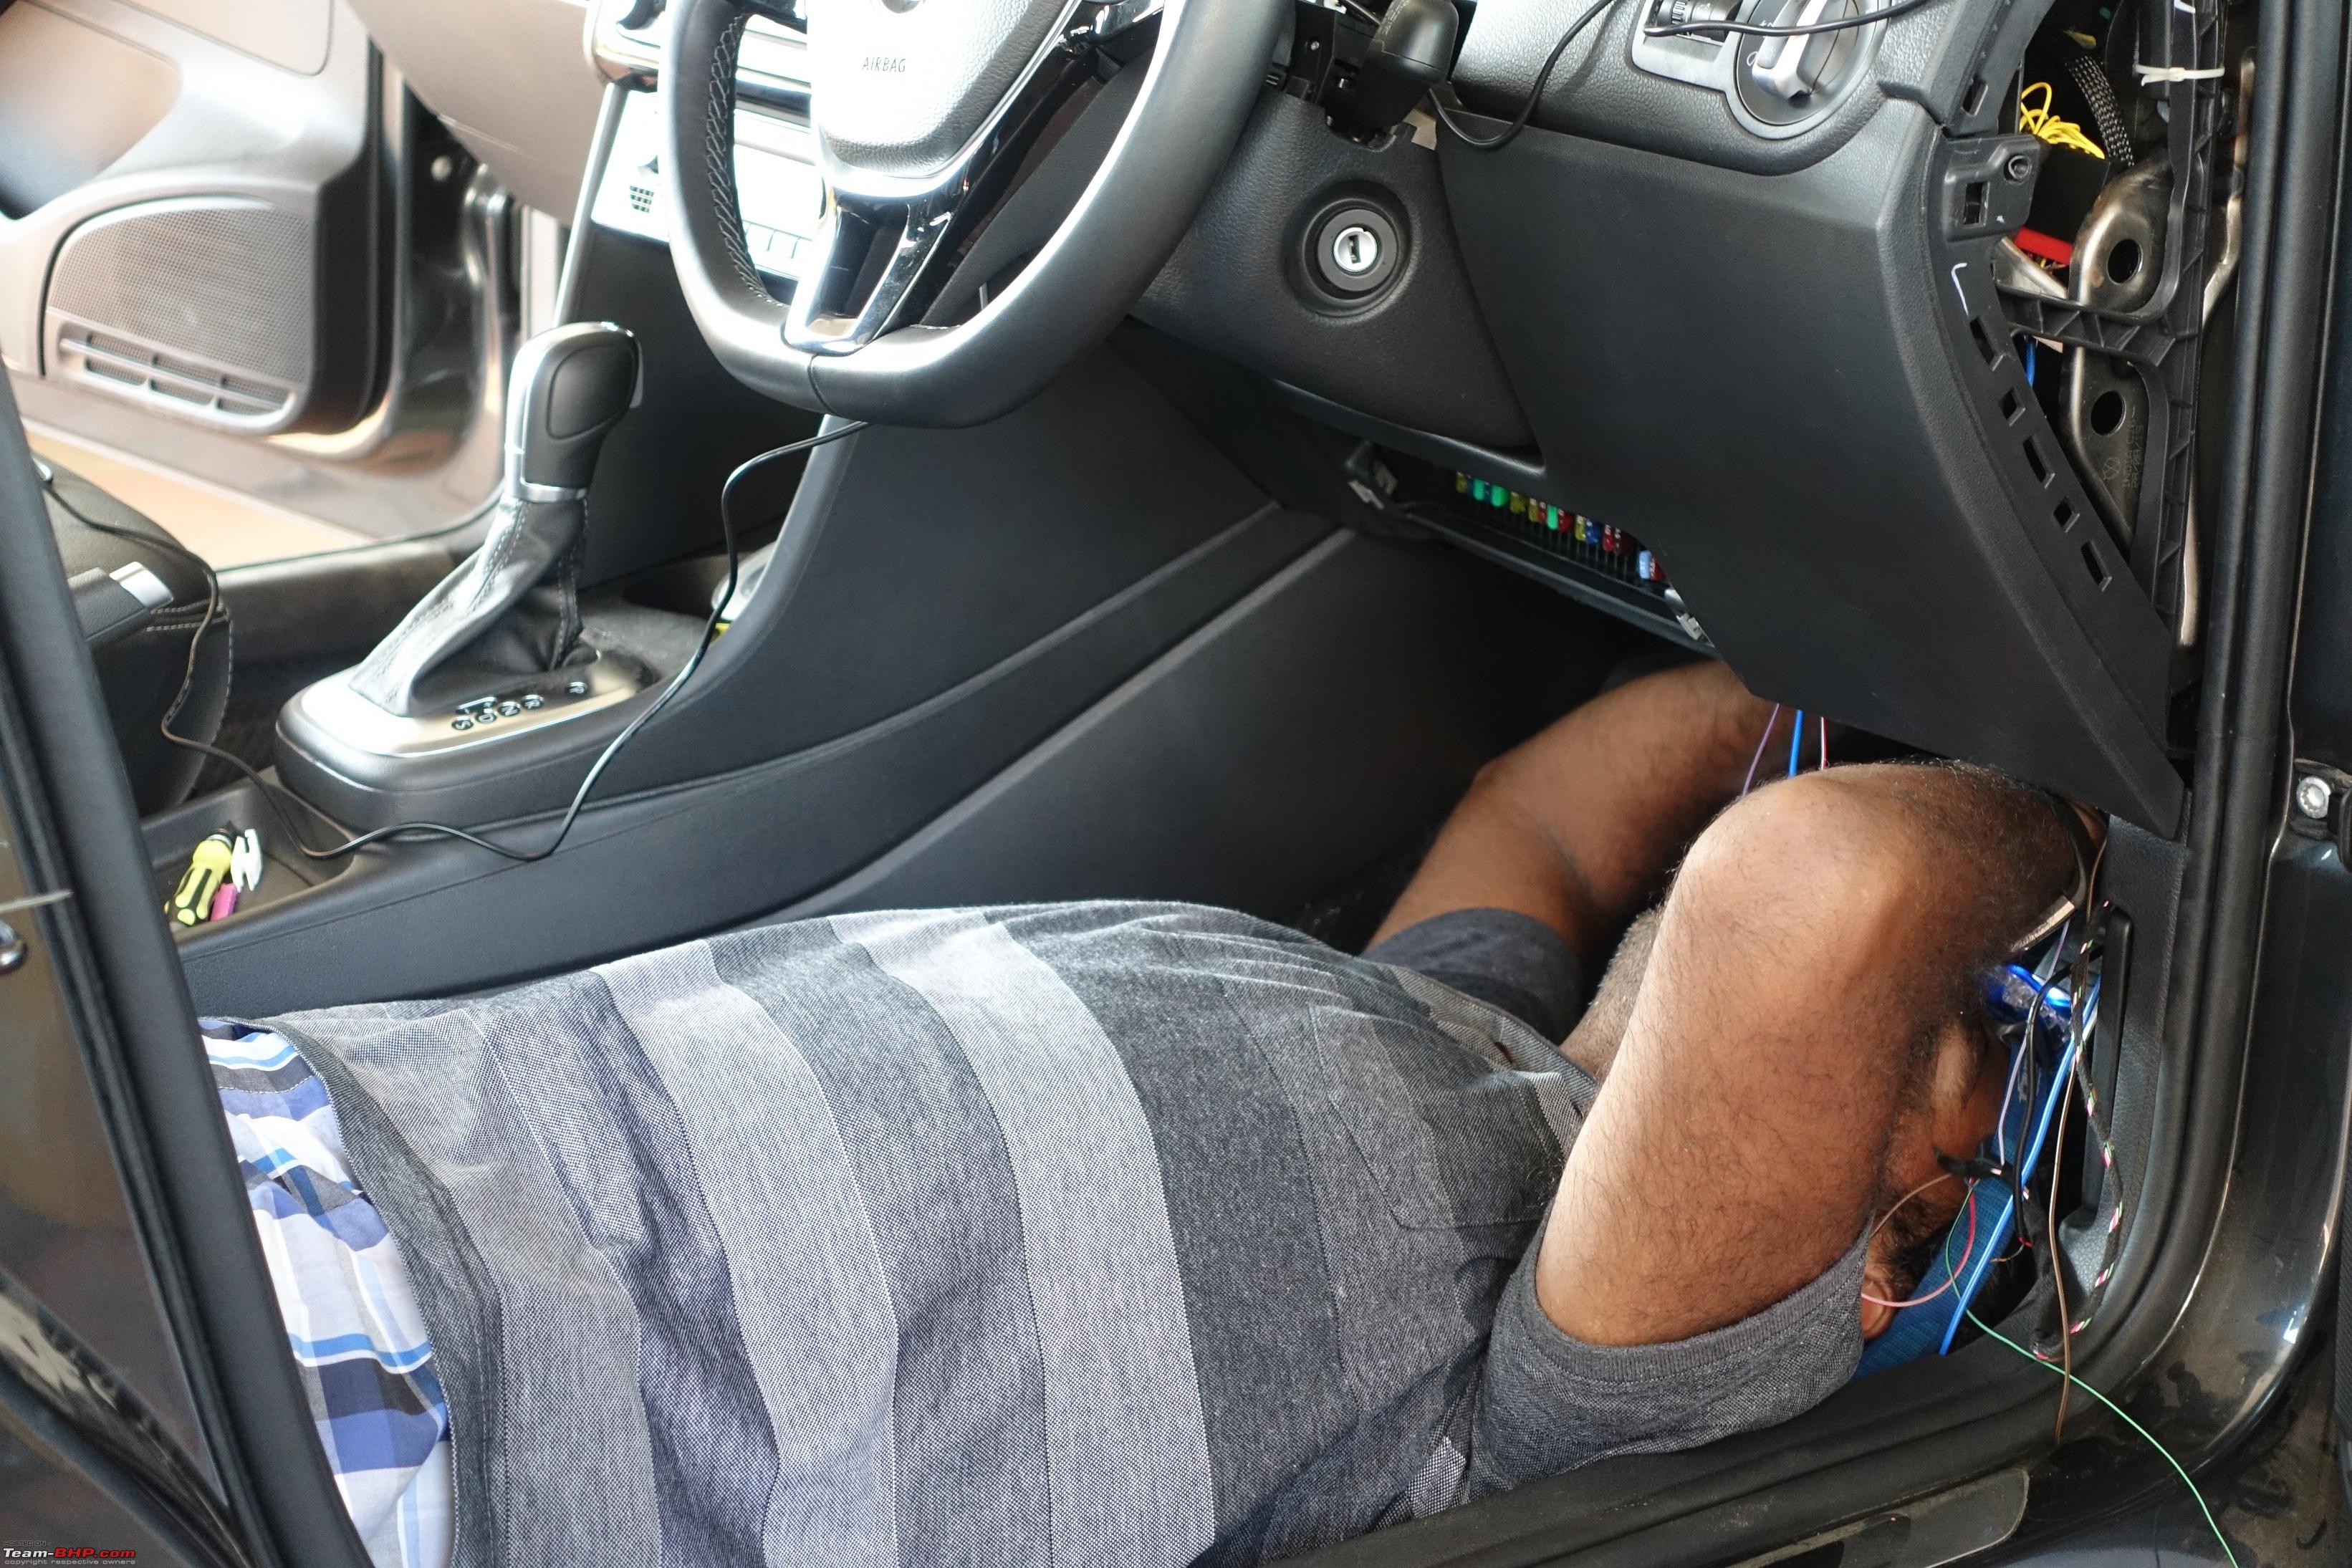 Scene of crime  Once all the wiring was done, next step was VCDS coding. Last edited by graaja : 21st March 2017 at 07:56. |
|
| (35)
Thanks
|
| The following 35 BHPians Thank graaja for this useful post: | anandpadhye, anky, Arun.K, audioholic, Avikbrio, batterylow, BLACKBLADE, Bubby, CarguyNish, carrazy, deetjohn, Dr.Naren, ecenandu, fluidicjoy, Gannu_1, GaryTSI, GTO, h14, InControl, Jaggu, kat, Mr.Boss, Nicky, PraNeel, pritanshchandra, Rehaan, rockygidz, rohiT Nonu, somspaple, SS4, vaasu, Vik0728, vishy76, VivekCherian, yajaman99 |
|
20th March 2017, 21:15
| #6 |
| Team-BHP Support Join Date: Nov 2013 Location: Coimbatore
Posts: 3,711
Thanked: 25,620 Times
| VCDS Coding VCDS Coding 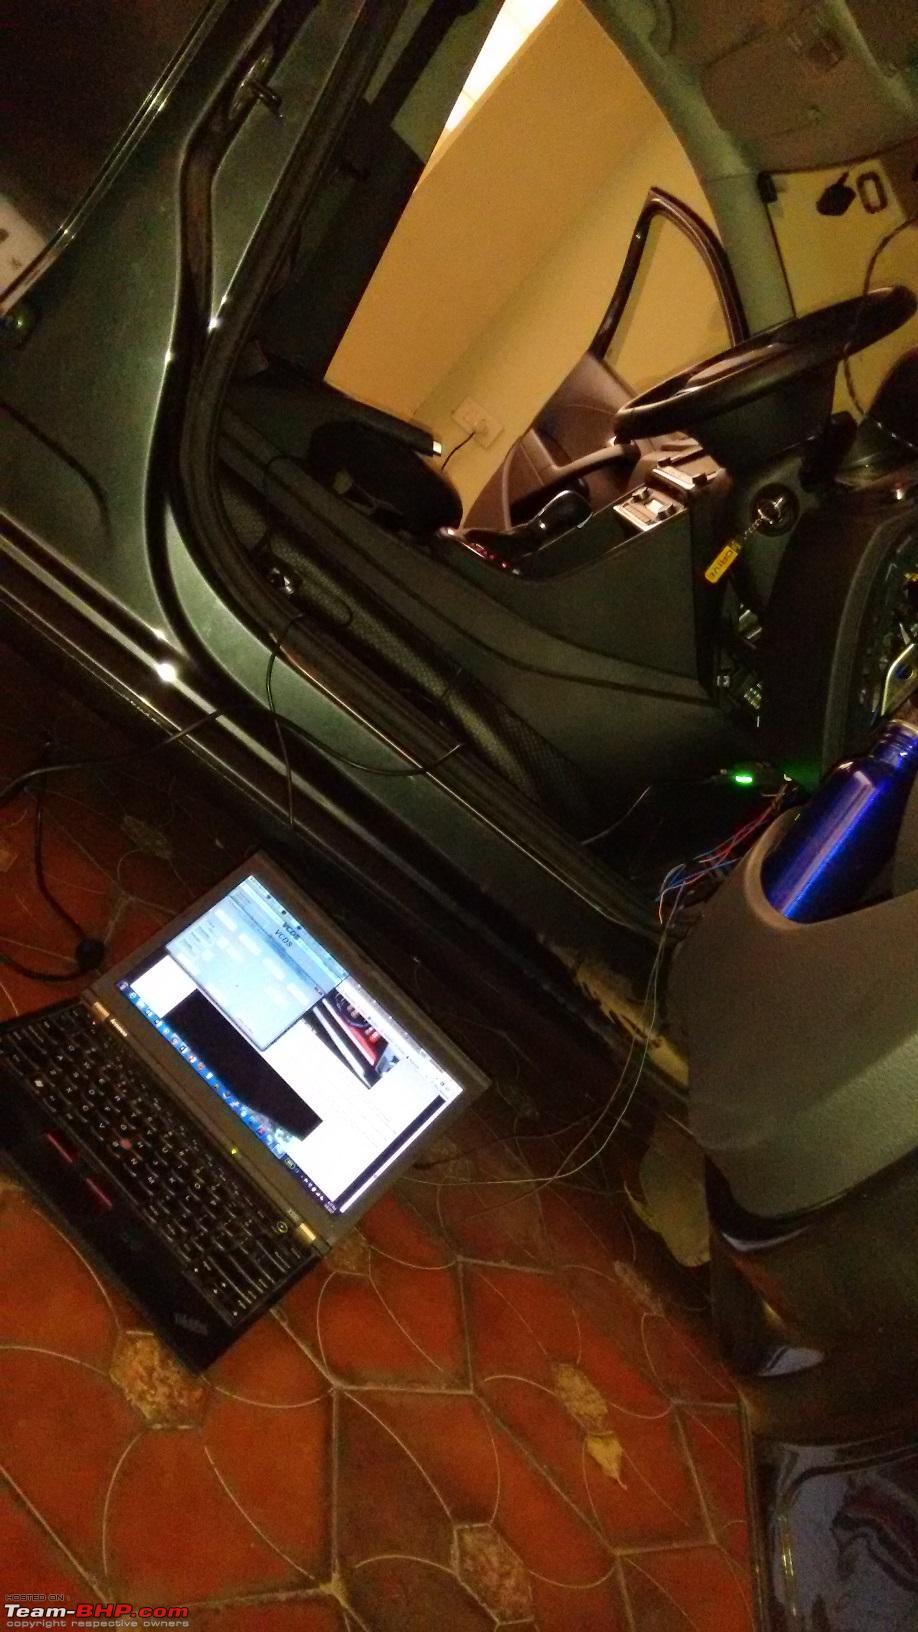 Following are the important steps in VCDS coding. As lots of details are available in the net, I will not give a step by step instruction on this. Refer to RossTech site for detailed instructions. Key adaptation: The new BCM has to be adapted to the remote key(s). Key adaptation is explained in detail in Gannus BCM upgrade thread and also in Ross Tech site. Links below. Gannu's BCM upgrade threadGateway Installation list: This step is also explained in Gannus BCM upgrade thread. Before starting the BCM swap, it is very important to note down the modules installed in the CAN gateway and enabling these modules with the new BCM. Below is the picture of the installation list in my GT. 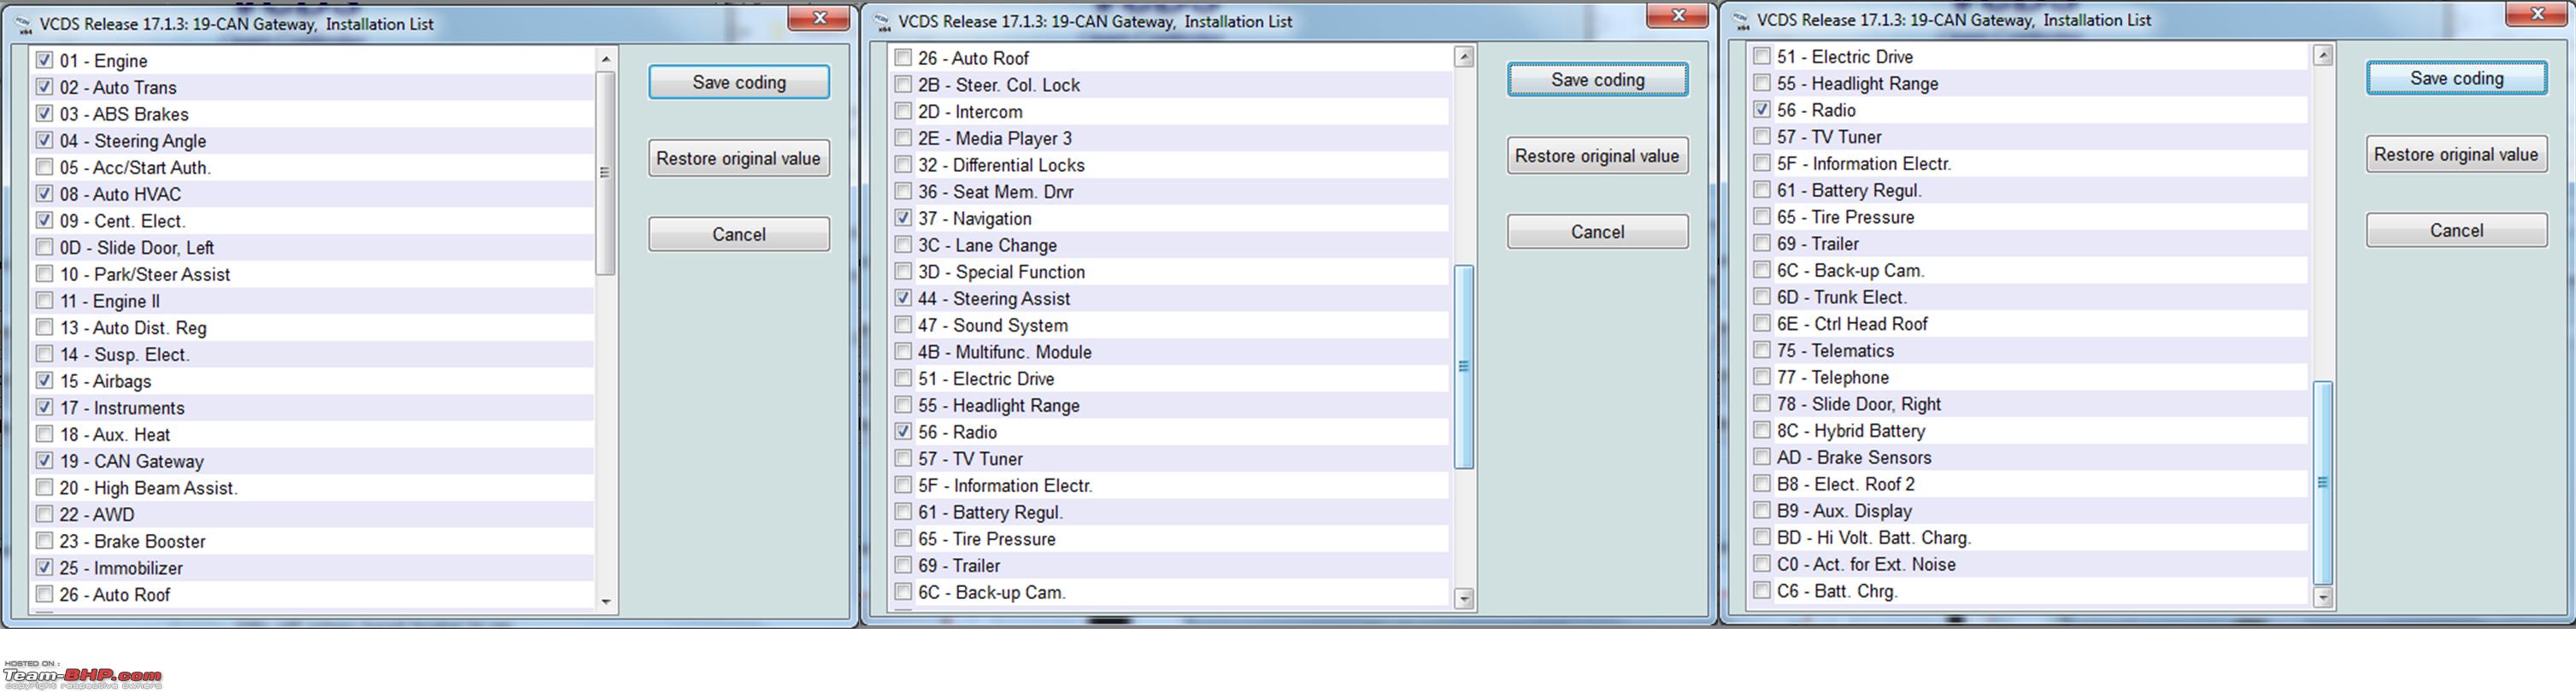 Long Coding the BCM: The long coding for the BCM has to be set next. As this is a completely new BCM, ciclo sent me the long coding that I need to program into the BCM. Long code for BCM: 3AB02BBF08A10000013806917CEB96905AC0672F600D304120 0000030000Important Note: The long code here is just for reference. Though it may work for most cars under most circumstances, the coding may change depending on the car model and manufacturing year. Long Coding the RLS: Next the long code for the rain light sensor has to be set. Long code for RLS: 06302DAgain, this code may be different for different models and manufacturing year. Next, there are many other features that may be enabled using VCDS. Duration of Coming Home Lights This parameter sets the duration the headlights remain on in the Coming Home feature. This setting can be found under Central Electronics -> Adaptation. 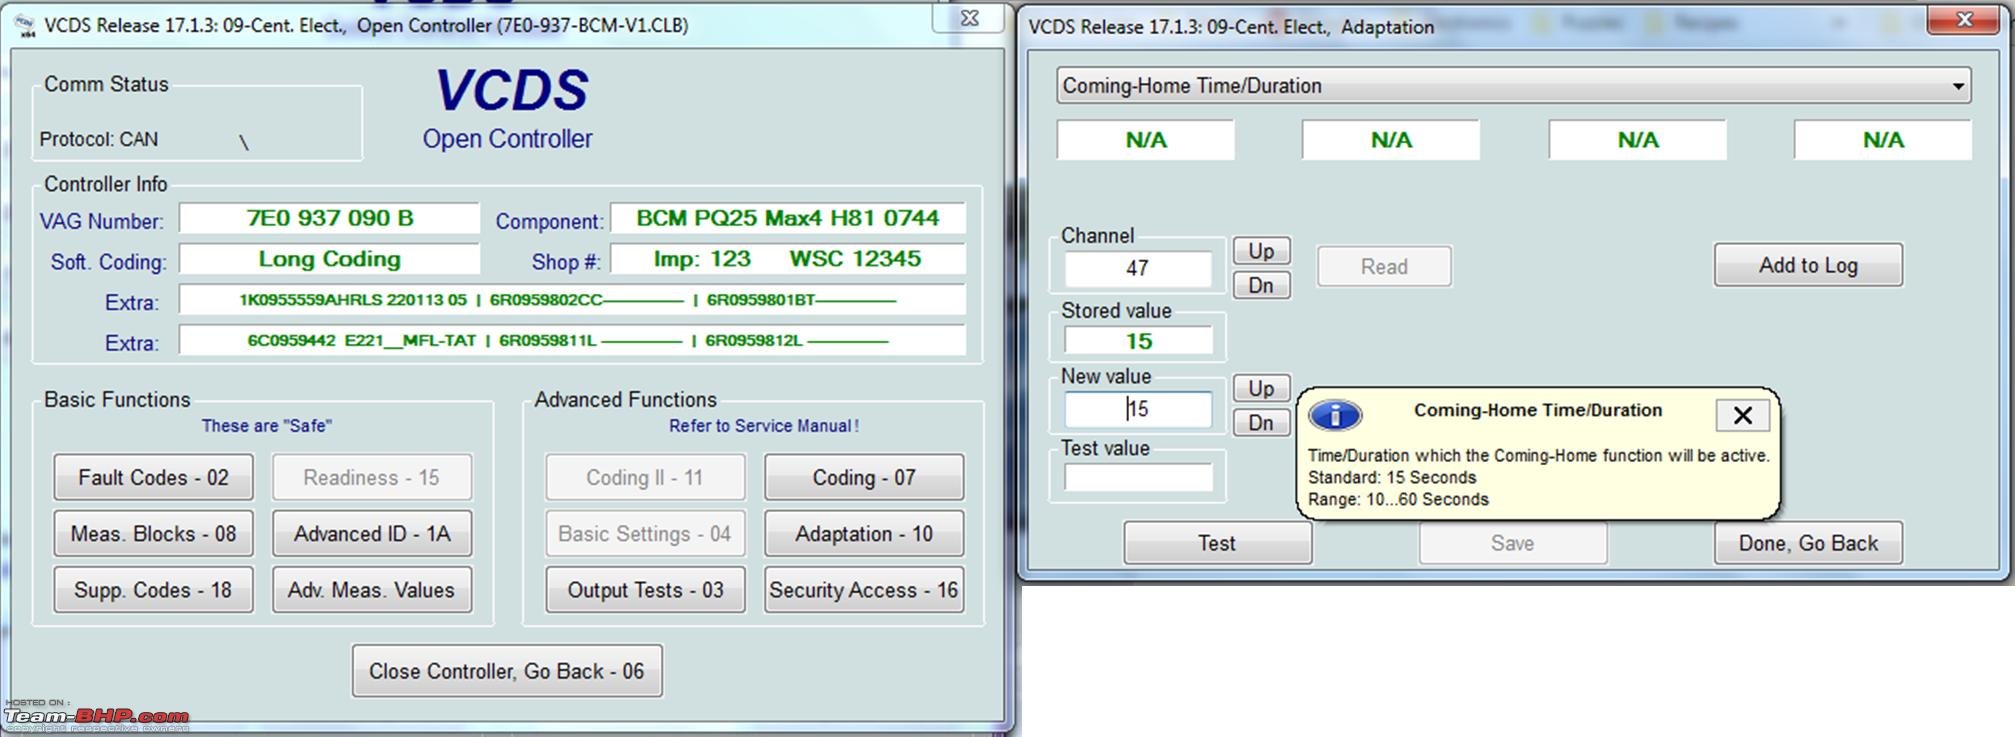 Duration of Leaving Home Lights This parameter sets the duration the headlights remain on in the Leaving Home feature. This setting can be found under Central Electronics -> Adaptation 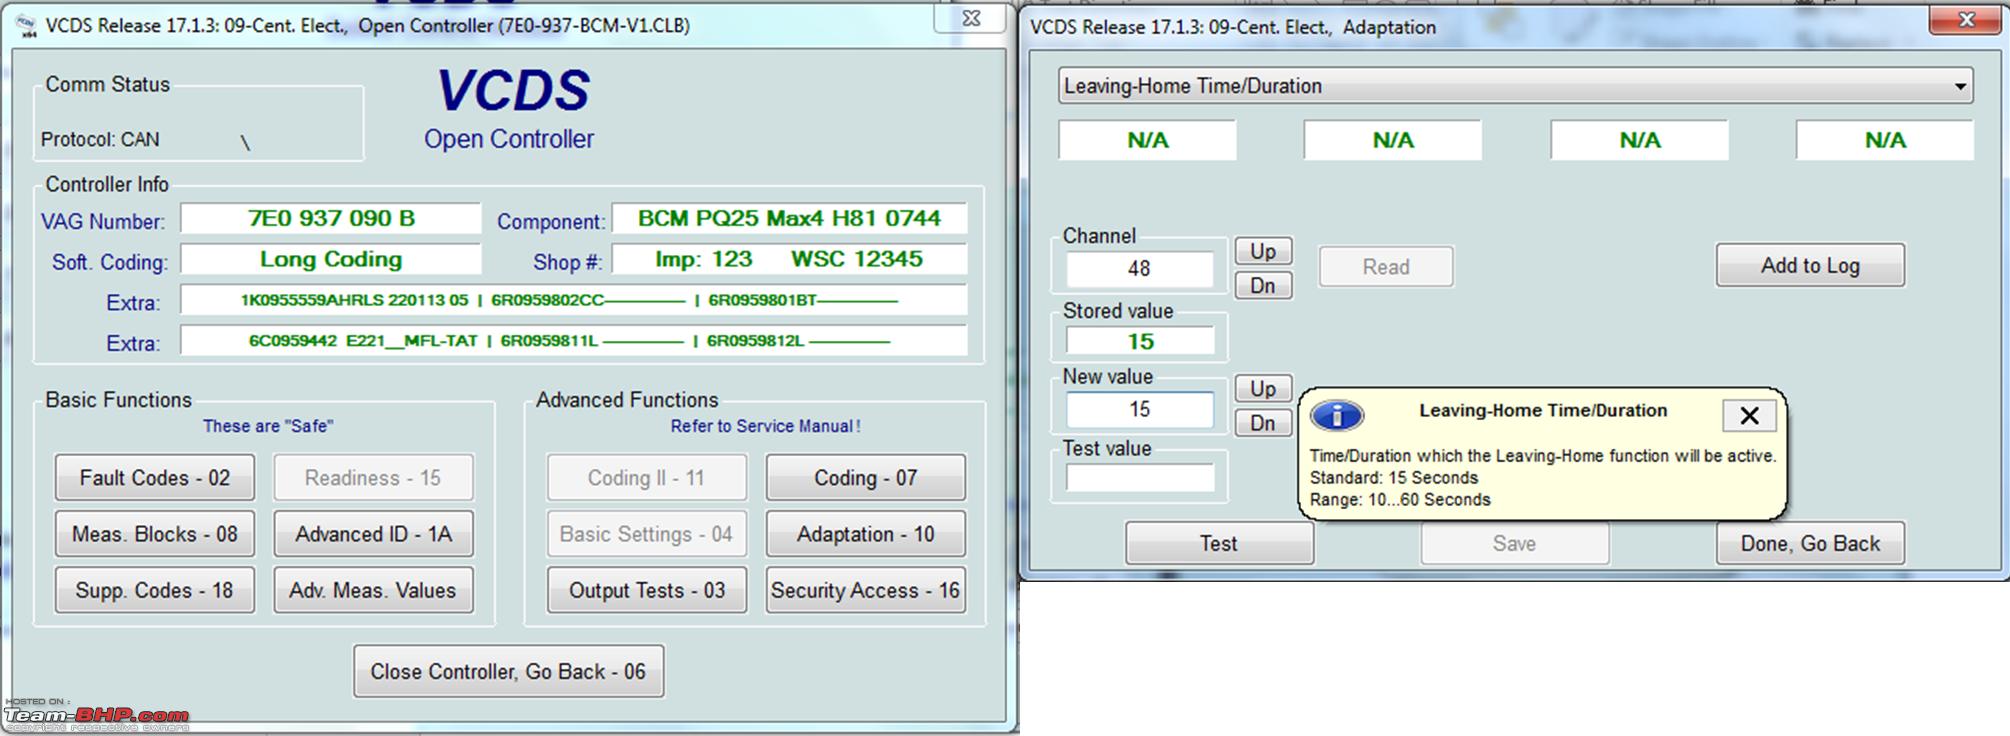 DRL Off When Turn Signal Activated This is a cool feature found in many D segment cars and above. In daytime, when only the DRLs are on, turning on an indicator turns off the DRL on that side. For this Bit#7 in Byte#23 in the BCM has to be set. This bit can be accessed using the Long Coding Helper. 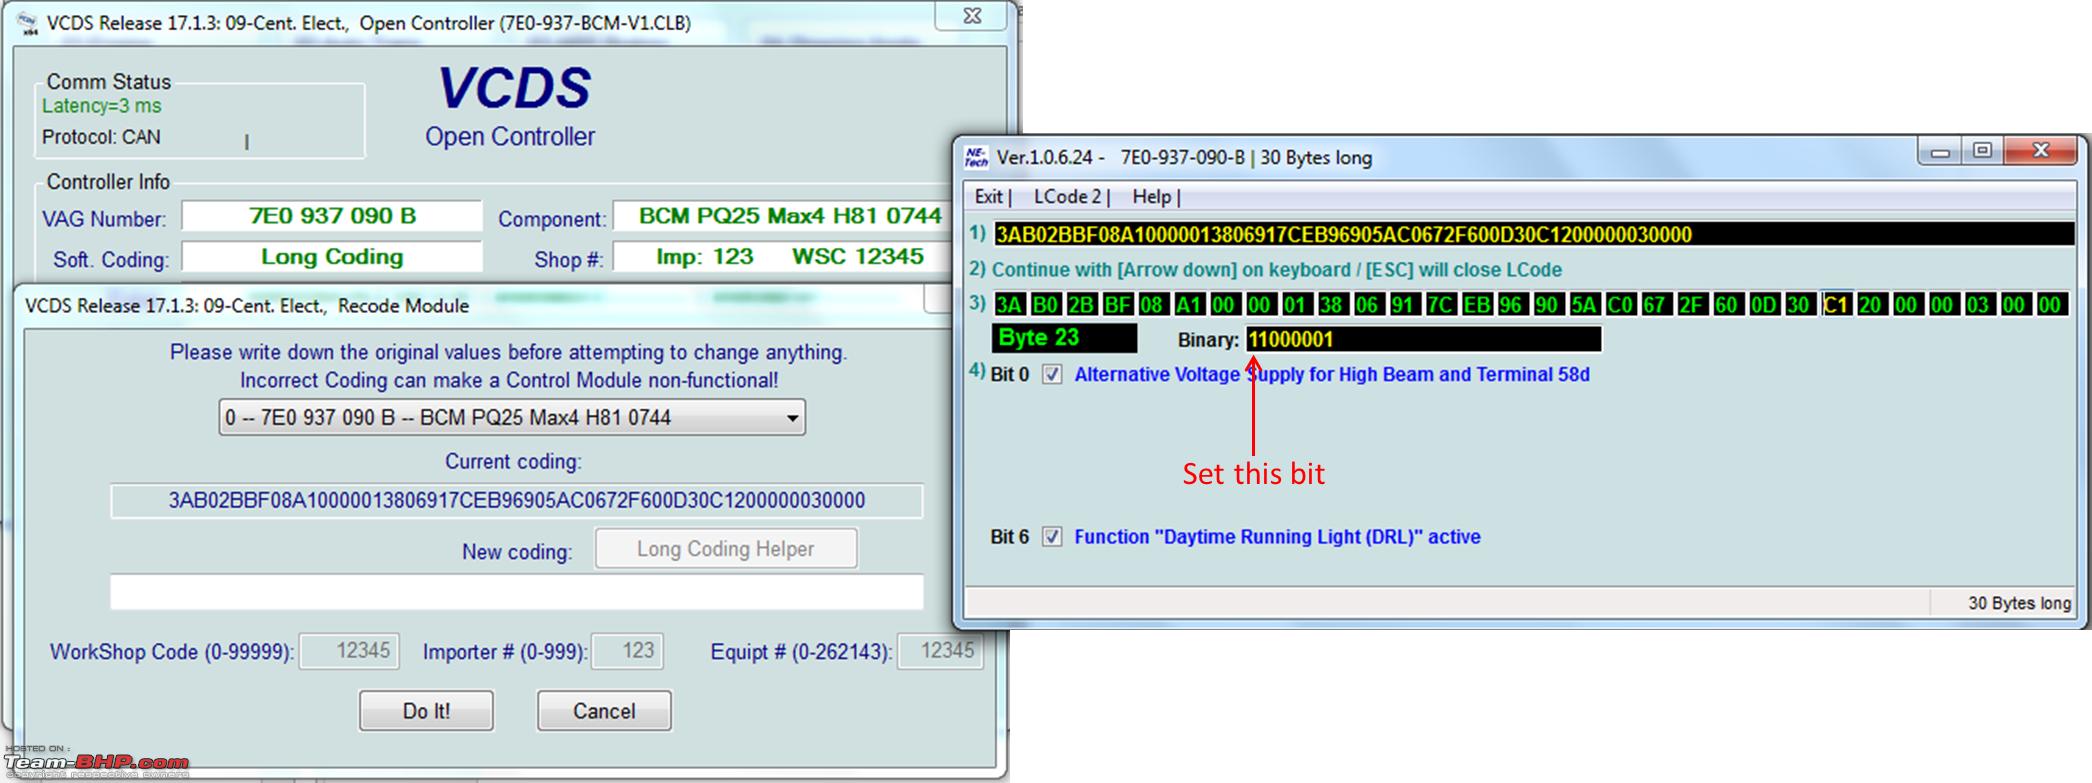 Speed Threshold for Cornering Lights This parameter sets the speed below which the cornering lights get activated. This can be accessed through Central Electronics -> Adaptation - Channel 32. The default value is 40. I set this to 55. 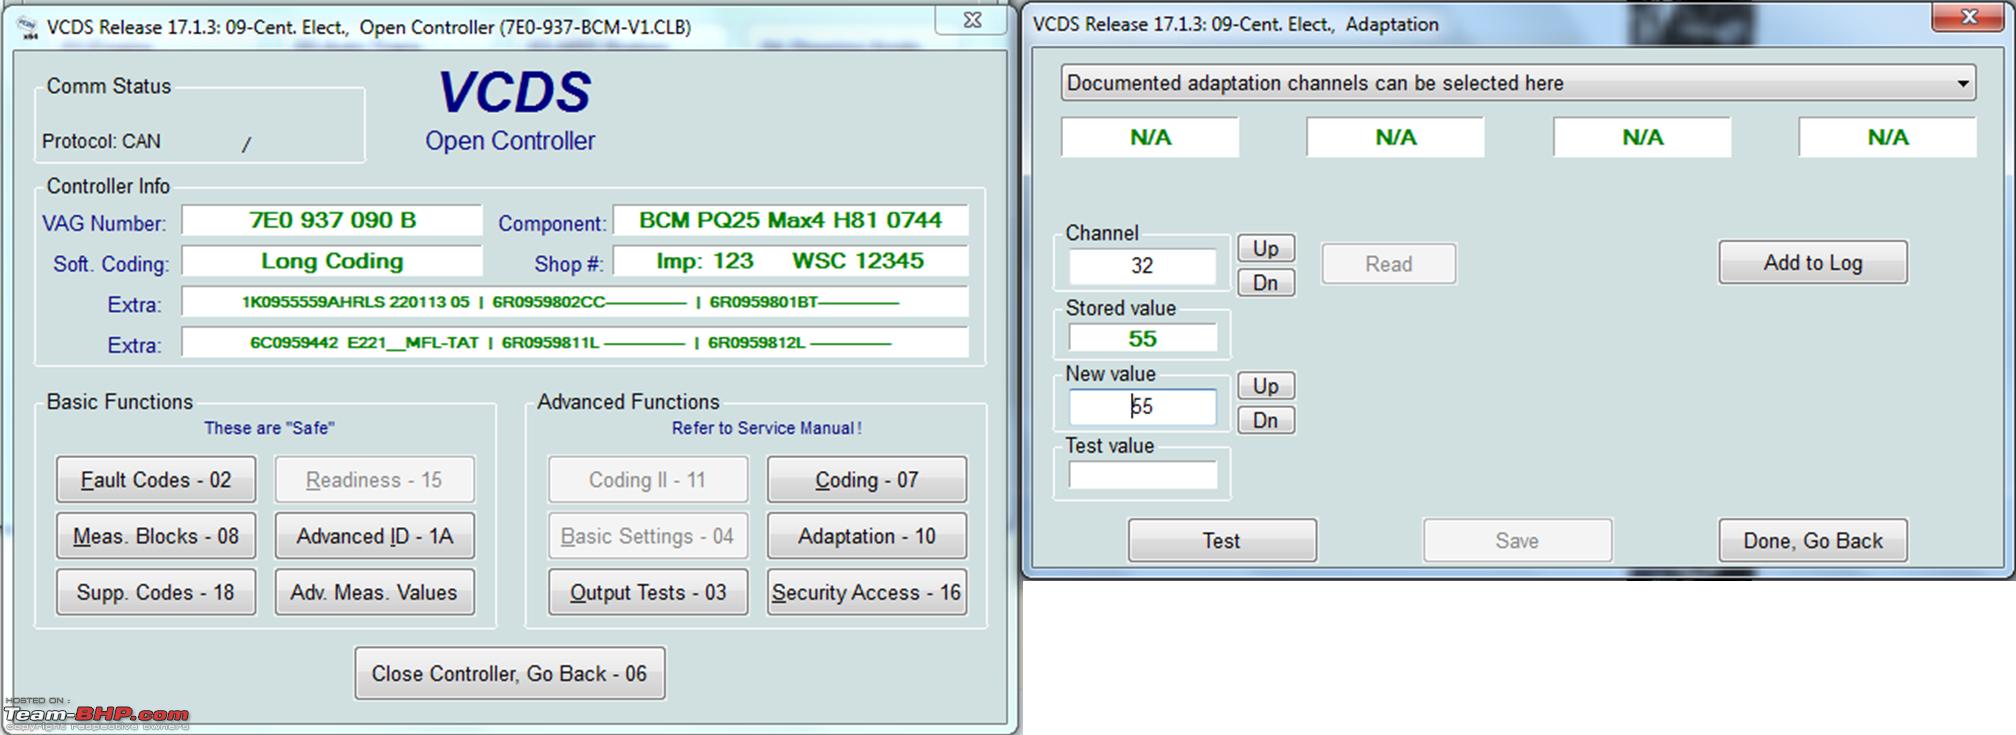 There are many more features that can be enabled. Below are the links to these features. Static cornering lights turn on while reversingAnother interesting feature that comes with BCM Max is parking. If you turn on the indicator stalk after turning off the car, the DRL and rear parking light on the direction that the indicator is set will turn on. For example, if you set the indicator to right, turn off the ignition and remove the keys, the right side DRL and the right side reverse parking lights remain on. This is very useful when you park the car in a dimly lit road. Once everything was complete, took the car to 3M and gave it a good wash.  Finally, the installation is complete!  Last edited by graaja : 21st March 2017 at 07:11. |
|
| (29)
Thanks
|
| The following 29 BHPians Thank graaja for this useful post: | anky, AppyS, Arun.K, Avikbrio, batterylow, BODHI25, CarguyNish, carrazy, Dr.Naren, ecenandu, fluidicjoy, Gannu_1, GaryTSI, GTO, h14, Jaggu, kat, Mr.Boss, PraNeel, pritanshchandra, R2D2, Rehaan, rockygidz, RohanDheman, rohiT Nonu, suhaas307, Vik0728, vishy76, VivekCherian |
|
20th March 2017, 22:37
| #7 |
| Team-BHP Support Join Date: Nov 2013 Location: Coimbatore
Posts: 3,711
Thanked: 25,620 Times
| Results, Lessons and Future Plans The Results Once VCDS coding is done, tidy up all the wiring with lots of wire ties, and close everything and enjoy the new headlights. Below are some pictures of the GT with the BiXenons.     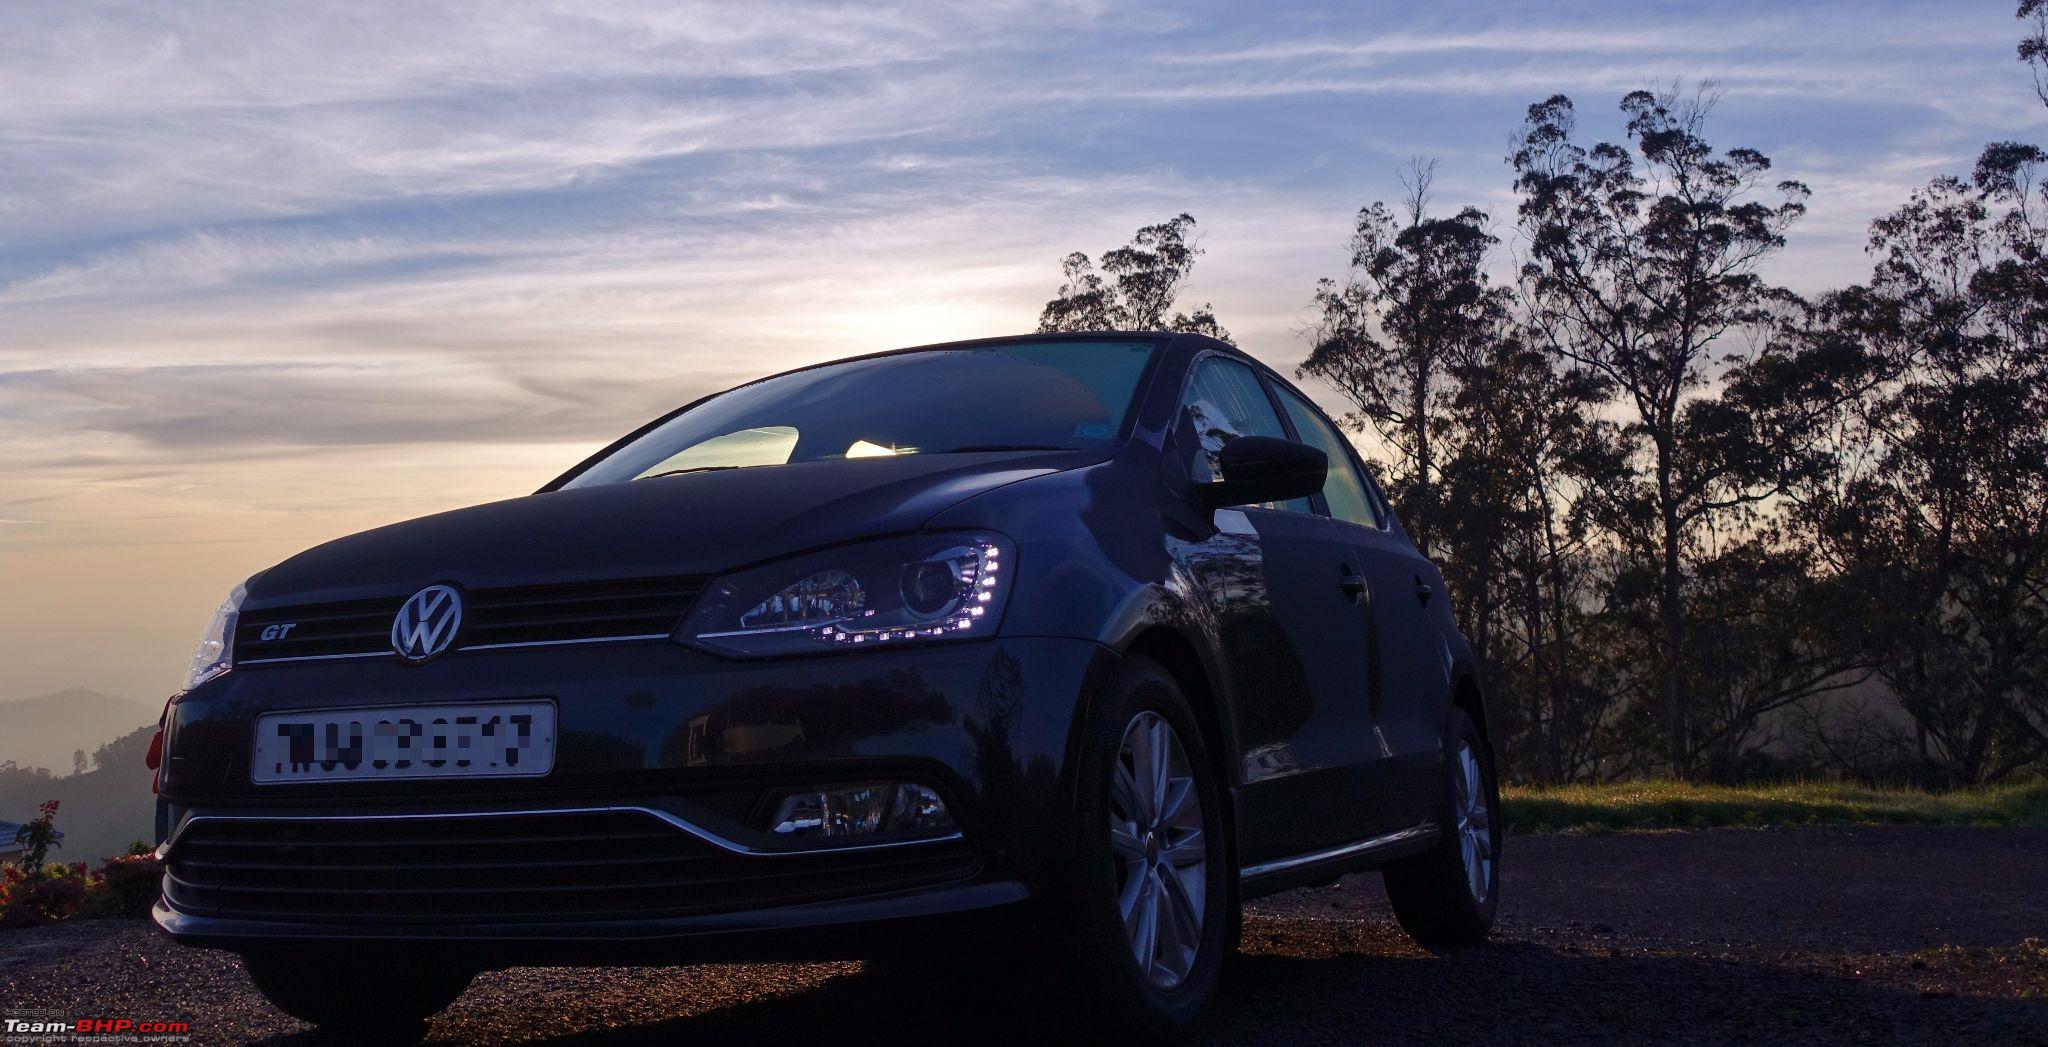 Below video shows the features of the BiXenons with BCM max I also did an alignment of the headlights. I have covered this procedure in the below post in my projector retrofit thread. Projector Alignment Below pictures show the low beam and high beam patterns. These are under exposed pictures to bring out the shape of the hot-spot and were taken before the alignment. So the right side light looks a little higher. I forgot to take pictures after alignment. Low beam 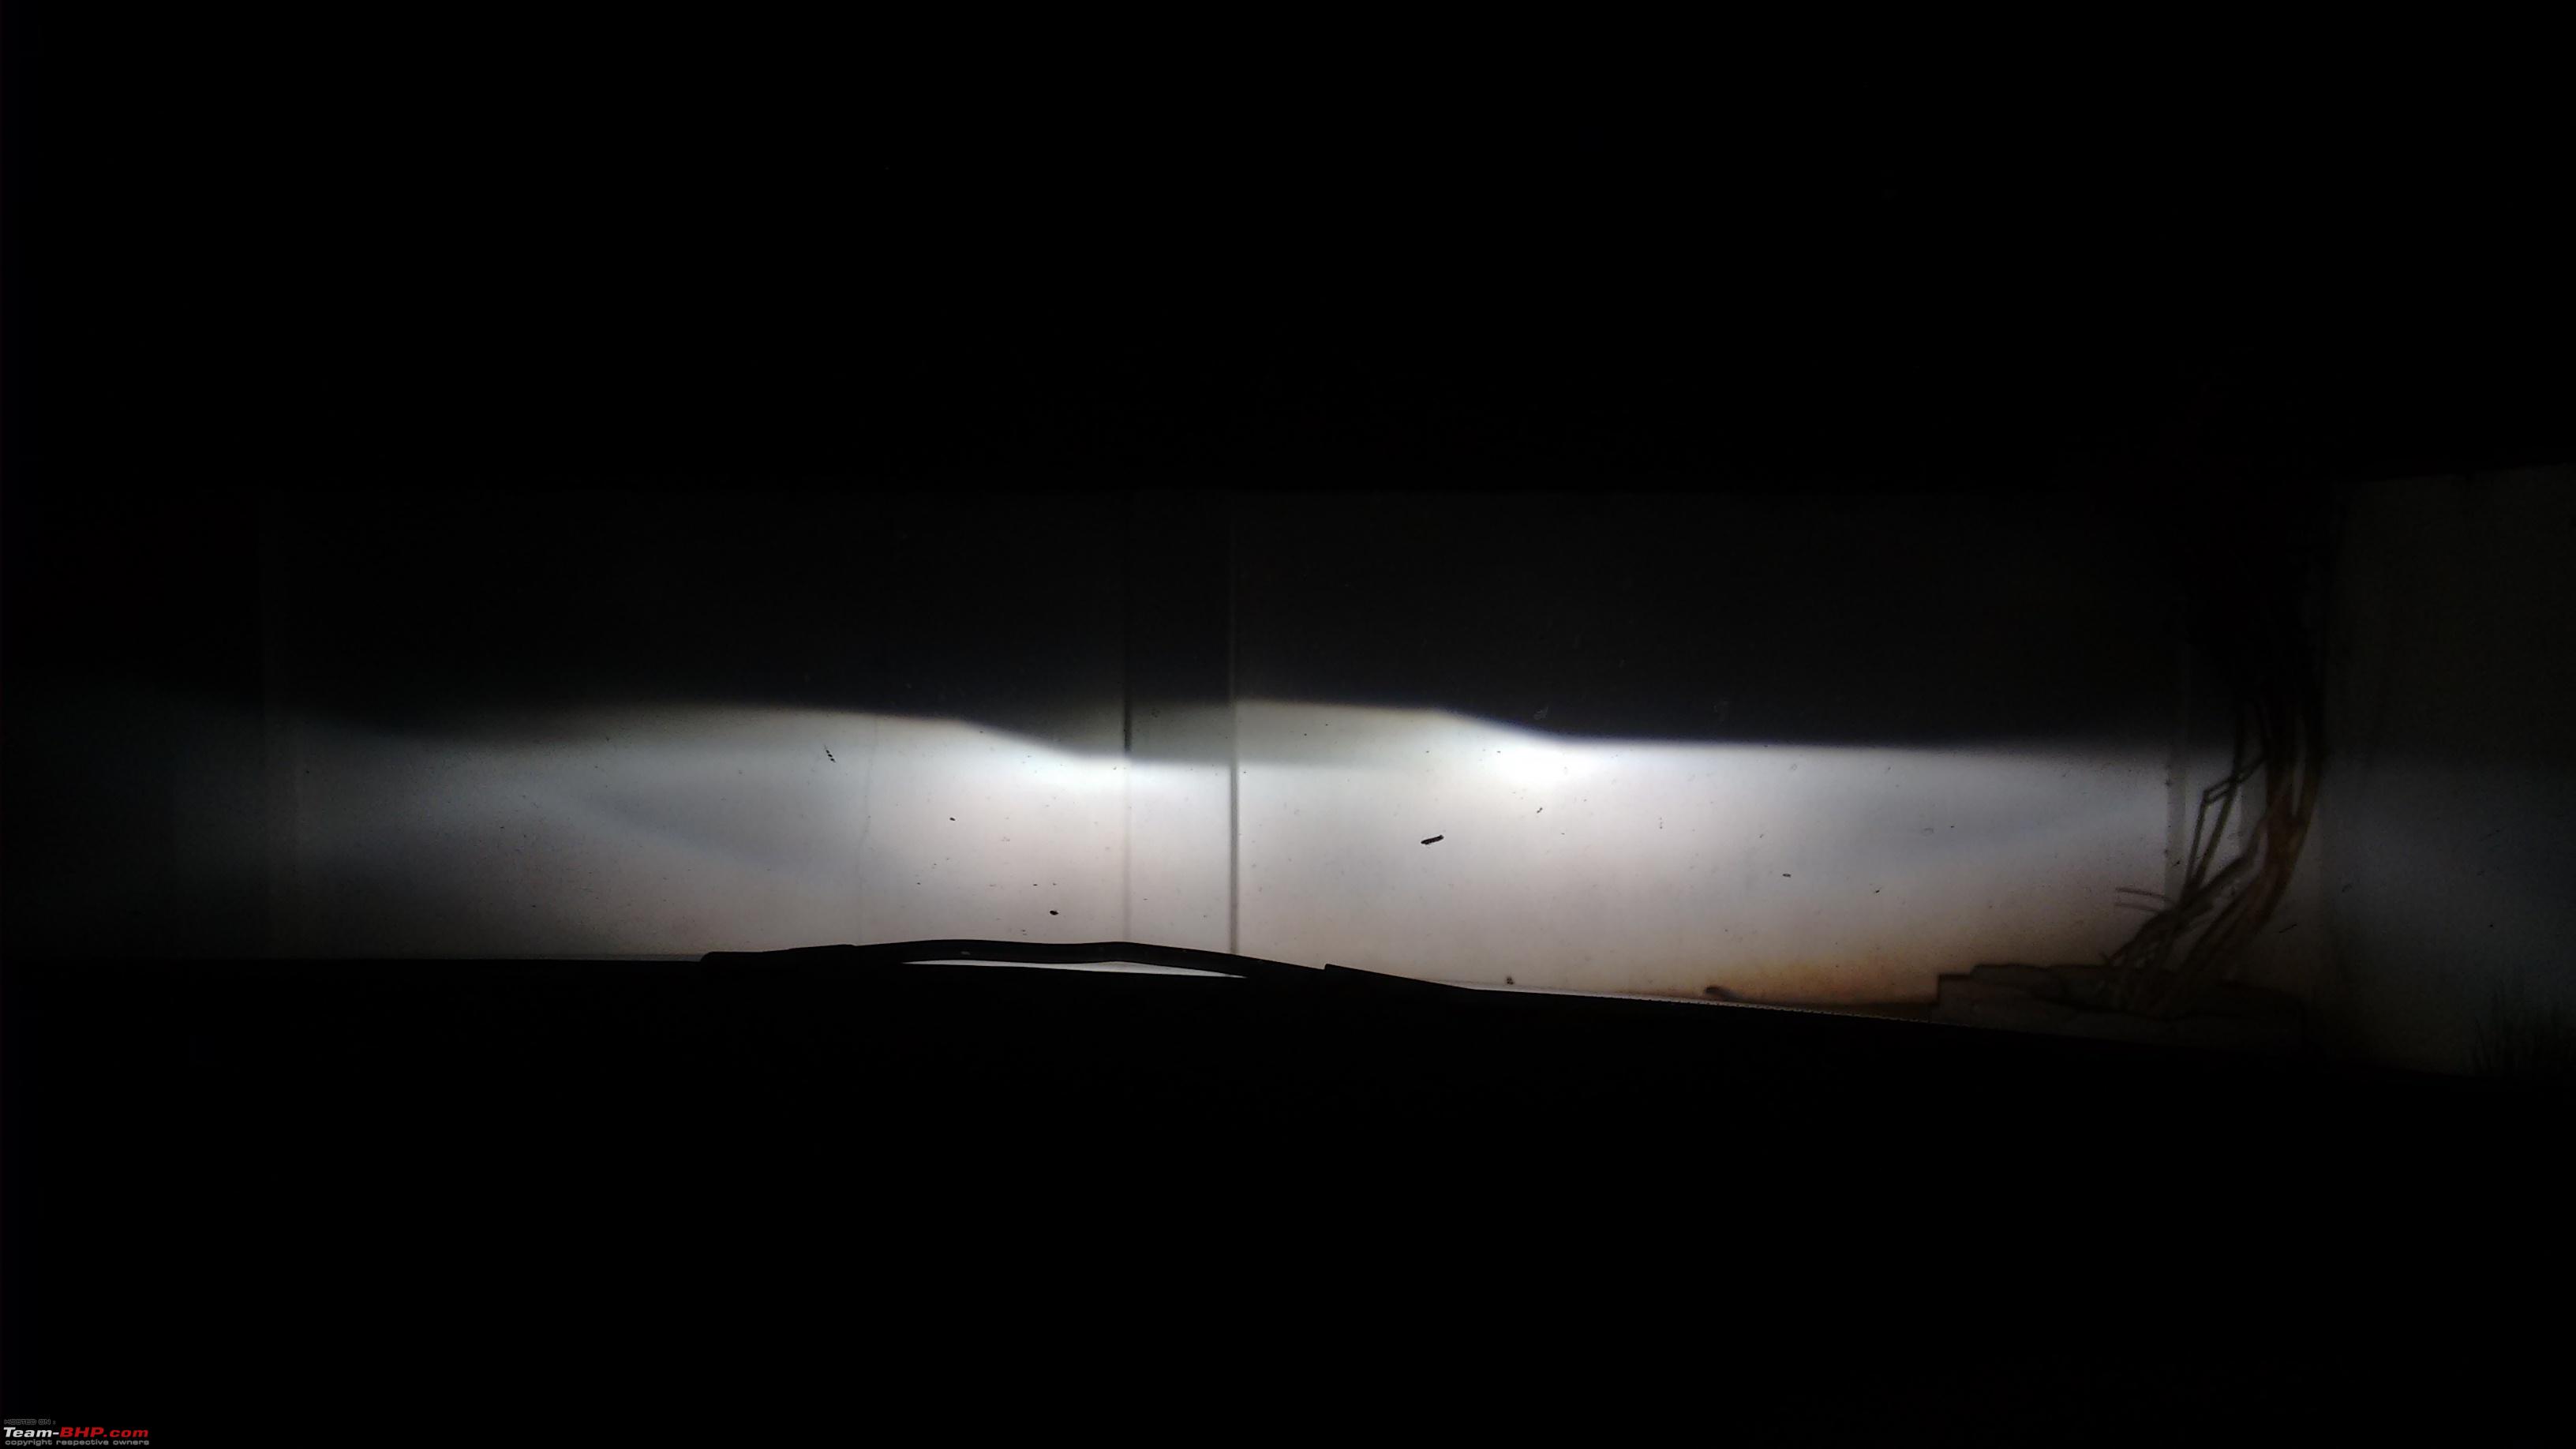 High beam 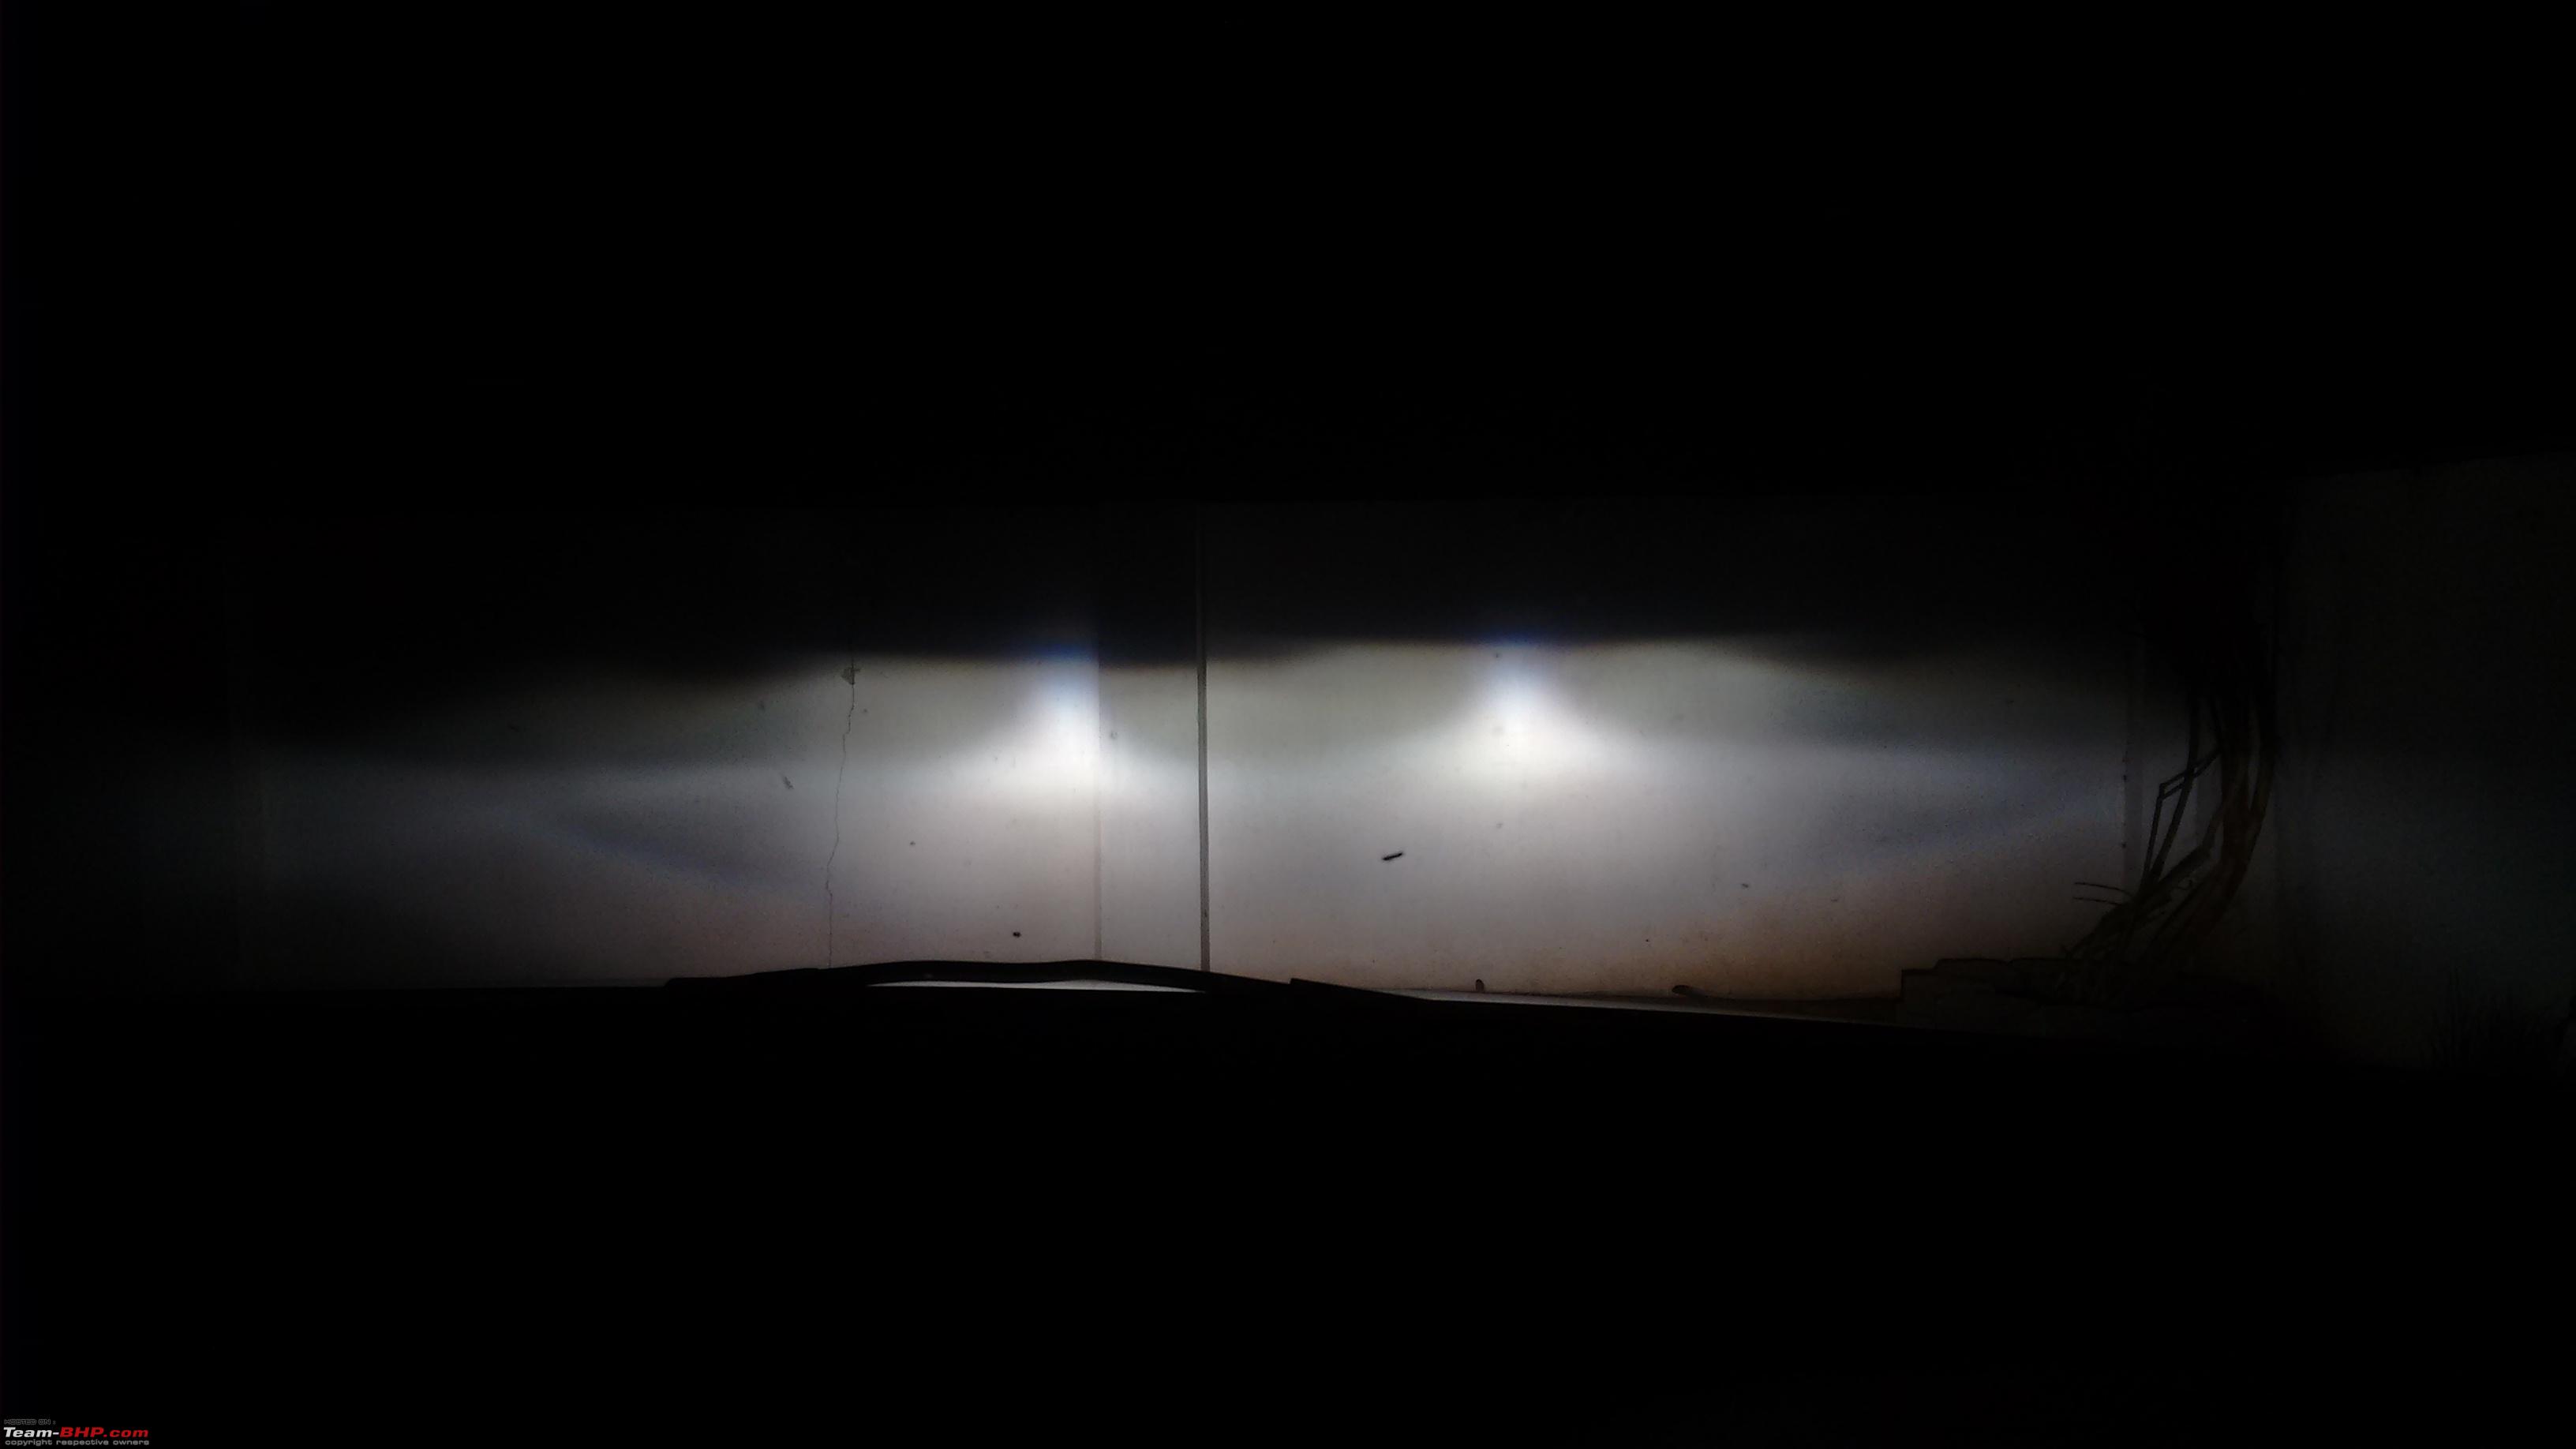 The cutoff is no way closer to the very sharp cutoff with that bluish tinge we see in the after market projectors. Call it a biased opinion, but I found this be less distracting while driving. Earlier when I had the retrofit projectors, my eyes always used to focus and admire the sharp cutoff. But with the OEM projectors, the light spread on the road is even and there is no distraction. Also, the large part of the hotspot opens up only in high beam. This greatly reduces foreground light and increases distance visibility. Also the above pictures were taken at 25 feet. As the distance increases, both the high beam hot spots come closer. At about 60 feet, they merge into one big hot spot providing very good illumination. You can see this effect on distance vision in the below video. There is another possibility for the not so sharp cutoff. Instead of going for the OE HID bulbs, I chose to go with Philips Extreme Vision 4800K HIDs. Maybe the bulbs also affect the cutoff properties. For now, I have decided not to over analyze and enjoy the fruits of labor Below drive-by video shows the light output. Comparing this with the older projectors, the most important point is that the light spread is much even. In the retrofit projectors, there was lot of foreground light. Though this will result in a very bright low beam, because of the bright foreground light, the long distance visibility was highly reduced. In the OE BiXenons, the full strength of the hotspots open up only when high beam is activated. Because of long distance visibility has greatly improved. Important Lessons from this DIY Here is a list of lessons I learnt from this DIY. I am listing them for the benefit for others who plan this upgrade to save them some time and pain
Pending Issues: There are two issues that I need to resolve which I will do in the near future once I have the components.
Future Plan: Once all the pending issues are fixed, the next thing to do would be to install the AFS controller for auto leveling of the headlights. This will involve fixing a level sensor to the rear axle. The AFS controller will detect the angle of the car (depending on the presence of passengers and luggage in the rear seat), and automatically control the level of the headlights so that the lights do not glare oncoming traffic. I also plan to add the BiXenons to the car's insurance. Have already sent a request to Bajaj Allianz, and the representative said he will send me details of documents required. I think this is very important considering the costs involved. That’s all folks, I have on the OEM BiXenon upgrade. Last edited by graaja : 21st March 2017 at 08:23. |
|
| (63)
Thanks
|

| The following 63 BHPians Thank graaja for this useful post: | aayushnair, anky, Arun.K, arunphilip, audioholic, Avikbrio, batterylow, bharatbs, BigBrad, BLACKBLADE, BODHI25, CarguyNish, carrazy, Chaman K, Chethan B G, d3mon, deetjohn, DevendraG, Divya Sharan, Dr.Naren, Enobarbus, fluidicjoy, FreeZaX, Gannu_1, GaryTSI, greenwolf08, GTO, GTp0wer, harsh79, hiren.mistry, InControl, Jaggu, joethomasv, kat, keeru, Lobogris, mallumowgli, Mr.Boss, Nicky, Night_Fury, PraNeel, R2D2, raihan, Ramsagar, redcruiser, Rehaan, rejoycjohn, rockygidz, RohanDheman, rohiT Nonu, Safari_Beast, Santoshbhat, somspaple, suhaas307, supertinu, The Rationalist, The Saint, TorqueTwist, vaasu, VaibhaoT, Vik0728, VivekCherian, zavegur |
|
21st March 2017, 08:25
| #8 |
| Team-BHP Support | re: Polo GT TSi Install: OEM Bi-Xenons with BCM Max Upgrade EDIT: 6C RLS + Auto-dimming IRVM installed! Thread moved from the Assembly Line to the DIY Section. Thanks for sharing! |
|
| (1)
Thanks
|
| The following BHPian Thanks GTO for this useful post: | graaja |
|
21st March 2017, 08:50
| #9 |
| Distinguished - BHPian  | re: Polo GT TSi Install: OEM Bi-Xenons with BCM Max Upgrade EDIT: 6C RLS + Auto-dimming IRVM installed! Thanks for taking the effort to put up everything in detail!! Going OEM way might be expensive, but there is no headache of dealing with warranty issues of after market projector setups. Regarding the cut off being not sharp, these are OEM projectors and they do not come with "Clear Lens". So you don't get sharp cut off / blue colour like the after market projectors with clear lens. Anyways the output is very good and no need to break your head about cut off Last edited by Dr.Naren : 21st March 2017 at 08:52. |
|
| (4)
Thanks
|
| The following 4 BHPians Thank Dr.Naren for this useful post: | Ashtoncastelino, fluidicjoy, graaja, GTO |
|
21st March 2017, 09:56
| #10 | |
| Team-BHP Support Join Date: Nov 2013 Location: Coimbatore
Posts: 3,711
Thanked: 25,620 Times
| re: Polo GT TSi Install: OEM Bi-Xenons with BCM Max Upgrade EDIT: 6C RLS + Auto-dimming IRVM installed! Quote:
| |
|
| (1)
Thanks
|

| The following BHPian Thanks graaja for this useful post: | Dr.Naren |
|
21st March 2017, 10:21
| #11 | |
| Distinguished - BHPian | re: Polo GT TSi Install: OEM Bi-Xenons with BCM Max Upgrade EDIT: 6C RLS + Auto-dimming IRVM installed! Quote:
| |
|
| (3)
Thanks
|
| The following 3 BHPians Thank Dr.Naren for this useful post: | graaja, GTO, sudeepg |
| |
|
21st March 2017, 10:55
| #12 |
| BHPian Join Date: Feb 2006 Location: Bangalore
Posts: 900
Thanked: 2,894 Times
| re: Polo GT TSi Install: OEM Bi-Xenons with BCM Max Upgrade EDIT: 6C RLS + Auto-dimming IRVM installed! A beautiful thread and a superb DIY. I am very impressed with the work done. As someone who is looking to upgrade the lights of the S-Cross alpha, I believe the setup you have put together here has excellent lighting. Unfortunately, the options for S-Cross folks are limited to none. I have a quick question though. How does the head lamp leveling work? Does that work seamlessly with this install? |
|
| (2)
Thanks
|
| The following 2 BHPians Thank sudeepg for this useful post: | graaja, GTO |
|
21st March 2017, 11:07
| #13 | ||
| Team-BHP Support Join Date: Nov 2013 Location: Coimbatore
Posts: 3,711
Thanked: 25,620 Times
| re: Polo GT TSi Install: OEM Bi-Xenons with BCM Max Upgrade EDIT: 6C RLS + Auto-dimming IRVM installed! Quote:
The biggest advantage of VW cars is the modular design. Most of the upgrades are plug and play by connecting the new module to CAN bus and coding through VCDS. And the parts are also easily available. Quote:
| ||
|
| (2)
Thanks
|
| The following 2 BHPians Thank graaja for this useful post: | GTO, sudeepg |
|
21st March 2017, 12:11
| #14 |
| BHPian Join Date: Oct 2014 Location: Kollam
Posts: 48
Thanked: 53 Times
| re: Polo GT TSi Install: OEM Bi-Xenons with BCM Max Upgrade EDIT: 6C RLS + Auto-dimming IRVM installed! Amazing DIY upgrade, the key word here being 'DIY' ! The level of satisfaction is unparalleled when the results are so good! An inspiring post!  |
|
| (1)
Thanks
|
| The following BHPian Thanks cunnuvila for this useful post: | graaja |
|
21st March 2017, 14:01
| #15 | |
| BHPian Join Date: Mar 2017 Location: Chennai
Posts: 855
Thanked: 1,434 Times
| Re: Results, Lessons and Future Plans Quote:
| |
|
| (1)
Thanks
|
| The following BHPian Thanks swissknife for this useful post: | graaja |
|