| |||||||

| Search Forums |
| Advanced Search |
| Go to Page... |
 |
| Search this Thread |  1,113,299 views |
 6th January 2023, 00:09
| #1021 |
| Distinguished - BHPian  | Re: My Car Hobby: A lot of fiddling, and some driving too! Jaguar XJR, Mercedes W123 & Alfa Romeo Sp I picked up my new alternator this morning.   It is a Dutch brand. Ton told me it is a small Dutch company that has outsourced its production to Poland. But they have a permanent presence in the factory to ensure quality control and so on. He was very enthusiastic about this brand.  The old alternator lasted for 40 years and some 186000km. Ton told me that these days your average normal alternator will easily last 250000km. Well, I have two more cars, the Spider and the Jaguar, who are still on their original alternator!! I have also finished the special rack for my two gas bottles for my brazing burner. As you might recall, a few weeks ago I helped a friend of ours with clearing out a lot of her old stuff. I took it all to the local tip, but I kept her old bed frame as I thought it might come in handy for this very purpose. This is how I started:  Cut it up a bit with my electric super Bosch angle grinder. Works a treat! 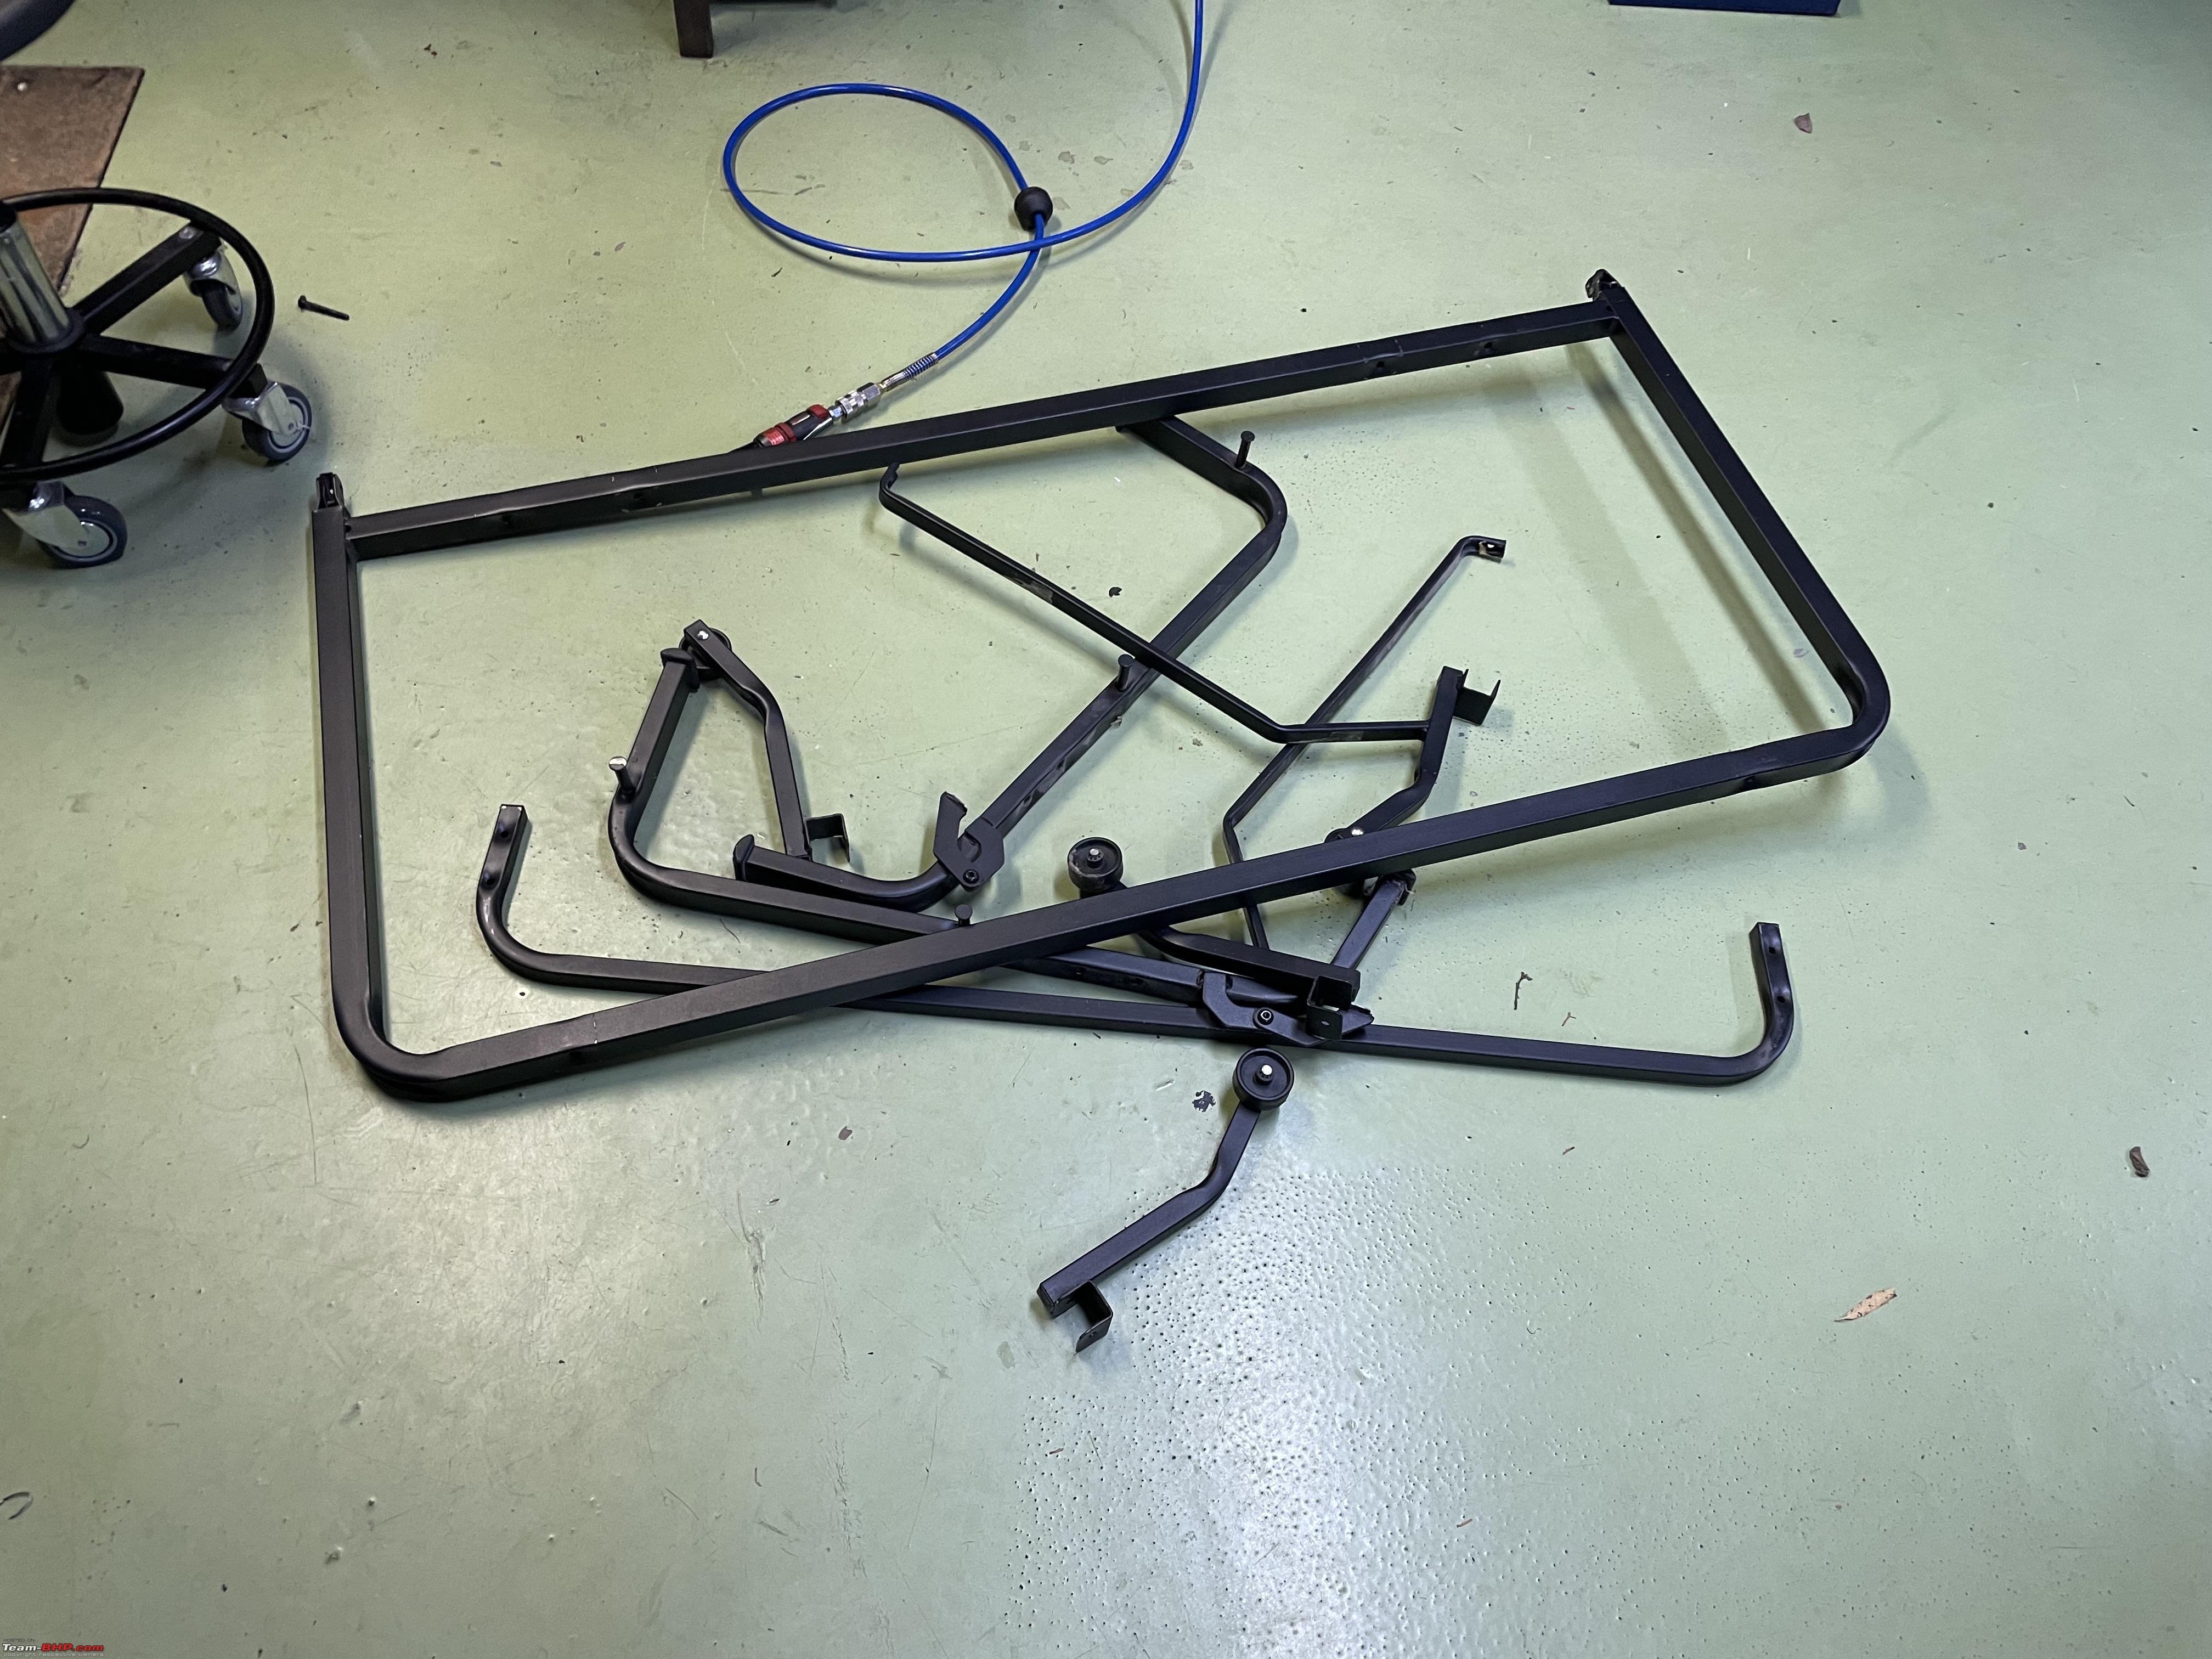 Hammered out all the plastic end plugs.  Cut off a couple of the bends. I thought these would make great support for the bottles.  Welded it together, thus so  I must admit my electrical welding skills are quite rusty. This is also very thin material, only 1mm, and I only had 2mm electrodes. Still, my Bosch Angle grinder is very patient. I must have spend as much time grinding as welding. Just so it did not look to awful. Put two layers of Hammerite black paint on it.   Got myself a couple of very simple straps from the local hardware shop, hammered the end plugs back in and this is the end result.   Very happy with this set up. The little wheel are about 1mm of the ground when it is just standing up straight. So you only need to tilt it a bit and you can easily push it across my garage floor. I havent done to much on my model engine building lately, but I hope to restart that next week. I have had good use of the electrical welder already. Apart from this job I have also welded a hinge on the kitchen door at my daughters home. Jeroen |

|  (8)
Thanks (8)
Thanks
|
| The following 8 BHPians Thank Jeroen for this useful post: | --gKrish--, dailydriver, IcarusMan, Prowler, Thad E Ginathom, vaasu, vb-saan, VivekCherian |
| |
|
6th January 2023, 00:47
| #1022 |
| Distinguished - BHPian Join Date: Jun 2007 Location: Chennai
Posts: 11,429
Thanked: 29,941 Times
| Re: My Car Hobby: A lot of fiddling, and some driving too! Jaguar XJR, Mercedes W123 & Alfa Romeo Sp The transformation of that metal from bedframe to scrap bits to bottle trolley is super-amazing! Great work! I'm sure that a hand grinder is a wonderful tool to have, but I am very shy of them. What are the basic safety precautions? Obviously, eye protection is a must. And I suppose my usual home dress, bare-chested in the Chennai heat, is not such a good idea? |
|
| (1)
Thanks
|
| The following BHPian Thanks Thad E Ginathom for this useful post: | --gKrish-- |
|
6th January 2023, 12:26
| #1023 | |
| Distinguished - BHPian | Re: My Car Hobby: A lot of fiddling, and some driving too! Jaguar XJR, Mercedes W123 & Alfa Romeo Sp Quote:
Yes, eye protector is a must. Not just safety glasses. When you work for long periods of time with the grinder, you might even consider wearing full face protection. Prolonged use, means the disc heats up and can shatter, although these day it is rare. I just wear my usual work clothes I always wear in my garage. Always be careful with loose clothing. The most important part is to check where the sparks are flying. You will surprised how far they will go. If they land on a car, they will leave tiny pits in the paint as they basically burn the paint. Also, make sure there is nothing flammable around and have a fire extinguisher at the ready. The other thing you need to be careful about is when you put the grinder down. When you switch off it takes several seconds to spin down. If you put it down and it bites into something on the floor or your workbench you could be in for a lot of trouble and potential pain! I make it a rule to keep it in my hand until the disc has come to a full stop before putting it down. But they are extremely handy and convenient! Jeroen | |
|
| (4)
Thanks
|

| The following 4 BHPians Thank Jeroen for this useful post: | Prowler, Thad E Ginathom, vb-saan, VivekCherian |
|
6th January 2023, 15:08
| #1024 |
| Distinguished - BHPian Join Date: Jun 2007 Location: Chennai
Posts: 11,429
Thanked: 29,941 Times
| Re: My Car Hobby: A lot of fiddling, and some driving too! Jaguar XJR, Mercedes W123 & Alfa Romeo Sp Many thanks for the hints. I think that full-face protection is a good idea. Will also memorise, Do not put down until it has stopped. Thanks especially for that one. I have used bench grinders without fear. But I was a lot younger then, and also less aware. A bench grinder feels safer. But I have often been told that perception of safety can be very wrong. Apparently people have more accidents with planers than circular saws, because they don't look so dangerous. But they are. |
|
| (1)
Thanks
|
| The following BHPian Thanks Thad E Ginathom for this useful post: | Jeroen |
|
7th January 2023, 17:05
| #1025 |
| Distinguished - BHPian | Re: My Car Hobby: A lot of fiddling, and some driving too! Jaguar XJR, Mercedes W123 & Alfa Romeo Sp Our friends from France, Annelies and Cees, are staying with us for a few days. They own and run a very nice Bed & Breakfast that has featured many times in our travels. https://leparadis.nl/?lang=en We will be visiting them with our other Spider friends in May again. Our usual 4-6 days trip to France. Their B&B is closed during the winter month and they often spend a couple of weeks in the Netherlands, visiting family and friends. Cees is quite an accomplished spanner mechanic as well. Yesterday Cees and I spend two hours happily fiddling in my garage. Cees needed some small plastic knobs from his stereo set replaced. So we made ten perfect new ones, out of aluminium on my lathe! This morning Cees helped me with the W123. We put the alternator back in and also replaced the V-belt of the power steering pump. In order to replace it the V-belt of the alternator needs to be removed as well. They both run across the main pulley on the engine crankshaft. But the alternator belt sits in front of the steering pump belt. As the alternator one had already been removed, I had decided to replace both belts. I could not remember when I did it last. Better safe than sorry. The steering pump has a similar ratchet system as I showed earlier on the alternator to tighten the belt. So first thing was to undo various bolts and brackets from the Steering pump. Quite the fiddly job.  Here you see the steering pump from above, you can see the pulley as well.  Put the new belt on, tightened everything up and started with the alternator. If you look carefully you will notice that the new alternator has one extra connector compared to the old one. According to Cees that was most likely for the tachometer signal on a diesel engine. Could well be.  Putting the alternator back in was a very simple job.   We had a good look at the two old belts. They are actually in very good shape. Good not detect any cracks or so. I will keep both belts in the boot of the W123. You never know when you might need them. And finding a correct belt when you are out and about can be a real problem. Especially when you find yourself abroad.  Started the engine and all looks and sounds really well. So the noises I heard earlier were definitely caused by the bearings of the alternator. The V-belt also runs straight and is properly aligned with the other pulleys, once again! Cees and I might start on the W123 carburator tomorrow. I did take off the little dipstick connector from the Spider. With so many parts removed due to Peter and me taking out the steering box, at long last I have easy acces to the dipstick and the connector to the engine. This has always annoyed me, as it often leaks. Here you see it. The dipstick tube fits in the top of the black bracket. With rubber inlays it is supposed to seal, but the rubber is perished.  After I removed it:  I have been looking online to find a replacement. Put a message on the AlfaBB forum maybe somebody can identify it. But I have a strong suspicion it is not available anymore, so I will need to improvise something. https://www.alfabb.com/threads/dipst.../#post-8788201 Jeroen |
|
| (5)
Thanks
|
| The following 5 BHPians Thank Jeroen for this useful post: | dailydriver, IcarusMan, Prowler, Thad E Ginathom, VivekCherian |
|
9th January 2023, 13:53
| #1026 |
| Distinguished - BHPian | Re: My Car Hobby: A lot of fiddling, and some driving too! Jaguar XJR, Mercedes W123 & Alfa Romeo Sp I have been searching the internet for the original Alfa part for the dipstick tube connector. As I suspected, no way to find the original part anywhere. So I have decided to make it myself. I managed to find a piece of petrol hose with an external and internal diameter that I think might work.  We will have to wait till I get my Steering box back before we can re-install it all and see if it works. Yesterday Cees and I decided we would have a go at the W123 carburator. I had done quite a bit of research and i thought we would be able to replace the needle and jet easily. But as so often with these jobs, I was wrong! This is how the carburator looks on the W123 engine. It is a Stromberg 175CD. It is a type that is used on many cars from this era, in particular also on many English cars, such as Triumph TR series. However, there are endless variations on this type. All a bit different from the other. I have yet to find a piece of documentation that describes the exact version I have.    The needle can be extracted from the top. I have had these parts off before, when I replaced the membrane. See earlier post. But the jet sits on top of the shut off assembly which sticks out underneath. I was pretty convinced we could just unscrew it and I would be able to retrieve it.  Cees starting to undo the various little bolt on the top of the carburator.  With the top cover removed, you see this little reservoir with dampner oil.  A few more bolts removed and that comes off too. You are looking at the top of the membrane. These have a tendency to tear over time, which affects the proper function of the carburator. The membrane is attached to the air valve.  You can just extract the air valve with the membrane attached to it. I replaced this membrane not too long ago. But I got a new one. For two reason. I have found that once used, it becomes very difficult to re-install these membranes. They sort of get flattened as you tighten down the flange. But also, I found out there are two different types about. One is a bit more stiff than the other. My Mercedes needs the most flexible one. So better safe than sorry. You can also see the needle sticking out from the bottom on the air valve.  So that was all the work needed doing on top of the carburator. Next, we removed the engine stop valve from underneath. Very easy. Just slacken up the retaining nut and unscrew it. This is also how you adjust the CO content.  I thought with the engine stop valve assembly removed the jet would come out too. It sits on top of the engine stop valve. But it was left inside the carburator. We tried to get it out, only to find out that its diameter was larger than the outside diameter of the engine stop valve. So it just would not fit through. At this point we decided to remove the complete carburator from the engine to get better access. All gone!!  With the carburator sitting on the workbench we sat to work removing the float chamber which is held in place by six small bolts.  Carburators are pretty amazing, precision, instrument. So I had cleaned my workbench, vacuumed and polished it and put some workshop towels on it, before commencing taking everything apart.  With the float chamber removed we could take out the jet. Here you see the inside of the float chamber. The float assembly has been moved out of the way. It is retained by a tiny tiny spring attached to the needle valve. As I had a spare needle valve, I wanted to replace it.  A more close up view  The needle valve just unscrews from the body of the carburator. It is just a very simple, gravity powered, valve. When the float chamber gets pumped full of fuel, the float assembly rises and pushes upwards on the needle valve and closes off the fuel. Very simple, very effective.  The tiny spring that fits on the stem of the needle valve and keeps the float assembly in place.   We decided that everything needed a proper cleaning.  Using my trusted Dremel and a brass small brush on it to clean all the flange faces.  I brought out my degreaser tank. Had not used it for a while. In fact I have had this thing for about 4-5 years, and it does get some use, but I have never cleaned it or refreshed its degreaser liquid. So we decided to clean the degreaser tank first. It was very dirty, it had about 5mm of dirt and muck on the bottom.  When we started the pump, it started spraying liquid from the base. So we took it out and inspected it to find it was broken. Where the hose connector screws into the pump, the plastic connection had broken into multiple little bits. 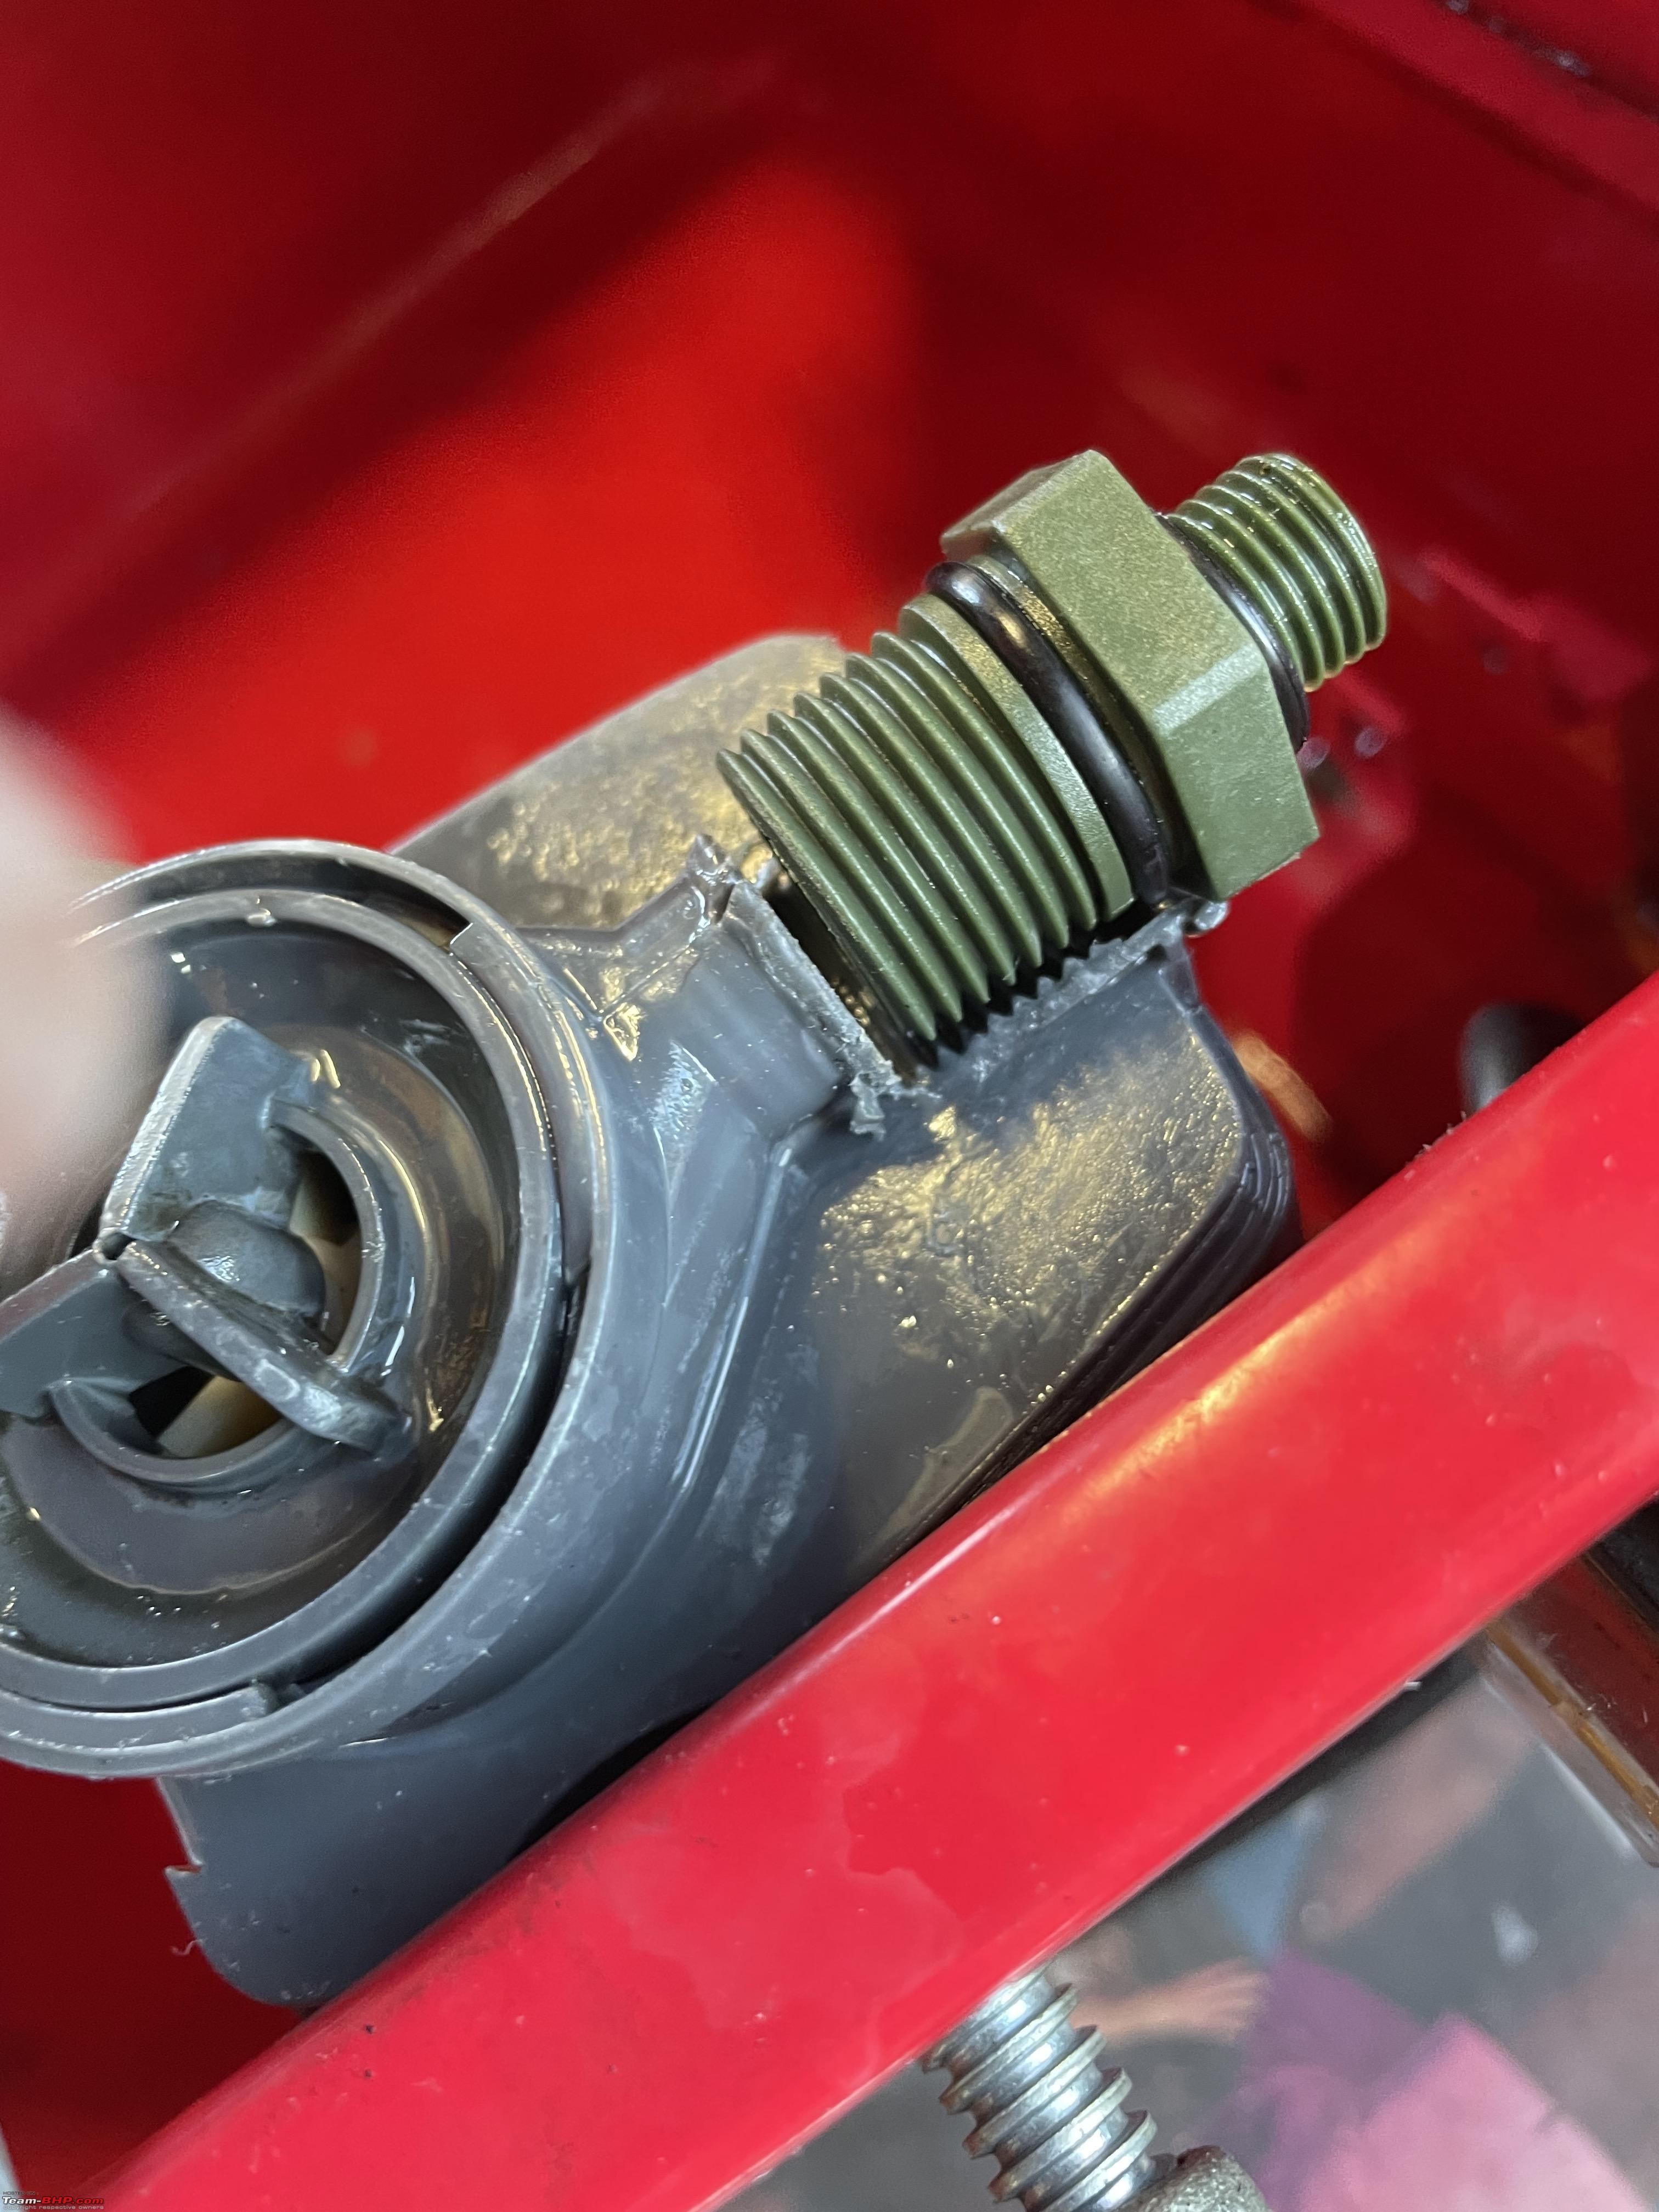 Because the pump was still wired into the switch on the tank, and we did not want to mess with the wiring, we fixed the pump on the side of the tank with a clamp.  We used JB Weld to glue the plastic bits back in place. Will take 24 ours to properly cure. If this doesnt work, I am going to replace the pump. Cees and Annelies have moved on. I will be working on getting the carburator cleaned and put it back together with many new parts, gaskets and O-rings in the next couple of days. Jeroen |
|
| (6)
Thanks
|
| The following 6 BHPians Thank Jeroen for this useful post: | IcarusMan, Jaggu, Prowler, Thad E Ginathom, vaasu, VivekCherian |
|
10th January 2023, 16:38
| #1027 |
| Distinguished - BHPian | Re: My Car Hobby: A lot of fiddling, and some driving too! Jaguar XJR, Mercedes W123 & Alfa Romeo Sp This morning a bit of an unusual load for my Jeep. We have a beautiful and very pretty walnut tree in our garden. It provides lots of shade in the summer, ideal. It also provides a lot of walnuts! In the autumn we pick them up, clean them, dry them. This morning I took them to a farm about 40 km east from us. Cees and Annelies have some walnut trees too and they had left their walnuts with us. This farm does pressing of all kinds of fruit. You can bring your own fruit and they will press it. If you pay for it, you will get all the liquid. If you let them press it and keep it, they pay you in part of the total liquid pressed. So we took 12,5 of this baskets full of walnuts. They get inspected and weighted, 57,6kg. Which left 23 bottles for us. 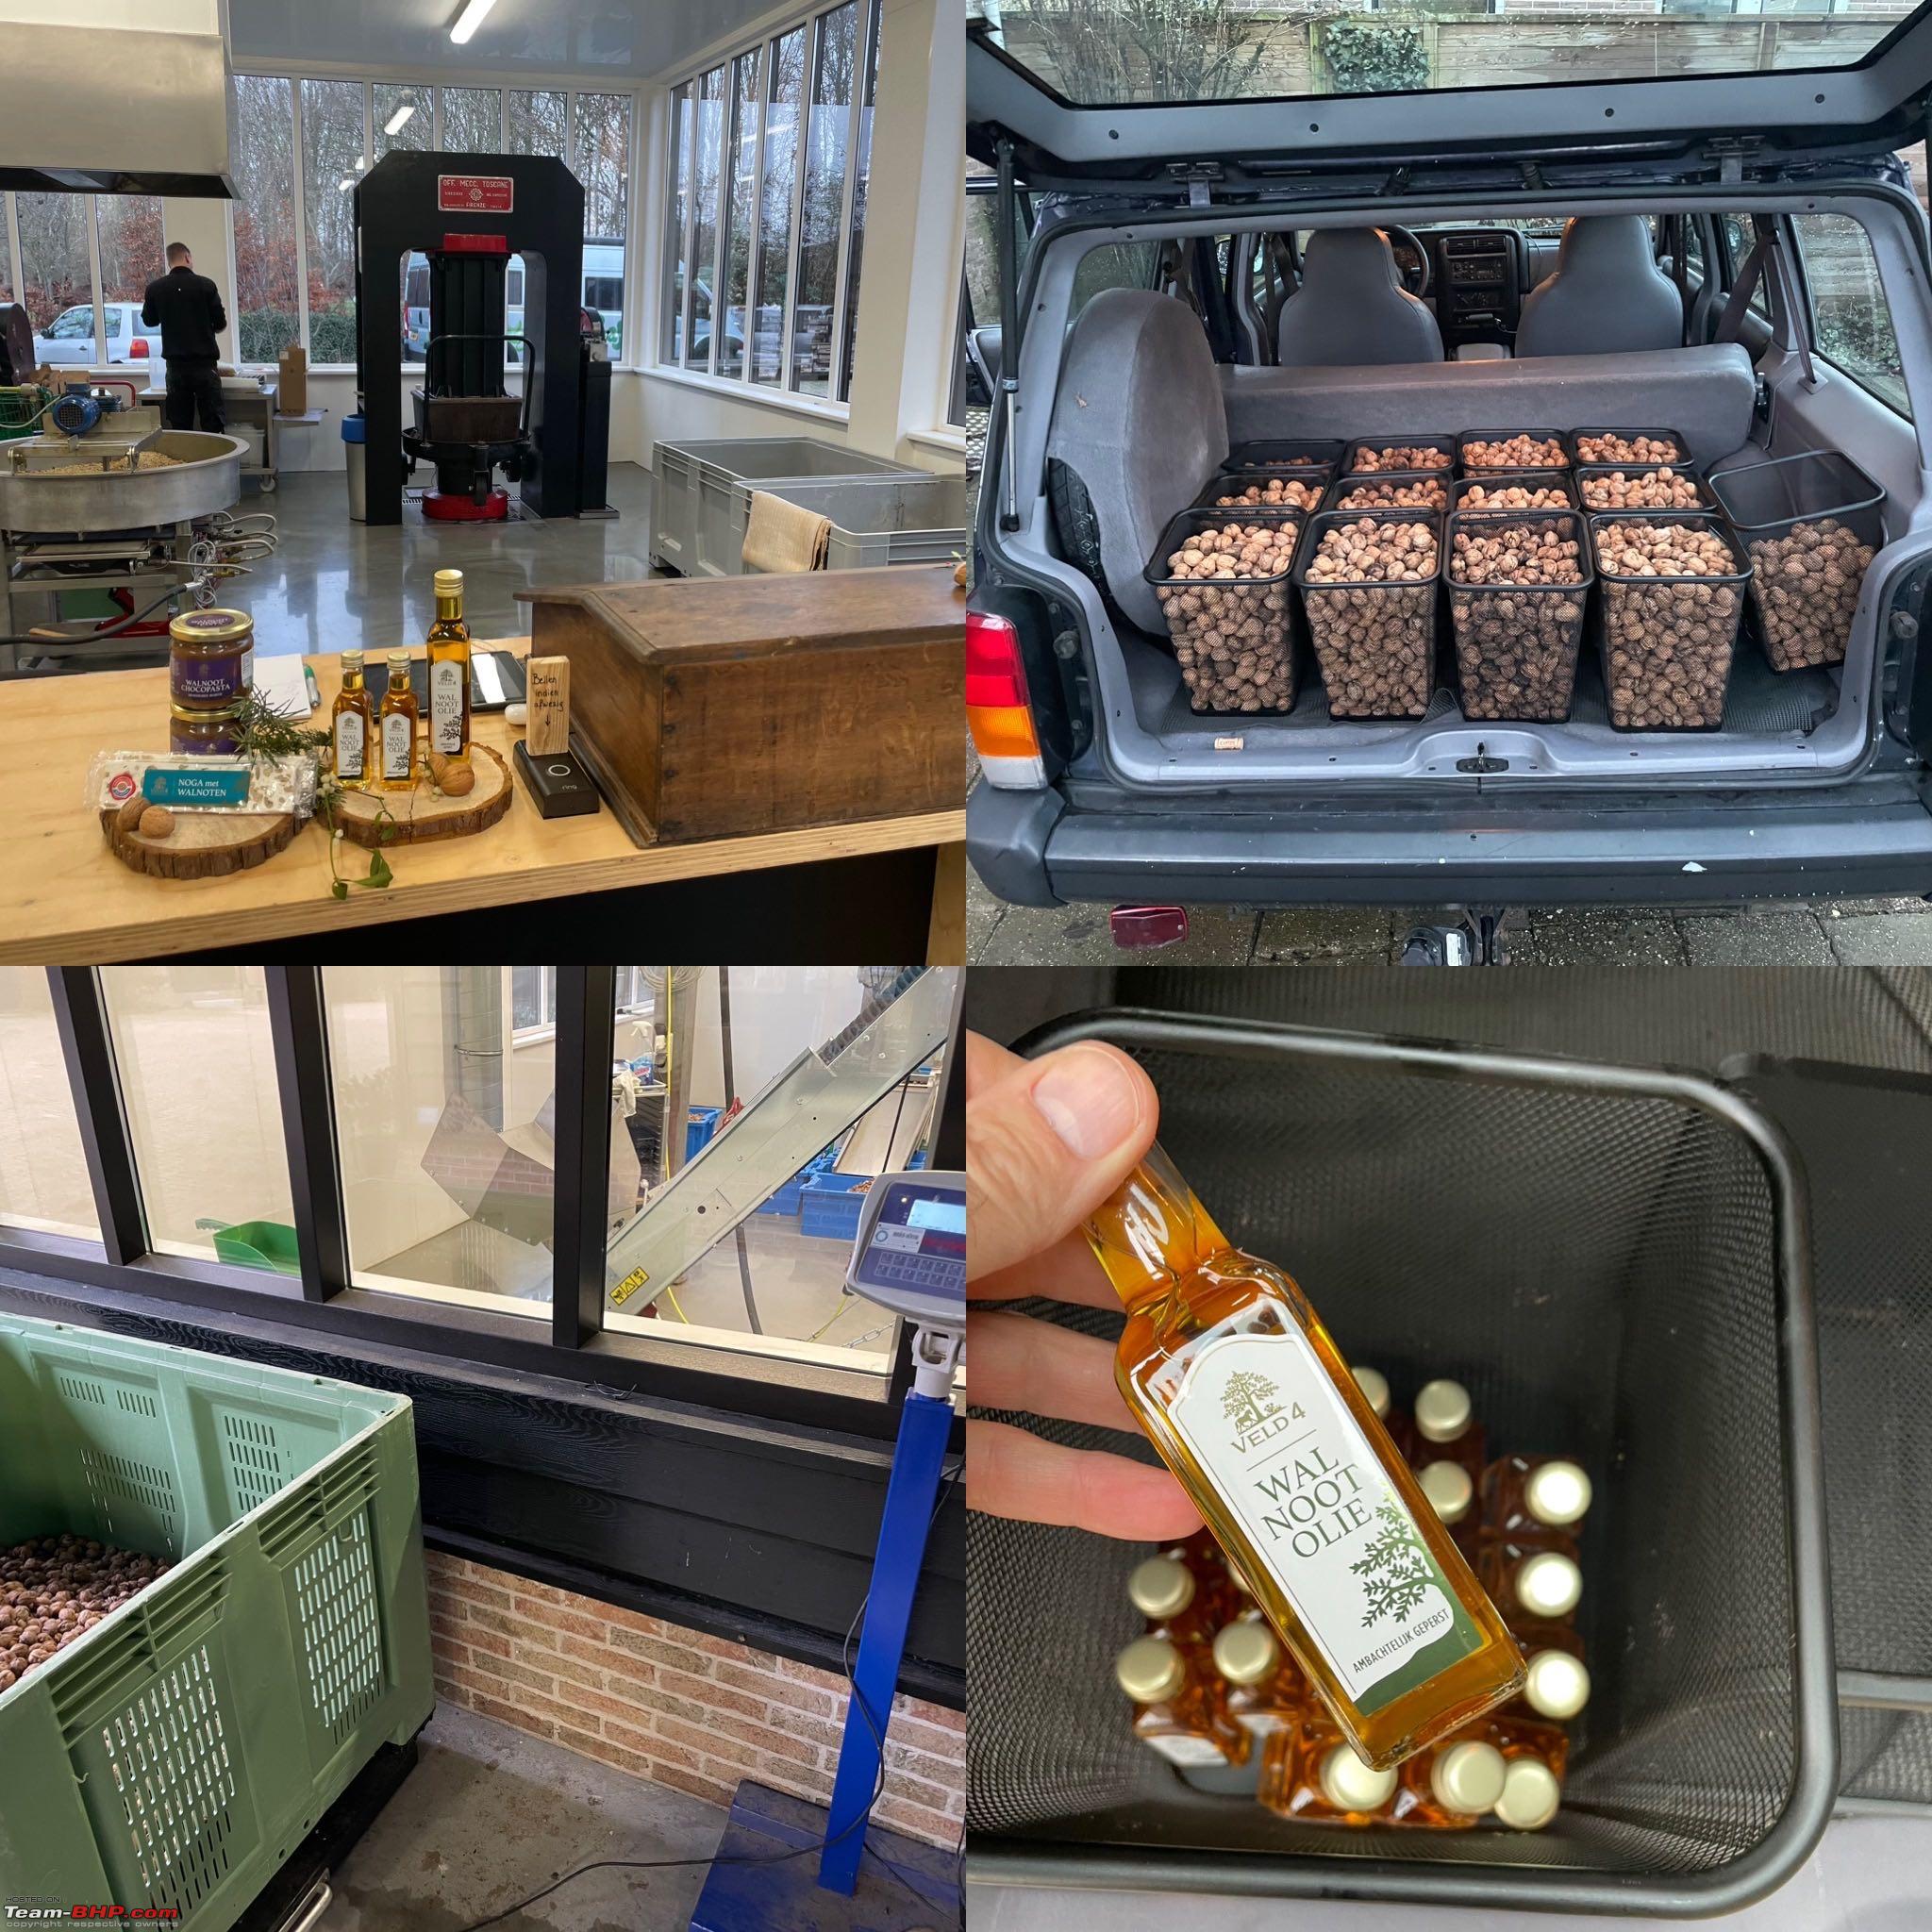 Five of those bottles are for Annelies and Cees. My wife uses the oil for cooking and the bottles make a nice gift for friends and family that visit us.  On the way home, I picked up the carburator gasket from the local Mercedes dealer. I have also ordered two new O-rings for this part. I don’t feel comfortable putting the old ones back in.  The pump on the degreaser tank is working again. It leaks a bit round the connector, but its good enough to use for now. So I have been doing a lot of cleaning on the outside and the inside of the carburator. Putting bits back on. This is the jet nozzle being inserted, there is a spring underneath it. The stop valve assembly pushes all of this in place.  I wanted to check how the new jet fitted which meant reassembling the float chamber too. If you look very carefully you can just see the top of the jet in the (dark) centre of the top of the carburator. I checked and double checked and I have some measures from the old one. It needs to be positioned in a similar postion as the old one or it won’t run at all.  Beginning to look good!    Lots and lots of cleaning, polishing, blowing clean air etc etc.   Still puzzled by the needle valve. I have talked to a real carburator specialist. She might have a new needle for me. Learned a lot from her. Mercedes has stopped making these needles, but they also had two different version of needles. The original needle fitted till about 1980 had as different code and it runs slightly more rich. I am not to worried about that. As long as it will fit I am going with it. The new (top) and old (lower) needle. In in short space of time this is the fourth new part that doesn’t fit and or works as it should be!   I would like to get all the parts in-house and installed before Thursday afternoon. The Jeep needs to come into the garage, so I can take the wheels off for new tires and sand blazing and powder coating of the rims! Jeroen Last edited by Jeroen : 10th January 2023 at 16:39. |
|
| (3)
Thanks
|
| The following 3 BHPians Thank Jeroen for this useful post: | IcarusMan, Prowler, vaasu |
|
10th January 2023, 21:49
| #1028 |
| Distinguished - BHPian | Re: My Car Hobby: A lot of fiddling, and some driving too! Jaguar XJR, Mercedes W123 & Alfa Romeo Sp I just got an email from my friendly carberator specialist Wink. She studied the photographs and dimensions I had provided her. She measured several needles she had in stock. Her conclusion was that the needles for Volvo and Mercedes are about 6,24-6,26mm and the ones for the English type of cars are 6,27-6,32. She is probably correct, because that would explain why I cant fit it! So I immediately ordered a new, correct one, it will arrive tomorrow! Fingers crossed. I have been having an interesting discussion about my Spider dipstick with other Spider enthusiast. This so called AlfaBB forum is one of the best. On my very simple question I had 18 replies within 24 hours. I have investigated some more and also called Goos, my local Alfa Specialist on how this dipstick is supposed to be mounted. Have a look here: https://www.alfabb.com/threads/dipst.../#post-8788620 Since I could not continue with the carburator I decided to tackle a few other jobs. I checked the brake discs and the pads on the W123. So chokes behind the wheels and the trolly jack under the main engine support beam.  Did all four brakes of course. Some people will do only one, or one side and figure the other brakes will have similar wear. But that is not necessarily always the case. Pads and discs do wear unevenly sometimes, especially when there is something wrong with the calliper. So best check them all, individually. Using my special little disc measuring tool  Here you see the caliper of the left front wheel. Notice the wear indicators on the brake pads. You cant really measure the pad thickness without taking the pads out. But I could see they were absolutely fine.  The brake pads on both rear brakes really need replacing in the next few months or so. When putting the wheels back on, always use a proper torque wrench!! 110Nm in the case of the W123, steel rims.  I wrote down the measurement. I still need to check if the discs are within spec, but I believe so.  I did notice a couple of rubber bushing on the suspension looking a bit tired. But they seem to be working ok. Huge job replacing these.  Next I spend a couple of hours, sorting all kinds of stuff. I came across a couple of these plastic boxes and they are ideal for keeping all kinds of small stuff sorted.   Jeroen |
|
| (7)
Thanks
|
| The following 7 BHPians Thank Jeroen for this useful post: | IcarusMan, keroo1099, Prowler, Thad E Ginathom, vaasu, VivekCherian, wbd8779 |
|
12th January 2023, 21:39
| #1029 |
| Distinguished - BHPian | Re: My Car Hobby: A lot of fiddling, and some driving too! Jaguar XJR, Mercedes W123 & Alfa Romeo Sp Lots of work done in the last couple of days! Yesterday I had all the parts in house except the new needle. But I had the gasket and the new O-rings. So I decided I would at least fit the carburator back on to the engine. Here you see the new parts and also the old O-rings already taken off the shut off valve assembly.Difficult to see but the old O-rings looked quite compressed compared to the new ones. I am glad I decided to replace them.  Fitting O-rings is easy, just make sure you dont stretch them too much and dont damage them. Looking good!  I put the complete carburator back onto the engine, using the new gasket. I connected the throttle linkage, the cooling water, fuel lines, vacuum line and a few more things. (electrical mass connection)  This is what was still left on my workbench.  This morning I got lucky, the mailman delivered my needle at 10.00am. Usually he comes around 1400 hours. The new needle fitted perfectly in the vacuum piston.  Next I attached the also new membrane. It has these small protrusions. You must make sure you install it in the correct orientation.  Vacuum piston with the membrane and needle attached goes back on.  This is how it looks so far  Next the carburator cover goes back on. Only one correct orientation. Make sure to put the large spring back in as well. I added a few drops of oil here and there, to make sure everything operates smoothly. And of course, prior to installation of any part, I made sure everything was meticulously clean!  finally the cover goes on.  Next I add the special carburator oil. This stuff is as expensive as liquid gold. I kid you not. Actually, the workshop manual states to use ATF. But I bought this little body a few years ago. Might as well use it!  I also replaced a piece of the tubing on the thermo valve. Looked in really rough shape   I finished up a few more connections and bits and pieces and voila!!     I am really pleased how it looks from the outside. So much better!!  I did notice a bit of insulation that keeps some wires together had rubbed against the carburator. So I just fixed it with a bit of tape.  Finally put the connection between the air filter and carburator back in place. Everything looks really good!!! 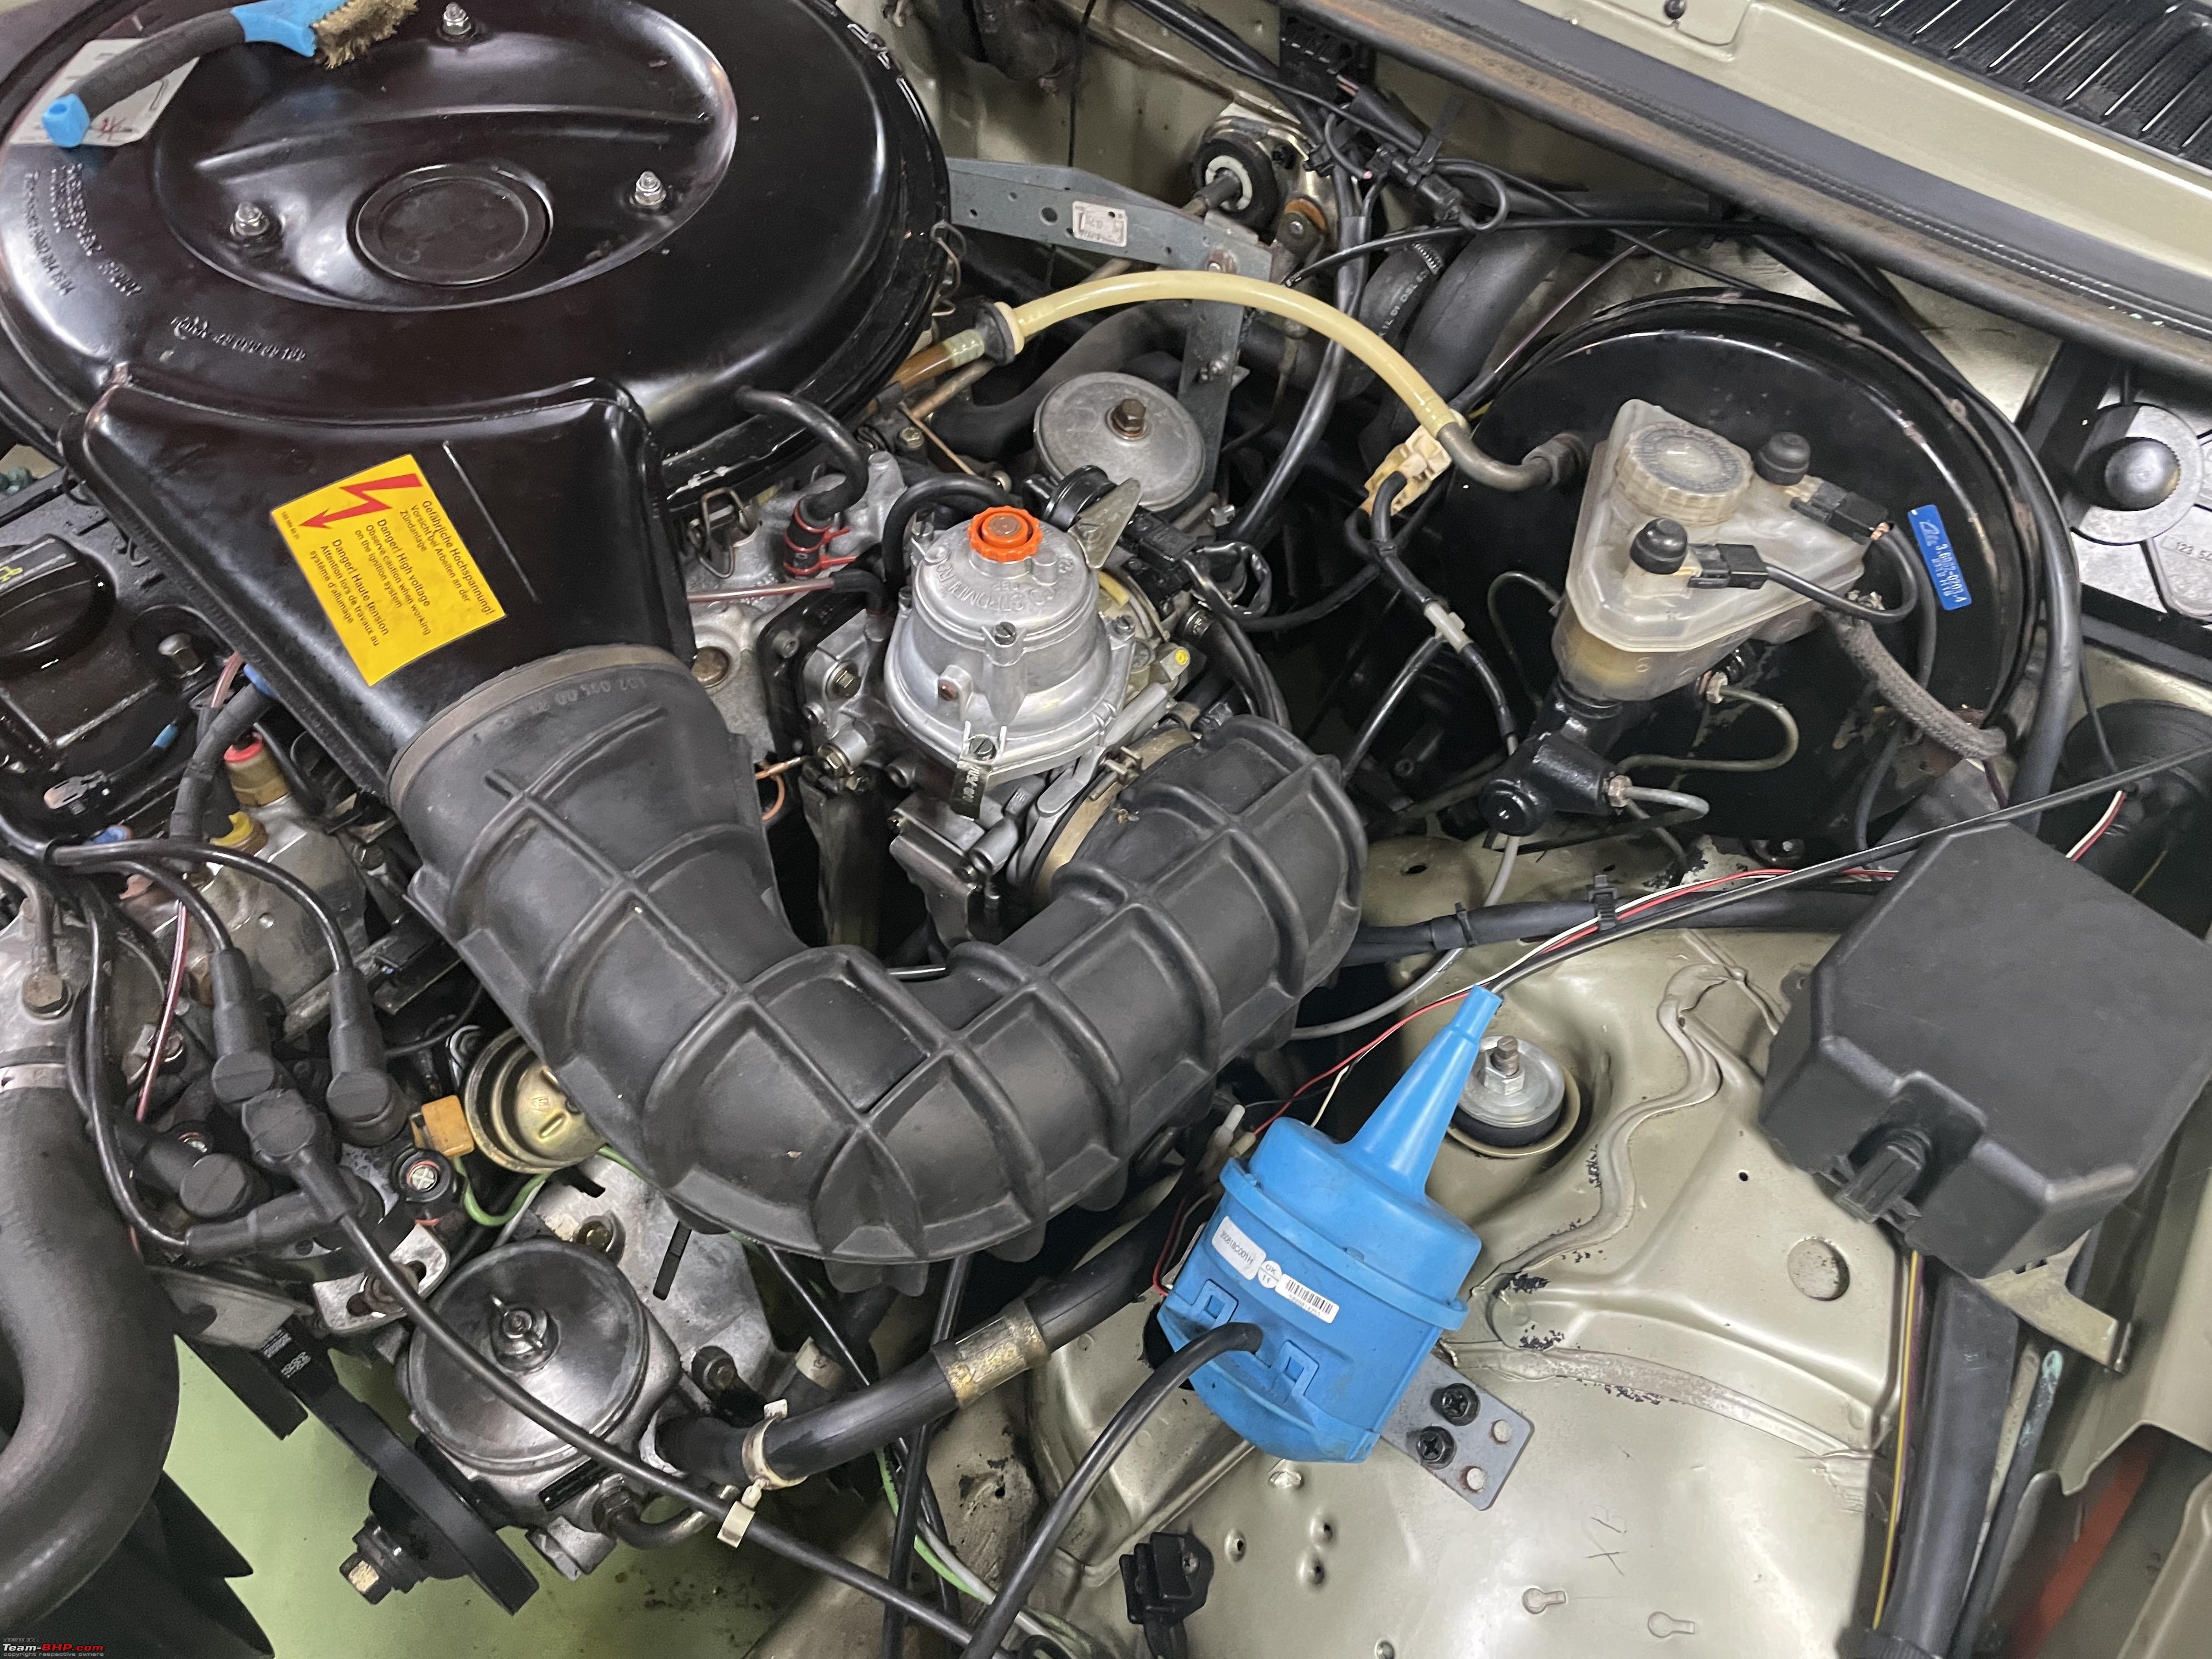 But the most important question is of course, will it start and will it run. I hooked up my special meter to check the RPMs. Got behind the wheel and started the engine. It took about 3-4 seconds before it fired up. I was expecting having to start a bit longer, in order to get the fuel back into the carburator. As you can see it is running a bit high on idle. But that is because the automatic choke is adjusting the idle RPM to about 1350 RPM. I was very very pleased with this result so far. Also, the engine did idle better than before. So I took it out for a quick test drive. As the engine reached its normal operating temperature the engine started to loose power, acceleration became difficult and when left idling it stalled. I managed to get it back into my garage. I turned the CO adjustment down. Which is essentially the stop valve pushing against the jet. Gave it a couple of turns and it runs very smooth now at 830 RPM.  No hunting. Took it for another test drive and it ran beautifully. No more stuttering!! So a huge improvement. Next I swapped the original Mercedes electronic ignition for the Hitachi one I had bought earlier. I wanted to see if it made any difference. Which it did not, so I put the original Mercedes one back in. Very very happy with the result. Big relief I must admit. Carburators can be hugely temperamental. I have made an appointment with my W123 specials Cor first thing Monday morning. He will adjust the CO one more time. I dont have a CO analyser. With the Mercedes back on the road, time to swap the cars, so the Jeep could be worked on.  I jacked the Jeep up and put axle stand underneath it. Next I took all the wheels off.  Tomorrow morning Berndt will come and pick me and my four wheels up with his Rover Estate. First we will drive over to our local Euromaster tire shop. They will take the tires of the rims. Next we will drive to Maastricht for the Interclassic Event. One of the big and important events on the European Classic Car event calendar. https://interclassics.events/en/clas...ow-maastricht/ I do hope the Euromaster guys will be able to take the tires off right away so we can take the rims with us. I need to bring the rims to the paint shop on Monday and when I go to Cor to get the CO adjusted I am already half way there. We will see. Jeroen |
|
| (9)
Thanks
|
| The following 9 BHPians Thank Jeroen for this useful post: | dailydriver, dip27in, IcarusMan, keroo1099, Prowler, Thad E Ginathom, vaasu, vb-saan, VivekCherian |
|
15th January 2023, 09:01
| #1030 | |
| BHPian | Re: My Car Hobby: A lot of fiddling, and some driving too! Jaguar XJR, Mercedes W123 & Alfa Romeo Sp Quote:
 Two questions- indulge me please.. 1. Aren't you little jittery that some part of those Classics might get damaged and may not be available - I literally gave away my bike due to a damaged oil seal (the metal seat of the seal got a nick and needed probably the whole casing replacement) with no spare! 2. What do you do with a unusable (after installation trial) part like this carburettor maybe and how do you dispose these or the replaced parts in your country? And like always for the posts keep them coming  | |
|
| (1)
Thanks
|
| The following BHPian Thanks Freespirit27 for this useful post: | Thad E Ginathom |
|
15th January 2023, 14:34
| #1031 | |||
| Distinguished - BHPian | Re: My Car Hobby: A lot of fiddling, and some driving too! Jaguar XJR, Mercedes W123 & Alfa Romeo Sp Quote:
Quote:
Very often parts can be repaired. That is also a big difference between modern day car mechanics and classic car (DIY) mechanics. On a classic car many people would prefer to restore original parts, rather then replace it. In this thread you can see me taking certain parts apart to fix, whereas in a normal garage the whole part would be replaced. (E.g. the electro motor on the fan of my Jeep. I had replaced one of the bearings and one also made a new bracket on my minimill to retain one of the brushes. Or the wiper motor assembly on my Spider etc. etc.) If you can’t find new parts, you could always resort to second hand parts for a while too. Over the years I have collected some parts that I know are going to be hard to get. It is also why I often keep my old parts when I replace them.I am always trawling the internet for parts, be it new or second hand. Just in case. You might still be able to use them, or use it as a reference getting something that comes close. There is a huge market with thousands of companies providing services and parts for classic cars in most western countries. It is a huge industry employing tens of thousands of people. Also, classic car clubs play an important role in maintaining parts and knowledge about these old cars I can make some parts myself. These days, many parts, including for instance pistons can be 3D printed. Obviously, that comes at a huge cost. If you watch Jay Lenno of YouTube you will often see him getting parts specially made for some of his cars. He has got an amazing workshop and tools himself, but he uses specialist restoration companies too. So far I have managed ok. This latest job on the carburator of the W123 being a good example. New jets are not available, but luckily I had one, I bought one many years ago. The original needle is not available. I had an aftermarket replacement, which did not fit correctly. Eventually, the needle that I did manage to get was an original one, but for earlier models. But it still fitted and appears to run fine. Quote:
When I lived in the USA you could always bring back old car liquids to the car parts stores. They would have big containers at the back of the shop and you would simple pour your oils/liquid into it and it would be safely disposed off. When you buy new tires, the tire shop keeps your old ones, you pay a few euro’s per tire (mandatory) for them to be disposed off, again all being recycled. Similar with batteries, when you buy a new battery, the car part shop, or garage will keep your battery to be disposed/recycled properly. Have a look here; https://www.team-bhp.com/forum/diy-d...ml#post4459204 Everything gets either recycled or safely and or environmentally friendly disposed off. The same goes for all our appliances, whether it is a fridge, or a cooker, or a coffeemaker an electric razor. All being collected separately and recycled. In fact in most supermarkets you can bring your old household batteries and small electrical appliances to be recycled. It does mean for our house hold alone we have four different bins. One for garden waste, one for paper, one for plastics, one general waste. We have so called bottle banks everywhere where you can bring your bottles and glass. Bottles with a refund you take back to the supermarket, including your crates with empty beer bottles. They have a machine that you feed them into and you get a refund ticket. Essentially, all waste, be it just our household waste or anything from my car hobbies gets collected, or I bring it to a collection point for safe and environmental handling. What can be recycled is being recycled. Jeroen Last edited by Jeroen : 15th January 2023 at 14:43. | |||
|
| (7)
Thanks
|
| The following 7 BHPians Thank Jeroen for this useful post: | Freespirit27, IcarusMan, Omkar, PM - B, Prowler, Thad E Ginathom, VivekCherian |
| |
|
17th January 2023, 00:46
| #1032 |
| Distinguished - BHPian | Re: My Car Hobby: A lot of fiddling, and some driving too! Jaguar XJR, Mercedes W123 & Alfa Romeo Sp This morning I left home at 07.15 to drive to Cor de Jong, my friendly W123 expert, to check the CO after all the fiddling with the carburator.  First thing we did was to check what the CO was. Bear in mind, that I dont have a CO analyser and I adjusted the carburator going by ear and Hilde RPM only. It was running at 3,6% which is not bad all things considered!  But Cor fiddled a bit more and we brought it down some more. Once you go below 2,5% the idle becomes a little more rough and the engine starts to exibit an every so slight shudder again when accelerating. It is a bit of a tedious process. You adjust the CO by twisting the stop valve assembly, but it takes some 20-30 seconds for the CO to stabilise. So once we were happy we took it for a test drive. Typically that will lower the CO% some more. It is ok for now. I think I will drive it for a few hundred kilometers and then re-adjust once more. I know enough garages with a CO analyser and I can do the adjustment myself now. Next I drove onward to Schaik to deliver my Jeep rims to the place that will sandblast and powder coat them. I chose a very nice silver colour. Unfortunately they could not powder coat the center piece of the rim as this is plastic. The problem with plastic is that it will melt during curing due to high temperature. I have heard about a different powder coating process which would allow plastics to be used as well. They will be done on Saturday morning. I will pick them up and drive back home via Breda. I will visit my usual car paint shop to get a can of similar spray paint made. I will have to clean and prepare these four centre pieces in the next few days.  Once I got home I decided to have a go at my Jeep Cherokee with a major job. During its last MOT it was noted that the Universal Joint on the front drive shafts have some play. Also the ball joints on the steering knuckle had some play. Not enough to fail its MOT, but we are almost a year onwards and almost 6000KM added to the clock!! I had been debating with myself whether I would attempt this job myself or not. The problem is that although a pretty straightforward job, various parts can be very very very stuck. In the end I decided to see how far I could get!! So here we go: This is how it all looks, still assembled  First thing remove the brake calliper, which means undo two bolts at the back and pry it off the disc. 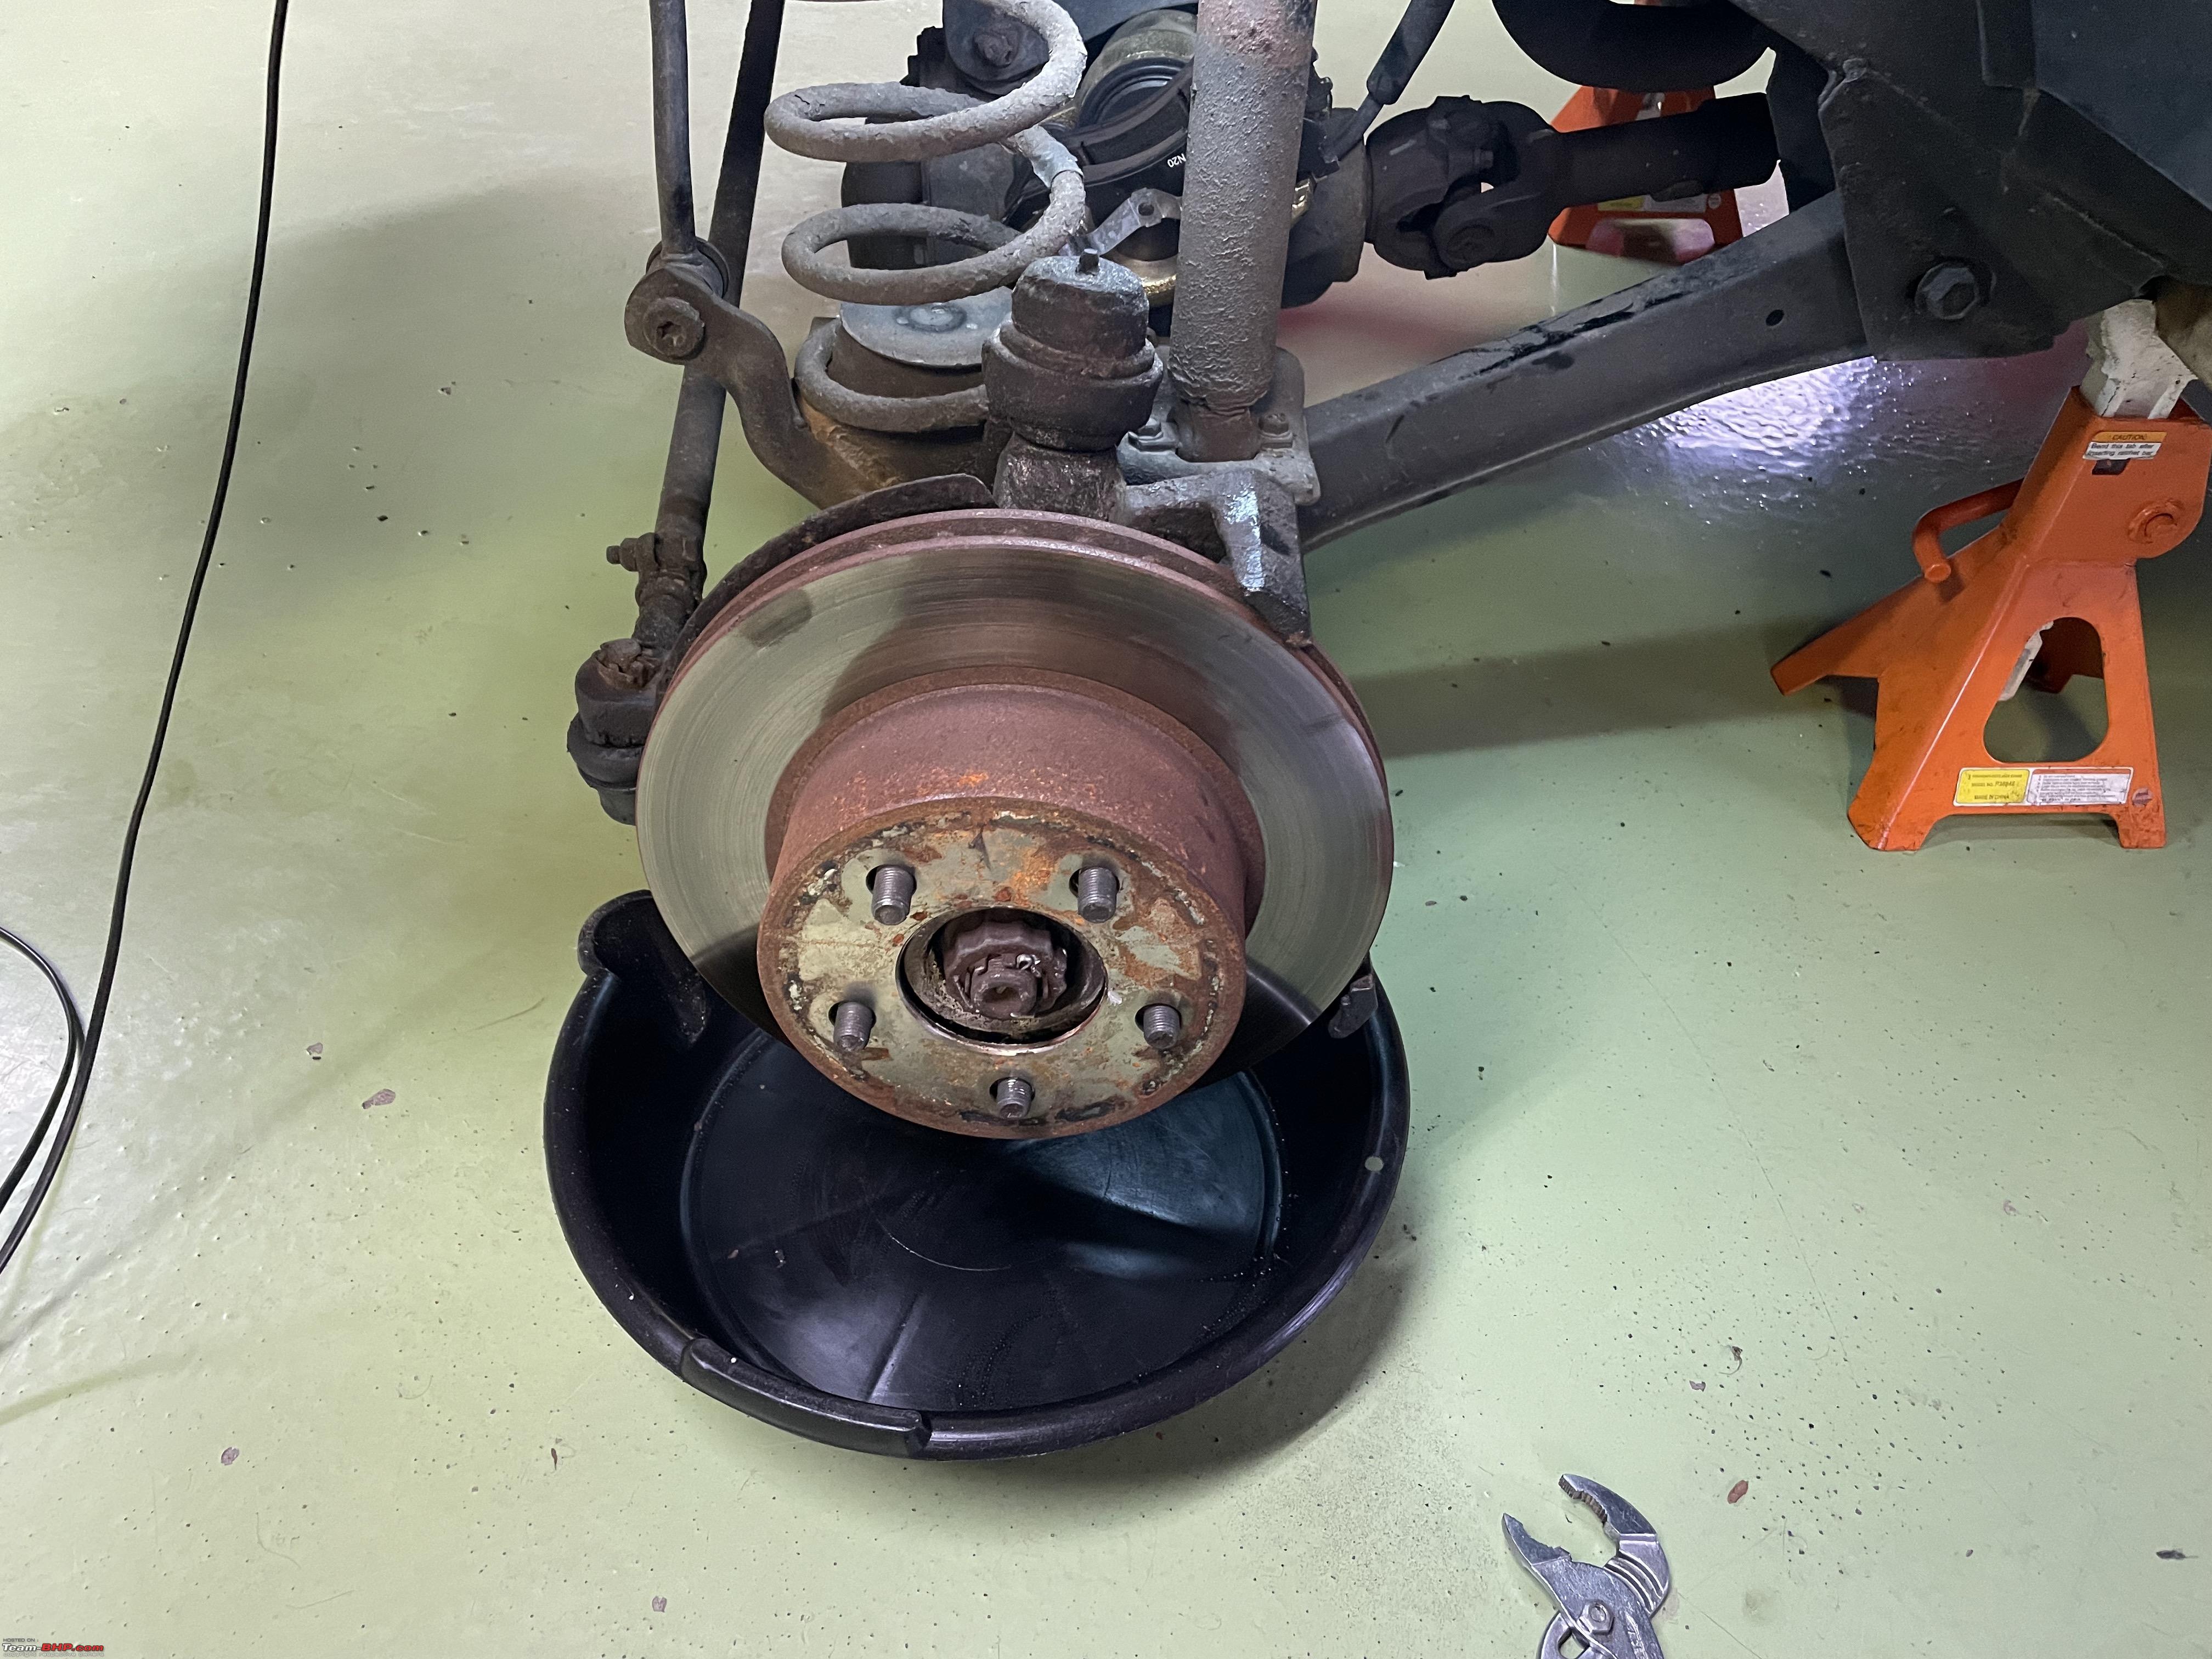 I put the complete brake assembly, calliper and pads behind the spring, fully supported as you dont want it hanging on the brake line/hose.  There are two way you can remove the drive shaft. You can undo the large nut on the axle or undo three bolts which frees up the complete hub and bearing assembly. 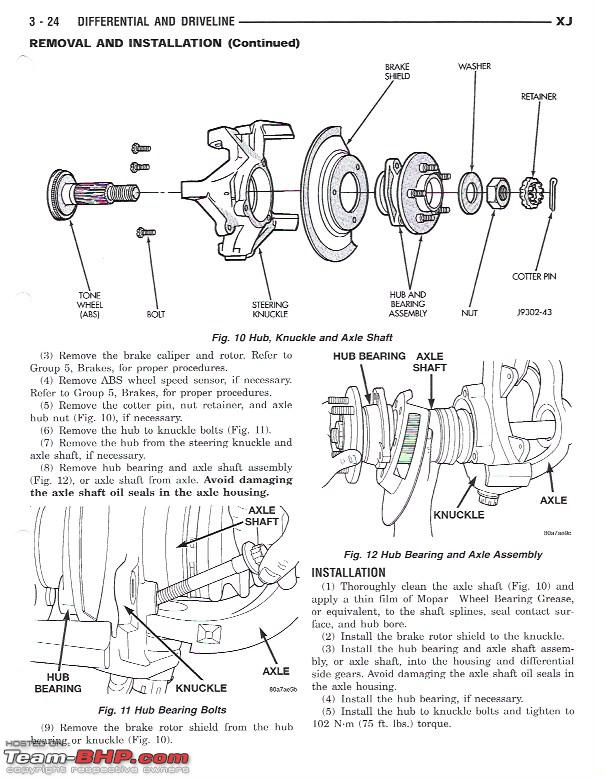 I choose the latter as I did not have the correct socket for that large axle nut! The three bolts are fastened with similar bolts requiring special sockets as well. I do have all the small sizes, luckily!  I had soaked everything in penetrating oil. Even so, everything was absolutely stuck solid. I had to use my extender ratchet to break free these bolts. First I hammered the correct socket onto the bolt. Next I positioned a trolley jack to support the socket extender and ratchet. I had to jump up and down to free it up. Also, repeated hammering of the complete assembly.  First hurdle taken successfully!!  Here the complete drive shaft, including the bearing assembly. It was pretty tough getting it out. Once I had undo the three bolts, I left them in with just a few mm clearance. Than I started walking the bolts with a very heavy hammer which pushed the bearing assembly out of the steering knuckle.  Definitely play on the Universal joint!! So that needs replacing. Also, the wheel bearing does not feel all that great. I will compare to the right hand one, once I get that out and decide what to do. Next the steering knuckle has to come off.  The two ball joints holding the steering knuckle in place have so called castle nuts, secured with cotter pins. I spend about two hours removing two cotter pins!! They were seized, they broke, I tried to drill them out, to break three of my drills etc. etc. Eventually I managed to get the two nuts off and I started wacking the steering knuckle. I used my special pneumatic hammer as well. Worked a treat!! The official procedure calls for undoing the steering ball stud as well. But I left it as there is sufficient room/play to move the whole steering knuckle, still attached to the steering bar aside.   Next , the real fun part. Pressing the ball joints out!! I bought this special tool for the W123. I replaced one of the ball studs a few years ago. It is somewhere on this thread. This is a universal set, which means it never fits anything perfectly. So I had to made do with a few sockets here and there as well. Remarkably the upper ball stud is pushed in from the top! So you have to push it out upwards. I had to experiment with a few accessoires and sockets to get a good set up to push it out.  Once you have the various pipes, adaptors, sockets and the C-clamp all aligned, you start winding down the main spindle. Very hard work, you keep on tightening it till it will not go any further. Then you start smacking the area around the stud in the steering knuckle. You will get a very audible POP as it moves a mm or so. tighten the clamp, some more whacking, more POP etc. I managed to get the top one out without to much effort. Next the bottom one, same procedure, slightly different set up with the C-clamp and bits.  It also came out, relative easy, but using a lot of force and a lot of whacking. that is just how it is. If that is not enough, you might want to consider putting a big torch on the steering knuckle, see if that helps. Both ball studs removed. Very pleased with myself!!  Here they are. The bottom one was completely gone!! So high time it gets replaced.  The aftermath:    It took about 4-5 hours for me to get all of this undone. Tomorrow I start on the left side. I hope it will go along similar lines. Once I got everything out I will make a list of parts I need. Jeroen |
|
| (20)
Thanks
|
| The following 20 BHPians Thank Jeroen for this useful post: | anivy, CLIX, DicKy, fluidicjoy, gunin, g_sanjib, IcarusMan, jnanesh, keroo1099, Omkar, PM - B, premsky, Prowler, sagarpadaki, Siva Prakash, SmartCat, swiftnfurious, Thad E Ginathom, vaasu, VivekCherian |
|
18th January 2023, 12:25
| #1033 |
| Distinguished - BHPian | Re: My Car Hobby: A lot of fiddling, and some driving too! Jaguar XJR, Mercedes W123 & Alfa Romeo Sp Yesterday I made good progress on the Jeep. Took everything apart on the right side too. Did it in about two hours, practices makes perfect. This time I managed to deal with the cotter pins a lot quicker too. I just cut them off as near to the castle nut as I can. I dont even attempt to pry them out anymore. I just put my socket wrench on and start wrenching. These cotter pins are pretty soft, so the nut will just cut off any remaining part that is sticking out. Tied of the track bar and various other bits of the steering linkage, so it is out of the way.  Here we are, two complete axle shafts on my workbench.  I checked how the bearing on this one felt and it was pretty bad too. So I will be replacing both bearings as well. These come as a complete bearing.  Getting them removed is in theory at least very easy. Undo the cotter pin first.  Take off the little fixture plate and spring.  Next all you need to do is undo this nut. I decided to remove the U-joints for, so I could handle the assembly a bit better. Removing U-joints is always a bit of a pain. First you need to pry off these four sort of snap rings that are on the inside of the yokes. 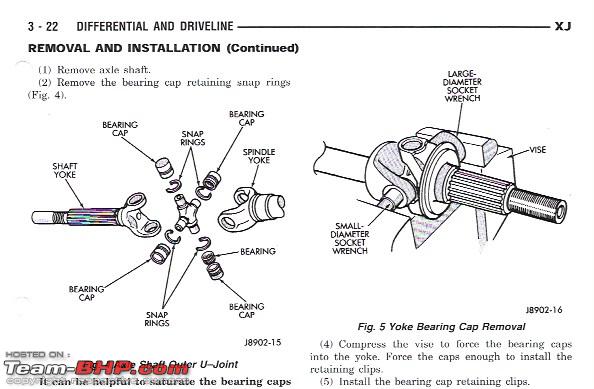  I wrapped some cardboard around the spline on the end of the shafts, because on no account should these splines be damaged.  Next I used my trusted old C-clamp again to press out the bearing caps one by one. Worked really well. You can also just hammer them out, but this is a bit more controlled way of doing it.   One front axle done, one front axle to go.  All done!!  With the complete hub and bearing assembly removed from the axle I attempted to undo the very large nut. This is a M36. I have a M36 socket, but I dont have a breaker bar. All my tooling is really too small. I pounded away at it with my pneumatic tools, but it would not budge. So I took the two assemblies to my local friendly Jeep Specialist Martin of Brinkman Autobedrijf in Vuren. Last year Martin has helped me out a few times on some jobs on the Jeep I could not do myself. He also gave my Jeep a thorough inspection after I had bought it, so I could decide what jobs needing doing etc. https://www.brinkman-vuren.nl It took Martin, working a massive pneumatic torque wrench about 3-4 minutes to undo the nut on each assembly. He was surprised on how stuck they were! No wonder I could not get them undo by myself and my little DIY tooling. Very lucky to have such a friendly, helpful and knowledgeable guy so close by!! I also made the appointment with him for the Jeeps next MOT in a few months time. Martins garage is always chock full with work for at least 5-6 weeks ahead of time. So you need to plan any job with him about two months in advance. Next I drove over to Tiel to pick up all my new parts: 2 Hub and bearing assembly 2 sets of upper/lower ball stud assembly 2 sets of U joints 2 bolts 20 lug nuts.  I am a bit puzzled by this piece, a sort of threaded bushing. It came with the ball studs. I seem to recall having seen them on a YT video. But my old ones did not come with them, nor is it shown in the workshop manual. So I posted a question on the Jeep forum.  So far, only one casualty. I broke my long nosed pliers. Very sad, I have had it for a very long time. I might grind down the other side, so it still can be used to some extend.  I always pride myself on working pretty cleanly, but with jobs like these everything gets very messy very quickly. I will be spending a lot of time cleaning and painting all the various parts and bits before I start installation of all the new kit.  Last edited by Jeroen : 18th January 2023 at 12:30. |
|
| (31)
Thanks
|
| The following 31 BHPians Thank Jeroen for this useful post: | --gKrish--, anivy, asbshyam, CLIX, DicKy, dip27in, fluidicjoy, Fuldagap, g_sanjib, IcarusMan, keroo1099, KkVaidya, PM - B, prashantuchil, premsky, Prowler, sagarpadaki, Sangwan, sgm, Siva Prakash, sridhar-v, swiftnfurious, TejasV, Thad E Ginathom, vaasu, vb-saan, VivekCherian, wbd8779, Whiplash7, ysjoy, zalaps |
|
19th January 2023, 13:36
| #1034 | |
| BHPian Join Date: Jul 2008 Location: Madras
Posts: 798
Thanked: 1,403 Times
| Re: My Car Hobby: A lot of fiddling, and some driving too! Jaguar XJR, Mercedes W123 & Alfa Romeo Sp Quote:
| |
|
| (10)
Thanks
|
| The following 10 BHPians Thank Prowler for this useful post: | anivy, dailydriver, Heisenberg_ad, IcarusMan, Jeroen, mugen_pinaki27, premsky, rt363, TejasV, Thad E Ginathom |
|
21st January 2023, 13:07
| #1035 | |
| Distinguished - BHPian | Re: My Car Hobby: A lot of fiddling, and some driving too! Jaguar XJR, Mercedes W123 & Alfa Romeo Sp Quote:
I do enjoy adding to this thread on a regular basis. As you can imagine I am active on various car forums around the world. When I see people asking questions about certain jobs I have done in the past I post a link to the respective post. Actually, I am beginning to refer to some of my older posts now and then as well. I have taken so many photographs of every part of my cars over the years. Yesterday working on the Jeep I was confused as to how the brake dust shield had to be fitted back. Looked up the posts on the brake work I did about a year ago. Sure enough there was an image that showed me the exact orientation of the brake dust shield! Jeroen | |
|
| (5)
Thanks
|
| The following 5 BHPians Thank Jeroen for this useful post: | IcarusMan, Prowler, Thad E Ginathom, vb-saan, wbd8779 |
|