| |||||||

| Search Forums |
| Advanced Search |
| Go to Page... |
 |
| Search this Thread |  41,202 views |
 29th September 2016, 03:51
| #1 |
| BHPian Join Date: Apr 2016 Location: New Delhi
Posts: 426
Thanked: 798 Times
| Rear-facing Dashcam installed! Mobius ActionCam Ever since my interest in Dashcams and installing the first one in my Active, I had it in the back of my mind to install one for the rear but initially for a couple of reasons it didn't pan out as expected and was put on the back-burner. Only until a couple of months later. That's when I got rear ended by an impatient rider and driver on two different occasions during slow moving traffic. The thought of dealing with the misery of, 'your word against mine', in an incident where uncouth people and damage could be involved, brought some urgency to the almost shelved plan. These two incidents and the blatant lies plus subterfuge some people resort to, of which I can speak from personal experience, made me seriously look for a discreet solution for the rear. Luckily on both occasions the Active escaped unscathed. Neither had an answer to maintaining a safe distance, in my response to them accusing me of braking suddenly. With the SG9665GC performing brilliantly in the front it was time to look for an equally discreet and reliable camera to go in the back. Once again the search had begun. My requirements from the new dashcam were:
I tried mounting the idle laying Mini 0805 and A118C to the rear windshield, the headliner and the exposed metal part in between, but to no avail. Both cameras were sticking out like a sore thumb from every angle. Two Dashcams that are considered discreet than most of what's available had failed miserably at being inconspicuous in the rear. With most of my 'research' concentrating on content available on DashcamTalk, I came across a thread dedicated to pictures showing how members had mounted various different Dashcams in the front and rear using supplied, tweaked or DIY mounts and magnets. This is where the size and varied mounting options possible with the Mobius and a separate thread dedicated to mounting the Mobius caught my attention. With a little clarity plus inspiration from the posts, I could actually picture the Mobius mounted where it is now, minus the tilt mount finally used. Then it was just a 'triangular wedge' shaped filler I was looking for, so that I could tilt and push the camera a little forward towards the windshield. Mobius ActionCam  The Mobius ActionCam is manufactured by a Chinese company that's also know for its popular #16 Keychain 808 Spy Camera. The Mobius is mainly targeted at the FPV RC racing and drone flying community due to its compact size and minimal weight. Measuring just 61 x 35 x 18mm and weighing a mere 39 grams, it is ideal for mounting on remote controlled boats, cars, quadcopters and even pets for a first person view. Due to its form-factor and myriad of mounting options it didn't take long for the Mobius to receive a lot of attention from Dashcam enthusiasts. Features like loop-recording, file-recycle and power-off on disconnect only helped this tiny and mount friendly camera's cause. The Mobius is capable of 1080p @ 30fps and 720p @ 60fps. As a rear Dashcam, video quality during the day is excellent. Night-time video quality for the rear suffers to varying degrees depending upon the surrounding levels of light, in a nutshell - it isn't great. The video needs to be flipped 180° in the settings menu for dashcam usage as usually it'll be mounted up-side down. Unless you mount it on the dashboard. The Mobius supports cards up to 128GB when formatted in FAT-32. Using a 32GB card I get about 4.5 hours of footage. The Mobius comes fitted with a 820 mAh battery that lasts 120 minutes in 1080p mode on a full charge. The battery can be easily swapped with a super-capacitor, which was the first thing I did after opening the package. The housing is made of 'rugged high-density plastic'. On the outside there are three buttons, two LED indicators and metal heat sink, in addition to the SD card slot, mini USB power supply port and holes for the reset button + microphone. The Mobius with its minimalistic design can be fully operated with just its 3 buttons - the Power button, Mode and Record button. The Power button turns the camera on and off. The Mode button changes the resolution to 720p @ 60fps from 1080p @ 30fps. Pressing it again switches the Mobius to Photo mode. The record button starts and stops a recording. Of course once set-up and mounted to be used as a Dashcam, you don't need to press any buttons. The Mobius starts recording when it senses power and turns off after saving the last file when power is cut. As of now there are 2 lens configurations available - Standard A lens - HFOV of 87° with minor fisheye distortion. Narrower view but better number plates readability. C2 Wide angle lens - HFOV of 131° with major fisheye distortion. The C2 is a better performer in low-light. There's a 3rd version with the lens rotated to 90° for easy mounting on a helmet for bikers and cyclists. LED's on the housing indicate if the Mobius is recording or in standby, colour of the LED on top of the housing indicates the mode it's recording in. A detailed instruction manual cum user guide and the Windows configuration utility is available at the following link. http://www.mytempfiles.info/mobius/index.html Top - Power button, mode button, record button, the heatsink and LED indicator.   Underside.  Side.  The lens. Microphone hole visible.  Mounting holder with the 1/4" tripod nut.   Back - Mini USB charging port, MicroSD slot, reset button hole and LED indicator.  Standard package. I was unable to find the included allen key at the time of taking this photo. The adhesive backed velcro piece included was useless.  Mounts - Adhesive ball-joint mount, helmet mount and the 25° FPV tilt mount.  Mounted in the rear on the bare metal area between the windshield and headliner.    The excess cable automatically folds into the gap when the hatch is closed.     Specifications: Processor: Novatek NT96650 CMOS sensor: Aptina AR0330 Sensor size: 1/2.7″, 3.5 mega pixels Lens: Wide angle C2 lens – 131° HFOV Video formats: Full HD 1080P @ 30fps and HD 720P @ 60fps. H.264/AVC Audio format: Mono @ 512 Kbps Photo resolution: 2304 x 1536, 1920 x 1080 and 1280 x 720 Battery: 3.7v 820mAh, up to 120 minutes Storage: Up to 128GB with FAT-32 Connector: Mini USB Package contents:
Cost and store links: The Mobius and its mounting accessories were bought from Banggood, below's the break-down. Mobius ActionCam wide angle C2 version - $69.99 Super capacitor - $5.29 FPV mount 25° - $4.82 FPV mount 15° - $4.99 (recently bought) Mini adhesive ball-joint tripod mount - $3.99 Lens extension cable - $5.29 Total cost including shipping and transit insurance was just shy of $95. I had also ordered the 20cm lens extension cable but the FPV mount worked out so well that I didn't need the cable after all. The lens can be extended outside its casing using the extension cable and be mounted discreetly with some DIY. The manufacturer sells the Mobius directly from China via eBay with free shipping worldwide. Here's a link to their eBay stores - http://stores.ebay.com/eletoponline365/ & http://stores.ebay.com/digitalele889 The only reason I bought from Banggood is because the tilt mount, lens extension cable and the super-capacitor were all available in one place. The manufacturer does not stock the mentioned accessories. Mobius ActionCam C2 lens - http://www.banggood.com/Mobius-New-V...-p-985644.html Super-capacitor - http://www.banggood.com/Super-Capaci...-p-918122.html 15° FPV mount - http://www.banggood.com/Mobius-HD-Ca...-p-988182.html 25° FPV mount - http://www.banggood.com/FPV-Mobius-C...p-1024388.html Adhesive ball-joint tripod mount - http://www.banggood.com/Vehicle-Reco...p-1037206.html Lens extension cable - http://www.banggood.com/20cm-26PIN-L...m-p-91830.html What I like:
Don't like:
After using the Mobius for the past two months, below are a few observations - The Mobius performs way better in front than the rear for night-time footage, quality suffers due to varying lighting conditions at night. In order to get better exposure, it's recommended to aim the Mobius angled a bit downwards, especially when mounted in front. The FPV mount takes care of that in the rear. Even though the video gets grainy post evening, there is still a lot of detail captured by the Mobius. It does a great job at capturing the sidewalks even on dimly lit roads. The Mobius ActionCam app for Android works well to configure and aim the Mobius, only thing missing is the ability to format the SD card. The few times I've used mSetup was for configuring the Mobius initially and for formatting the SD card using the built-in routine a couple of times. The microphone quality leaves a lot to be desired. Plan on turning off audio recording as the SG966GC has that covered. I could see glitches in some of the videos for a couple of days initially, formatting the SD card while inserted in the Mobius rectified that issue. Last edited by theMAG : 4th October 2016 at 23:04. Reason: Updated correct link, as requested. |

|  (19)
Thanks (19)
Thanks
|
| The following 19 BHPians Thank harsh79 for this useful post: | abishek2222, arunphilip, batish, gautam109, Grand Drive, GTO, lambuhere1, Myth_sx, paragsachania, parsh, procrj, purohitanuj, R2D2, Rajeevraj, siddarthab, SmartCat, SnS_12, Turbanator, Vik0728 |
| |
|
30th September 2016, 23:35
| #2 |
| BHPian Join Date: Apr 2016 Location: New Delhi
Posts: 426
Thanked: 798 Times
| re: Rear-facing Dashcam installed! Mobius ActionCam Mounting options, File information and Configuration utilities Mounting options explored Found the FPV tilt mounts on Banggood while browsing accessories tagged with the keyword 'Mobius'. I knew these would be perfect for my install the moment I lay my eyes on them. View with the hatch raised - 25° tilt mount, 15° tilt mount with the Mobius attached and a small ball-joint type adhesive tripod mount. All mounts have been stuck to the metal surface with 3M 5952 VHB double sided adhesive tape. Link - http://www.amazon.in/clickforsign-Do.../dp/B01C054CNI  The Mobius is mounted in the 15° mount.  View from the outside with the hatch down. Mobius mounted using the 15° tilt mount. The 25° tilt mount is on the right.  Ball-joint mount, next to the FPV mounts.  Mobius mounted with the old 25° tilt mount. Angle and size variation between the two mounts is clearly visible.  15° tilt mount in use.  25° tilt mount in use.  Ball-joint tripod mount in use.  Closer view. 15° tilt mount in use. 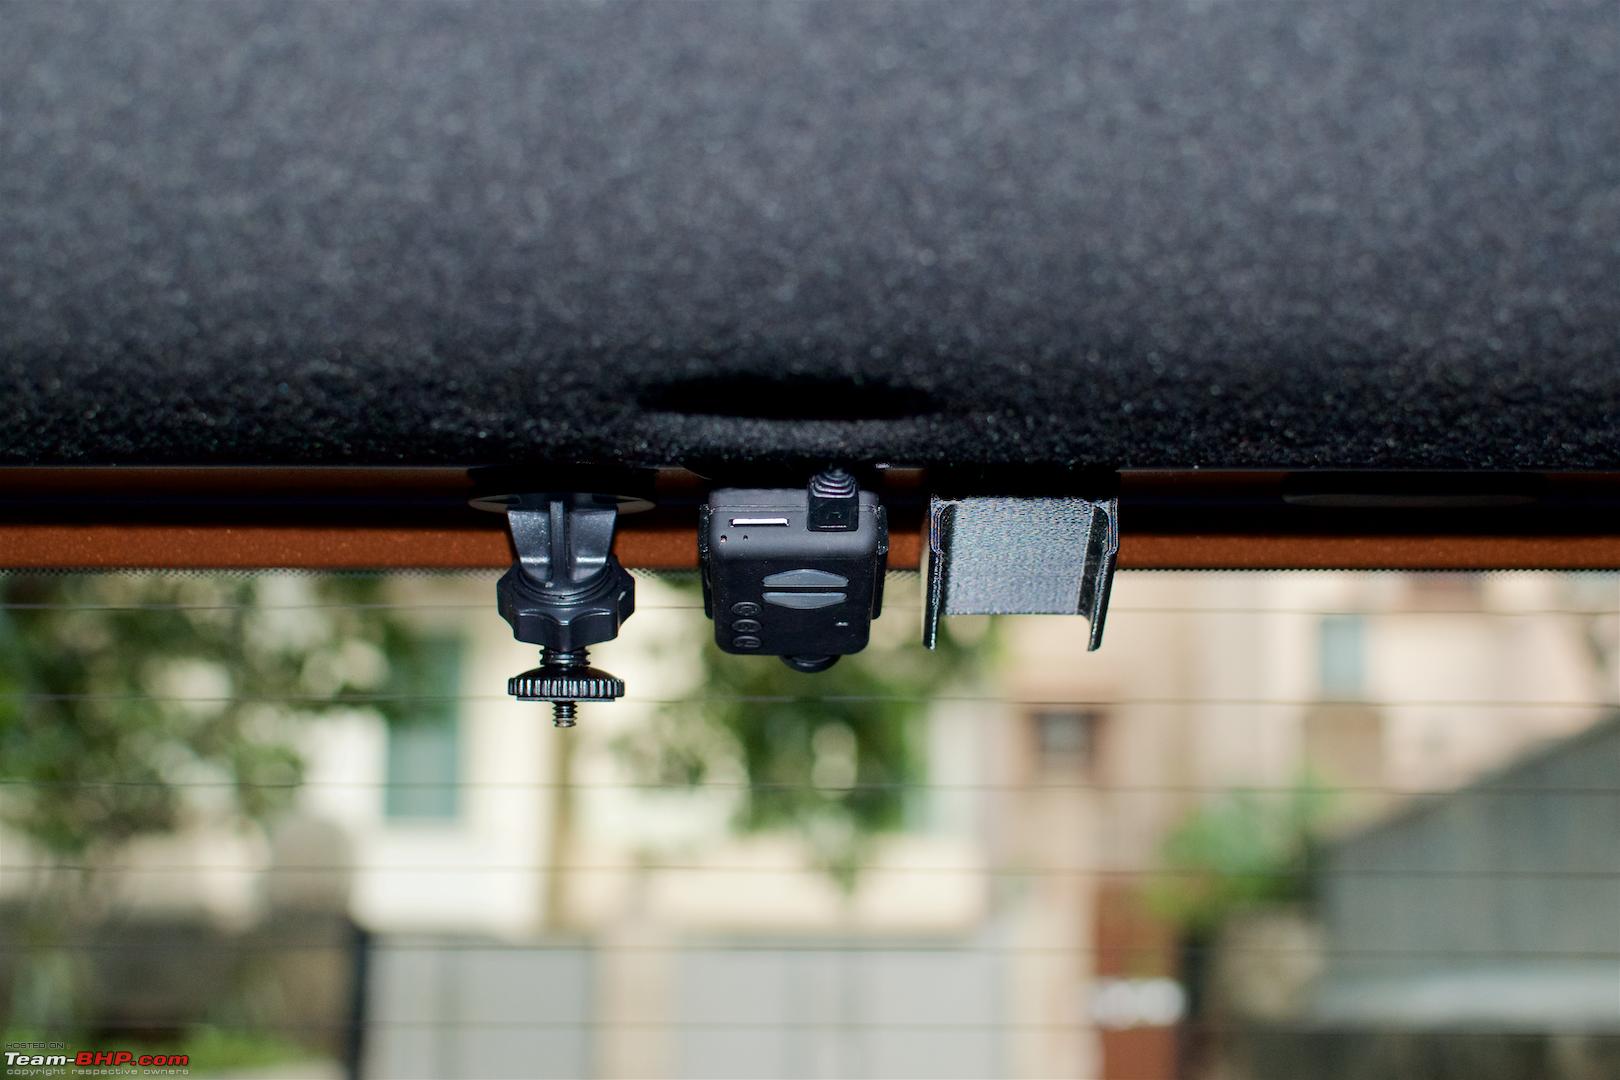 Mobius mounted in the front using a tweaked low-profile helmet mount. Very versatile mount, wish I could say good things about the quality as well.  Link - http://www.banggood.com/Mount-holder...S-p-91748.html Generated video file properties Codec details  Bitrate details  Files list  The Mobius records video in 1080p @ 30fps with a bitrate of 18mbps, audio is recorded in Mono @ 512kbps. As the Mobius does not have GPS, I do not see the need for a dedicated playback software. VLC and Quicktime work great. Configuration utilities Mobius ActionCam app for Android https://play.google.com/store/apps/d...ctioncam&hl=en Main window.  Configuration menu with customisable camera settings, all the configuration tabs available in mSetup are present.  Live view screen with grid lines which assists in aiming the camera while mounting.  Media on the SD card, can be copied to the phone.  Firmware update check.  mSetup for Windows http://www.mytempfiles.info/mobius/index.html The options selected in the screenshots below is how my Mobius is configured to be used as a Dashcam. Main window with basic settings tab.  Miscellaneous settings.  Video mode 1.  Video mode 2.  Photo mode.  Advanced settings.  Tools menu.  Last edited by harsh79 : 4th October 2016 at 15:52. |
|
| (8)
Thanks
|
| The following 8 BHPians Thank harsh79 for this useful post: | arunphilip, F150, GTO, Karthik Chandra, Myth_sx, parsh, purohitanuj, siddarthab |
|
2nd October 2016, 01:25
| #3 |
| BHPian Join Date: Apr 2016 Location: New Delhi
Posts: 426
Thanked: 798 Times
| re: Rear-facing Dashcam installed! Mobius ActionCam DIY Install and Videos The Mobius is powered in the rear using a Mini USB cable coming from an Aukey 4-port USB car charger, which sits in the glovebox. The Aukey unit connects to a 12V female cigarette lighter socket coming from the fuse box on the driver's side, with the wiring hidden behind the lower console and footwell trim panels. The 2 metre female socket kit comes crimped to a fuse-tap, which connects to the fuse box. The ground wire is connected to a bolt on the car's body using a ring terminal. The 2 metre female cigarette lighter socket kit that comes crimped to a fuse-tap is exactly the same as the one used for my Street Guardian SG9665GC. Only difference being that for the SG9665GC, I had used a shorter version. Below's a link to the DIY hardwire install for my Street Guardian SG9665GC. The hardwiring process using the one metre kit is covered step-by-step in the linked post. http://www.team-bhp.com/forum/diy-do...ml#post4033437 The hardwiring process is exactly the same as done for the SG9665GC install, hence I'll not be repeating the steps and pictures in this thread. This post will concentrate on connecting the new Aukey power supply that resides in the glovebox and routing of USB cables to the rear in a concealed manner. If one's interested in a similar install that involves hardwiring, I highly recommend going through the above linked post before continuing with this thread further. Items used for the install Aukey quick charge 2.0 USB car charger. http://www.amazon.in/Aukey-Charger-A.../dp/B00VFZKA22 Unable to get hold of Monoprice cables, I settled for cables from Amazon basics. Mini USB cables. http://www.amazon.in/AmazonBasics-US.../dp/B00NH11N5A http://www.amazon.in/AmazonBasics-Ex.../dp/B00NH136GE ( for the rear) The cables are shielded and well protected against interference and noise. 2 metre cigarette lighter socket kit with a crimped fuse-tap. https://www.aliexpress.com/item/1M-1...272214179.html The 2 metre kit was ordered on special request as the seller doesn't list the 2 metre version as regular inventory in their online store. Most of the 2-5 metre 12V extension cables available online come with a 12V male socket on one end and a female one on the other. DIY Mobius ActionCam rear install I was not happy with the 12V sockets cable-tied and concealed behind the trim panels after getting done with the SG9665GC's hardwiring, the power supply setup needed to be more accessible. Decided to move it to the glovebox while reducing the number of fuse-taps needed to power more than one Dashcam. With the new setup, the Aukey USB charger and the 12V female socket sit comfortably in the glovebox, providing easy access if required. Started with taking off the weather seal rubber beading from both the passenger side doors, the A-pillar trim and the dashboard side trim, using a pry-tool where possible. The glovebox also needs to be removed. 2 Metre Cigarette lighter socket kit with a crimped fuse-tap.  Original fuse - 20A, additional fuse - 10A.  The 12V female cigarette lighter socket connected to the fusebox using the crimped fuse-tap, excess wire was cable tied and using a wire management clip the visible wire was secured behind the upper trim panel.  The female socket comes out from behind the trim panels into the passenger area. 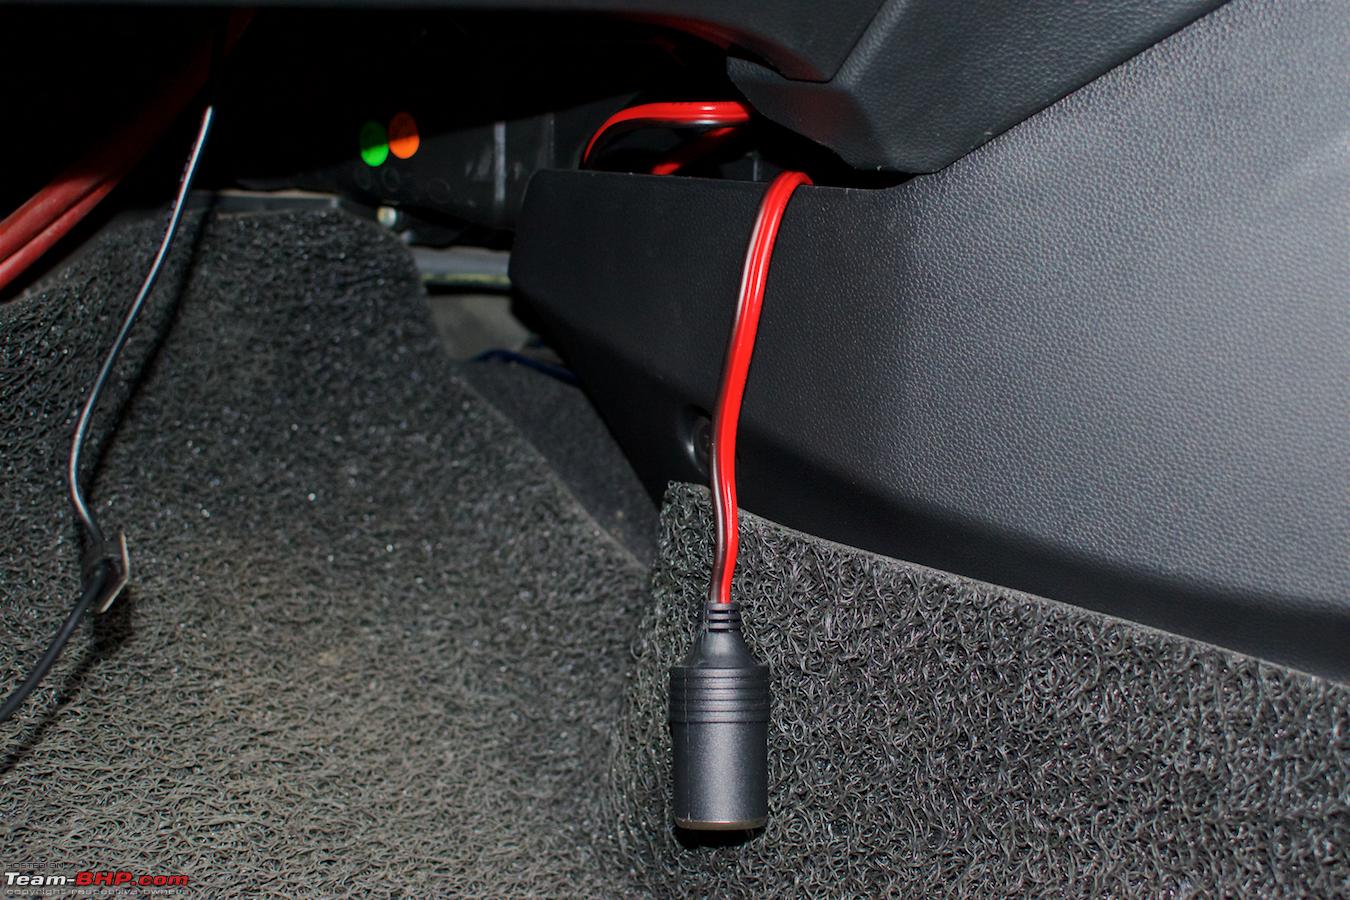 12V socket fed into the glovebox from the right.  The Aukey 4 port USB charger connects to the 12V socket and is secured together using electrical tape.  Mini USB cable from the Aukey coming up the side and going towards the headliner via the A-pillar. Secure the loose wire using wire management clips.  The Mini USB cable was extended to the rear using a 1.8 metre extension cable. The USB connection between the two cables is secured using lots of electrical tape.  Mini USB cable routed towards the B-pillar  Mini USB cable further routed past the B-pillar. Once the rubber beading is removed, gently pry the B-pillar trim and slide the cable into the gap that's created on nudging the trim panel. Once completely past the D shaped part of the trim's top, it easily fits into the headliner as it did on the other side.  Mini USB cable going from the B-pillar to the C-pillar. The cable can be gently pushed behind the C-pillar's trim panel and continue towards the back via the headliner.  This is where it comes out once past the C-pillar trim panel.  Always exit the cable from under the rubber beading so that there's no gap created for water to seep in.  All that remains is to tuck the excess cable into the headliner gap and put back the rubber beading, A-pillar and dashboard trim. Done! The Aukey charger connected and powering both Dashcams. I've routed two USB cables for the front, in case I want to mount the Mobius next to the SG9665GC using the helmet mount. Third USB cable is hidden behind the Aukey unit.  The 16AWG wire with a length of 2 metres including the crimped fuse-tap checks out to be electrically sound for a 10A draw, as per the chart below.  Amp draw for front and rear cameras is 0.33A and 0.34A respectively. My HTC M8 Eye draws 1.2A when connected to the QC port, with the regular port it draws 0.90A. Total amp draw with the Dashcams and a phone connected is well under the 10A limit for a 6 foot 16 AWG wire.  Conclusion The versatility of the Mobius and what it offers is definitely worth a lot more than its $70 price. I couldn't be happier with how discreet the setup has turned out by using the FPV tilt mount. IMO the Mobius is truly a mount and forget device. It comes with proven reliability as a Dashcam and hasn't missed a beat till date. Hope this was useful. Cheers! Videos Front and rear video combined and synced. Following are from when the 25° mount was in use, you can see a bit more of the parcel tray. Daytime Night-time Videos with the new 15° mount Daytime Night-time Night-time front Last edited by harsh79 : 4th October 2016 at 16:14. |
|
| (32)
Thanks
|
| The following 32 BHPians Thank harsh79 for this useful post: | abishek2222, arunphilip, arun_josie, blackwasp, drvhplyevraftr, Dry Ice, Durango Dude, ecosport rules, F150, gautam109, GKMahajan, GTO, jacobvarughese, Leoshashi, LoneRidder, Luv_Jaiswal, ManishSoni, Myth_sx, parsh, purohitanuj, sbala, sidzz, SmartCat, SnS_12, sourabhzen, sumeethaldankar, The Rationalist, Vik0728, vivtho, wanderernomad, whitewing, yajaman99 |
|
4th October 2016, 16:56
| #4 |
| Distinguished - BHPian  | re: Rear-facing Dashcam installed! Mobius ActionCam Mod's note: Moving thread from Assembly Line to the DIY section. Thanks for sharing! Last edited by theMAG : 4th October 2016 at 16:58. |
|
| (2)
Thanks
|
| The following 2 BHPians Thank theMAG for this useful post: | GTO, harsh79 |
|
5th October 2016, 10:58
| #5 |
| Distinguished - BHPian Join Date: Sep 2008 Location: --
Posts: 3,617
Thanked: 7,683 Times
| Re: Rear-facing Dashcam installed! Mobius ActionCam Wonderful thread Harsh! All the information you have shared is actually an overload! lol! I had to split the reading in 2 sessions to completely go through everything. The cam is perfectly discreet. But as you rightly pointed out, the videos are not that great due to the constant glare - an India specific problem with all the high beam use. About the A118C, I guess, it won't bother other people much as they might think you are nut who installed the reverse cam at a bad location. Rarely have I come across anyone outside of T-BHP who was aware of dashcams. The rear cam can also double up as a parking camera (especially useful for cars that don't come with one). How does the Mobius display the live view on phone? Last edited by Dry Ice : 5th October 2016 at 11:01. |
|
| (1)
Thanks
|
| The following BHPian Thanks Dry Ice for this useful post: | harsh79 |
|
5th October 2016, 13:18
| #6 | |
| BHPian | Re: Rear-facing Dashcam installed! Mobius ActionCam Wonderfully detailed thread Harsh. I have been thinking about dash cams for a while now, and your thread is immensely helpful. THANK YOU! Quote:
Thanks Bugs. | |
|
| (1)
Thanks
|

| The following BHPian Thanks bhagathmp for this useful post: | harsh79 |
|
5th October 2016, 17:05
| #7 | ||
| BHPian Join Date: Apr 2016 Location: New Delhi
Posts: 426
Thanked: 798 Times
| Re: Rear-facing Dashcam installed! Mobius ActionCam Thank you guys. Quote:
I had tried mounting the A118C where the Mobius is and directly on the windshield too but without the tilt the A118C's view was getting blocked and on the windshield it looked odd. Connect the Mobius using an OTG adaptor/cable to your Android phone. The app opens up automatically on sensing the Mobius.  Clicking 'Live video' brings up this window. Pressing the record button on the Mobius pops up an option to choose the desired resolution.  On selecting the desired resolution, the live view is initialised.  Quote:
Last edited by harsh79 : 5th October 2016 at 17:07. | ||
|
| (4)
Thanks
|
| The following 4 BHPians Thank harsh79 for this useful post: | blackwasp, hemanth.anand, Myth_sx, RubberSideDown |
|
3rd November 2016, 23:52
| #8 |
| BHPian Join Date: Mar 2014 Location: KOL, BBSR
Posts: 98
Thanked: 88 Times
| Re: Rear-facing Dashcam installed! Mobius ActionCam Thanks for the very detailed review harsh79.  The details of the item, the links of actual sources as well as the list of compatible accessories for the primary dashcam are most useful for anyone looking to install a similar setup in their cars. Have you chanced upon a waterproof casing for the mobius? Also, why did you not opt for the mobius 2. I believe it has better low light recording. |
|
| ()
Thanks
|
|
4th November 2016, 14:39
| #9 |
| BHPian Join Date: Apr 2016 Location: New Delhi
Posts: 426
Thanked: 798 Times
| Re: Rear-facing Dashcam installed! Mobius ActionCam Yes, a waterproof case is available from Joovuu that fits the Mobius - https://www.joovuu.com/gb/cases/103-...roof-case.html The Mobius 2 does employ a better chipset and sensor but still needs a lot of work. There are issues with WDR when using H.264 and low-light performance. Early adopters and Beta testers (hardware + software) firmly believe that with the same amount of work that's gone into the M1, the M2 will definitely outshine its predecessor and then some but it's going to take time. I had bough the M1 after the launch of the M2 (mid July) but was advised by the same Beta testers to opt of the M1 at that point. Even after a couple of revised firmwares since then, some users have actually gone back to their M1's due to the inconsistency in performance from the M2 as of now. I will definitely upgrade to the M2 once all the bugs are ironed out, keeping an eye on the development. Last edited by harsh79 : 4th November 2016 at 14:44. |
|
| (1)
Thanks
|
| The following BHPian Thanks harsh79 for this useful post: | Myth_sx |
|
12th March 2017, 08:56
| #10 |
| BHPian Join Date: Apr 2016 Location: New Delhi
Posts: 426
Thanked: 798 Times
| Re: Rear-facing Dashcam installed! Mobius ActionCam More videos under different lighting conditions. Mobius (F.W V. 2.41) - 1080p @ 30 FPS, Bitrate - 18 MB/s, WDR - On, Sharpness - +15, CPL - No. Night. Market Intermittent ambient lighting Mobius (F.W V. 2.41) - 1080p @ 30 FPS, Bitrate - 18 MB/s, WDR - On, CPL - No. Night. Different market Tailing headlights Mobius (F.W V. 2.41) - 1080p @ 30 FPS, Bitrate - 18 MB/s, WDR - On, CPL - No. Night. No streetlights https://drive.google.com/open?id=0B4...DlrLXVTZjBVdFk Mobius - (F.W V. 2.41) - 1080p @ 30 FPS, Bitrate - 18 MB/s, WDR - On, CPL - No. Night. Rapidly changing lighting https://drive.google.com/open?id=0B4...zBCcmU0YU5neVU Mobius - (F.W V. 2.41) - 1080p @ 30 FPS, Bitrate - 18 MB/s, WDR - On, CPL - No. Afternoon. Sunny https://drive.google.com/open?id=0B4...nBaSGhLRHdXajg Driving into a basement parking https://drive.google.com/open?id=0B4...mVpZVN1aEhpTUk Driving out of a basement parking https://drive.google.com/open?id=0B4...lZLX2FvSGtUSUE Mobius - (F.W V. 2.41) - 1080p @ 30 FPS, WDR - On, Bitrate - 18 MB/s, Exposure- -10, Contrast - +10, CPL - No. Night. Streetlights Market Mobius - (F.W V. 2.41) - 1080p @ 30 FPS, WDR - On, Bitrate - 18 MB/s, CPL - No. Evening Streetlights Tailing headlights (low-beam) Tailing headlights (high-beam) |
|
| (1)
Thanks
|
| The following BHPian Thanks harsh79 for this useful post: | parsh |
|
24th April 2017, 03:13
| #11 |
| BHPian Join Date: Apr 2016 Location: New Delhi
Posts: 426
Thanked: 798 Times
| Re: Rear-facing Dashcam installed! Mobius ActionCam Night time comparison between the C2 lens and the D lens. D lens has a narrower FOV. Top - Mobius (C2 Lens) - (F.W V. 2.41) - 1080p @ 30 FPS, WDR - On, Lens profile - C Bottom - Mobius (D Lens) - (F.W V. 2.41) - 1080p @ 30 FPS, WDR - On, Lens profile - C Night. Market Intermittent streetlights Varying lighting Other than the FOV, not much difference. Flaring from tailing headlights also looks identical. |
|
| (2)
Thanks
|
| The following 2 BHPians Thank harsh79 for this useful post: | ecosport rules, parsh |
| |
|
25th April 2017, 01:20
| #12 |
| BHPian Join Date: Apr 2016 Location: New Delhi
Posts: 426
Thanked: 798 Times
| Re: Rear-facing Dashcam installed! Mobius ActionCam As there was a slight variation in the mounting angle because of two different mounts being used, redid the mounting. Both cameras now are mounted using identical 15° FPV tilt mounts and are mounted right next each other. Evening Due to the C2's mounting angle being flawed in the videos from last night, will redo them in a day or two. |
|
| ()
Thanks
|
|
26th April 2017, 18:00
| #13 |
| BHPian Join Date: Apr 2016 Location: New Delhi
Posts: 426
Thanked: 798 Times
| Re: Rear-facing Dashcam installed! Mobius ActionCam Top - Mobius (C2 Lens) - (F.W V. 2.41) - 1080p @ 30 FPS, WDR - On, Lens profile - C Bottom - Mobius (D Lens) - (F.W V. 2.41) - 1080p @ 30 FPS, WDR - On, Lens profile - C Late afternoon Evening Tailing headlights Intermittent lighting and bit of the market |
|
| ()
Thanks
|
|
8th December 2017, 22:59
| #15 |
| BHPian Join Date: Apr 2016 Location: New Delhi
Posts: 426
Thanked: 798 Times
| Re: Rear-facing Dashcam installed! Mobius ActionCam Telephoto M12 lenses with the Mobius 8mm (1/2.7"), f/1.6 Afternoon Late afternoon 8mm (1/2.7"), f/1.6 8mm (1/2.7"), f/1.6 Side by side with a wide-angle Night Streetlights 8mm (1/2.7"), f/1.6 Side by side with a wide-angle 8mm (1/2.7"), f/1.6 Side by side with a wide-angle Market 8mm (1/2.7"), f/1.6 Side by side with a wide-angle 8mm (1/2.7"), f/1.6 Side by side with the C2 (2.3mm, f/2.0) 12mm (1/2.5"), f/1.8 Afternoon Night Traffic Afternoon (smog) 12mm (1/2.5"), f/1.8 Side by side with the C2 (2.3mm, f/2.0) Building and tree cover (smog) Side by side with the C2 (2.3mm, f/2.0) Comparison - 8mm (1/2.7"), f/1.6 & 12mm (1/2.5"), f/1.8 8mm (1/2.7"), f/1.6 12mm (1/2.5"), f/1.8 Side by side 8mm (1/2.7"), f/1.6 12mm (1/2.5"), f/1.8 Side by side 8mm (1/2.7"), f/1.6 12mm (1/2.5"), f/1.8 Side by side |
|
| ()
Thanks
|
|