| |||||||

| Search Forums |
| Advanced Search |
| Go to Page... |
 |
| Search this Thread |  28,098 views |
 7th June 2016, 12:44
| #1 |
| BHPian Join Date: Aug 2011 Location: BengaLuru
Posts: 430
Thanked: 1,669 Times
| DIY: G1WH Dashcam Installation & Review The dashcam bug bit me when I was going through some travelogues and found a few of them with Videos - these were travel tales of TBHPians doing the Himalayan circuits and capturing every moment of their drives over stunning roads, capturing their spectacular journeys and sharing them with the world. I was a spectator to surreal hills and valleys, butter smooth tarmac, horrendous roads from hell, no roads, landslides, waterfalls over the roads, water crossings, and everything else a road trip junkie could ask for. That's it - I wanted a dashcam for myself! Then the arduous process of finding the best dashcam started. I went through almost all the posts in the Dashcam Thread and also took up memberships on other dashcam forums and pored over tons and tons of information. My requirement was this:
Based on these requirements and my research, I came across the KDLinks X1 - a fully featured dashcam with stunning reviews on Amazon.com (rated 4.6 by with 1250+ reviews) and decided to get this. Fortunately or unfortunately, I did not have anyone coming from the US at that point and had to postpone my purchase and it was not available on Amazon's Global Shipping yet. As time went by, I was reading more and more on the dashcam forums and was particularly interested on the GPS Speed Stamp on the video. Finally, I decided that GPS was optional and after going through a lot of discussions debating whether the speed-stamp on the video could in-fact implicate the person driving, I decided to skip GPS enabled dashcams and dropped the KDLinks cam. Very soon after that, I came across the most popular dashcam - the G1W series. The more I read about this, the more I was impressed - mainly because everyone was happy with the video recording quality and the price of just US$39 =~ 2600 INR. For those who are interested to know further, G1W series of dashcams are available in multiple variants:
A complete analysis and Pro/Con comparison between the variants is available at https://dashcamtalk.com/g1w/ - so I will not reinvent the wheel by discussing the same here in this thread. A review by the Dashcam Don, (aka Techmoan on Youtube) is available here: http://www.techmoan.com/blog/2013/12...th-buying.html So I ordered the G1WH from Aliexpress and the waiting game began. Surprisingly, I found that the package was in Bangalore within 7-10 days and I was super excited to have something from Aliexpress delivered so quickly. Alas - my joy was short-lived as the package was held up in Customs. After sorting things out with the Customs Dept (I was asked to send the the order copy and so I did) the package arrived at home in the next couple of days and I was asked to cough up a mind numbing amount of Rs. 1300+ for Customs Duty. I was shocked! Not knowing any other alternative, I paid up and got the package and found that it was opened and repackaged (rather re-stuffed) by the Customs Dept. I was wondering why my camera got caught up with the Customs office, while others on the forum were getting theirs without much hassle. Later, I found out the reason for being tracked by the customs office - the package as labelled "Car - Auto Parts" on the shipping label for customs declaration. Moment of "aaaaaaaaaaaaaaaaaaaargh" for me - just plain unlucky.  Fast forward 2 months and I have received the G1WH and a Hardwire Kit, and all other tools required for the job that I had ordered from various websites. Special thanks to arunphilip for starting the wonderful thread on how to hardwire a dashcam neatly (link). So, I had everything in place and my first DIY was about to begin! So ... without further ado, lets get started! I will pictorially list out all the things that were used to complete this DIY. Most of the pictures are self-explanatory, but I may add a few lines to discuss some specific points related to my setup (or my preference and why I chose that option) Now, The dashcam I had purchased was the one with a Mini USB Port but I specifically got a Hardwire Kit with a Micro USB plug. the reason being - In case I do not use a dashcam, I can always use the spare Micro USB Plug as a cell phone charger (and the cell phone can also double up as a GPS / Navigation device). 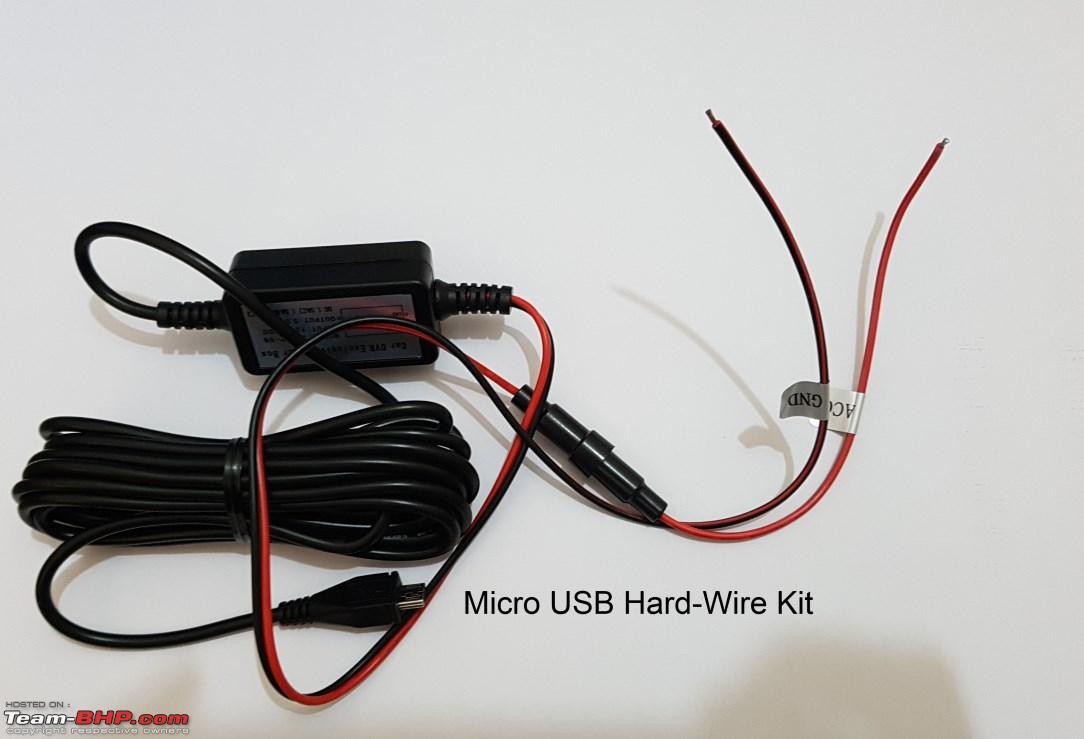 A closer look at the Hardwire kit: 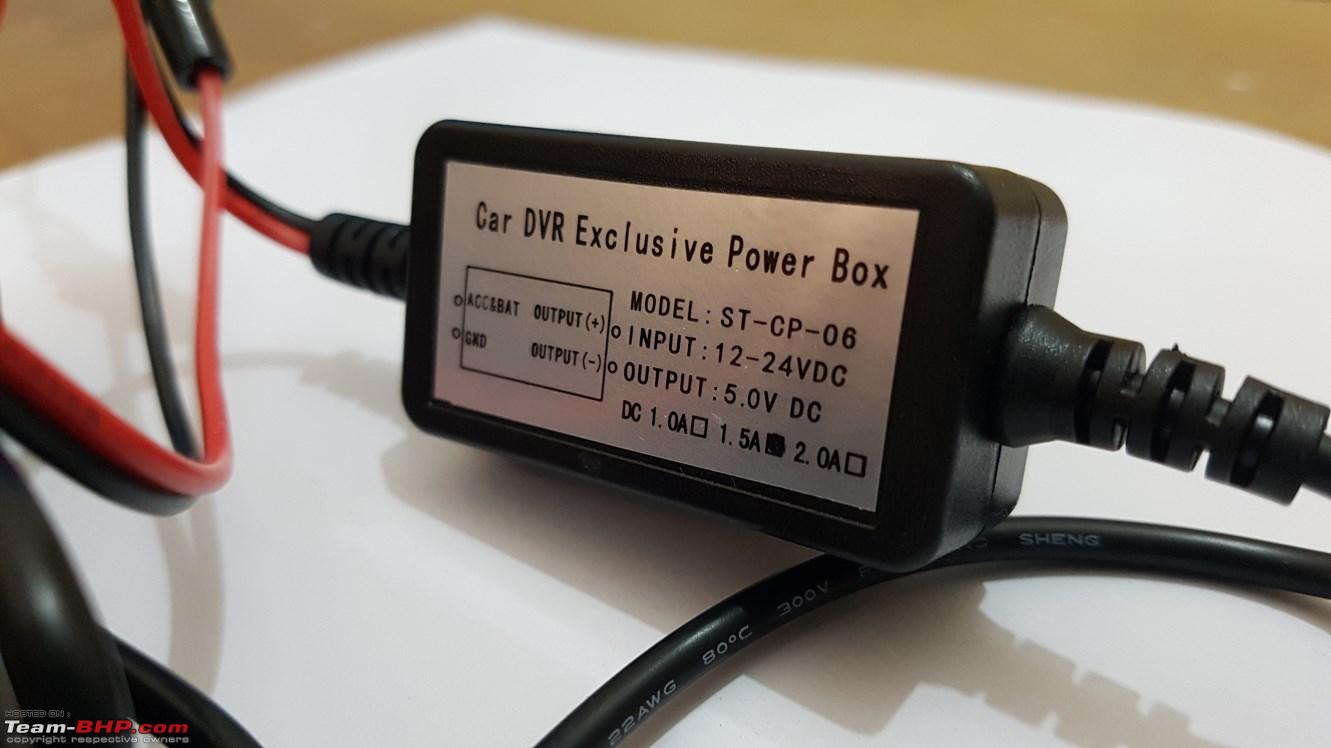 Now, as I said, my hard wire kit had a micro USB and my dashcam had a mini-usb. so what I did was to get a Micro USB Female to Mini USB Male adapter plug. This modular plug allows me to use the usb plug on different devices based on my requirements. I could have gotten a Hardaire Kit with Mini USB plug right away and then gotten an adapter which does the reverse - i.e., from Micro USB Female to Mini USB male - but oh well, it's all the same. As long as I'm able to power my devices, I'm a happy man! 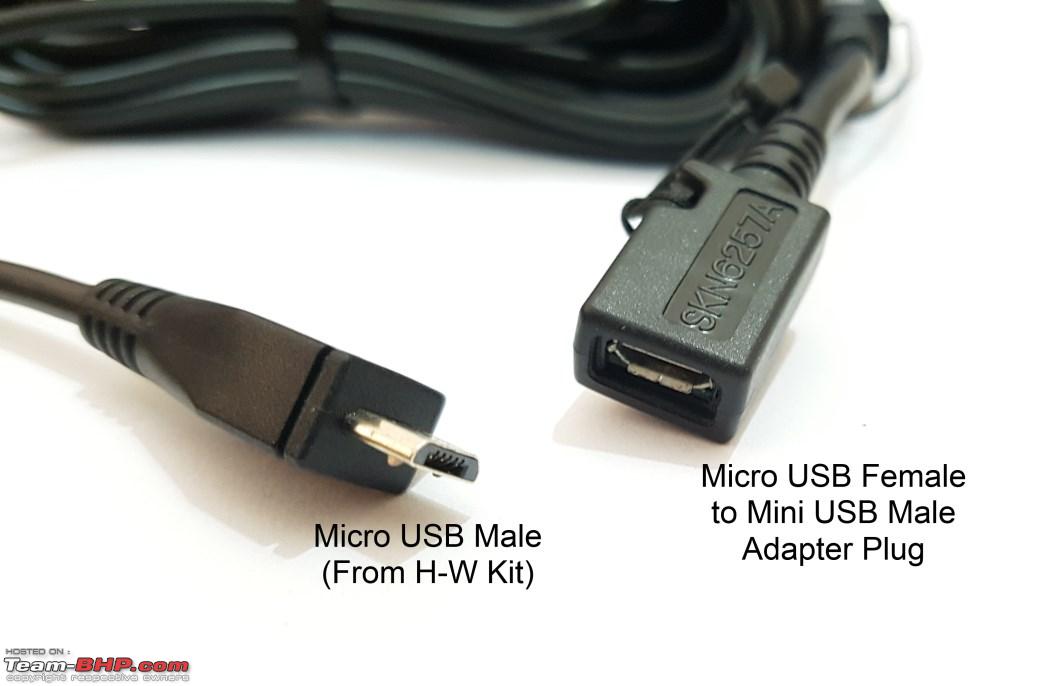 A closer look at the adapter plug: 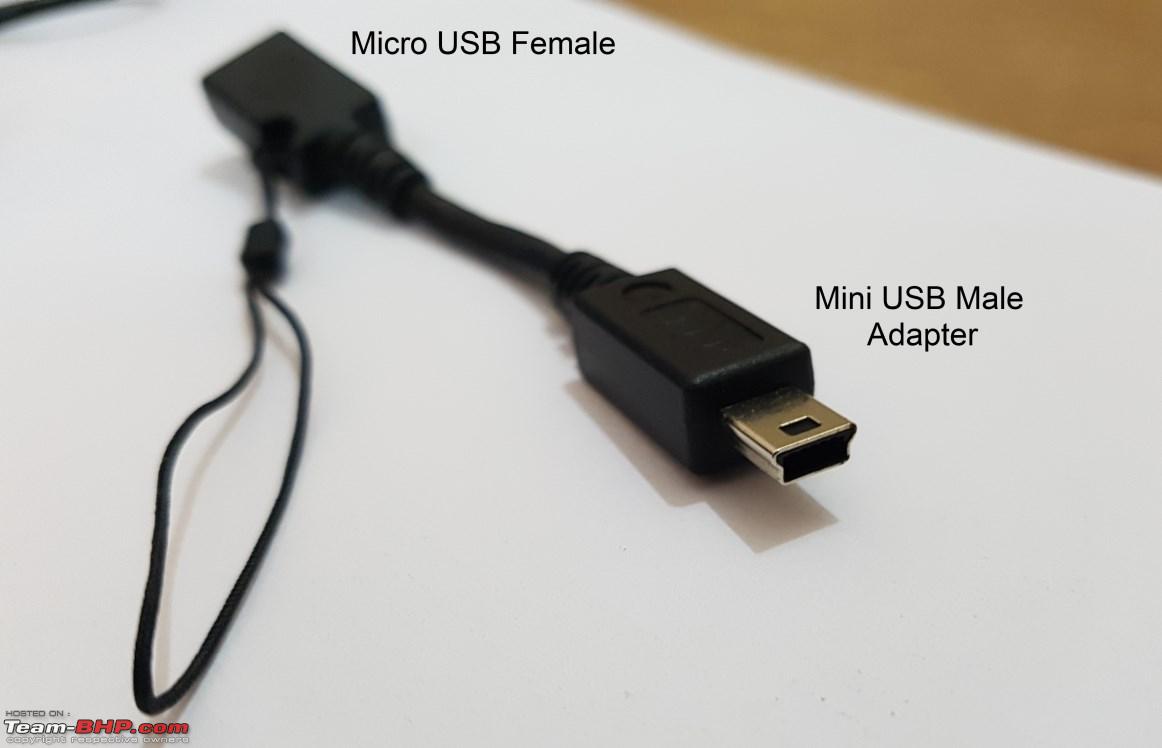 Note that the hardwire kit has an inline fuse. I highly recommend getting these hardwire kits compared to ones without a fuse as it acts as a secondary precaution - just in case things go wrong, you wont fry your cell phone / dashcam. 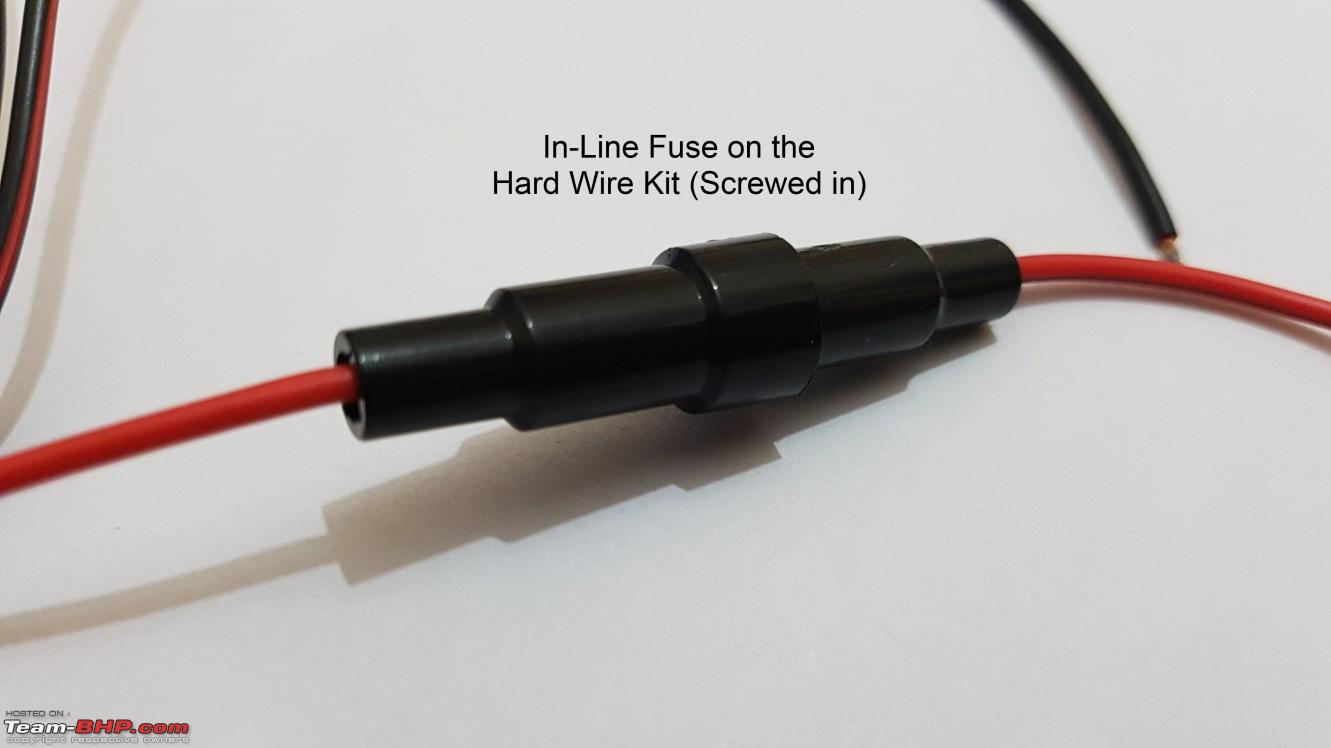 Unscrewing the fuse housing reveals the fuse in the hard-wire kit:  The Fuse TAP that I ordered came with 4 fuses of different ratings. Note that the fuse type is the ATM Mini Fuse. This may differ for your car. I got these for my new gen Alto K10 AMT. 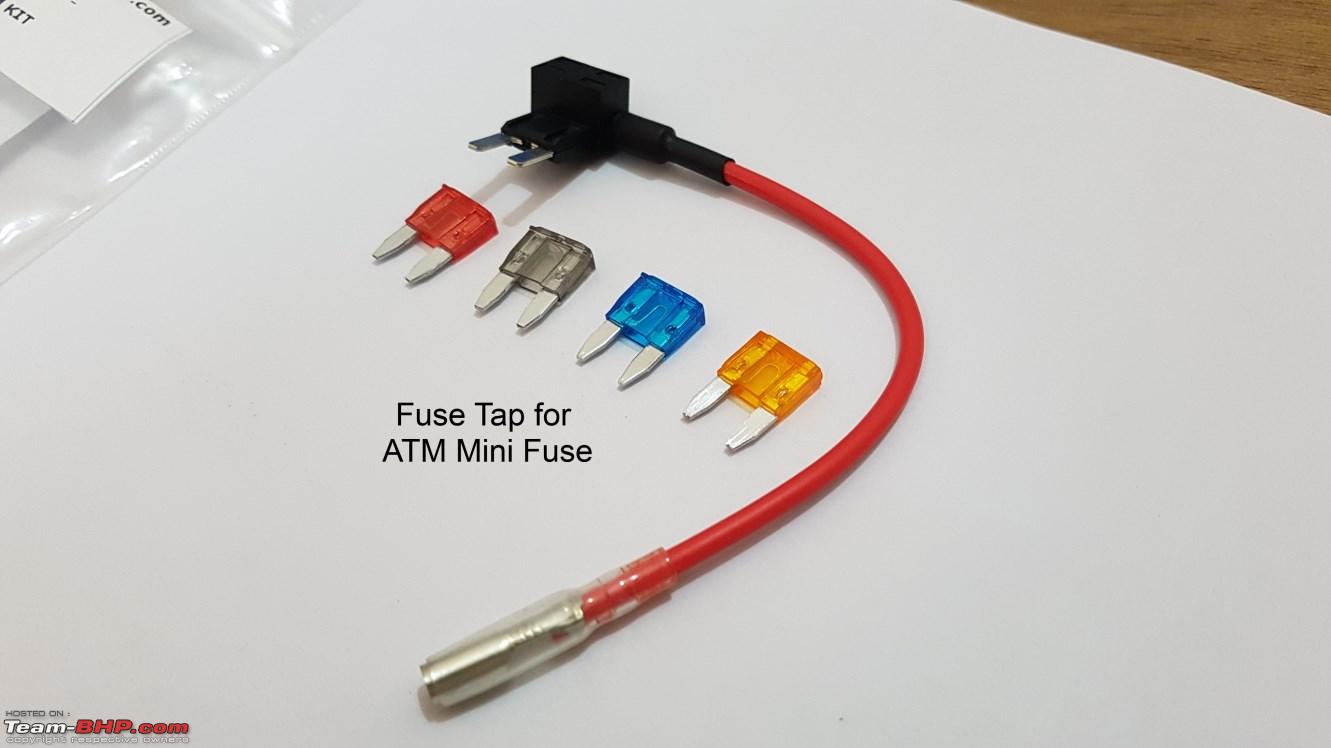 Fuse Tap Connectors up-close! 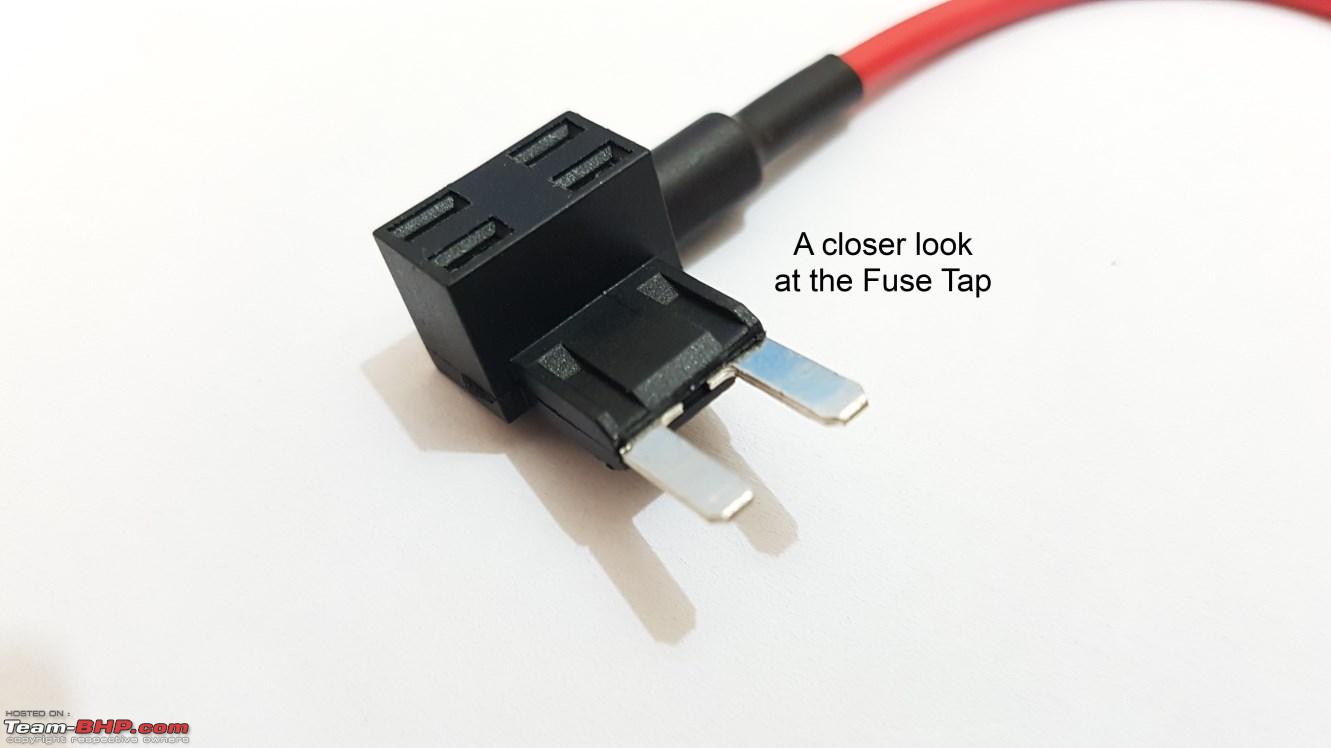 Note that the new accessory connects to the socket next to which the fuse tap has the wire coming from. 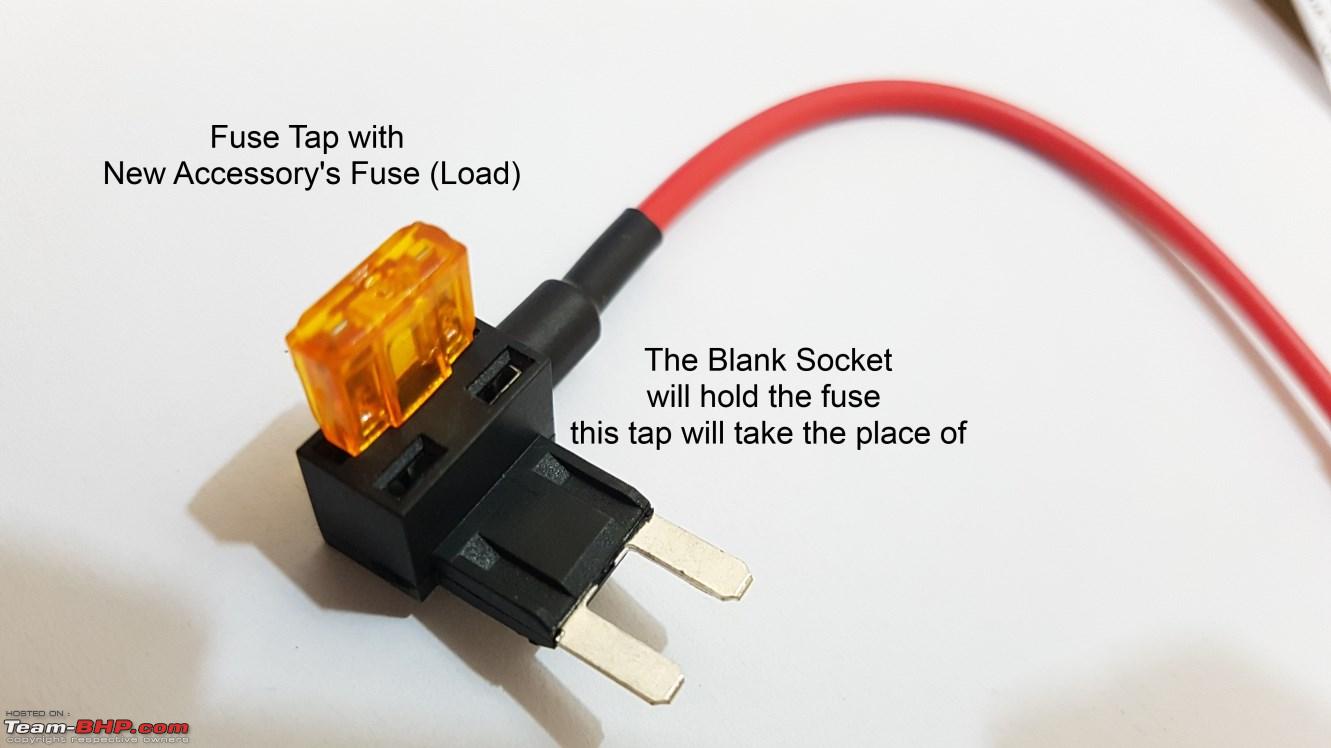 Note the load ratings on the different fuses. I picked the 5A fuse as my current requirement wouldn't be higher. 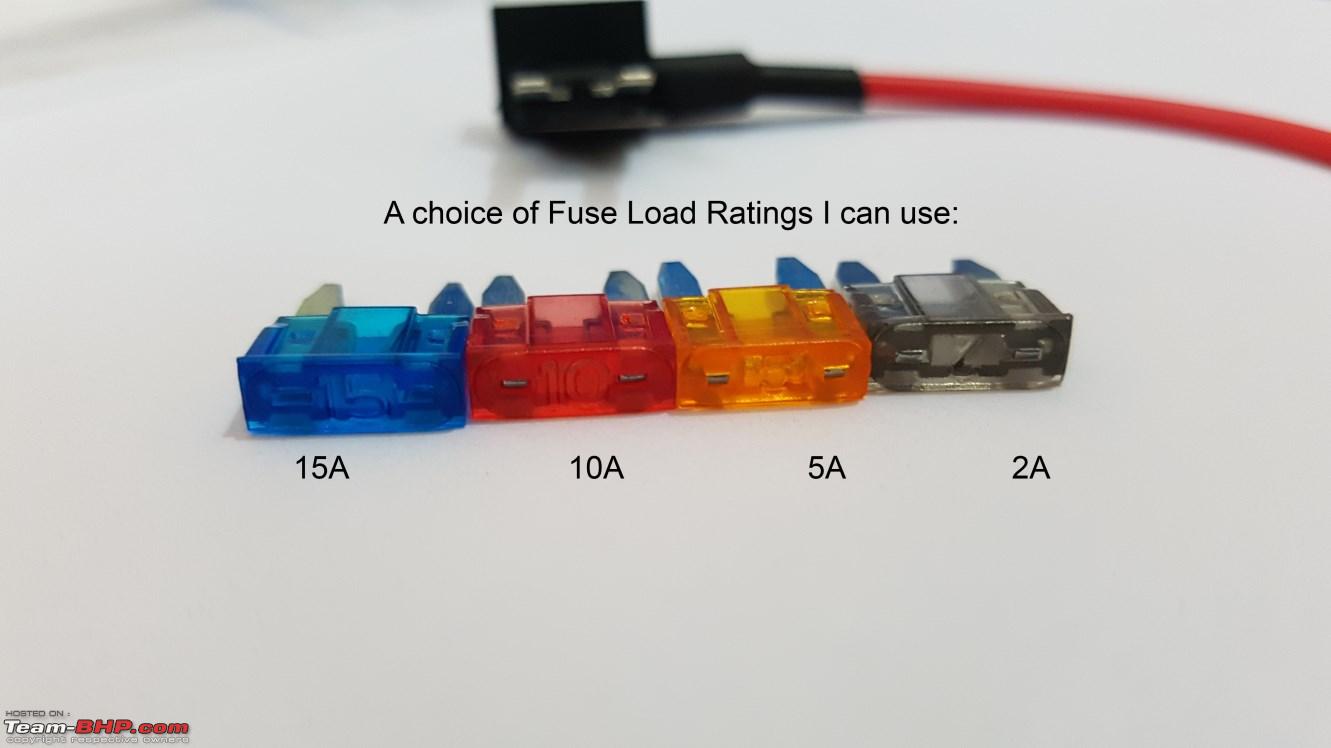 A Fuse tester - this one came in really handy as one of my fuses (10A) was not working and this tester allowed me to check the same. You can use this to test which socket in the internal fuse box gets power when the key is in OFF, IGN1, IGN2 and Engine ON positions. I would highly recommend to go through arunphilip's post on how to use this tester. 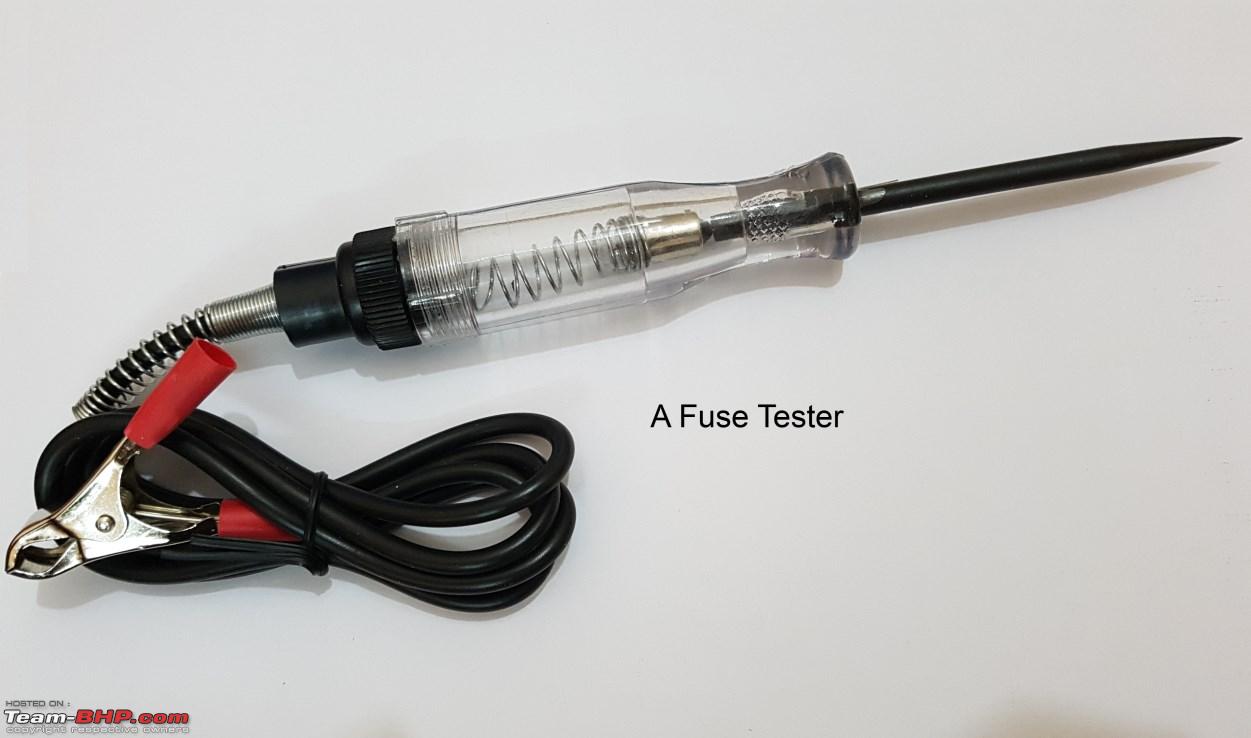 I purchased this crimping kit (with crimp ends) to connect and crimp the wires. 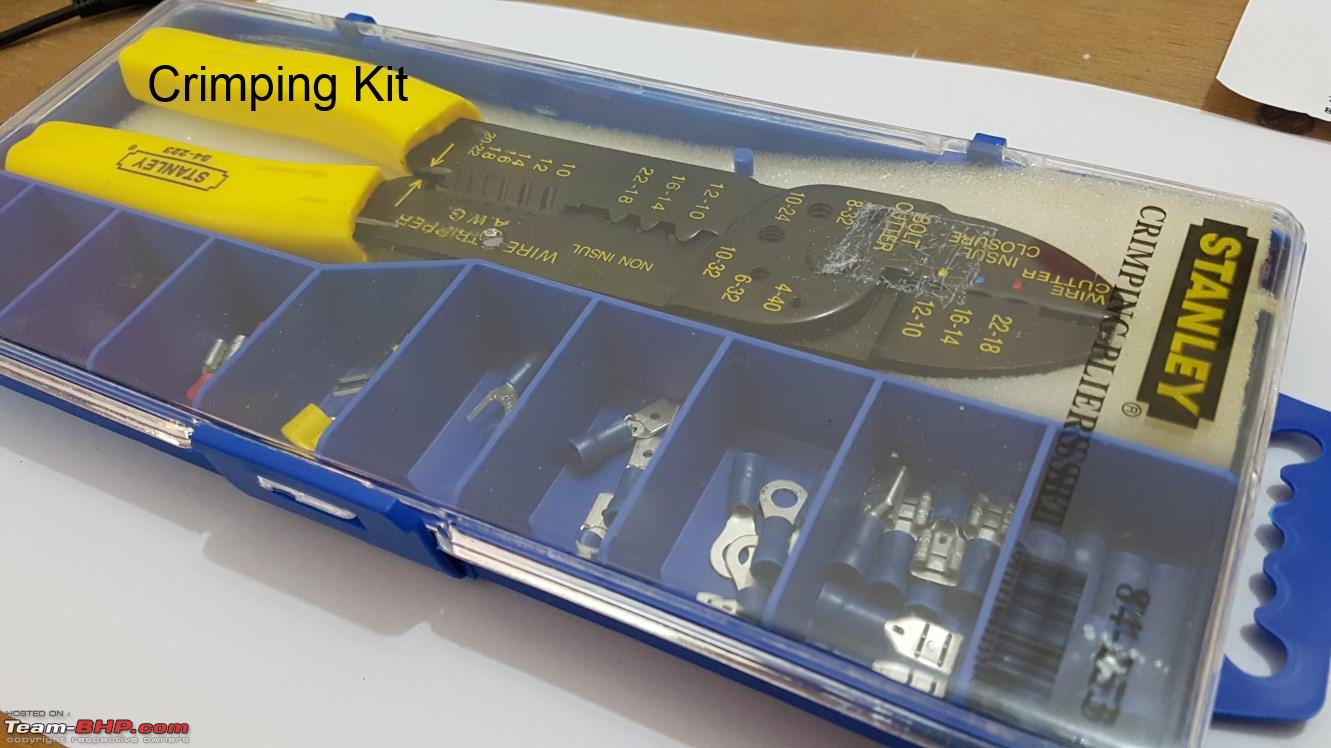 I bought these heat-shrink tubes from eBay.in - although this bag is overkill for this project, I'll keep the kit for future DIYs!  Finally - the camera with its accessories 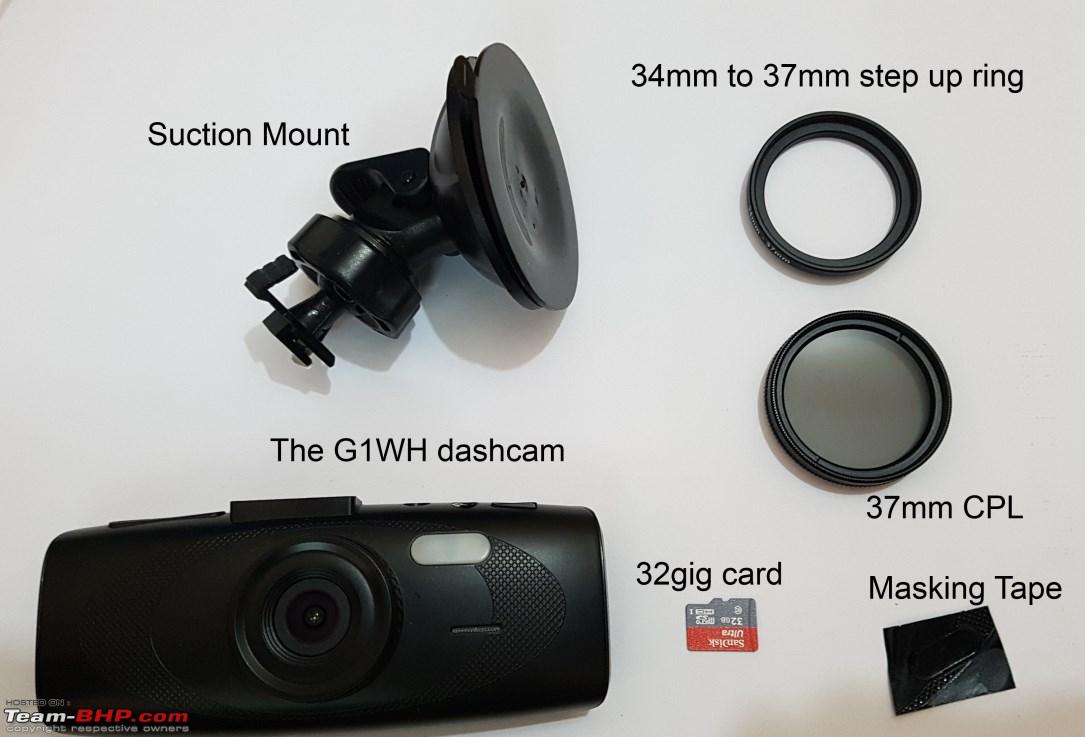 A Closer look at the G1WH. The G1WH comes with an all black lens front (compared to the shiny chrome element on the G1W and G1WC variants). The All black look helps keep the camera discreet and away from curious eyes. 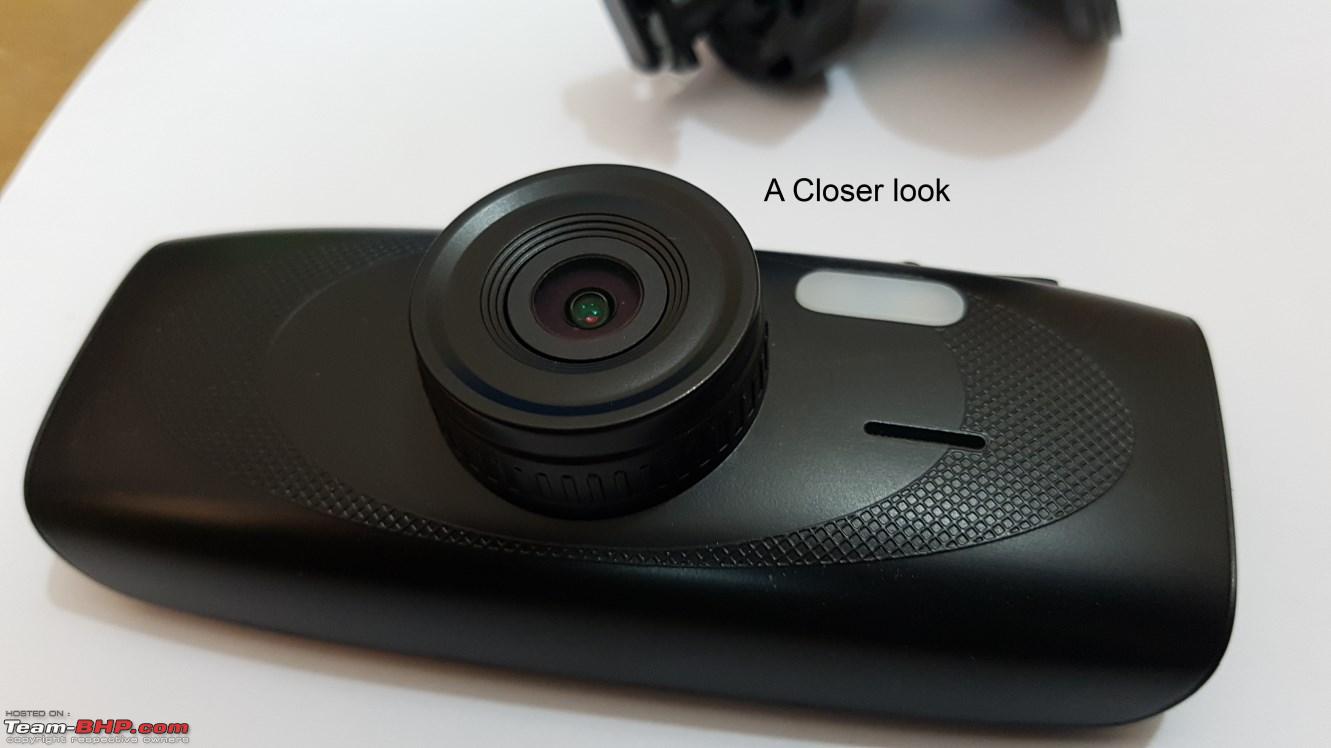 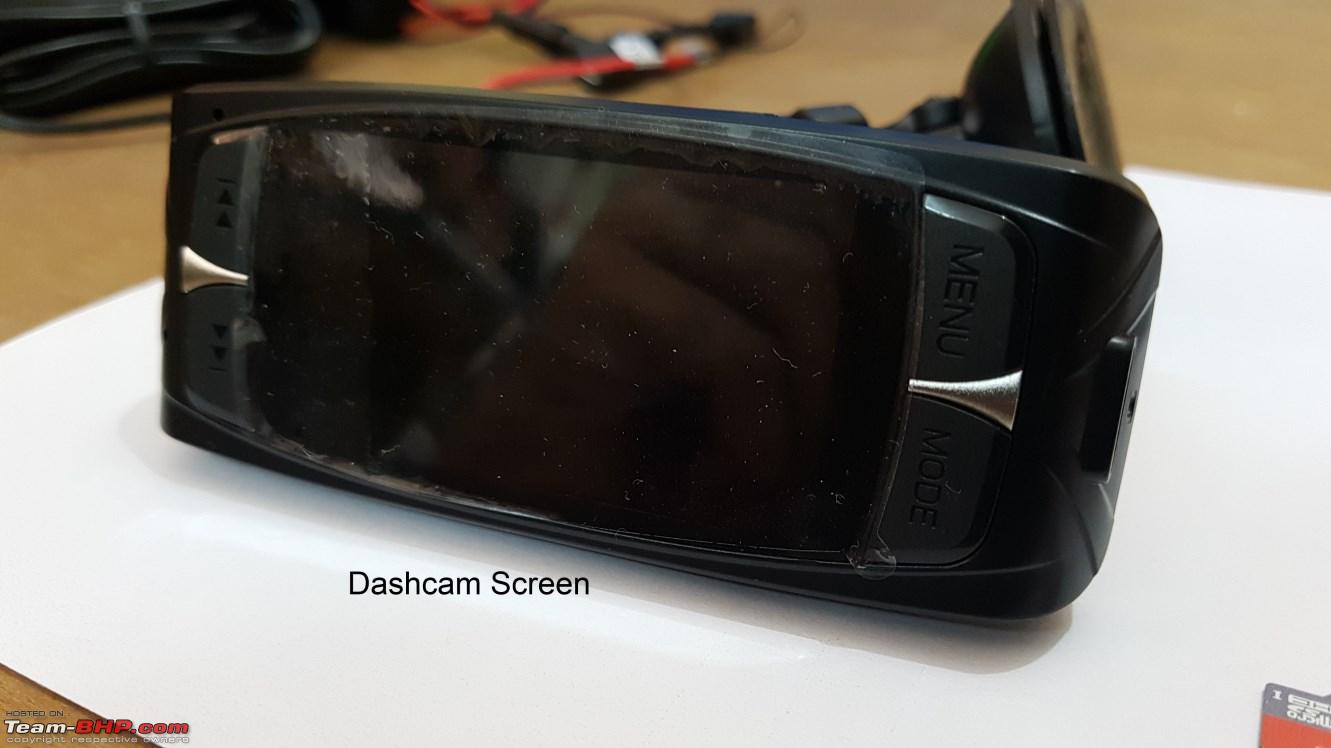 Although most of the camera is black, the front has a white plastic area which is supposed to be for IR LEDs for night vision (which is a joke!). The camera comes with standard white LEDs and these are more of a nuisance and attention grabbing eye-sore than anything else. The white LEDs are useless in the sense that they don't help in making things visible for the camera lens in any way - whatsoever! Note that the camera "claims" to have night vision with IR LEDs - this is false and almost everyone accepts this fact as no big deal. The LEDs are better covered up than open. So, I took a black piece of insulation tape and masked it off! 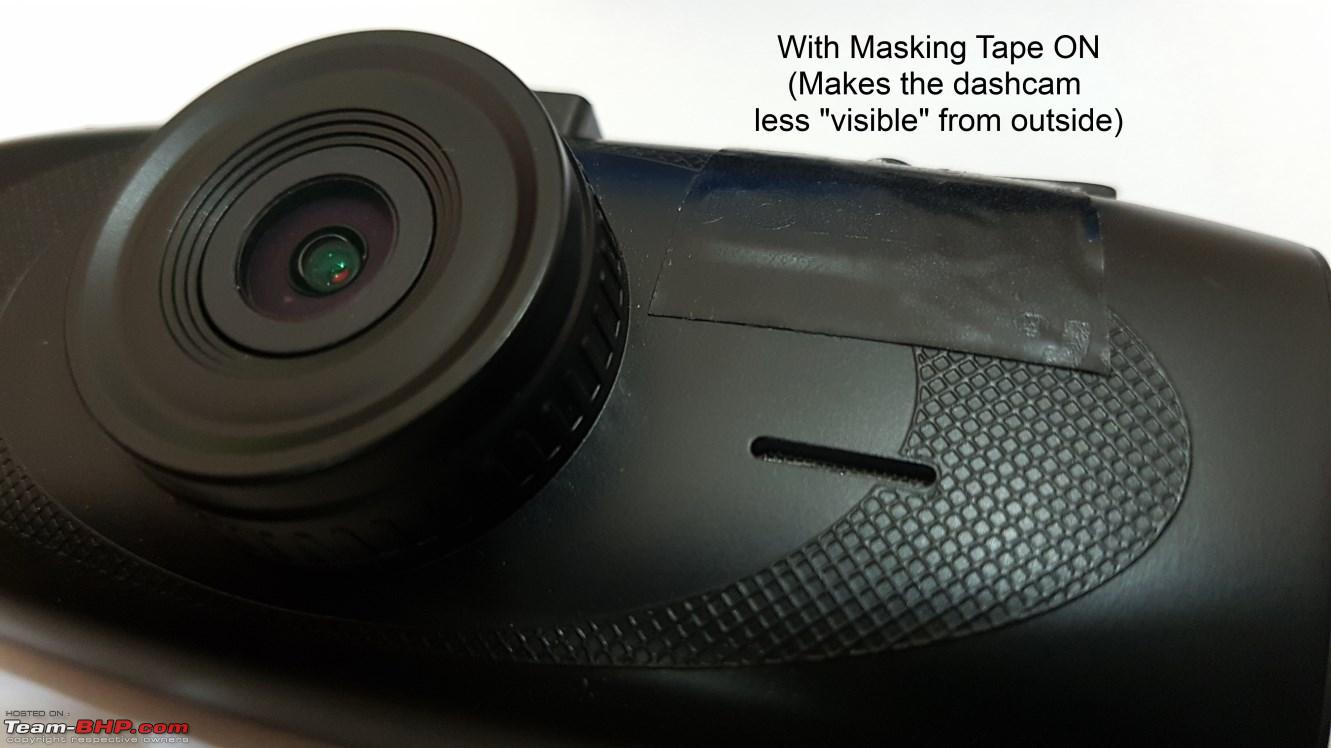 I discovered that the dashboard reflection shows up very prominently in the video and hence decided to get CPLs. Thankfully, its an easy fit- once we have the right adapter. The camera's front element has a diameter of 34mm and the CPL is of 37 mm. To bridge this gap, we get what is known as the "step up" ring where a ring has both 34mm and 37mm diameters. The CPL is mounted on the broader diameter while the smaller diameter region goes on the camera. I use a similar setup for my DSLR Lenses as well - Instead of buying CPLs for various lens diameters, I bought a MASSIVE 72mm CPL which fits on my wide angle lens. I have similar "step up" rings for my other lenses with 67mm and 52mm front element diameters and I can use one CPL across all my lenses, instead of spending a mini fortune on CPLs for each dia! 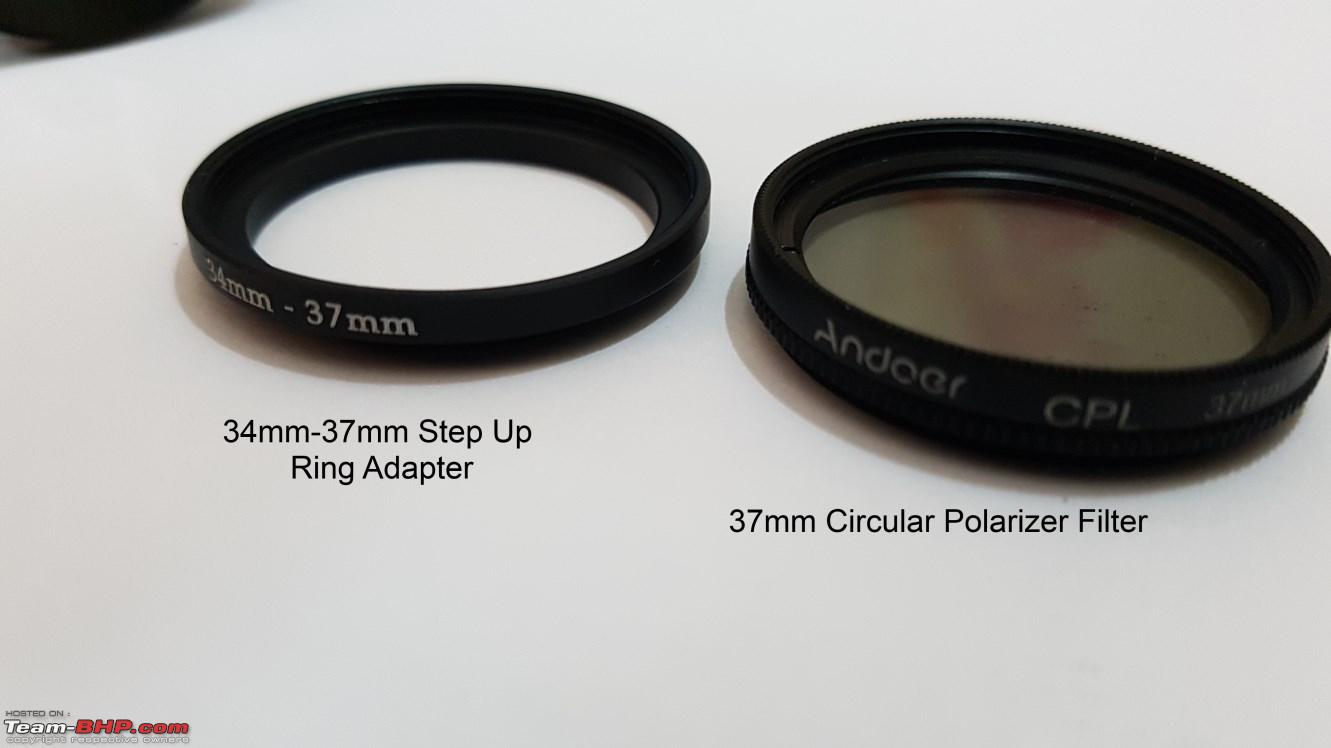 Once mounted over the step up adapter, the CPL looks like this: 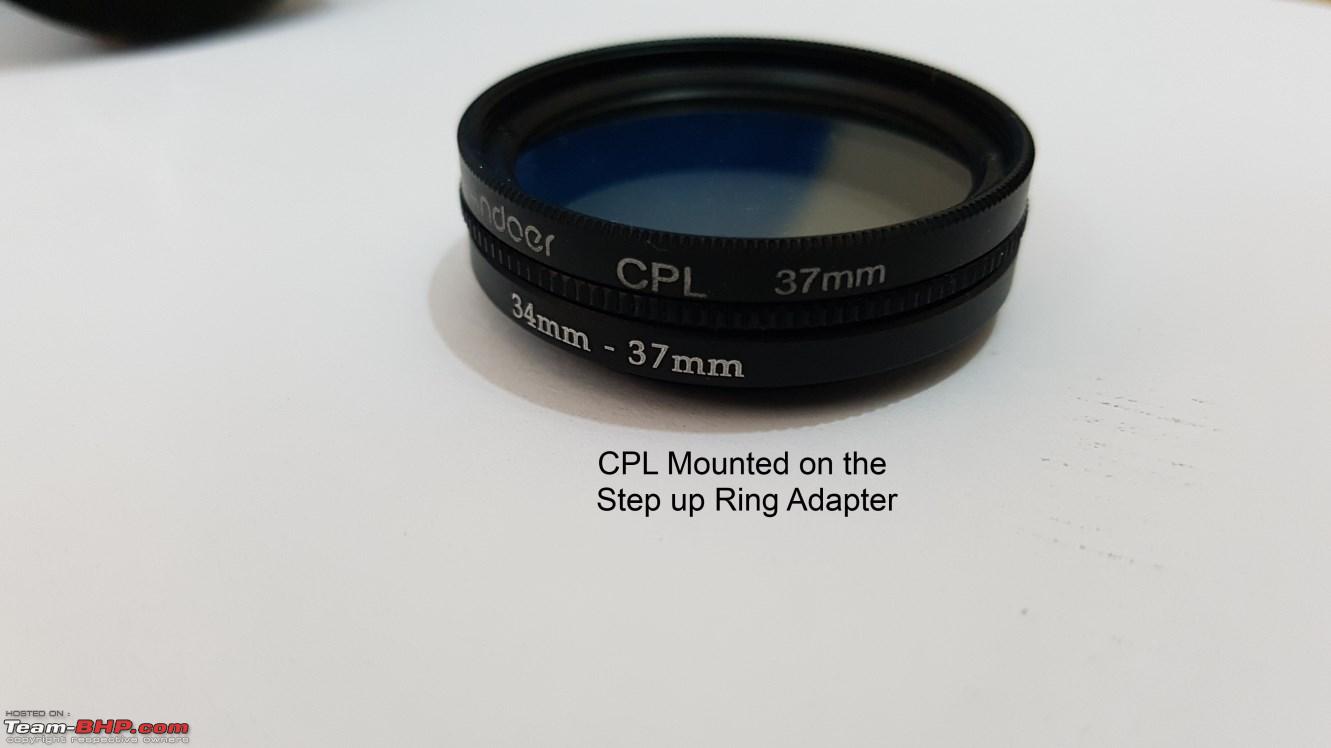 Finally, when I mount the CPL and Ring combo on the dashcam, it looks like this: 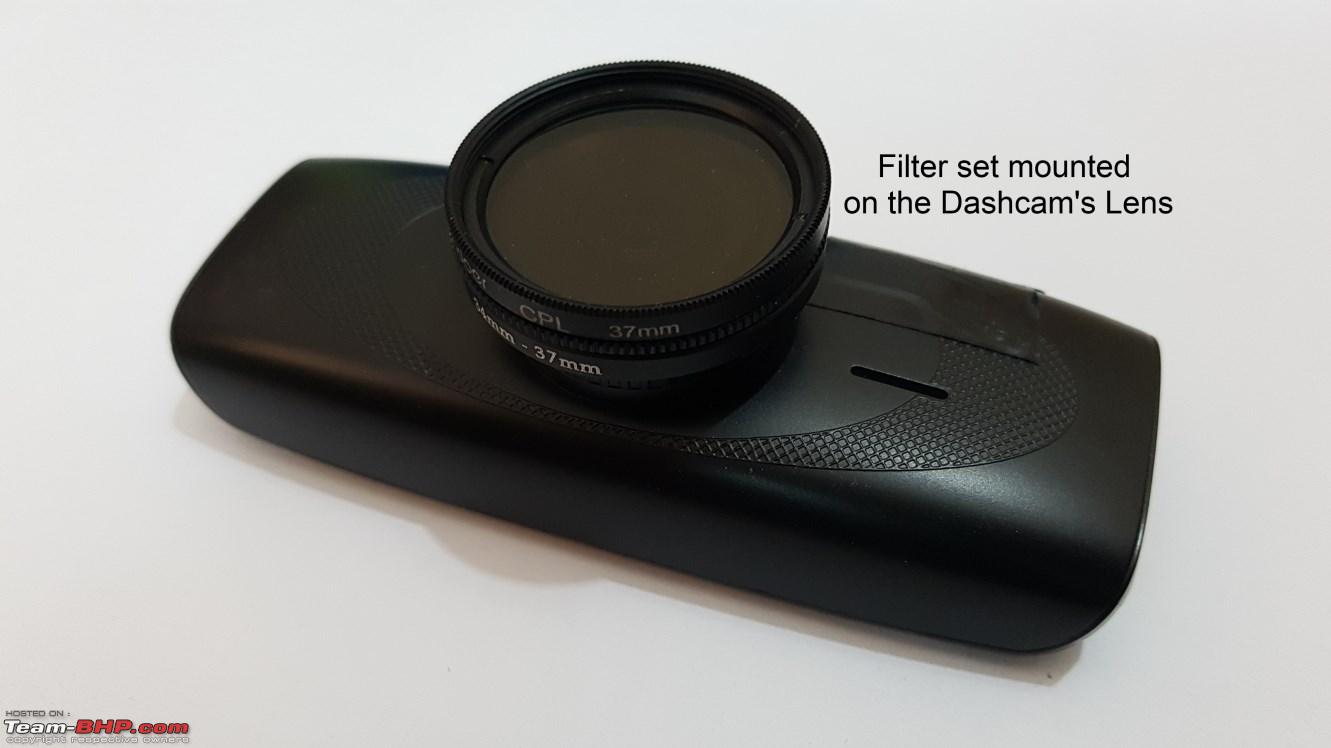 |

|  (14)
Thanks (14)
Thanks
|
| The following 14 BHPians Thank vsathyap for this useful post: | aeroamit, arunphilip, bblost, ganesc, GTO, HappyWheels, InControl, mrbaddy, Myth_sx, paragsachania, RavenAvi, Rehaan, samaspire, theexperthand |
| |
|
7th June 2016, 13:01
| #2 |
| BHPian Join Date: Aug 2011 Location: BengaLuru
Posts: 430
Thanked: 1,669 Times
| re: YA-DIRT! : Yet Another Dashcam Installation & Review Thread! (G1W) Overall fit and finish of the step up ring over the camera can be seen below. Once I was happy with the fit, I just used a few drops of superglue at 3 spots (at 120 degrees relative to each other, i.e., at 12 o clock, 4 o clock and 8 o clock positions) to glue the step up ring ONLY to the camera's front element. 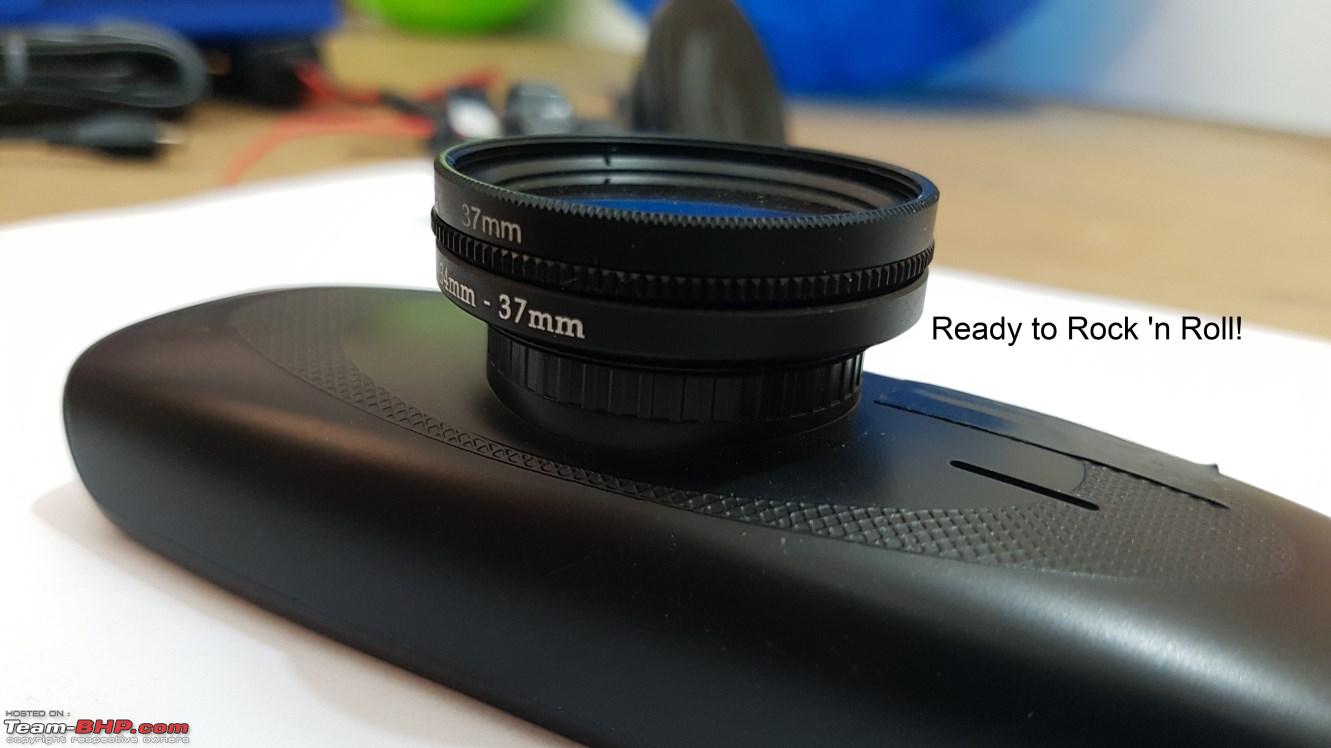 Lets now head to the car where I will be setting up the hardwire kit. I identified the fuse slot where I will be plugging in the Fuse Tap: 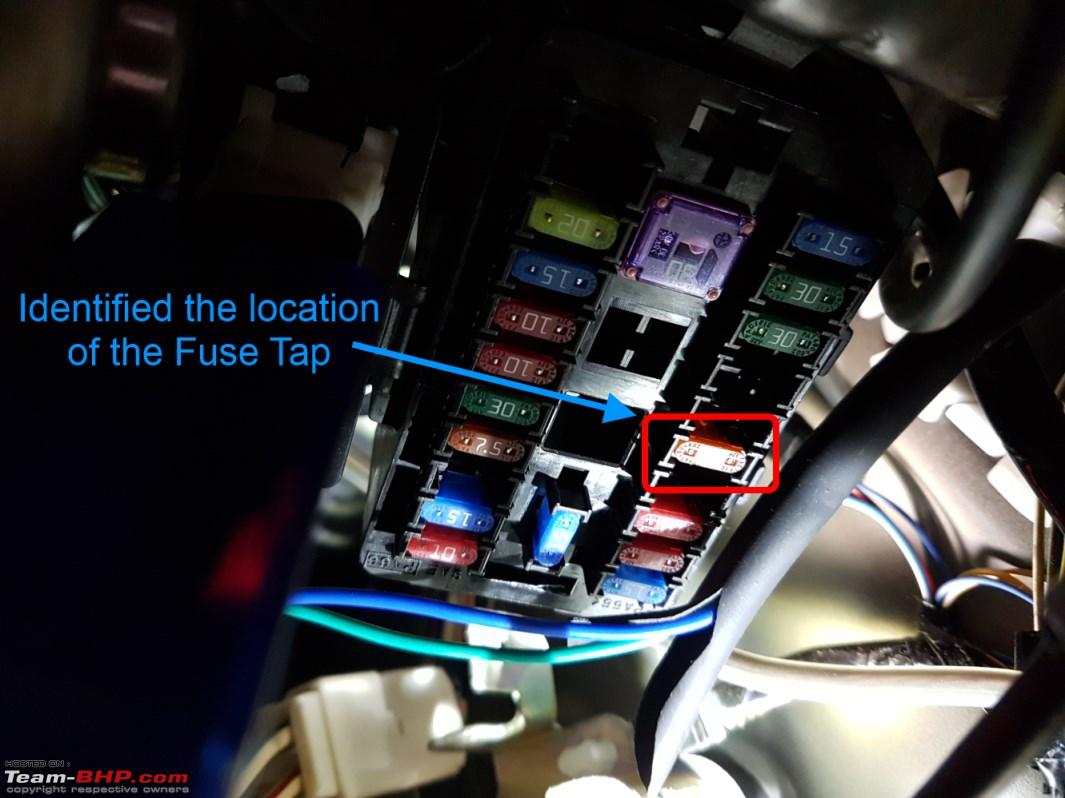 I then crimped and heat-shrunk the fuse tap to the open end of the "red" cable of the hardwire kit. 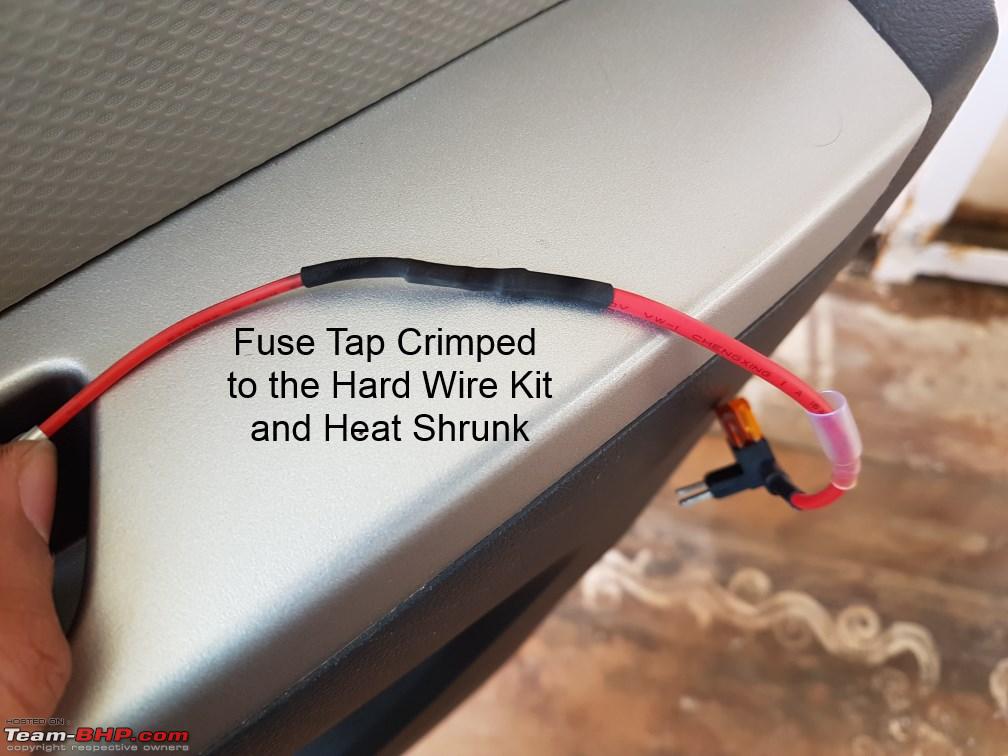 Once it was ready, I pulled the fuse from the car's fuse box and plugged it into the hardwire kit. This is how it looks finally: 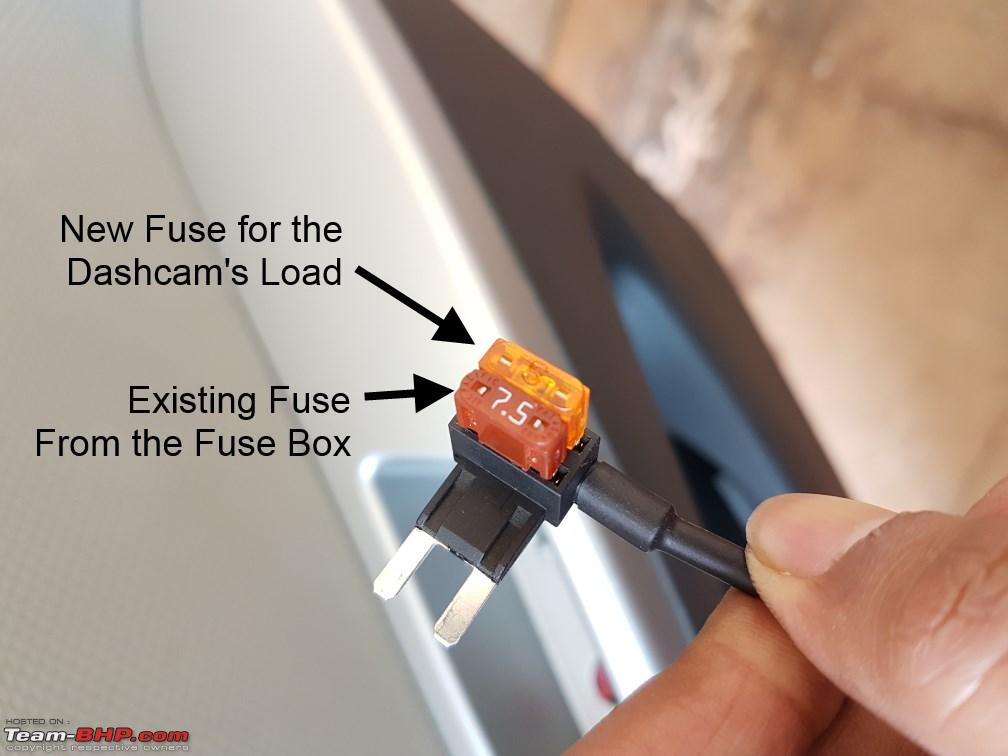 Once done, I routed the cables through the A Pillar and through the dashboard and under the steering - where the inner fuse box was. I used an old cable to pull up my wiring kit from under the dashboard. Once done, I tucked the cable under the roof liner and pulled only enough of the Port that would be required for my setup:  I also crimped and heat shrunk the ground terminal - ready to be bolted to one of the car's bare metal grounding points. 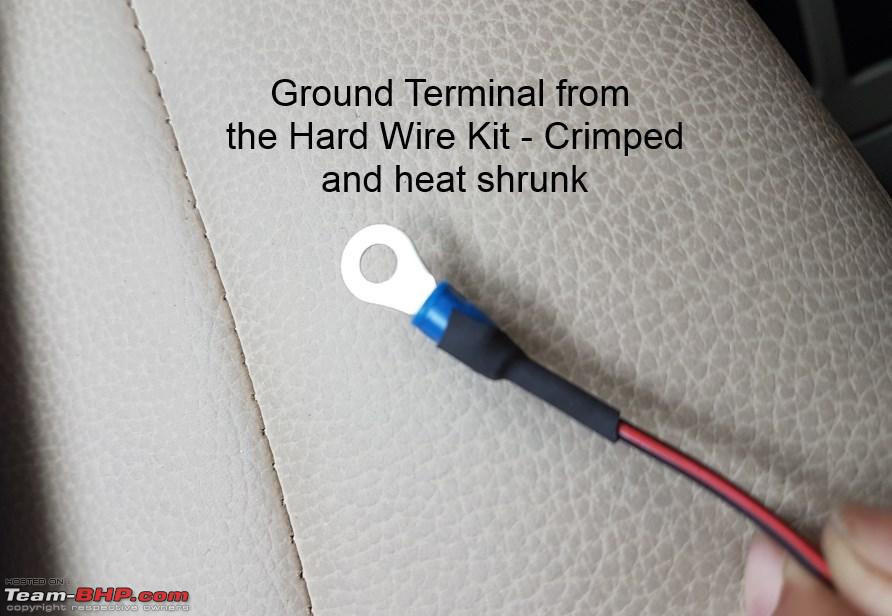 All done, I tied up the excess cable and prepared to hide all the "setup". Please note that before you do this, its a very good idea to test your setup - look for any unusual heating/smoke/sparks from under the fuse box or anywhere along the length of the wire - cant really trust these things made in China  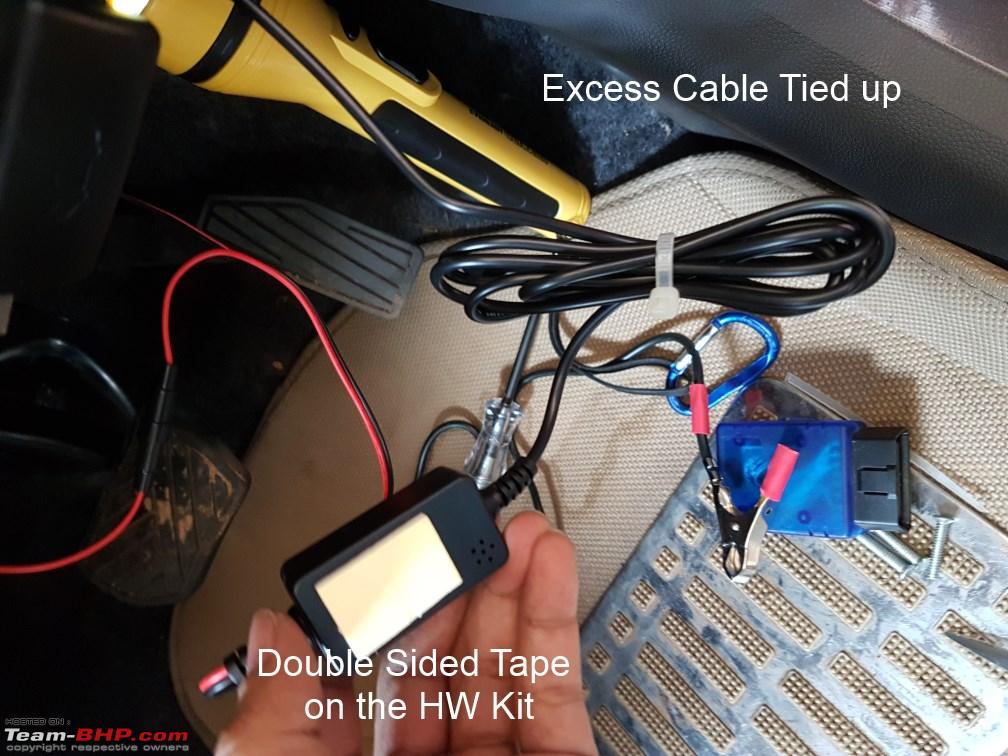 Once I did a sanity check, I proceeded to connect the ground wire to a bare metal connector. I spent nearly 30 minutes getting this into position - It was a back breaking exercise as I had to literally squeeze myself into the driver side foot-well and under the dashboard to access this place. The next time i meet the person who designed the underside of the dashboard, I'll have a word or two with him  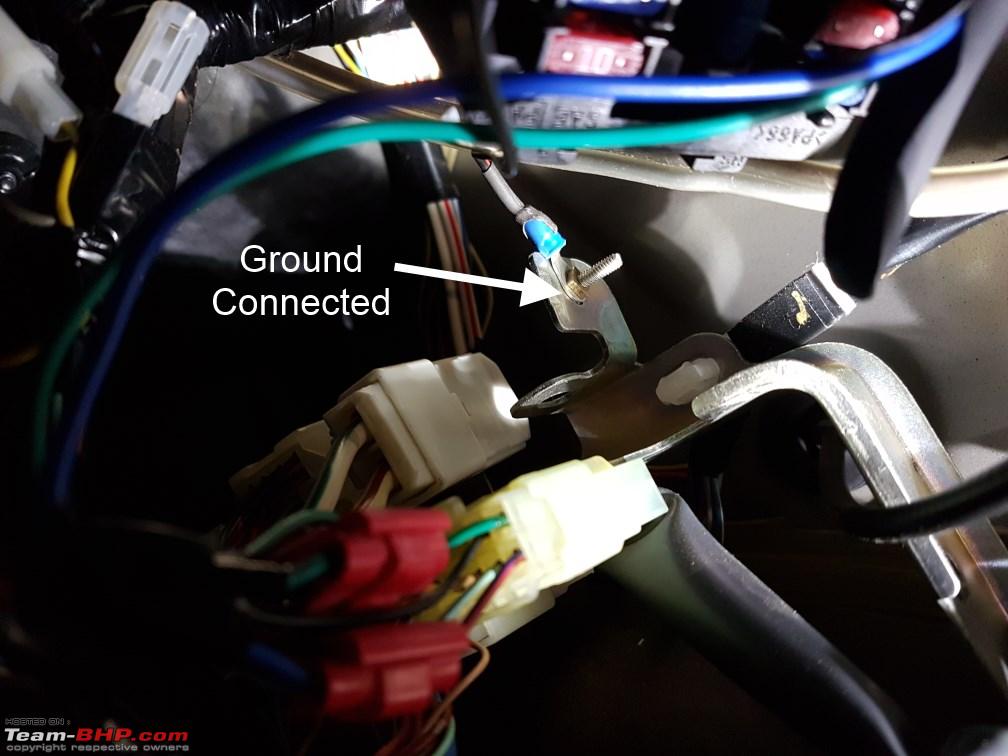 With everything in place, I plugged in the fuse tap into the same slot where the older 7.5A fuse was: 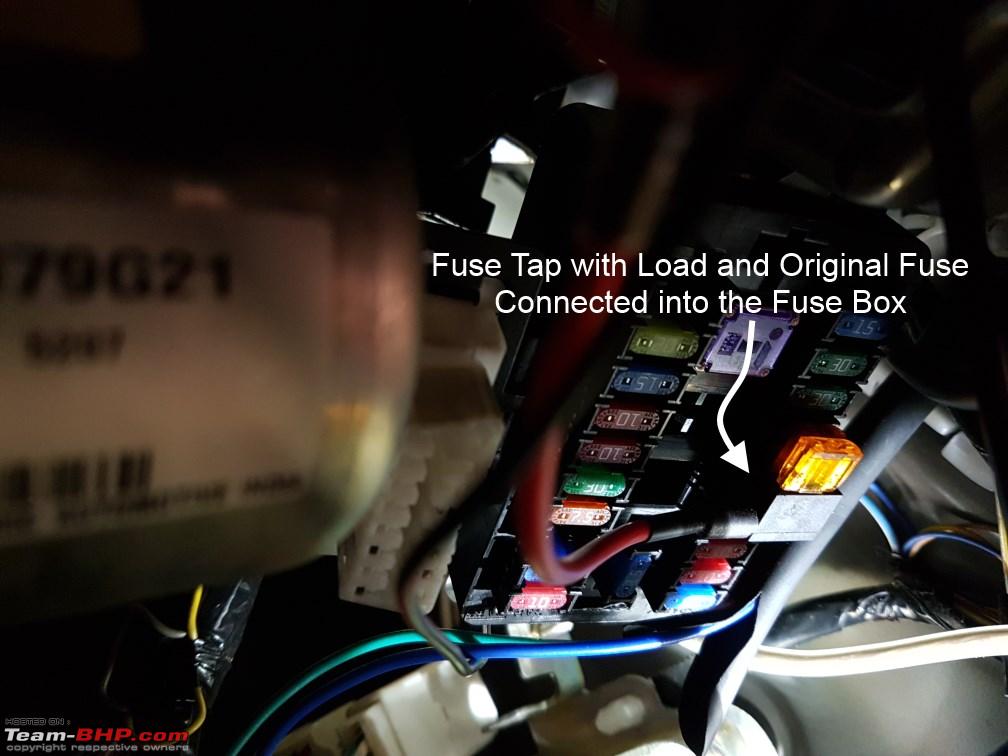 All done now, I used some soap water to wet the suction cup area of the dashcam and mounted it on the screen. I locked it into position and did a second sanity check. Again - look for heat, smoke, sparks and any thing else that may signify something went wrong - keep your noses and ears open! 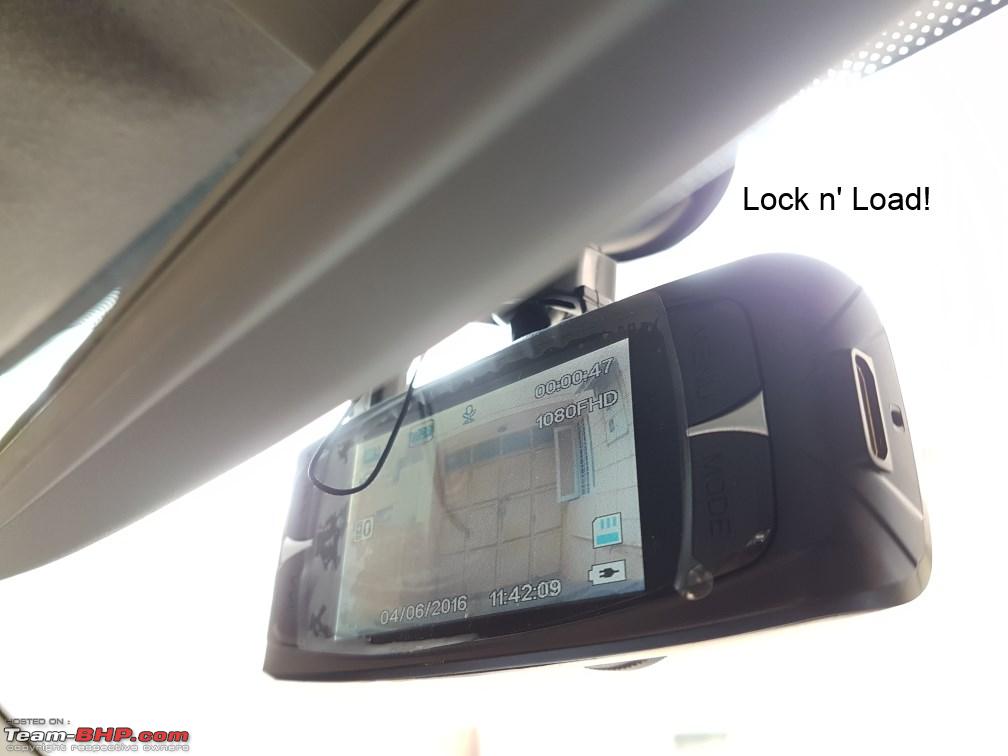 I was done! I checked the play area to see if I have enough free space to move the IRVM. I was very happy that the dashcam was literally invisible from the driver's position from the inside: 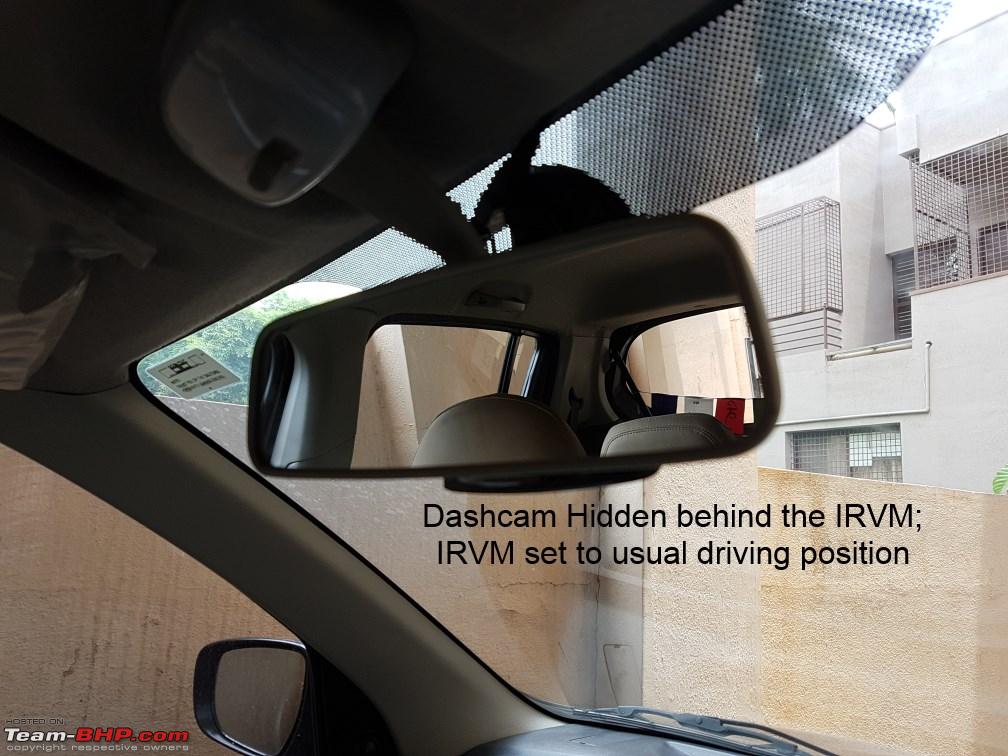 This is what it looks like from the side - apologies for the weird 45 degee angle.  View from the outside - pretty discreet - wouldn't warrant a second glace as there is nothing "shining" 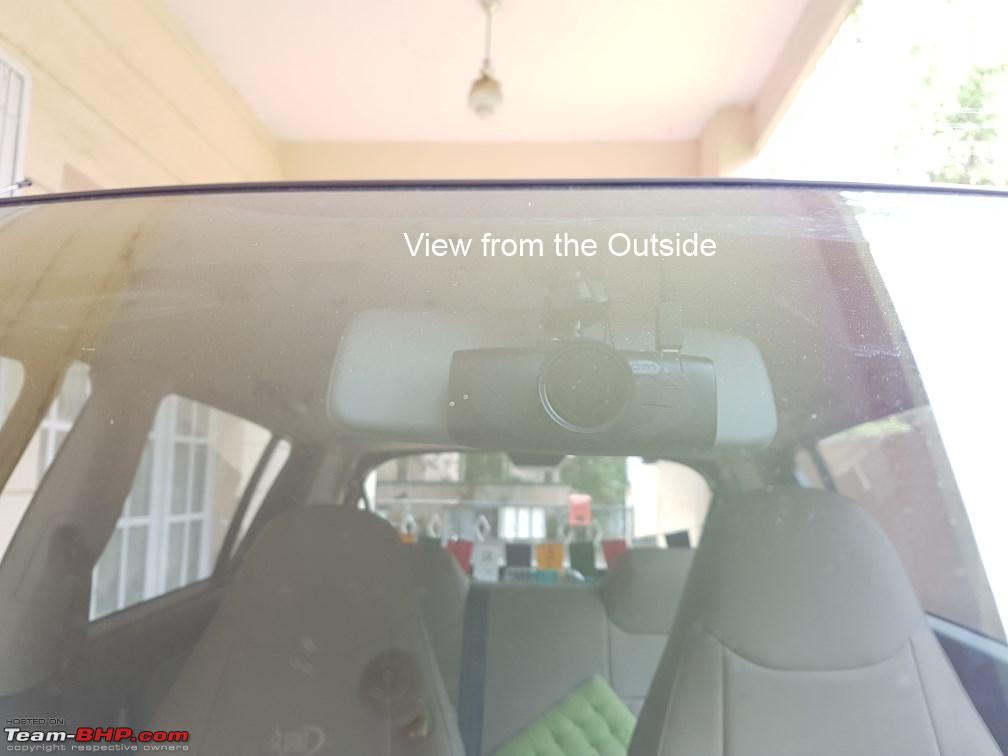 To check if it was working correctly, I removed the key, locked the car, got out. Then, to mimic a typical entry, I unlocked the car, got in, inserted the key and put it into the IGN2 position (ACC). Lo and Behold! The Dashcam turns itself on and starts recording! 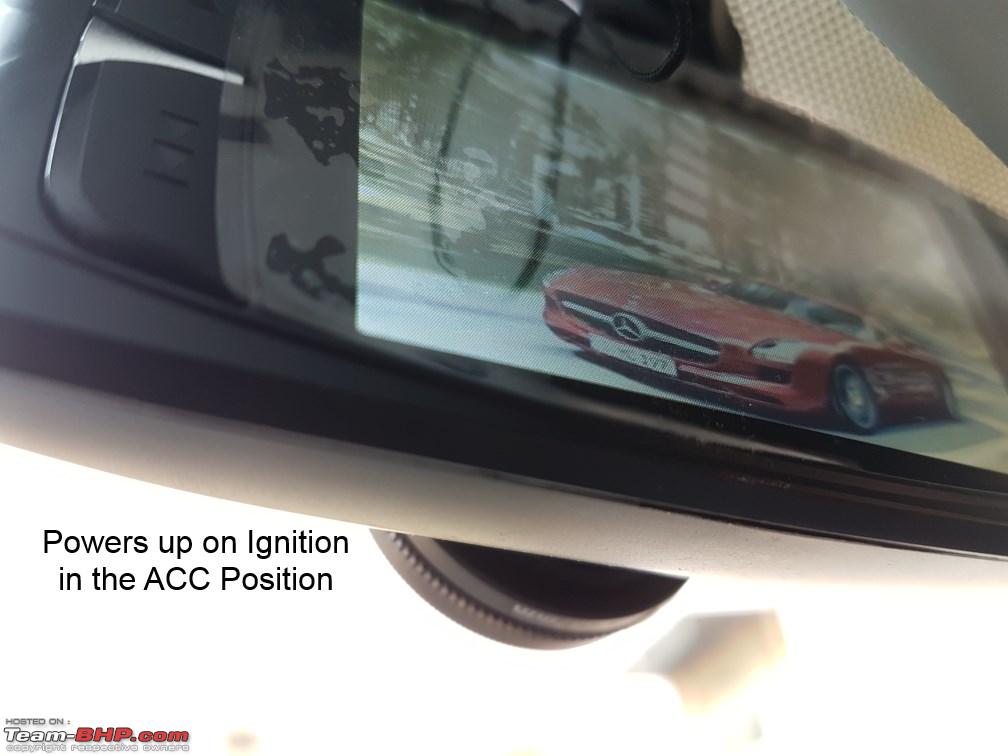 Then, I turn off the engine, remove the key and wait - the dashcam does a mandatory 30s after poweroff recording. Once the time is up, it shuts down gracefully! 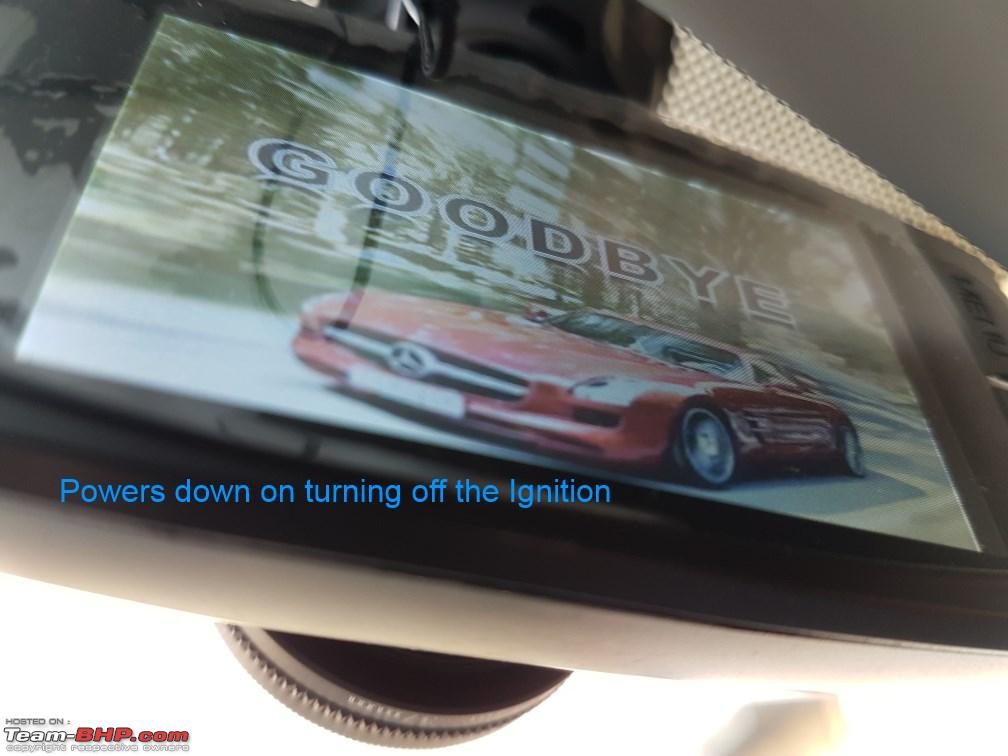 Job done! |
|
| (20)
Thanks
|
| The following 20 BHPians Thank vsathyap for this useful post: | aeroamit, arunphilip, bblost, bsdbsd, glomus123, Grace, GTO, HappyWheels, InControl, IndigoXLGrandDi, mrbaddy, Myth_sx, Omkar, paragsachania, Rahulkool, RavenAvi, Rehaan, The Great, VaibhaoT, Vik0728 |
|
7th June 2016, 13:18
| #3 |
| BHPian Join Date: Aug 2011 Location: BengaLuru
Posts: 430
Thanked: 1,669 Times
| Finally, my thoughts on the entire process and things I liked and didnt like about this entire setup - typical TBHP Ishtyle!  What I liked:
What I didn't like:
Other important points:
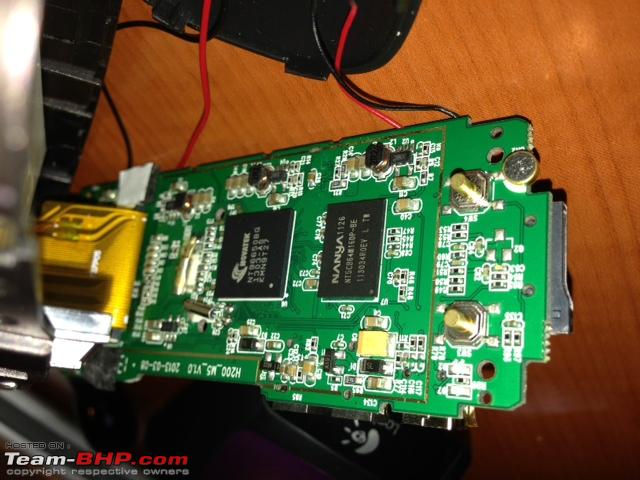
So, I will end this DIY - by thanking TBHP members (specially arunphilip and a4anurag!) and everyone else who have helped me in setting up my dashcam! Cheers to TBHP in making me do my first DIY! This post lists ways to identify real vs fake G1W dashcams - a very important thing to consider for potential buyers and users. Another VERY important point I forgot to add in my write up is about the abundance of fake G1W Dashcams on the Internet. You may get a fake one from Aliexpress or even GearBest and there is a sure shot way of identifying if you got a fake one (and start your refund process right away)! Genuine G1W dashcams use the Novatek NT96650 CPU and Aptina AR0330 CMOS sensor. The ones that are being produced off late use the newer GeneralPlus GPCV2159 processor. The easy way to identify whether you got a fake or not is to check for the following things:
The youtube video below shows you how to open the G1W cameras to check the chipset: Once you are certain that you got a GENUINE dashcam, sit back and enjoy the drives! Last edited by GTO : 8th June 2016 at 12:20. Reason: As requested |
|
| (22)
Thanks
|
| The following 22 BHPians Thank vsathyap for this useful post: | AKTRACK, arunphilip, a_bharadwaj, bblost, ganesc, GTO, HappyWheels, harsh79, InControl, IndigoXLGrandDi, mrbaddy, Myth_sx, Nicky, NirmalK, paragsachania, RavenAvi, Rehaan, Ruchitya, samaspire, sidzz, TheSkinnyDevil, TheTeacher |
|
7th June 2016, 16:08
| #4 |
| Senior - BHPian | Re: DIY: G1WH Dashcam Installation & Review An excellent DIY vsathyap sir. I simply cannot stress on the importance of dash cams these days, because anyone can make false claims for things like insurance and set you back thousands of bucks along with hours of inconvenience. The cam has been integrated very cleanly.It doesn't really look like a retrofit. Kudos to you for the DIY. Regards, vishy76 |
|
| ()
Thanks
|
|
7th June 2016, 17:25
| #5 |
| BHPian | Re: DIY: G1WH Dashcam Installation & Review The DIY was wonderfully explained in detail. Dashcam is turning out to be an indispensable tool nowadays. Pardon my ignorance, it would be better if you could give a pictorial explanation on how to open the A pillars and the ceiling to conceal the wires. |
|
| (1)
Thanks
|
| The following BHPian Thanks IndiaSierra for this useful post: | vsathyap |
|
7th June 2016, 19:07
| #6 | |
| BANNED Join Date: Oct 2011 Location: Hyderabad
Posts: 12,348
Thanked: 21,450 Times
| Quote:
Now that's an excellently documented DIY. Loved every bit of it. Thank you for posting. PS: It is OT for this thread but I'll suggest you get a Manual D/N IRVM for your K10. Wish the IRVM was black, it would have made the dashcam invisible. More the Beige IRVM shows the dashcam presence somehow. :( | |
|
| (1)
Thanks
|

| The following BHPian Thanks a4anurag for this useful post: | vsathyap |
|
7th June 2016, 20:43
| #7 |
| BHPian Join Date: Dec 2011 Location: Mississauga, ON
Posts: 351
Thanked: 552 Times
| Re: DIY: G1WH Dashcam Installation & Review Excellent DIY. I just got my G1W-CB delivered from Gearbest.com. Please let me know where did you order the hardwire kit and CPL filter and step up bracket from. |
|
| (1)
Thanks
|
| The following BHPian Thanks dheepak10 for this useful post: | vsathyap |
|
8th June 2016, 11:09
| #8 | ||||
| BHPian Join Date: Aug 2011 Location: BengaLuru
Posts: 430
Thanked: 1,669 Times
| Re: DIY: G1WH Dashcam Installation & Review Quote:
In relation to this, what's the experience of those using dashcams been like, when such untoward incidents have happened - have you openly disclosed your dashcam, or kept quite at that moment, and felt it would be better to capitalize on the issue when it got escalated further? Quote:
Quote:
Quote:
| ||||
|
| (2)
Thanks
|
| The following 2 BHPians Thank vsathyap for this useful post: | GTO, RavenAvi |
|
8th June 2016, 12:01
| #9 |
| BHPian | Re: DIY: G1WH Dashcam Installation & Review Very Well Documented DIY.  May I request you to add the source of all parts that you have used, for others who would be encouraged in attempting this. Pricing info will definitely aid as well  |
|
| ()
Thanks
|
|
8th June 2016, 13:45
| #10 | |
| BHPian Join Date: Aug 2011 Location: BengaLuru
Posts: 430
Thanked: 1,669 Times
| Re: DIY: G1WH Dashcam Installation & Review Quote:
The pricing is in ascending order to make things easier to read. Also, note that for most of the items that I bought from India I have mentioned the list price - I got them at much lower rates thanks to discount codes and other cash-back offers and gift vouchers that I redeemed
TOTAL Rs. 6,258.00 | |
|
| (11)
Thanks
|
| The following 11 BHPians Thank vsathyap for this useful post: | arunphilip, Ashir, a_bharadwaj, dheepak10, ganesc, GTO, IndigoXLGrandDi, RavenAvi, Ruchitya, soumobakshi, TheHkrish |
|
11th June 2016, 11:47
| #11 |
| BHPian Join Date: Apr 2014 Location: Austin, BLR
Posts: 89
Thanked: 124 Times
| Re: DIY: G1WH Dashcam Installation & Review Great job vsathyap! Hope to do the same in my car, just haven't mustered the courage to ship the parts internationally. Local garages here don't seem to stock up on dashcams, atleast in Rajarajeshwarinagar(Bengaluru). Any idea if I could buy the components here on maybe JC road? Reg. using your phone on the USB outlet, the converter says output is 1.5A. Not all phones take that amount of current for prolonged periods (older gen. models usually recommend 1A output). Check your phones charger for recommended current levels. You would anyways have to mount your phone differently to use the screen. And does the phone feed to the display of the dashcam? Also pardon my lack of knowledge reg. this, but will a 5A fuse really help when the electronics will fry at lower current? I know its to guard against surges, was just wondering. Don't know how probable the event is in a car.. Last edited by Ruchitya : 11th June 2016 at 11:55. |
|
| ()
Thanks
|
| |
|
11th June 2016, 13:41
| #12 | |
| BHPian Join Date: Aug 2011 Location: BengaLuru
Posts: 430
Thanked: 1,669 Times
| Re: DIY: G1WH Dashcam Installation & Review Quote:
If you are not keen on the hardwiring bit with all the fuse taps, etc., just go to your local accessories shop and ask them to install a secondary 12V Cigarette lighter socket under the steering. They will do a similar setup, but will give you an extra socket through which you can power your dashcam with the charger that came with the kit. There is a DIY from our very own TBHP member paragsachania on how to do this - so a quick glance at that DIY will give you an idea about the entire process. Regarding the higher current, most mobile phones and their battery circuits have an inbuilt current limiter. For example, when I use a 2A charger on my older MotoX (which is rated to be charged @ 1A), it draws whatever current it requires and charges fine without any issues. With most phones now being able to take 2A chargers, I dont see this as a major issue. On the 5A fuse thing, yes - a fuse is only a protection and it can only do so much. But, having the fuse is a lot better than nothing at all and hence I've used it. Note that my hardwiring kit also has an in line fuse - so that's double protection. It's very rare that current spikes may happen in the car - I've seen cheap USB chargers blow up but that's because of the way they have been built - with cheap spared and bad designs. Doing this is DIY is a very clean and safe way of powering the dashcam. One should not be worried about the elecrical spikes, etc., as long as other electricals in the car are working fine (and you haven't spliced and joined any wires to tap current, etc.) | |
|
| ()
Thanks
|
|
11th June 2016, 14:11
| #13 | |||
| BHPian Join Date: Apr 2014 Location: Austin, BLR
Posts: 89
Thanked: 124 Times
| Re: DIY: G1WH Dashcam Installation & Review Quote:
Quote:
Quote:
| |||
|
| ()
Thanks
|
|
27th June 2016, 17:35
| #14 |
| BHPian Join Date: Aug 2011 Location: BengaLuru
Posts: 430
Thanked: 1,669 Times
| Re: DIY: G1WH Dashcam Installation & Review Quick Update - The Mini USB Plug on my G1WH came loose and I discovered that the camera wasn't holding a charge and the battery was pretty much dead. With no power, I wasnt recording any footage as well. I removed the dashcam and discovered that the Mini USB plug had come clean off it's soldered mounts. A quick visit to the local mobile repair shop and 50Rs later, the camera was back in business! Quick tip to those who purchase the G1W series of Dashcams - please get the mini USB plug double checked and re-soldered from your friendly neighborhood mobile repair fellow; I discovered that this is a common problem in G1W cameras worldwide. Better have a running dashcam - you never know when and where and how some duffer may hit you! |
|
| ()
Thanks
|
|
8th August 2016, 22:22
| #15 |
| BHPian Join Date: Jan 2016 Location: Bangalore
Posts: 75
Thanked: 72 Times
| Re: DIY: G1WH Dashcam Installation & Review A great DIY job vsathyap ! Even I am looking to install dashboard cam on my Baleno but I am not that confident about hardwiring it myself. Do you have any idea about any accessory guy in Bangalore who can install this reliably? Any recommendation ? I have acquired the below unit https://www.amazon.com/ODRVM-Dashboa...shboard+camera Also, will there be any implication on warranty of the electrical system if you hardwire by tapping power from the fuse box? |
|
| ()
Thanks
|
|