Team-BHP > Technical Stuff > DIY - Do it yourself


Reply
  Search this Thread
152,933 views
Old 4th March 2016, 00:35   #1
BANNED
 
Join Date: Oct 2011
Location: Hyderabad
Posts: 12,350
Thanked: 21,432 Times
DIY: Cleaning the Intercooler

Here's another small DIY that I could do on a lazy Sunday morning. Nice time spent in total of 4.5 hours for the whole DIY.

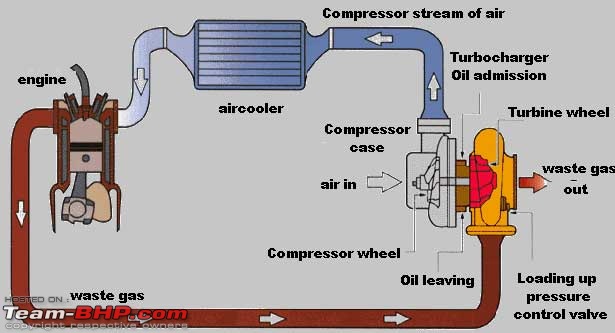
Intercooler - Why is it required?

DIY: Cleaning the Intercooler-turbo_diagram.jpg
  • It is used to cool engine air after it has passed through a turbocharger, but before it enters the engine. The idea is to return the air to a lower temperature, for the optimum power for the combustion process within the engine.

  • It means that it cools the turbo's air charge before it is routed into the engine. Usually it means an air-to-air cooler where the heat is rejected using ambient air flowing through the heat exchanger, much like the engine's coolant radiator.

  • An Intercooler is used to improve their volumetric efficiency by increasing intake air-charge density. A decrease in air intake temperature provides a denser intake charge to the engine and allows more air and fuel to be combusted per engine cycle, increasing the output of the engine.

DIY: Cleaning the Intercooler-basicautomobileworking35728.jpg
Source: Google Images

Why should we clean it?

Oil vapours can coat the interior walls of the charge piping and it is coating the inside of the intercooler and adding an insulating layer between the aluminium intercooler fins and the charge air that needs to be cooled. In this DIY of mine, I’ll be getting rid of that oil which is collected, affecting the overall performance.

Also this is the first time the intercooler is being opened in the 72,000 kms that the car has clocked. So I thought of giving it a try and see how much would be collected after this duration of usage.

Tools Required:
  1. Car jack;
  2. Star screwdriver;
  3. Flat head screwdriver;
  4. 10mm socket;
  5. Plastic trim removal kit;
  6. Cover or mats to be used when lying on the ground to open the bumper;
  7. Soap solution or shampoo;
  8. Heater or a hot air blower;
  9. A pan to collect oil and the waste water;
  10. Lots of waste cloth for cleaning and wiping;
  11. Bottle cleaning brush
  12. A Mug;
  13. 100% Iso propyl alcohol around 1L.


The DIY consists of four steps:
  1. Front bumper removal;
  2. Intercooler dismantling;
  3. Intercooler Cleaning and
  4. Intercooler & Bumper refitting.

Last edited by a4anurag : 4th March 2016 at 23:57.
a4anurag is offline   (18) Thanks
Old 4th March 2016, 00:48   #2
BANNED
 
Join Date: Oct 2011
Location: Hyderabad
Posts: 12,350
Thanked: 21,432 Times
re: DIY: Cleaning the Intercooler

Here is the first step in the DIY that will make the DIY happen in the first place:

1) Front Bumper Removal

(i) Park the car on a firm ground and raise it using the jack so that one can work beneath to open the bolts at the base of the bumper. Keep the handbrake engaged for safety.

(ii) Loosen the 4 bolts that I have circled in Red colour. A 10mm socket can be used for opening these bolts.

Bolts and plastic plugs that hold the bumper:
DIY: Cleaning the Intercooler-1.jpg

(iii) Then press and lift the plastic clips that are embedded in the metal frame of the chassis. See the yellow square in the picture. Be gentle on them to avoid any damage. One must insert the fingers from inside and underneath the metal frame to reach these clips if it is hard to lift open them from top. After this the top portion of the bumper is free and not held by any bolts or clips.

Plastic clips to pressed and lifted
DIY: Cleaning the Intercooler-2.jpg

(iv) Go to the sides of the bumper and open the screw that is located on the top of the wheel well where the bumper is in contact with the metal fender. Use a star screw driver and open that screw that holds the bumper mainly.

Bumper side retaining screw
DIY: Cleaning the Intercooler-3.-bumper-side-screw.jpg

(v) Then open the plastic retainer clips that are placed along the wheel well that holds the plastic cladding securely. Once these clips and screws are undone, using mild pressure pull out the bumper from the sides. The plastic clips are the holding bumper by its sides.

Bumper side retaining clips
DIY: Cleaning the Intercooler-4.-bumper-side-clips.jpg

Clip end where they sit into
DIY: Cleaning the Intercooler-5.-bumper-side-clips.jpg

Top portion of the bumper opened:
DIY: Cleaning the Intercooler-6.-top-bumper-free.jpg

(vi) Go beneath the car and unscrew 4 screws that hold the bumper by its base. On the either ends where there is a flap just ahead of the front wheel, the flaps are held by two plastic clips that need to be opened to free up the bumper from its base.


Plastic clips holding the flap to be opened
DIY: Cleaning the Intercooler-8.-base-clips.jpg

4 screws that hold the bumper base
DIY: Cleaning the Intercooler-9.-bumper-base-screws.jpg

(vii) Once this is done, the bumper will hang loose and free from the chassis of the car.

(viii) Last but not the least, unplug the connectors of the fog lights and remove the bumper completely.

Fog light connections
DIY: Cleaning the Intercooler-7.-fog-light-connection.jpg

Bumper removed completely
DIY: Cleaning the Intercooler-10.-bumper-removed.jpg


>> We are done removing the front bumper completely giving complete access to the intercooler for its removal and cleaning subsequently.

Bumper kept aside all the while during the DIY
DIY: Cleaning the Intercooler-11.-bumper-set-free.jpg

Last edited by a4anurag : 4th March 2016 at 00:57.
a4anurag is offline   (16) Thanks
Old 4th March 2016, 01:14   #3
BANNED
 
Join Date: Oct 2011
Location: Hyderabad
Posts: 12,350
Thanked: 21,432 Times
re: DIY: Cleaning the Intercooler

2. Intercooler Dismantling

Here the intercooler has the inlet and outlet hoses/pipes bolted on when removed from the engine so it is better to remove them for better cleaning and the ease of cleaning. The clamps and hoses are kept aside and cleaned later on.

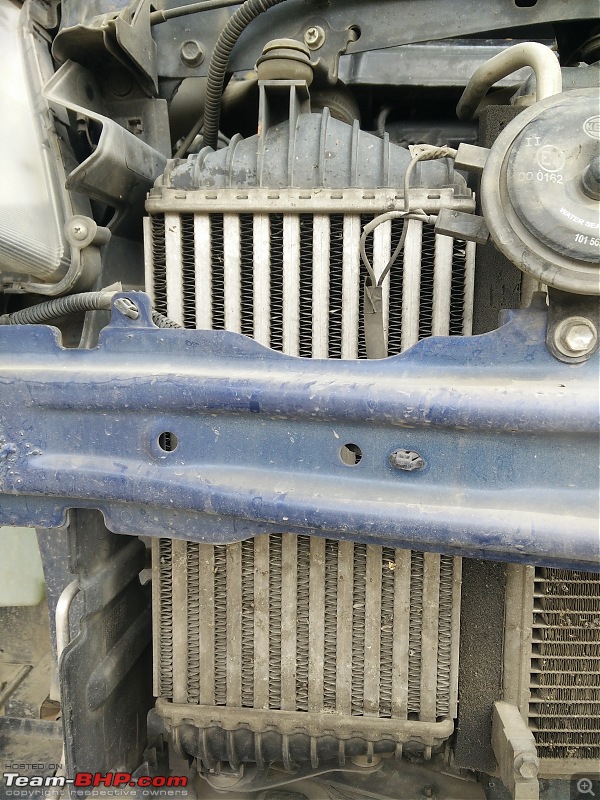
Intercooler & Condensor:
DIY: Cleaning the Intercooler-1.-intercooler-location.jpg

The one that needs to be opened and cleaned:
DIY: Cleaning the Intercooler-2.-one-needs-cleaning.jpg

a. Once the bumper is off the chassis, disconnect the horn wiring (High Tone one) that is located on the front bar between the condenser and intercooler to facilitate easy removal of the intercooler from its mounting.

Horn connections removed
DIY: Cleaning the Intercooler-6.-connections-removed.jpg

Engine cover removed:
DIY: Cleaning the Intercooler-5.-engine-cover-removed.jpg

b. Using a star screw driver, open the bolt that I have highlight in yellow which is the bracket holding the intercooler (a.k.a the top mount).

Top mount bracket:
DIY: Cleaning the Intercooler-3retaining-bracket-top-mount.jpg

Base Mount - Not required to open as the intercooler is placed on two grommets on the base mount:
DIY: Cleaning the Intercooler-4.-holding-braket-base-mount.jpg

Grommets (rubber) in which the intercooler is seated:
DIY: Cleaning the Intercooler-9.-intercooler-base-mount-bracket.jpg

c. Using a flat head screwdriver open all the clamps that secure the hoses and pipes (Both inlet and outlet).

All clamps that are to be removed:
DIY: Cleaning the Intercooler-7.-open-clamps-marked-yellow.jpg

Clamp removed:
DIY: Cleaning the Intercooler-8.-clamp-removed.jpg

d. Once the hoses are removed, just lift the intercooler by its sides and tilt it forward and then up to free it from the base mount – grommets.

All piping disconnected to remove intercooler
DIY: Cleaning the Intercooler-8a.-piping-disconnected-demount-intercooler.jpg

e. Intercooler unit is off the chassis and ready to be cleaned.

Front View of Intercooler:
DIY: Cleaning the Intercooler-10.-intercooler-front-view.jpg

f. Again using a flat head screw driver, open two more clamps that hold the inlet hose of the intercooler and the metal pipe at the rear end of the intercooler.

Rear View of Intercooler:
DIY: Cleaning the Intercooler-11.-intercooler-rear-view.jpg

For the extra information to all the ones who are interested. Here is the page from the parts manual pertaining to the Intercooler and its individual parts.

Intercooler Parts:
DIY: Cleaning the Intercooler-12.-intercooler-parts-breakup.jpg

Last edited by a4anurag : 4th March 2016 at 01:19.
a4anurag is offline   (18) Thanks
Old 4th March 2016, 01:39   #4
BANNED
 
Join Date: Oct 2011
Location: Hyderabad
Posts: 12,350
Thanked: 21,432 Times
re: DIY: Cleaning the Intercooler

3. Intercooler Cleaning:

Cleaning process is divided into three major steps:

A. Washing
B. Removing the soapy residue content
C. Drying

A. Washing:

Since the intercooler is coated and filled with almost 50 ml oil that I could drip out into a 1L bottle, there will still be a coating of oil inside that needs to be got rid of. Since the content here that needs to be cleaned is ‘Oil’ – I did the washing in two stages.

Stage 1:

While I let the intercooler stand inverted for 15 minutes to drip out most of the oil, I prepared a mild solution of dish washing detergent and some car shampoo that I had at home and heated it up mildly (not boiling temperature) so it is more effective an agent for loosening the oil from the fins. Once the solution that I prepared was ready, I poured it inside till it approximately filled half the intercooler and held the intercooler by the ends. Sealed both the openings with my palms and shook it by horizontal and vertical movement so the soap solution comes in contact in full contact inside. Pour out the content in a jar or a bucket. The first 3 washes were too black (read oil) so what I did was collected this in a 25L can so that I could hand it over to my FNG who agreed to dispose it.

Stage 2:

After the 5 washes totally that I did with the hot soap solution, the subsequent ones were with regular shampoo (read without heating). After every batch of washing, when I pour out the contents, the liquid should be almost clear with lesser oil content as possible which does indicate that most of the trapped oil is out of the intercooler.

>> A total of 14 washes I had to do to get a clear soap solution when emptied into the bucket.


B. Soap residue removal:

This is a critical step as I have read that the soap if not removed thoroughly could enter the through the piston rings and breakdown the oil. So this is another important step in this process.

>> I used regular water for this process and the way I followed for cleaning the soap is similar to what I did in the washing step. Fill the intercooler to ˝ its level and then shake it vigorously both horizontally and vertically so that the water reaches throughout the intercooler so as to loosen the soap and any remaining oil.

>> Repeat the cleaning process till the output water is free from any traces oil that is seen floating on the top layer. 9 washes are what it took in total to get clear water out.

>> Last but not the least add 500 ml of 100 % IPA over the intercooler and pour some of it inside and let it drain. It evaporates quickly without remaining inside for long and does disperse the water droplets inside so the drying step is easier.

C. Drying:

--- All the water inside must be thrown out of the intercooler before refitting it. Use a heater or a high capacity blower for this process. A heated blower is preferred. I used my wife’s hair dryer for this purpose.

--- Pass the heater through the whole intercooler unit and also for a couple of minutes through both the inlet and outlet connection hoses for heating up of inside core. Tap your hand on the unit a couple times to free any water particles that could be trapped inside.

--- The drying must be done as soon as you can as any delay would initiate rusting process (Depending on weather conditions). May not be a substantial issue but why take the risk.

--- I heated the whole intercooler till the metal frame was hot enough where water could evaporate though the process took time. The whole drying time was 1 hour.


All piping/hoses disconnected:
DIY: Cleaning the Intercooler-1.-disconnected-all-piping.jpg

Piping kept separate for cleaning:
DIY: Cleaning the Intercooler-2.-pipes-removed-better-cleaning.jpg

Before starting the cleaning process:
DIY: Cleaning the Intercooler-before-cleaning.jpg

Oil collected in a 1L bottle:
DIY: Cleaning the Intercooler-oil-collected-1l-bottle.jpg

Oil from Outlet tube:
DIY: Cleaning the Intercooler-oil-dripping.jpg

Oil from Inlet tube:
DIY: Cleaning the Intercooler-oil-outlet-pipe.jpg

Used a bottle cleaner brush + a cloth to clean the tubing below the engine cover:
DIY: Cleaning the Intercooler-oil-pipes.jpg

Oil floating in the intercooler base:
DIY: Cleaning the Intercooler-oil-intercooler.jpg

Turbo outlet joint cleaned:
DIY: Cleaning the Intercooler-turbo-outlet-cleaned.jpg

Internal cleaning of the pipe/hoses done:
DIY: Cleaning the Intercooler-pipe-internal-wall-cleaned.jpg

First wash solution of the intercooler - Look at the colour:
DIY: Cleaning the Intercooler-first-wash-intercooler.jpg

13th Wash - Look at the colour:
DIY: Cleaning the Intercooler-13th-wash.jpg

After cleaning - Front View:[/b]
DIY: Cleaning the Intercooler-after-cleaning-front-view.jpg

After cleaning - Rear View:
DIY: Cleaning the Intercooler-after-cleaning-rear-view.jpg

Cleaning comparison picture of Before vs After:
DIY: Cleaning the Intercooler-cleaning-outide-comparison.jpg

Condenser Unit cleaning:
DIY: Cleaning the Intercooler-condensor-unit-cleaning.jpg

Left for drying (15 minutes):
DIY: Cleaning the Intercooler-left-drying.jpg

Inside fins post cleaning:
DIY: Cleaning the Intercooler-inside-fins-after-cleaning.jpg

Another shot of the fins:
DIY: Cleaning the Intercooler-inside-fins-another-shot.jpg

Piping re-fixed:
DIY: Cleaning the Intercooler-piping-refit.jpg

Last edited by a4anurag : 4th March 2016 at 23:18.
a4anurag is offline   (23) Thanks
Old 4th March 2016, 03:30   #5
BANNED
 
Join Date: Oct 2011
Location: Hyderabad
Posts: 12,350
Thanked: 21,432 Times

4) Intercooler & Bumper Refitting:

Since the steps to open both of these are mentioned above, for reporting them just go reverse in process. Installation will be successful.

Some Points to remember:
  1. While refitting the clamps, be careful to not over tight them or else they'll crack, leaking pressure and loosing engine power.

  2. Be it either the intercooler or the condenser, to straighten the bent fins use a flat had screwdriver to get them back in shape. Be gentle on these fins as they are delicate. You'd not be wanting to to ruin them totally.

  3. When the intercooler was getting dry in sun, I was cleaning the bumper and the condenser unit till then. Use a paint brush to loosen out the insects etc.

  4. During Washing, ensure that the soap solution that is used doesn't generate too much of froth or else the time required to clear it off would be longer which means wastage of water.

Conclusion:

--> At the end of the day, post the cleaning, the heat exchanging would be better and air getting into the engine would be cooler than what it used to go. So there would be marginal increase in performance and Fuel efficiency.

--> Not sure but its around 660 kms that I have clocked since Sunday when I did this D.I.Y. There is a increase in the Average FE by 0.1 kmpl. This cleaning exercise may or may not have effected or just the increase by co-incidence, I am not fully sure. Will keep an eye on the following full tank that I do.

A Sunday morning well spent doing the DIY. With a bad back and a dirty dress.

Last but not the least, Here is the Family posing for a Photograph!

DIY: Cleaning the Intercooler-img_20160228_135849.jpg

Last edited by a4anurag : 4th March 2016 at 23:29.
a4anurag is offline   (45) Thanks
Old 5th March 2016, 07:20   #6
Team-BHP Support
 
Join Date: Feb 2004
Location: Mumbai
Posts: 19,247
Thanked: 83,033 Times
re: DIY: Cleaning the Intercooler

Thread moved from the Assembly Line to the DIY Section. Thanks for sharing!
Aditya is offline  
Old 5th March 2016, 07:48   #7
BHPian
 
Manoj2268's Avatar
 
Join Date: Jul 2008
Location: Delhi
Posts: 310
Thanked: 449 Times
re: DIY: Cleaning the Intercooler

Awesome DIY, Anurag! I will print this and sit with the FNG guy and clean it tomorrow when the Ritz is serviced. *two thumbs up*

Last edited by GTO : 5th March 2016 at 10:53. Reason: Typo
Manoj2268 is offline   (1) Thanks
Old 5th March 2016, 07:51   #8
BHPian
 
EFF-EIGHT-BEE's Avatar
 
Join Date: Jan 2010
Location: Patiala
Posts: 196
Thanked: 113 Times
re: DIY: Cleaning the Intercooler

Wonderful DIY a4anurag, a neat exercise to do on a lazy Sunday and the work done will be better than done at A.S.S as they usually don't clean it thoroughly but just blow compressed air through it and charge a bomb for it! One thing I would like to recommend(if I may) that while cleaning,the turbo outlet and the engine inlet hose must be covered by a cloth or plastic as any foreign object may enter in them while they are left open. Thanks for sharing.
EFF-EIGHT-BEE is offline   (3) Thanks
Old 5th March 2016, 08:07   #9
BANNED
 
Join Date: Oct 2011
Location: Hyderabad
Posts: 12,350
Thanked: 21,432 Times

Quote:
Originally Posted by Manoj2268 View Post
Awesome DIY, Anurag! I will print this and I sit with the FNG guy and clean it tomorrow when the Ritz is serviced. *two thumbs up*
Thank you sir for the kind words.

Why not do a DIY target than visiting an FNG?!

Quote:
Originally Posted by EFF-EIGHT-BEE View Post
One thing I would like to recommend (if I may) that while cleaning, the turbo outlet and the engine inlet hose must be covered by a cloth or plastic as any foreign object may enter in them while they are left open. Thanks for sharing.
Thank you for the suggestion. Shall keep in mind.
a4anurag is offline   (1) Thanks
Old 5th March 2016, 08:45   #10
Distinguished - BHPian
 
condor's Avatar
 
Join Date: Jun 2006
Location: Speed-brkr City
Posts: 16,144
Thanked: 16,577 Times
re: DIY: Cleaning the Intercooler

Anurag, very well written too ! Taking care to put together all the snaps, right from removing the bumper.

One suggestion to any one trying this - when working, cover the opening of the tubing that leads to the turbo so that nothing goes in even accidentally.
condor is online now   (2) Thanks
Old 5th March 2016, 10:49   #11
BHPian
 
Neil Roy's Avatar
 
Join Date: Sep 2009
Location: Chennai
Posts: 465
Thanked: 1,724 Times
Re: DIY: Cleaning the Intercooler

Talk about a meticulous DIY. I just love your commitment not only to complete the DIY, but also log it for Motor lovers like us to be inspired to do the same. How does the engine feel now? Is the engine smoother and has the pickup increased? Waiting for your reply eagerly.
Neil Roy is online now   (2) Thanks
Old 5th March 2016, 10:55   #12
BANNED
 
Join Date: Oct 2011
Location: Hyderabad
Posts: 12,350
Thanked: 21,432 Times

Quote:
Originally Posted by Neil Roy View Post
How does the engine feel now? Is the engine smoother and has the pickup increased?
Thank you. Happy that you liked the DIY.

Pick up not sure but I guess FE has gone up by 0.1 kmpl. Will check the next two full tanks and report.
a4anurag is offline  
Old 5th March 2016, 10:56   #13
BHPian
 
adrian's Avatar
 
Join Date: Sep 2009
Location: Trivandrum
Posts: 942
Thanked: 1,272 Times
Re: DIY: Cleaning the Intercooler

Very well explained DIY with clarity of description in each detail As a matter of fact, it is good enough to be printed out as a manual.
regards Arun
adrian is offline   (1) Thanks
Old 5th March 2016, 14:10   #14
Newbie
 
KiranSwift's Avatar
 
Join Date: Feb 2016
Location: Jamnagar
Posts: 5
Thanked: 9 Times
Re: DIY: Cleaning the Intercooler

Comprehensive DIY steps. inspires me to do the same, but after careful reading and complete understanding of things. best technical one than simple bulb replacement DIYs. took printout for the same. Keep posting more for Swift DDIS.
KiranSwift is offline   (1) Thanks
Old 5th March 2016, 16:56   #15
BANNED
 
Join Date: Dec 2011
Location: Chennai
Posts: 818
Thanked: 1,722 Times
Re: DIY: Cleaning the Intercooler

DO NOT work under a car by placing it on a jack. Always place the car on a jack stand (two ideally in this case). It can be extremely hazardous if the jack slips / gives way (for the car and the individual).

Last edited by VeyronSuperSprt : 5th March 2016 at 16:58.
VeyronSuperSprt is offline   (9) Thanks
Reply

Most Viewed
Thread Tools Search this Thread
Search this Thread:

Advanced Search

Copyright ©2000 - 2024, Team-BHP.com
Proudly powered by E2E Networks