We swapped the stock BCM of the Polo GT with an advanced model last weekend. It was relatively easier than I had thought and pretty much straightforward. As always, I have documented the procedure here. If you plan to retrofit cruise control in your car, you might have to replace the BCM. Read on to find out.
BCM/CECM: 
CECM -
Central
Electronics
Control
Module
BCM -
Body
Control
Module
The terms CECM/BCM are used interchangeably and they essentially mean the same component. The BCM is an electronic control unit that monitors and controls several functions in the car such as the interior and exterior lighting, the central locking and anti-theft system, interfacing with the vehicles instrument cluster, HVAC system, rear-view mirrors, wipers etc. The BCM communicates with the cars other control modules through the CAN bus.
The BCM gets its input from the several sensors and variable resistors mounted onboard the car. For instance, the rain sensor will sense the droplets on the windshield and will close the windows and the sunroof automatically, and will turn on the wipers if the BCM has been programmed to do so. Or if it gets dark, the light sensor will sense the intensity of light falling on it and will turn on the headlamps automatically. Another classic example is speed sensitive door locks - if the speed of the car exceeds 15 kmph, the doors auto-lock. All these functions are controlled by the BCM.
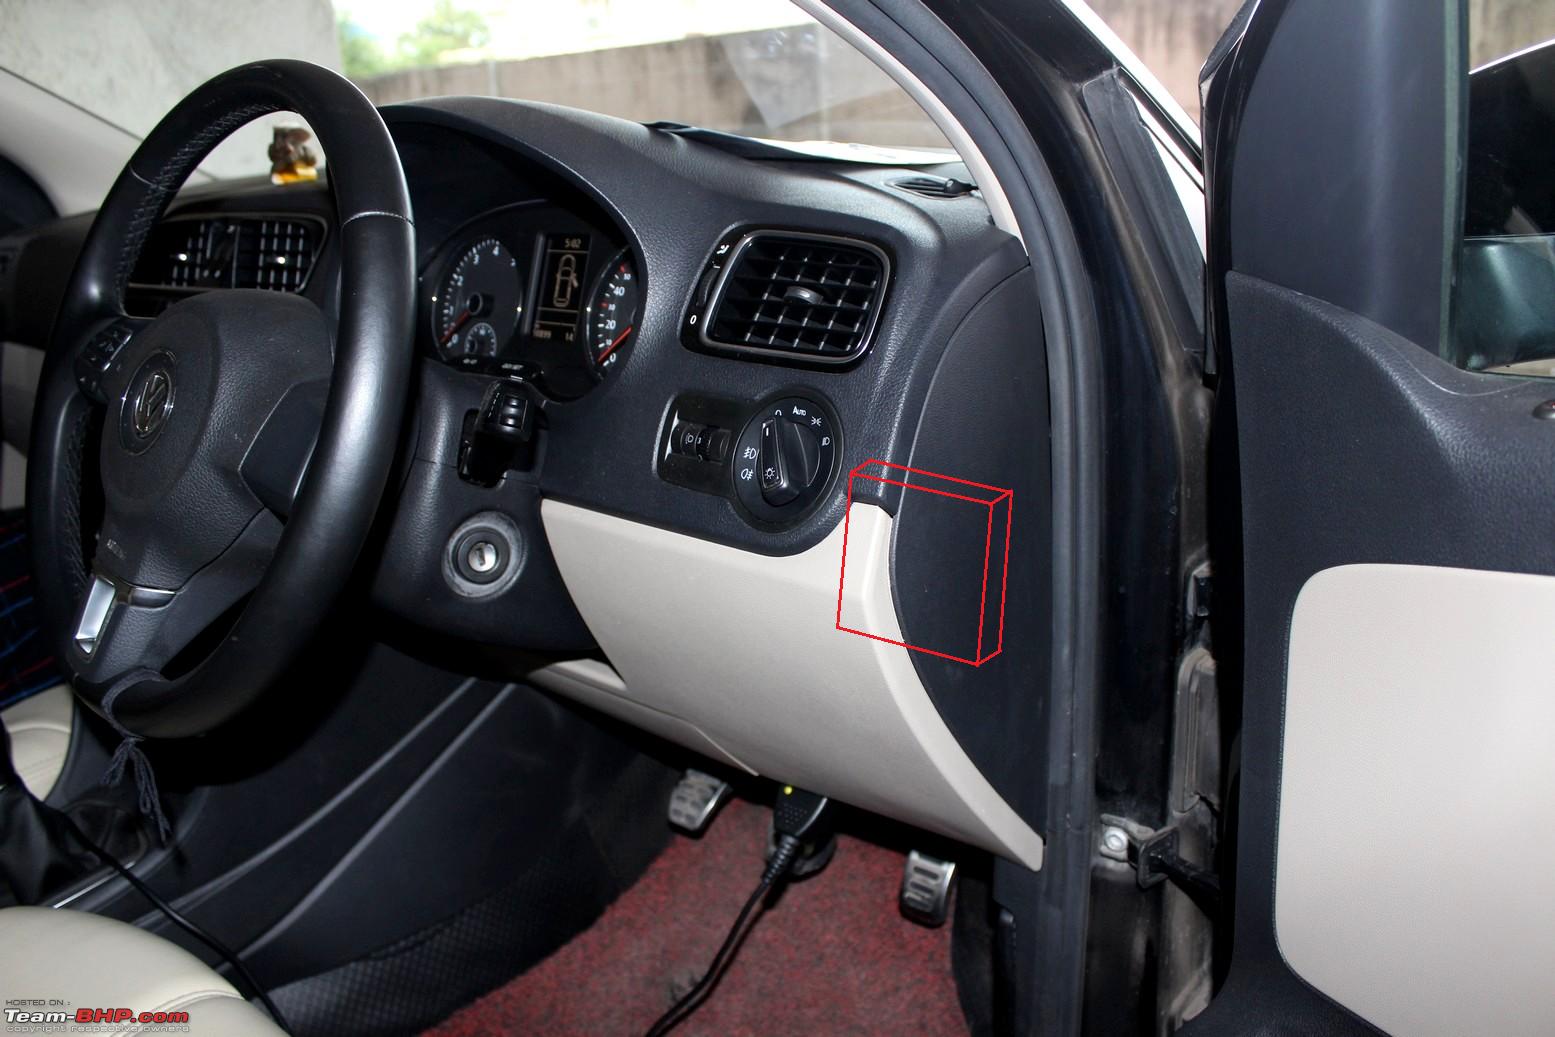
Location of the BCM:
On the VW/Skoda cars, the BCM is located behind the dashboard above the pedals:
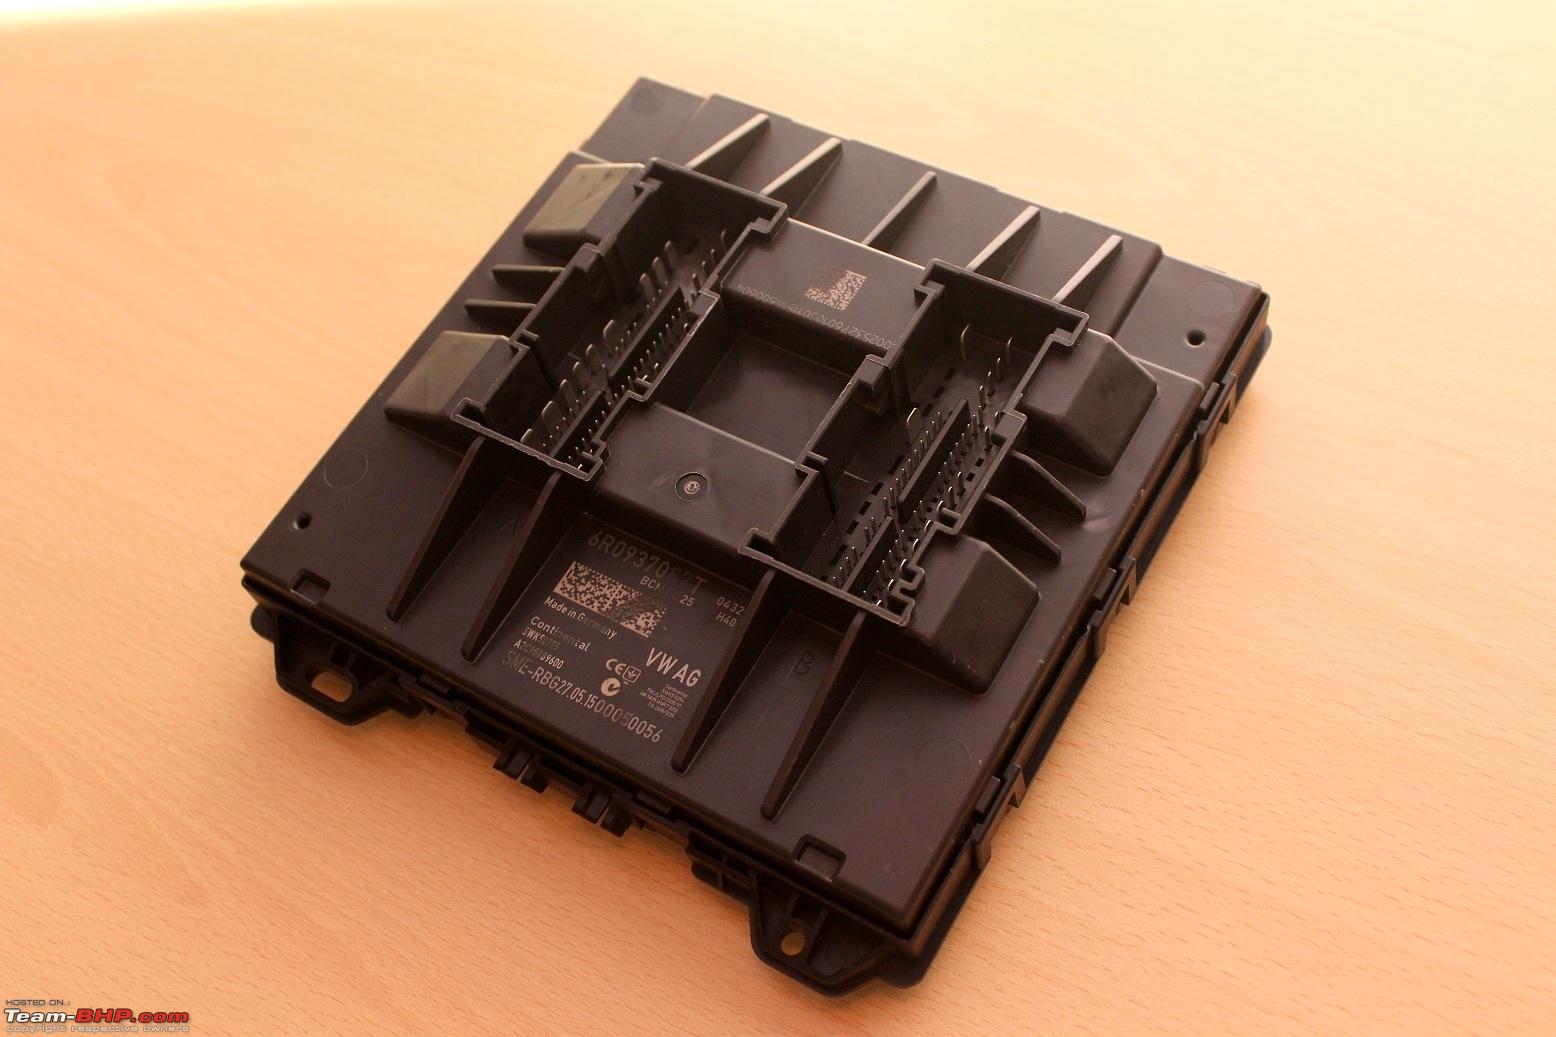
Stock BCM installed in the car:
There are several ways to find out the stock BCM:
a. Physical verification of the unit at the location mentioned above.
OR
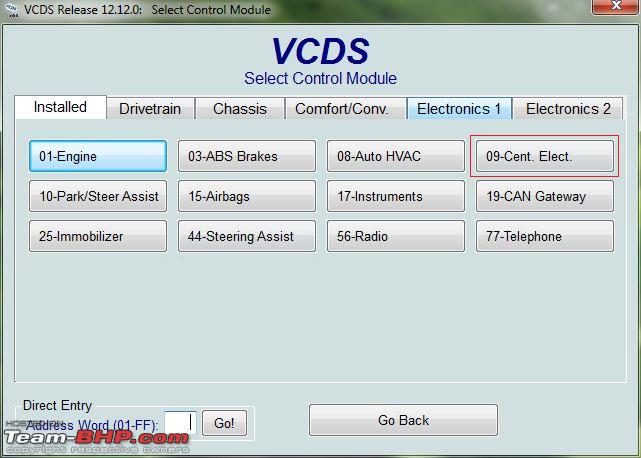
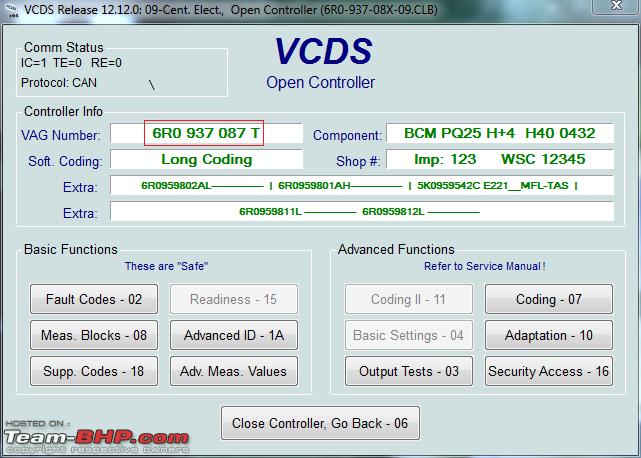
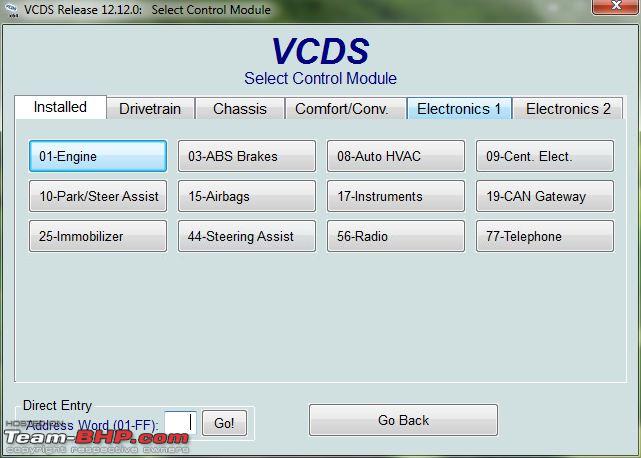
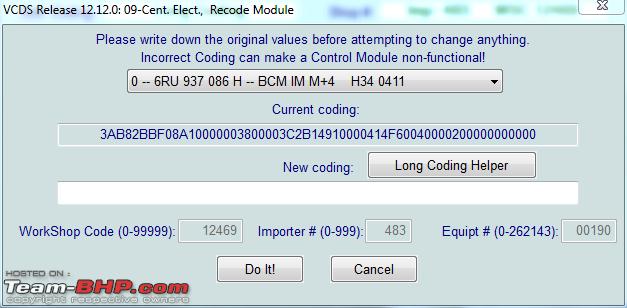
b. Use a VCDS cable and click on the
Central Electronics module:
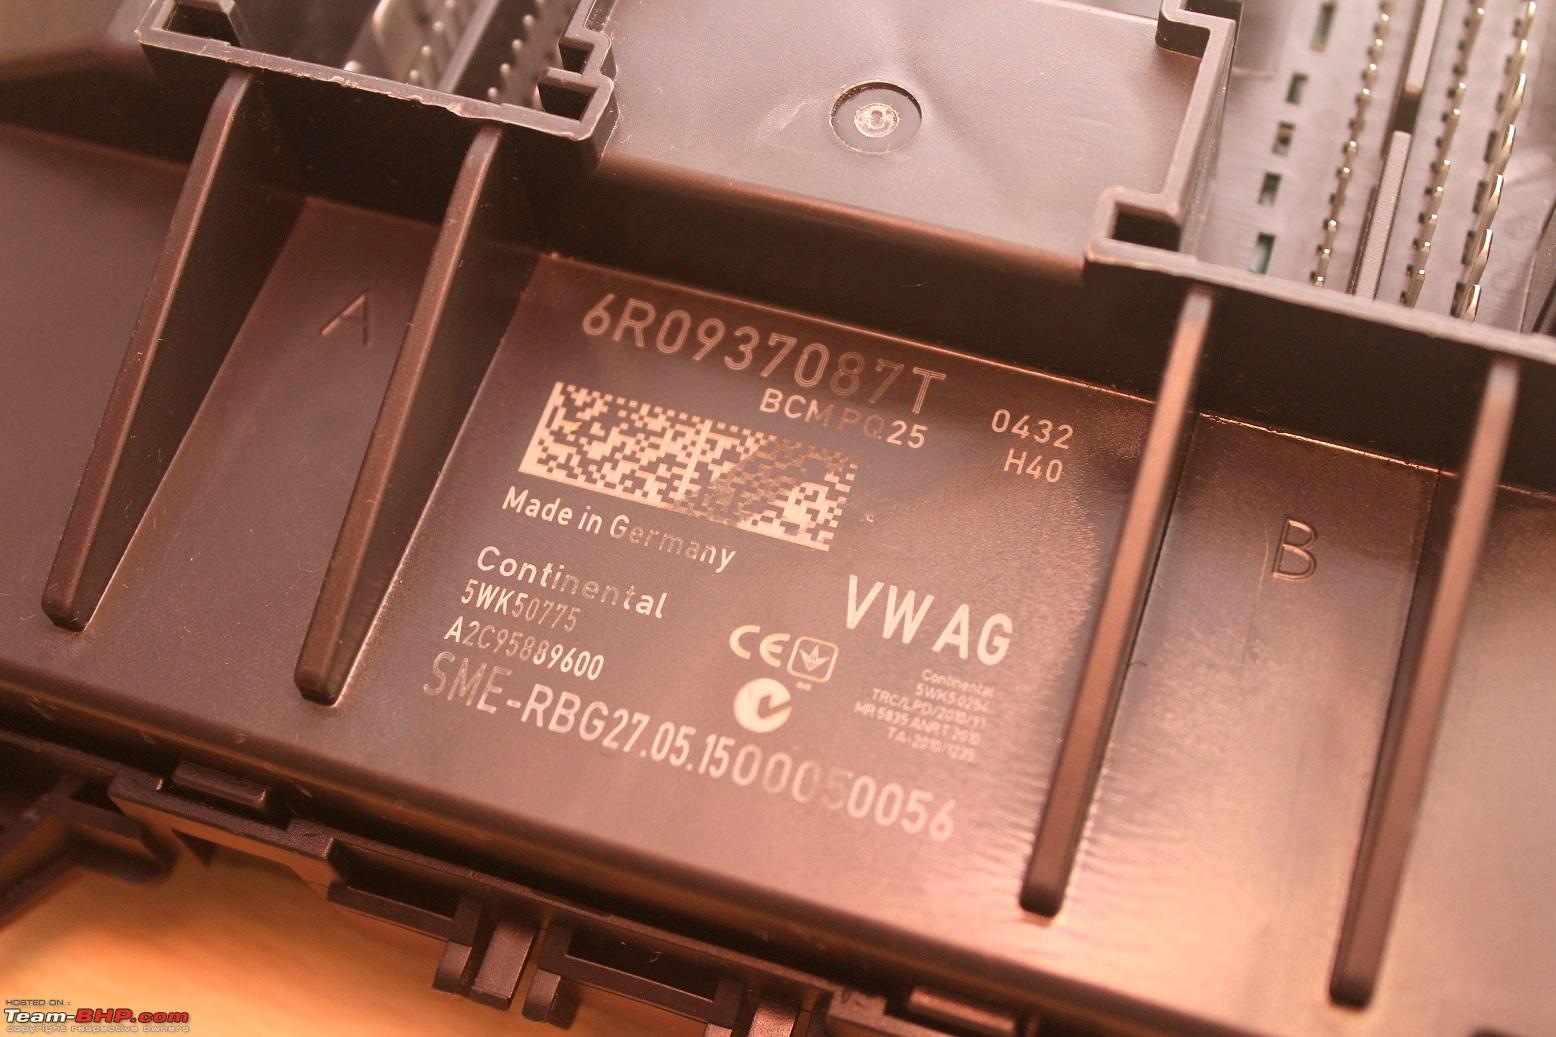
The number highlighted above indicates the BCM part number.
OR
Run an Autoscan using VCDS and the report would mention this:
Quote:
Address 09: Cent. Elect. (J519) Labels: 6R0-937-08x-09.clb
Part No SW: 6R0 937 087 T HW: 6R0 937 087
Component: BCM PQ25 H+4 H40 0432
Revision: BF040001 Serial number: 0775 146150604
Coding: 3AB82BBF08A10000003800003C2B14900000414F6004000020 0000000000
Shop #: WSC 12345 123 12345
VCID: 4E9388B31922FE6E56F-801B
|
Need of upgrading the stock BCM:
There are BCMs which provide a basic set of functions (e.g. central locking, fog lights etc.) and those that have advanced features (e.g. cruise control, static cornering lights, OEM bi-xenon projector lights etc.)
From
Ross Tech's website, for the Polo 6R this is how it is:
- Basis+ Part Numbers: ***-937-084-***
- Medium+ Part Numbers: ***-937-085-***
Supported Features (like Basis+ and additionally): Central Locking, Anti-Theft-System, Outside Mirror Heating, Seat Heating
- Medium++ Part Numbers: ***-937-086-***
Supported Features (like Medium+ and additionally): Remote Control
- High+ Part Numbers: ***-937-087-***
Supported Features (like Medium++ and additionally): Cruise Control System (CCS), Anti-Theft-System LIN-Databus (for Alarm Horn)
- Reku (Recuperation) Part Numbers: ***-937-088-***
Supported Features (like High+ and additionally): Start/Stop System (with Recuperation)
- Licht (Lighting) Part Numbers: ***-937-089-***
Supported Features (like High+ and additionally): Lighting Functions (LED DRL, Bi-Xenon etc.)
- Licht/Reku (Lighting/Recuperation) ## Part Numbers: ***-937-090-***
Supported Features (like High+ and additionally): Lighting Functions (LED DRL, Bi-Xenon etc.), Start/Stop System (with Recuperation)
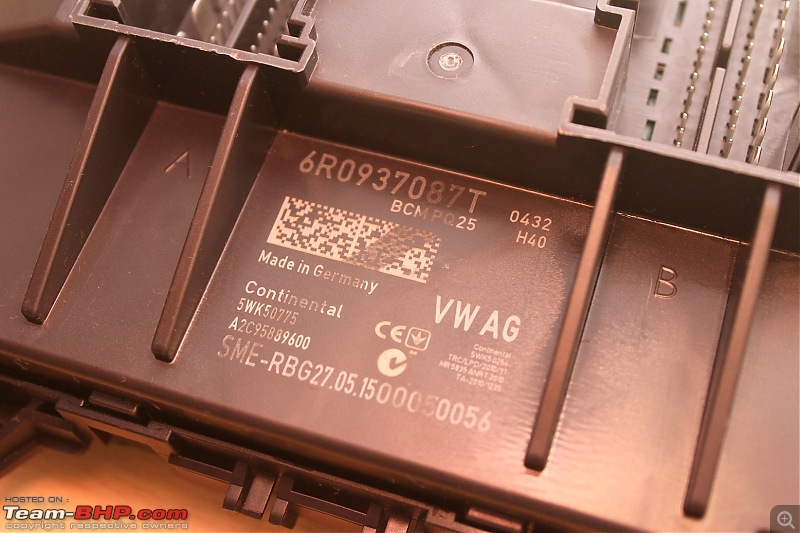
As suggested by Ross Tech, only BCMs ending in
087 and above supports cruise control. Then again, during my research I found one 087 module which does not support cruise control:
 (Image Source: drive2.ru forums)
And whys that? For cruise control support, the 4 pins highlighted above are required.
I am primarily doing this upgrade for 2 reasons:
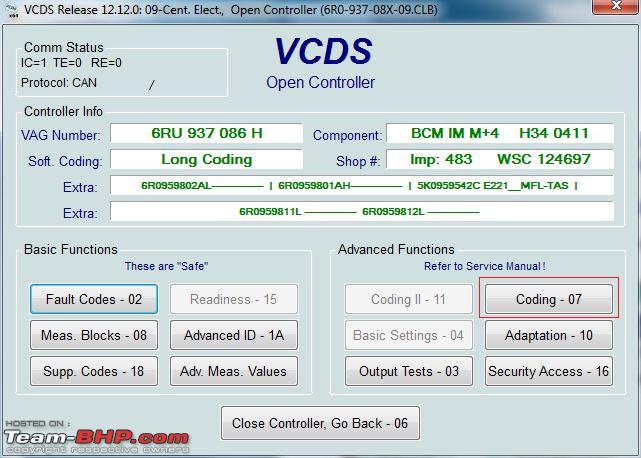
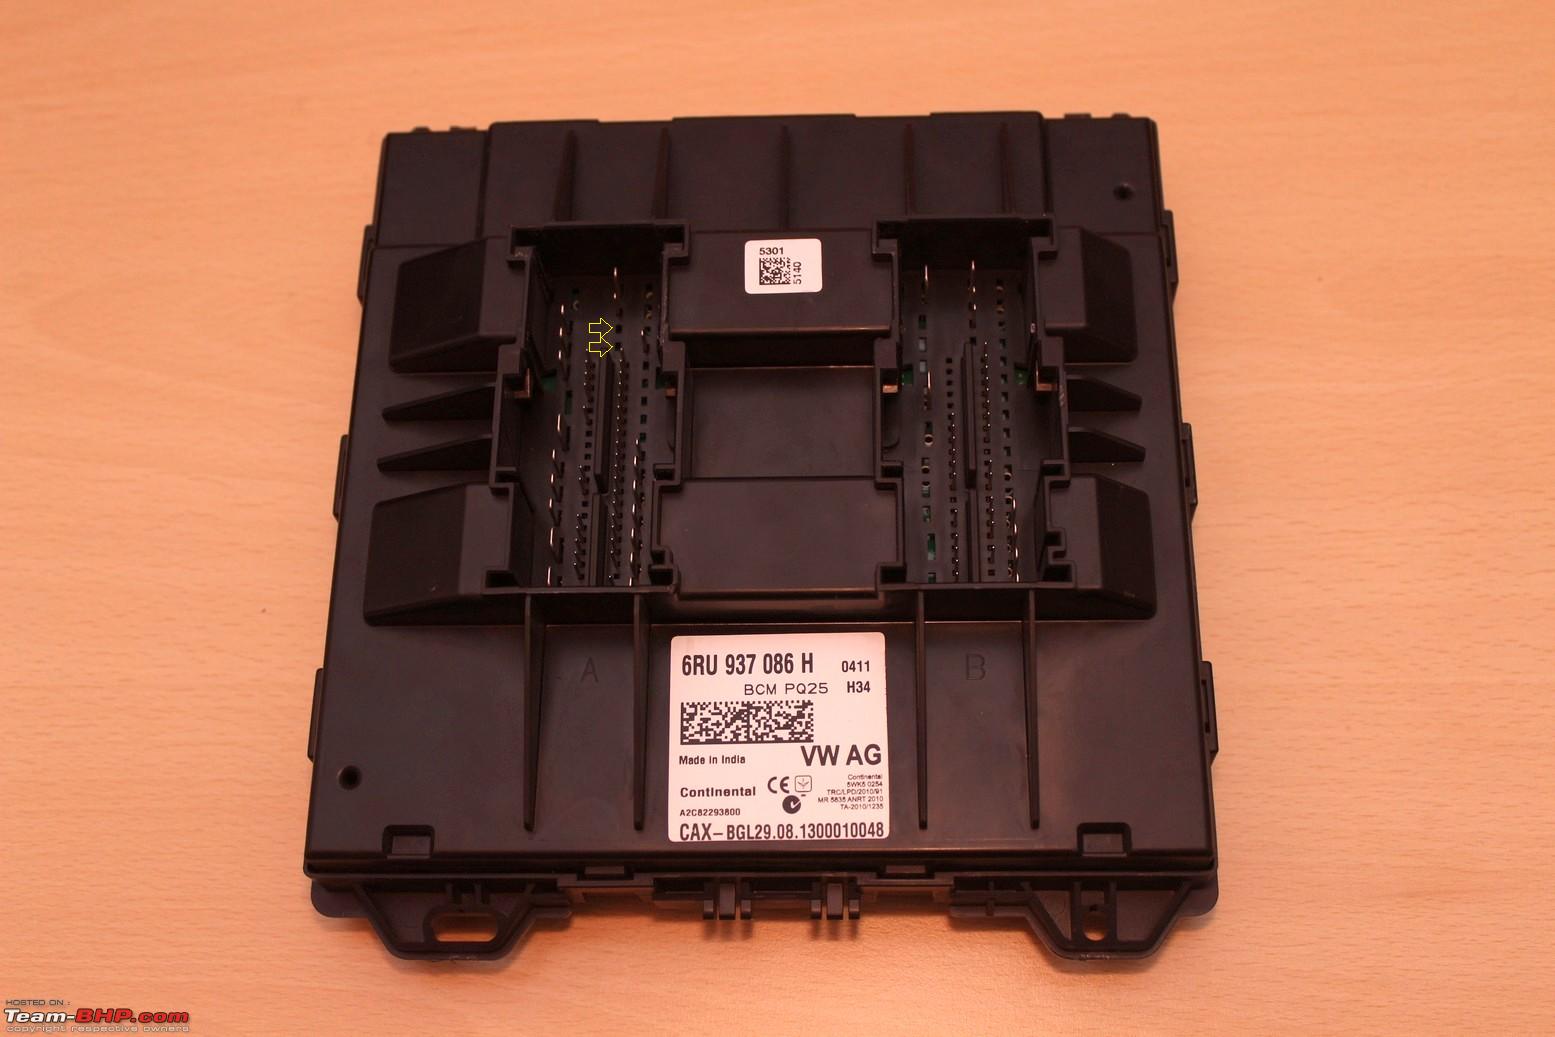
- Cruise control support (the stock BCM is a 086 H model which does not support CC).
- Backlighting for the Mk7 steering wheel buttons (the stock BCM has the older firmware which does not provide backlighting for the newer steerings).
The newer Highline and GT models now roll out with the High+ BCM with the most recent firmwares so these owners need not do this upgrade.
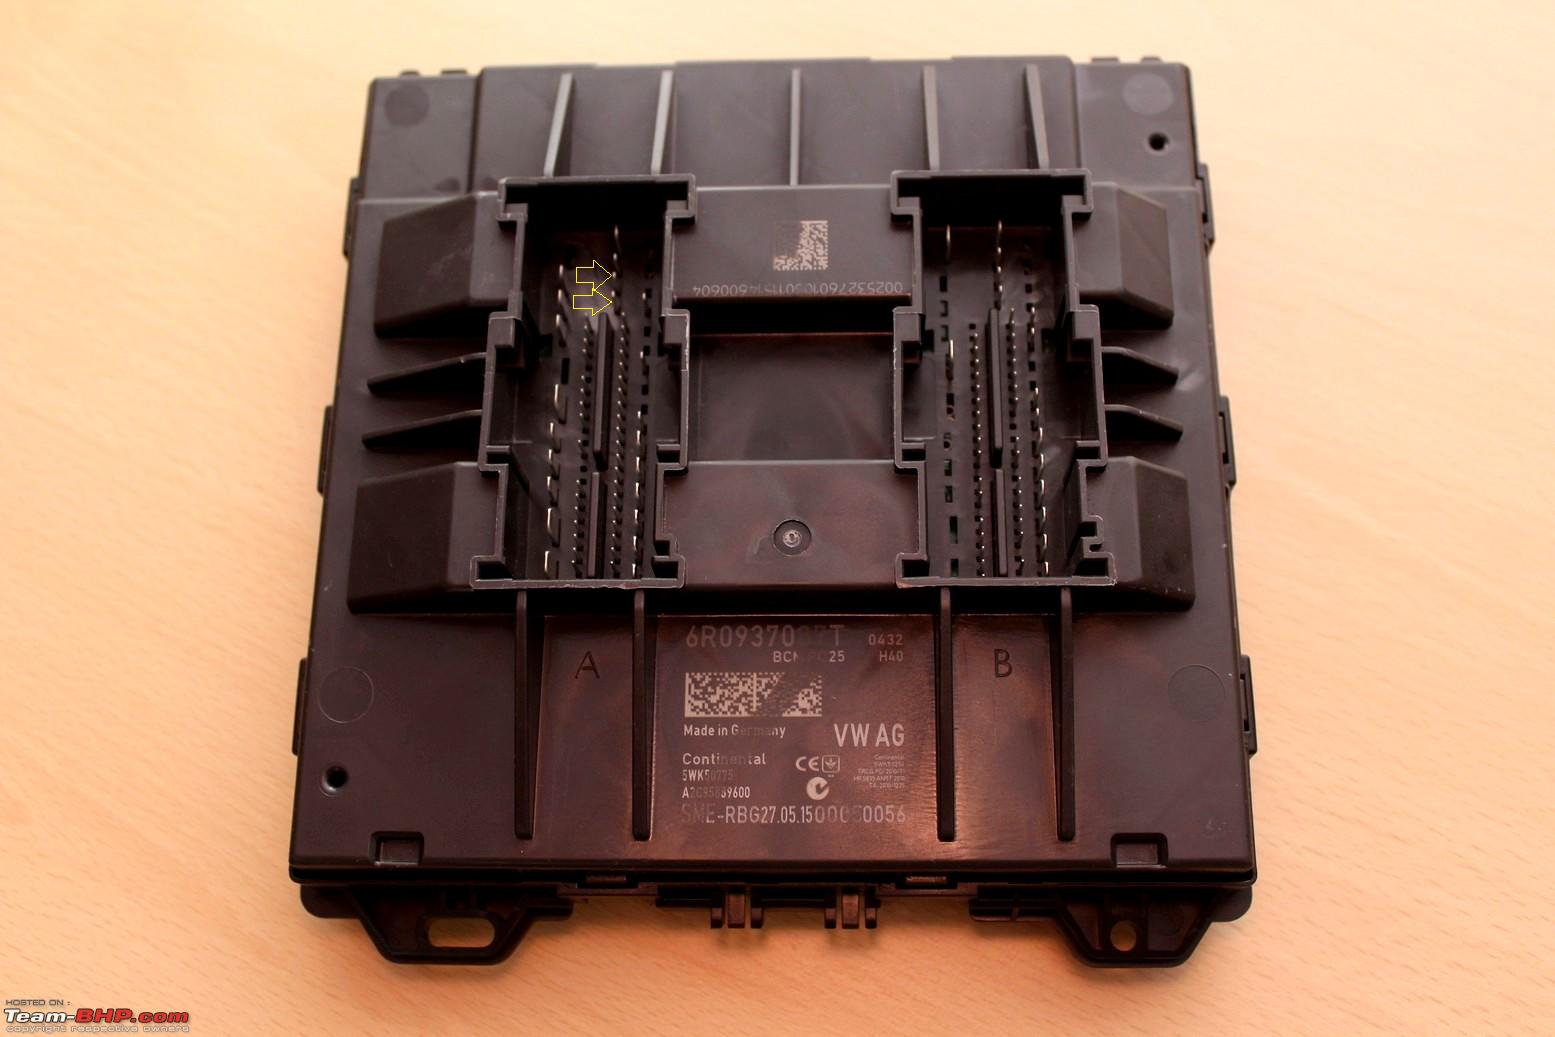
Parts Required: - A highline BCM - 6R0 937 087 _.
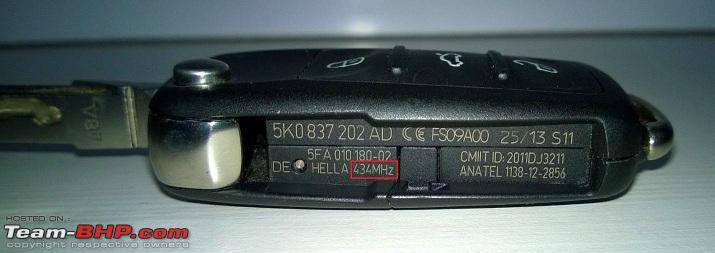
Note the underscore after the part number above - I have intentionally left it blank since the last letter signifies the carrier frequency for the keyfob radio:
- BCMs with 434 MHz radio carrier frequency ends with the letters B, D, F, H, K, M, P, R, T. Pick up one of these if you are looking to upgrade. These BCMs are used in India, EU, South Africa and Russia.
As a matter of fact, refer your keyfob. The radio frequency is indicated:
- BCMs with 315 MHz radio carrier frequency ends with the letters A, C, E, G, J, L, N. These are used in Mexico. Avoid these units!
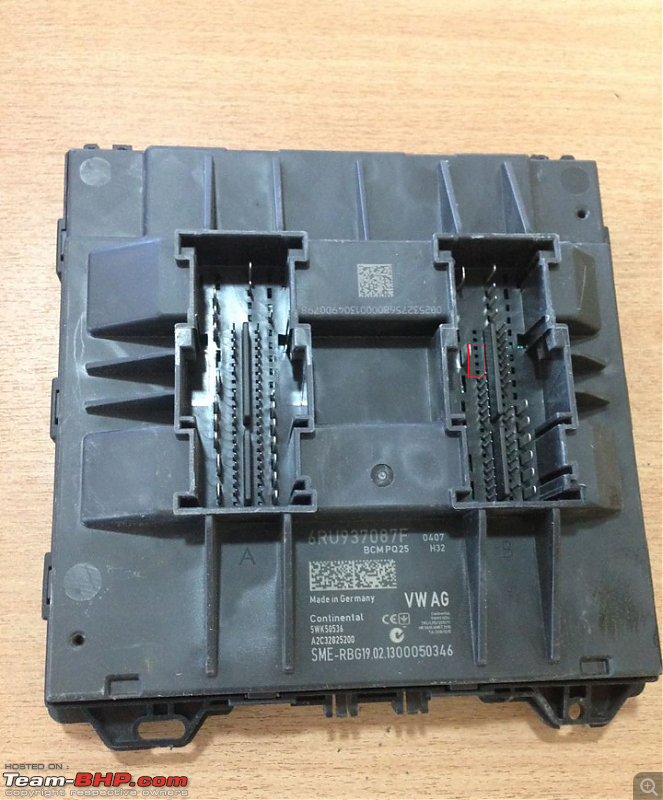
You can also pick up a used BCM as long as it is in working condition. If the BCM is being bought for cruise control support, ensure that the 4 pins are visible on the socket B as indicated in this pic.
Tools Required: - Ring spanner (10-11) - for unscrewing/fastening the nut on the battery.
- VCDS cable and laptop with the latest VCDS version installed - for adapting the new BCM.
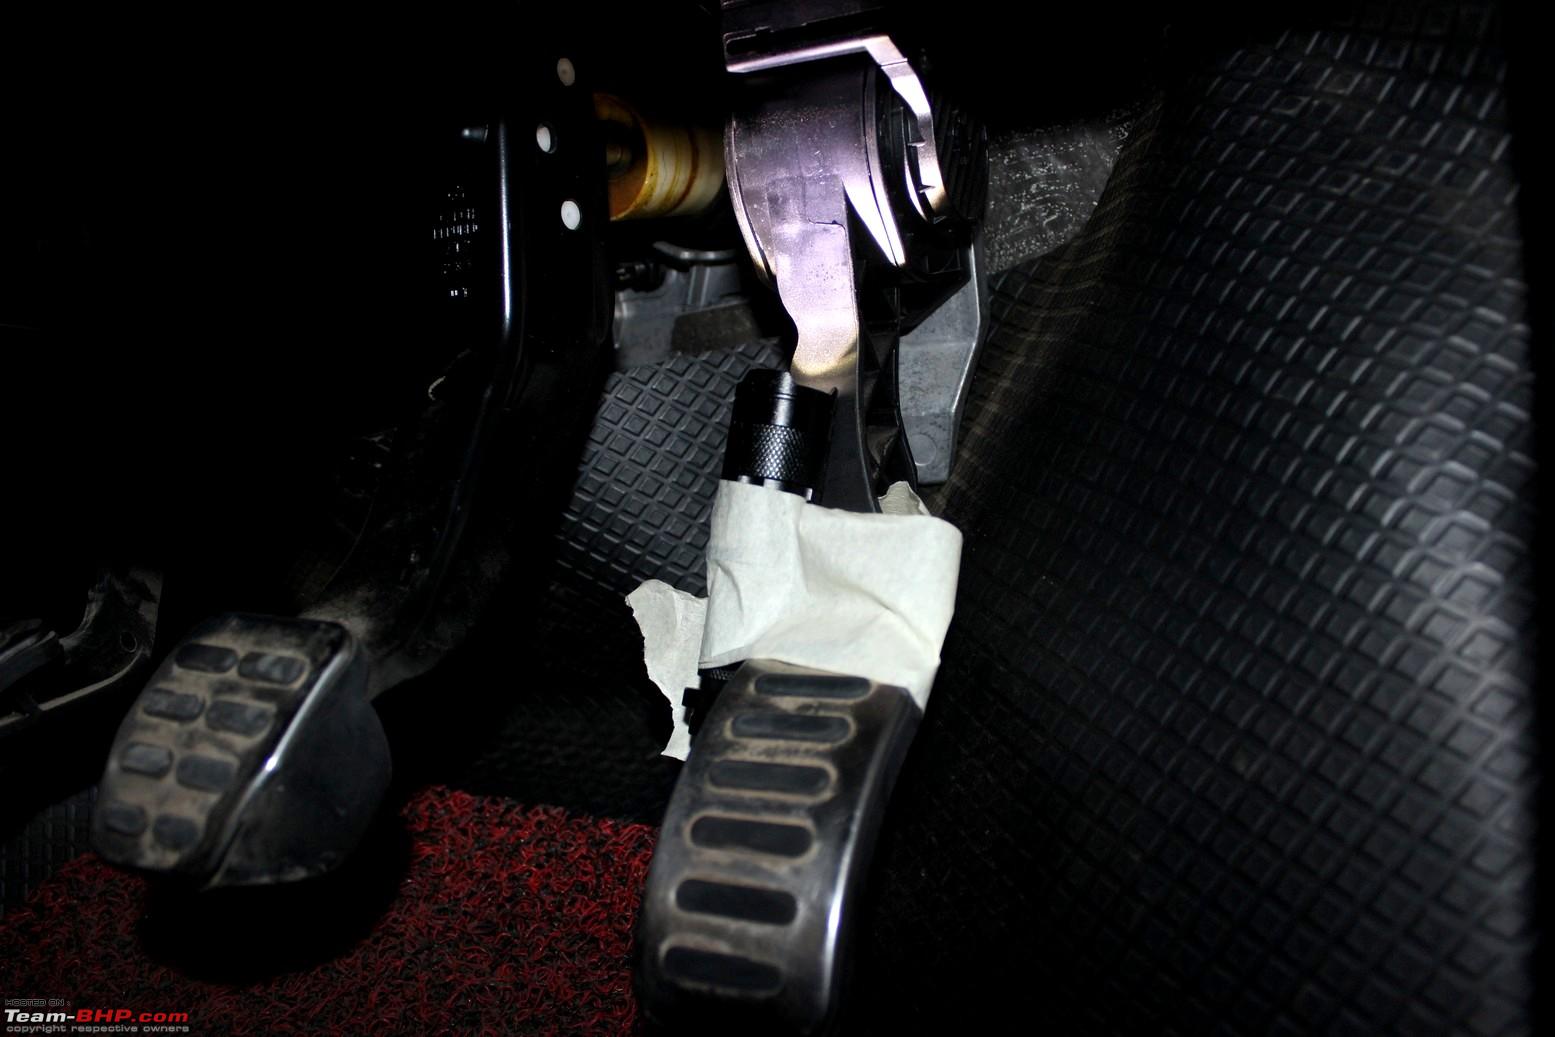
- Torch - to highlight the BCM area. This area is completely dark and based on my experience with using the smartphones LED flash, I suggest getting a torch and taping it to one of the pedals.
Misc. things Required: - Masking tape - to attach the torch to one of the pedals.
- Newspaper - to cover the exposed negative terminal of the battery.
Procedure:
The procedure is pretty straightforward and simple.
- First and the most important step - connect the VCDS cable and copy-paste the long coding from the 09-Central Electronics module > Coding - 07 to a notepad file.
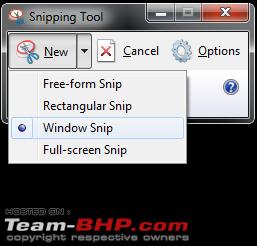
Take screenshots of all the 29 Bytes under the Long Coding Helper.
Use the Snipping Tool and use the New Window Snip option to quickly select the window for which the screenshot has to be taken:
This way, you will know what options were individually enabled and disabled when you adapt the new BCM to the car.
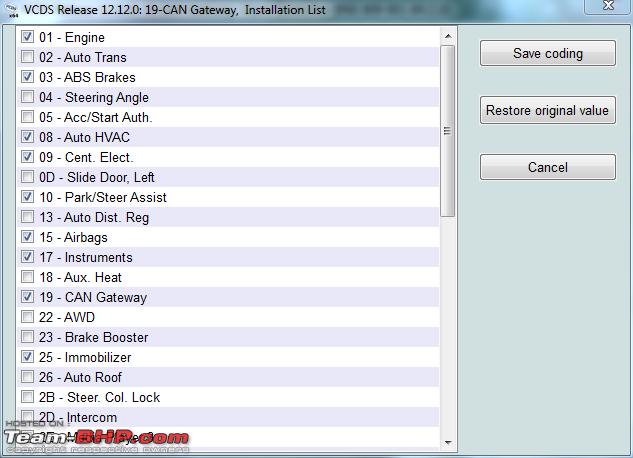
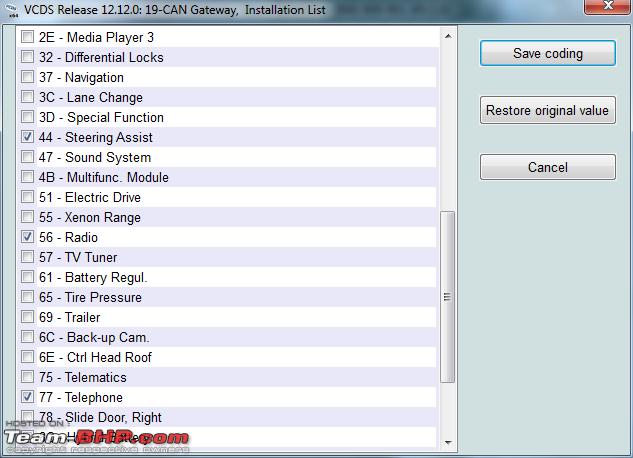
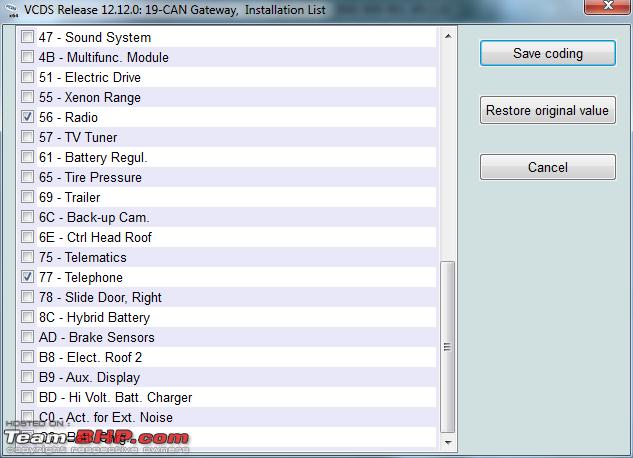
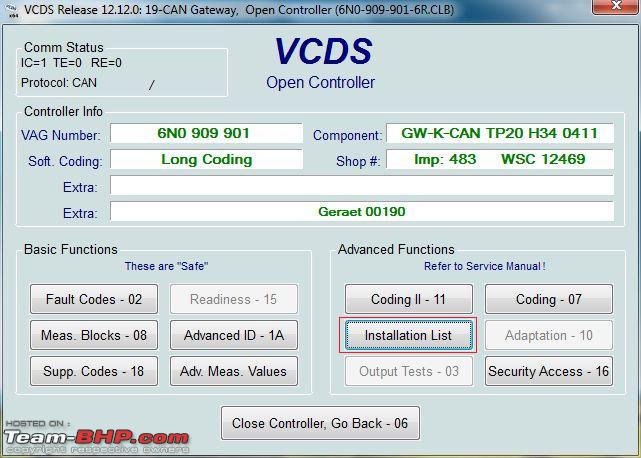
- Next up, go to 19-CAN Gateway module > Coding - 07 and copy-paste the long coding to the notepad file.
Click on Installation List and take the screenshots of the options that are ticked:
Important: These options will vary from car to car! Please do not take this as a reference for your car!
These have to be transferred to the new BCM after doing the physical swap.
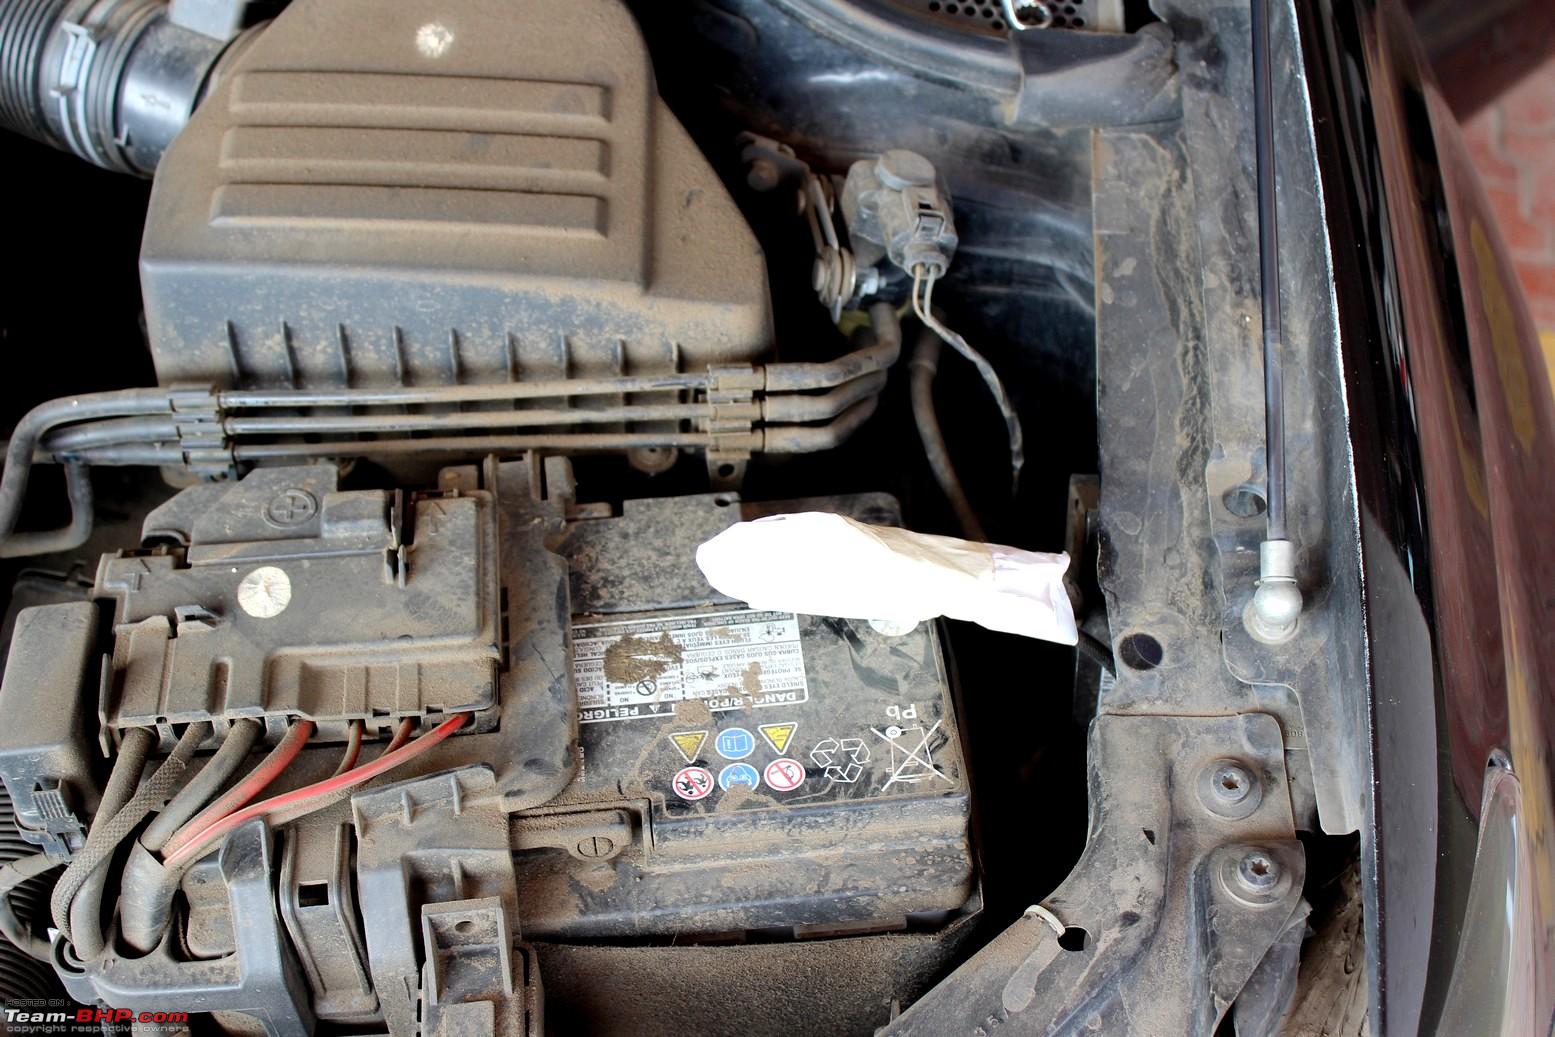
- Pop up the hood and use the ring spanners 10-end to unscrew the negative terminal of the battery. Use a plastic cover or newspaper to temporarily insulate the exposed terminal so it doesnt touch the body of the car:
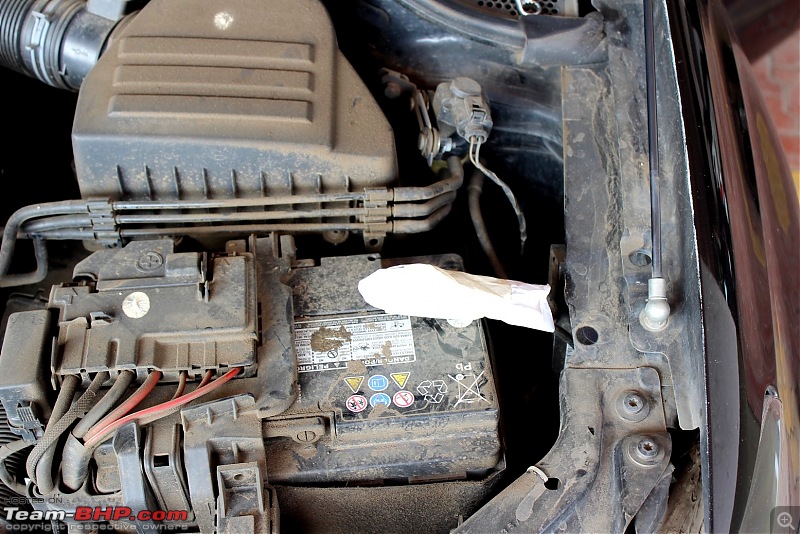 (With 100 km of daily driving, not much can be done to the cleanliness of the engine bay!)
Wait for a while and press the horn pad or use the stalks to remove any residual charge just to be on the safer side.
- Take out the driver side floor mat and move the seat to the AFT as much as possible to make room in the footwell. Attach a torch to the pedal to highlight the area above:
I didn't do this step and used the smartphone's LED flash. It was a pain as I had to use both the hands at one point.
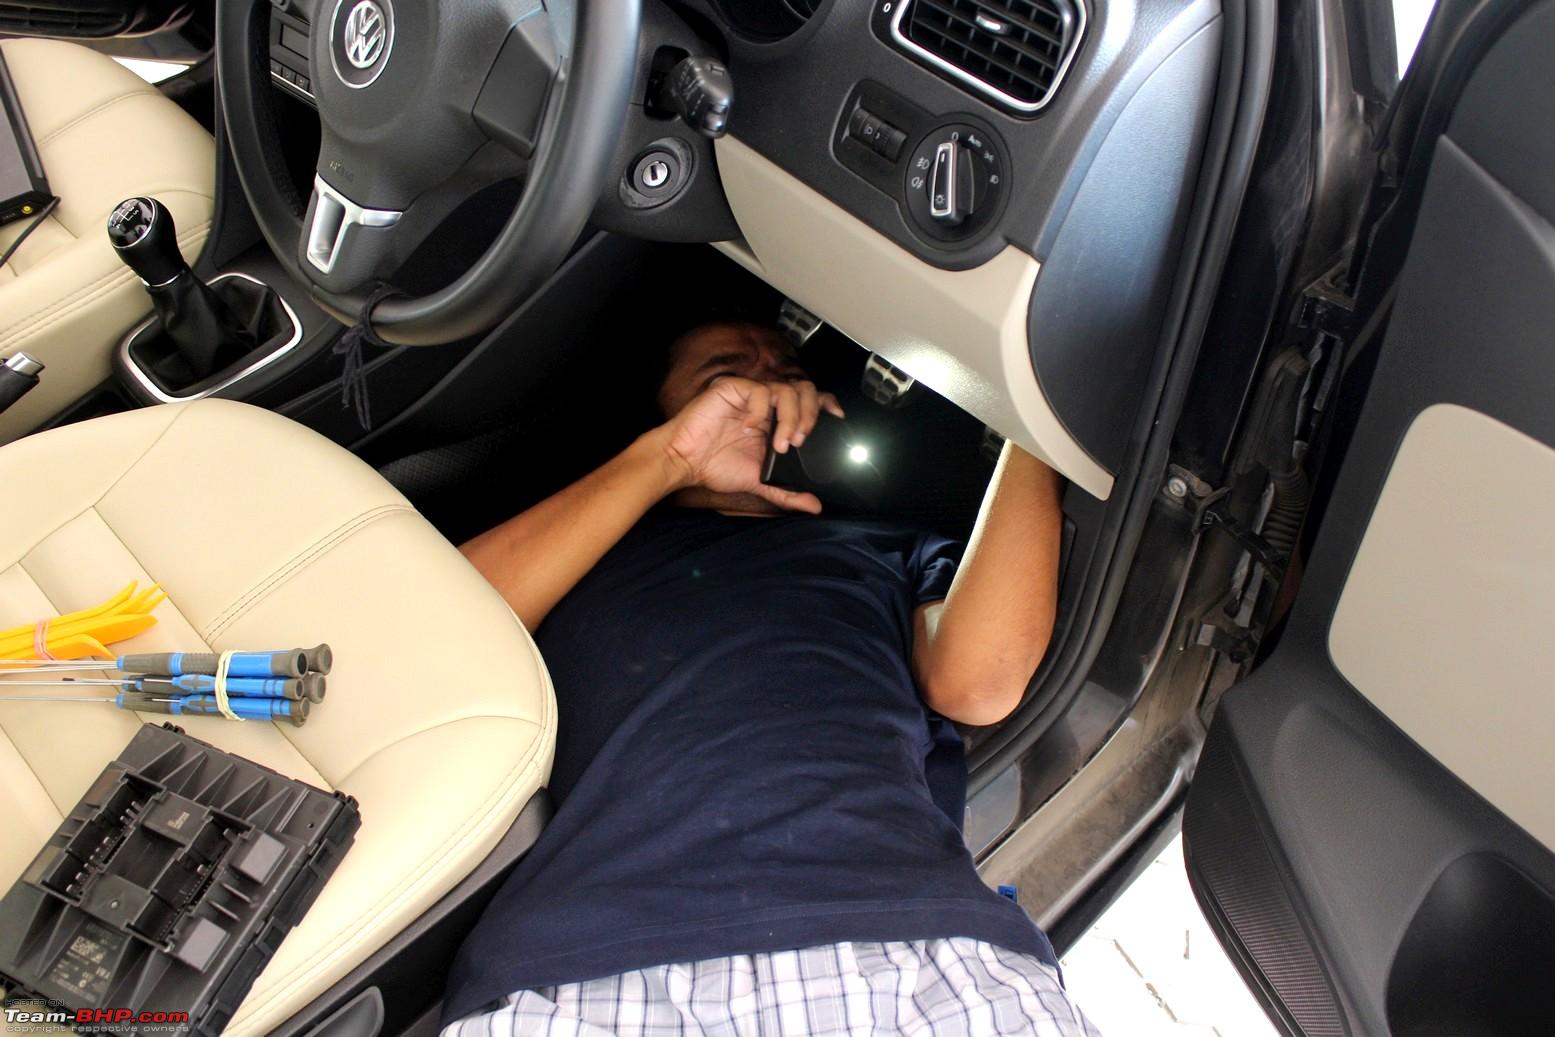
- While keeping the head near the pedals, flex the body in such a way you are able to see the BCM above:
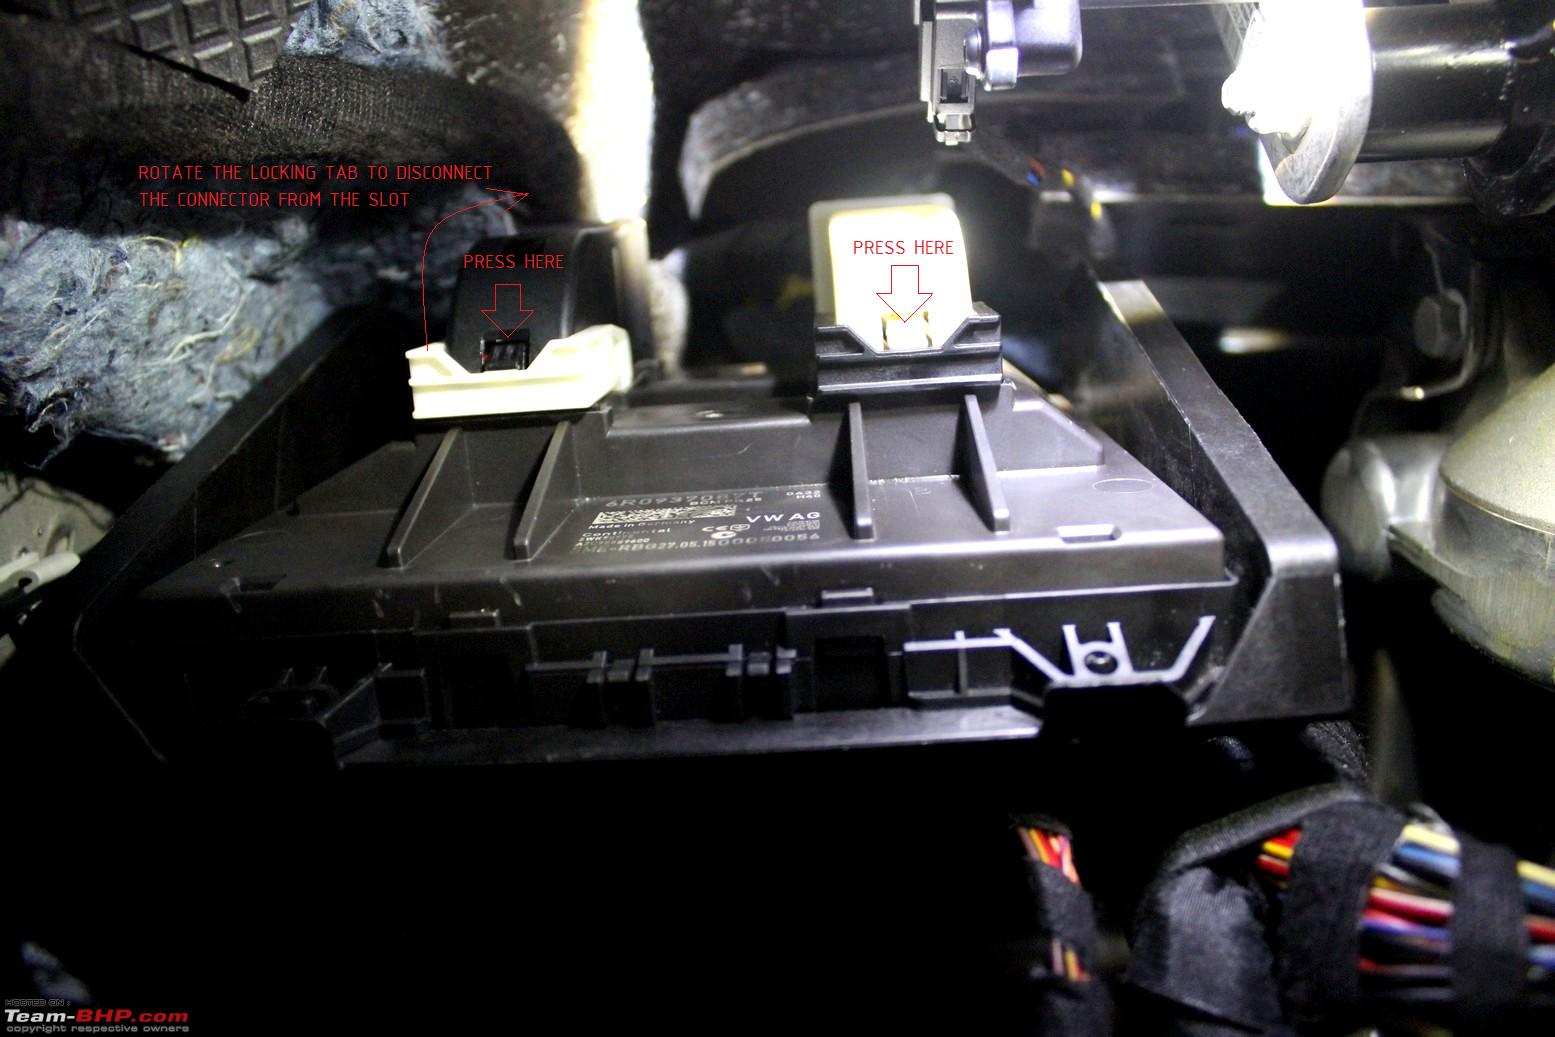
- Remove the 2 73-pin connectors plugged to the BCM - press on the tab so the lock comes out and rotate the locking tab so it unplugs itself from the slot.
There is no need to physically pull the plug out of the slot.
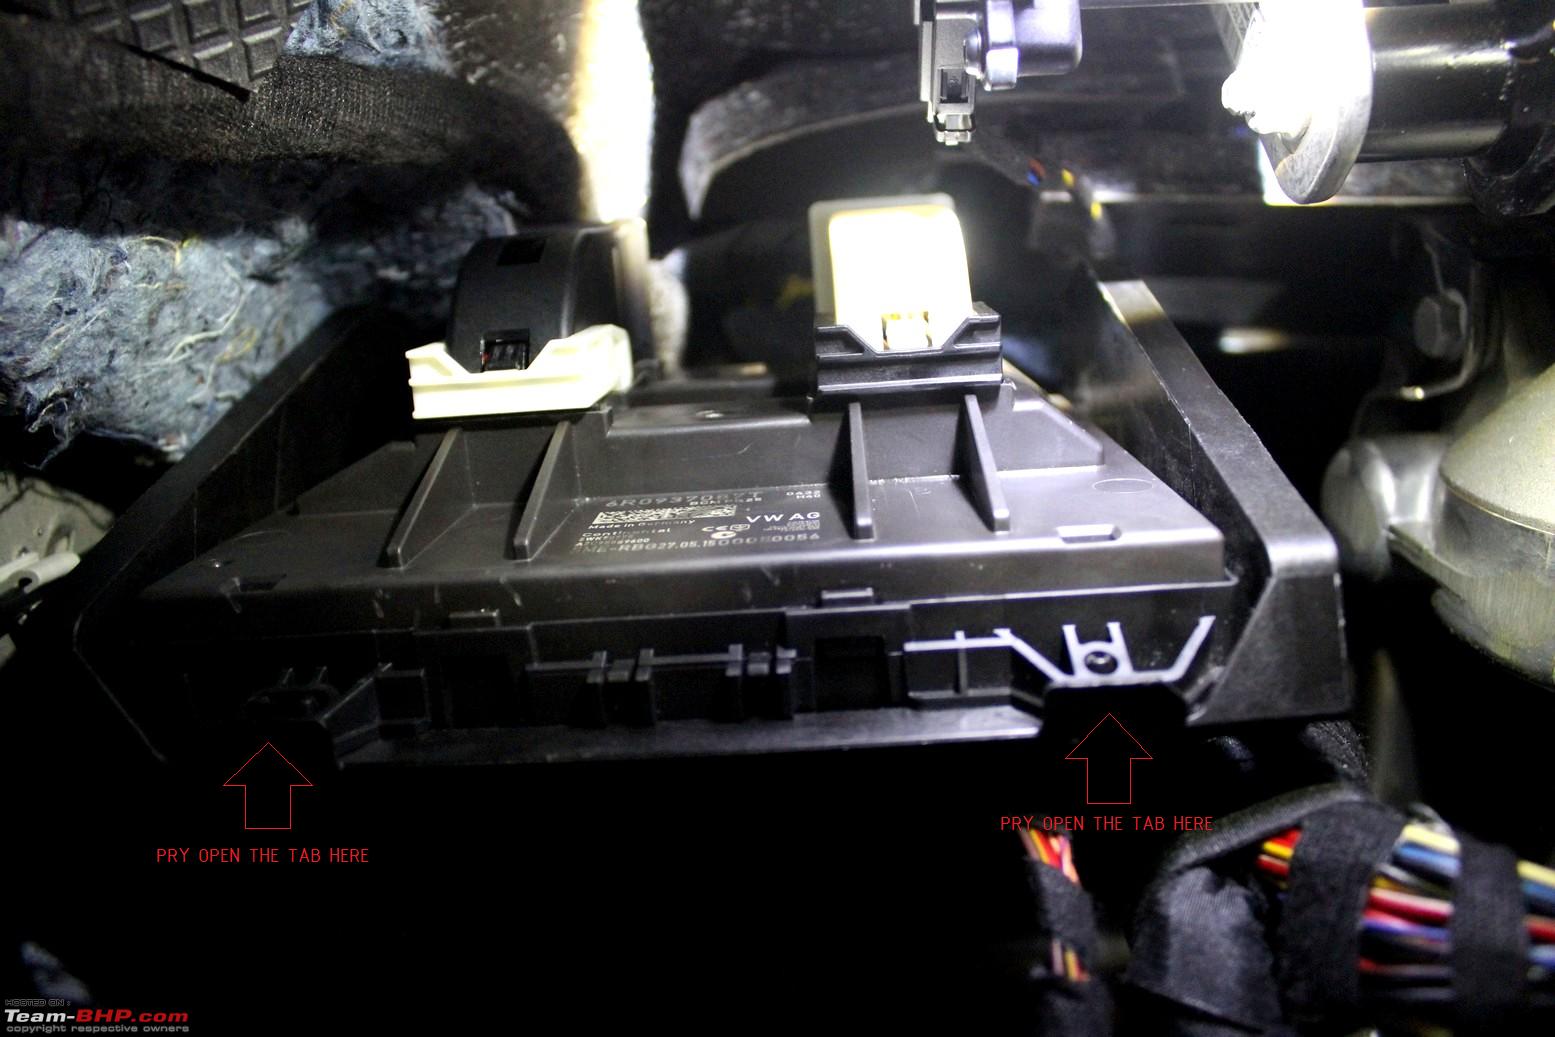
- Remove the BCM off the slot - pry open the 2 locks at the bottom of the BCM on either side as shown below:
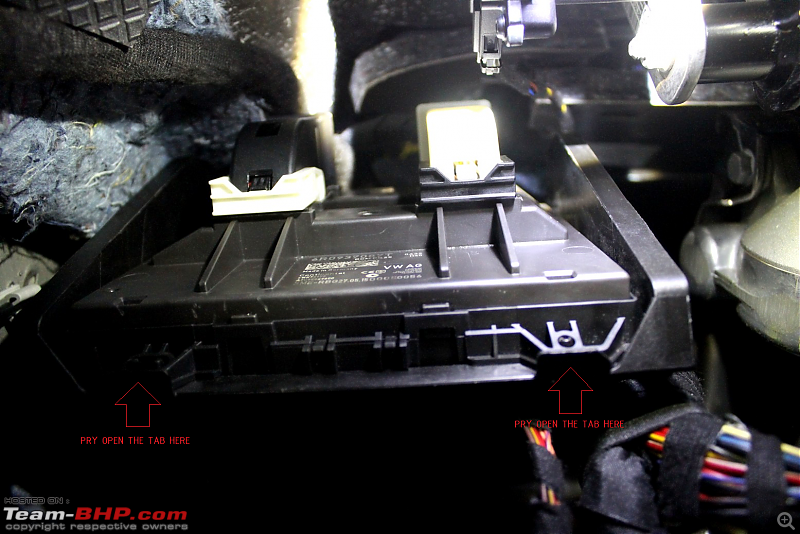 (Apologies for using the same pic twice!)
This might take a while but please be careful when you are doing this and dont break your nails. I almost did:
- Once the BCM is out, insert the new BCM in the slot and replug the 2 connectors. Reconnect the negative terminal of the battery.
- Plug the VCDS cable to the laptop and start the program. Do the below steps in the order they are specified:
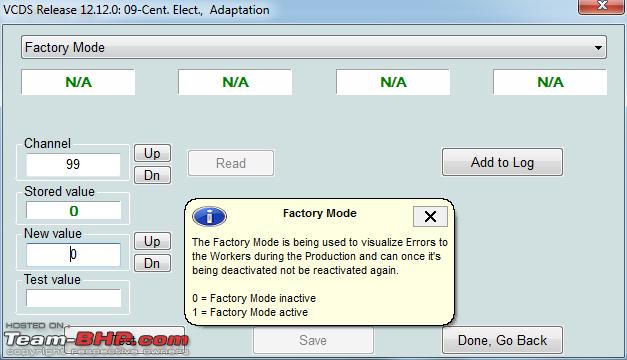
- Disable the factory mode of the BCM - if the BCM is new, it is probably shipped in the factory mode (mine was). To disable it, go to 09-Central Electronics module > Adaptation - 10. In the drop down menu, there will be an option - Factory Mode. If the Stored Value indicates 1, enter the New value as 0, click on Test, Save and Done, Go Back. If the Stored Value indicates 0, proceed to the next step.
- Go to 19-CAN Gateway module > Coding - 07 and copy-paste the long coding from the notepad file in the blank New coding field.
Click on Installation List, refer to the screenshots that were taken and select only those options that were selected in the Installation List from the previous BCMs CAN Gateway. Unselect those that were not selected in the stock BCM.
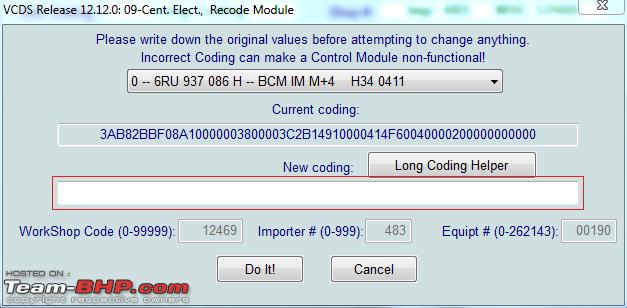
- Go to 09-Central Electronics module > Coding - 07 and copy-paste the long coding from the notepad file in the blank New coding field below.
Click on Do It! and it will pop up a window indicating Coding Accepted. Click on OK. The new BCM has now been configured as per the stock BCM.
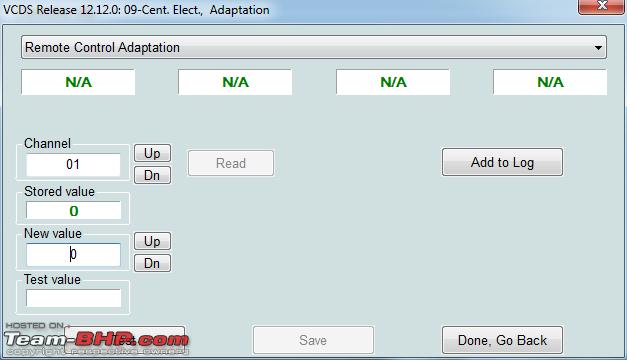
- Lastly, the most important step - adapting the keyfob(s). A new BCM requires the keyfob to be registered with it. Go to 09-Central Electronics module > Adaptation - 10. Select Remote Control Adaptation.
Under channel "01", the Stored value field would read as 0 by default. In the New value field, enter 1 (if your car has one keyfob, 2 if there are two keyfobs), press Test and then press the unlock button on the keyfob(s). You have 15 seconds to complete this step. If the keyfob has been registered, you will get an acknowledgement as the indicators flash. If it did not work, repeat the steps and it would. We got this in one shot.
Once the keyfob is adapted with the new BCM, check the locking/unlocking of the car.
- Do an Autoscan under VCDS and clear the errors.
Result:
I was able to successfully swap the BCM on my car this way. The Autoscan threw an error for the front parking lights as indicated below:
Quote:
Address 09: Cent. Elect. (J519) Labels: 6R0-937-08x-09.clb
Part No SW: 6R0 937 087 T HW: 6R0 937 087
Component: BCM PQ25 H+4 H40 0432
Revision: BF040001 Serial number: 0775 146150604
Coding: 3AB82BBF08A10000003800003C2B14900000414F6004000020 0000000000
Shop #: WSC 12345 123 12345
VCID: 4E9388B31922FE6E56F-801B
Subsystem 1 - Part No SW: 6R0 959 802 AL HW: 6R0 959 802 AL Labels: 6R0-959-802.CLB
Component: ------------- 006 5550
Coding: 010000
Subsystem 2 - Part No SW: 6R0 959 801 AH HW: 6R0 959 801 AH Labels: 6R0-959-801.CLB
Component: ------------- 006 5550
Coding: 010000
Subsystem 3 - Part No SW: 5K0 959 542 C HW: 5K0 959 542 C
Component: E221__MFL-TAS H31 0037
Coding: 020000
Subsystem 4 - Part No SW: 6R0 959 811 L HW: 6R0 959 811 L
Component: ------------- 006 5550
Coding: 020000
Subsystem 5 - Part No SW: 6R0 959 812 L HW: 6R0 959 812 L
Component: ------------- 006 5550
Coding: 020000
2 Faults Found:
03431 - Activation of Left Parking Light
011 - Open Circuit
Freeze Frame:
Fault Status: 01101011
Fault Priority: 2
Fault Frequency: 1
Reset counter: 0
Mileage: 50885 km
Time Indication: 0
Date: 2014.14.11
Time: 00:26:30
03432 - Activation of Right Parking Light
011 - Open Circuit
Freeze Frame:
Fault Status: 01101011
Fault Priority: 2
Fault Frequency: 1
Reset counter: 0
Mileage: 50885 km
Time Indication: 0
Date: 2014.14.11
Time: 00:26:30
|
Reason? The old BCM did not have the corresponding 2 pins whereas the newer one has these pins:
Stock BCM: 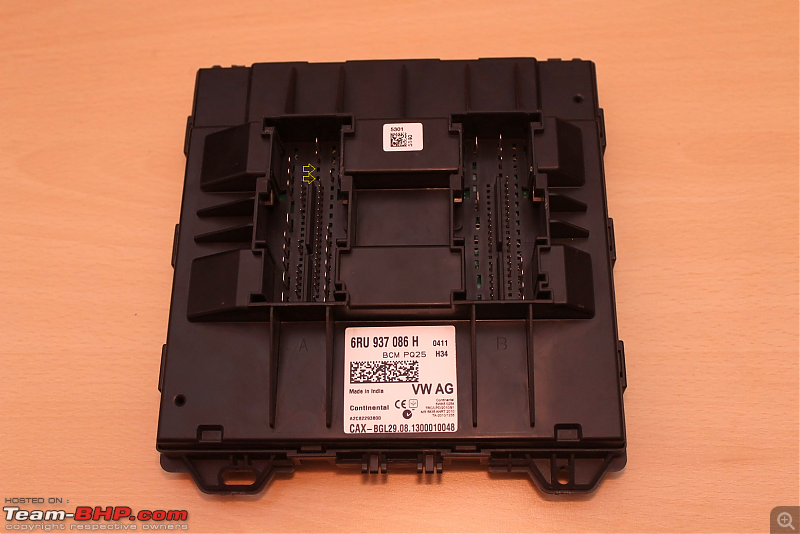 New BCM:
And these pins are designated as:
T73A 40 - Output signal on lamps, front right position lamp
T73A 41 - Output signal on lamps, front left position lamp
I tried removing the errors by disabling individual bits under VCDS but the errors wouldnt go. Theres a workaround available which I shall be sharing here once I get it done. But this isnt a deal breaker as it does not hamper the cars day-to-day usage.
Shopping Experience:
The search for a new BCM was on since the last year and I had been hunting various online sources. Luckily, I found this unit from a dealer based in Russia and it was listed on eBay Germany (dealer ID:
car_electronics, name: Konstantin Lunev). Contacted the seller and he was
extremely helpful with my queries. After the deal was finalized, I made the payment of 155 Euros over PayPal directly and he promptly shipped it on the day he had promised to, packing it in a compact box with plenty of bubble wraps. It was delivered in less than 14 days, zero customs duties charged (thank you India Post!).
Tracking details from
www.trackingmore.com:
Next up, the cruise control installation and the steering wheel upgrade!


 26th October 2015, 15:03


 (55)
Thanks
(55)
Thanks