Team-BHP
(
https://www.team-bhp.com/forum/)
Time taken:
30-60 minutes
DIY experience level:
Beginner Introduction and Benefits of Hard-Wiring Dashcams are gaining popularity in India, particularly among Team BHP members, as can be seen by the interest in the dashcam thread (link). This thread covers how to hard-wire your dashcam to your car's fuse box. I've used this approach to hard-wire dashcams to both my Ford EcoSport (Garmin Dash Cam 20) and my Hyundai Getz (Transcend DrivePro 100).
All dashcams that I've seen come with a mini-USB input, which is a slightly larger port than the micro-USB input that we're used to seeing on mobile phones. The dashcam kit therefore comes with a 12V cigarette lighter plug to power the dashcam from the car's 12V socket. Firstly, we look at the challenges of the 12V socket, which are usually resolved by hard-wiring.
Challenges of using a 12V socket- The 12V socket is usually easily accessible, and can therefore be easily unplugged
- Some cars do not power off the 12V socket when the ignition is turned off (e.g. Ford EcoSport) while others turn off the 12V socket. If the socket does not power off, it means the dashcam will be running continuously even when the car is parked. This might be preferable for those of you who wish to also use your dashcam as a parking camera, but even then you run the risk of slowly draining your car battery over time, particularly in a car that is not your daily drive. Parking camera mode might also be better served by using motion-triggered recording and the built-in battery.
- Some cars are limited to a single 12V socket, so dedicating it to a dashcam is not preferable
- Some owners dislike using 12V extension sockets (i.e. convert a single 12V socket into more than one, see this for an example) since they are either of dubious quality, or end up adding to the clutter in the car, and run a risk of being knocked out.
Benefits of Hardwiring- Hard-wiring addresses the above challenges
- Hard-wiring your dashcam makes it works transparently like any other accessory in your car - it turns on and off with the ignition, so you don't have to worry about plugging in the charger, or turning the dashcam on, or any such stuff
- It does NOT entail any cutting or alteration of a vehicle's existing electrical wiring, hence electrical warranty should be unaffected (hard-wiring just piggybacks on the electricals)
- It can be quickly and easily reversed at the time of sale
Alternatives to Hard-Wiring- We mostly use the 12V socket to charge devices, so buying a dual-USB plug means we can use one USB port for a USB to mini-USB cable (to the dashcam), and the other for a USB to mini-USB cable for electronics like mobile phones.
- Some cars have multiple 12V sockets, so you can dedicate one to a dashcam power supply. For example, even a Hyundai i10 has two 12V sockets in the front!
- Under the section about the hard-wire kit (which comes below), I've listed different choices you have. While all of these are variants of hard-wiring, they give you a choice of flexibility and cost.
With that introduction out of the way, let's get on with the details. This DIY guide is split into two parts:
- The first part covers the concepts and equipment used
- The second part covers the actual process of hard-wiring
High-Level SchematicHere's a high-level view of how the hard-wiring process will work, with a description of each item.
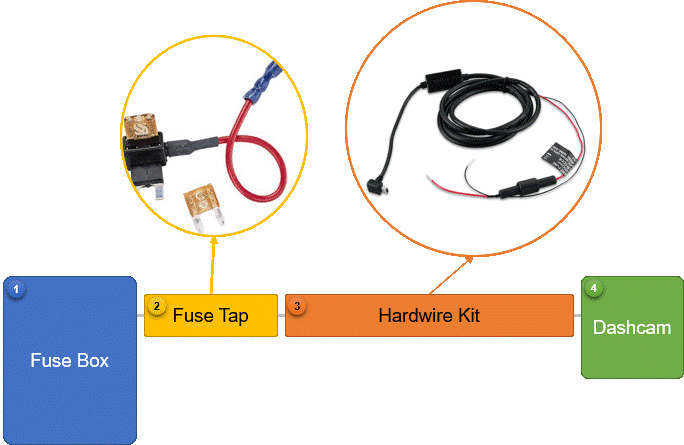
The key elements are:
- The fuse box - present in the car, you tap power from this
- The fuse tap - allows you to tap power from the fuse box without any messy cutting of wires
- The hard-wire kit - converts the 12V of your car's electrical system to the 5V required for USB. Good ones have an inline fuse
- The dashcam - the raison d'être for all this work!
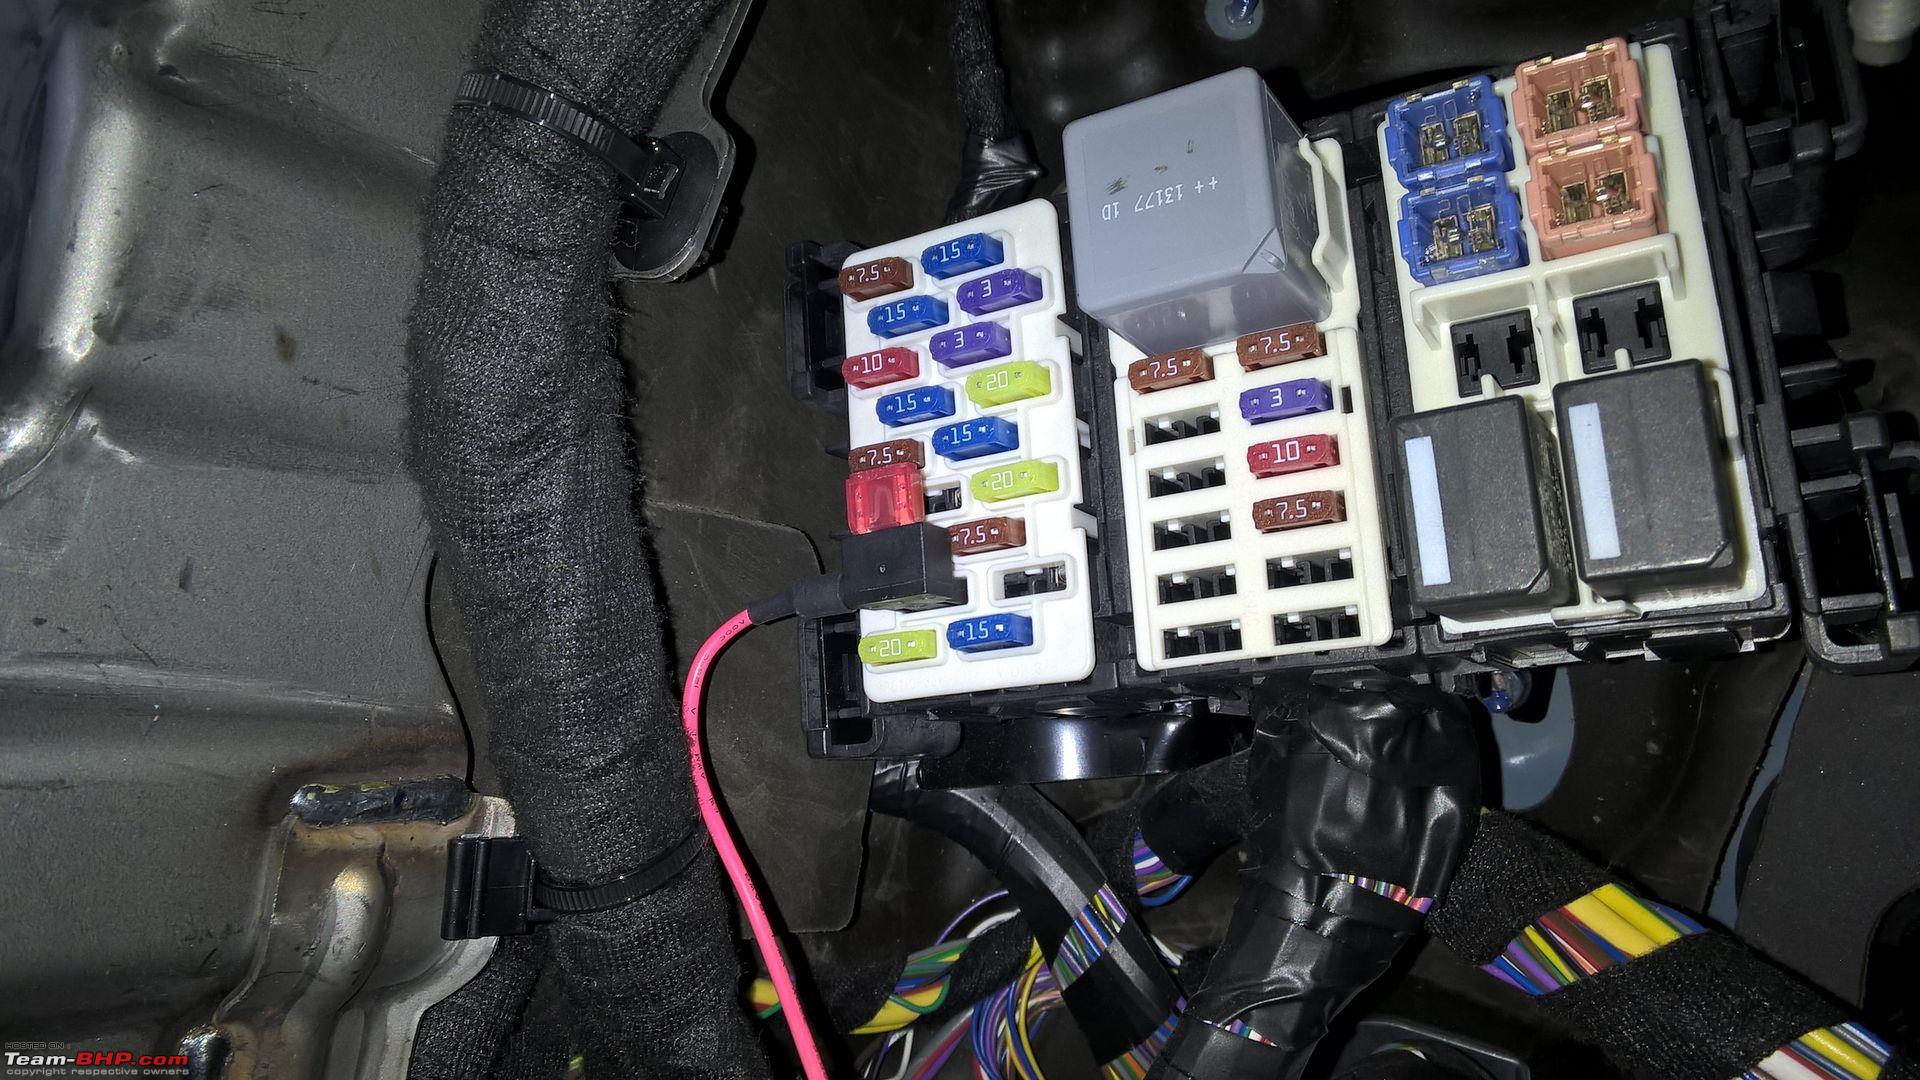
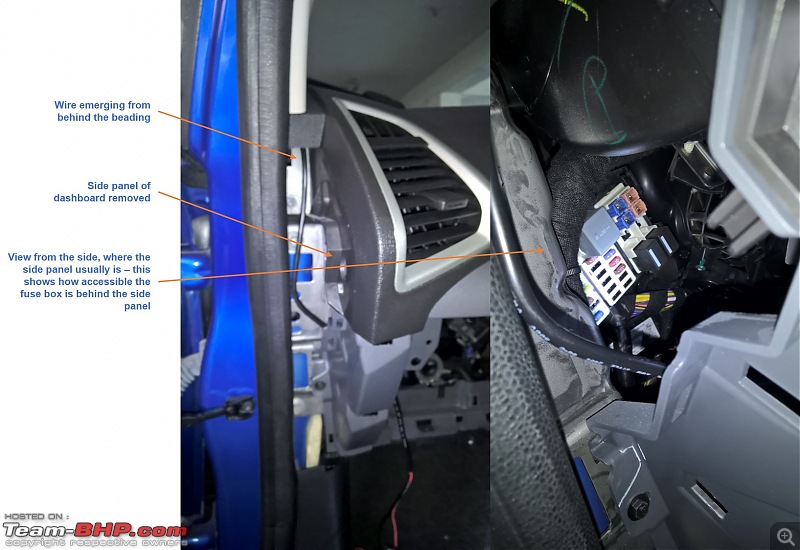
1: The Fuse Box- Modern cars usually have two fuse boxes. There's one in the engine compartment, that usually houses high-ampere fuses and relays for engine-related items (e.g. starter, pumps, electric power steering). The other is in the passenger compartment itself, and deals with electricals in that compartment (blower motor, power windows, ICE, etc.). The fuse box we use for hard-wiring is the one in the passenger compartment.
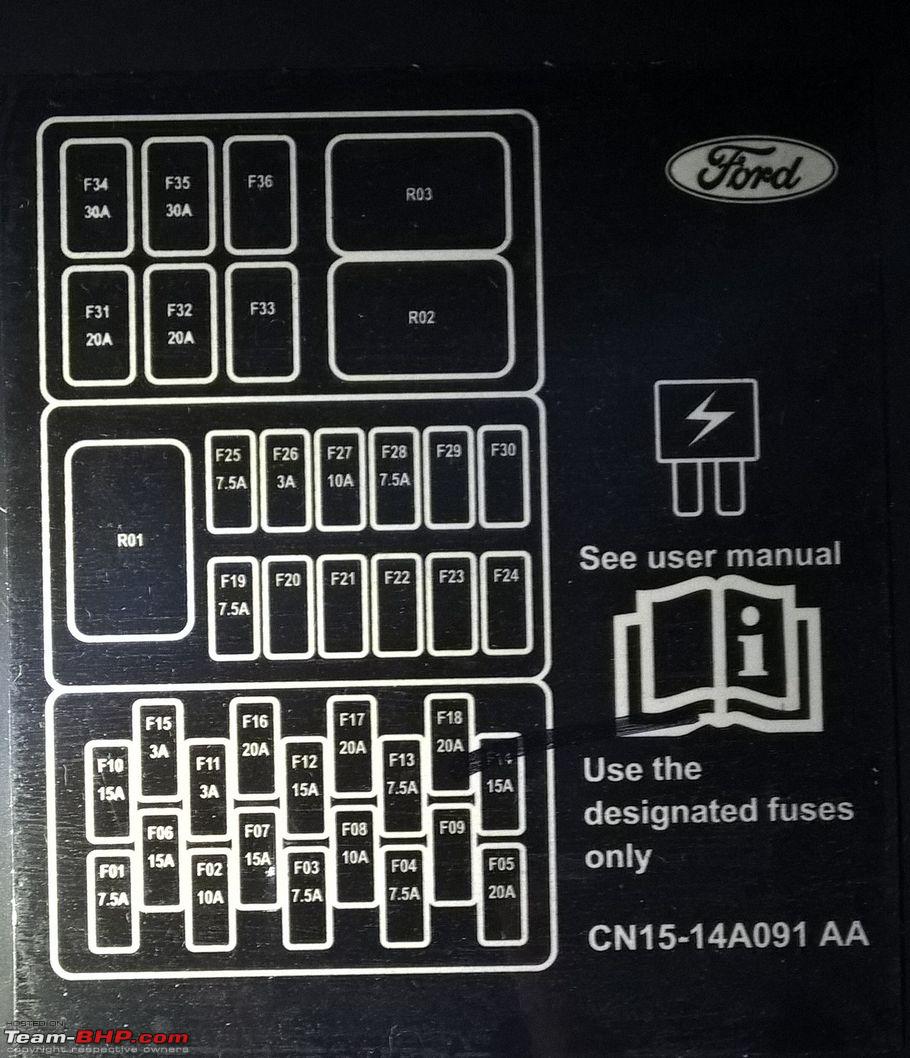
- Check your car owner's manual for the fuse box diagram, since that will give you the details of fuse sockets, ampere ratings, and usage of the fuse. This diagram will also be present in the car itself, near the fuse box. A sample diagram looks like this:
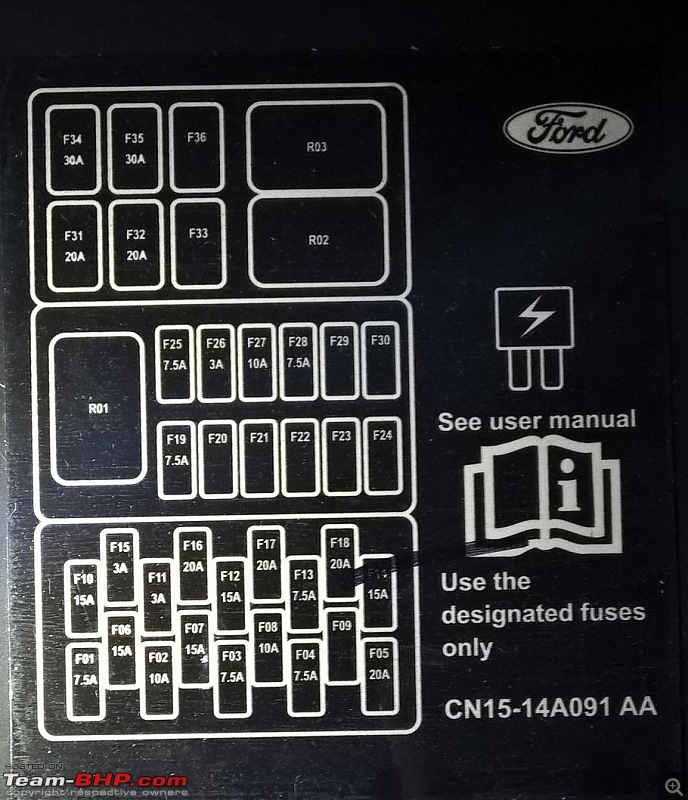
- The manual will also give you the location of the fuse box itself. Some cars have it easily accessible behind a panel that can be opened by hand (e.g. Hyundai Getz, Hyundai i10 have a panel by the driver's right knee), others require varying degrees of disassembly (e.g. Ford EcoSport requires removing the entire glove box assembly to access the fuse box mounted on the firewall).
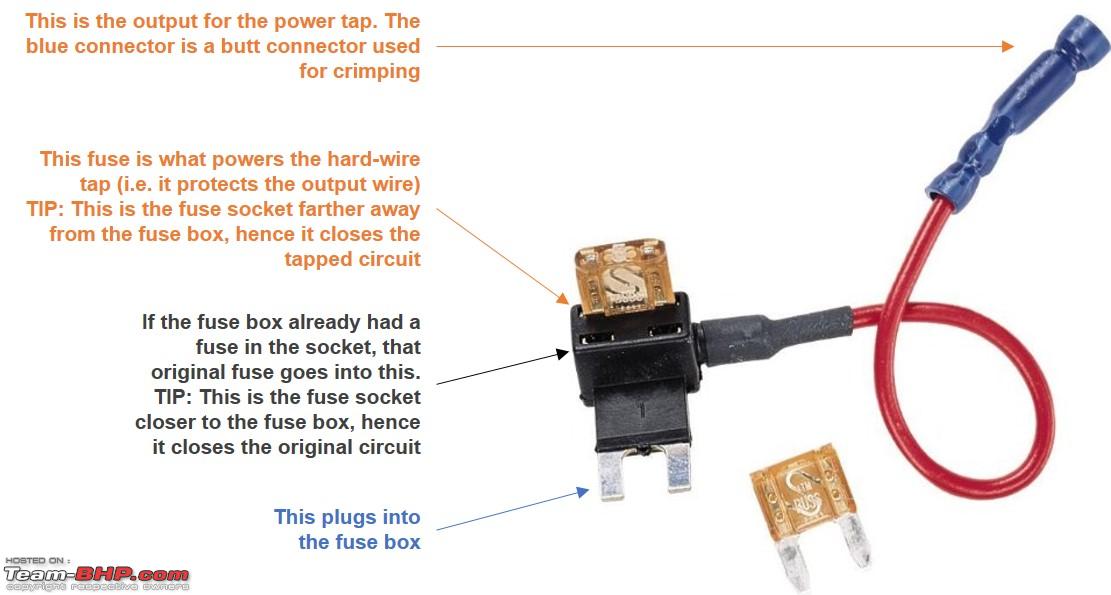
2: The Fuse TapA fuse tap works by plugging into the fuse box, closing off the original circuit using the original fuse, and also providing a fused current tap for an extra circuit. The below diagram will give you a better indication of how this works:
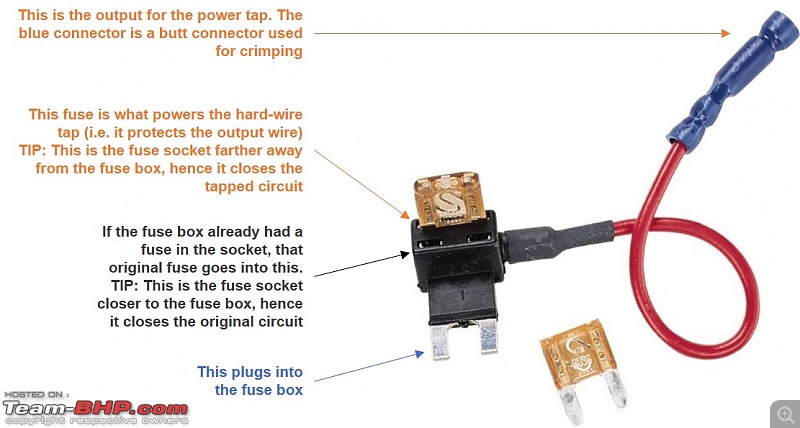
- Modern passenger cars typically use mini fuses, also known as ATM fuses. The above picture shows a fuse tap for an ATM fuse.
- The specific item that I purchased is this Bussman ATM fuse tap.
- Note that the fuse tap that I linked to does not come with any fuses at all, so you'll need to supply one ATM fuse, rated 2A, 3A or 5A. I picked up this set of Bussman fuses+fuse puller.
- Note that there is another kind of fuse tap that consists of a sliver of metal that sits on top of a fuse (see this kit for an example). Reviewers have recommended against using this, since it has a tendency to slightly enlarge the fuse socket, which can result in a looser fit over time.
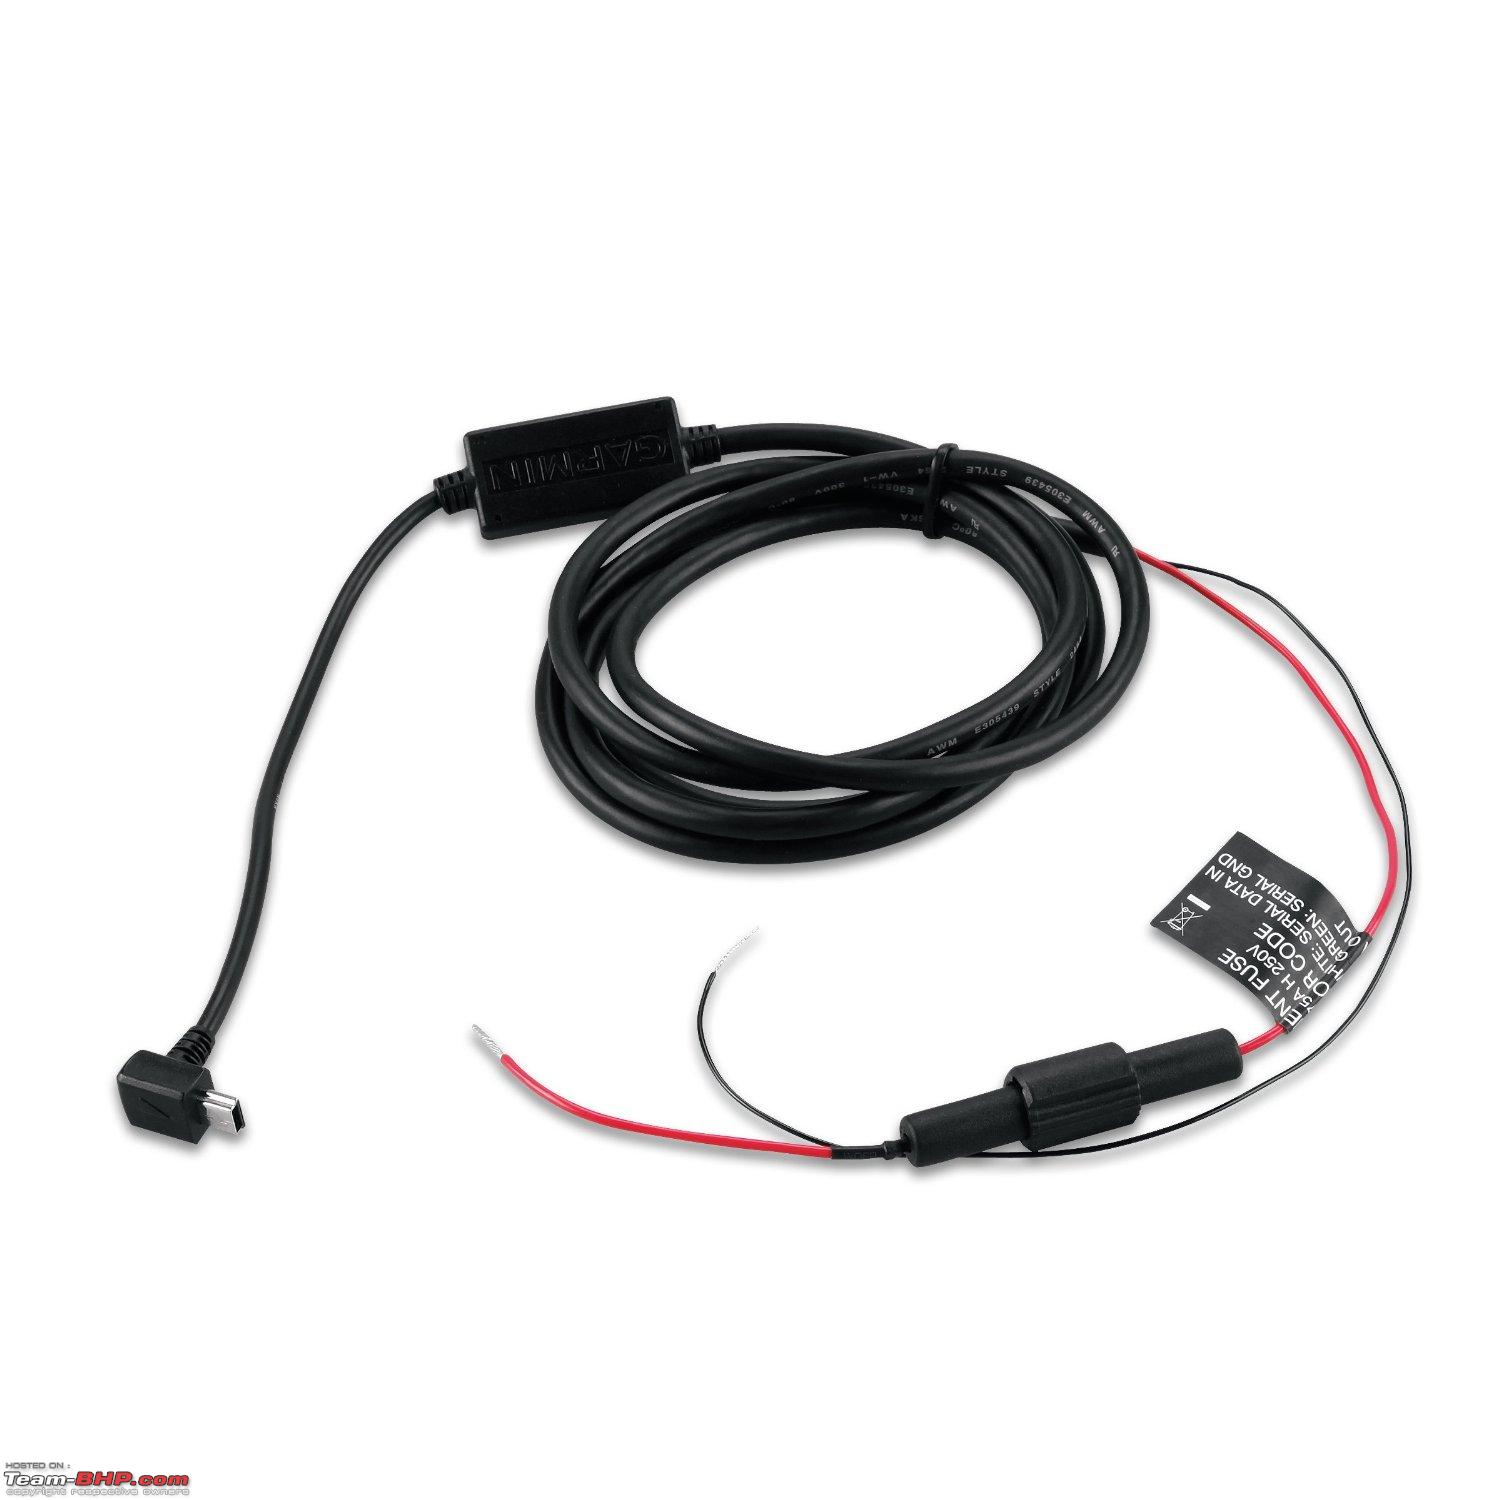
3. Hard-Wire KitThe hard-wire kit converts the 12V of the car's electrical system into the 5V required for USB. It has bare wires at one end, and a mini-USB jack at the other. Between these two, there'll be a DC-DC converter, and usually an inline fuse also.

- The specific hard-wire kit I used is this Garmin hard-wire kit.
- Note that this one has a 500mA output, and it works just fine powering both my dashcams (one of which has integrated GPS for recording, but not for navigation).
- You needn't be limited to just mini-USB output. There are other devices that provide micro-USB output, or a more generic female USB jack that gives you more flexibility as to what you can connect.
- Different models have different sizes for the DC-DC brick, and also position it in different places. For instance, the Garmin one that I used has the brick very close to the mini-USB jack (which is a bit of an annoyance, to be honest), whereas the EDO Tech one that I linked to has the brick closer to the bare wires (which is nice since you can conceal it near your fuse box, behind the dashboard, and just run a thin wire).
- Instead of a hard-wire kit, you could otherwise fit a 12V socket to your fuse box, and use the existing 12V charger that comes with your dashcam itself. This will be cheaper and more general-purpose. Just ensure that you get a good quality socket, you don't want your car to go up in flames!
4. The Dash CamThis is your dash cam of choice! For reference, I use a Garmin Dash Cam 20 and a Transcend DrivePro 100.
Procedure for Hard-Wiring
Now that we've got all that background information out of the way, let's move on to the actual work.
- Access the fuse box
- Identify an appropriate fuse
- Test the fuse socket
- Measure the wiring length
- Prepare the wiring
- Fit the hard-wire kit
- Test the hard-wire kit
- Route the cabling
- Final test
- Close and clean up
1. Access the Fuse BoxYour owner's manual will detail how you access the fuse box in the passenger compartment. If in doubt, you can ask around at your A.S.S. or an FNG. If you need to perform some disassembly, then make sure that you keep track of each screw, nut/bolt, connector. You don't want to put everything back together only to wonder why you're left with a stray screw!
If you need to pry open panels, I'd highly recommend using tools that are designed for this. I used this set of tools (pictured below) that are used for opening up car trim panels, and removing car stereos. If you don't want to pick up this, you can use equivalent plastic items, but be careful - you don't want to scratch up any panels!

2. Identify an Appropriate Fuse- For the purpose of this guide, I will assume that you want the dashcam to turn on once you start your car, and switch off once you stop. (Note that any half-decent dashcam should have either a battery or a super capacitor to allow a clean shutdown when power is lost.) Many dashcams also allow you to continue recording for some preset time (30 seconds to 5 minutes is common) once power is lost.
- You need to therefore find a fuse that is powered on when the car is turned on (this usually means either the ACC position or the ON position in the ignition) and powered off in the OFF position. Note that push-button start vehicles have their ACC mode accessible by pressing the START-STOP button without pressing the clutch.
- Look at the owner's manual to locate an appropriate fuse. There are some factors to consider when picking a suitable fuse:
- Current Rating: Consider a normal USB charger, which outputs 750mA - 1A at 5V. This translates to a maximum power of 5W (5V x 1A). Dashcams work comfortably on this power. So, to get 5W of power from a 12 V system, you'd need a 0.5A supply (5W divided by 12V). What this basically means is that any low-current fuse will be perfectly sufficient for a fuse tap. Typically, the lowest current rating will be 2A, 3A or 5A. Higher current is also fine, since your circuit will only draw what it needs, although you will then be depending on the fuse present in the hard-wire kit.
- Original purpose of fuse: The fuse tap splits a fuse's power supply into two. It is usually recommended that you select a non-critical fuse; you wouldn't want to select a fuse that powers the central locking or ICE, and end up knocking out that system due to some mistake in the DIY.
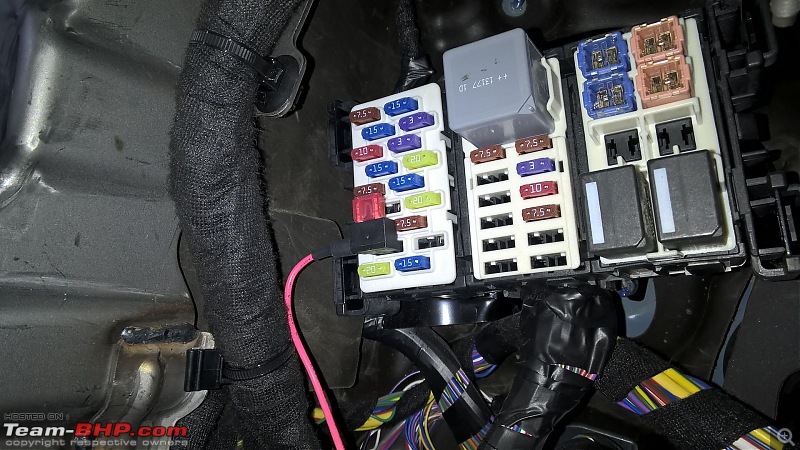
- Unused fuses: If you're lucky, your car will have an empty fuse socket that is powered. In India, we will often have this in international model cars, since cars sold in India often drop some features as opposed to the same model sold in international markets. For example, in my Hyundai Getz, I was able to use fuse #22 (rear fog lamp) and in my Ford EcoSport, I was able to use fuse #9 (passenger heated seat). In both cars, the fuse sockets themselves weren't populated with a fuse, but the wiring from the battery to the socket was intact. If you do have unused fuses that are powered on appropriately, it is best to use one of these, since it means that any wiring problem will not affect any equipment in the car other than the dashcam.
3. Test the Fuse SocketFor this step, you'll need an automotive tester. I used this Draper Low-Voltage Tester.

- The tester consists of a crocodile clip that you will connect to a ground point, and the tester tip.
- Remember that a car uses its metallic body/frame to complete a circuit (this is beneficial since it cuts wiring requirements by half).
- Connect the crocodile clip to some metal, preferably exposed metal.
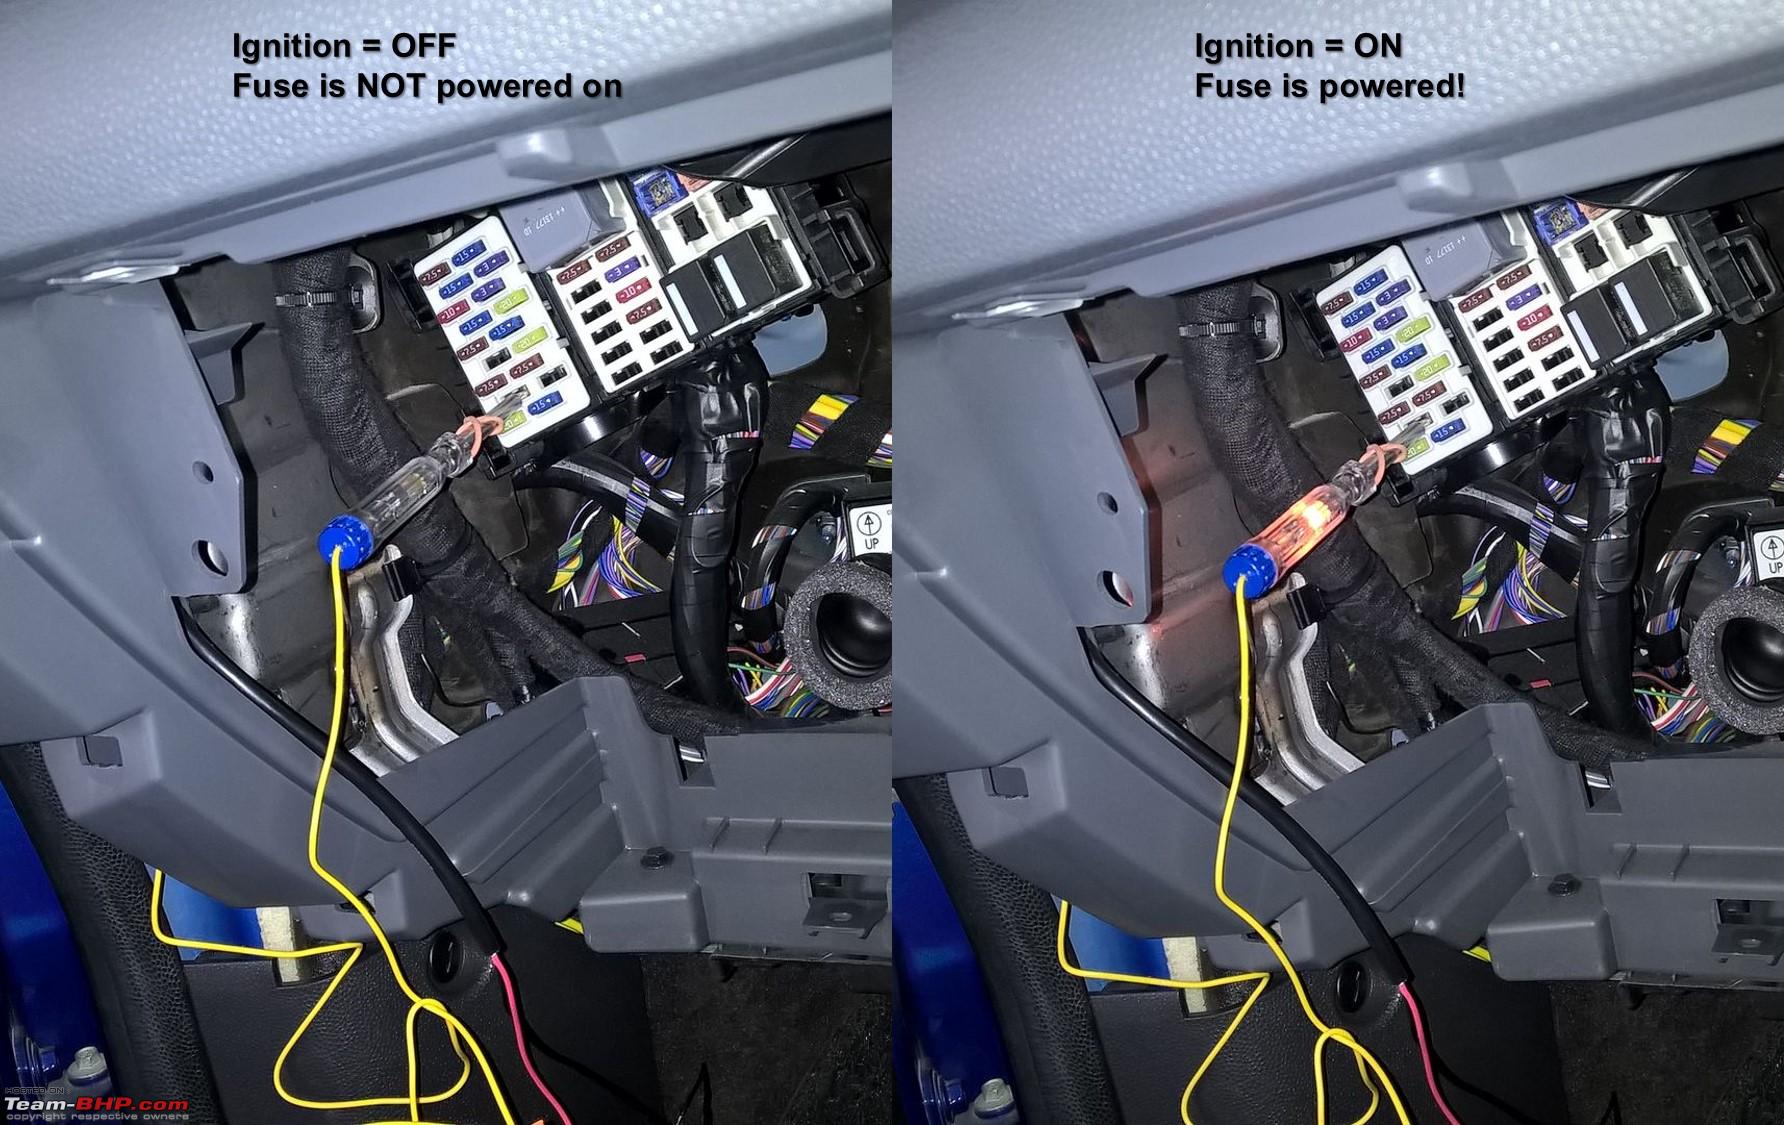
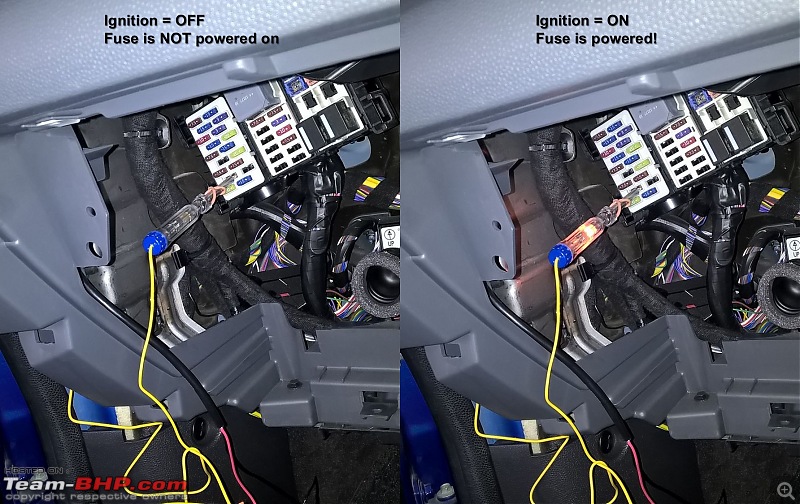
- Test the connectivity by then putting the tip of the tester into the center of the 12V socket, and ensuring the glow lamp lights up (ignition in ON position).
- Once you've verified your tester is working fine and you've chosen a good ground point, start testing the fuse. Keep the ignition ON, and touch the tester to one side of the fuse socket to see if the glow lamp lights up. If it doesn't, then try the other side (since we don't know which side of the fuse socket is connected to the battery, and which is connected to the equipment).
- If you're successful, the fuse you've selected will light up the glow lamp.
- Turn the ignition off, and repeat the check to ensure that the glow lamp does not light up. If it doesn't light up, then you're successful, and have found a suitable tap point.
4. Measure the Wiring Length- You need to check whether the hard-wiring kit is long enough to reach your dashcam from the fuse box. If not, you might need to put in an additional length of wire between the fuse tap and the hard-wire kit.
- In my case, I did not need any extension - the hard-wiring kit was long enough to reach the dashcam behind the IRVM.
- Instead of putting in a length of electrical wire, you might be tempted to use a generic mini-USB extension cable. I'd recommend against this, because it can confuse the dashcam. Dashcams use the mini-USB pins to determine whether they're connected to a charger (with just the power pins working) or a computer (with power and data pins all connected); and will switch between recording mode (if only power is connected) or data transfer mode (if power and data are connected). Generic extension cables often wire the data pins, so the dashcam will switch into data transfer (mass storage) mode. You'll need to buy a specific mini-USB extension cable that does not trigger the data pins. Now, instead of running up that added cost, it would just be simpler to put in a length of wire between the fuse tap and hard-wire kit (see next step).
5. Prepare the WiringAside: This is an area where I learnt a lot from online resources, since I had initially thought of our Indian jugaad approach of twisting wires and using insulation tape!
- The one place where you are connecting wires is between the fuse tap, and the hard-wire kit. The fuse tap comes with a butt connector on the end, and you can quickly and easily crimp the hard-wire kit's red power wire to this butt connector.
- If the measurement of the wiring length from the previous step indicates you need extra wire, include that here (i.e. join the fuse tap to one end of the extra wire, and the other end of the extra wire to the hard-wire kit). Ensure that you don't go for very thin extension wires. The fuse tap usually has 16 AWG wire, so use either 16 AWG (same) or 14 AWG (marginally thicker) extension wire.
- The black ground wire in the hard-wire kit needs to be connected to the frame of your car. To do this, I would recommend using a U-shaped terminal or a ring-terminal, and crimping that terminal to the black ground wire.
- I purchased this Draper set of terminals, and used a U-shaped terminal (the red one shown below) and connected it to one of the bolts that holds up the dashboard.
- While a ring-terminal is more secure, you need to remove the nut or bolt to fit it on. I didn't want to mess about with this, and picked a U-shaped terminal - this allowed me to just loosen the bolt enough to slip it in, and re-tighten it.

- For crimping, you can go in for standard crimping pliers or a ratchet action crimping tool. The former is cheaper, the latter is easier to use and gives more predictable crimp joints. I've never crimped before, but checking a few YouTube videos and some practice made it very simple.
- You can use insulation tape to cover the crimped joints. However, the various guides that I was reading recommended heat-shrink tubing as a better alternative (as the glue in insulation tape can weaken over time). So, I picked up this box of heat-shrink tubing to use.
- Ensure that you slide the heat-shrink tubing onto the wire before you crimp the joints! Otherwise you won't be able to get it on. Also, ensure that the size of tubing that you use will fit over the crimp connectors but is not too loose. I used a cigarette lighter to heat the tubing down to size. If you have a hot air gun, that's even better. In any case, if you're using heat-shrink tubing for the first time, practice on other wire first to get comfortable.
6. Fit the Hard-Wire Kit - Fit the fuse tap into the selected fuse socket. This ensures the hard-wire kit receives power via its red power cable. Note that sometimes during testing, you'll find that the fuse tap is not working (supplying power) despite you having tested and proven that the socket is the correct one. The quick fix for this is to rotate the fuse tap by 180 degrees. This occurs because the fuse tap draws power from one of its pins, and that pin might not be connected to the side of the socket that you tested.
- If you are fitting the fuse tap into a fuse socket that is already in use, then remove the fuse already present, and fit it into the fuse tap in the socket that is closest to the fuse box (see earlier diagram).
- Fit a new fuse of 2A, 3A or 5A into the fuse socket that is farther away from the fuse box, this is the fuse that will protect your tapped circuit.
- If you have identified a socket in the fuse box that is unused, then you will only need to put in a new fuse in the fuse socket that is farther away from the fuse box. The socket that is nearer the fuse box can remain empty.
- Fit the ring terminal for the black ground cable of the hard-wire kit. In my case, I used one of the bolts that hold the dashboard to the frame. Don't tighten this too much yet, as you're only doing this for initial testing purposes.
- I was initially nervous whether such a bolt would have sufficient electrical conductivity, or if I needed to look for some bare-metal connector. Fortunately, my checks proved this was sufficient. In the earlier step, when I was using the tester to check the fuse socket, I had connected the crocodile clip to the same bolt to ensure it was a suitable ground point.

- Note: In the above photos, you'll notice that the heat-shrink tubing hasn't been shrunk. I left it like this just to perform the testing, and subsequently shrunk them.
7. Test the Hard-Wire Kit - Now that the circuit is complete, its the moment of truth, and time for some tests.
- The first test is a smoke test - don't connect the mini-USB jack to anything, but just turn on the ignition. Then, use your senses:
- Look for any smoke or sparking
- Listen for any crackling sound that indicates a short/spark
- Smell for any burning smell or ozone smell
- If this is fine, then turn off the ignition, connect your dashcam, and repeat the test, to see if there's anything abnormal under load.
- Also, verify that your dashcam has switched on correctly. Wait for 5-10 minutes to ensure that the electric circuit is continuous.
- Turn off the ignition and verify that your dashcam starts to shutdown.
- If all these tests are successful, then you're near the end!
8. Route the Cabling - Remove the fuse tap and the ground wire ring/U terminal, such that all your wiring is free again. Don't worry, putting it back is much faster now that you know exactly what you need to do.
- Now that you know your crimping has worked fine, is the time to shrink the heat-shrink tubing.
- Cable routing is easiest when done from the dashcam towards the fuse box. This ensures that surplus wire ends up behind the dashboard, where it can be easily concealed.
- Cable routing is another activity that is specific to vehicles in question. In most cases, the approach is very similar, however.
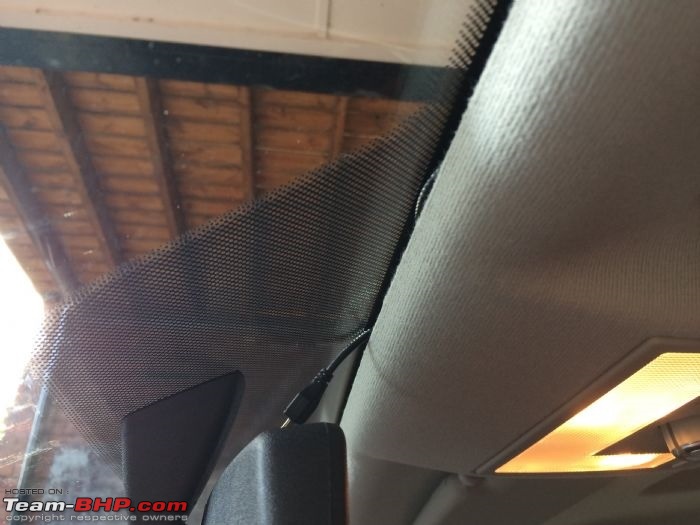
- Assuming that the dashcam is fitted towards the top of your windshield (e.g. near the IRVM), then you would route the wire from the dashcam up towards the headliner (the soft material that you see on the roof of your car).
- The headliner often has a gap at the very front where it meets the windshield. You can use this gap to push the wire in from the center towards the A-pillar (which side A-pillar is determined by your fuse box location).
- If the headliner doesn't offer easy access, gently use the orange prying tools I mentioned above to open a gap to stuff the wire in. Repeat until the wire reaches the A-pillar. (Note: the below picture is a representative picture from the Internet, which is why the mini-USB plug is of the straight variety, and not the L-shaped right-angled connector that comes with the Garmin hard-wire kit).
- Once you reach the top of A-pillar, you'll notice that the A-pillar has plastic trim on it.
- Once again, gently pry it away to get enough of a gap to route the wire across the top of the A-pillar, from the windshield towards the door frame. Remember - you don't need to pull this trim away so much that it detaches from the clips holding it, you only need to pull it enough to put the wire in.
- Now that you've brought the wire to the door frame, you'll see that there's thick rubber beading on the door frame. Again using the pry tools, lift the beading on the inside, so you can route the wire behind it.
- Run the wire down this beading until you reach the dashboard level.
- The quick and dirty approach will be to then route the wire beneath the dashboard, and rewire the connections.
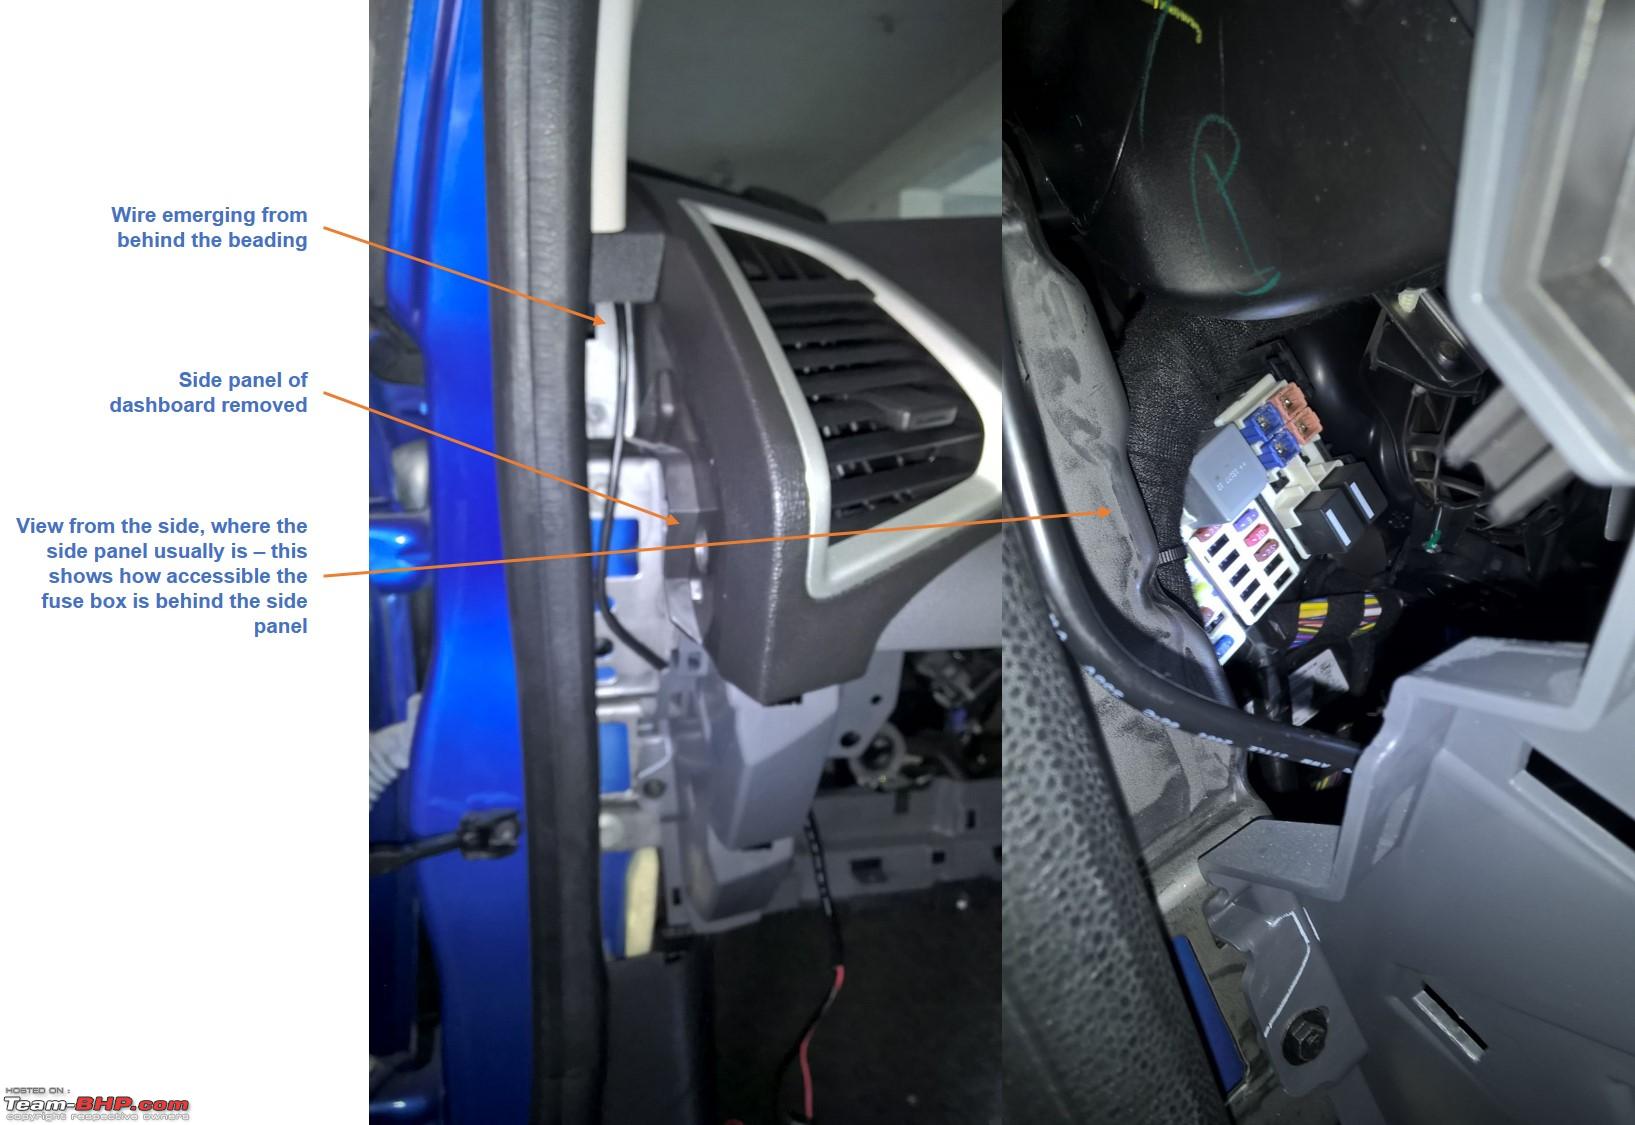
- The cleaner approach will depend on your car. Most dashboards will have a side panel on the dashboard that is visible when you open the door. This panel can be removed using - you guessed it - pry tools.
- Open this panel, and you will be able to route the wire from the beading directly behind your dashboard.
- Now, you can start finalizing your changes. Reattach the fuse tap, and ground terminal.
9. Final TestBefore you proceed with any other activities, redo the tests you performed earlier, just to ensure that things still work fine.
10. Close and Clean-Up - Use cable-ties to firmly secure any wires or DC-DC converter bricks.
- Put back any panels/assemblies that you removed.
- Ensure that there are no loose screws, nuts, bolts or washers running around your car floor or garage floor.
- Take your car out for a spin and verify that things still work fine when on the move, and that there are no rattles from any loose components, and to ensure that electrical connectivity is continuous over speed breakers and potholes!
If all of this checks out, then congratulations - you've now got a cleanly wired dashcam.
Thread moved from the Assembly Line to the Modifications Section. Thanks for sharing!
That's a clean DIY Arun clap:.
We have done exactly same in funkykar's Linea before we headed for our Ladakh Drive last year. The need of the hour then was an independent power source for the Dashcam while the 12V socket at the front was used for Navigation device and another DIY 12V socket sitting at the back was used for Mobile/Tab charging.
For the Ertiga too I thought of hardwiring but then I got a neat location to add another 12V socket that almost looked OE where I have plugged the Dashcam's charger almost permanently while I use the other 2 sockets for charging multiple devices on the go.
Thanks for sharing this, will certainly help a lot of folks who want a non-messy, clean and independent route to power up the Dashcam and not worry about it subsequently to turn it on/off.
What coincidence, I was fiddling with my car the other day just to do the same.
But considering my limited knowledge I found it best to leave the work to a professional least my car goes up in flames.
But after reading this I think I am ready to give it another shot!
Thank You Arun!
Quote:
Originally Posted by zazer
(Post 3783478)
What coincidence, I was fiddling with my car the other day just to do the same. But considering my limited knowledge I found it best to leave the work to a professional least my car goes up in flames. But after reading this I think I am ready to give it another shot!
|
Go ahead and do it yourself :thumbs up. Re-read this part and take confidence from it:
Quote:
Time taken: 30-60 minutes
DIY experience level: Beginner
|
I am not a hands-on guy, but with the right tools and knowledge found this to be a cakewalk. Hence I'm paying it forward with this thread.
There is an advantage, and a risk, to performing this (or any other) DIY:
- The advantage: you will feel proud about a job well done, to your satisfaction and exacting standards
- The risk: you will never trust any shop/mechanic to do as passionate a job as yourself in future - be it for fixing ICE, or anything else. But therein lies the opportunity for future DIYs :)
Thanks. I have ecoSport and have recently ordered a dashcam on sale from Aliexpress. Will try this one as 12V socket is already in use by Garmin Navigation system.
This is one really useful DIY, and not that tough to perform! Thanks for detailing each step.
However, I wanted to ask that did you order each item from the international websites or are they (good quality stuff) available in India?
Quote:
Originally Posted by parth.jain
(Post 3783668)
However, I wanted to ask that did you order each item from the international websites or are they (good quality stuff) available in India?
|
The links that I provided are the exact sites I ordered them from. I opted for reputed brands (e.g. Garmin, Bussmann, Draper) for peace of mind, and the specific items I chose were done only after reading their reviews.
While I did try to find these items in Indian sites first, I faced a few challenges:
- In some cases, I was not able to find the same product (or quality equivalents) on either Amazon.in or Flipkart. By 'quality equivalents' I mean products that have had consistently good reviews. I've shied away from Ebay.in for the last few years, so I didn't bother to check there.
- In some cases, I found that although the product was available on Amazon.in (e.g. Garmin Dash Cam 20), it either wasn't Amazon Fulfilled, or it was being sold by an importer (the dead giveaway is the delivery time is a few weeks, and you'll soon start to recognize their names like Cart2India, Booyah Chicago). Also, these items often resulted in the following point (since the importer needed to make their cut).
- Often, the product was costlier on Amazon.in and cheaper on Amazon.co.uk or Amazon.com even after factoring in shipping and customs duties.
- I had finite patience to run down options on Indian sites, and decided it was quicker to just order it from these international sites.
If you do find these products cheaper in India, then please do post details of that on this thread, for the benefit of others.
This is a good solution to power multiple devices. However for people who don't want to fiddle with the electronics one can get a power bank. I was able to power and record from my Transcend camera by connecting it to a usb power bank which i purchased from Amazon. This is however impractical as one has to remember to charge the power bank overnight and remember to carry it daily in the car but for long distance journey with a overnight stay is still a decent option.
Quote:
Originally Posted by sumeethaldankar
(Post 3783944)
This is a good solution to power multiple devices. However for people who don't want to fiddle with the electronics one can get a power bank.
|
In reality you aren't really fiddling with electronics here at all. You are merely leveraging on an easily available source to tap 12V power - The
empty Fuse socket.
And remember - The Fuse Tap cable always have 2 Fuses. One that takes care of the load and the other to take care of the internal (car's) circuit.
Fuse Tap method is perhaps the cleanest & Safest of options to source 12V power and its 100% reversible that leaves zero signs if you revert back.
Quote:
Originally Posted by arunphilip
(Post 3783488)
Go ahead and do it yourself :thumbs up. Re-read this part and take confidence from it:
|
Arun,
Excellent !! To the point write-up, detailed pics, attention to detail and above all its inspirational, and if not this there are a lot of bits on our car that we can do it on our own.
Hats off !!
A quick question here, I know you are a pro in this but, did you see any difficulty in fixing the dashboard area back. I assume you did the whole thing on your own.
I am also curious to know, whether there are any new rattling noises of uneven fitting post your work.
Excellent post Arun! Immensely useful. I can identify with each of the cons you have put up under "Challenges of using a 12V socket". After living for close to 2 year with a 12v extender arrangement, I absolutely abhor all the wiring going around, and desperately want to reduce the clutter.
Are these fuse taps/heat shrink tubing etc, available locally? Or one needs to order from AE?
Quote:
Originally Posted by sumeethaldankar
(Post 3783944)
This is a good solution to power multiple devices. However for people who don't want to fiddle with the electronics one can get a power bank. This is however impractical as one has to remember to charge the power bank overnight and remember to carry it
|
Quite true, you make a good point. Like anything, it is a trade-off. Hard-wiring is a one-time change to make things automatic in the future. But if you're not keen on making such a change, or if the cost doesn't seem VFM, then yes, using another approach is fine. That approach will bring with it its own challenges (like the ones you pointed out with a power bank). In the end, its probably down to the individual, and which aspect he values more. There's no right or wrong, its all subjective.
I'd probably just qualify that while you are working with the car electricals, you're not tampering with the OEM electricals in any way (unlike say, a poor ICE installation which results in cutting/splicing of wires). So that should reassure you.
Quote:
Originally Posted by paragsachania
(Post 3783966)
In reality you aren't really fiddling with electronics here at all. You are merely leveraging on an easily available source to tap 12V power - The empty Fuse socket.
|
Thanks for your response, Parag!
Quote:
Originally Posted by peterjim13
(Post 3784036)
did you see any difficulty in fixing the dashboard area back. I assume you did the whole thing on your own. I am also curious to know, whether there are any new rattling noises of uneven fitting post your work.
|
Thank you for your kind words Jim. I did laugh at your question about rattling - it takes a fellow EcoSport owner to relate to and worry about rattles in the plastic :D! So firstly, yes, I did all the work myself, unaided. The dashboard and side panel are well equipped with clips that come off and latch back on cleanly, so it was easy, and no damage was caused. I've not faced any rattles, so that too seems to be fine (phew!). Again, the clips ensure that alignment is perfect - once it snaps back in place, its like a factory fit, there's no dependence on the DIYer to carefully align panels. Its like Lego!
Quote:
Originally Posted by Dry Ice
(Post 3784038)
Are these fuse taps/heat shrink tubing etc, available locally? Or one needs to order from AE?
|
In my limited local research, I did not find fuse taps locally. Heat shrink tubing is definitely available in India, though I wasn't able to find it online. You can try Ebay, or go to Ali Express as you've suggested. If you know someone coming from either the UK or US, then get them to bring it in. All these items are so tiny that it will not cause them any inconvenience at all.
| All times are GMT +5.5. The time now is 12:13. | |