Team-BHP
(
https://www.team-bhp.com/forum/)
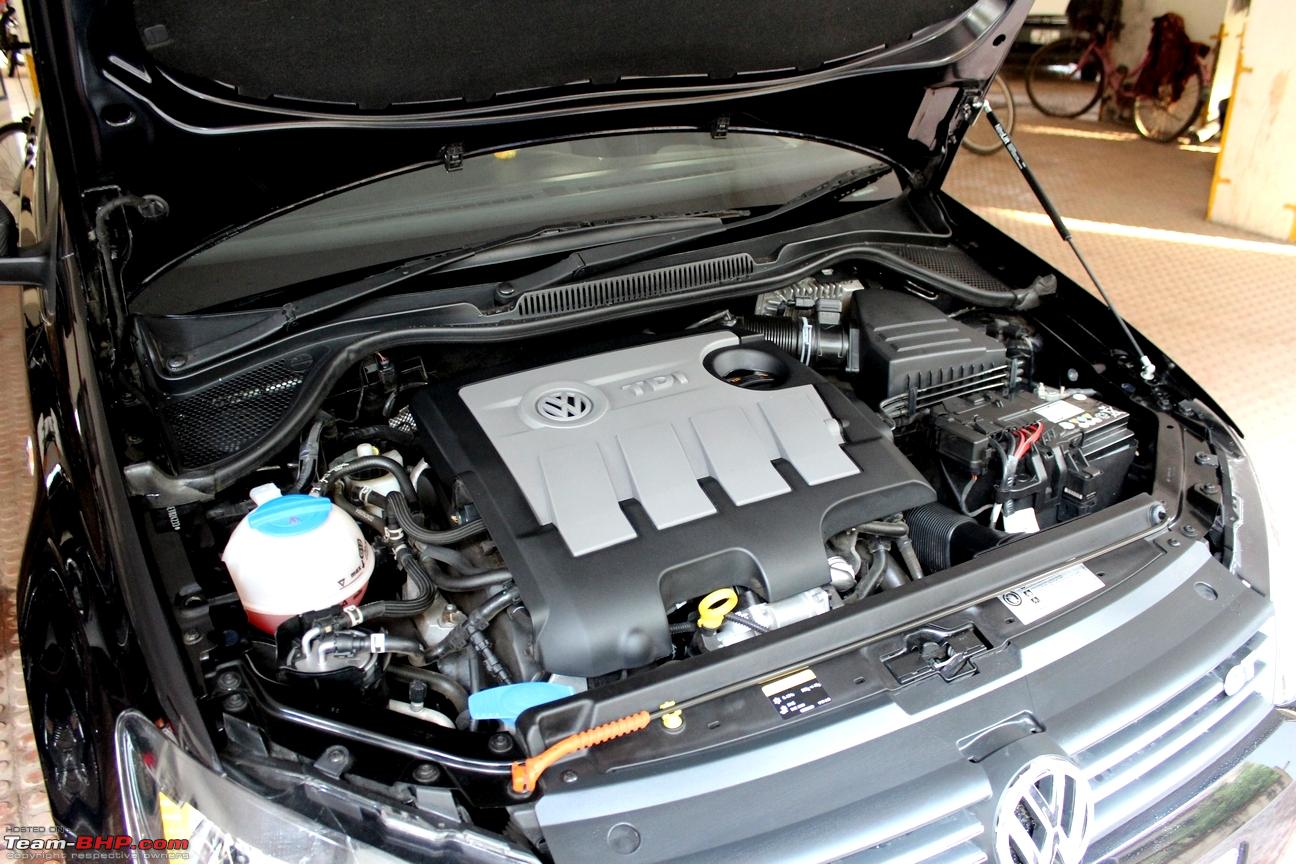
A gas strut (also referred to as a gas spring) is a spring that operates due to the force exerted by the compressed gas (usually Nitrogen) stored inside the cylinder. Luxury carmakers provide a gas strut to lift the hood and hold it in place. It takes minimal efforts to lift an otherwise heavy hood and lends that upmarket feel to the car. I wouldn't want to go into the technicalities of gas struts and post much about it here; here's a link from Wiki -
Gas Spring: Wiki.
Gas springs are largely used in automobiles to lift the boot door in hatchbacks. They also find applications in furniture (beds, rack doors etc.), marine (hatches, doors etc.) and industries. These are some of the other uses:
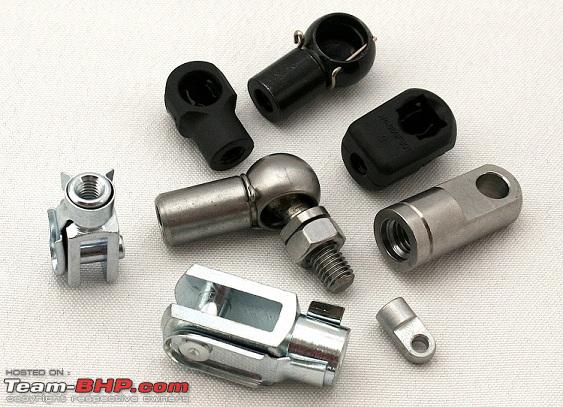
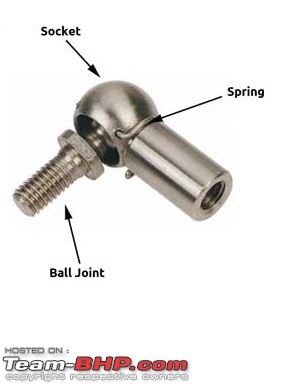
Gas springs come in various sizes, lengths, force ratings and different end fixings depending on the application. A kitchen shelf door may not require a gas strut with a force rating or stroke length as that required by a car's hood. These are some of the end fittings available:
It is not very hard to retrofit a gas strut in the engine bay to lift the hood of the car. All we need is a gas strut of a required force rating that can push the hood (the force rating is primarily determined on the basis of the weight of the hood) and the stroke length (which determines how high can the hood be held) and 2 clamps which will be mounted to the existing holes in the structure. Drilling additional holes on the chassis is NOT recommended. The last thing you’d want is the manufacturer denying warranty because holes were drilled!
- Parts Required:
1. Gas strut with threaded ball joints:
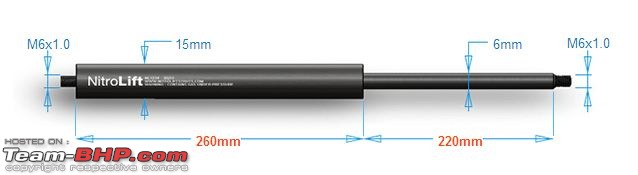
Specifications: Force - 350 N, Rod Dia - 6 mm, Stroke - 220 mm, Extended length - 480 mm, Threads - M6x1.0.
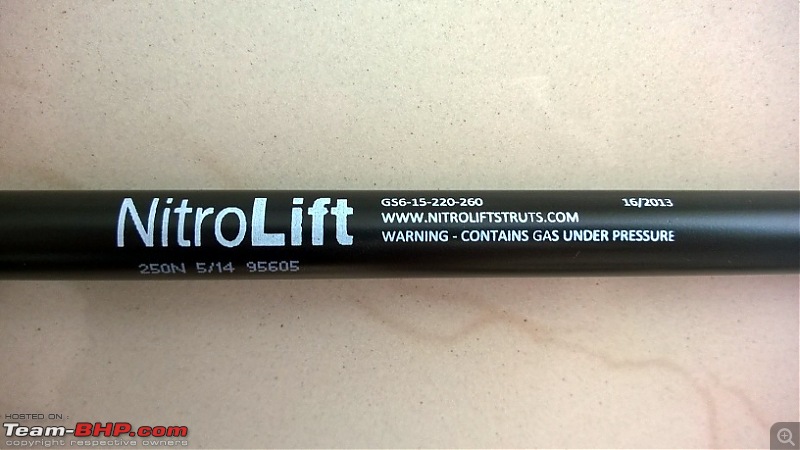
The force rating of the strut I used was 250 N. This was a calculated guess since the Passat B6 uses a strut with a force rating of 350N and I believed that the hood of the Polo would weigh less. The force rating can be divided by half if 2 struts are used on both ends of the hood. Extended length is calculated based on the end points at the chassis and the hood where the strut ends would be installed. Ball joints permit some amount of deviations when the strut is not aligned in a single axis at the top and bottom. When you purchase a gas strut from SGS Engineering, the end fixings are offered free of cost so I chose to go ahead with threaded ball studs. I sourced the strut from SGS Engineering Solutions, UK and the purchase experience has been detailed towards the end of the thread.
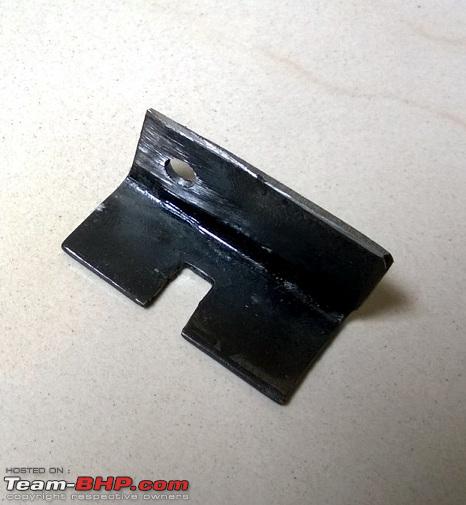
2. Clamp:
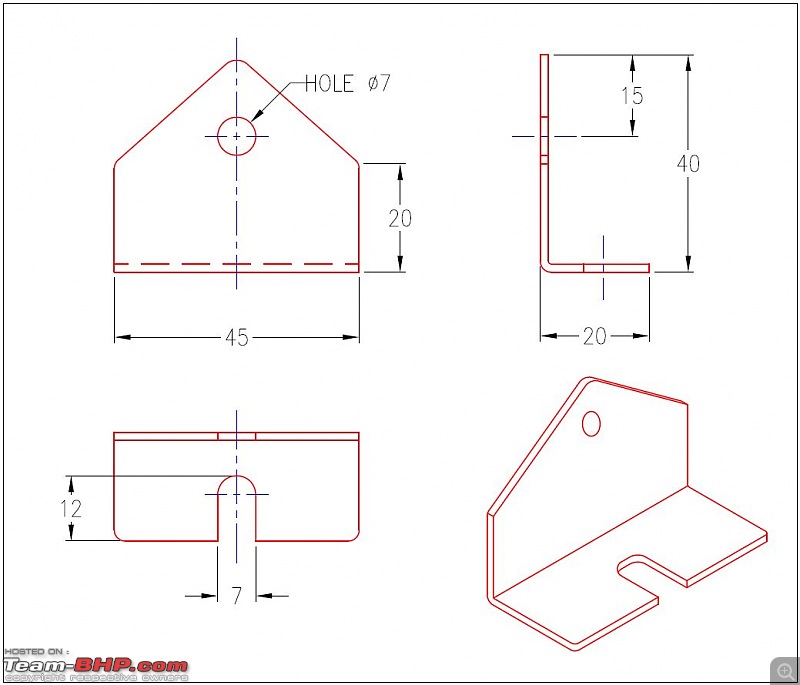
The clamp was fabricated (after various design iterations; discussed later on) from an MS (mild steel) square channel:
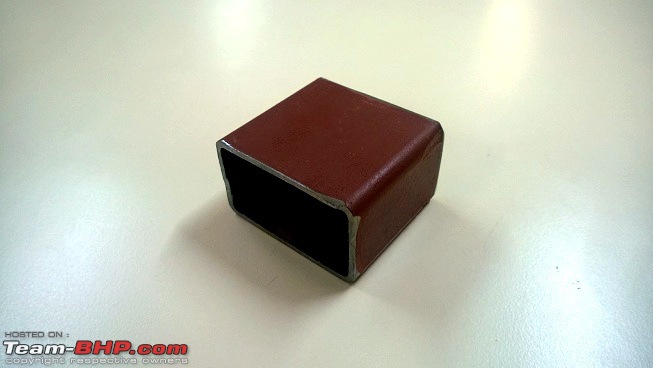
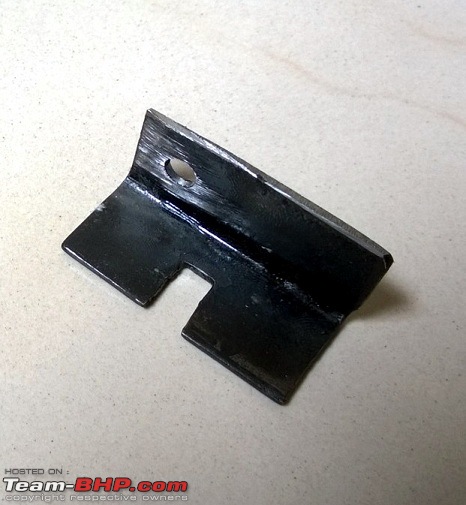
You need a clamp preferably made of steel (better strength compared to Aluminium) that does not foul with any other part while closing. SS would be the ideal choice considering it would resist corrosion in the long run but it is substantially expensive compared to MS. With MS, one can always paint it and it would work.
This is the design of the clamp used for the DIY and was fabricated out of a square channel.
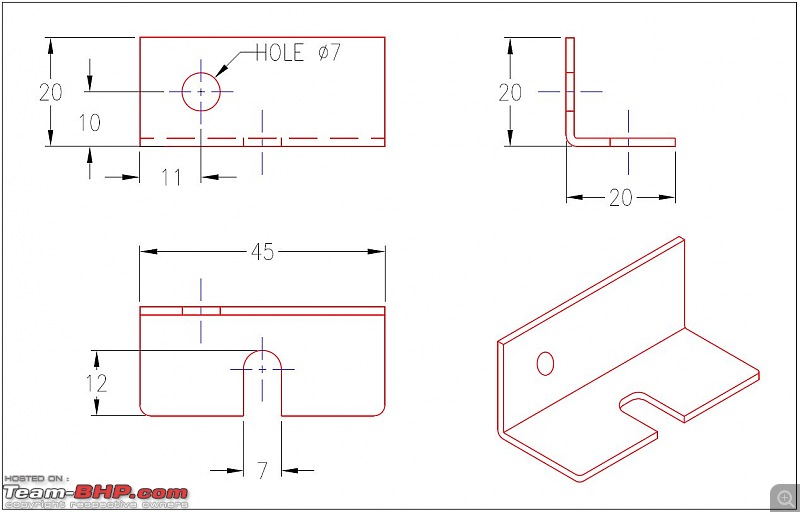
CLAMP Model (2).pdf
It is best that this part be fabricated from your neighbourhood machining shop. They would do it professionally and safely and, would hardly cost you 100-150 Rs. as labour charges.
3. Spray paint can:
Only required if the clamps are fabricated of MS. Paint would prevent the clamps from being corroded in the long run.
- Tools Required:
Ring spanners - 10 x 11 and 12 x 13. India's home grown brand Taparia FTW! :D
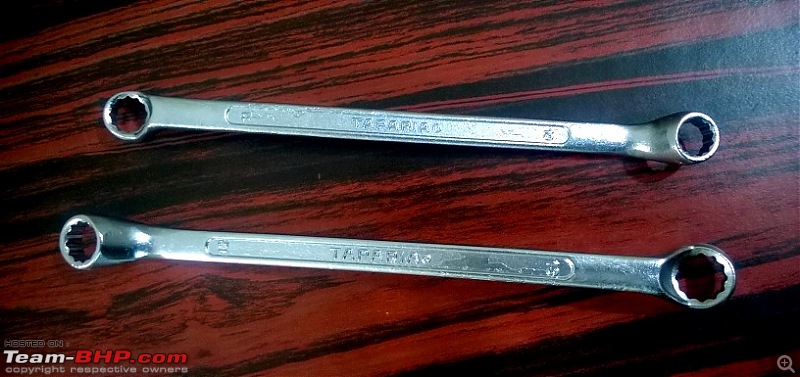
These are used to unscrew the hex. head bolts on the hood and the chassis and, to tighten the nut on the ball heads at the clamps.
- Procedure:
A friend would be immensely helpful for this DIY.
1. Open the hood and support it using the arm.
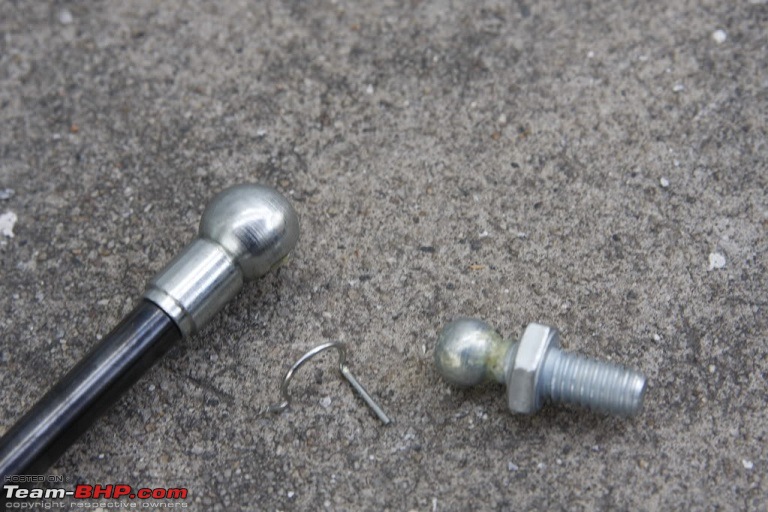
2. Remove the spring pins from the end fixings:
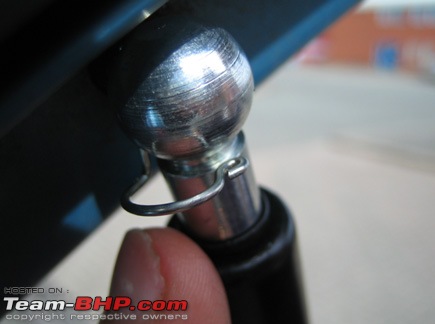
Detach the ball studs from the strut by pulling it off the socket:
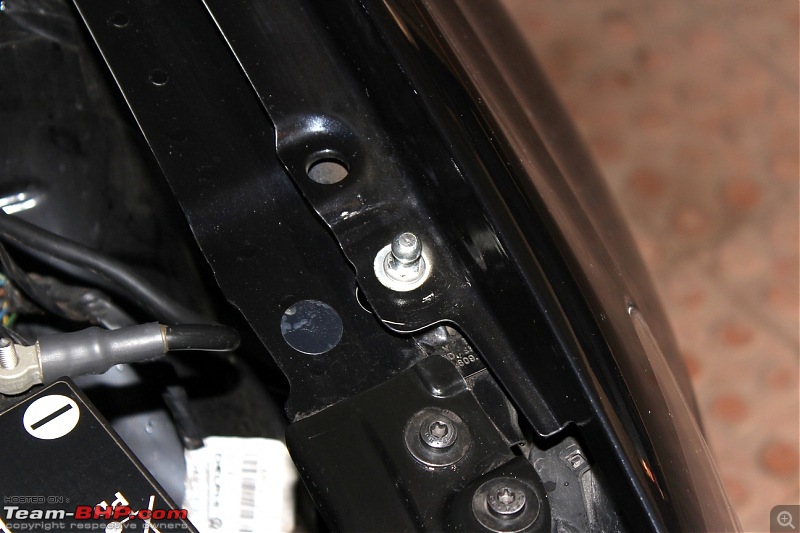
3. Unscrew the M6 gr 8.8 hex. head bolt on the chassis using the ring spanner:

Replace it with the ball stud and tighten it:
4. Screw the other ball stud to the fabricated clamp and tighten the nut using the ring spanner.
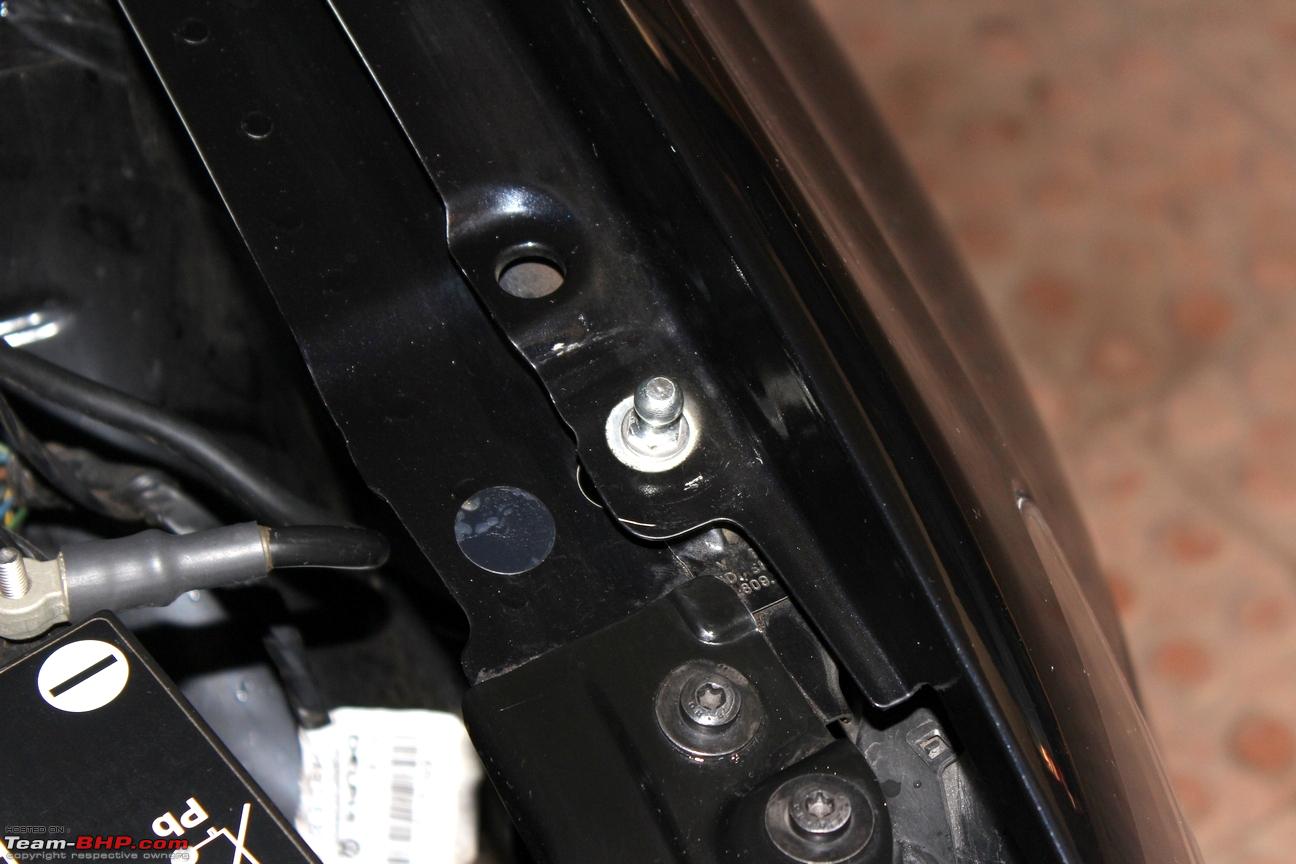
5. Unscrew the hex. nut on the hinge of the hood:
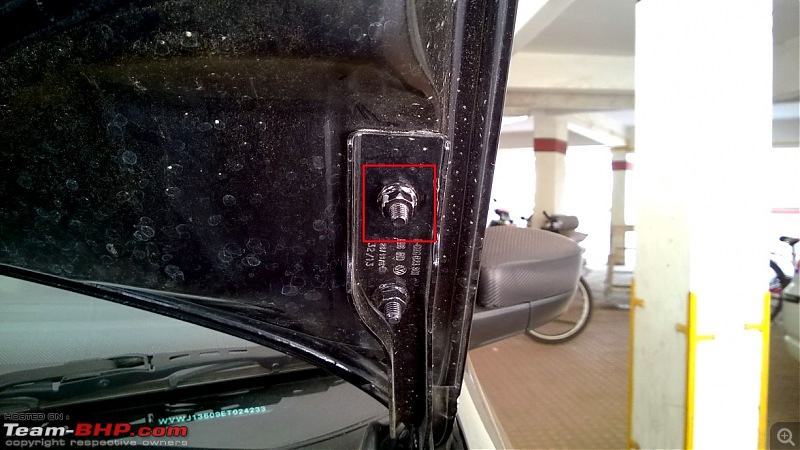
Insert the clamp (notice the direction as indicated in the snap below) and tighten the nut:

If the direction of the clamp is reversed, the strut will interfere with the hood while closing.
6. Detach the arm from the hood and let your friend hold the bonnet while you insert the strut to the ball studs:
The hood should now be supported purely by the strut.
7. Close the hood completely and test the results.
- Result:
https://www.youtube.com/watch?v=6zUcRcL2reI
Note that the hood needs to be lifted to a certain extent manually and then the strut pushes it further. It does not defeat the purpose of providing the strut. In order to lift the hood entirely by the strut, a higher force rating (350 N) will do the trick.
- Shopping experience from SGS Engineering, UK:
I was searching for the struts online and stumbled upon this website (link) that deals with struts, tools, hydraulic jacks, garage equipment among other things. They had struts suited for various applications and I customised one based on the force, extended length and the end connections. Added the strut and end connections to the cart and checked out. Delivery charges through Royal Mail UK (without tracking facility) were Rs. 662.45. I made the payment using a credit card and got a couple of mails intimating me of the payment and completed order. A day later, the order was dispatched from their factory and I was intimated by a mail. 13 days on and there was no news of the consignment. I sent a mail to their customer support team and promptly got back a response. The gentleman said since this item contains compressed gas, it may take a bit longer than usual since the customs department tend to be a bit fussy with such consignments. Moreover, he also mentioned that if I do not receive the shipment within the next few days, they would mark the item as 'lost' and would refund my money. I was pleasantly surprised by their gesture.
Talk about coincidence! The same day evening, the caretaker of our apartment handed me over the consignment which was shipped in a nice long cardboard tube. Inside the tube, the strut was neatly packed in bubble wrap and enclosed within a plastic sleeve:

All in all, I was extremely happy with the purchase. The shipping charges were reasonable, quick dispatch, robust packaging and excellent customer support. Zero customs duties were charged. Total expense incurred - Rs. 2396.
- DIY experience:
One word - amazing!
Although this DIY is nothing in comparison to some of the hard-core ones we have on the forum, it was a good learning experience considering this was not an OEM part and a direct fit was not possible without some workarounds. We ran into roadblocks from time to time but found a way out eventually and felt very satisfied that a Sunday was well spent.
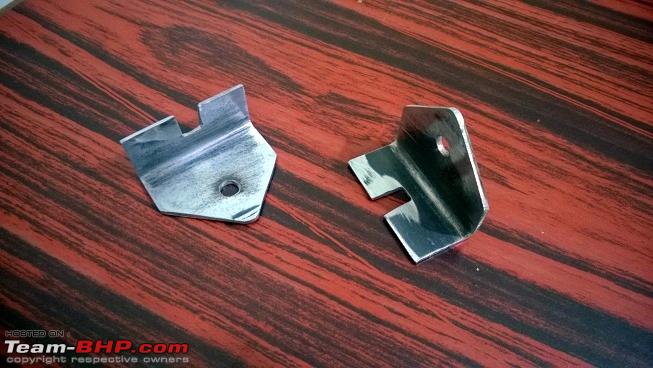
The clamps were the major culprit throughout this DIY. This was the initial design of the clamps:

And we decided to have two of these - one each for the hood and the chassis but neither of these would fit properly because the clamp would interfere with the hood while closing.
The paint was nicked at the bonnet as a result:

Then, the triangular top portion was chopped off. And this was the revised design:

These worked but the strut would still interfere with the hood because the clamp screwed at the chassis was not proper.
Finally, the eureka moment! The same ring spanner which was used for unscrewing the gr. 8.8 hex. head bolt in the chassis:
...was also used for screwing the ball stud.
Then it struck us - the bolt could also be of M6 thread so why use the clamp at all? Why not just replace the bolt with the ball stud? We gave it a try and it worked beautifully:
The clamp at this location was not required and was removed entirely. And this clamp could be used at the hood so the length of the strut (480 mm) would not be an issue. And it worked. If the strut had a higher force rating, it would have pushed the hood the moment the user detaches the lock. In this case, it requires us to take it to a certain height and leave it.
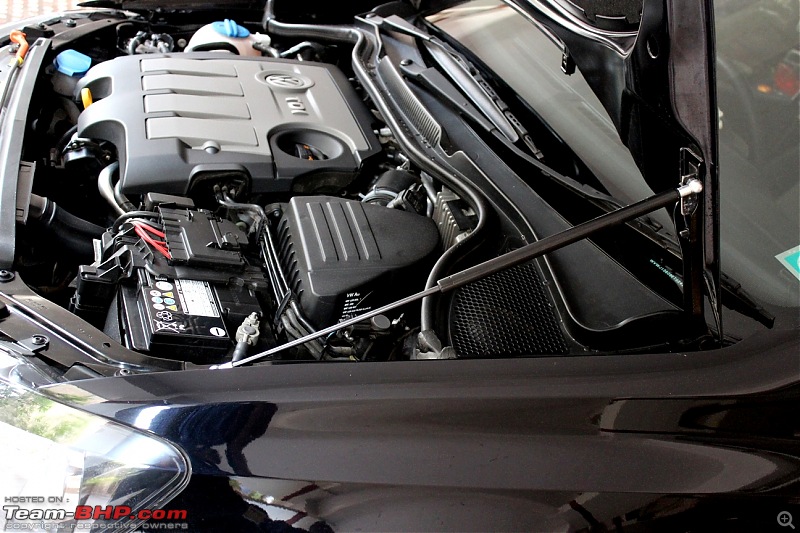
Finally, we figured out that when the strut was mounted with the cylinder on the chassis end, the hood would vibrate/shake a bit as it opens completely. Check out this video:
https://www.youtube.com/watch?v=JPyLaKKHaI0
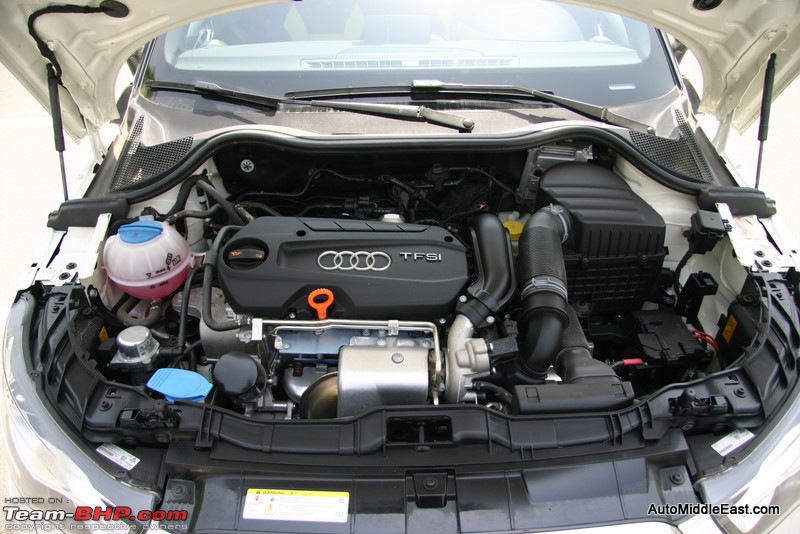
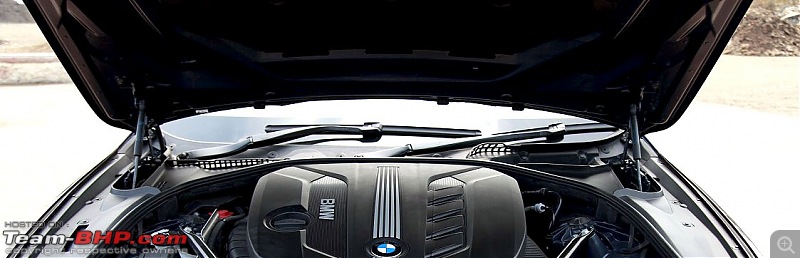
Then, we noticed that in some of the high end cars, the strut was mounted with the cylinder on the hood end and not the chassis end. For instance:
Audi A1:
BMW 520d:
Merc S500 coupe:

So we swapped the strut ends:
And voila!
https://www.youtube.com/watch?v=6zUcRcL2reI
The vibrations were gone!
- Warranty concerns:
This DIY is entirely reversible save for the paint nicks on the bolt heads and nuts when they were screwed/unscrewed using the spanner. No holes were drilled anywhere in the chassis or on the hood. Returning back to the stock state takes less than 5 minutes. If you feel that your car service center might make an issue out of this mod, it is better to play safe and undo the modifications.
A big shout-out to my roomie
Moorthy for helping me with the DIY and BHP'ian
ecosport rules who had installed a strut on his Ecosport's hood and shared the idea with the community. :)
Thank you for reading.
PS: Few images were sourced from Google Images. All images are copyrighted and property of their respective owners.
Note from Mod : Moved the thread from Assembly Line to Technical Section. Thanks for sharing
Lovely mod again Gannu. And as usual, executed to perfection there.
Your way of getting the right parts than contemplating on jugaad is quite impressive. At the end of the DIY, it certainly leaves an impression that it is not an aftermarket fitment or a DIY and looks almost OEclap:.
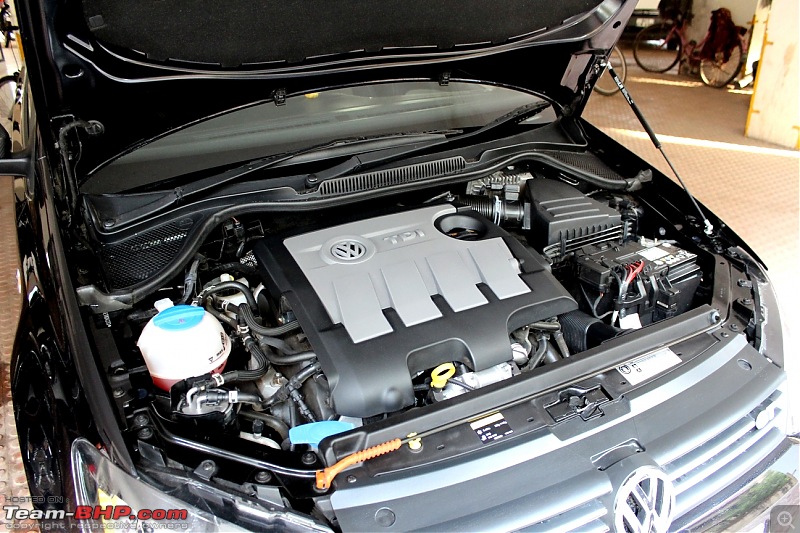
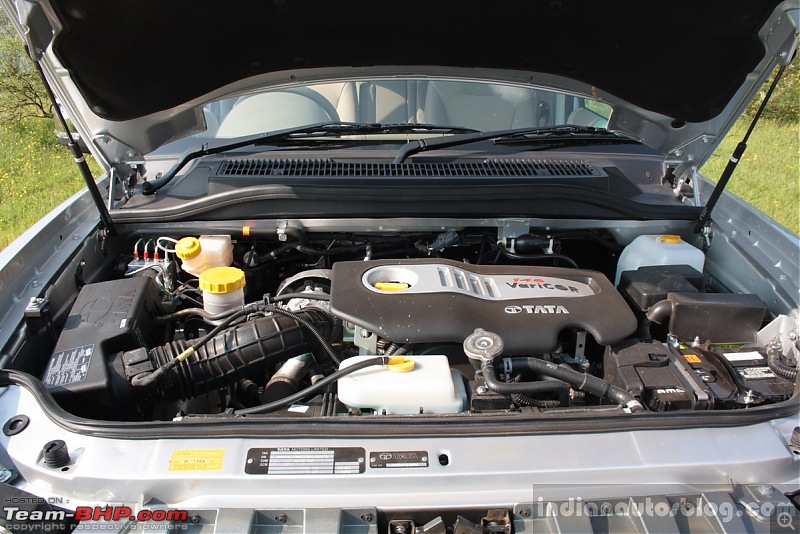
Very nice work, both planning and execution! :thumbs up I too was thinking of something like this but never got started. I am concerned about heat in the engine bay and this is compressed gas in a cylinder. Looking at the OE gas lift photos you have posted the engine area is sealed off from the strut area. But maybe the heat is not of a huge concern because our desi Safari has the strut well within the engine compartment.
Good one Gannu_1, your execution was to perfection. With all the DIY done and i am sure many more to come on your Polo it seems like you will be DIY specialist on Team-bhp :D.
Keep them coming its a perfect way for noob person like me to learn :thumbs up
Interesting DIY here and congratulations on the results too.
Most of the cars, need the hood to be dropped from a distance for it to lock into position and not sure if this car also needs the same. If they are pressed by hand, there is a chance of the bonnet being misaligned. How is that taken care of through this?
Good Job :thumbs up
Quote:
Originally Posted by dass
(Post 3453033)
Interesting DIY here and congratulations on the results too.
Most of the cars, need the hood to be dropped from a distance for it to lock into position and not sure if this car also needs the same. If they are pressed by hand, there is a chance of the bonnet being misaligned. How is that taken care of through this?
|
You just need to press the hood below with both hands , Safari has gas strut in bonnet from initial 1998 version ,If size requirement is same interested members can buy gas strut from T.A.S.S spare parts counter.
Extremely interesting! I believe we had something like this in our old fiat, where no one needed to hold it open, even if the locking rod was not fixed in place. (I believe it was spring based). I will now move the DIY ahead in earnest for my present vehicles.
Thanks.
@Gannu_1
Could you help me with the rear hood pop DIY for polo. Just like the one that ECS Tuning sells for Golf, etc.
I am trying to figure out which strut to order.
This is an amazing DIY. Already ordered these struts for my bonnet DIY.
Thanks
Good one Gannu_1. Perfect planning and execution. Doesn't look like a DIY job. Looks like factory fit. After seeing this I have started thinking about fitting one in my Rapid. Hope the specification of the strut will be same for Rapid.
Quote:
Originally Posted by Sankar
(Post 3452846)
Very nice work, both planning and execution! :thumbs up I too was thinking of something like this but never got started. I am concerned about heat in the engine bay and this is compressed gas in a cylinder. Looking at the OE gas lift photos you have posted the engine area is sealed off from the strut area. But maybe the heat is not of a huge concern because our desi Safari has the strut well within the engine compartment. Attachment 1249081
|
Did you notice? The safari does not have the cylinder on the hood end. I wonder if it vibrates as stated by gannu.
I guess the heat shouldn't matter since they are placed far away from the engine and there should be enough circulation of air to keep temp under control. Would there be a rating of how much heat these gas struts can withstand?
Quote:
Originally Posted by sudeepg
(Post 3453269)
Did you notice? The safari does not have the cylinder on the hood end. I wonder if it vibrates as stated by gannu.
I guess the heat shouldn't matter since they are placed far away from the engine and there should be enough circulation of air to keep temp under control. Would there be a rating of how much heat these gas struts can withstand?
|
No it doesn't vibrate and Safari hood is lot heavy then other cars.
Gas filled is nitrogen usually so heat shouldn't be an issue.
Fine work Gannu. So clamp is used only at the chassis end. Let me explore for my Figo.
If the strut is not used for a quite long time (hood not opened frequently) will it affect the performance or life?.
How to find the maximum length (extended length) used by the hood?
Another exemplary piece of work. Your DIYs are very close to what I'd call professional. Great going. Few questions/inputs:
1. Are the clamps primered & painted? It doess look like they are, but couldn't be sure. Some kind of anti-rust treatment would be ideal.
2. The single gas spring looks like it's good enough to handle the weight of the hood, but two would provide for better symmetry. Both terms of lifting/retention forces and appearance.
Appearance? Under the hood? Yes, I believe in that a lot. A well laid out engine bay with neatly routed cables and hoses is always such a treat to watch... :D
Seeing this, I am now interested in doing the same for the hood and boot on my Vento.
Could you please inform me as to the following:
1) What is the exact model/spec of the strut you purchased for your Polo?
a) Can the same be used for the Vento?
b) If not, what model would you suggest?
2) What model/spec should I order to replace the spring arm on my Vento's boot lid?
a) Would any additional parts/mods be required for attaching this to the Vento's boot?
My wife has a colleague currently in the UK, so we can probably ask him to bring the stuff down when he returns to India, so shipping is (probably) not an issue.
| All times are GMT +5.5. The time now is 12:40. | |