Those of you who have followed my posts over the years will have picked up I am an engineer and a (private) pilot. I have made several engine models over the years, from assembling some plastic model kits to building my own 2-stroke engine made on my home lath and mini mill.
Quite some time ago, I came across a model of the famous Wright Cyclone 9 radial engine. A legendary engine from an engineering and aviation perspective.

I picked it up by visiting this fantastic store, only a few kilometres away from Amsterdam Schiphol airport in the Netherlands.
https://www.aviationmegastore.com/en/
If you are a model builder, you will know the feeling. If you see a model kit you really want, you buy it, hang the cost! Subsequently, it goes on the pile of other "must-have kits" in your shop. I know modelbuilders who own a larger stock of kits than most professional model kit shops. Seriously, I kid you not.
You will be happy to hear, I just finished the building of this famous engine. Not sure what brought on this spur of activities. It might have something to do with the fact that the DDA (Dutch Dakota Association) just made its final commercial flight. It's curtains for its wonderful DC3 Dakota. The Dakota DC3 was powered by two of these Wright Cyclone engines. The Dakota was also the very first plane I flew on. As a little boy, for my birthday, my dad took me on a flight in a Martinair Dakato, flying over Amsterdam. Since then, I have also flown Dakota's commercially as a passenger in South America.
Before we dig into the building part of this kit, let's spend a few moments with the real McCoy. Images courtesy of the Internet.

The Wright Cyclone series began in 1924 with a U.S. Navy contract for a nine-cylinder air-cooled radial engine having approximately the same displacement as the water-cooled World War I era Liberty engine. By 1930 the Cyclone displacement had grown considerably, and the R-1820 played a major role in establishing scheduled airline operation in the U.S. and abroad, particularly with the highly successful Douglas DC-3.
The R-1820 Cyclone 9 represented a further development of the Wright P-2 engine dating back to 1925. Featuring a greater displacement and a host of improvements, the R-1820 entered production in 1931. The engine remained in production well into the 1950s.
The R-1820 was built under license by Lycoming, Pratt & Whitney Canada, and also, during World War II, by the Studebaker Corporation. The Soviet Union had purchased a license for the design, and the Shvetsov OKB was formed to metricate the American specification powerplant for Soviet government factory production as the M-25, with the R-1820's general design features used by the Shvetsov design bureau for many of their future radials for the Soviet air forces through the 1940s and onwards. In Spain, the R-1820 was license-built as the Hispano-Suiza 9V or Hispano-Wright 9V.[2]
The R-1820 was at the heart of many famous aircraft including early Douglas airliners (the prototype DC-1, the DC-2, the first civil versions of the DC-3, and the limited-production DC-5), every wartime example of the Boeing B-17 Flying Fortress and Douglas SBD Dauntless bombers, the early versions of the Polikarpov I-16 fighter (as the M-25), and the Piasecki H-21 helicopter.
The R-1820 also found limited use in armoured vehicles. The G-200 variant developed 900 hp (670 kW) at 2,300 rpm and powered the strictly experimental M6 Heavy Tank.
If you ever find yourself in an aviation museum, chances are there will be a Wright Cyclone 9. If you are lucky, it could be one of these cut-away ones. Have a good look. It is incredibly well-engineered (for its era of course)

There are dozens and dozens of different variants. Over its life span, it went from initially producing some 550HP to well over 1525HP in its latest version. This also meant it broke the magical 1-pound weight per 1 Horsepower ratio!!
Its official type designation is a single brown, radial, air-cooled, single-speed supercharger, 9 cylinders, compression ratio 6,8:1. Developing max horsepower at around 2800 RPM at sea level.
Another interesting fact I found out about the model kit. Originally the kit was developed and manufactured by the well-known plastic model kit manufacturer Monogram in 1959. I am from 1959!
Not sure how it ended up being branded as an Atlantis kit. From what I can tell, 99,9% sure, Atlantis is still using the original 1959 moulds! And cheap plastic!
The fit and finish of the parts is, and I am putting the diplomatically, leaves something to be desired".

The kit comes with an almost A3-sized assembly instruction.


It also comes with a small booklet about the history of this engine, the planes it was used in and so on.

If you were ever in doubt that this is a kit produced by an American manufacturer. Check out the conversion from inches to cm. Whenever I get the chance I am using this image to tease Americans on Facebook. Of course, American inches must be considerable bigger than anybody's else's!


As you can also see in the above image, only 64 parts. So not that complicated.

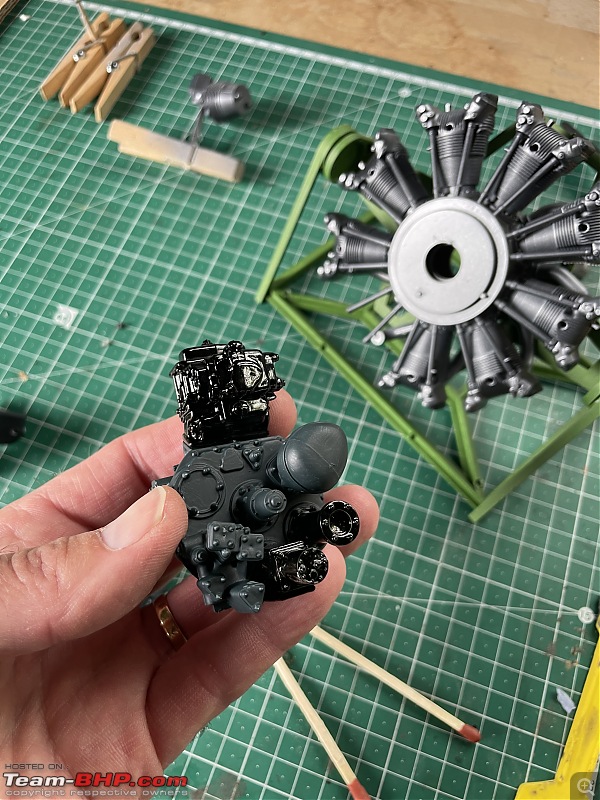
So I set off a few weeks ago and started assembling various bits

It is possible to build the model with one "cutaway" cylinder so you can see the piston. I chose not to do so.

Back to the horrible quality of the parts. Look at this!! These are the spark plug leads. They are made from a kind of very soft, flexible plastic. And you can see, they are not particularly well made either. What you see on the edges is usually the result of poorly made or worn moulds.

Nevertheless, we are making progress!


The kit comes with this engine stand. Again, same cheap soft, almost greasy, type of plastic.

I had been discussing my progress with our son Thomas. Who is very much into model building, in particular the so-called Warhammer games/models. His work is phenomenal.
I have built a lot of plastic and wooden models in my teens, but not much since. Except for the ones I have shown here on the forum in various threads. Paints have come a long way in the last 50 years!
So Thomas advised me to use a spray-on primer and also spray paint for the metal colours. We visited a well-known model kit shop in Rotterdam and bought various paints and spray cans.

Never heard of them in my time, but these days acrylic paint is all the rage.

On a nice sunny day,I sprayed the various parts. Day one with primer, day two with the metal colours.

I must say I was very impressed with the result of the primer and the subsequent metal paint!

The acrylic paint works well too!


 20th October 2024, 20:42


 (23)
Thanks
(23)
Thanks


