Team-BHP > In-Car Entertainment
Register New Topics New Posts Top Thanked Team-BHP FAQ


Reply
  Search this Thread
10,442 views
Old 20th September 2023, 10:02   #1
Distinguished - BHPian
 
vigsom's Avatar
 
Join Date: Feb 2006
Location: NSEW
Posts: 3,831
Thanked: 26,695 Times
Installing Car audio (ICE) myself | My way of beating post operative blues

Introduction

The intent behind these posts is not to

* define or defend the choice of audio equipment shortlisted and installed

* claim that I have in-depth knowledge of audio equipment

but the intent definitely is to narrate how one can beat blues by undertaking something exciting, all by oneself!

Background

I've already outlined my journey pre and post coronary artery surgery here. It is a known fact that many folks who go through this procedure suffer lows, and I was warned of the same by my well wishers. For me, excitement = try something challenging, something I've never done before on my own. Post discharge from hospital, I'd already set myself two small targets to keep the excitement alive

1. charging automotive aircon refrigerant myself (already documented on the forum)
2. getting an ICE installed

For item#2 above, I was thinking of what equipment to source, from whom to source, and where to get this installed, when suddenly, taking a cue from target#1, I thought to myself, "Why not do this myself?". Although the decision to do it myself hadn't been taken, the die seemed to have already been cast!

Last edited by graaja : 20th September 2023 at 22:17. Reason: As requested
vigsom is offline   (21) Thanks
Old 20th September 2023, 10:12   #2
Distinguished - BHPian
 
vigsom's Avatar
 
Join Date: Feb 2006
Location: NSEW
Posts: 3,831
Thanked: 26,695 Times
Re: Installing Car audio (ICE) myself | My way of beating post operative blues

Project ICE - ingredients

Having got audio upgrades done in two of my earlier cars, I was absolutely clear on re-using the equipment I've been carrying all these years, and only filling the blanks.

What was available

1. Kenwood 6033BT Head Unit already in the car
2. RCA cables - I had 4 of them from my 2003 Toyota Corolla; two long RCAs and two of medium length
3. Oxygen Free Copper (OFC) speaker cables - some were already cut to custom length to be connected to an under-seat amplifier
4. Main power line from the battery with a glass fuse holder with a 40A fuse
5. Philips 10" subwoofer in a custom MDF sealed box

Items #2 to 5 have been with me since 2008-10, and were lying mothballed for over 12 years. I never thought of installing this in my later cars only because I really never felt the need to do so.

(PS: I was also carrying my Kenwood KAC-8401 amp, with Monster Interconnect RCAs, the power cable, ground cable, remote wiring, and some OFC wiring cables but lost that entire set to seepage from the floor above sometime in 2014; had to discard the whole set into trash thanks to this damage. )

Filling in the blanks

I've never been great at selection of audio equipment, and this time, did not have the time to do auditions (I was advised complete home rest), and so the only way out was to look on line and find out what was available at the right price point. I looked at GTO609c, Alpine S65C, Morel Maximo 6, Infinity Reference 6530 on amazon.in. i was inclined towards the Alpine and the Morel, but wasn't sure of the kind of stuff that would be delivered. I also looked at several youtube videos to get an idea of what was available at what price point. While I was in this quandry, I got in touch with a supplier from NCR, saw some of his installs, some testimonials of his integrity, and got in touch with him. I eventually got the following at pretty reasonable prices, and received the stuff in good time despite the then logistical disturbances in NCR:

1. Component speakers - Steg Leo 650c
2. Four Channel Amplifier - Cerwin Vega 1200.4D
3. Spacers - Ferry Rain Guard
4. Silicone cones for spacers/speakers
5. Damping sheets - Vibromax 4 sheets

In addition, after I was cleared for short distance commutes, I went over to the full-of-life SP Road and got the following cables and connectors:

1. Power (Red) and ground (black) cables - (8AWG or approx10 sq.mm) - 03 metres
2. Remote cable (01 sq.mm) - 03 metres
3. Oxygen free copper cable for the subwoofer - 05 metres
4. Nylon sleeve black (8mm) - 08 metres
5. lugs for cable ends
6. gland for the power cable (if needed)

I also got a wire stripper cum cutter cum crimper from amazon, which is a very useful tool (as I learnt later during the execution phase)

Audio equipment and accessories
Installing Car audio (ICE) myself | My way of beating post operative blues-ice_equipment.jpg

Steg Leo 650c speakers (no separate crossover here)
Installing Car audio (ICE) myself | My way of beating post operative blues-ice_speakers.jpg

Cables and lugs
Installing Car audio (ICE) myself | My way of beating post operative blues-ice_cablesterminals.jpg

Wire stripper
Installing Car audio (ICE) myself | My way of beating post operative blues-ice_wirestrippercuttercrimper.jpg

Last edited by vigsom : 20th September 2023 at 16:26.
vigsom is offline   (16) Thanks
Old 20th September 2023, 11:47   #3
Distinguished - BHPian
 
vigsom's Avatar
 
Join Date: Feb 2006
Location: NSEW
Posts: 3,831
Thanked: 26,695 Times
Re: Installing Car audio (ICE) myself | My way of beating post operative blues

Quick impressions on the audio equipment

Since I'd procured car audio equipment after over 14 years, here are my impressions from then and now, focusing only on the now negatives

1. the user manuals now are zilch compared to then
2. speakers - no separate crossover in the Steg Leo, a few bits of wire given unlike full wiring in my earlier Boston Sxi606, the manual has no instructions on how to push the tweeter out of the pod. Bostons had a straightforward twist and remove tweeter which could be housed in another pod on the dash.
3. Amp - no speaker level inputs, the frequency range doesn't have graduations like in my earlier amp

Steg Leo 650
Installing Car audio (ICE) myself | My way of beating post operative blues-ice_speakers.jpg

BostonSXi606
Installing Car audio (ICE) myself | My way of beating post operative blues-boston_sxi606_woofercrossover.jpg

Steg Leo Tweeter - had to use a small screwdriver and tap the tweeter out - rather crude
Installing Car audio (ICE) myself | My way of beating post operative blues-ice_stegleopod.jpg

Pod to mount tweeter on the A-Pillar or dash
Installing Car audio (ICE) myself | My way of beating post operative blues-ice_stegleopod2.jpg

Boston SXi606 tweeter pods and accessories - part of the accessories have already been used in another car
Installing Car audio (ICE) myself | My way of beating post operative blues-ice_bostonsxi606.jpg

Input side - Cerwin Vega 1200.4D
Installing Car audio (ICE) myself | My way of beating post operative blues-ice_amp_audiocontrols.jpg

Input side - Kenwood 8401 (note the distinct markings
Installing Car audio (ICE) myself | My way of beating post operative blues-ice_8401_audiocontrols.jpeg

Output side - Cerwin Vega 1200.4D
Installing Car audio (ICE) myself | My way of beating post operative blues-ice_amp_powernoutput.jpg

Output side - Kenwood 8401
Installing Car audio (ICE) myself | My way of beating post operative blues-ice_8401_powerside.jpeg

Last edited by vigsom : 20th September 2023 at 15:55.
vigsom is offline   (18) Thanks
Old 20th September 2023, 12:24   #4
Distinguished - BHPian
 
vigsom's Avatar
 
Join Date: Feb 2006
Location: NSEW
Posts: 3,831
Thanked: 26,695 Times
Re: Installing Car audio (ICE) myself | My way of beating post operative blues

Preparations for installation

1.Trial placement of the amplifier : The first step here was to place the amplifier below the front left seat to check if it fitted in there; it showed a good fit (no liberal clearances though) and I reconfirmed this also giving due clearance for cable dressing for the power side wiring and audio output wiring. All looked good

Amplifier placed at the intended location
Installing Car audio (ICE) myself | My way of beating post operative blues-ice_amp_trialplacement.jpg

2. Power cable from battery to fuse : Next, was to lay the power cable from the battery end to the fuse. The first thing was to disconnect the battery negative to prevent any inadvertent shorts. I laid the cable from the battery with the glass fuse holder (one of the parts I was carrying with me since 2010 in the Corolla), and it was as if it was perfectly designed for this car. I decided to finally lay in such that it rested below the fuel filter clamp - no accidental tugging at the cable in case the filter is replaced

Battery negative disconnected
Installing Car audio (ICE) myself | My way of beating post operative blues-ice_powersource.jpg

Cable from battery to fuse holder
Installing Car audio (ICE) myself | My way of beating post operative blues-ice_cablenfuse.jpg

3. Glove box and glove box rear panel removall: Removal of the panel behind the cabin air filter so that one could see the firewall

Glove box and its rear panel removed
Installing Car audio (ICE) myself | My way of beating post operative blues-ice_gloveboxandpanelremoved.jpg

4. Power cable laying from fuse to inside: There is this wiring harness that moves to/fro the ECU to the engine side via a water-proof grommet on the firewall. I've seen this in all older SUVs that are designed for water wading. Apparently this is to project against water ingress into the cabin (not sure). I could not find a single opening/rubber plug anywhere else in the firewall to route the power cable. Keeping the damage minimum, I opened one bolt on the grommet, examined the inside, poked a few holes in the rubber grommet conical end using a cobbler's (mochi) needle, wetted the outer surface of the power cable with some water (for lubrication
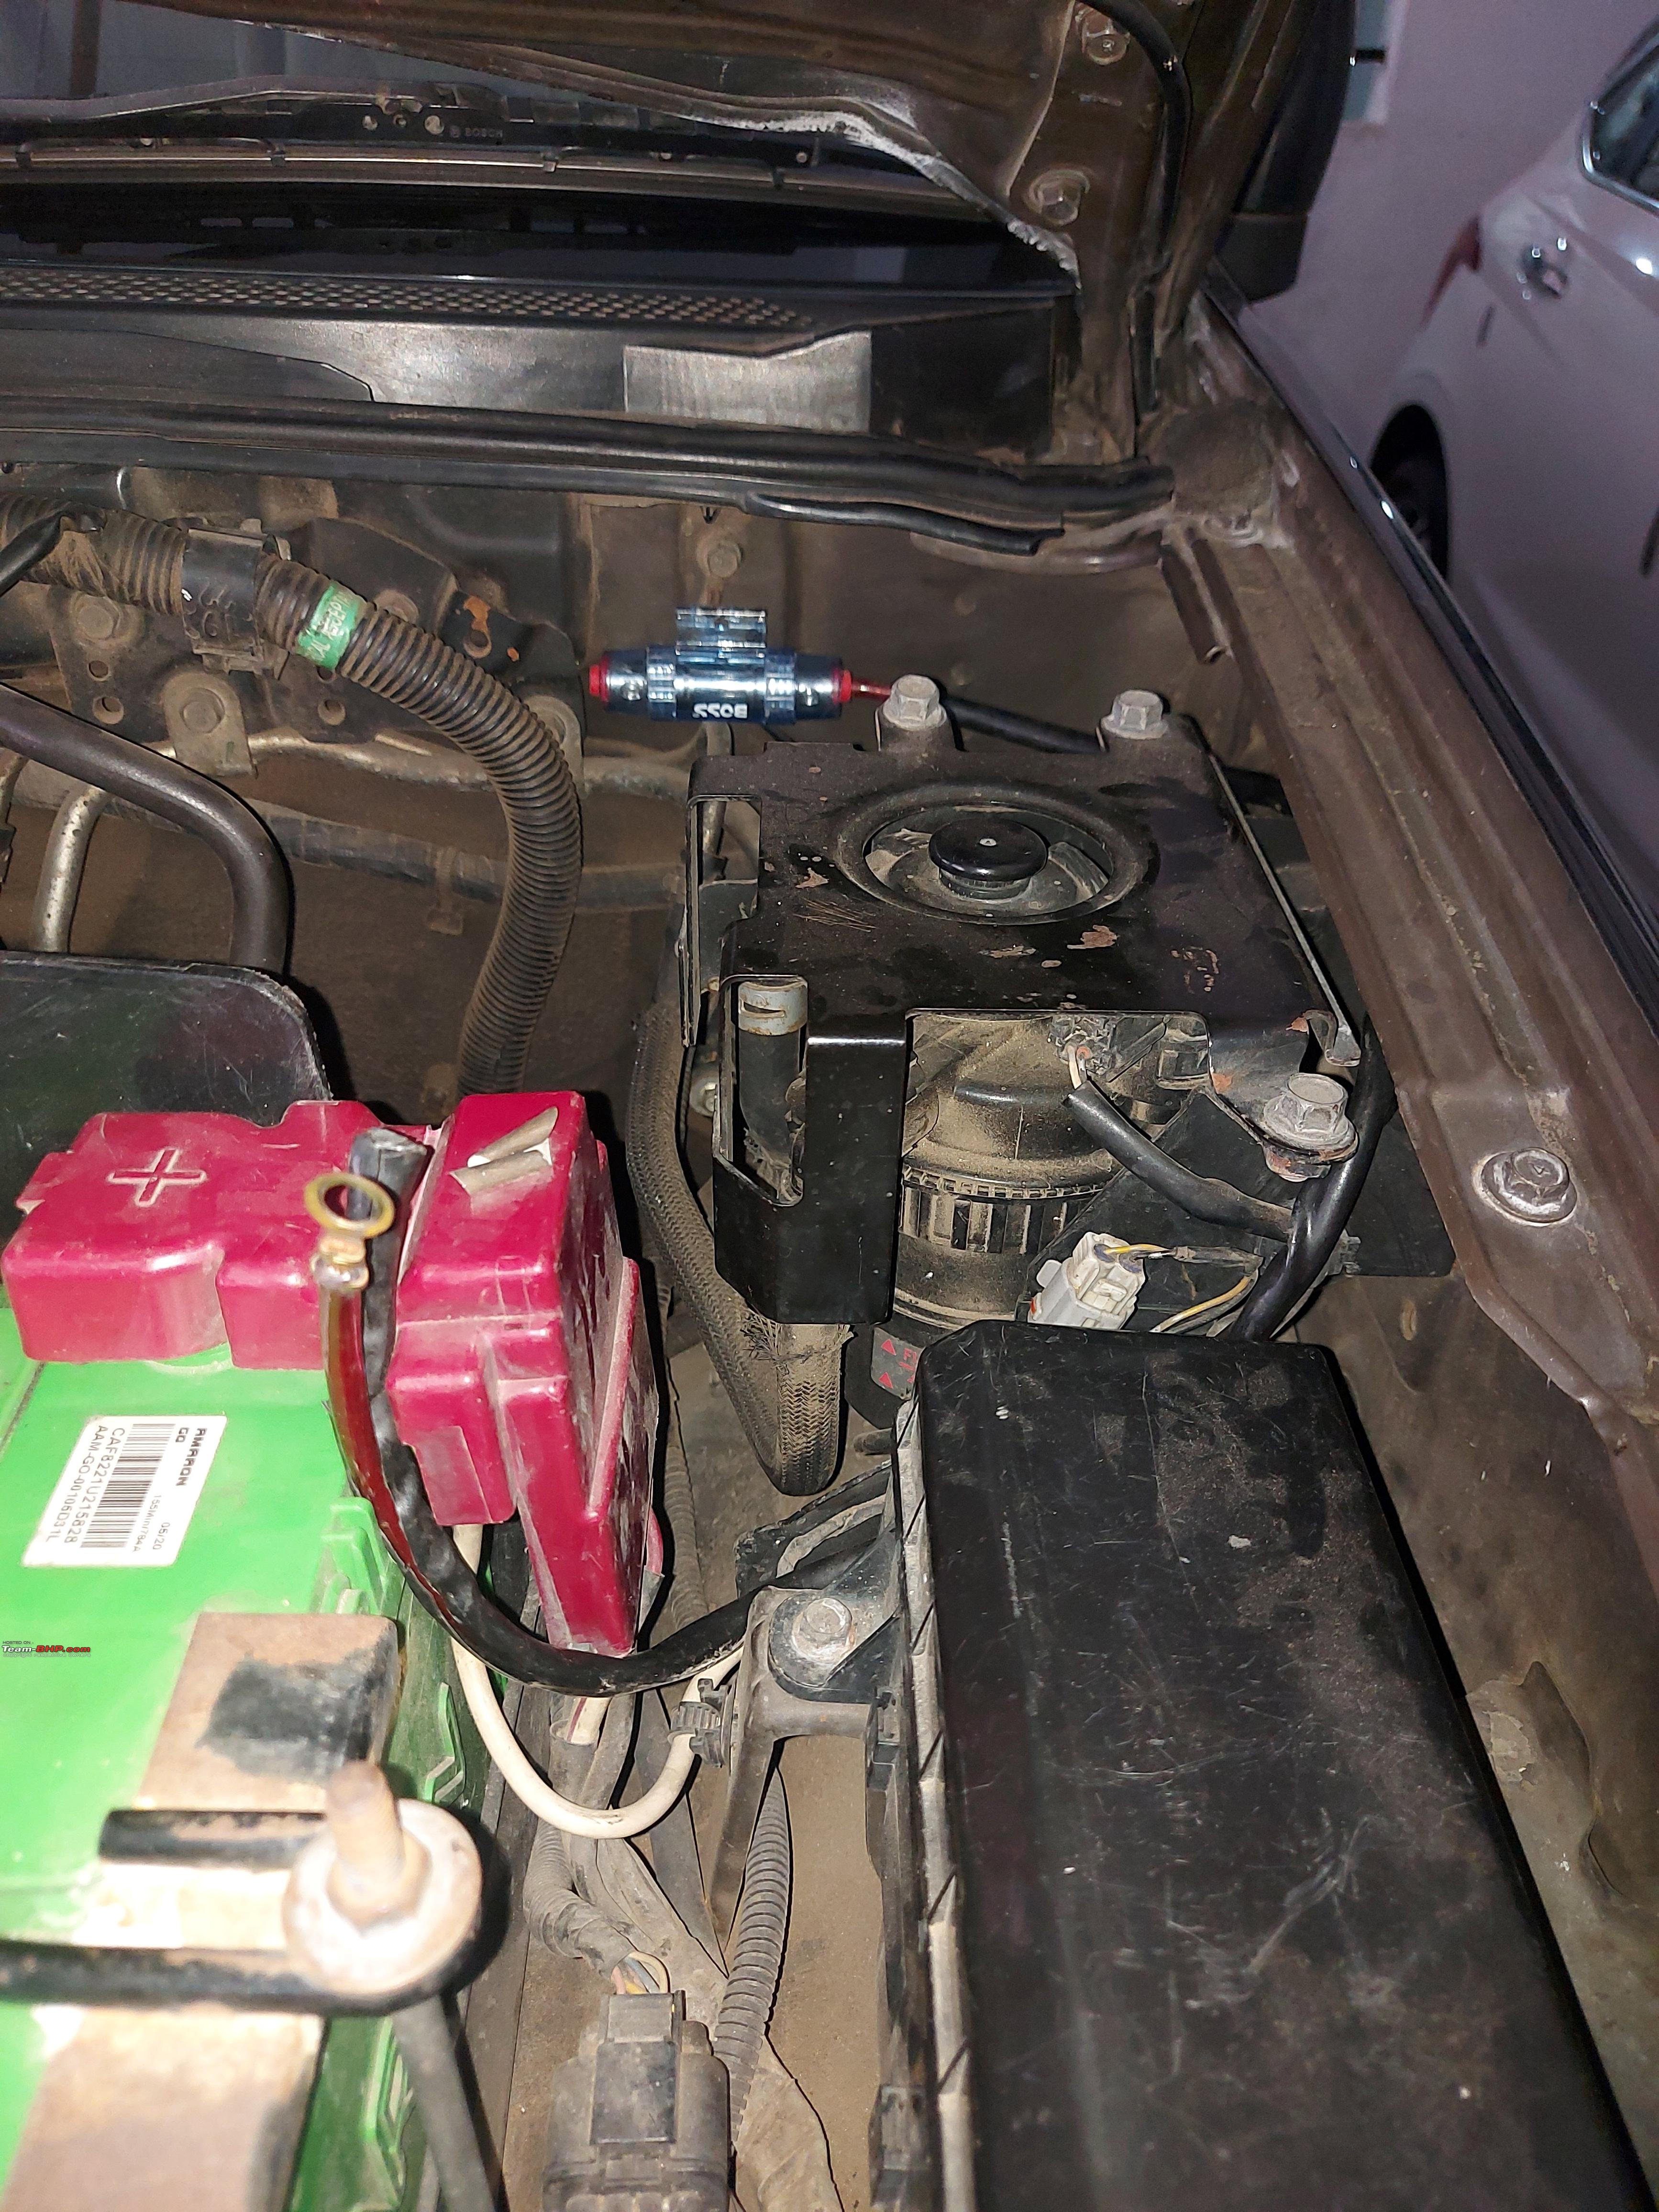
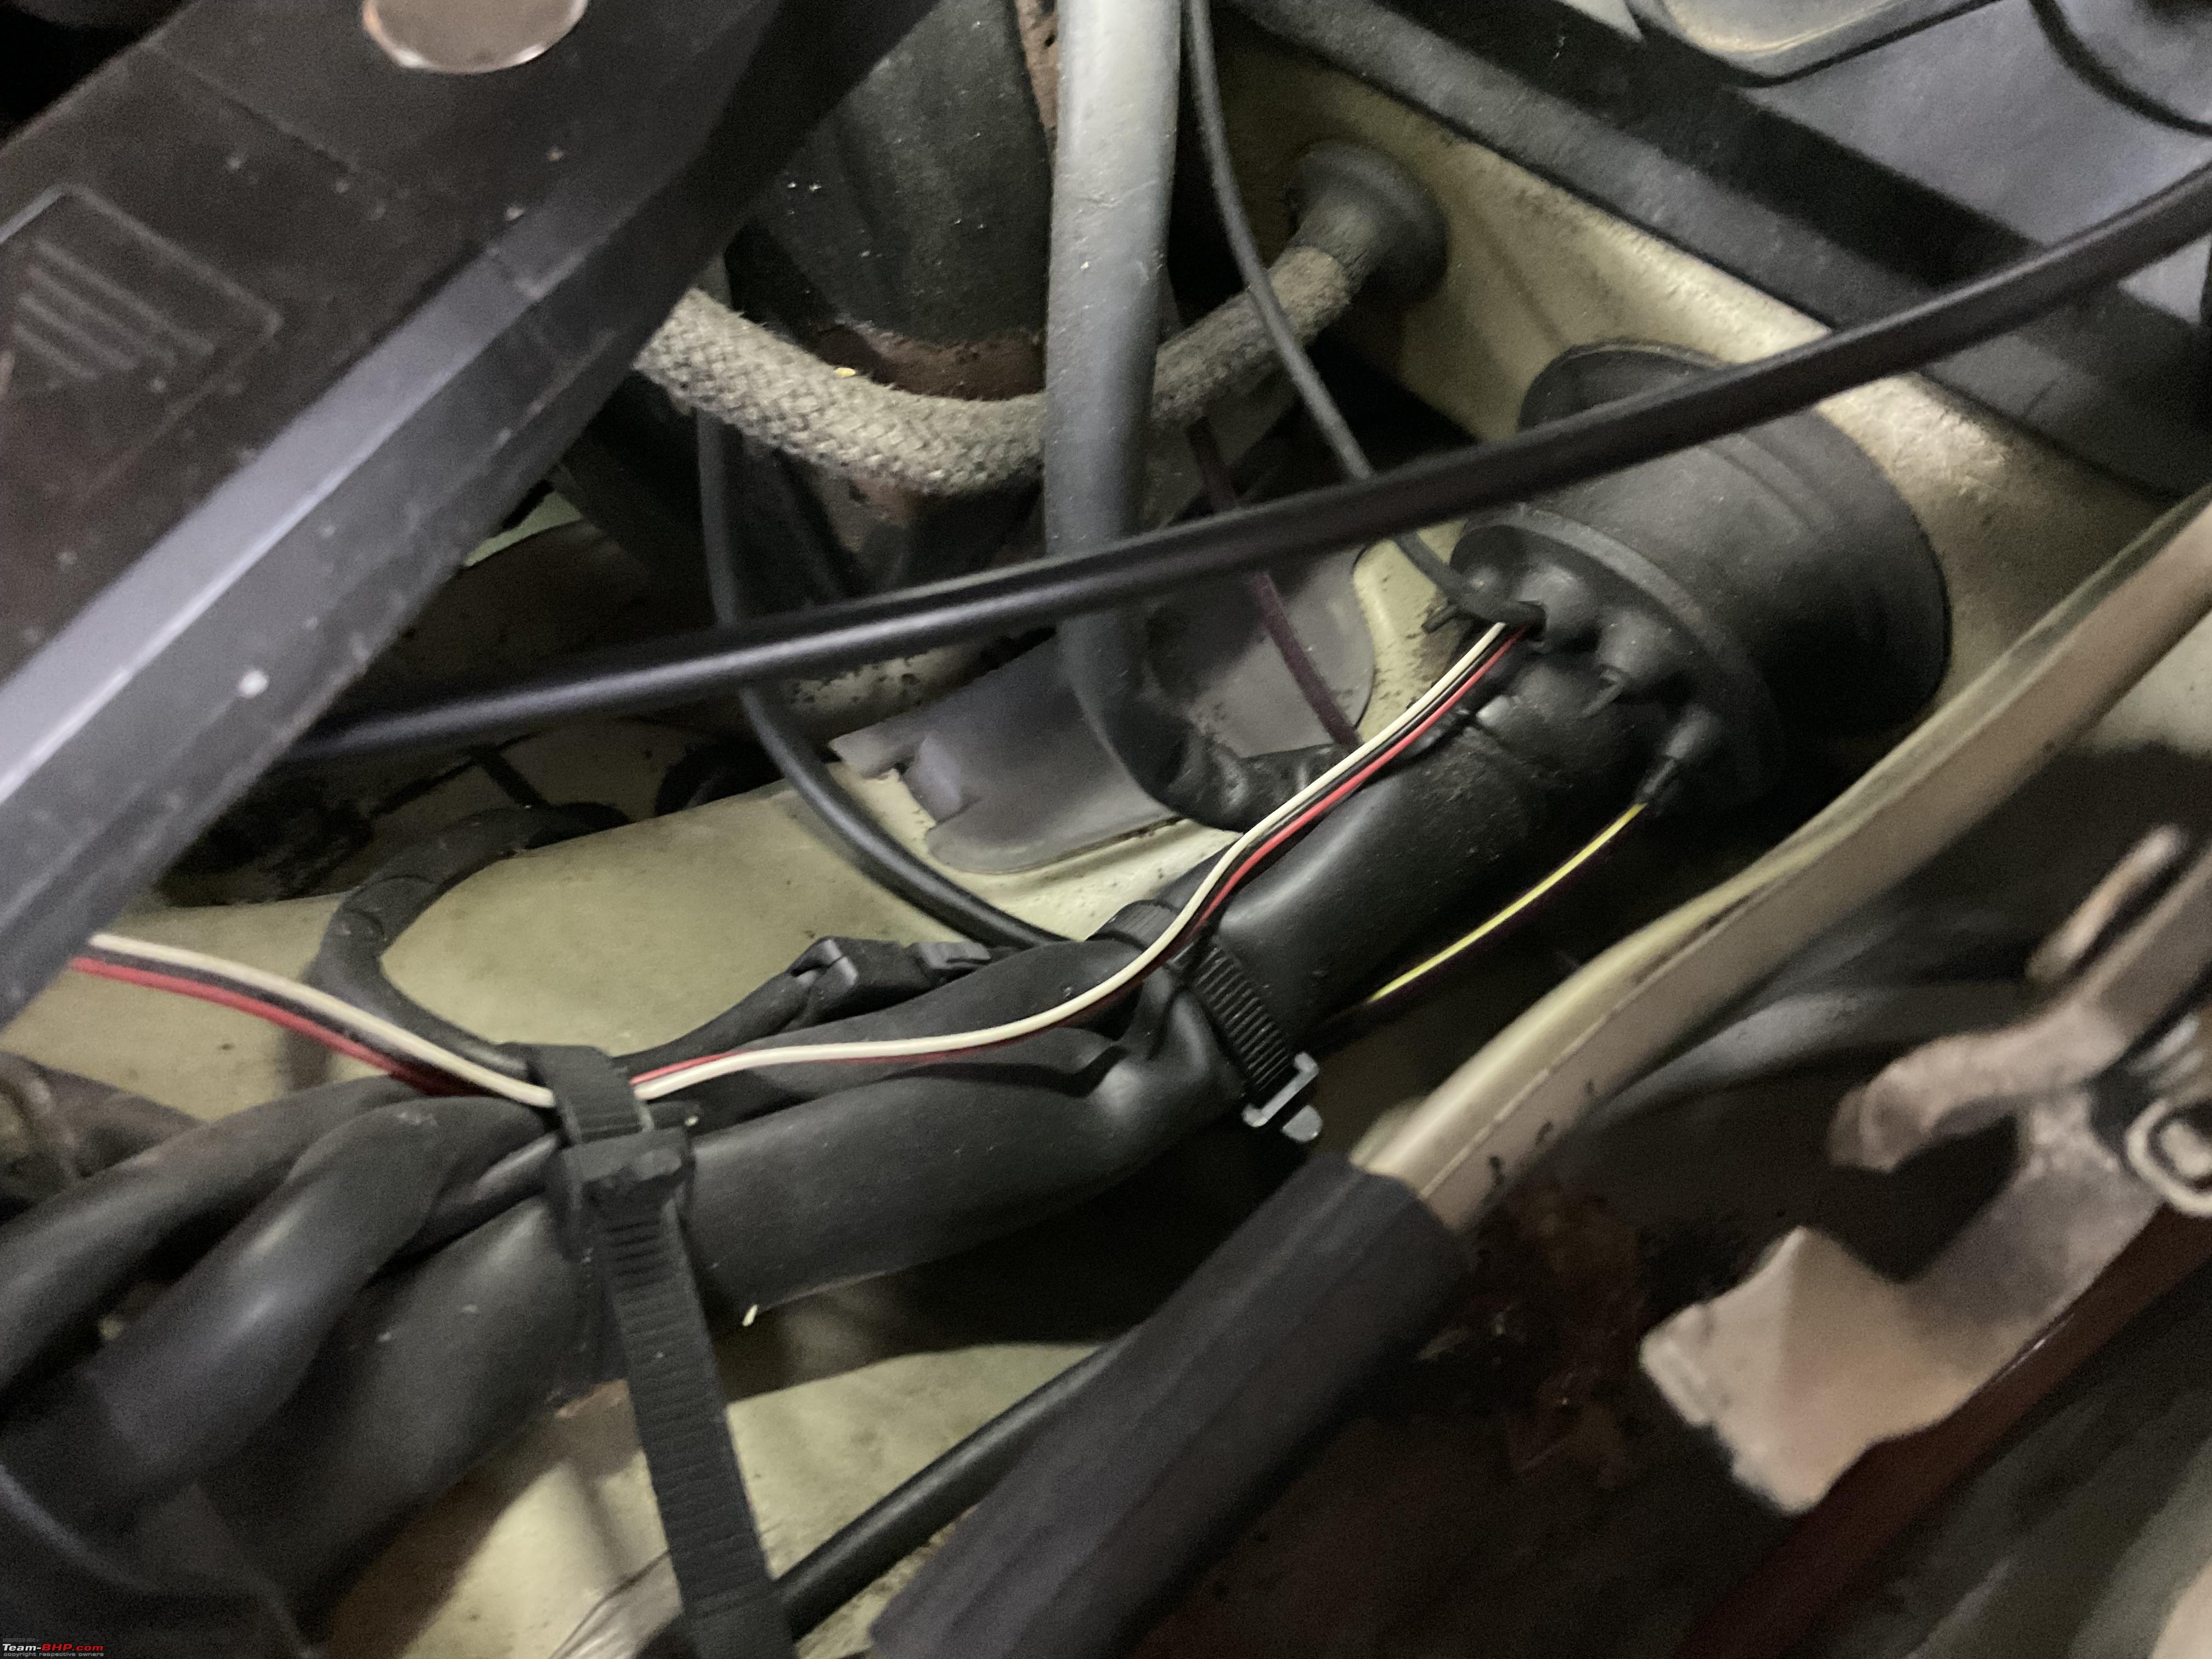
) and inserted it through the grommet. I laid the power cable such that it would be routed alongside the transmission tunnel all the way to the amplifier


Installing Car audio (ICE) myself | My way of beating post operative blues-ice_powercableinside1.jpg
Installing Car audio (ICE) myself | My way of beating post operative blues-ice_powercableinside2.jpg
Installing Car audio (ICE) myself | My way of beating post operative blues-ice_powercableinside3.jpg

Installing Car audio (ICE) myself | My way of beating post operative blues-ice_powercableinside4.jpg

5. Ground wire: I chose one of the seat bolts for the grounding points, and used some 80 and 400 grade emery to roughen the surface for good grounding

Ground point
Installing Car audio (ICE) myself | My way of beating post operative blues-ice_groundbolt.jpg

6. Removal of the left front seat for the amplifier installation and scuff plates and kick panels for the wiring routing

Installing Car audio (ICE) myself | My way of beating post operative blues-ice_seatnpanelsremoval.jpg

7. Front door pads removal : Removing the door pads isn't as easy as it seems when we see fitment guys do it; one screw on the inside door lever and the power window switch assembly need to be removed, then open the door panel starting from the speaker side until the door clips pop out, and gradually work one's way up. Separating the door lever mechanism from the main door panel is to be done extremely carefully - two flimsy locks to be unlocked and two screws to be removed

Installing Car audio (ICE) myself | My way of beating post operative blues-ice_doorpad1.jpg

Installing Car audio (ICE) myself | My way of beating post operative blues-ice_doorpad_2.jpg

Installing Car audio (ICE) myself | My way of beating post operative blues-ice_frontleftdoorpaneloff.jpg

Last edited by vigsom : 20th September 2023 at 15:59.
vigsom is offline   (17) Thanks
Old 20th September 2023, 12:55   #5
Distinguished - BHPian
 
vigsom's Avatar
 
Join Date: Feb 2006
Location: NSEW
Posts: 3,831
Thanked: 26,695 Times
Re: Installing Car audio (ICE) myself | My way of beating post operative blues

Surprise #1

When it was time to lay the speaker cables, here comes a surprise - this car has twist to open speakers and surprisingly, the speaker mounting hole is triangular and not circular. There was no way the speaker spacer rings would go in unless the weather covering was chopped off. Have I to abandon the speakers installation? I decided on something else

Stock speaker mounted on the front left door - note no screws
Installing Car audio (ICE) myself | My way of beating post operative blues-ice_speakermounting_ps_1.jpg

Speaker removed
Installing Car audio (ICE) myself | My way of beating post operative blues-ice_speakermounting_ps_2.jpg

Just FYI, the stock speakers in the Mitsubishi sport larger magnets than stock speakers in other equivalent cars.

Stock speaker of the old Grand Vitara vs the Mitsubishi
Installing Car audio (ICE) myself | My way of beating post operative blues-ice_oespeaker_gv.jpg

Installing Car audio (ICE) myself | My way of beating post operative blues-ice_oespeaker_ps.jpg

Opportunity in adversity

The rear right speaker hadn't been firing since Aug-2021 when I got the car AC done up. On diagnosis now, I found that the speaker continuity was zero viz. dead speaker. I decided to use this as an opportunity to create a speaker spacer from this dead speaker. It would be a straight fit with no extra holes needed to be drilled in the door frame. I first separated the cone, spider (voice coil) from the speaker and then chopped off the magnet supports. Next, was to trim other supports so that the new spacer ring would sit seamlessly on the Steg speakers. Also, this spacer thickness was 30mm against the 20mm on other standard spacers, so I wondered if they'd not foul with the door pads. Holes in this spacer could not be drilled anywhere so the speaker had to be placed in the spacer and then the screw points had to be defined.

Speaker confirmed dead!
Installing Car audio (ICE) myself | My way of beating post operative blues-ice_rearrightspeaker_dead.jpg

Dead speaker cone, spider, voice coil destroyed
Installing Car audio (ICE) myself | My way of beating post operative blues-ice_deadspeaker_destroyed.jpg

Preparing the new spacer from a dead speaker
Installing Car audio (ICE) myself | My way of beating post operative blues-ice_deadspeakertospacer_wip1.jpg

Installing Car audio (ICE) myself | My way of beating post operative blues-ice_deadspeakertospacer_wip2.jpg

Installing Car audio (ICE) myself | My way of beating post operative blues-ice_deadspeakertospacer_wip3.jpg

New speaker installed on the custom spacer
Installing Car audio (ICE) myself | My way of beating post operative blues-ice_deadspeakertospacer_final1.jpg

Installing Car audio (ICE) myself | My way of beating post operative blues-ice_deadspeakertospacer_final2.jpg

New speaker fixed in position for trial
Installing Car audio (ICE) myself | My way of beating post operative blues-ice_speaker_installed.jpg

Last edited by vigsom : 20th September 2023 at 16:01.
vigsom is offline   (21) Thanks
Old 20th September 2023, 14:31   #6
Distinguished - BHPian
 
vigsom's Avatar
 
Join Date: Feb 2006
Location: NSEW
Posts: 3,831
Thanked: 26,695 Times
Re: Installing Car audio (ICE) myself | My way of beating post operative blues

Cables routing and fixing

A: RCA and power control cables

1. RCA cables - from front and rear RCA pre-outs on the Head Unit
2. Amplifier power control cable - this is a blue cable marked P.Cont. at the Head Unit output.

I initially laid blue RCAs but they turned out to be very long so went with the other two shorter RCA cables that I had.

Connected the 1sq.mm blue cables to the P.Cont cable at the head unit, and ran the RCAs and the power control cables together via the dashboard tubular frame all the way to the left kick panel area of the car. Key here is to tape the cables, lay them all the way to the amplifier, and dress them suitably before connection. I used the nylon wiring sleeve to encase the RCAs and the control cables.

B: Speaker cables - this was the toughest part; although I had OFC cables of custom length from my earlier car, pushing this through the panel, into the mighty tight rubber grommets into the door frame was really tough, but I managed. Again, water tight grommets!

Once the cables were all laid, the end connections were stripped using the tool; it was so easy. Then ends were terminated using lugs and crimped using the tool.

I routed and dressed the cables suitably so as to have no interference between the power cables and the audio cables and the system powered on without fuss.

Laying the blue RCAs before switching to the shorter ones
Installing Car audio (ICE) myself | My way of beating post operative blues-ice_layingrcas.jpg

RCA cables finally sleeved and secured to the dashboard frame
Installing Car audio (ICE) myself | My way of beating post operative blues-ice_gloveboxandpanelremoved.jpg

The mess during installation
Installing Car audio (ICE) myself | My way of beating post operative blues-ice_frontnreardoorpads_off.jpg

Installing Car audio (ICE) myself | My way of beating post operative blues-ice_gemba.jpg

Installing Car audio (ICE) myself | My way of beating post operative blues-ice_gemba_2.jpg

Tweeters on the dash in an experimental position
Installing Car audio (ICE) myself | My way of beating post operative blues-ice_tweeter_experimentalposition.jpg

The grommet when viewed from inside the door
Installing Car audio (ICE) myself | My way of beating post operative blues-ice_doorinside.jpg

New speakers in position
Installing Car audio (ICE) myself | My way of beating post operative blues-ice_speaker_installed.jpg

Amplifier turning on
Installing Car audio (ICE) myself | My way of beating post operative blues-ice_amp_turningon.jpg

Amplifier installed and ready in landscape mode
Installing Car audio (ICE) myself | My way of beating post operative blues-ice_ampinstalled_ready.jpg

Installing Car audio (ICE) myself | My way of beating post operative blues-ice_ampplacement_landscape.jpg

boAt Aux Cable fixed to the head unit - no aux cable all these years

Installing Car audio (ICE) myself | My way of beating post operative blues-ice_headunit_auxcable.jpg


Tuning

I tuned the system with whatever little knowledge I had

1. Head Unit - front - HPF set at 100Hz
2. Head Unit - rear to stock speakers - set at 80Hz
3. Amp front channel - HPF on and set at approx 150Hz (the markings on the amp weren't distinct hence could not get the right point); gain adjusted to just hear the front speakers at approx 50% volume
4. Amp rear channel - LPF on and set at approx 150Hz (the markings on the amp weren't distinct hence could not get the right point); gain adjusted to just hear the subwoofer

Played a few tracks, set the EQ at Rock, loudness off and bass boost on the amp off

Last edited by vigsom : 20th September 2023 at 16:08.
vigsom is offline   (20) Thanks
Old 20th September 2023, 15:16   #7
Distinguished - BHPian
 
vigsom's Avatar
 
Join Date: Feb 2006
Location: NSEW
Posts: 3,831
Thanked: 26,695 Times
Re: Installing Car audio (ICE) myself | My way of beating post operative blues

Surprise#2 and the subsequent scare

When it seemed that all was well, I'd taken out all the tools, and other items out of the car, cleaned the whole place up and was ready to put the seat back in place. Lo and behold, the seat wouldn't fit in place. Two issues

1. rails on either side weren't properly aligned (one was a little forward), and
2. the left rail was touching the top of the amp

No.2 was despite me doing a trial placement of the amp even before I started the job. I figured out that this was because I'd estimated a lower clearance for the cabling dressing, but that turned out to need more clearance. I tried shifting the amp a little towards the transmission tunnel but even in the end position, there was just a 1-2mm clearance between the left rail and the left edge of the amplifier. I decided to re-orient the amp in portrait mode.

Clearance check with amplifier in portrait mode
Installing Car audio (ICE) myself | My way of beating post operative blues-ice_amp_clearancescheck1.jpg

Installing Car audio (ICE) myself | My way of beating post operative blues-ice_amp_clearancescheck2.jpg

Amplifier re-orientation - connections W-I-P
Installing Car audio (ICE) myself | My way of beating post operative blues-ice_amp_reoriented.jpg

Installation of amplifier in portrait mode

Disconnected the battery negative, and then reoriented the amplifier. This job didn't take too long and all was set again. I connected the battery negative and heard a pop. It seemed as though the circuit had drawn more amps. Went to the amp and found that it hadn't turned on. Measured voltage from the 12V power pin to the ground bolt and that was fine; so was the continuity from remote line to ground. I then pulled out the two 25A fuses and found both of them blown.

An act of stupidity that caused me a lot of pain and time

I'd already been getting quite tired of working on this project, and committed a blunder which even I am not able to explain why - in the absence of two 25A fuses, I wrapped some thin wire around one of the fuses and shoved the fuse in, only to be greeted by another pop and some minor fumes. I said to myself, " This is the end!". The main in-line fuse on the line from the battery had also popped due to this blunder.

Installing Car audio (ICE) myself | My way of beating post operative blues-ice_powerline_blownfuse.jpg

Amplifier inspection and incident investigation

Disconnected the battery negative, took the amplifier home, and opened the end cover on the power side to observe for something amiss. Although I could smell that something had heated up, there was no damage on any path - equipment, solder, board lines. What I could not understand is what went wrong. After a while, when I was putting the panel into place, I suddenly realised what I'd done - while reorienting the amplifier, I'd hooked up 12V to ground and ground to positive.

How could I, who ensured multiple times to connect the speaker leads correctly, make an error in connecting the power and ground? Two theories:

1. From the earlier evening, I'd forgotten to pick up my stuff after paying for it at a grocer, at a bakery, and at a veggie shop. Mind wasn't working at its best
2. My earlier amplifier, the Kenwood KAC-8401 had the 12V point at the outer end followed by ground followed by the remote power. Was this a case of primacy bias? No idea.

Installing Car audio (ICE) myself | My way of beating post operative blues-ice_amp_inspection.jpg

Installing the amplifier back, test run, and final installation

All I could do under the circumstances was to install two new 25A fuses, a temporary jugaad in the form of a 30A blade fuse, and check if the amplifier powered on. It did and I heaved a sigh of relief. After the amp powered on, I connected the front channels first and both speakers fired. Subwoofer followed next on the rear channel in bridged mode and even that worked fine. The next task was to get the AGU 40A in line glass fuse.

Temporary 30A blade fuse for testing
Installing Car audio (ICE) myself | My way of beating post operative blues-ice_bladefuse.jpg

Searching for an AGU 10X38mm fuse

I must have asked at no less than 20 places (electrical, auto electrical, accessory stores) to no avail. Two accessory stores did say that the whole set was available (the fuse inside the fuse holder) but that's not what I wanted. Eventually rode with someone to SP Road, and got the 10x38mm fuse in the ceramic avatar, rated for 32A.

Installing Car audio (ICE) myself | My way of beating post operative blues-ice_powerline_replacementfuses.jpg

Installing Car audio (ICE) myself | My way of beating post operative blues-ice_powerline_newfuseinposition.jpg

Finally!

It was a perfect fit, and once lined up, the equipment all worked as intended. I ran the system at various volumes just to check if the in-line fuse heated up or whatever. All was well. Amplifier secured, seat in position and tightened, and all was well.
Attached Thumbnails
Installing Car audio (ICE) myself | My way of beating post operative blues-ice_amp_portraitmode.jpg  


Last edited by vigsom : 20th September 2023 at 16:14.
vigsom is offline   (20) Thanks
Old 20th September 2023, 15:40   #8
Distinguished - BHPian
 
vigsom's Avatar
 
Join Date: Feb 2006
Location: NSEW
Posts: 3,831
Thanked: 26,695 Times
Re: Installing Car audio (ICE) myself | My way of beating post operative blues

Brass tacks

A: Time - 7hrs a day for 6 days

B: Money - Audio equipment INR 21,000, Cables and fuses INR 1,300, Labour NIL

C: Satisfaction - 08/10

D: Damping - deferred for later

Acknowledgements

Although this was many years ago, the foundation for whatever little I know in car audio was laid by moderator @Navin and bhpian @Bass&Trouble. @paragsachania led me to an all-in-one cables place. When I was almost lost in this project, @Vishy76 and @AshtonCastelino pitched in with some moral support.

Key takeways:

1. Never consider something as difficult to accomplish, so long as this is within one's stretch limits
2. Avoid critical tasks when one's mind isn't energised eg. the blunder that I made
3. Beat blues doing something that excites oneself!

Leaving you with the end result (bass hasnt been captured satisfactorily; use headphones)


Last edited by vigsom : 20th September 2023 at 16:38.
vigsom is offline   (38) Thanks
Old 20th September 2023, 16:53   #9
Team-BHP Support
 
Join Date: Feb 2004
Location: Mumbai
Posts: 18,423
Thanked: 79,293 Times
Re: Installing Car audio (ICE) myself | My way of beating post operative blues

Thread moved out from the Assembly Line. Thanks for sharing!
Aditya is offline   (3) Thanks
Old 20th September 2023, 19:17   #10
Senior - BHPian
 
shancz's Avatar
 
Join Date: Oct 2020
Location: Ranchi
Posts: 1,949
Thanked: 5,345 Times
Re: Installing Car audio (ICE) myself | My way of beating post operative blues

I couldn't even comprehend either the patience or the sweat and toil apart from the technicalities but I do feel the sense of accomplishment this would've generated.
Listening to the track in the video, amazing

I don't think I will ever undertake a DIY of this magnitude but if I do, this will be a very major source of inspiration.
Have fun.

Last edited by shancz : 20th September 2023 at 19:18. Reason: ccl
shancz is online now   (1) Thanks
Old 20th September 2023, 20:15   #11
BHPian
 
Join Date: Aug 2023
Location: Chennai
Posts: 52
Thanked: 489 Times
Re: Installing Car audio (ICE) myself | My way of beating post operative blues

This is so inspiring sir. Kudos on the effort and happy miles ahead
flipflop is offline   (2) Thanks
Old 20th September 2023, 22:02   #12
BHPian
 
Join Date: Aug 2008
Location: bangalore
Posts: 593
Thanked: 1,640 Times
Re: Installing Car audio (ICE) myself | My way of beating post operative blues

Superb effort. Nothing more satisfying than a DIY even if it's half baked compared to a pro install.

For future reference, a shop to the left just as you enter SP road (just off the angular side road that connects to SJP road) keeps all sorts of audio connectors, from regular to gold plated. Amar Radio House further up SP road also keeps quality components and sometimes automobile grade wires.

Dispensary road, has a small hole in the wall shop next to Exel Traders that sells all kinds of glass fuses.
keroo1099 is online now   (5) Thanks
Old 21st September 2023, 12:34   #13
BHPian
 
rajeevsulu's Avatar
 
Join Date: Jul 2020
Location: Erode
Posts: 476
Thanked: 2,214 Times
Re: Installing Car audio (ICE) myself | My way of beating post operative blues

You are a very hard man, Vigsom sir!! Forget doing this after getting a bypass done, I would not contemplate doing this before one as well! On top of that, you give your self only 8/10!!! I would hate to work for or under you!!
On a side note, very glad to see you managing your recuperating hours doing what you love instead of wallowing in self-pity as most do! More power to you, good sir!
Cheers
Rajeevsulu
rajeevsulu is offline   (1) Thanks
Old 21st September 2023, 15:57   #14
Distinguished - BHPian
 
Reinhard's Avatar
 
Join Date: Nov 2010
Location: Pune
Posts: 4,870
Thanked: 17,795 Times
Re: Installing Car audio (ICE) myself | My way of beating post operative blues

Nice thread! thanks for sharing. I'll be swapping out the terrible stock speakers in the Ignis (they really are embarrassing) with JBL components (front) and coaxials (rear) in the coming weeks at home. I've already installed an under-seat subwoofer in the car, so the combination should be sufficient for the car and types of drives it is used for.

I intend to install the tweeters in the corner-pieces in the front door windows besides the mirrors. I'm too scared of routing the wires from the door conduits onto the dashboards to mount the tweeters on dash. I see that you did it - and nicely! I'll be making cut-outs in the black plastics of the corner trims, to try and install the tweeters there. Let's see how that goes.

Rated the thread well deserved 5 stars.
Reinhard is offline   (1) Thanks
Old 21st September 2023, 16:55   #15
Distinguished - BHPian
 
Join Date: Oct 2012
Location: Delhi
Posts: 8,367
Thanked: 53,865 Times
Re: Installing Car audio (ICE) myself | My way of beating post operative blues

Thanks for sharing, great job done. Perseverance will get you there in the end.

Running cables from the engine bay into the cabin is almost always a problem. Because all cable looms tend to be packed very tightly and as you discovered ran through grommets. Pretty standard on most car, not just 4x4. You don’t want water ingress or cold/warm air coming into the cabin from the engine bay. Or worse exhaust gas from a leaking gasket or so.

I have managed to get small diameter cables into the same grommet.
Here you see the wires of my aftermarket cruise control I installed in my Mercedes W123.

Installing Car audio (ICE) myself | My way of beating post operative blues-img_0136.jpeg

Pulling speaker cables, aerial cables across a car cab a major headache.
In the old days, when cars did not come with a radio factory installed, let alone complete HiFi sets and info centres, this was a DIY job for many car owners. If you had a good radio, you would take it out when you sold the car and install it into your next car.

One of the most helpful tools for running cables behind trim and carpets and so on is a simple long flat piece of bendy plastic.

Here the one I made and used recently when installing a switch on the electrical motor of the Jaguar aerial.

https://www.team-bhp.com/forum/attac...-img_3487.jpeg

For the full story:

https://www.team-bhp.com/forum/diy-d...ml#post5612116 (My Car Hobby: Jaguar XJR, Mercedes W123, Alfa Romeo Spider, Jeep Cherokee & Mini One)

Looks like we have been using the same wire strip pliers!

Although relative simple jobs, as you found out it always take a lot of time!

Don’t worry about your mistakes of messing up ground and positive. These things happens all the time. To err is human as they say. I have made so many similar stupid mistakes over the year. Often difficult to understand how one could mess up so badly, afterwards.

Look forward to more of your DIY adventures!

Jeroen

Last edited by Jeroen : 21st September 2023 at 17:00.
Jeroen is online now   (4) Thanks
Reply

Most Viewed


Copyright ©2000 - 2024, Team-BHP.com
Proudly powered by E2E Networks