| |||||||

| Search Forums |
| Advanced Search |
| Go to Page... |
 |
| Search this Thread |  43,162 views |
 2nd December 2020, 16:20
| #1 |
| Senior - BHPian Join Date: Jan 2014 Location: Bangalore
Posts: 1,632
Thanked: 4,052 Times
| Operation Jeep Compass : Foxfire Android Head-Unit with a 360-degree camera Operation Jeep Compass - Foxfire Android Head Unit with a 360° Camera A few years ago, I wrote an article here on Team-BHP about a Morimoto Headlight Upgrade on my Uncle's Jeep Compass.  The Jeep Compass - One of the most good looking vehicles on Road!  Jeep Compass Limited 4 x 2 - Finesse Uncompromised! Here I would like to cover yet another upgrade made on the same SUV, this time a Head Unit Upgrade which also includes a 360° Camera Support. For people interested in the Morimoto Headlight Upgrade article - that can be accessed here > (Jeep Compass: Morimoto HID Headlights + FE Retrofit Projector Foglamps Upgrade). For the impatient here is a teaser view of the Jeep Compass Post Upgrade:  Jeep Compass 4 x 2 Limited Wearing a Foxfire Android HU with 360° Camera Support There are two detailed articles that I have already covered on the 2GB/32 GB Model @ and the more recent 4GB/64GB Model @ (Unbranded - Journey from Blaupunkt to an Android Head-Unit in a Ciaz) of the Android HUs here on Team-BHP, so I will focus more on the 360 Degree Camera as part of this thread. Foxfire Contact Details: Sunny Gupta | Mobile/WhatsApp: 95550 11134 | Website: http://www.foxfire.co.in/ With this introduction - let us now move on to story of upgrading the HU on the Jeep Compass! Chapters:
Last edited by vsrivatsa : 12th December 2020 at 00:24. |

|  (13)
Thanks (13)
Thanks
|
| The following 13 BHPians Thank vsrivatsa for this useful post: | ast.ggn, CEF_Beasts, digitalnirvana, GTO, InControl, lemedico, mh09ad5578, myavu, NPV, PM - B, ramnaresh_2000, vaasu, WhiteSierra |
| |
|
2nd December 2020, 18:00
| #2 |
| Senior - BHPian Join Date: Jan 2014 Location: Bangalore
Posts: 1,632
Thanked: 4,052 Times
| re: Operation Jeep Compass : Foxfire Android Head-Unit with a 360-degree camera Chapter 01: The Backstory behind the Upgrade My Uncle had been debating about an Audio System upgrade for quite some time. He had seen my upgrade to the 10.1 inch Android HU and had jokingly called it a "TV in the Car". This year, we had some discussions around it and the main concern was that the Head Unit in the Jeep Compass was multi functional and had lot of integrations with car features such as the Headlights, Door Open and Close being displayed and also had Adaptive gridlines for the Reverse Camera. I passed on Sunny's number to my Uncle and he got the clarifications that most of these features would continue to work with the Foxfire system as well. Finally he made the decision to proceed with the Foxfire upgrade and since he was anyway going with the HU upgrade he decided to opt for the 360° Camera setup as well. As called out in my thread on the Foxfire Upgrade for my cousin's Ciaz, both these Units were negotiated for together and they were shipped as one package to Bangalore. There were several delays as Sunny claimed it was a new software based on Android 9 and the package was received after a long wait of almost 2+ months. Now, the delay did not end there. My Uncle then had to fix up an appointment with RedSoul in Bangalore for installation. While the Ciaz installation of Foxfire happened quickly as it was just a one hour effort, Red Soul requested for time to arrange for the Jeep Compass installation as it involved the 360° camera setup as well. After a few calls, my Uncle visited Red Soul and spoke to them to arrange for a slot. As Jeep Compass has many integrated features with the Head Unit, Red Soul folks were slightly on the defensive and wanted this installation to be done by one of their Senior Engineers with lot of experience. They also called out upfront that the Jeep Compass install inclusive of the 360° camera was a detailed one and would take half a day. As result it some time to arrange for an installation timeslot. Finally it was fixed and one of the most Senior Technicians at Red Soul by name Raju was blocked to help with the install. The Head at Red Soul, Siddu also was very supportive and provided his valuable inputs as well during the installation process. Installation was done by Red Soul, Bangalore - Full details in below picture:  Specifications Overview:
 Specifications from the Head Unit And for those who go by CPU-Z for Processor and Memory Specifications below are screenshots from CPU-Z:  CPU Specifications  RAM & Storage Specifications Last edited by vsrivatsa : 9th December 2020 at 11:38. |
|
| (18)
Thanks
|
| The following 18 BHPians Thank vsrivatsa for this useful post: | ashpalio, dailydriver, digitalnirvana, Drbhavesh, GTO, HappyWheels, InControl, keroo1099, lemedico, lovetorque, mh09ad5578, NPV, PM - B, ramnaresh_2000, sunnsood, Varun_HexaGuy, vredesbyrd, WhiteSierra |
|
2nd December 2020, 18:21
| #3 |
| Senior - BHPian Join Date: Jan 2014 Location: Bangalore
Posts: 1,632
Thanked: 4,052 Times
| re: Operation Jeep Compass : Foxfire Android Head-Unit with a 360-degree camera Chapter 02: Unmounting the OEM Stereo Unit The first step in the process is to unmount the OEM Head Unit. The OEM Head Unit in Jeep Compass Limited 4x2 is a 5 inch Touch Screen. The frame of the HU includes the two center AC vents as well and these need to be removed as well for the purpose of clearing the Head Unit Bay and preparing it for installation of the New Head Unit.  Unmount of the Existing Head Unit Starts  The AC Vents are also Part of the Frame  Unmounting the AC Vents  Vents Removed - Head Unit Pending  Unmounting the OEM Head Unit  OEM Head Unit Dislodged from the Bay  OEM HU Removed with Wires showing  Front View of the OEM HU 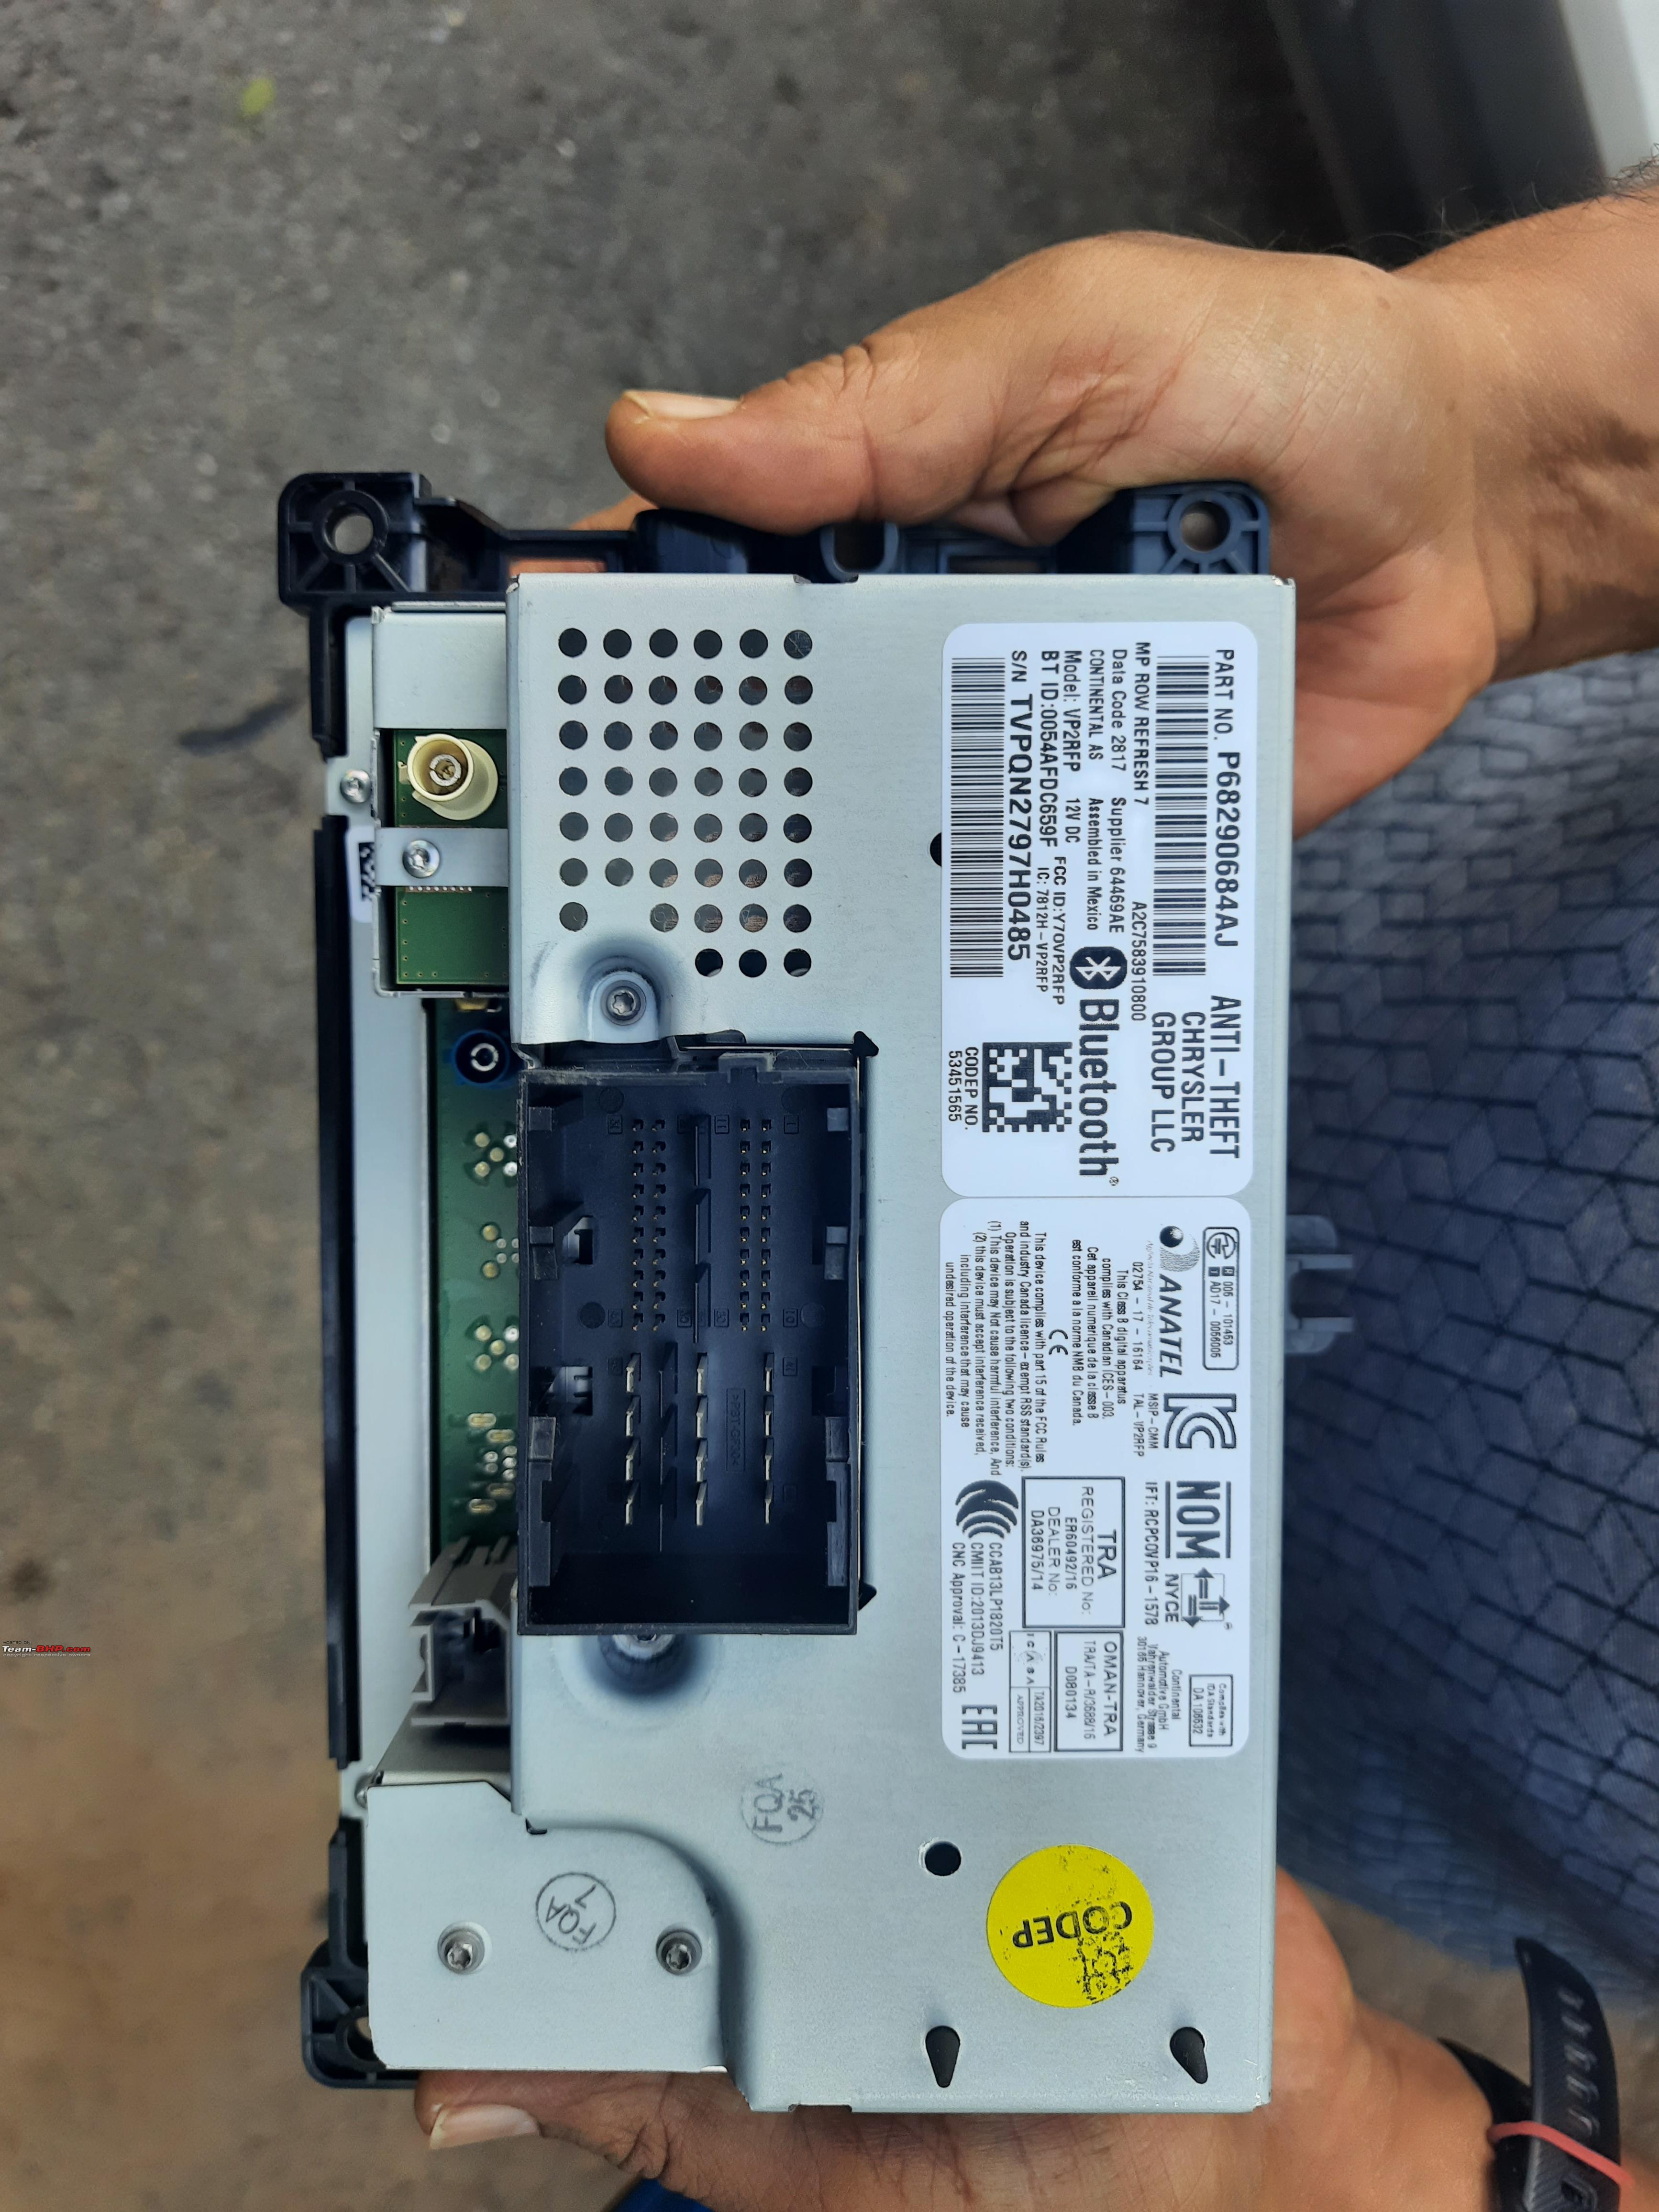 Rear View of the OEM HU  Side View showing Fan  Opposite Side View Kudos! A special call out to Red Soul and its Engineers for following the Covid-19 Safety protocols also at the time of installation - as can be seen in the pictures the Technician wore the Mask throughout the Installation process. Now that the OEM HU has been unmounted, the next step is to begin the installation of the new Foxfire 4GB/64GB 10.1 inch Head Unit. Last edited by vsrivatsa : 6th December 2020 at 21:54. |
|
| (16)
Thanks
|
| The following 16 BHPians Thank vsrivatsa for this useful post: | digitalnirvana, GTO, HappyWheels, InControl, keroo1099, lovetorque, mh09ad5578, NPV, PearlJam, PM - B, ramnaresh_2000, Reinhard, The_Outsider!, vaasu, Varun_HexaGuy, WhiteSierra |
|
3rd December 2020, 11:34
| #4 |
| Senior - BHPian Join Date: Jan 2014 Location: Bangalore
Posts: 1,632
Thanked: 4,052 Times
| re: Operation Jeep Compass : Foxfire Android Head-Unit with a 360-degree camera Chapter 03: Setting up the Foxfire Head Unit Next Step is the installation of the Foxfire Head Unit. The Foxfire Head Unit comes with its own frame and the OEM Frame can be discarded. However this has to be done carefully by retaining the AC Vents and required screws that fasten the AC Vents to the Frame. Also, another complexity that the Red Soul Engineer called out was that the Jeep Compass is also a Canbus enabled Car in terms of the Electricals. Hence the wiring and connections need to be handled with utmost precision to ensure that things work properly. With that context, let us now take a walk down the installation process of the Foxfire Head Unit in the form of a photologue that follows:  Addition of the Antenna for 4G Connectivity  GPS Antenna placed on the far end of the Dashboard  Additional External Microphone placed near the Speedo  Initial Wiring in Progress  Wiring Harness  More Wiring Work in Progress  The Removed AC Vents Provide lot more space to manage the wiring/installation  Routing of the 4G Antenna wiring through the Glovebox  Additional wiring placed on the Seat  Canbus with Warranty Seal  Backside View of the OEM Frame  Foxfire Head Unit with Frame (Replaces the OEM Frame)  AC Vent Side View  AC Vent - Existing Vents are ReUsed in new Frame  The Screws are harvested from the OEM Frame  OEM Frame - After Screws were harvested  OEM Frame - Time to say Good Bye!  Fitment of the Vents onto the Foxfire Frame Begins  Fitment of the Vents - Fully Plug and Play - No Holes were drilled  More Wiring Work  Readying the wiring  Connecting the Power to the Foxfire Unit  Foxfire Unit is Powered On  Default Car Logo (Jeep Logo is available but needs to be purchased)  Initial Testing of the Foxfire Unit Starts  360 degree Camera App  Configuration Settings  Mapping the Steering Mounted Controls  Testing the Radio  Foxfire Installation Completed Last edited by vsrivatsa : 6th December 2020 at 21:54. |
|
| (16)
Thanks
|
| The following 16 BHPians Thank vsrivatsa for this useful post: | ashpalio, digitalnirvana, fluidicjoy, GTO, HappyWheels, Harjot37, keroo1099, mh09ad5578, myavu, NPV, PearlJam, PM - B, ramnaresh_2000, Reinhard, SuhairZain, The_Outsider! |
|
3rd December 2020, 20:41
| #5 |
| Senior - BHPian Join Date: Jan 2014 Location: Bangalore
Posts: 1,632
Thanked: 4,052 Times
| re: Operation Jeep Compass : Foxfire Android Head-Unit with a 360-degree camera Chapter 04: 360 degree Camera Setup - Front and Rear Cameras The Jeep Compass Limited 4x2 comes with a Reverse Camera as standard but given the Large screen of the Android Head Unit, it is recommended to replace the OEM Reverse camera as well along with the addition of other cameras to achieve the 360 degree view. Let us first look at the fixing of the Front and the Reverse Cameras - these are relatively straight forward installations as compared to the Cameras that get mounted onto the Wing Mirrors. The Reverse Camera will not fit onto the OEM slot and so this camera gets fixed beside the OEM Camera as a separate Camera. Front and Reverse Camera Setup:  Front Camera - Up Close  Front Camera - Another View  Front Camera - Bottom View  Front Camera Mounting work begins  Positioning the Front Camera  Fixing the Front Camera  Front Camera Mounted below the Grille  Close Up of the Front Camera  Reverse Camera Work Begins  Reverse Camera Fixing Work  Foxfire Camera Added and the OEM Camera shown in the Original Mounting  Close Up View of the Foxfire Rear View Camera Last edited by vsrivatsa : 6th December 2020 at 21:55. |
|
| (20)
Thanks
|
| The following 20 BHPians Thank vsrivatsa for this useful post: | ashpalio, ast.ggn, digitalnirvana, GTO, HappyWheels, InControl, keroo1099, lemedico, mh09ad5578, myavu, NPV, PM - B, PraNeel, ramnaresh_2000, Reinhard, SuhairZain, sunnsood, The_Outsider!, vredesbyrd, WhiteSierra |
|
5th December 2020, 11:54
| #6 |
| Senior - BHPian Join Date: Jan 2014 Location: Bangalore
Posts: 1,632
Thanked: 4,052 Times
| re: Operation Jeep Compass : Foxfire Android Head-Unit with a 360-degree camera Chapter 05: 360 degree Camera Setup - Outside Rear View Mirrors The 360 degree Camera Setup is not a straight-forward one, although what we have seen so far covered is more or less simple. The side cameras are mounted onto the ORVMs on either side and this requires drilling a small hole through the ORVMs. In order to do this and the wiring the door pads of both doors are fully removed and the ORVMs as well.  My Uncle said he almost got a Heart Attack seeing the next sequence of steps that were carried out to achieve the Side Mirror Camera Integration. It is not a nice scene to see your expensive possession being ripped apart in front of you! Let us go thru the photologue now of the Side Mirror Cameras and their setup.  Operation Starts!  Door Pad screws Removed  Door pad being removed  Door Pad Removal in Progress  Wire Connections being disconnected  Untangling the Wires  One Wire Connection to go  Door pad removed  Closer View with Door Pad removed  ORVM also unmounted  View of the ORVM  Additional View of the ORVM  Work starts on Passenger Door  Door Pads unmounted on Passenger Door  Both Door Pads Placed Away Safely  Drilling Machine is kept Ready  Drilling Machine is positioned  ORVM Drilling Starts!  ORVM Drilling - Final Touches  ORVM with the Camera fixed and wiring is seen  ORVM with the Camera fixed - View 01  ORVM with the Camera fixed - View 02  ORVM with the Camera fixed - View 03  ORVM Wiring Connections being Restored  ORVM Remounting Starts  ORVM Screws being put back  Panel is restored back  Same Steps are Repeated for Left Hand Side ORVM Last edited by vsrivatsa : 5th December 2020 at 17:09. |
|
| (20)
Thanks
|
| The following 20 BHPians Thank vsrivatsa for this useful post: | ashpalio, ast.ggn, digitalnirvana, frankmehta, GTO, HappyWheels, InControl, keroo1099, lemedico, lovetorque, mh09ad5578, myavu, NPV, PM - B, PraNeel, ramnaresh_2000, sridhar-v, TrackDay, Varun_HexaGuy, WhiteSierra |
|
5th December 2020, 18:30
| #7 |
| Senior - BHPian Join Date: Jan 2014 Location: Bangalore
Posts: 1,632
Thanked: 4,052 Times
| re: Operation Jeep Compass : Foxfire Android Head-Unit with a 360-degree camera Chapter 06: 360° Camera - Demonstration & Car Settings  Jeep Compass - In One Piece after the 360 Cam Surgery!  Right Hand Side ORVM with Camera Added  Left Hand Side ORVM with Camera Added 360° Camera at Work Let us now look at the working of the 360° Camera starting with the Reverse Camera. All cameras provided are of higher resolution and the clarity of the camera feed is very good. The 360° Camera splits the screen into two portions with the left hand side portion showing the Birds Eye View which kind of consolidates the feeds from all the 4 cameras. The right hand portion of the screen provides the specific selected view from the four available views. The cameras also provide multiple types of gridlines/tracking lines to choose from - in all about 4 different types of tracking lines which can be chosen from the menu options. All gridlines are adaptive and turn based on how the Steering is turned. The right hand portion of the screen provides two modes, one being a 2D and other a 3D mode. The 2D mode is depicted with the pictures first: The Reverse Camera can highlight any object/pedestrian as they come within specific distances from the vehicle.  Reverse Camera View - With No Object in Front This is the initial feed when there is no object close to the camera.  Reverse Camera View - With Pedestrian in View at a Distance This is the view when a Pedestrian has entered into the view  Reverse Camera View - Yellow Lines with Green Highlighting as the Pedestrian/Comes closer This highlighting is visible in the left hand portion Bird's Eye View panel as well.  Reverse Camera View - Yellow Highlighting of the Pedestrian as he comes more close Next as the Pedestrian moves closer, the Camera software highlights the object in Yellow indicating that the object is now even closer. 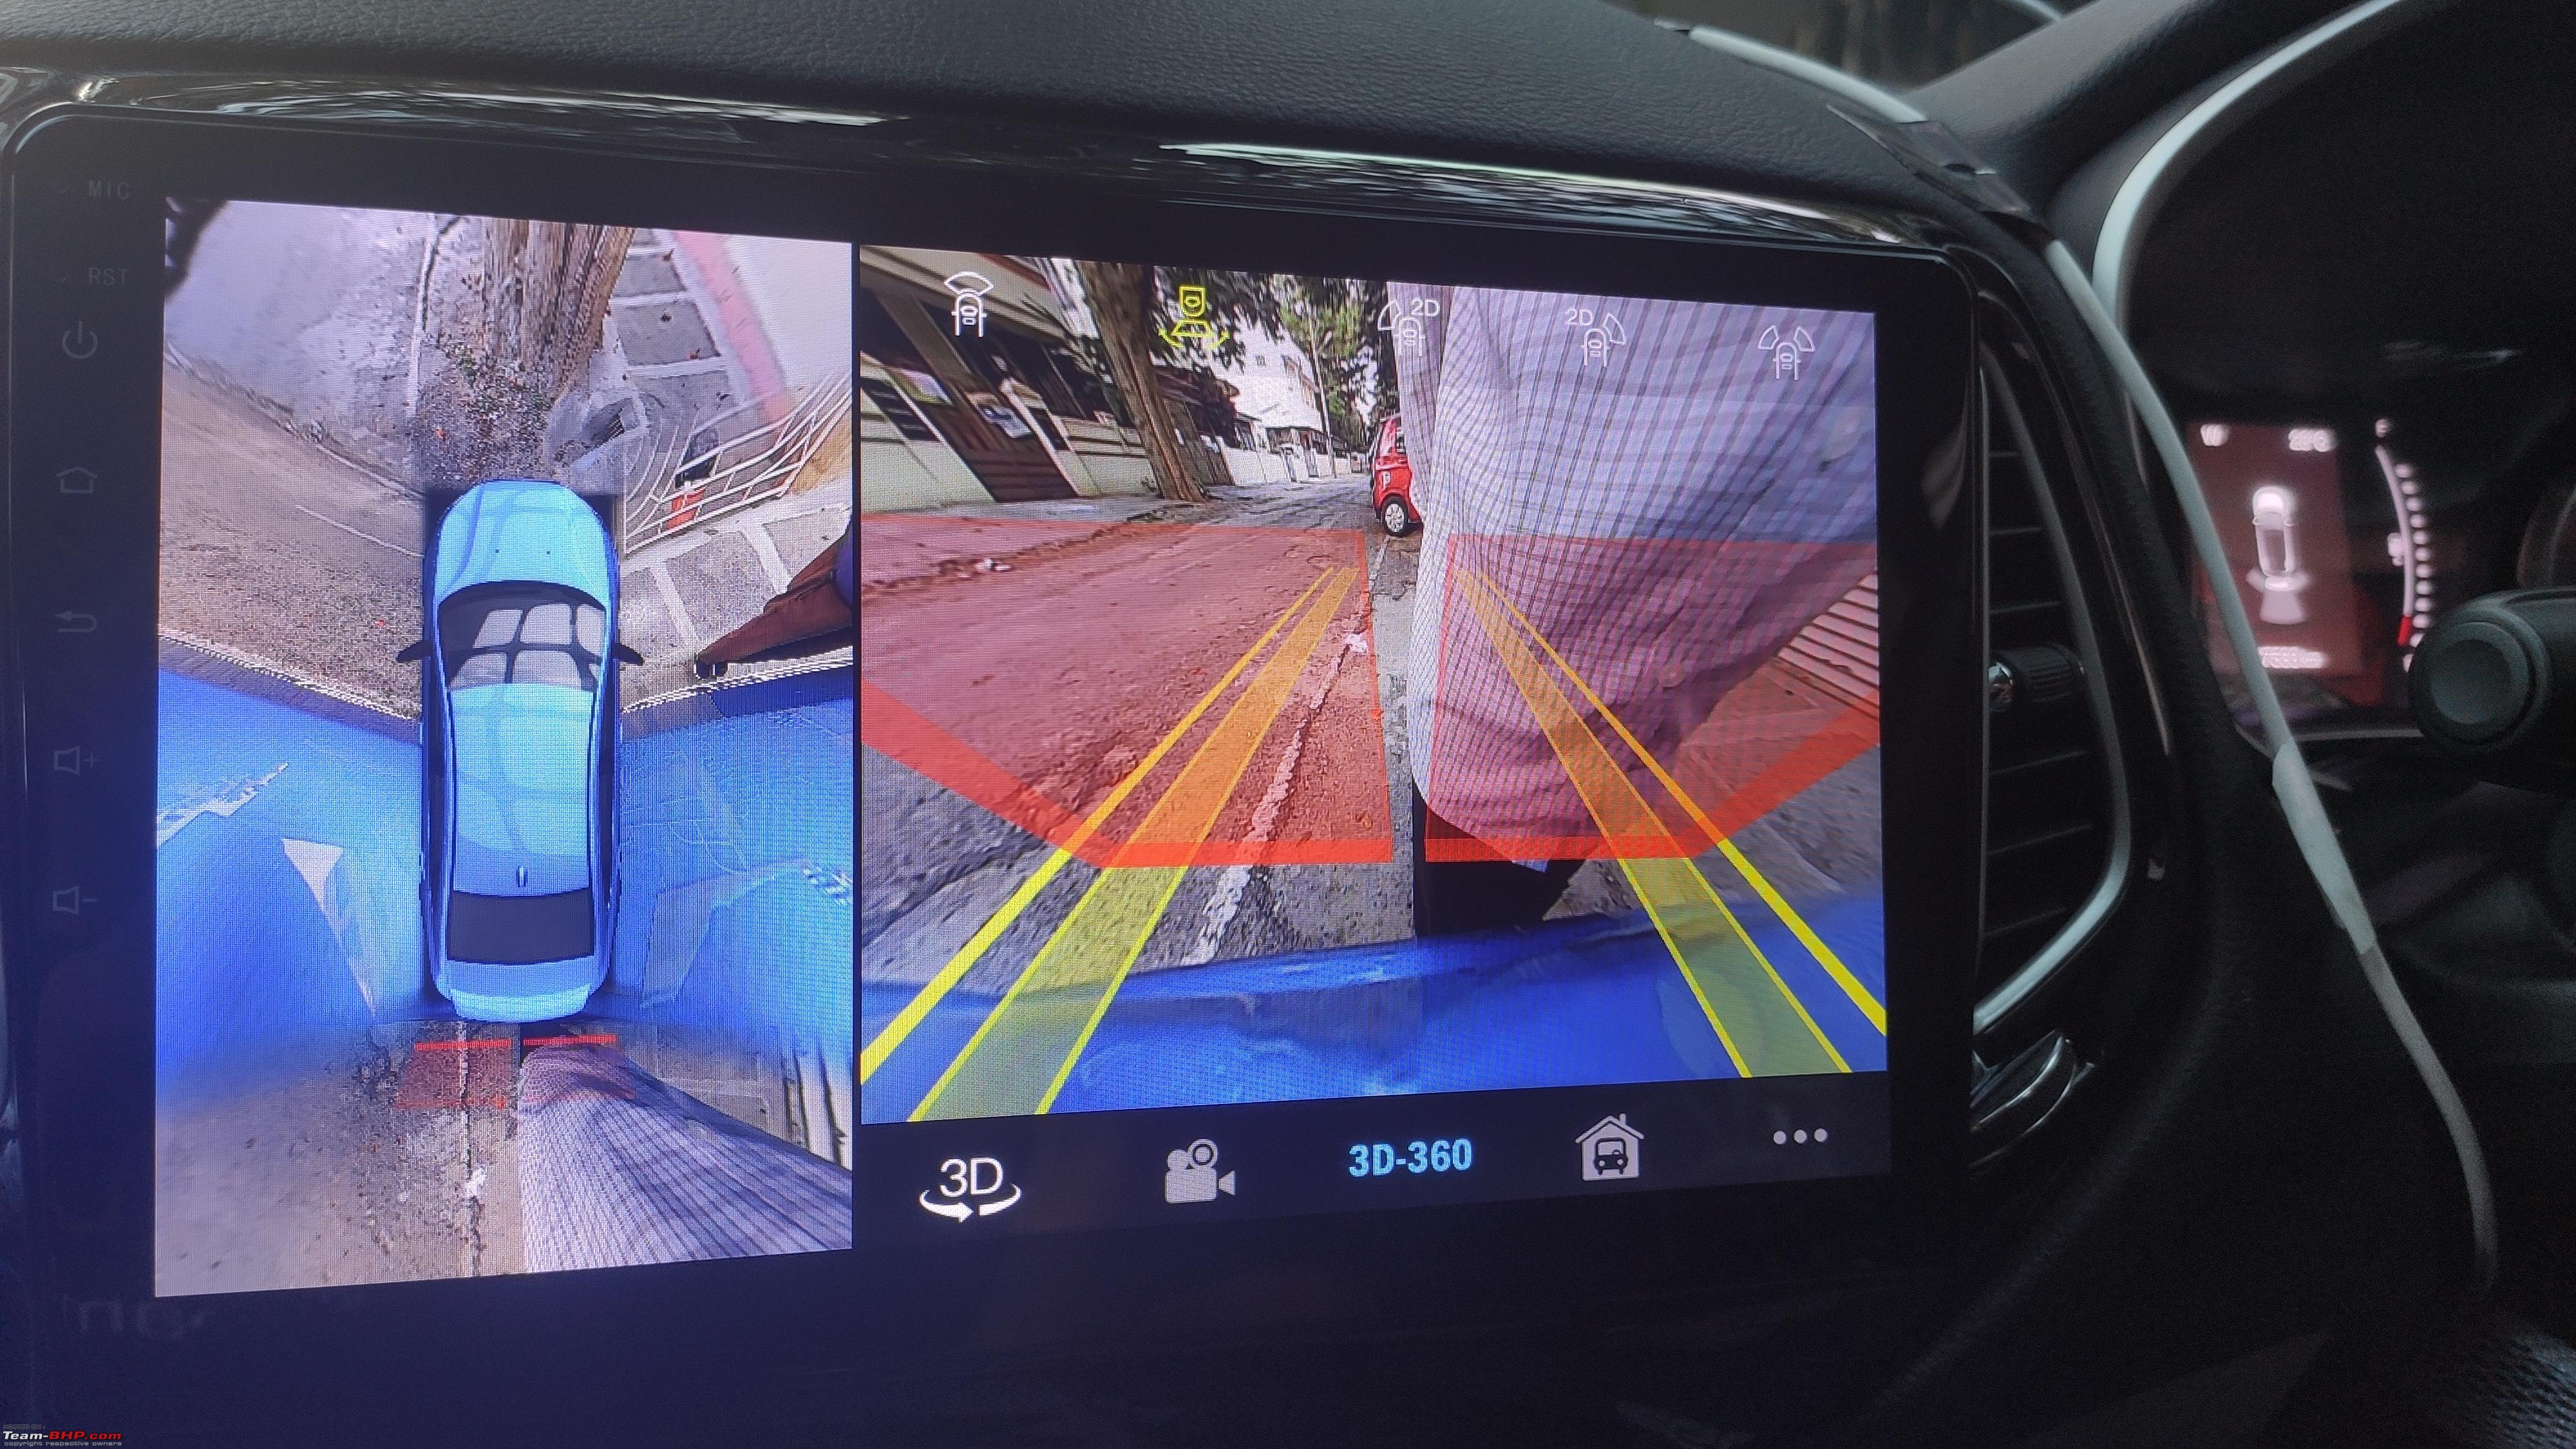 Reverse Camera View - Red Highlighting of the Pedestrian as he comes even more close Next as the Pedestrian moves even closer, the Camera software highlights the object in Red indicating that there is danger of collision In a regular scenario, if the car was reversing and if a tree or a Pedestrian was stationary, the mechanism would work in the same way and show the red color when the object gets too close and the beeping sound is also activated to warn the driver about it.  View from the Left Hand Side Camera  View from the Right Hand Side Camera  View from the Front View The 3D Radar mode when enabled shows the views as shown below:  3D Left View  3D Right View  3D Left + Right in One Screen In this mode, one can use the Touchscreen to hold the car shown in the picture and rotate it full circle and see the inputs from all the cameras. It is also possible to touch a specific portion of the screen in the Bird's Eye View shown on the left portion of the screen and the appropriate view gets activated. When I say the view gets activated it is not just 4 views as in Left, Right, Front and Rear. In case, I touch the left hand corner of the screen in the Bird's Eye View, it provides a Front View which is more focused towards the left hand side of the car. So, from that perspective it does try to provide a true 360 degree view. Overall, I think the reverse cameras are a great assist to have and will serve as a Safety Device which can prevent accidents. It enables a better view from around the car and helps in eliminating various blind spots. Often one of the issues we face is when parking a car the front is not visible and we have to second guess the distance of the object in front - this eliminates the need for the guesswork and enables the driver to make an informed decision. Car Settings Next important aspect to cover is how do the Car Settings work with the new System. In the Jeep Compass the OEM Head Unit was doing things beyond just audio such as showing when a Door Opens or Closes, Settings for Headlights and Settings for AC as well. This makes it complicated to provide a Aftermarket system since all these features would also need to be supported by the Android Head Unit as well.  Car Settings Menu  AC Settings Menu  Language and Units Setup  Headlight Settings  DRL Settings  Lock/Unlock Settings  Engine On/Off Settings  Steering Learn Function - Enables Mapping of Steering Mounted Controls Software Issues: Most of the settings work as expected however the AC Settings have one glitch. The Jeep Compass has a Dual Zone AC with independent controls for Driver Side and the Passenger Side. It appears that the software was tuned for Left Hand Driven Models and hence these are interchanged.  AC Settings Menu - Interchanged While it works correctly, what it means is that when the Driver Side Control knobs are operated the display is shown reversed in the screen. Increasing the AC on Driver Side, shows the number incrementing on the Passenger side. Yet another glitch in the same AC Software is with the display numbers for the AC Temperature - these now start from 32 degrees after "Lo" instead of the regular 15. Hopefully these are software issues and will be resolved in due course of time - as on date they have not been able to fix these two issues and these are open. A key observation to note here is that the Adaptive Gridlines also appeared in a reverse way at first as well but the Red Soul engineer tried a few settings and managed to fix this issue. As they learn more and gain knowledge about this new system, we trust that they would be able to resolve the AC display issues as well. (Fingers Crossed!) Last edited by vsrivatsa : 6th December 2020 at 22:00. |
|
| (22)
Thanks
|
| The following 22 BHPians Thank vsrivatsa for this useful post: | ashpalio, ast.ggn, digitalnirvana, GTO, HappyWheels, Harjot37, InControl, keroo1099, lemedico, lovetorque, mh09ad5578, Nilesh5417, NPV, PearlJam, PM - B, PraNeel, ramnaresh_2000, Reinhard, SuhairZain, vaasu, Varun_HexaGuy, WhiteSierra |
|
6th December 2020, 08:55
| #8 |
| Senior - BHPian Join Date: Jan 2014 Location: Bangalore
Posts: 1,632
Thanked: 4,052 Times
| re: Operation Jeep Compass : Foxfire Android Head-Unit with a 360-degree camera Chapter 07: Video Review, Overall Comments & Conclusion Here is a Video Walkthrough of the 4GB/64GB 360 Camera Enabled Foxfire Unit for Jeep Compass: Overall Comments:
Open Issues:
Conclusion: In summary, when we talk of a Car Infotainment System, should the comparison be based only on sound quality or should we consider an above average sound quality with a combination of the other aspects which makes it an attractive offering as a sum of all parts is an open question and this is a judgement call that the individual buyers need to make - there is no one size fits all approach. For people who want a combination of good audio quality coupled with benefits of an Android System such as the ability to install apps and a 360° Cam as a bonus, this is a great buy! Credits: I would like to thank my Uncle and my cousin who assisted me in compiling this thread with time spent on testing out the features as well as in proof reading the content on this thread prior to publishing. Also this review thread served as a feedback process for my Uncle to get to know the features better and explore all aspects of the new upgrade and we all had a good time going on several drives testing and exploring the new features! Last edited by vsrivatsa : 12th December 2020 at 00:21. |
|
| (25)
Thanks
|
| The following 25 BHPians Thank vsrivatsa for this useful post: | 2himanshu, ACM, ashpalio, ast.ggn, CEF_Beasts, digitalnirvana, GTO, HappyWheels, Harjot37, InControl, kedar_GT, keroo1099, lemedico, lovetorque, mh09ad5578, Nilesh5417, NPV, PearlJam, PM - B, RaceHorse, ramnaresh_2000, Reinhard, RoadSurfer, spdfreak, WhiteSierra |
|
12th December 2020, 04:46
| #9 |
| Team-BHP Support  | re: Operation Jeep Compass : Foxfire Android Head-Unit with a 360-degree camera Thread moved out from the Assembly Line. Thanks for sharing! |

| (4)
Thanks
|
| The following 4 BHPians Thank Aditya for this useful post: | digitalnirvana, GTO, Reinhard, vsrivatsa |
|
12th December 2020, 11:45
| #10 |
| BHPian Join Date: Mar 2012 Location: Pune; Wales
Posts: 450
Thanked: 810 Times
| Re: Operation Jeep Compass : Foxfire Android Head-Unit with a 360-degree camera Fantastic thread, thanks for sharing. Just a thought, the cameras on the ORVM showing the side view, are they not too close to the body? As in the feed on the display for the sides of the car, all that can be seen is the blue side of the door - I believe more of the ground should be seen to give a better "360" view, else the point may be lost. This can also be seen in the virtual 360 view of the entire car. Ps. Can the virtual car view be changed to a car of your choice or only what is there by default in the app? |
|
| (6)
Thanks
|
| The following 6 BHPians Thank s4ch for this useful post: | Arjun123max, Auto freak, digitalnirvana, nikhn, satvik4134, vsrivatsa |
|
12th December 2020, 11:51
| #11 | |
| BHPian Join Date: Feb 2013 Location: Bangalore
Posts: 74
Thanked: 231 Times
| Re: Operation Jeep Compass : Foxfire Android Head-Unit with a 360-degree camera Quote:
| |
|
| (1)
Thanks
|

| The following BHPian Thanks Mahven for this useful post: | vsrivatsa |
| |
|
12th December 2020, 12:42
| #12 | |
| Distinguished - BHPian  Join Date: Oct 2009 Location: Namma Bengaluru
Posts: 7,518
Thanked: 11,168 Times
| Re: Operation Jeep Compass : Foxfire Android Head-Unit with a 360-degree camera Excellent review with a great eye for detail, thanks for sharing  I think this is a very nice accessory for the Jeep Compass to replace the rather bland OEM unit. Quote:
One more question I had was regarding the rear camera. From the picture you posted, the new Foxfire camera did not replace the OEM camera but got its own fitment location on the left side, so what's the role of the OEM camera now ? Maybe I missed this part in your review ? Last edited by NPV : 12th December 2020 at 12:44. | |
|
| (3)
Thanks
|
| The following 3 BHPians Thank NPV for this useful post: | digitalnirvana, InControl, vsrivatsa |
|
12th December 2020, 13:06
| #13 | ||||||
| Senior - BHPian Join Date: Jan 2014 Location: Bangalore
Posts: 1,632
Thanked: 4,052 Times
| Re: Operation Jeep Compass : Foxfire Android Head-Unit with a 360-degree camera Quote:
Quote:
Quote:
Quote:
 Quote:
The AC works fine and its only the display that seems to be the issue. The Left Hand Drive/Right Hand Drive Mode should be another setting hidden somewhere which should fix the other issue as well. Since this model is based on new software, even the technicians are not fully proficient with the software as yet. They have agreed to let us know if they find a fix for these issues as they do more installations. Quote:
In my car (Honda City) when I went for the 2GB/32GB model I decided to keep the stock Rear View Camera as the stock camera had 3 views and it works fine - only issue being the view is more grainy now due to the larger screen and the camera having a lower resolution more suitable for a smaller screen. The second reason - which makes it mandatory to change is the 360° Camera as that would work with its own set of cameras and we cannot mix and match. The OEM Camera is just left there as is with wires disconnected and is of just cosmetic value - the technician said that the Foxfire Camera wont fit in the slot of the OEM Camera. | ||||||
|
| (2)
Thanks
|
| The following 2 BHPians Thank vsrivatsa for this useful post: | digitalnirvana, NPV |
|
12th December 2020, 13:20
| #14 | |
| Senior - BHPian Join Date: Oct 2020 Location: Magic land
Posts: 1,057
Thanked: 4,432 Times
| Re: Operation Jeep Compass : Foxfire Android Head-Unit with a 360-degree camera Quote:
Are these Head units compatible with connected cars ? I am talking about the Sonet, 5th gen city etc. which are all connected via Apps and mobile phone. | |
|
| (1)
Thanks
|
| The following BHPian Thanks TrackDay for this useful post: | vsrivatsa |
|
12th December 2020, 13:32
| #15 | ||
| Senior - BHPian Join Date: Jan 2014 Location: Bangalore
Posts: 1,632
Thanked: 4,052 Times
| Re: Operation Jeep Compass : Foxfire Android Head-Unit with a 360-degree camera Quote:
 But we have had good past experience with Red Soul and they have been in this accessory fitment market for years. Another thing reassuring for us was that they acknowledged upfront that this is a complex install and reserved their most experienced technician for us. Also Sunny, although based out of New Delhi is reachable over phone during the install and ensures that he also helps in case of any issues remotely. Quote:
I would recommend you WhatsApp Sunny Gupta (Contact details provided in the introductory part of the thread itself) and check with him on availability of a Head Unit for Sonet. Last edited by vsrivatsa : 12th December 2020 at 13:34. | ||
|
| (1)
Thanks
|
| The following BHPian Thanks vsrivatsa for this useful post: | mh09ad5578 |
|