Team-BHP > Technical Stuff > DIY - Do it yourself
Register New Topics New Posts Top Thanked Team-BHP FAQ


Reply
  Search this Thread
89,837 views
Old 27th September 2016, 19:37   #1
Distinguished - BHPian
 
audioholic's Avatar
 
Join Date: Jun 2012
Location: BengaLuru
Posts: 5,742
Thanked: 19,748 Times
Maruti Celerio DIY - Fog lights and DRL installation

There are two types of lights in cars -
1. Light to see
2. Light to be seen

It was a more than a month back that I got the Celerio home. Thanks to Maruti Suzuki's awful level of equipment cutting to save costs, they removed Fog lights from the ZXi Automatic variants, though the Manual variant gets it. Not that Bangalore needs fog lights as such, but the one on the WagonR served a useful purpose to me - When I drive early in the morning to work, I use them to be seen by other drivers, who in the early hours might still be in a sleepy mood. Headlights would mean people waving out, thinking that you are wanting to pass them and it was something that we use to see.

Just before getting the car home, I had returned from Germany, and the DRLs on cars there was pretty attractive. Subtle and yet they would do the job effectively. Not flashy and of all colours that we see in India. And here in India people do not even understand why they are meant for. Most of the people here use DRLs TO SEE which is blatantly wrong. As the stupidity continues, installers in the accessory shops wire them to the parking lights

While I was in Germany, on a random day I was talking to Bhpian Parag Sachania, and he gave me a glimpse of the DRLs installed on speedsatya's Ciaz. Drool stuff, and both of us were discussing DRLs for the day. When I heard the price, it was atrocious. Of course, it could be worth it, but I was definitely not in a mind to afford that much for a pair of lights. Money spent : Purpose served ratio was not balanced for me.

Fast forward, as I came back to India, and took delivery, I enquired about the MGA fog light kit. The cost was close to 4.5k and I had initially told them to just hand me over the kit and I would install it myself. I had no trust in the guys at dealership who would install it. However, the accessories guy had no stock, and after taking delivery, I contacted them multiple times but as expected, since the sale was done, they were least interested to get it to me.

I then stumbled upon this one while I was randomly browsing Aliexpress: https://www.aliexpress.com/snapshot/...77883090065683

This was exactly as described by Parag, but I was not sure of the brand. Alternatively, I also found the same Osram product retailing in Germany for 200Euro which was again an attractive buy. Seeing the listing and the quality of the description, and also comparing with a few cheaper options by other sellers, I zeroed into this one. Main things I liked were:
  • Being a clone of Osram, I was a little confident of it not turning out to be a bummer.
  • The package was just what I wanted, Fog lights as well as DRL, into one single piece which fit in as good as the stock fog lights fit in.
  • A dedicated controller for handling both the DRL and the fog lights.
  • The amount of inputs this controller takes from various things in the car is amazing. This was not a switch on/off light.
  • Good support tools like ties, screws and stuff.
Placed the order even though me and Parag were still discussing which one was the better option

Last edited by audioholic : 28th September 2016 at 10:00.
audioholic is offline   (16) Thanks
Old 27th September 2016, 20:03   #2
Distinguished - BHPian
 
audioholic's Avatar
 
Join Date: Jun 2012
Location: BengaLuru
Posts: 5,742
Thanked: 19,748 Times
re: Maruti Celerio DIY - Fog lights and DRL installation

The package took around three weeks to arrive, and I was also charged a customs duty of 325 for escalating the issue to higher ups due to delay in delivery. It arrived like this:

Maruti Celerio DIY - Fog lights and DRL installation-package.jpg

Maruti Celerio DIY - Fog lights and DRL installation-ub1.jpg

Maruti Celerio DIY - Fog lights and DRL installation-ub11.jpg

Maruti Celerio DIY - Fog lights and DRL installation-ub2.jpg

Maruti Celerio DIY - Fog lights and DRL installation-ub3.jpg

Neatly packaged and the feel of the product was pretty good. Somehow feel that Scotchlock connectors were misplaced by customs officials since it was supposed to be included too. Since the splice connector was missing, Parag came of help and offered his stock. Thanks for that

Another item that I had to procure was a switch for the fog light. Note that this product is a replacement for existing fog lamps and hence, does not come with a switch for the fog lights. And neither did my car have wiring for fog lights installed from factory so I had to do everything from scratch. I was sick of cheap aftermarket switches and wanted everything to look OE. Hence, I ordered the MGP fog lamp switch which were fetched for me by the folks at the MGP outlet nearby. Thats one advantage of Maruti

Maruti Celerio DIY - Fog lights and DRL installation-fs.jpg

Being a non frequent part, yet they fetched it for me within a day. That was nice.


Last edited by audioholic : 27th September 2016 at 20:10.
audioholic is offline   (16) Thanks
Old 27th September 2016, 20:15   #3
Distinguished - BHPian
 
audioholic's Avatar
 
Join Date: Jun 2012
Location: BengaLuru
Posts: 5,742
Thanked: 19,748 Times
re: Maruti Celerio DIY - Fog lights and DRL installation

Pre-Wiring:

Like I told, my car had no wiring done for fog lights, and I had to build it from ground. Speaking of wiring in cars, its very crucial that there are no dangling wires or loose ends anywhere, both the interior and the engine bay. So I decided to fabricate a harness before I install it so that it will be plug and play once I get down to the garage. And so I did:

Maruti Celerio DIY - Fog lights and DRL installation-harn1.jpg

The fog light switch has three pins. The technical wiring diagram and pin outs are like this:

Maruti Celerio DIY - Fog lights and DRL installation-diag.jpg

For noobs to electronics, here is the pin description:

Pin 4 - +12V for switch illumination
Pin 5 - For new vehicles, its IL(-) and for Old vehicles its GND for illumination. More on this later
Pin 6 - 12V output for fog lamp relay/signal
Pin 7 - +12V input for switching
Pin 8 - GND for indicator light(turns on when switch is pressed)

Pins 4 and 6 can be interlinked. We can call this the common +12v signal

Pins 5 and 8 can be interlinked if your vehicle doesnt come with variable illumination(or if you dont want a dimmable fog light switch illumination)

Since I dont have the time to draw a circuit diagram and post it here, I am happy to clarify any doubts thrown regarding connections

Now that we have the switch harness ready, we need to fetch power and signals. Now the easiest way to do this was to tap wires from the head light leveller switch which was next to the planned slot. SO here is how it looks when you pull out the leveller switch and expose the connector:

Maruti Celerio DIY - Fog lights and DRL installation-conn-front.jpg
Maruti Celerio DIY - Fog lights and DRL installation-conn-bac.jpg

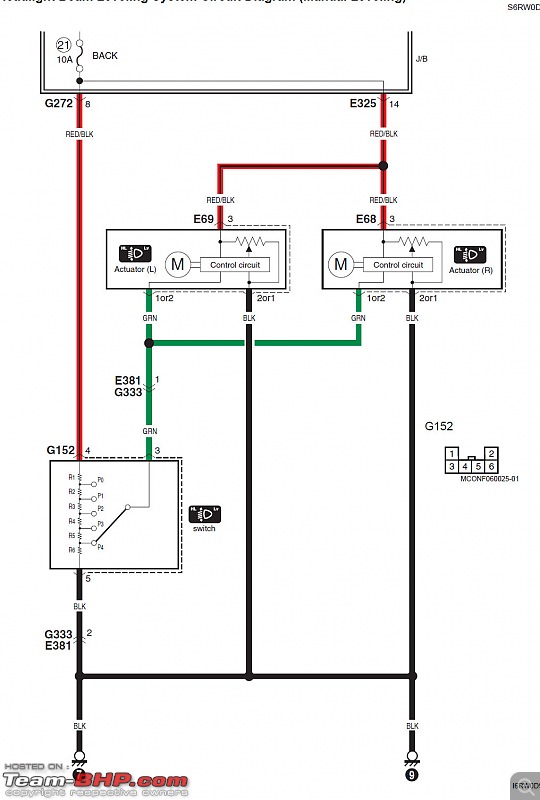
This is the wiring diagram of the leveller and the connector pins, but there is a small change from what is shown in the diagram:
Maruti Celerio DIY - Fog lights and DRL installation-diagram-level.jpg

Going by what I observed, here is the updated description:

Pin 1: Illum(-) This controls the brightness of the illumination of the switch. This pin is either unavailable on older models, or will be short with GND
Pin 2: NC
Pin 3: +12V from the park light switch
Pin 4: To the HL assemblies
Pin 5: GND
Pin 6: Not sure, but looks like a sub circuit for leveller

Took the three signals, ie +12V, GND and the Illum(-) using splice connectors and fed the fog light switch, and slotted it in. Here is how it sat as good as OE fitment.

Maruti Celerio DIY - Fog lights and DRL installation-switch.jpg

Here is the difference between max illumination and minimum. This is applicable for cars which have the stalk to rotate to select brightness of all the lights in the dash area. While the +12V has been common for all, while older cars used a GND pin to supply the entire illumination circuit, the current ones have a variable Illum(-) signal that varies the voltage to the lights thus controlling brightness.
Maruti Celerio DIY - Fog lights and DRL installation-illum.jpg

Pushing the switch, we should get this:

Maruti Celerio DIY - Fog lights and DRL installation-switchon.jpg

Thus, the fog light wiring is done. Now we have a signal to control the fog lights.

Signal for DRL:
This is simple and has been explained all over the forum. I used a fuse tap into the ACC port and drew a 12V signal that turns on when the key is in ACC position. Plan to move this a step ahead to the ON position shortly.

Now we have two signals inside the cabin, ie the Fog light 12V and the ACC signal. Next up is sending these to the engine bay.

The two wires should be passed into the firewall and for this, we need a hole through the firewall. Dont get shocked, there is no drilling involved. The main harness of the car and the power harness pass through the firewall at two main locations. There are water proof rubber boots here, which prevent any water ingress into the cabin area.

I have seen some accessory shops slitting this boot to pass wires. This is a bad practice. There have been dummy blisters provided which can be cut and wires can be passed through this, just like the OE harness passes through. Shown below is a picture of this dummy point to cut and pass wires through:

Maruti Celerio DIY - Fog lights and DRL installation-whatsapp-image-20160904-11.22.35.jpeg

Once the wires are passed, it can be taped around and secured using TESA or Insulation tape.

Thus, the pre-wiring is done.

Last edited by audioholic : 28th September 2016 at 09:50.
audioholic is offline   (17) Thanks
Old 28th September 2016, 09:59   #4
Distinguished - BHPian
 
audioholic's Avatar
 
Join Date: Jun 2012
Location: BengaLuru
Posts: 5,742
Thanked: 19,748 Times
re: Maruti Celerio DIY - Fog lights and DRL installation

Installing the lights:
I was using protective gloves throughout, so was not able to take much of pictures WIP. Excuse me for the same.

As I have previously shown in the unboxing part, the kit came with all the necessary stuff needed, along with a wiring diagram to indicate what goes where. There are three main components in the kit that is the controller, left and right light assemblies.

The wiring diagram is shown below:

Maruti Celerio DIY - Fog lights and DRL installation-ut8a.6axaraxxagofbx3.jpg

To explain in brief, the controller takes the following inputs:
  • 12V and GND with a fuse included.
  • ACC signal to trigger DRL and a requisite for Fog lamp
  • Fog light signal
  • Pilot lamp signal to turn off the DRL at night
  • Indicator signals from both sides
So there is a total of seven inputs including the power. Note that if any one of these inputs are not provided, the functionality will be wierd. The turn indicator signals can be avoided, but that will keep DRL on while indicator flashes, which shouldnt be the case. The DRL should turn off when indicator is flashing.

Anyways, one drawback of this package was that the input signals to the controller were bare wires with no sort of protection. To suit the wiring of my car, I wrapped them up with fabric and TESA tape as per the wiring layout I wanted to follow.

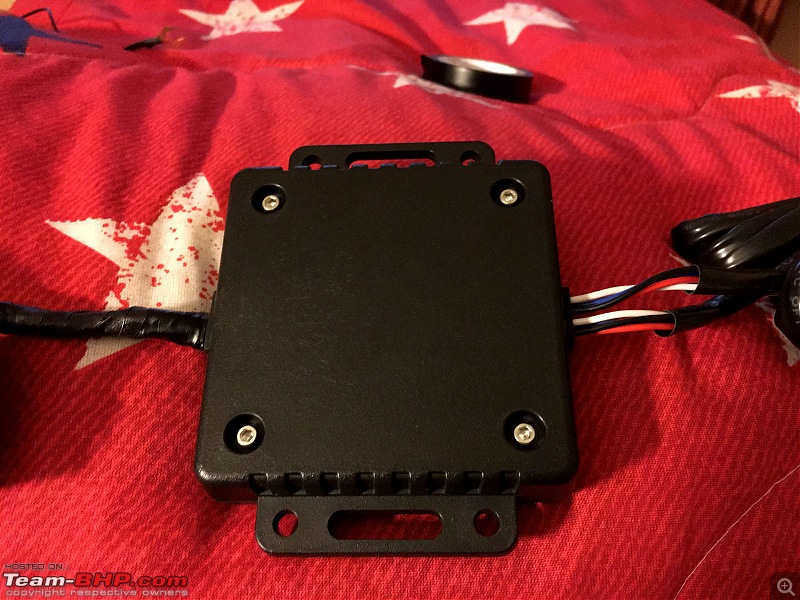
The controller was built and secured well, compared to some other cheap looking stuff I had previously come across while surfing. Its identical to the OSRAM controller. I mounted the controller next to the battery near the ECU. Ran an initial test to check if everything was functioning well. It was. Notice the beam difference between the fogs and DRL in this image:

Maruti Celerio DIY - Fog lights and DRL installation-test1.jpg

First impression and a lasting impression about the DRL, they are daaamn Bright. You cant look at it in the night.

After that, the wiring was secured and routed around the engine bay. The last part was to fix the lamps. The bumper had a moulded cover in the fog light area which had to be cut. This was an easy job with a regular craft knife and after making a small slit, I literally tore apart the rest of the circumference. It was that thin.

Mounting the lamp did not require removal of the bumper in contrast to my initial assumption. I removed a screw between the bumper and fenders, and a clip ahead of the front tyre, and the side of the bumper opened up, giving space for the fog lights to be put in the slot. Screws were not provided in the box(this was supposed to be a replacement set, so mounting screws were not a part) so I procured some screws from a nearby shop and mounted it.

After mounting, the light has to be aligned vertically. Each light assembly has a focusing screw(attention to detail) that helps us adjust the cutoff and focus it as per the need. Here is the method:

Maruti Celerio DIY - Fog lights and DRL installation-ut8l6vbxtraxxagofbxi.jpg

This is my criteria for setting the height of cutoff:

Maruti Celerio DIY - Fog lights and DRL installation-beam-alignment.jpg

Once this was done, I took the car out for a test drive to fine tune the height. And after four hours of work, I finally sat back listening to some music and experimenting the various combinations possible with the kit.

Last edited by audioholic : 28th September 2016 at 19:56.
audioholic is offline   (21) Thanks
Old 28th September 2016, 20:05   #5
Distinguished - BHPian
 
audioholic's Avatar
 
Join Date: Jun 2012
Location: BengaLuru
Posts: 5,742
Thanked: 19,748 Times
re: Maruti Celerio DIY - Fog lights and DRL installation

So here are the final results:


Maruti Celerio DIY - Fog lights and DRL installation-drl1.jpg

Fog lights
Maruti Celerio DIY - Fog lights and DRL installation-f1.jpg

Fog light cutoff
Maruti Celerio DIY - Fog lights and DRL installation-fl2.jpg

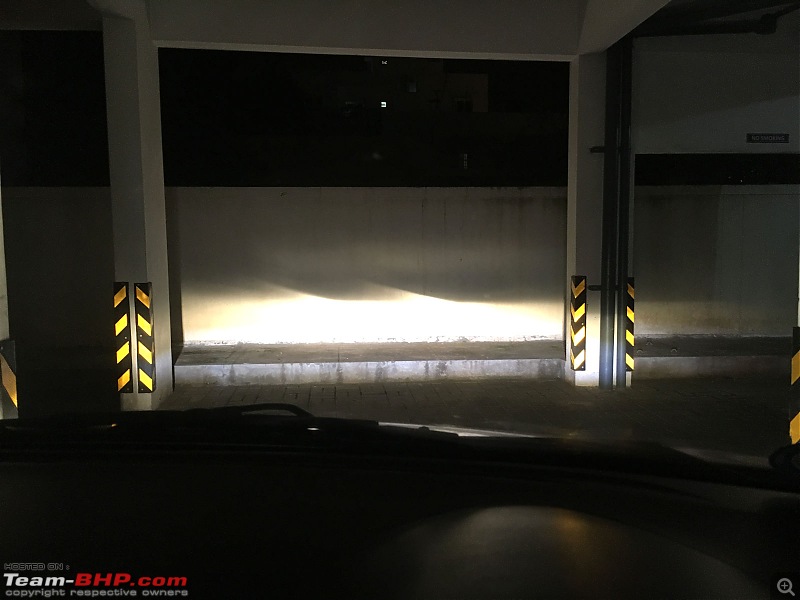
Fog light + Low beam
Maruti Celerio DIY - Fog lights and DRL installation-flhl.jpg

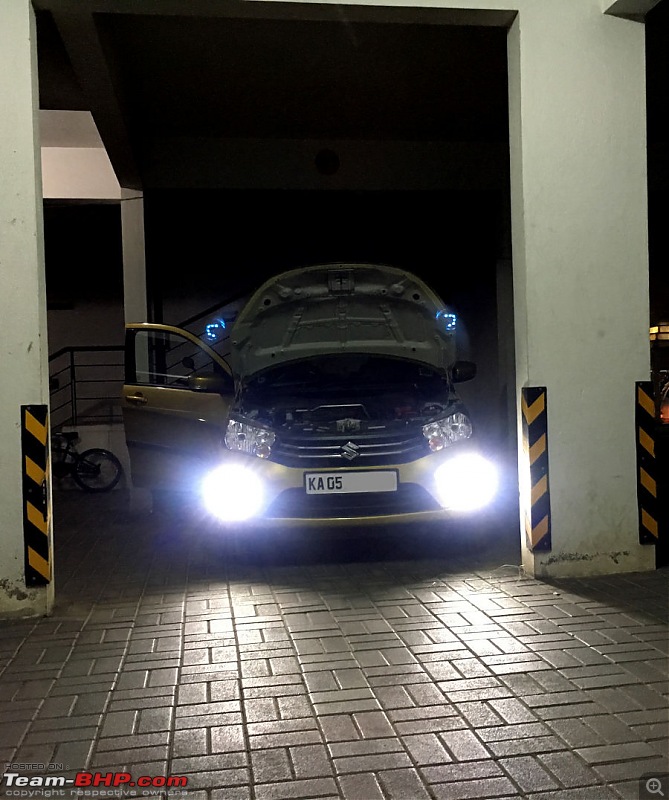
And this is why DRL shouldn't run at night. Absolutely intense light. They are only lights to be seen - At night you as well as others need 'to see'.


Maruti Celerio DIY - Fog lights and DRL installation-drl-front.jpg

Here is a video explaining the functions:


Last edited by audioholic : 28th September 2016 at 20:07.
audioholic is offline   (31) Thanks
Old 29th September 2016, 09:54   #6
Team-BHP Support
 
Zappo's Avatar
 
Join Date: Oct 2005
Location: Hyderabad
Posts: 5,927
Thanked: 2,716 Times

Thread moved from the Assembly Line to the DIY section!

Thank you for sharing.

Last edited by GTO : 29th September 2016 at 09:54. Reason: Bump
Zappo is offline   (3) Thanks
Old 29th September 2016, 11:03   #7
Distinguished - BHPian
 
paragsachania's Avatar
 
Join Date: Nov 2007
Location: Belur/Bangalore
Posts: 7,148
Thanked: 27,157 Times
Re: Maruti Celerio DIY - Fog lights and DRL installation

Finally a thread that I insisted you must have for the efforts taken for the installation

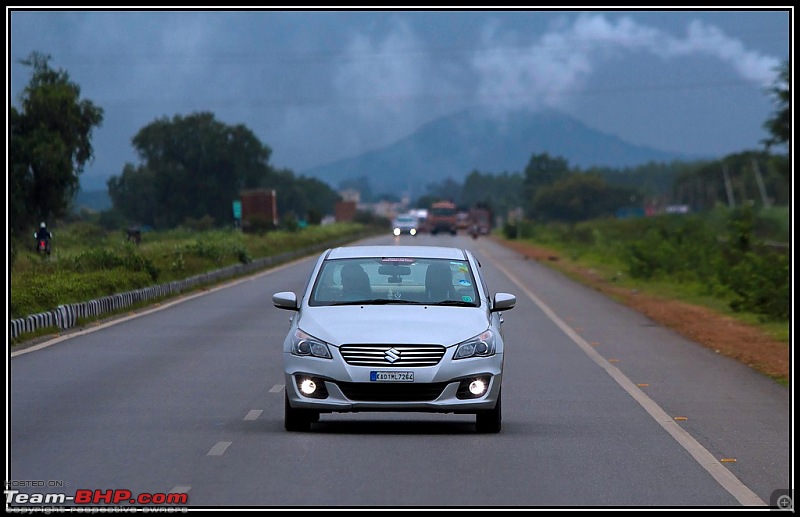
Congratulations audioholic - The DRL and Fog light combination is the best one I have come across in the recent past. Was super impressed by the set that speedsatya got installed on his Ciaz which of course were similar but branded (OSRAM):

Maruti Celerio DIY - Fog lights and DRL installation-_mg_9305bordermaker.jpg
  • The DRLs are as precise and useful the way they should be. Easily noticeable from a very good (far) distance on your IRVM or when in front

  • The Fog lamps are brighter too and way better than the OE H8/H11 you get these days - Has distinct focus when used at night

  • They are designed to do their job as per common sense - DRLs used strictly during the day. The logic from that controller units will automatically turn off the DRLs as soon as you switch on the fog lamps

  • The unit is designed to fit most of the cars without any need for modifications - Comes with all brackets, Bolts, Wiring, Zip ties and connectors and more than all this, a well built controller unit that I call it as the ECU of this Auxiliary light unit!

  • The assisted cornering option is good too - Use case may not be applicable entirely but still a nice to have feature

Now that I explained those small little yet useful and sensible features of the OSRAM LEDriving lights which are retailing on Amazon India for Rs. 23111, let me tell you that the one that audioholic has installed do the exact stuff like these Osrams do, for a price that is 80% cheaper! The intensity of both the lights (Fog 16W LED and DRL 24W LED) is as good as the Osrams.

audioholic did mention to me about the color temperature of the fogs to be slightly on the white/blue side but that is exactly how Satya's fog lights are too. At night whenever he is tailing me from far, I get this distinctive whitish spot in my IRVM which tells me its him.

The package is good and so is the build, wiring and the solidity of the controller unit. Even if these lasts for 2 years its worth the price paid on AliExpress for a chinese imitation that so closely resembles the branded one and also functions exactly in the same manner. For me 2 years would be at least 75000-8000 kms and make immense sense to put my money on these although mind has still been dillydallying in picking up those Osrams too. After all, the OE H8 Fog lights cost anything between 550-750 based on the brand and replacing a set of these is 1500/-.

Personally, I feel these small additions to one's car should be aimed with its usefulness quotient. This one for sure is very useful for a regular driver.

Here is the image to show how these lights function:

Maruti Celerio DIY - Fog lights and DRL installation-untitled.jpg

Last edited by paragsachania : 29th September 2016 at 11:10.
paragsachania is offline   (9) Thanks
Old 29th September 2016, 20:08   #8
Distinguished - BHPian
 
audioholic's Avatar
 
Join Date: Jun 2012
Location: BengaLuru
Posts: 5,742
Thanked: 19,748 Times
Re: Maruti Celerio DIY - Fog lights and DRL installation

Quote:
Originally Posted by paragsachania View Post
Finally a thread that I insisted you must have for the efforts taken for the installation

Congratulations audioholic - The DRL and Fog light combination is the best one I have come across in the recent past.
Thanks Parag! Given my schedule, I rarely get time to compile things in detail and hence, I was in two minds over describing the whole thing. I hope the generic information shared will be of use to a wide chunk of people.

And many thanks for immediately sharing those splice connectors(all of them ) without which I had to hold this install since mine are still a long way from arriving home.

Here is a picture of the ECU as you call it. The moulding, screw quality and the water proofing washers are pointers to the quality of the product:
Maruti Celerio DIY - Fog lights and DRL installation-ecu.jpg

Quote:
Originally Posted by paragsachania View Post

audioholic did mention to me about the color temperature of the fogs to be slightly on the white/blue side but that is exactly how Satya's fog lights are too. At night whenever he is tailing me from far, I get this distinctive whitish spot in my IRVM which tells me its him.
Speaking of the colour temperature, yes I do feel 6000K is a little too much for good illumination. However, my initial impression has changed on the brightness front since the LEDs seem to have seasoned well after the initial few hours of use and now its pretty bright. But again, I would have preferred a lesser temperature, say 4300K.

Sitting low and properly focussed, the throw is wide and flat. It ends up illuminating the underside of most buses and vans and passes beyond the immediate vehicle in signals. Most people end up searching for the light source near their legs, especially when the indicator is flashing. Here is one picture I took in a signal:

Maruti Celerio DIY - Fog lights and DRL installation-unnamed.jpg


Quote:
Originally Posted by paragsachania View Post

Personally, I feel these small additions to one's car should be aimed with its usefulness quotient. This one for sure is very useful for a regular driver.
You said it! I do take the usefulness quotient seriously before adding anything to the car. There is no point in loading up the car with gadgets just because something is available and its within our reach. Utility counts.

Here is how the DRL looks from a distance:
Maruti Celerio DIY - Fog lights and DRL installation-far-view.jpg
audioholic is offline   (7) Thanks
Old 30th September 2016, 10:19   #9
BHPian
 
Join Date: Nov 2013
Location: KL-7/ KL-8
Posts: 362
Thanked: 713 Times
Re: Maruti Celerio DIY - Fog lights and DRL installation

Hey!. Thanks a lot for sharing the details.
The fog lamps and DRL combo in a single console does indeed look very nice and fetching.

Btw, can you share the diameter of the fog lamps. I wanted to check if it will fit my 2014 nissan micra.
Also, did you end up really paying only INR 325 to customs?.

Cheerio!
alphadog is offline   (1) Thanks
Old 30th September 2016, 20:29   #10
Distinguished - BHPian
 
audioholic's Avatar
 
Join Date: Jun 2012
Location: BengaLuru
Posts: 5,742
Thanked: 19,748 Times
Re: Maruti Celerio DIY - Fog lights and DRL installation

Quote:
Originally Posted by alphadog View Post
Hey!. Thanks a lot for sharing the details.
The fog lamps and DRL combo in a single console does indeed look very nice and fetching.

Btw, can you share the diameter of the fog lamps. I wanted to check if it will fit my 2014 nissan micra.
Also, did you end up really paying only INR 325 to customs?.

Cheerio!
The diameter is 90mm. It depends upon the kind of mounting thats available in the bumper and the cutout. Regarding customs, the seller had indicated a value of 12$ only. But the package was opened considering its size and weight and maybe they did their own valuation. I was presented with a printed receipt of 294 as duty and 30 rupees as processing fee. Hence paid the same to the postman.
audioholic is offline   (3) Thanks
Old 2nd October 2016, 11:27   #11
Distinguished - BHPian
 
Join Date: Sep 2008
Location: --
Posts: 3,583
Thanked: 7,440 Times
Re: Maruti Celerio DIY - Fog lights and DRL installation

Wonderful find and nice clean install. I am wondering though, how safe are the wire tap devices? Aren't they doing the same thing as our neighbourhood shops which splice the wires to tap into power? Maybe in a cleaner way but essentially it's the same thing I suppose?

Apart from that, this looks like an awesome product. Now I wish my car took round fogs. Lol!
Dry Ice is offline   (1) Thanks
Old 2nd October 2016, 17:01   #12
Distinguished - BHPian
 
audioholic's Avatar
 
Join Date: Jun 2012
Location: BengaLuru
Posts: 5,742
Thanked: 19,748 Times
Re: Maruti Celerio DIY - Fog lights and DRL installation

Quote:
Originally Posted by Dry Ice View Post
Wonderful find and nice clean install. I am wondering though, how safe are the wire tap devices? Aren't they doing the same thing as our neighbourhood shops which splice the wires to tap into power? Maybe in a cleaner way but essentially it's the same thing I supposel!
Thanks!

Regarding the splice connectors, what they do is similar to what a jugaad accessory so will do. Function is to tap signal. But there is day and night difference in HOW they do. By safety, what is the thing that comes into your mind?

The benefits of using a splice connector instead of manual work is multiple:
  • Provides end to end solution from cutting of wire to joining of new wire to sealing the joint
  • Makes a precise slit in the wire which is not possible by manual stripping
  • Joint is far firmer than a joint of twisted wire and tape
  • Lasts as long as the car. In comparison a manual joint will hardly last a few years. Insulation tape can loosen within months in the engine bay while this stands firm

Accessory shops arm themselves with insulation tape which is never meant for places like the engine bay which is exposed to heat, water, dust which can nullify the adhesive in no time. Yes they are used by the manufacturer itself within the engine bay, but never to make a joint or hold two pieces of wire together. They are just used as secondary protection to harnesses and connectors. I have done the same. If the tape i have used comes off in a few months, I don't have to bother while if someone made a joint that would expose in some time, it's a potential fire hazard

Hope it's now justified why I used a patented technology than jugaad
audioholic is offline   (1) Thanks
Old 3rd October 2016, 15:32   #13
Distinguished - BHPian
 
Join Date: Sep 2008
Location: --
Posts: 3,583
Thanked: 7,440 Times
Re: Maruti Celerio DIY - Fog lights and DRL installation

Quote:
Originally Posted by audioholic View Post
Regarding the splice connectors, what they do is similar to what a jugaad accessory so will do. Function is to tap signal. But there is day and night difference in HOW they do. By safety, what is the thing that comes into your mind?
Short circuits mainly. Thank you for elaborating!
Dry Ice is offline   (1) Thanks
Old 3rd October 2016, 23:02   #14
Distinguished - BHPian
 
audioholic's Avatar
 
Join Date: Jun 2012
Location: BengaLuru
Posts: 5,742
Thanked: 19,748 Times
Re: Maruti Celerio DIY - Fog lights and DRL installation

Finally opened up the front bumper to tidy up the loose wiring and do a possible horn relocation which didnt happen. With the bumper off the car I was able to route the wires along company harnesses which will ensure that it runs around the engine bay without creating any hazards. Previously I had just routed the cable on top of the radiator and left the extra bits dangling in front of the front wheel arches(not out on the road but within the bumper area. Now it sits cleanly with just enough extra cable to let the bumper come out.

And for those who talk about front impact protection, here's something for you all:

Maruti Celerio DIY - Fog lights and DRL installation-img_0910.jpg

Now the only thing pending is protection for the main power cable. Its currently a single wire from battery to the fuse compartment of the lighting controller which should get some additional protection. Ideally I would have preferred the fuse to be as close to the battery, but in this case the job was already done and I had to use the existing setup of fuse near the controller. Now if this wire is damaged by any chance, it will either burn out or cause bigger trouble. Hence will provide additional tubing or so to the main power wires. After that,I will post pictures of before and after to show how much difference such attention to detail will make to reliability and safety.

Last edited by audioholic : 3rd October 2016 at 23:04.
audioholic is offline   (2) Thanks
Old 12th October 2016, 15:17   #15
Distinguished - BHPian
 
SS-Traveller's Avatar
 
Join Date: Jan 2009
Location: New Delhi
Posts: 8,185
Thanked: 27,711 Times
Re: Maruti Celerio DIY - Fog lights and DRL installation

Hi audioholic, good to see the DIY.
Quote:
Originally Posted by audioholic View Post
[b]Since I dont have the time to draw a circuit diagram and post it here, I am happy to clarify any doubts thrown regarding connections
You need an input from the headlight 'on' position, for the ideal wiring setup. Front fog lamps should not light up unless the headlamp low beams are on. Yours are set up like driving lamps.

Do the DRLs have a dimming function? They should automatically have their brightness reduced when parking lamps / headlamps are turned on.
SS-Traveller is offline  
Reply

Most Viewed

Copyright ©2000 - 2024, Team-BHP.com
Proudly powered by E2E Networks